How to properly seal the seams on drywall for a long time. We close the seams between the sheets of drywall on our own
When you finish the room with drywall before proceeding with it finishing, the seams at the joints of the sheets should be processed. These are the zones most sensitive to damage and destruction. With absence quality finishes cracks may occur at the seams, which will nullify the results of both work already done and subsequent work. Sealing seams between sheets of drywall is a simple but painstaking task. It requires attention both in the process itself and in the selection of materials and tools.
What materials and tools will be required
The standard set of tools for sealing joints looks like this:
- several spatulas (at least two): wide - 15 mm, narrow - 10 mm;
- special corner spatulas for finishing corners;
- building level;
- falcon - a special plate with a handle for a set of putty;
- primer brush;
- grater with sandpaper or abrasive mesh;
- paint knife;
- edging planer for drywall.
Tools for sealing joints between sheets of drywall
When choosing materials, pay attention to the list of the most necessary:
- starting gypsum putty such as Fugenfüller or Uniflot (the second type is somewhat more expensive, but has a higher density);
- acrylic primer mixture;
- perforated masking tape- sickle;
- metal corners, which strengthen the external or internal corners.
When you choose a mixture for sealing joints and seams, be sure to consider what the surfaces will eventually be finished with. For example, cheaper materials can be used for wallpaper or decorative plaster. Cracks that appear over time will not be visible. Fugenfüller-type mixtures are well suited for this. When using them, it is recommended to use a sickle.
But if you plan to paint the surface, it is better to purchase high-quality finishing mixtures. Mixtures of the Uniflot type are used without reinforcing tape if used for grouting. Paired with sickle, they give additional strength and stability to the drywall construction.
Closing process from start to finish
So, you have prepared everything you need, now you can get to work. How to seal the seams between sheets of drywall? First of all, you need to putty them at the joints. Above, we have already described the better to seal the seams in drywall and which putty mixture is more suitable for subsequent surface finishing.
The nuances of work
- When working, observe indoor temperature regime. Optimum temperature- not higher than +10 degrees.
- About two days after the end of work in the room there should not be sudden changes in temperature.
- Avoid drafts in the room while grouting.
- Installation of drywall refers to the final stages of work. Therefore, before him you need to do everything wet work(plaster and floor screed installation).
- Monitor the humidity in the room so that the puttying work is carried out efficiently and there are no problems with the seams.
- After plastering the surface, let it dry well before you start working with drywall.
- Check if the GKL sheets are well fixed to the base. A loose sheet will eventually destroy the putty layer.
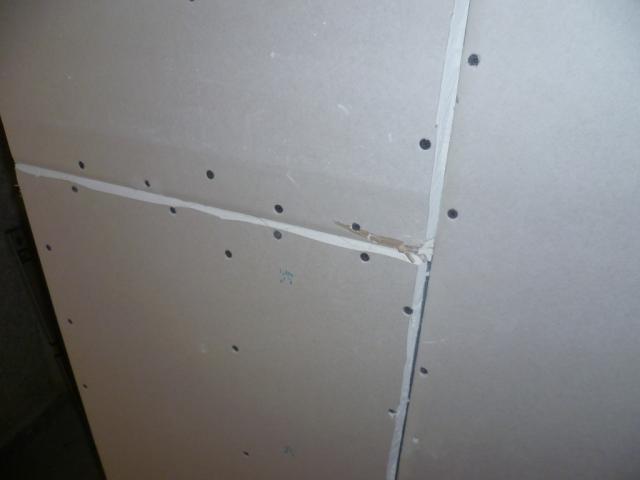
- Carefully tighten the heads of the fixing screws so that they do not form tubercles under the putty layer.
After spending preparatory work, proceed to the next step.
Stitching
Before proceeding to the processing of joints between sheets with putty, make the edges of drywall as workable as possible. This is achieved with the help of jointing, that is, processing the edges of the sheets with a paint knife and a special planer.
- First of all, the cut edges are processed with a drywall planer. GLK should fit as closely as possible to each other.
- Now cut the bevel of the sheet at an angle of about 40 degrees. Between the sheets, when they are joined, a wedge in the form of the letter V should form. Its depth is from 5 to 10 mm.
- Now hang the sheets and fasten them with self-tapping screws.
If the sheets have already been installed, you can simply chamfer with a paint knife.
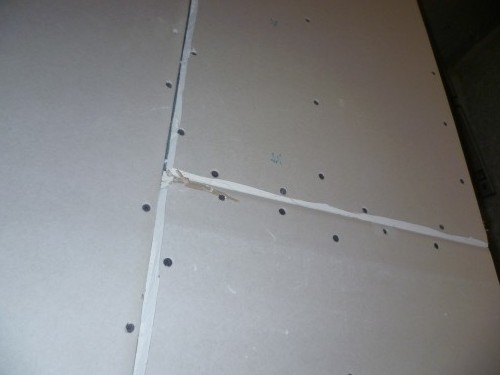
Jointing in drywall
Some manufacturers produce prepared plasterboards with a thinned edge that forms the necessary recess. Such sheets will free you from the need for jointing.
Primer
Often the priming process is considered optional, especially when working with drywall, which already has high level adhesion (adhesion), due to which the putty sets well. But we insist that a primer is required, especially if you plan to paint the surface after treatment. Otherwise, even the paint applied in two layers runs the risk of cracking over time and crumbling.
Seams are also subject to priming, like the entire surface. To do this, choose primer mixtures based on acrylic: they penetrate deeply into the structure of the drywall sheet. This material dries quickly enough - 1-3 hours - depending on the level of humidity and temperature in the room.
We knead the putty
Properly prepared putty mixture is one of the main conditions for quality work. The solution is usually prepared from a special mixture and water, in the proportions indicated by the manufacturer in the instructions. Stir it to the consistency of thick sour cream. For this, use a construction mixer or a drill with a special nozzle operating at a speed of 600 rpm.
After thorough mixing, leave the putty for 5 minutes so that it finally infuses and softens, and mix again.
Note! The putty solution dries quickly, so it must be used within a maximum of 2 hours after mixing. Do not try to reconstitute the mixture by diluting it with water or adding it to a fresh batch. Such a poor-quality mixture forms furrows on the surfaces, which cannot be eliminated.
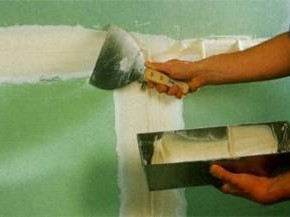
Puttying the seams and using sickle
When the putty mixture is ready, collect a small amount of it on the tip of a spatula and apply it to the surface of the seam with longitudinal movements so that the width of the layer is greater than the gap between the drywall sheets. Carefully press the mixture into the seam.
If the joint length is more than three meters, it will be more convenient for you if you divide the surface into several sections.
Cut off a piece of reinforcing mesh - sickles, equal to the length processed seam, and attach to the junction of drywall sheets. You need to glue so that the seam runs along the center of the tape.
Usually, the sickle needs to be glued at the beginning of work - the base allows you to do this. But if the first layer of putty has already been applied, you can press the tape into it. The sequence is not important.
Use a sickle to seal drywall joints
Place the putty on the falcon, so it will be more convenient for you to take it in small portions.
Wipe off excess mortar and cover the tape with another layer of the mixture. Carefully level all layers with a spatula. When they dry, apply the final layer and let it dry for a day.
Make sure that the seams are even and match the level of drywall sheets. The construction level will help you check this.
Instead of a sickle, you can use a special paper tape. It is not easy to glue it, but in quality it surpasses the reinforcing mesh.
- Cut from tape required amount strips of the desired length, put them in a bowl, pour boiling water and leave for several hours. While the paper is swelling, apply the first coat of mortar to the drywall joints.
- When the solution hardens, sand it so that there are no bumps left. Prepare the paper tape for gluing: remove a few strips from the water, wring out excess water, passing them between your fingers one at a time.
- Apply a layer of PVA glue to each strip with a brush and fold in half so that the glue does not dry out. When the strips are ready, glue one joint with glue and immediately smooth the paper tape to it in the center of the seam. Do the same for all seams. Smooth the tapes with a spatula without pressing it too hard.
- The tape after drying becomes thin, taking the form of a seam. In addition, it tightly sticks together with drywall, penetrating into its structure.
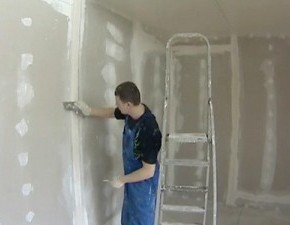
When all puttying work is completed, wait until the surface is completely dry and sand the seams with sandpaper or an abrasive mesh. This will help to thoroughly level the surface, ridding it of protrusions, excess mortar and roughness.
Drywall as construction material very good. It is mounted quickly, while "wet" processes are practically absent. You can create any designs and shapes. But there is one problem, which is sometimes not so easy to solve. This is a drywall grout. If it is not made according to the rules, after a while cracks will appear on the seams between the sheets of drywall.
On a plasterboard ceiling, the seams between the sheets should not be noticeable.
How to seal drywall seams: choose tools and putty
The work of sealing the seams is a painstaking task that does not tolerate fuss and negligence.
A spatula is the main tool that will come in handy for work. Everyone chooses a spatula that is most convenient to work with. Someone works with a narrow spatula, someone likes a wide one more. It is not important. The main thing is the flexibility of the blade. Check it by holding the handle and the blade - it should bend easily.
In addition to the tool, it is important to choose a putty for drywall. Many simply process the joints with finishing putty. This is wrong, especially if the surface is being prepared for painting. So, the choice of putty depends on the further finishing of the walls or plasterboard ceiling.
If the surface is being prepared for painting, the joints must be filled with a special joint filler. For these purposes, Uniflot putty from Knauf is excellent. This is a rather expensive putty, but if you are preparing the surface for painting, it makes sense to purchase it. In this case, the seams most likely will not crack, and this is very important for the surface to be painted. Professional craftsmen on drywall, preparing the surface for painting, use only the material of this company.
If you are preparing the surface for subsequent wallpapering, it is not necessary to use such putty, it will be enough to use the usual finishing or starting cheaper. You will also need tapes, reinforcing meshes or sickles, with which longitudinal and transverse seams will be glued.
Some masters successfully use ordinary paper tape to seal drywall joints.
To stir the putty, you will need an electric drill with a special nozzle, as well as a container for preparing putty.
Sealing drywall: process description

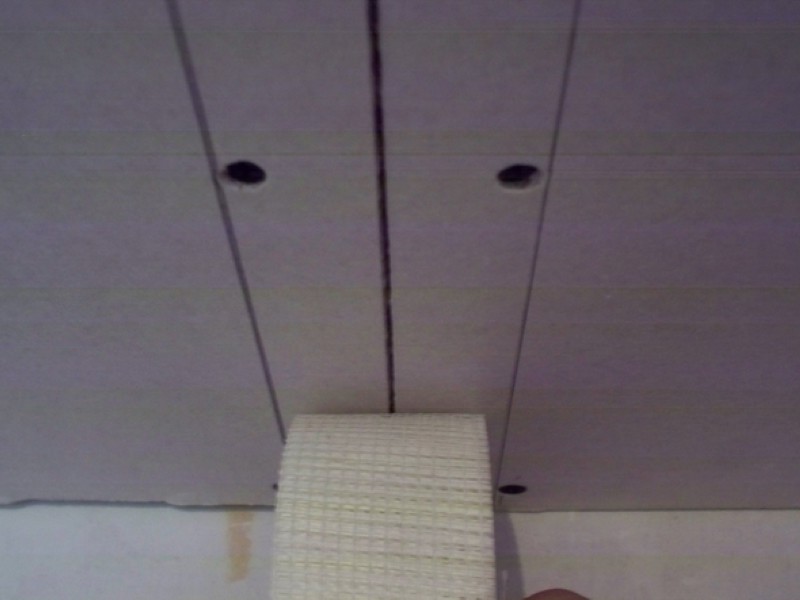
Gluing tape or bandaging is one of the stages of sealing joints between sheets of drywall
Having prepared the putty mixture, pick it up at the end of the spatula and apply it with longitudinal movements to the surface of the seam so that the width of the strip exceeds the gap between the sheets of drywall. Try to press the putty mixture into the seam. If the joint length exceeds 3 m, divide the surface into sections for work.
Cut a piece of paper tape or mesh along the entire length of the seam and glue it to the junction of the drywall sheets. Try to glue so that the joint runs in the middle of the tape.
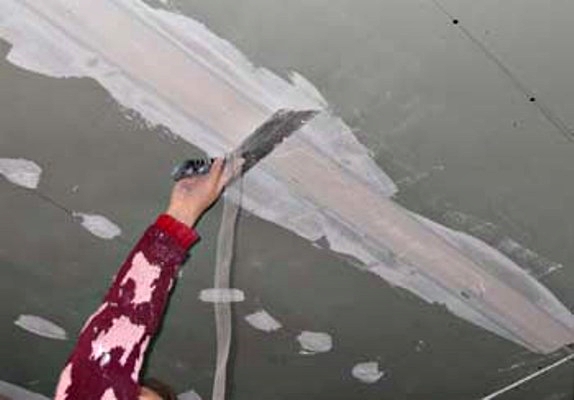
Sealing joints on the ceiling is, of course, more difficult. First, it's inconvenient. Secondly, the putty mixture does not adhere enough to the drywall and falls down. It is necessary to press the spatula to the surface of the ceiling at the beginning of the seam and draw it along, pressing harder. This will prevent the putty from falling off and the surface of the seam will become smooth.
How to choose a good reinforcing mesh? Take it in your hands, crumple it, pull it up a little, evaluate the stretch and shift of the cells, and then straighten the mesh again. If it is elastic and not disheveled, then it is suitable for work.
How to trim corners
Subject to all the rules, the seams between the sheets of drywall will be completely invisible
First, distribute the putty on one side of the spatula, and then transfer it to one side of the corner and inside the seam. Repeat the same on the other side of the corner. If you work in this sequence, you can avoid overspending putty.
After cutting a piece of tape along the length, fold it in half and attach it to the corner. Apply putty alternately on each side of the tape and stretch it with a spatula.
Similarly close up the inner corners along the ceiling. To close up outside corners, attach a metal corner to them. It can be fixed with screws. Apply a layer of putty wide spatula, working first on one side of the corner and then on the other.
Sandpaper is used to sand the patched areas. Remember that sanding generates quite a lot of dust, so wear a respirator. Drywall after sanding should be primed. Only after that the surface is considered ready for painting or decorative plaster.
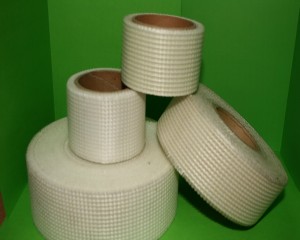
Tape for sealing seams greatly simplifies the work and allows you to get a better result
Even if all the rules are followed, cracks often appear on the surface of drywall after sealing the seams. This is not surprising: when the temperature changes, any material changes dimensions. Temperature changes can be several degrees. Sheet microshifts lead to cracks in the seams. To minimize the likelihood of occurrence, try to fill the seams well with putty.
It is advisable to seal the seams of drywall with putty after a constant humidity and temperature have been established in the room. In this case, there will be no cracks. But constant indicators of temperature and humidity are observed only in rooms that are equipped with serious ventilation and air conditioning systems, so it is very problematic to implement such recommendations in practice.
You may be misled by a similar inscription on the packaging of putty: for sealing joints on drywall without reinforcing tape. Do not think that this means that you will putty the walls and there will be no cracks on them. Most likely, this putty is simply not intended for reinforcing tape, since it cannot hold it.
Drywall jointing technology: video instruction
Closing seams before puttying
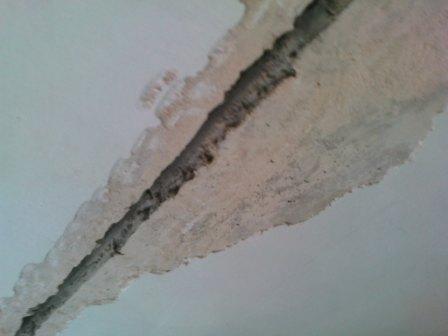
A ceiling crack becomes annoying as soon as it appears. At the same time, the main cause of irritation is unsightly appearance surface, which is sure to catch the eye. Most often, such a defect is formed at the junction of two concrete floor slabs. However, no one is immune from this trouble. drywall constructions, neither plywood nor others. Therefore, the question of how to correctly seal ceiling joints is quite relevant.
What to do so that cracks in these places never appear?
Surface preparation
First of all, it is necessary to clean the crack (joint) from poorly adhering fragments. If this is not done, then the crack on the ceiling will appear again. Therefore, do not feel sorry for it, open it, embroider it, and let even the most big chunks plasters. It's like in medicine - it's better to do a big operation right away, so as not to return to the sore spot later.
Please note that the process of jointing a crack is very dusty, so it is recommended to cover pieces of furniture plastic wrap. Be sure to wear protective gloves and goggles, as well as a gauze bandage.
Now you need to prime the crack and the adjacent sections of the ceiling. It is best to use a primer deep penetration which will strengthen the outer layer concrete slab and create a surface with a high degree adhesion. The best option if the primer is applied in several layers.
Defect repair
After that, it is necessary to dilute the dry putty with water according to the instructions that you will find on the package, and fill the crack with it to the brim. Try to do this with a little pressure so that the density of the material inside the crack becomes a little higher.
The filled defect must be left for at least a day so that the putty inside it dries well. After that, subsequent plastering can be carried out or. In this way, you can get rid of a crack in the ceiling, if it has small size. An impressive defect will have to be repaired using a more complex technology that uses reinforcing material. It can be a sickle mesh, special paper tapes And so on. Modern market ready to offer different options.
How is it carried out?
- As in the first case, the crack is filled, and until the putty material is dry, a reinforcing mesh is laid on it.
- Waiting for the crack to dry up.
- A layer of putty is applied, which closes the crack with the reinforcement cage.
Such cracks are not uncommon in old houses.
This method allows for long years get rid of the appearance of all kinds of defects. Masters assure that if everything is done correctly and competently, then for ten years or even more you will get rid of cracks.
However, this is not the only repair technology. There are a few more non-standard ones:
- Can the cracks be filled mounting foam or sealant. This is especially true in wet rooms where leaks from the upper floors are commonplace.
- Some craftsmen and home craftsmen use special linen bandages for these purposes. To do this, a strip is cut out several centimeters wide than the width of the crack. This is necessary in order to fasten the site in one plane. The bandage itself is pre-washed, ironed and moistened with any adhesive composition. Then they must be squeezed out, squeezing out the unnecessary volume, after which they are installed on the ceiling with wet putty. It is necessary to wait for the glue to dry completely, after which it is possible to level the ceiling with putty or plaster mortar.
Attention! It is better to determine the quality of the work performed in natural daylight.
How to repair a plasterboard ceiling
Nowadays dropped ceilings from drywall is not a rare phenomenon. Many people try to get rid of cracks in this way, but even similar structures are not immune from this disaster.
The reasons for the appearance of such a defect on plasterboard ceilings varied:
Special Tape
- First, the weakening of the frame. If its elements are wooden, then drying out may occur. If metal, then you can sin only for poor installation and fastening.
- Secondly, the formation of condensate between the two ceilings - the base and plasterboard.
- Thirdly, it is highly likely that a reinforcing mesh or strip was not laid at the junction of the sheets.
- Fourthly, it is possible that the chamfer was missing or not chamfered from the GKL sheets.
- Fifthly, the process of puttying the surface of the sheets was incorrectly carried out, or poor-quality putty was used.
How to close the seams in this case? This procedure is no different from the one described above. But there are still some nuances. First of all, you will have to expand the crack and inspect it - whether the mesh is laid, whether the sheets have chamfers. If you have found all this, then tear off the reinforcement cage and clean the joint from the old putty. Act radically, not sparing the material. If all this is not there, then clean the ceiling in the area of \u200b\u200bthe crack from the old putty, make chamfers with a knife and everything else old technology. The main thing - do not forget to lay the sickle.
What are the nuances of this process? The chamfers made must be cleaned of dust using an ordinary brush, and then a primer can be applied, in several layers. After filling the crack, another layer of primer is applied and only after that the area is puttied. But keep in mind that this area will be very different in color from the rest of the area. To prevent this, there are two ways:
- The first is to apply to the entire surface of the ceiling thin layer finishing putty and then repaint the entire ceiling.
- The second is to paint over the area to the shade of the main area.
There is another defect in the form of a crack, but only it is at the junction, but at the place where the plaster layer or paint peeled off. Of course, this is not such a difficult problem, but a visible defect remains. And that means you have to get rid of it.
There are ready-made putties specifically for sealing joints.
What is done in this case?
- Using a spatula, you will have to completely remove the exfoliated material to the base. It is better not to use other methods - it will not help anyway.
- The open area is cleaned of dust and primed.
- Now you need to dilute the dry mixture and apply it to an open plane.
- After drying, another layer of primer is applied.
- Staining is in progress.
The same processes, so this problem can be dealt with. The main thing here is to wait for each applied layer of material to be well dried.
Finally, it does not hurt to recall that any problem is better to prevent than to fix later. Therefore, we advise you to take seriously the arrangement of ceiling structures, whether it is puttying or installation drywall sheets. Get it right and you won't be repairing ceiling joints later.