How to make plafonds for a chandelier. Painting: an old chandelier in a new way. From yarn and PVA glue
The trend to make something, which is gaining momentum, cannot bypass such an interior item as a chandelier. It is not only a source of light, but also one of the main decorations of the room. Naturally, the eyes of the guests will be riveted to the individual creation and the works will not be left without attention. The abundance of improvised raw materials allows you to use the most a variety of materials. From what can a chandelier be created with your own hands?
DIY chandelier made of cardboard.
Cardboard is the most available material for the manufacture of various products.
Such a do-it-yourself chandelier will require cardboard different color, fabric or lace, PVA glue. And then it all depends on the imagination of the manufacturer.
1. We cut the cardboard into circles of the same diameter and fold it into hexagons.
2. Cut out inside each hexagon round hole.
3. Cut the fabric into circles with a diameter larger than the holes in the cardboard.
4. Using glue, we attach the fabric to the cardboard blanks so that it stretches well and closes the hole. We leave two unglued circles so that you can fix the cartridge with a light bulb, and there is an outlet for heated air.
5. We glue the finished hexagons together using the bent edges. Unclosed blanks are placed on opposite sides.
Attention: Paper burns very well! Install light bulbs of the economy option, they do not heat up much.


Chandelier with your own hands from a pumpkin.
In this case, the flight of your imagination is unlimited. The pumpkin, cleaned from the inside, is in itself a ready-made lampshade, you just need to cut out the desired pattern on it and insert the cartridge under the light bulb.
In order to make the pattern on the bark symmetrical and beautiful, before cutting it out, make a stencil out of paper and apply it to the workpiece with a pencil or marker. Then you can easily correct the image. A very delicate lace pattern or running fallow deer on a sunny golden background of a pumpkin will delight the eye in cold weather. winter evenings. If such a lampshade is properly dried, then it will serve you for a year.


Many people prefer to make their own items home interior. And this is good, because at the same time, not only the original creative abilities of a person are manifested, but also a dwelling decorated with such objects becomes unique and original, emphasizing the taste and ingenuity of its inhabitant.
DIY chandelierfrom plastic bottles.
To make a chandelier with your own hands from plastic bottles we will need:
- The frame of an old chandelier. (Perhaps you have old chandelier).
- Lots of plastic bottles in different colors. (from white, milky, to dark beer bottles, including green, blue and transparent).
- A few steel bars that you can buy at any hardware store.
Manufacturing technology.
- We cut plastic bottles and cut out petals and flowers from them. You can also cut out various shapes or animals - it all depends on your imagination.
- To attach flowers and other figures to the frame of the old chandelier, we attach steel rods. We make a hedgehog from 5-7 pieces of steel rods, connecting the rods with the middle in turn with a wire. We cut the upper rod of the hedgehog with pliers, there will be a light bulb.
- We carefully attach the cut-out figures and flowers to the resulting design.
- We insert our hedgehog into the frame of an old chandelier.
DIY chandelierfrom plastic bottles is ready to go!
DIY chandelier made from laser discs.
In the era of computer technology, almost everyone has accumulated a lot of CDs and DVDs. What use can they find? - DIY chandelier from laser discs! The design of the chandelier depends on the imagination and the number of disks accumulated in your house. Using wire, we connect them into various designs, not forgetting to leave a hole for the cartridge. You can make a ball, a curved cylinder, a cone, and more. With its brilliance and reflection of light, such a product will give an extraordinary charm to the room.

DIY chandelier from wood.
To make a wooden chandelier with your own hands, we need:
- Trims from the door trim, which are sold in hardware stores. 12 pieces approximately 30-45 centimeters each.
- 6 identical liter cans for plafonds.
- Tinted paint to match the color of the tree (oak or larch).
- Small wood screws.
- Rolling machine.
- White paint.
- We process the planks with sandpaper so that they are perfectly smooth on all sides.
- FROM back side each plank we make a shallow groove for laying the electrical wire.
- On three strips on both sides we drill holes for attaching the ceiling lamps.
- We paint our planks with tone paint to match the color of oak or larch.
- Using self-tapping screws, we fasten all the planks in pairs so that we get a regular hexagon.
- Punch holes in the center metal lids cans and fasten cartridges with light bulbs.
- We roll up jars with light bulbs with a seaming machine.
- We paint the lid and neck of the jar in the color of wood, and the ceiling in white or blue.
- We strengthen wooden chandelier to the ceiling.


Chandelier with your own hands from a headdress.
An old hat that has lost its shape, faded and out of fashion can also serve as a great addition to your interior. With a little creativity, you can make a beautiful chandelier with your hat crayfish. A design idea, as well as lace, ribbons, chiffon or organza, will turn an old shabby thing into a beautiful lampshade. For example, with the help of threads, attach lace in the form of a veil to the brim of the hat, tie at the top beautiful bow and the lampshade is ready. The simplest and original solution question.
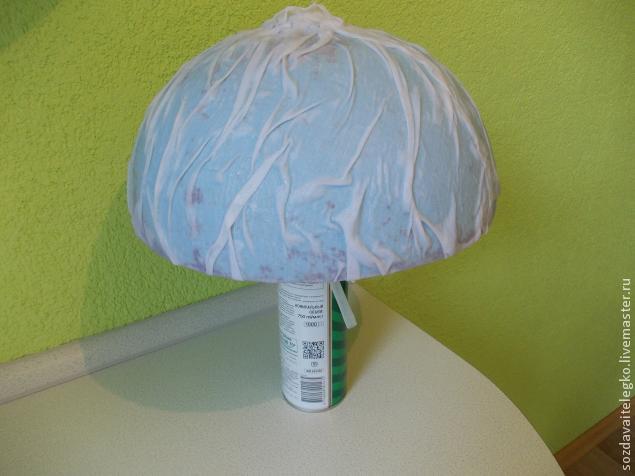
DIY chandelier from yarn.
To make a chandelier from yarn with your own hands, we need:
- Plastic bowl for making a lampshade.
- Yarn. Multicolored threads.
- Fixing paste.
Chandelier assembly step by step.
- Prepare a paste to fix the yarn on a plastic bowl. To do this, mix 0.5 cups of flour with 2 cups of water, then add 2 more cups to the resulting mixture hot water, bring the solution to a boil and add another 3 tablespoons of sugar. Then mix thoroughly and let the paste cool.
- In the cooled paste, soak the yarn and woolen threads for several hours.
- Squeeze the soaked yarn lightly and wrap it tightly around a plastic bowl. Here you can show creativity and design ideas. Especially wind the yarn should be on the bottom of the bowl.
- After drying, after about a day, carefully remove the bowl from the resulting lampshade made of yarn.
- We attach a ceiling with an electric wire to the bottom of the lampshade and hang the chandelier.
Important! A do-it-yourself chandelier made from improvised materials is not designed for high lighting power, therefore it is very important for fire safety not to use incandescent bulbs with a power of more than 60 watts!
You are tired of the ordinary look of the interior of your room or country house? So, it's time for amazing changes. Of course, you can buy a bunch of new things in stores and replace old ones with them, but we suggest plunging into creative process with your head and make something unique with your own hands. Unleash the designer in you and change the world make it beautiful and unique.
Let's start with replacing the chandelier, this element of the interior will become the accent of your author's design interior. original- it is possible. If you do not take into account the cost savings, then it is safe to say that the positive emotions that will certainly arise during the process will be remembered for a lifetime. In addition, you will become the owner of a unique and exclusive item. Stock up on patience, time and the necessary materials.
Materials for the manufacture of the ceiling can be different. The most forgotten and abandoned items will be used, everything will fit. Old kerosene lamps, an openwork cage for a canary, cups with saucers, burlap, grandmother's lace, decorative feathers, beads and much more.
Inventing new chandelier, it is necessary to decide in advance in what style the room will be decorated. romantic style rooms are suitable for a young girl, country style or Provence will create an unforgettable atmosphere in country house, - you choose. It is also necessary to determine what intensity of lighting you would like to achieve in the end. Then start picking necessary materials to make a chandelier.
DIY chandelier: photo tutorial on lampshade decor.
You will need:
- cartridge of the required diameter;
- electrical cord;
- frame of the future chandelier;
- decor elements;
- kapron threads;
- hot glue gun;
- bulb.
The old lampshade frame found in the attic, with the help of your imagination, will turn into an elegant and stylish thing. Many famous interior designers started their careers this way, making amazing things and putting them up for sale. Who knows, maybe your success is just around the corner?
And so, measure the lampshade and make a pattern. When choosing a fabric, pay attention to its density. It can be organza, chiffon or a denser burlap fabric, linen. Sew the details and, pulling the resulting cover onto the frame, fasten the fabric with threads. Now decorate the lampshade with lace, beads and artificial flowers. Attach the cartridge to the finished lampshade and connect the wire, it remains to screw in the light bulb and the chandelier with your own hands (as in the photo) is ready.


Your home has become a source of pride and admiration. Now no one can stop you from creating new masterpieces!
DIY chandelier from rulers.
Children's rooms are the most painful issue in terms of design. Children grow up very quickly, and chandeliers in the form of airplanes or other toys quickly lose their relevance. That is why we turn on the imagination and proceed to the creative process!
Making a chandelier with your own hands from rulers is easy! You need to decide on the shape and choose plastic or wood. The advantage of plastic is the good flexibility of the material, but at the same time it melts well, emitting bad smell, therefore, in such chandeliers they put light bulbs of low incandescence, best of all LED. Using plastic rulers, you can make round and semicircular lampshades.
But it is best to take wooden rulers of the same length, two small hoops and a wooden plank. Using self-tapping screws, we fasten the rulers at an equal distance to the hoops. We skip the bar inside one of the circles to install a cartridge with a light bulb on it. The rulers between the hoops can be fixed in parallel or in the form of a lattice. Such a do-it-yourself chandelier will especially appeal to schoolchildren and will suit any interior.

New Year's chandelier with your own hands (photo attached).
If your peak creative activity came on the eve new year holidays, you can surprise your friends and loved ones with a real work of art. DIY Christmas chandelier (photo attached) made of bright Christmas balls can replace the Christmas tree and become the central decoration of the house.
You will need:
- ordinary plywood or plexiglass;
- coarse linen rope;
- blue, silver, green and gold balloons;
- stapler;
- glass elements old chandelier.
Cut out a 50:50 cm square from plywood or plexiglass. Drill holes randomly every 5 centimeters.


Using a wire staple, thread the linen thread into one hole and out of the next hole. Cut two ends to a length of 2 m. Fill all holes in this way. Fasten the square to the ceiling instead of a chandelier, and tie the balls at different distances from the floor, cutting off the excess length. Do this in the central part of the composition. Hang around the edges small parts glass on shorter threads, giving the whole composition a pyramidal shape.

Stylish chandelier with your own hands, ready!
To make the image of your room unique, you can do many things with your own hands. Chandeliers are one of those items.
The most popular way to make a chandelier with your own hands is winding threads. We take the usual balloon, inflate it. You will also need a lot of PVA glue and more than 100 meters of thread. It is advisable to use cotton threads, so the glue will not run and lie evenly. It is more convenient to pour glue into some kind of container, and apply glue to the threads with a brush. We wrap the ball with these glued threads, making sure that there are no large gaps. We are waiting for the glue to dry. It is better to wait more than a day than to start again, but with other materials. When the glue has dried, untie the knot of the balloon and inflate it again. This is done so that the shape of the ball is not lost and our do-it-yourself chandelier does not become oval. Now you need to burst the ball with a needle, and carefully remove it from the cocoon of thread with something sharp. Cut a round hole at the top of ours and place a lamp in the ball, preferably with matte finish. Fix the light bulb and the story of the chandelier. You can compare the result obtained by looking at examples of photo chandeliers or a video lesson.
To make the chandelier with your own hands even more original and tender, use thin lace instead of threads. Starch the lace and paste over the ball in the same way. This lamp will fit perfectly into the kitchen, made in country style.
To make a sconce with your own hands, use the same method with pasting threads or lace. You can also use thin strips of fabric or tulle. Only instead of a round ball, take a juice box. Preferably from half a liter - so the sconce will look more attractive. Before creating, look at the photo chandeliers to understand which sconce suits you.
DIY chandelier from hangers.
Don't throw away old things. Everything has a use. You may even have a chandelier with your own hands from clothes hangers. This is very comfortable material for creativity, and hangers, as a rule, are very durable. Just fasten them together with wire and give them any shape, decorating with fabric, bows, paper or other improvised material. They can install not one, but several LED bulbs or led strip. A chandelier of this type characterizes the owner of the room as an extraordinary person who loves experiments.
![]()

There are more extravagant examples of creating chandeliers with your own hands.
Well, here is another idea on how to make a chandelier with your own hands from improvised materials.
For this chandelier model we need big bottle made of plastic and a lot of disposable spoons.


Look at the photo of the chandeliers with your own hands and decide what you want to get. An excellent do-it-yourself chandelier will turn out with the help of an old lampshade. Need a metal ceiling base with a ceiling. Seal the space around the light bulb with foil (be sure to save energy!). Remove the fabric from the old lampshade and attach suitable paper to it. Glue the bottom of the lamp in contact with the lamp with baking paper, which will give our chandelier a soft yellow light with your own hands. Ready. It seems that the chandelier is hanging by itself, without touching the ceiling.
If you have several embroidery hoops, use them to create beautiful lamps. As a base, take a hoop or wire to create the desired shape of the lamp. Cover the frame with fabric or look at the photo chandeliers to properly paint the base. Attach organza or sheer chiffon to the frame. For decoration, you can also put a solid Christmas tree garland inside. Instead of fabric, you can use pendants: string beads on a strong fishing line and attach the fishing line to the base. Get the original chandelier with your own hands. It looks interesting if you hang several of these lamps nearby.
A homemade chandelier made like this also looks unusual: carefully glue the barbecue sticks together into a square shape, as you will see in the photo of the chandeliers. If desired, attach pasta in the idea of bows along the edges of the chandelier. As a decoration, put a ribbon of bright fabric between the sticks. In the same way, you can create a sconce.
The lamp looks intricately disposable cups stapled together. How to do it correctly, photo chandeliers show. And with the help of a fishing line, attach the chandelier to the ceiling.
almost everyone can. The main thing is to have a chandelier on hand, with which it is not a pity to experiment, and to have a decor concept in mind. We will give you an idea how you can decorate an old metal chandelier, giving it a vintage look on one side and a natural look on the other.
You can look for an old chandelier in your home or from your relatives or friends. You may even decide to purchase a new inexpensive chandelier that you can decorate to your liking.
The author of this chandelier decided to slightly modify her chandelier with the help of grape shoots. Indeed, the vine has quite a decorative look and it bends well (which is important). After the hostess wired several grape shoots with wire, she also connected vines adjacent chandelier horns (see photo)
After that, it remains only to paint the chandelier in white (black, red, silver or some other) color spray paint. Agree - the chandelier has an impressive appearance. Such a chandelier is not suitable for every interior (what is - that is), but it will fit well into vintage style, shabby chic, rural style of the room. And for giving such a chandelier - just shine!
See the master class in photos


++++++++++++++++++++++++++++++++++++++++++++++++++++
Decor of an old chandelier for the kitchen with your own hands

Here she is:

The case has come, we needed a chandelier in the kitchen. I didn’t like anything suitable in the stores, and then such a “miracle” falls into my hands :) (They gave it away just to make something).

Inside view:

I don't know how to call it prettier, but this thing used to hang like a lamp in a factory or something.
And then the thought came to me, to connect my leg with this lamp, so that we get a chandelier. I cut off all unnecessary wires from the lamp and removed the fasteners.

They fit together so perfectly that I decided to “dance” from this :)
From the inside, the leg latches clings to the ceiling itself.

Since our kitchen is in a yellow-green color scheme with gold fittings, we make a chandelier to match the kitchen.
So let's get started.
To prepare for the decor of the chandelier, we need:
1. Sandpaper (I used not the roughest).
2. Primer on old paint (this is optional, it dries for 24 hours, if you wish, you can apply it, I didn’t apply it, everything also holds up perfectly without it). Photo just in case anyone is interested:

4. Paint (I have a matte paint that was used for the walls when renovating the kitchen).

5. Wallpaper glue (in my case). I used it because now we have it in abundance. You can use PVA glue or something suitable for gluing fabric to metal.
6. Bowl for glue.
7. Glue for gluing decorative elements (the one I chose is initially white, after drying it becomes transparent).
The photo shows an example of wallpaper glue and the one with which I glued the decor:

For decoration we need:

1. white fabric(mine is cotton, you can use another one).
2. Metallized tape.
3. Artificial leaves.
4. Wooden ladybugs(mine are Velcro).
5. Half beads (I have a diameter of 6mm).
6. Artificial flowers (in this case, latex callas).
7. Stamens for flowers.
Let's get to work.
First we need to clean the surface of the lamp with sandpaper.

After the primer has completely dried (24 hours), you can start gluing our lamp with a cloth. I had an idea to make folds out of fabric.
We dilute the glue in the right proportion (it took me about 600 ml of diluted glue) and wet the fabric well in it. It is better to cut the fabric into shreds, so it is more convenient to form folds.


We wrap the part of the fabric that remains free inside, since we glue the entire lamp both outside and inside.


After gluing, this is the picture:


Air bubbles are driven out by hand, smoothing the surface.
And you can speed up the process and it will take no more than 1 hour to dry :)
We put our lamp in the oven, on the grate. I do not advise on a baking sheet, otherwise it will not dry out from the inside.
We heat the oven to 70-80 degrees and keep the lamp there for about 10 minutes, then turn off the oven, open it slightly and wait another 10 minutes. total There are 3 such approaches.
After drying, the lamp looks like this:

As long as she's not attractive at all :)
In the process of gluing with a cloth, the upper hole where the leg is attached closed, so it needs to be cut:


Everything is ready for the next step - painting.

Do not forget to cover the table so as not to get dirty.
And we start with a sponge, with blotting movements, apply paint to the entire surface (from the inside too).

![]()
Fully painted lamp:

The paint I used takes 1 hour to dry. After the first layer has dried, cover the lamp with another layer, because. in some places, however, there were traces of rust. We are waiting for complete drying.
Don't forget to paint the bottom of the leg the same color so that it doesn't stand out in the overall picture.

After the paint has dried, we connect the leg with the lamp.
Do you dream of adding brightness to the nursery or refreshing yours? workplace in the House? Or maybe you are a lover of the East, where did the fashion for these delicate things come from? Then you should definitely read how to make a paper lamp with your own hands - unusual original gizmos will instantly add a drop of magic to any corner of the house!
We guarantee that your guests will keep asking where you bought this designer lamp, and after learning that you made it yourself, they will ask you to tell you how to make a paper chandelier with your own hands and its step-by-step instructions.
In this master class, we will show as many as four ways to make a paper lamp, watch and choose the option that is right for you.
To create this delicate lamp, prepare:
- Colored paper of any color;
- PVA glue or glue stick;
- Paperclips;
- Compass;
- Scissors;
- Fishing line;
- Colored yarn;
- LED lamp ( );
- Wire with switch.


Step-by-step instruction:
Step 1
- On a colored sheet, using a compass, draw semicircles 1 cm wide.
- With each line, increase the diameter of the semicircle.
- Note that the sheets will require quite a lot. Then cut semicircular strips and cut them into pieces of 2-5 cm.


Step 2
- Fold and glue the resulting strips, making one side larger than the other - this will make it easy to glue them together into a domed shape. After that, you can connect them with five pieces of glue.
- Glue the clusters together, reinforcing them with paper clips until the glue dries. Glue until you have a circle, with a small hole for the lamp.
Of course, you can fantasize, and your lamp will be a little different than ours.

Step 3
Now, while our glue is completely dry, let's decorate our wire. For this, take the yarn of any color you like and carefully begin to rewind the wire with it. Try not to leave bumps when winding the yarn on the previous layer.
You can put a drop of glue on the end of the yarn in order to strengthen it.


Step 4
Let's make a holder for the LED lamp. To do this, we will tie a fishing line to our glued strips on three sides (preferably evenly measure the distance), and the other ends to a paper clip, which we will first straighten to the shape of a triangle.

Everything! It remains only to place the lamp in a circle and screw it to the wire. You can hang such a lamp both separately and in combination with, for example, .

Master class number 2: Rice or parchment paper chandelier
We bring to your attention new master class, on which we will teach you how to make lamps from rice paper. There is nothing complicated, as it might seem at first glance, in manufacturing, and you can connect to this exciting activity all households. The designer lamp is suitable for both the nursery and your bedroom.
Instead of rice paper, you can buy a roll of parchment paper for baking.

So, to make a lamp you will need:
- Unnecessary lampshade;
- Thin wire;
- Several rolls of rice paper;
- Iron;
- Paper cutter;
- Sewing machine.
Self-manufacturing
Step 1
Take the lampshade you don't need (you can buy inexpensive new) and remove everything from it, leaving only the base. If your lampshade is similar to ours, then add a wire in the middle, securing it well.

Step 2
- Prepare the parchment paper by unwinding the rolls and cutting into roughly equal rectangles.
- Iron the sheets until they are completely flat and smooth.
- Fold each sheet with an accordion, measuring the equal distance of the strips, and cut the same even circles with a paper cutter.
- Try to use the cutter carefully and don't leave too much paper- You will need a lot of circles.


Step 3
- Connect together, stitching in the middle, all the circles. Make connected circles of equal length and begin to strengthen them around the circle of the lampshade.
- As soon as you complete the first circle, go around the subsequent ones, reducing the length each time.
- Carefully secure your lamp in place, straightening out all the threads.
Remember to only use LED lamp, to avoid fire.


This beautiful chandelier- the result of painstaking work, after which you will admire your work and be proud of yourself for a long time. On our site you will find many more ways to diversify your home lighting, for example:
- can or .
- , for modern lovers.
- Or for lovers of eco-style.

Also, you can paint the rice paper circles any color you want, based colors rooms. If you want to hang this lamp in a children's room, you can add, for example, glass angels on long gold threads - again, choose the right accessories for different rooms, this will add warmth and originality.


CAUTION: Be aware that incandescent lamps heat the paper very much, which can cause it to ignite. For paper lamps and fixtures, use only LED lamps.
Master class number 3: Paper origami chandelier
![]()
This beautiful bright lamp really resembles a ripe berry!
To make it, take the following:
- 2 paper bags, so that when gluing you get a one and a half meter bag (preferably with an interesting print);
- LED lamp (no incandescent bulb );
- Wire with switch;
Once you decide that training is no longer needed, start preparing the paper bag. Remove the handles and cut the bottom off the bags and glue them together to make one large paper bag.

Fold the resulting bag in half, and then fold the halves with an accordion so that you get 16 identical curved strips. Then fold the two outer strips diagonally.


![]()


Follow the simple schemes and you will get wonderful lamps for decorating your home. It may take a little practice to fold origami perfectly, but you will not regret it, because origami is the whole world a variety of interesting gizmos created by their own hands. And your children will be simply delighted with your skillful hands!

Master class number 4: Corrugated paper lamp

To make unusual lamp you will need:
- Corrugated paper 88×44cm;
- Ruler;
- Spoke;
- Glue;
- A thread;
- Cable;
- LED lamp ( no incandescent bulb ).
Step 1 
- Using a ruler, mark a sheet of paper at equal intervals and fold accordion according to the markup.
- Helping yourself with a knitting needle, fold the folded sheet of paper diagonally, first on one side, and then, unfolding it, on the other side.
- Expand the sheet - you should be able to diamond-studded double sheet.
Step 2
- Connect the marked lines according to the photo, it is desirable that the sheet is not very wrinkled at this time - otherwise appearance lamp will be damaged.
- It remains only to connect the top of the lamp with a thread so that it does not fall apart, and fix the cable with the LED lamp.

Watch out for safety - do not use ordinary incandescent lamps, they heat up the paper very much and it may catch fire.

paper butterfly chandeliers
The most popular paper chandelier is the butterfly chandelier. And such love for this product is not simple:
- Firstly she looks very chic and expensive.
- And secondly The production is very simple, you can even attract a child.
Such an elegant lamp will go well with any style of interior, and it is also appropriate in the living room or dining room, and even in the children's room.

Manufacturing technique:
- The basis is an old chandelier or a frame from it. If this is not the case, then you can take a regular metal or wooden rim. If this is not the case, he takes a thick wire and makes 2-3 skeins of himself, so that a circle is obtained.
- Cut out the butterflies according to the pattern (butterfly pattern below)
- We take a nylon thread or fishing line and attach butterflies to it. Fastenings can be of two types: either we pierce the butterflies or put them on silicone glue. Whichever is more convenient.


Butterfly pattern
To make a butterfly chandelier, simply take a template and scale it to your size. It looks very nice if you make butterflies of several sizes, for example 3-4 diameters. Using a pencil, draw a sketch on paper and cut it out.
- Cut best stationeryknife or manicure straight scissors without rounding.
- paper is better to use denser and which does not attract dust, such as velvet texture. Since you will often have to vacuum such a chandelier

Also, a very beautiful option is obtained if you make a ball of wire, as a basis we take an old suspension from a chandelier and place several butterflies with a glue gun.


Paper ball chandelier
The basis of such chandeliers is a ready-made Chinese lamp ball made of rice paper. Usually they are very cheap up to 1-2 dollars. But you can decorate it as you like with paper tartlets, an unnecessary map, a newspaper or sheets of old books. We publish a few ideas for decorating a ball chandelier with paper.


Lamp for the New Year made of paper
Standing idea for the New Year is to use old lampshade and string snowflakes various forms. Very effective and beautiful. Below are a few photo ideas such decor for the new year.


To polish your skills, as well as replenish the collection of unusually beautiful lamps, see more ideas and . We are sure that among them you will find many that you will definitely want to create!
Probably, everyone has such an idea in their heads that at least something in the house should be exclusive, not from the store shelf. This thing may not be expensive and prestigious, but thanks to it your guests will understand who they came to and what kind of atmosphere reigns in this house. What do guests see when they enter the room? Naturally, this is a do-it-yourself chandelier.
A custom-made chandelier will perfectly show your character. In addition, in our days in the store, lighting devices cost a lot of money. By making homemade lighting, you can save your money. You can spend them on something else that is required when repairing a house.
Do not think that creating a truly masterpiece is very easy. It is required to apply all your design skills and accuracy. If the chandelier does not come out the way you intended it, then most likely it will then simply collect dust in the pantry in the farthest corner. So don't waste your time and try to do everything right the first time. Another plus of homemade lighting is that often such a product looks much more stylish than Chinese lamps sold in bulk in our stores. If you have a desire to save on electricity, then you can make your chandelier with a cartridge suitable, for example, for a light bulb with LEDs. You can insert as many cartridges as you like, limited only by your desire and needs.
How to make a chandelier with your own hands?
Let's just say that there are a very large number of ways. We will consider the most popular, namely:

Chandelier with pendants
All of them are made in the same way. You need to find a wire that can be bent without difficulty. This will be the frame. To hide the wire, it is usually hidden under the fabric or repainted. Then hang on the lampshade various decorations. It can be flowers, beads, chains, etc. Very often, people prefer a chandelier with wooden pendants. Instead of chains and jewelry, they simply hang wooden planks interlocked with each other. It looks very beautiful, unusual and interesting. A good option. if you need to make an antique design. You can use the same principle to make lighting in the children's room. Toys, candies and multi-colored trinkets are used as hanging decorations. A similar technique is also well suited for the kitchen.
Chandelier - ball
Used for base balloon. This method is very simple, and thus the most affordable. All you need is a rounded object and materials for decorating it. The ball can be perfect in any size. It depends on your desire and ideas. Decorations can also be completely different, for example, from paper of different colors, ribbons, newspapers, leaves, branches, etc. 
 At the first stage, they must be soaked in glue. The glue must be colorless so as not to spoil the color. Then we smear our sphere with this glue. Then we wrap the threads around it so that we get an unusual pattern. Now it remains only to wait for it all to dry. Once everything is dry, gently deflate the balloon. So we got the form for the future light source. Now you can additionally decorate it with leaves and flowers.
Below is step-by-step instruction:


Updating an old design
Sometimes there is no time and desire to make lighting design from scratch. For this, the option of decorating an existing chandelier is suitable. Use your imagination. For decoration, people use anything, from ordinary decorated butterflies made of paper, beads, and even ending with old teapots. A plafond for decoration is also very good.
Making homemade lighting from discs (CD)
This method has become widespread recently. This is due to the fact that the disks have fallen in price, and on the shelves of people great amount this material. So the craftsmen found good use. Of course, you will have to suffer a little, but the result will please you in the end. An example can be seen in the photo below.

LED
You can do this in just one evening. It will be best if you already have a foundation - old ceiling. In principle, you will only need to change the usual incandescent lamp and socket, but more economical option with LEDs. Further, if desired, the decor of the finished lamp is carried out.

LED
Chandelier Chizhevsky
You can do it yourself, but it is much more difficult than the above types of home lighting. This video is not simple process made by people who know electronics. 

Its main principle is the improvement of people in the shortest possible time. She fills negative ions oxygen room. To start the effect, you need to ventilate the room well and turn on the Chizhevsky chandelier.
From bottles
Naturally, not all bottles are suitable for its manufacture. If you want it to be not only light, but also beautiful, then we recommend using dishes from expensive alcohol. Usually it is colored frosted glass. On the wooden frame bottles with evenly cut bottoms are suspended with a wire. You can cut either straight or obliquely, as you like here. It's better to hang different height to get an interesting effect. Then we mount cartridges inside the bottles.


When you find the chandelier of your dreams, it is always a great success. Such a functional piece of furniture will be long years pleasing to the eye and giving a pleasant electric light.
However, nothing lasts forever, and after a certain number of years, the chandelier will dim and lose its original view. How to restore the beauty of your pet? We will tell you how to update the chandelier in this article.
What can be done with a dilapidated chandelier?
- paint
- Update ceiling lights
- Update lampshades
- Dramatically change the look of the chandelier

Creating a new bright image of a chandelier with your own hands is quite real!
Painting: old chandelier in a new way
Painting a chandelier means updating the color of the base, as well as the shades. Why paint a chandelier? This can become a necessity when changing the color of the main interior - after all, with paint you will help the old chandelier fit into any environment. Your mood can be expressed in the color of the chandelier and repainted as often as you like.
You can paint the base:
- oil paint
- Airbrush acrylic paints
Before painting, be sure to disconnect all elements of the chandelier that are not intended for painting - light bulbs, cartridges, decorative elements. Clean and sand the chandelier to remove residue old paint; then degrease the surface. Cover everything before painting workspace newspapers or PVC film, it is better to choose a balcony or any other open area for painting work. Painting is best done in several layers, subsequently fixed with varnish. After applying the first coat of paint, let it dry thoroughly. Adjust the number of layers of paint by eye - the paint should hide all defects and have a uniform and saturated color.
After the paint and fixing varnish are completely dry, you can assemble the chandelier.
Drawings on the lampshade will make your lamp brighter and give it a personality.
How to make a new chandelier out of an old chandelier with the help of painting ceiling lamps?
The paint on the shades can simply be updated, or you can create an author's style with a new color or pattern. It is recommended to paint the plafonds with acrylic or stained glass paints. Here you can give free rein to your imagination by depicting ethnic patterns, birds and animals, imitating popular painting options or preferring smooth transitions or a uniform color.
A little trick for those who are not confident in their talent as an artist, but really want to give individuality to the plafonds with the help of patterns - use stencils with drawings.
In addition to painting and updating the paint on the shades, you can also use decorative ornaments, various improvised materials:
- Beaded, beads
- Ribbons, braid, fringe
- lace
- Fur and feathers
- Flowers, butterflies, paper petals,
- Scraps of fabric
- chains
- wire
- Yarn and cords
Attach the selected elements to the ceiling with a glue gun or double-sided tape.
When choosing an adhesive material, take into account the fact that the ceiling during operation can get very hot and weak glue can lose its properties.
Restoration of an old chandelier: do-it-yourself lampshades
Do-it-yourself lampshade for a floor lamp can be made from a variety of various materials. We will talk about some of the most popular options for hand-made lampshades.
From yarn and PVA glue
Inflate the balloon required size and wrap it with yarn threaded through a container of PVA glue. After that, dry the product and pierce the ball. You have a filament lampshade that can be decorated with beads and fringe.

A lampshade made of threads will bring coziness to your living room
From wire
Build a wire frame and cover it with the material that you have chosen to decorate your lamp. It can be fabric, paper, vine, thread, etc. But when choosing a material, remember about fire safety! Use fire-retardant impregnations and discard "dangerous" materials. The finished lampshade for the sconce can be decorated or painted at your own discretion.

The process of making a frame for a hand-made lampshade
From prefabricated elements
As a lampshade, you can use various things that surround us. These can be wicker baskets, glass containers with drilled bottoms, and so on. If your chandelier's lampshades have fallen into disrepair or you just decide to update the style of the lamp, this option is for you.

Lampshade from ... skirts! Why not?