Do-it-yourself wood transformer coffee table. How to make a bench-table (transformer) with your own hands. To assemble a bench - a transformer, we need
Many modern apartments can't brag large area. Therefore, we often have to give up some pieces of furniture. This state of affairs significantly reduces the quality of life. But is it really necessary?
It turns out not. Multifunctional furniture comes to the rescue. Moreover, it can be made by hand. A transforming table, for example, will fit perfectly in the kitchen, living room or even the bedroom. There are so many options that you can easily find exactly what you need.
In this article we will talk about how you can make a transforming table with your own hands. Let's discuss what are the designs and functionality.
What are they like?
Such tables are most often called folding. Depending on the functional purpose they are:
- workplace- magazine version;
- chest of drawers or other storage system;
- dining coffee table.
The most popular option is the "magazine-dining" transforming table. It is not so difficult to make it with your own hands. It will be much cheaper than in the store, but it will look just as good. This option is very convenient because at the moment of arrival of guests, with one movement of your hand, you turn an inconspicuous coffee table into a full-fledged place for a friendly feast.
DIY dinner table-transformer can be placed in the kitchen. Unfortunately, in old houses, these rooms can only be compared with a mouse cage. A minimum of furniture is placed there, and in order to place a full table for big family, there is no talk at all. The folding design will allow you to increase the area of \u200b\u200bthe table only at the moment when the whole family is gathering for dinner. The rest of the time, the structure will occupy a minimum of space.
A table combined with a storage system most often consists of several drawers covered with a table top. By turning the latter around its own axis, you can significantly increase the surface area and get a full surface.

As a personal workplace, a square or round transformer table is most often used. It is quite simple to build such a structure with your own hands. Here, in general, nothing should turn, change shape or unfold. To turn such a table into a full-fledged place to work, it is enough to raise its countertop to the desired height. To do this, use special mechanisms, most often purchased. You can equip such furniture with additional drawers or shelves. It will be very convenient to store various little things there.
Design features
To make a transforming table with your own hands, it is worth considering what the main structural elements will be made of. There are only three of them, but each of them is very important:
- Folding device. It is on the quality of this element that it will depend on how exactly the structure will unfold and how easy it will be to do it. Don't "reinvent the wheel". It is this detail of the future table that is best purchased, and from a trusted manufacturer.
- Frame. Depending on the functional purpose, it can be made of glass, metal, wood or plastic. In order for the transforming table to serve you for more than one year, it is best to choose a tree. This material is quite durable, it is relatively inexpensive. If something breaks over time, the part will be easy to replace. plastic tables definitely weigh a lot less. But there is no need to talk about long-term operation here.
- Legs. This part of the structure is designed to withstand the greatest loads. And when unfolding, it only increases. Massive metal or wooden legs will provide your creation with the necessary stability. Thick glass supports are also good.

Types of mechanisms
To DIY coffee table-transformer turned out to be not only beautiful, but also functional, it is necessary to choose the right transformation mechanism. They are like this:
- Double expansion. This is the simplest option, in which the countertop consists of two halves laid one on top of the other. To expand it, you need to fold the top.
- Application of inserts. This option is the most popular. The tabletop simply stretches into different sides, sliding on special guides. An additional part, previously hidden in special fasteners, fits into the resulting space.
- Swivel mechanism. Enough complex structure, at which the main table and additional elements do not form a unified whole. Here you will need basic knowledge of mechanics and special guides.
- Automatic movement. Several additional surfaces are placed under the main tabletop. When top part starts to move, it engages the rest of the parts. They go up and are installed in their places automatically. Often these tables have 2-3 layout options. The design can use a gas lift or several springs.
Making a folding table
Many people decide to build a transforming table with their own hands after they get acquainted with the assortment of stores and find out average cost such products. Whichever model you choose, independent production will cost you about 3 times cheaper.

The process consists of the following steps:
- Selecting the type of folding mechanism.
- Development of a project sketch.
- Cutting and cutting structural parts from chipboard.
- Approximate fit.
- Assembly of the main frame.
- Installation of the folding mechanism.
- Installation of support parts.
- Fixing the table top.
To make the drawings as accurate as possible, they are best done using special programs. These can be found quickly and for free on the Internet. Most simple drawing programs are elementary and intuitive. It will take you several hours to master them. But then you can not only make high-quality drawings, but also calculate exactly how many materials you will need. Also, the programs allow you to create a cutting map, so you do not have to spend extra.
If your house does not have special carpentry tools, cutting according to the drawing can be ordered at the same workshop where you plan to purchase a chipboard sheet. Such a service is inexpensive, and you just have to drill holes in the right places and assemble the structure together. Just choose the materials good quality- and your creation will be no different from salon counterparts.
Folding table for the kitchen
For the manufacture of such a table, thick laminated chipboard is best suited. Such a transformer is considered the leader in saving space in the kitchen. When folded, it looks like a narrow shelf mounted on the wall. To get a full-fledged table, just lift the side part and install it on the leg-stand.

Before starting work, it is worth making a drawing of the future table or drawing a small sketch. The design itself consists of only a few parts:
- the main part of the tabletop;
- additional lifting part (it can be either rectangular or semicircular);
- one or two legs and struts to strengthen them.
Manufacturing process
From the prepared chipboard we cut out two parts of the countertop: one is stationary, the other is lifting.
Additionally, we cut out the base panel. It will be mounted on the wall, and on it, in fact, the whole structure will be held. Its dimensions are approximately 20 x 30 cm, but may be larger. It all depends on the size of the table.
We also need a retractable panel that is attached to the main one and supports the lifting tabletop in the open state. It can be cut in the form of a right-angled triangle from a single piece of chipboard, or it can be assembled from individual slats.
We connect the stationary and lifting parts of the tabletop to each other using a piano loop. You should get a design in the form of a book.
On the mounting base, with the help of butterfly loops, we install a triangle-support with an acute angle down. When folded, the triangle should be parallel to the base, and when unfolded, it should be perpendicular.
We apply the wall panel to the location, level it and securely fasten it.
With the help of special hooks, we hang the main part of the table-top shelf just on the wall directly above the base.
Ready. To fold the table, simply turn the triangle support to the side and lower the movable part of the tabletop.

Table-transformer on goats
If you are planning to make a transforming table for a student with your own hands, we suggest doing it in an industrial style. Such furniture is very popular today, although it looks a little rough. This style includes a transforming table on the goats. The advantage of this is that as your student grows, you can easily change the height of the tabletop.
Action algorithm:
- Work begins with the manufacture of "goats". To do this, you need to take 8 identical pieces of the board and fasten them in pairs in the form of triangles.
- In order for the structure to be strong, the legs must be provided with jumpers. It is best to make them two: from below and from above.
- As a result of all efforts, you should get four strong trapezoids of the required height.
- Now, using horizontal jumpers, connect the trapezoid to each other. You have got legs - "goats".
- In the middle of the upper part of each trapezoid, you need to make a hole. A screw will be inserted there to adjust the height of the countertop.
- Fasten the upper ends of the screw together with a strap.
- Now it remains only to cut and strengthen the countertop.

To give a more presentable look, the table on the goats can be stained, varnished or painted. As your child gets older, you can gradually remove the screws and raise the level of the tabletop. Thus, the student will not stoop and maintain an even and beautiful posture.
Finally
There are many ways to make a transforming table with your own hands. All of them are designed for different taste and skill level. Choose the one that suits you best and get started.
Have you been dreaming of a folding table for a long time? Can't find suitable model? Do not despair. Indeed, it is possible to do
Benefits of transforming tables
The modern world is full technical innovations. This applies not only to electronics, but also to furniture. Transformer furniture is at the peak of popularity. This is especially true for tables. They can be placed in any room: living room, kitchen, dining room. Thanks to the compactness of this furniture, you have great opportunity save a large number of space. In addition, it can carry several functions at once. For example, today the table-bed-transformer is in great demand. You can also make it with your own hands. During the day, you can seat all your friends at it and have a meal, but at night this table turns into a bed on which you can relax. Interesting, isn't it?
Transforming tables are especially relevant for a small kitchen. Their functionality depends on the mechanisms that are the most important aspect such furniture.
Often these tables change not only in size, but also in purpose. So, for example, a small box that can serve as a chair can easily turn into a festive dining table. Now you can organize a feast and not worry that you will have nowhere to seat guests.
What is the secret of the mechanism of transformer tables
The mechanism for the transforming table is so simple that even a child can handle it. It works with the help of special built-in iron parts, which move certain parts of your table, thus turning it into a powerful and large one.
As a rule, stores today offer a wide selection of modern folding furniture. It is durable and can please everyone with its long service life. In addition, transforming furniture can please with its wide choice in color solution. Thus, you can choose the shade that suits your interior.
The only drawback is the high cost. Not every average citizen of our country can afford to purchase given element interior. But for those who want to acquire it, we suggest making a transforming table with your own hands.

How to make a book table yourself: materials and tools
Before you make a transforming dining table with your own hands, you need to make all the calculations correctly and prepare a drawing. There are certain parameters for this product: height - 75 cm, width - 80 cm, tabletop length - 152 cm. Therefore, you will make a table of just such dimensions or deviate slightly from them, but you need to build on these parameters.
For the basis of such furniture, you should opt for moisture-resistant chipboard, although non-moisture resistant is also allowed. Fasteners in this case are 12 pieces of butterfly loops in the amount of 4.5 cm.
To attach the tabletop to the side of the table, 4 corners are needed. In addition, 2 limiter corners are also needed here.
We collect a table-book
The first thing you should do is process the saw cuts. To do this, use a simple iron. Remove excess material with a sharp construction knife.

After that, start assembling from the legs. Attach the hinges using special modern screws. The mechanism for the transformer table is ready. For an aesthetic appearance, confirmations are closed with plugs.
Take the bottom edge, which should be at the bottom of the table, and two side walls. Fasten them so that the edge is 10 cm from the floor. In this case, the rib should be between the walls. Take the second crossbar and fasten it to the side pieces parallel to the first. It should be about 40-45 cm from the floor. Here it is worth considering the moment that the distance from the ends of the inner ribs to the side ends of the side walls should be approximately 3 cm less. Otherwise, the tabletop wings will not fit snugly and loosely against the table base when folded.

After that, on the sides, first attach a small one in the middle parallel to the inner ribs, and then two large parts of the table top on the sides.
Strengthen the legs and tighten all the mechanisms.
One do-it-yourself transformer table is ready.
What you need for a folding table for the kitchen
The transforming table for the kitchen is a leader in space saving. It is ideal for small spaces, as its base is attached to the wall.
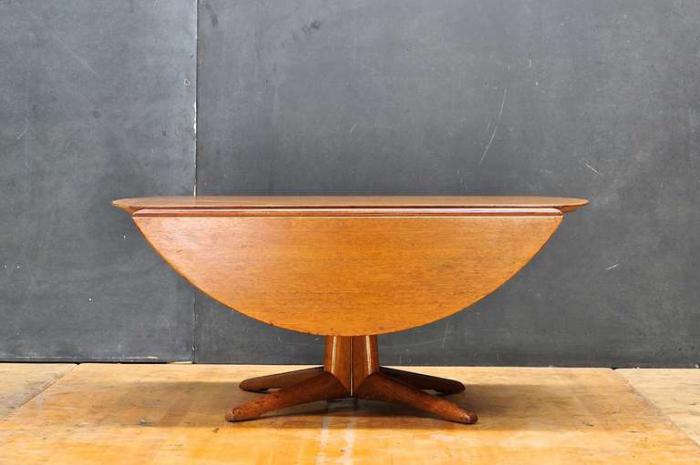
In order to make such a round transforming table with your own hands, you need to have the following components at hand: a bearing part, 2 struts, shelves and a tabletop rounded on one side.
To get started, also prepare a drawing with the dimensions you need. For material it is better to take laminated chipboard with a thickness of at least 1.5 cm. But if you do not have one, then it can be replaced with or planed boards. But in the latter case, they must be rubbed with fine sandpaper. In addition, such material requires painting or varnishing.
Assembling a kitchen folding table
The base is attached to the wall by hanging. For this, experts advise using special anchors. And its parts themselves are assembled using self-tapping screws and This process is less time-consuming compared to the previous one, but it still requires a lot of effort and attention.
So, the mechanism of a do-it-yourself transforming table, in this case, lies only in the fastening of moving elements to the base, which already fits snugly against the wall. After the ends are glued with an edge, staple the back surface and attach the shelf parallel to the upper small part of the countertop, fix it with self-tapping screws. After that, follow the instructions above and continue to fasten the parts of the table one by one.
The choice of mechanism and the design of a coffee table-transformer
Before you make a transforming coffee table with your own hands, you need to decide on its functionality, which fully depends on which mechanism for the transforming table you choose. After all, its appearance (with a spring or gas lift) directly affects how your table will fold and unfold.

The second stage in the assembly of folding furniture is its design. As a rule, here you should be guided by the recommendations that are included with the mechanism itself. The design of the coffee table may be different. by the most simple option is normal small table, consisting of two halves of tabletops, which are further moved apart and another part of the tabletop is inserted in the middle. Thus, a transforming coffee table, which almost everyone can do with their own hands, increases in size.
Assembling a folding coffee table
After all the details are cut out of chipboard, their ends must be glued with an edge. After that, try on all the details. Mark with a pencil. If your product is dark in color, then it is recommended to use a sticker for this purpose. In this case, the previously made marks will not be erased and will be clearly visible on the surface of the laminated chipboard of any color.
We assemble a transforming table with our own hands using special drill for confirmations. After assembling the base, proceed to fixing the mechanisms. To do this, make through holes in the right places and fix the parts with special bolts.
What is a coffee table for? Most often, there are drinks on it while we watch TV, there are laptops on it for work or entertainment. In addition, it is desirable that the coffee table has a place to store any household trifles, and also can serve as a stand for tired legs. Doesn't sound very aesthetically pleasing, but who among you doesn't?
It is not always possible to purchase a finished table of exactly the height and shape you want. So, there is only one way out - to make the coffee table of your dreams with your own hands.
What will you need
Screwdrivers or an electric drill with a set of drills;
Wooden panel for cover and shelves;
bolts;
nuts;
Dismantling of old elements


We remove the table cover, unscrew the rollers (if any), remove the edging elements that connect the walls of the table together. The legs are usually glued on, so they can be removed with a hammer. All boxes, handles are also removed and cleaned.
Further actions

There are several options for how to fix the countertop:
You can make a hinge on which it will hold on one side;
You can make it move back and forth as if on rails;
You can divide the countertop into two halves and fix it on both sides;
Great solution will be the use of cantilever hinges. In this case, the table will open or close as you wish, when closed, the tabletop will be flat.
Storage boxes require a little refinement, initially they have too little space.
We disassemble the loops


Ownerless wooden planks make excellent loops. Their shape is clearly visible in the presented photographs. Please note that it is the short parts that will move.
The movable parts are fixed on the long part at the same distance and height. The moving parts are the same length.
The first photo shows exactly how the holes should be drilled. The second photo shows the hinge in the open state.
The third photo shows the sinking bolts. Well, on the fourth we see approximately completed loops.
Storage boxes


To support the boxes, it is necessary to strengthen the entire structure. After that, carefully examine the table and remove all extra nails and brackets.
Surface preparation


It's time to work on the countertop and put it back in place. By using grinding machine remove the old coating and level the surface. If there are irregularities on the countertop, then they can be smoothed out with the help of a finishing finely dispersed putty composition intended for wood.
Reconstruction


Put the countertop back in place and check how everything works.
Coloring


Before you process the surface of the table, it must be sanded sandpaper, clean from dust and dirt, level and degrease. After that, the table can be painted or covered special composition for wood - matte or glossy. Pay special attention to the end sides, sides, internal surfaces.
Final result

You can put tired limbs on the table at the end of a heavy labor day, if you lift the lid, then the laptop will be exactly at the height at which it will be convenient to work while sitting on the couch, you have additional storage space for various household trifles, and it will be very convenient to have dinner at such a table in front of the TV.
Most apartments cannot please wide area. Residents have to get out in order to deceive the space and not deprive themselves necessary items. Multifunctional furniture helps win extra square meters, and belongs to this group.
Transforming tables are well suited for the kitchen, living room and even for the bedroom. Such a piece of furniture can be made in different ways, depending on the functions that you want to endow it with.
This table is also called folding. It is classified by function:
- magazine-lunch;
- coffee table - workplace;
- table - storage system.
The magazine-lunch option can be found most often, because the number of friends and acquaintances who come to visit increases over the years, but the living space does not.
The transforming dining table is hardly noticeable and does not detract from valuable space. On ordinary days, it plays the role of a coffee table, and on holidays it turns into a real dining table. In order to seat 5-7 people, a few simple manipulations are enough. This is suitable when all space is connected into one.
When creating a coffee table - a workplace, a different type of countertop is used. It does not need to unfold completely or change shape. This version of the transforming table turns into a desk, taking the required height. Additionally, furniture is equipped with drawers to store stationery. Depending on the system of fasteners, the table can be given several positions.

Models with smooth adjustment mechanisms are more convenient to use. With their help, you can organize a workplace in any corner of the apartment.
Table-storage system has original design. It consists of two or three drawers and a table top. The table is opened by turning around its axis.
Folding device
You can’t skimp on it, because ease of use depends on it. The table should be laid out with a few movements and not require much effort.
Folding tables with a complex automatic mechanism provide a simultaneous change in the area and height of the tabletop.
Table frame
Duration of operation depends on its durability. Frames come in different materials:
- wooden;
- metal;
- with plastic parts.
Structures made of metal and wood are considered the most reliable. They withstand repeated folding and unfolding cycles well. Frames with plastic components are cheaper, but do not withstand long-term operation. But if the table will rarely transform, this option can be considered.

legs
They serve as a support, so they must withstand a large load, which increases when the table is unfolded. Thick glass supports have proven themselves well. They themselves are quite weighty and able to withstand considerable weight. Glass legs are perfect if you need a transforming table for the living room.
Wooden poles also handle the load well. This option is suitable for classic interiors.
Additionally, you should read. Depends on the material from which the top is made. appearance products.

Such furniture can be of several varieties, which depend on the mechanism for transforming the table:
- Using inserts. It is considered the most popular type. A countertop is built into the design, which diverges along the guides at the time of transformation. The additional part of the tabletop can be placed in the center or on the sides of the table.
- Using the automatic mechanism. It has one or two additional surfaces located under the tabletop. When the main part starts to move, the additional parts also move. This type of table can have several layout options and have a gas lift or springs. Last option considered more reliable.
- Double expansion. The model consists of two surfaces stacked on top of each other. To expand such a table, it is enough to fold the top.
- Rotary table . An interesting option, in which the main top and additional countertops do not form a single whole when decomposed. To create such a table, special metal guides are used.
What do you need to create a transforming table?
Many people decide to make such a piece of furniture on their own after getting acquainted with the prices of transformer tables in stores. The finished table will cost about 15 thousand rubles. If you do it yourself, you can save at least 5 thousand rubles.

Project cost:
- Transformation mechanism - from 3 thousand rubles.
- Chipboard panels for countertops and legs - from 500 rubles.
- Fasteners - from 50 r.
- A set of screws and self-tapping screws - from 200 rubles.
A folding table can really be made for $100.
Manufacturing consists of several stages:
- The choice of folding mechanism.
- Project creation.
- Cutting parts from a chipboard panel.
- Initial fit of parts.
- Frame installation.
- Table support installation.
- Tabletop installation.
To make a high-quality transformer table, it is better to create drawings in special computer programs. They not only draw the layout future furniture, but also calculate how many materials are needed and create a cutting map. The programs are quite simple to manage, so the creation of the project will take one to two days.
The number of parts and their dimensions can be ordered at the same store where chipboard panels are sold. The cut planks will only need to be bolted together, after which the transformation mechanism is installed. For even installation, it is necessary to make markings with a pencil before drilling the holes for the screws.

The finished table will not differ in any way from store exhibits if you choose a high-quality transformation mechanism and materials for the frame. Such furniture should be chosen if you do not know how to create
A table is an essential attribute of every home, allowing you to create comfortable conditions for life. But many residential apartments they cannot place a full-fledged structure inside, since this piece of furniture takes up a lot of space. Transforming tables will help correct the situation, which can, if necessary, be disassembled or converted into another product. Before you make a folding table with your own hands, it is important to choose optimal design and functionality of this design. This will allow you to optimally fit it into the interior, making it as useful and in demand as possible.


Features and benefits of a folding table
The folding table is a design that consists of several independent elements. All elements of the system are interconnected by special fasteners, which allows, if necessary, to disassemble it into separate parts. The classic representative is a table, in which the tabletop is moved apart, and another part is inserted into the vacated space.


Tables of this type have several positive aspects:
- Functionality. The table can change its dimensions, which allows them to be increased if necessary (arrival of guests, and so on). At the same time, it is very easy to supplement such a system drawers to be used as additional storage.
- Small dimensions. The design is completely disassembled, which allows you to keep it in the pantry or on the balcony. The dimensions of the table itself are compact and practical.
- Originality. Almost all tables that are made by hand have no analogues on the market and are distinguished by many details.
- Practicality. The table can be installed both in the kitchen and in the living room, transforming its size. This approach also allows you to save quite a lot of space, which is important for small apartments.
- Reliability. The service life of the structure can be very long if the drawings are followed in the manufacture and high-quality fittings are used.

materials
The quality of transforming tables depends largely on the material from which they are made. Today, for the design of such systems use:
- Chipboard. The plate is durable and low price, so it is very often used in the manufacture of such furniture. To give the table attractive design, you can make it from chipboard.
- Fiberboard. This material is in many ways similar to the previous type of product. The plate is perfectly processed and practically harmless to humans.
- Wood. Solid wood tables are the most durable and expensive. The material is easy to work with, and also has a unique texture that can be matched to any style of home.
- Plywood. This product not used as main. It is made from auxiliary elements(shelves, rear walls, boxes, etc.).
- Metal. This material is one of the strongest and most durable. It is used for the construction of parts that are subjected to significant loads (metal legs and so on). Very often used here profile pipes different section and forms.

It should be noted that today many parts for tables can also be made from polypropylene pipe, glass and other similar materials.
How to make a folding transformer table yourself?
Transforming tables come in several types, as they are used to solve various problems. The algorithm for creating such structures consists of several sequential steps:
- Initially, you need to decide on the type of product. Today, tables-beds or tables-sofas are very popular. The next step is to create drawings with all structural elements. The best option will use ready-made plans.
- At this stage, the selection of materials and accessories is carried out. Transformer mechanisms are of several types. They differ in the method of fastening and the parameters of spatial movement. For example, a bench-table should have not only sliding, but also lifting mechanisms.


- When all the materials are collected, they begin to manufacture structural elements table (table tops, legs, and so on). Here it is important to carefully adjust all sizes in order to future system could move without effort and failure.
- The procedure ends with the assembly of the table. They all start with small elements that do not transform minimally. After that, they go to large systems, where turn-sliding mechanisms are already installed. At the same time, careful measurements are performed before fixing each element.

The process of building transforming tables can be both easy and complex. It all depends on your imagination and desire. Sometimes you can just attach wheels to a transformer to change its purpose and functionality.


Production of a turn-and-fold model
Turn-and-fold tables are systems in which the tabletop can move to the side parallel to the floor. This design is much more complicated than the usual folding model. It uses special loops and mechanisms that provide this functionality.
The construction algorithm of such a design can be divided into several successive stages:
- First of all, you need to carefully calculate the table-book. It is advisable to use ready-made drawings, on which all the main dimensions are applied.
- After that, a material is selected that can withstand many rotation cycles. The best options would be metal and natural wood.
- When everything is ready, the frame and countertops are made under the table. The upper part should be completely covered by one element. The second tabletop will be hidden under the table. After careful measurements, the lid is screwed to the frame using special transforming mechanisms. It is important to control the location of all structural elements.

Please note that the second cover can be attached to the first element, forming a kind of book. Similar table with folding tabletop much more convenient and practical.

Homemade folding wooden table against the wall
Wall tables are one of the most popular wall tables optimal solutions for small kitchens. These designs do not take up much space, which makes them very functional. The construction of such a structure involves the following operations:
- Initially you need choose the material for the countertop. Many today use chipboard sheets, but wood is best, as it is durable and beautiful. The shield can be knocked down or glued from several polished boards. After that, you need to determine the height of the table. Based on these values, 2 supporting legs are made. Theoretically, they can be adjusted to the height after fixing the cover to the wall.
- At the very end of the countertop screwed to the wall. For this, special rotary mechanisms. Please note that the product should not fit snugly against the support, as it will not be possible to close it. When the canvas is screwed, you should take care of the fixation system in vertical position. The process ends with the installation of the legs. Attach them to two corners using rotary systems.

If desired, the legs can be made removable.

Making a coffee table in the hall
This table features small size. Externally, this design may resemble a coffee table. Today, there are many options for such products that differ in design and technical equipment.


Consider how to build a table for the living room with your own hands. This procedure consists of several successive steps:
- Initially, you need to select materials. The best option would be wooden plank and bruce. Of these, you should create a frame under the countertop. Outwardly, it resembles an ordinary square or rectangular table, but without the lid.
- After that, cut out of the boards and form two countertops. One of them should be smaller and fit inside the frame (it will be hidden). The second cover is made as for a regular table.

- The assembly of the structure begins with the installation of a small tabletop inside the table (between the legs). To do this, use a special mechanism that can, if necessary, move the system up. The tabletop should, as it were, rise and move simultaneously to one side.
- When the bottom sheet is fixed, the top tabletop is mounted in a similar way. It is mounted on special levers, which also allow you to lift and move the system.


Please note that the upper part must be displaced in such a way as to make it possible to get the lower shelf and install it next to it.
Features of creating a round product
Round folding tables are very popular today, as they are distinguished by their originality. Technically, such a design can be supplemented with an insert in the middle, which will increase its size.


Creating a semicircular table involves making a round tabletop. This process is quite simple and consists of the following steps:
- Initially, a layout is drawn on paper future design. This can be done in different ways, but often they use a thread and a pencil, which is attached to one of its ends. The second end is simply placed in the center and held, and the pencil is moved to the stretch.
- After that, with the help of a workpiece, the circle is transferred to the boards folded together. Some experts alternately cut out the parts, applying the dimensions of the board to a certain part of the circle.
- When the tabletop is cut, it is glued or knocked down with the help of transverse bars. After that, you need to cut it strictly in the center of the circle to form two even halves. The procedure is completed by installing these elements on the table frame using the movement mechanisms.

Camping table-suitcase
Such a design combines not only a surface for food, but also a container for storing certain things that will come in handy in nature. To build such a table is relatively simple and can be done in several steps:
- Initially, you need to choose the bars for the frame. The capacity of the suitcase will also depend on their thickness. The best option would be a rectangular beam, about 4-5 cm thick.
- At this stage, the sides of the suitcase are being built. For this, rectangles of a certain size are knocked down from the bars. Here it is important to carefully fit all the ends in order to get even and not skewed parts. Then a sheet of plywood is nailed to one of the sides of the frame, which will act as a countertop. The result should be two small drawer closed bottom.