How to stylishly use old things and containers as pots and vases for flowers. DIY flowers from improvised materials or How to make a bouquet from “nothing” What can be done from an empty flower pot
Read how to make a lighthouse, giraffe, spider. You will make these items from unnecessary flower pots. From the same material, make crafts for New Year.
The content of the article:
Making a cottage with your own hands - an exciting activity. You can make wonderful items for the garden from already unnecessary things. In the spring, summer residents bring flowers, seedlings in pots to their plots. Then the plants are planted in the ground, and the containers are thrown away, or they lie unnecessarily, littering the site. See what you can turn into flower pots, seedlings.
How to make a lighthouse from a flower pot?
For its manufacture, both plastic pots and old clay pots are suitable, which eventually lose their visual appeal. If you don’t have a dacha, having learned how to make a lighthouse, make it and decorate a balcony or window sill with such an accessory. If you install lamps on top of solar panels, then in the evening the lighthouse will add romanticism to the room.
To make it, take:
- 3-4 pots of different diameters;
- adhesive for ceramics and plastics;
- acrylic paints;
- brush;
- alcohol or solvent;
- newspaper.
When the containers are dry, put the largest one on the newspaper, cover its bottom with glue. Place the second largest pot on top. Glue a small one to it, on which place the smallest one.

When the glue is dry, paint the beacon white and the protruding border black. After a while, draw windows, put a decorative lantern upstairs.
You can paint the lighthouse with yellow and white stripes obliquely, and make the windows black semicircular, as in the photo. There are many other ideas on how to make a lighthouse.
For example, for the following you will need:
- flower pots;
- white and scarlet acrylic paint;
- pot trays;
- glue;
- refractory glass;
- candle.
To draw the windows perfectly even, cut out a rectangle inside the sticky note paper. Attach it to the pot, paint the hole black.
Cover two flower pot trays with blue paint. When all this is dry, you can collect our lighthouse. Glue the three pots together with the largest one on the bottom and the smallest one on top. Glue the pallet on the last one, put a transparent glass on it, in which you place a candle.
It needs oxygen to burn. To do this, drill a hole in the second pallet in the center or make it with a heated nail. Flip the pre-painted blue color miniature pot. Glue it on the prepared pallet with a hole. Place this design on a candle. The lighthouse will be safe, decorate the house, cottage.

At sunset, you will light a candle, you will admire your creation at dusk. Such a beacon will solve the problem of lighting, especially if you make not one, but several.
To do this, check out the following ideas. This one can be decorated with pebbles by gluing them to the bottom flower pot. Install the lighthouse on a round pedestal that needs to be cut out of plywood. Lubricate this part of the workpiece with glue, wrap it with a rope.

Do you want the lighthouse to become a bird feeder at the same time?

Then put it in a wide bowl or in a bowl. Here you will pour dry food for birds, thereby helping them survive harsh winter and draw them into your gardens. Birds will help to cope with small pests and will be beneficial.
If you are thinking about how to make a lighthouse so that it illuminates the path in the country at night and in the evenings, then stick an ordinary solar-powered lamp into the hole in the upper pot, and the problem will be solved.

You can decorate your creation with a net by tying it. Glue a few shells, and the marine attribute is ready.
If you wish, make another item from pots - a ship's bell.

To do this, flower containers need to be painted, then sorted by size from small to large. After that, a rope is passed through the hole. At its end, you need to hang a plastic ball, and you can hang it from the other end of the rope.
When a gardener decides to transplant a plant in a pot with a closed root system, the container remains. If a lot of them accumulate, then you can make not only a lighthouse, but also other figures for giving.
How to make a spider, butterflies, caterpillar from flower pots?
A lot is done from the pots left after transplanting flowers. Such funny insects can decorate not only a personal plot, but also become crafts in Kindergarten, to school. Among the flowers, on the windowsill, a colorful butterfly, striped bee will also look great.

For crafts you will need:
- flower pots;
- acrylic paints;
- pieces of plastic;
- scissors;
- wire;
- Super glue.
The body of butterflies is also dark, and the head can be yellow or red. Wrap the wire with black thread. The spider craft is created like this:
- Cut 8 identical pieces of wire, fold their edges into loops.
- Place an inverted flower tray on the table, place on it pairs of bent legs of an insect made of wire.
- Lubricate upper part pot inside with glue. Attach it, turned upside down, to the pallet.
- For the eyes, take plastic spoons, you will need their rounded parts. Glue those to small pot, which will become the head of the spider.
- Pupils can be drawn or cut from a bicycle tube or from an old rubber thing (mouse pad, old toy etc).
- Glue the pupils to the squirrels, and the insect's head to its body. Here's how to make a flower pot spider.
The body of the butterfly must be installed on the flower pot by gluing. The wings are cut out of colored plastic. Here's how to make a spider, butterflies, caterpillar. Other representatives of the animal world are also easily created from this material. You will be convinced of this now.
How to make a giraffe and other animals with your own hands?
Prepare materials, namely:
- 4 identical small flower pots and 1 larger;
- 4 wooden skewers;
- plasticine;
- acrylic paints;
- brush;
- ready-made eyes for dolls;
- wire;
- Styrofoam;
- liquid Nails.

- Let's start with coloring the pots. First you need to cover them with brown or yellow paint. When it dries, do dark spots. On a brown background, they should be light.
- Color the wooden skewers too. When they dry, stick circles of dark plasticine on one edge, which will become hooves.
- Using a knife, cut the foam into an oval shape. From pieces of plastic, cut out two ears, stick them into the head of the giraffe. Color this piece brown tone when it dries, draw a mouth and nose, stick ready-made eyes.
- Attach the giraffe's legs to its body with liquid nails. Thread the wire first through the bottom inverted pot, secure it here by twisting. Then lift the other end of the wire up, string 4 small inverted pots.
- Then a giraffe's head is put on this section of the wire. To make his horns, attach plasticine to the wire, stick the workpiece in place. Instead of plasticine, you can use the same foam. Here's how to make a giraffe out of waste flower pots.

And here's how to make a flowerpot for a summer residence using all the same materials.

The photo shows a way to create such things. Large pots, which will become the head and body of a man, are fixed with metal rod. The lower end of it must be stuck into the ground to secure the structure.
Small pots are put on the wire. This is how the arms and legs of the character are created. To decorate it, glue colored plastic where the dress will be and as an eye and a nose. Draw the mouth with acrylic paint.
It turned out to be a very beautiful flowerpot. By the same principle, you can make other little men. Such a couple looks great in any corner of the garden. You can place them next to a lighthouse, marketplace, to create a marine picture.

Find a place for picturesque mushrooms. To make them, flip the white plastic pot, put on it a flower tray, pre-painted, with traced circles.

If you want to make a strict school lady out of pots, then put glasses on her and attach a brooch to her neck. Decorate the head of this character with artificial flowers or dried flowers.

If a teacher with a pointer is not your option for decorating a summer house, then make such a Papuan. The top pot is both his head and a container for the fern, which will become the character's hair. On his feet you can put on old shoes that no one wears anymore.

Do-it-yourself flower pots can also be turned into the right item in the kitchen. Draw funny faces on them by choosing any of the presented ones, and you can put knives, spoons, forks inside.

Crafts for the New Year from flower pots
You can also make them from flower pots. To make a snowman you will need:
- 4 flower pots of the same size;
- three dark buttons;
- two pallets for pots;
- acrylic paints;
- tinsel;
- tapes;
- tassel;
- glue.
After the paint has dried, turn the tray over work surface, glue a pot to it. Using glue, we connect the other two together, the last, fourth we attach as a head.
It is better to apply the features of the snowman's face first, and then glue the head to the neck. To make the eyes, mouth and nose even, use a stencil.
Glue the inverted black pallet to the top of the head, fix artificial or natural spruce branches tied with ribbons here. Glue buttons, tie tinsel around the neck.

Here's how to make a snowman. It can be crafted even if you only have one pot. Color it like this, and this essential attribute of the New Year will remind you of the upcoming holiday.

If you have a small glass vase, it will come in handy for the next craft for the New Year. To make it easier, here's what it takes to make another snowman:
- 1 flower pot with tray white color and one pallet;
- glass round vase;
- black and scarlet acrylic paint;
- white filler;
- tennis ball;
- a piece of red cloth;
- scissors;
- glue.
Glue the vase to the tray, fix the black tray on it, on which you want to glue the tennis ball. It will become a pom-pom.
As a craft for the New Year, do not forget to make a Christmas tree. To do this, you must first paint the pots, let them dry, then glue them, placing them evenly from large to small.
The star can be cut out of plastic or cardboard. It should be on a leg of the same materials. Insert it into the hole of the upper pot and fix it with glue.

For such a Christmas tree for the New Year, you will need only 3 flower pots that need to be painted in green color. Then decorate your creation with gold braid, multi-colored buttons.
For the next craft for the new year you will need:
- three flower pots;
- pallet;
- green paint;
- tassel;
- sweets in the form of cones, balls;
- cotton wool;
- glue;
- cardboard;
- gold wrapping paper;
- scissors.
If you have cotton pads, ruffle each one with your hands. Glue this supposedly snow to the Christmas tree. Also add some candy. Cut out a star from cardboard. You will need two identical blanks. Put a wooden stick between them, glue. Paint the star or cover it with gold paper.

You can even make a New Year's deer from pots.

Glue two white pallets together. Set them on a wide neck glass jar. Glue 2 pots, draw eyes, mouth, nose on them. Bend the wire into deer antler shapes, and slide the bottom edges of the wire into the hole in the top of the pot. Glue the head in place. Here is another craft for the New Year from flower pots ready.
Now you know how you can transform unnecessary plant containers in order to decorate a summer house or a house with them.
Do you want to see how wonderful the figures from the pots look on household plots? Then check out a selection of such ideas in the next video.
From the second, you will learn how to make a lighthouse. All stages of work are shown here.
![]()
The flowering time for most flowers, alas, is short. But this is no reason to be upset. You can transfer natural beauty daisies, roses, peonies and other flowers, creating their artificial counterparts. This article "Cross" will teach you how to create flowers with your own hands from improvised materials.
Flowers from cotton pads
Many do not even suspect that cotton pads can be used not only as a means of hygiene, but also as versatile material to create all sorts of inflorescences.
Surface cotton pads can be flat, or maybe with a printed pattern. Depending on the type of flower, choose the one that suits you best.
Even a child can make a spring card with a primrose using cotton pads, scissors, glue, colored paper, paint or simple felt-tip pens.

If the cotton pads are a little “fluffy” around the edges, then you will get such airy roses. Looks very gentle and original!

From cotton pads, a cotton swab and a straw for drinks, you can create an elegant calla.

Cotton pads and a stationery stapler will help to make an original chamomile) If desired, instead of clerical brackets, you can use glue, and paint the chamomile with gouache or acrylic paint.

Cotton pads are very often used in the manufacture of a very popular flower - roses. Pearls will decorate roses, which will give nobility to the resulting flower arrangement.

The secrets of creating flowers from cotton pads with your own hands will be revealed by SunduchOK113 in a video master class:
From a large number roses can be created such a festive Christmas. To do this, you need a round blank, glue, cotton pads and various elements for decoration (ribbons, beads, rhinestones, sequins, etc.)


Flowers from cotton buds
Cotton buds are also an affordable and wonderful material for creating beautiful flowers.
Via cotton buds, plasticine and colored paper you can create cute daisies.

Willow twigs from the tips of cotton buds look very natural on an Easter card)

Using the tips of cotton swabs, paints and colored paper, you can make bright and fluffy dandelions.

You can make creative ones from colored cotton swabs and a round foam blank. For example, such a mischievous chamomile.


When making flowers from cotton buds with your own hands, you can choose any paint (gouache, watercolor, acrylic):

From the colored tips of cotton swabs, you can make mini flower beds with carnations.

Flowers from egg trays
Egg trays are one of waste materials for needlework. Usually egg containers are thrown into the trash, not knowing what beauty can be created from them! DIY flowers from egg trays will decorate the interior of the house, photo frames, wreaths, mirrors, etc.
To make these flowers you will need:
- egg trays (cardboard and plastic can be used);
- brush and paint (gouache, acrylic);
- scissors;
- glue;
- wire.
We cut the egg tray into separate sections, after which we form each section with scissors. The height of such blanks may be different. The resulting petals are painted with paint, preferably in two layers. Further, depending on the type of flower you are making, one blank can be inserted into another, forming a bud. We fix the elements of the resulting flower with glue.

The materials and the process of creating flowers from egg trays are discussed in detail in the MK Masterpieces of Needlework:
We bring to your attention the most common types of flowers from egg trays. But remember that you can come up with the shape of a flower yourself!


The frame of the summer wreath is also made of egg trays. This can be decorated with chamomile, cornflowers or pansies.

From plastic egg trays, you can even make a small masterpiece of floristry!

For example, snow-white roses from plastic containers, combined with pearls and decorative gypsophila, form such a delicate bouquet.

Brightness and festivity to the Christmas wreath from plastic roses will give decorative moss or fern, as well as red ribbons and beads.

A personalized flower on the table will please a colleague or your loved ones:

Let's see how you can make an exclusive photo frame out of a simple one:

A simple mirror decorated with flowers from the trays will look more interesting and sophisticated.


Gorgeous mirror decorated with lush peonies

Flowers from disposable spoons
Disposable plastic spoons can also be used to create flowers.
From simple white spoons you can make this

Spoons can be used not only white, but also bright colors, especially when creating .

When creating flowers from, you can use spoons different sizes and colors:

To create these decorative water lilies, some of the spoons were painted gold. spray paint. White and gold water lilies side by side look very stylish!

In addition to all kinds of paints, you can decorate spoons with decorative sparkles and glue:

DIY Gifts and Crafts Ideas offers MK for creating a bright spring from disposable spoons:
From white spoons, drinking tubes, plasticine and colored paper, you can create spring flower bed. Petals (white spoons) and stems (tubes for drinks) of snowdrops are interconnected using ordinary green plasticine. Cut out snowdrop leaves from colored paper. We make yellow ones from plasticine.

With the help of thermal treatment (lighter flame, candles), spoons can be melted and deformed into a petal of the desired shape. Then paint the petals suitable color and collect . It is convenient to use spray paint. Such flowers can be used even in the manufacture.

Using the same principle, you can make this. You can learn all the secrets of its manufacture in the master class.

wire flowers
Exist different technologies making flowers from wire with your own hands.
Flowers made of wire and nylon
For example, from unnecessary nylon tights and wire, you can make nylon flowers.

The technique for making nylon flowers is quite simple, but you can create real floral masterpieces. For example, -phalaenopsis, which is not immediately possible to distinguish from the real one!) A wonderful element of decor for both home and office!


Wire flowers and nail polish
Another handy tool for creating wire flowers is regular nail polish.

It is better to use a fresh varnish of a more liquid consistency so that it flows from the brush.
The varnish is applied to the edges of the petals formed from the wire. After the first drying of the varnish, additional layers of the same color can be applied or, for example, topped with glitter varnish.
To prevent the varnish from dripping onto one side of the flower, secure the stem vertically in a dishwashing sponge.
Olga Lazarchuk reveals in her master class the features of making flowers in this way:
And ladybug sure to bring good luck!

If you do not have time to take care of ordinary flowers, then your window sill can decorate this one.

A comb with delicate flowers will be a worthy decoration for your hair:


Flowers made of wire and floss
Ganutel - a technique for making flowers from wire and.

To create such a flower you will need:
- wire
- floss in different colors
- scissors (nippers)
- pliers.
We make a spring from a wire: we wind thin wire on a long rounded object, for example, a pen rod or a simple knitting needle.
From the resulting spring we form the petals and leaves of the flower. Next, on the resulting flower frame, we begin to wind floss threads in a certain order. We connect the resulting flower details!
More visually this process you can see the creation of flowers in the master class DIANA Bilohorka:
From hard wire and soft threads, you can even create such airy beauty!

Burlap flowers
Create flowers from unusual material- burlap, anyone can. This is a very popular pastime that is born for!

Beginners can start with the simplest, make a rose from burlap.

To do this, you will need the material itself - burlap, matching threads and a needle.
If you can use it carefully, then the needle and thread can be replaced with hot glue.
We cut off the burlap 4-5 cm wide, about 1 m long. Fold the resulting strip in half along the entire length and begin to twist the rosette.
YOU WILL USE
See the step-by-step process of folding a rose in this way in the master classes "Cross":
Burlap roses look very stylish! They can decorate various things in your home, for example, make such designer lamps ...

... or make such a wreath-decoration for the door:


There is a universal technique for creating flowers from burlap. In this case, the burlap is glued to finished frame wire petals.

First, the burlap is coated with PVA glue.
After drying, the fabric will become firmer and more comfortable to take on any shape.
From the wire we prepare the frame of the petals for the flowers, we wrap the wire with colored adhesive tape.

The resulting petals are superimposed on the glued pieces of fabric and are again treated with glue from above.

The workpiece must be allowed to dry in this form for 1 day. Next, cut out the resulting petals along the contour of the wire so that the edges are perfectly even. We bend the cut elements of the flower in the right direction and form a flower.
Thread flowers
Flowers from pom-poms
Thread pom-poms - lovely element to create flowers! With their help, you can create a spring mimosa:

Or a bouquet of summer dandelions.

MASTER CLASS ON THE TOPIC

Anyone can make flowers from threads with their own hands - and even without a crochet hook and knitting needles!

It is clearly shown how and from what materials such flowers can be made in the master class by Natalya Melnik:
Master class on creating a solar dandelion
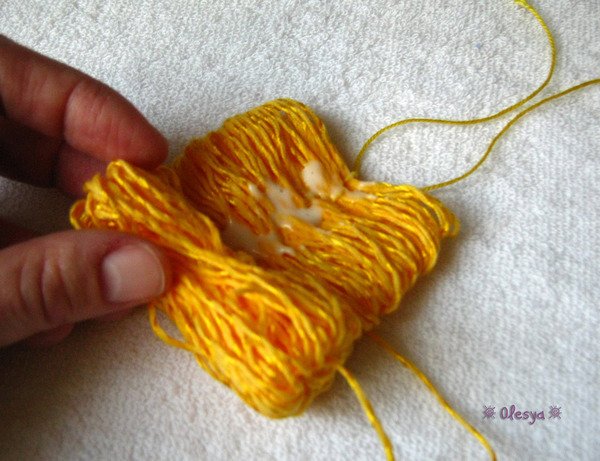
To make a dandelion, you will need threads of two colors.

We wind yellow threads on any hollow frame. Next, we sew the middle of the wound threads with the same threads and coat with PVA glue. We remove the frame, and tightly wind the threads on the middle of the workpiece, stitched and smeared with glue.


After the glue dries, cut the workpiece in half. We cut the yellow threads and straighten the resulting dandelion.


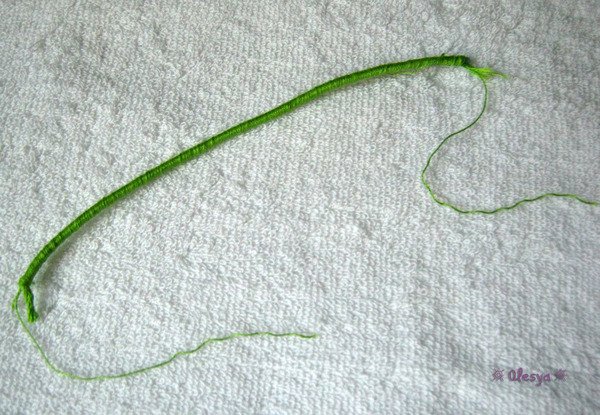
We make sepals from green threads.


We make the stem from wire wrapped in green threads.
A dandelion leaf can be crocheted.

Thread flowers can be made using the Tenerife loom (flower loom). Flowers are created by winding threads in a certain order on circle skewers. This process is very addictive and captivates not only adults, but also children. The resulting flowers can decorate clothes, hats, scarves and bags.


In work, you can use twine or jute natural color, dyed or bleached.

Twine flowers…

...and jute
The process of weaving flowers can be seen in detail in the Povyazuli master class:
You can buy a Tenerife machine at a needlework store.

Or do the same with your own hands. The easiest option is to cut it out of cardboard

There is another option homemade machine. To create it, you will need cardboard, needles, compasses, glue and a large needle.

Cut out two circles from cardboard and glue them together.

The resulting circle is divided into equal parts. According to the lines we stick needles or pins:


We form the core of the flower according to:


After the "birth" of the flower, remove the cardboard base:

Such ideas can be used not only by those who are too lazy to go shopping or do not want to spend money on numerous ordinary flower pots, but also those who love originality, needlework, fight for environment and simply does not know what to do with the accumulated amount of ... bottles, cans, old furniture, books and stuff, and stuff. Let's see what and how can be used for flowers.
1. You are a fan(s) of teas and often buy large quantities of them in tin cans? Then, for example, a row of colorful Twinings tea tins is more stylish option flower pots, and if you use colorful Japanese or Chinese jars with different patterns (and even different sizes) - they will competently enliven the decor of any dull or plain kitchen. What is especially convenient, when watering, the earth from such “pots” will not fall off from the sides, because there will be only a small hole in the center in front of you.
2. Figured containers of medium depth from transparent plastic(from under salads or store-bought small pies/puddings) will make a great bottom hanging planters. You just need to make 3 neat holes on the sides and then use a coarse rope. For greater showiness, the side parts should be laid out with small pebbles / pebbles, the rest - behind the planted flower.

3. Do you still have elongated straight jars of pickled peppers, onions, etc.? A row of these pots - with miniature in nature indoor flowers - on the shelf will look the best! Curly standard small jars, of course, will not look here, but if there are straight or original curly ones - go ahead!

4. The same story about cut-off one and a half liter plastic bottles, but did this idea come to your mind? We cut the base approximately at a height of 2/3 from the bottom of the colorless transparent bottle, and upside down, turning it over, put 1/3 of the top of the plastic colored bottle. It is better if the latter has an elongated throat and saturated color, but standard for Russia color bottles will also look stylish - but always bright or with intense color - bottles. And now you already have an aesthetic vase or flower pot with an original watering method (we pour water into the lower part, pour earth into the upper part).

5. If you have on your hands small bottles of an interesting shape, even if it looks like a drop, then by wrapping a tinted hemp rope around their throats in several rows and hanging it on the wall by the rope, you will get a pretty vase for a small bouquet of wildflowers!
6. Well, about various bouquets (especially from roses) in the old teapot or a coffee pot (here made of wild flowers), everyone has probably heard it already. Absolutely adorable vintage look!
7. And again the bottles. The most common white glass bottles with a high neck, attached to the wall with metal holders: how it looks! Real wall art and a range of flower vases. It is better to choose fasteners so that you can remove bottles from them (tightening collars, for example) and wash them.

Or complete analogue- banks. And here they are already any, the main thing is that they be the same color and size. The principle is the same.
.jpeg)
8. You work at a scientific institute, and you have a couple of long beakers lying around? Take the old one wooden box for shoes (or a stool, or a small chest), make holes in the top of the lid, insert the beakers and put them in the last bouquet or plant in a bush - and small garden ready.

9. Have you kept the old colander? Another idea for the bottom of the chain planter. A little more complicated than the first option, but also interesting.
.jpeg)
10. Cleverly paint (such as herringbone or diagonal stripes) any wooden box, and it can already be used as a creative outdoor pot for small tree at the door, at the bench, or anywhere on the lot. Choose colors for the chevron Christmas tree that are not too bright and complement each other, then everything will turn out very stylish.
11. Of course, spoiling books is barbaric. But all the same, many books have withered at home that it is a pity to throw them away just because they fit under this definition"books". Of these, you can always make a decorative part of medium-sized flower pots. There are 2 options. Stack 3-4 books in a stack, but unevenly, and center down, make a hole in them that fits the chosen plastic pot. Or for smaller flowers: open one book to the top few pages, or even 1/3 if the book is thick enough - it will look even more interesting - and make a hole in the center. Hard work, but very original.


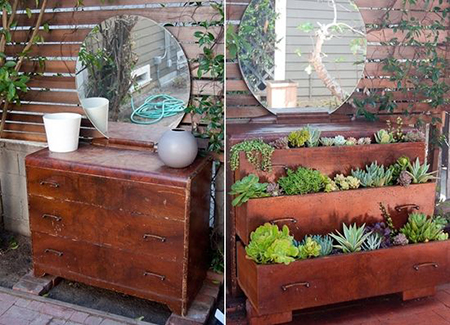
12. Interesting use an old chest of drawers, or rather its drawers. Each drawer, starting from the bottom, pull out to a certain length, with the bottom being the widest of all. Be sure to lock the drawers in the selected position. Then it remains only to put containers in them underground and plant small flowers. It will turn out something like a piece of the gardens of Babylon.
13. Or like this original way to use the old carved chair came up with the original gardeners. To my mind main element here is the bright color of the chair)

14. Instead of using for young seedlings plastic containers try a fresh orange or lemon peel! An analogue of this idea is hanging feeders for birds from half an orange peel.

15. After the construction of the house / repair, there were small square hollow concrete blocks one open side? Fill the earth, plant flowers that don't require frequent watering, and put the blocks on top of each other: in two rows, when 1 upper pot stands on 4 corners of the 4 lower pot blocks; or, in principle, a pyramid in several rows, when there will be empty blocks inside, and outside - with flowers; or a ladder - empty blocks will also serve as a support inside.
16. An old bright rubber slipper can become an equally interesting and pretty flower pot. Here you don't even have to put something inside underground.

17. A candy, tobacco or branded accessory tin can be a good hiding place for small flowers and seedlings. You don't even need to separate the lid: just open it and secure it upright, then its inner shiny surface will reflect sunlight flowers in the back!

18. Decorative drains make excellent shallow "pots" for vertical gardening, which look much more aesthetically pleasing than their plastic store counterparts. The main thing is to choose small and unpretentious flowers. Including, for example, lettuce grows very well in drains.
