How to whitewash high ceilings. Master's advice - how to whitewash the ceiling yourself
If, when starting the interior decoration of a room, you decide how to economically and environmentally make the ceilings in your apartment or house, then there is only one answer: whitewash the ceiling with your own hands. It is traditionally believed that whitewashing is painting in White color. But this is not so relevant now. You can paint with the addition of special dyes in any color. And using such simple materials like lime or chalk. The method is as old as the world. But still it is still used and finds its supporters due to a number of undeniable advantages.
Ceiling whitewashing
What are the benefits of this renovation?
Preparing the room for ceiling repair
When deciding to whitewash the ceilings with lime or chalk, you must first prepare the room for repairs. Remove all furniture, paintings, lamps and other removable parts of the interior of the room. What cannot be removed and taken out of the room must be carefully wrapped with plastic wrap, fixed masking tape. Such a film is now sold in any store building materials. There is an easier way - to cover all surfaces with posters and newspapers, which also need to be secured with paper tape.
Need to take care of own health and security. Vapors and lime dust are harmful, to protect the lungs, you need to wear a special respirator when working. As well as a hat, work clothes and comfortable shoes. Safety glasses and rubber gloves complete your outfit.
The better to whitewash the ceiling
We have already discussed all the advantages of whitewashing ceilings. If all these arguments seem weighty to you, then go for it. Before proceeding with the repair, it is necessary to prepare - to purchase necessary materials and tools. To do this, we first decide whether we will whitewash the ceiling with chalk or lime. If the ceiling is already bleached, then you need to check with something - lime or chalk. To do this, wet a small area and rub. The ceiling bleached with lime will darken and if you rub it, it will not stain your hand. And the chalk whitewash gets wet and stains the hand if rubbed.
Having determined which whitewash was used for the ceiling before, you can, without much further ado, buy the same material and whiten it. If there is a specific goal of whitewashing only with lime or chalk, then the surface will need to be cleaned thoroughly of the previous paint. Putty places of cracks. Joints ceiling tiles also putty and glue with a sickle, for special strength.
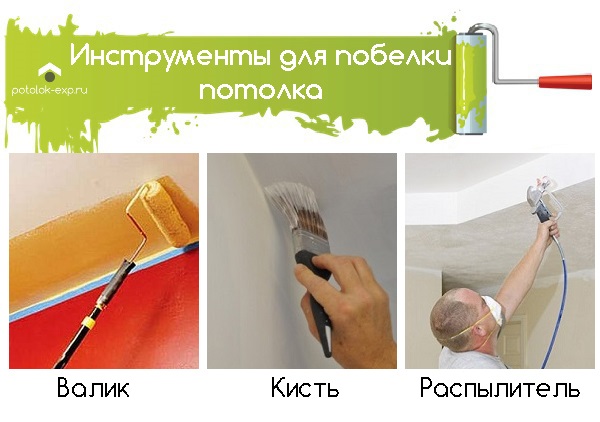
What tools are needed to whitewash the ceiling with lime or chalk.
- A natural fiber brush 15–20 centimeters wide or a maklovitz paint brush.
- Roller with a tray (pallet) for paint (lime).
- Sprayer or pneumatic sprayer, spray gun.
- Vacuum cleaner with a special nozzle for bleaching paints.
What materials are needed for whitewashing the ceiling with lime or chalk. The number of components per approximately ten square meters.
How to whitewash ceilings
Before whitewashing the ceiling, the surface must be prepared. Remove grease, dirt and dust warm water from soapy water. Clean up the old layer ceiling covering sponge or brush. If the surface is too dirty, you will have to remove all whitewash. Do this carefully so as not to damage the plaster. Clean the surface in small areas, pre-wetting it. For cleaning, use a spatula and a scoop or a special tray so as not to contaminate the floor and furniture. Remove dirt residues with a wet sponge.
Then close the cracks and seams with putty and sickle. Smooth with sandpaper. In rooms with high humidity it is necessary to treat the surface with an antifungal solution. It is also good to use a primer specially designed for lime or chalk. After applying the primer, it must dry for 24 hours.
How to whitewash the ceiling: you need to start whitewashing from the wall, carefully walking along the perimeter of all walls. You need to whitewash the ceiling in several layers. The first layer is applied parallel to the window. The second is perpendicular to the first layer. Each layer should overlap the previous one. It is necessary to avoid the formation of drops or bubbles - this is how stains or stains form in their place. In the process of work, it is necessary to mix the solution of both chalk and lime from time to time. This is necessary so that the paint is of the same density and the layers do not differ from each other. We apply the final layer of whitewash towards the light, that is, towards the window opening.
How to whitewash the ceiling - which tool is better
 The oldest, simplest and most common way is to whitewash the ceiling with a whitewash brush, otherwise called a maklovitsa. You can use other brushes with artificial or natural bristles.
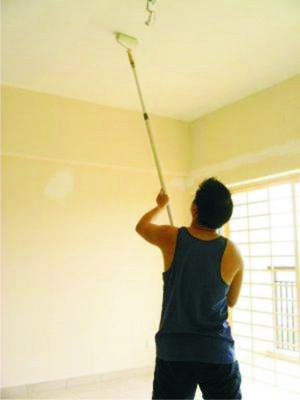
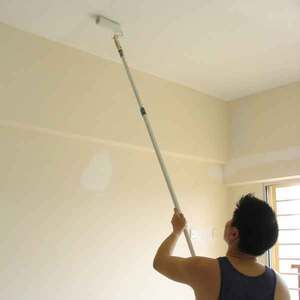
Whitewashing with a paint roller will turn out more efficiently and evenly. Let's look at how to whitewash the ceiling with a roller. The whitewash solution is poured into a special tray or tray. The roller is dipped completely in the solution, rolled over the sloping surface of the pallet for even distribution, and the paint is applied to the ceiling covering. If you put an extension handle on the roller, you can paint the ceiling from the floor.
Perhaps someone will recommend painting the ceiling with a vacuum cleaner with a special nozzle. In my opinion, the vacuum cleaner is still quite expensive and not a very convenient tool for whitewashing. In this case, it is better to use a spray gun or spray gun. When whitewashing with these tools, the paint must be applied in a circular motion. The big disadvantage of this method is that both the floor and the walls are splattered with paint. Yes, and spent excess whitewash. Plus it saves time and effort. And the whitewashing of the ceiling is more even. So the choice is yours. But if you whitewash the ceiling in a room where repairs have not yet been made, it has not been completed. interior decoration and there is still no furniture and other interior items, then, of course, painting with a roller will be much more effective.
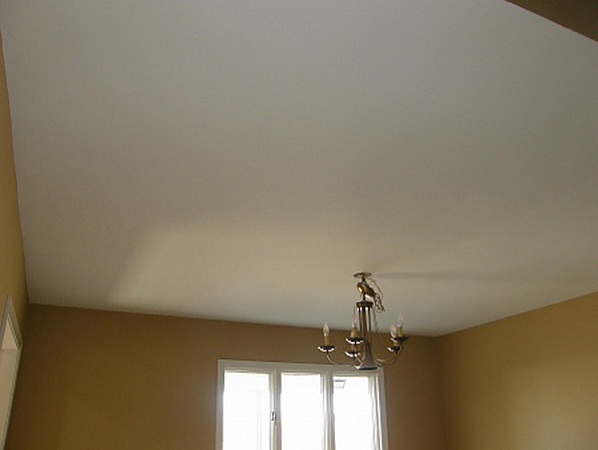
As a result of such work, we will get a healthy, environmentally friendly white ceiling. Having saved a considerable amount, especially if we do this work on our own, without involving other people's hands. And why pay someone. When you can do this simple work with your own hands, knowing how to whitewash the ceiling yourself.
The smooth and even surface of the ceiling coating visually gives the room more light and spaces. Whitewashing the ceiling is one of the most common modern ways its finishes.
This is due to the fact that a small amount of money is spent on the source material. In addition, carrying out such a finish is completely safe for health, and it is in harmony with absolutely any design.
Make a ceiling snow-white coating you can do it yourself, the main thing is to adhere to the basic rules.
Varieties of materials used for whitewashing
The choice of one or another type depends on what the ceiling was originally covered with.
If lime whitewash was used, then there will be no trace on the finger, and after chalk it will be obvious.
To prevent spots and stains from forming on the ceiling, it must be remembered that chalk cannot be applied over the lime coating.
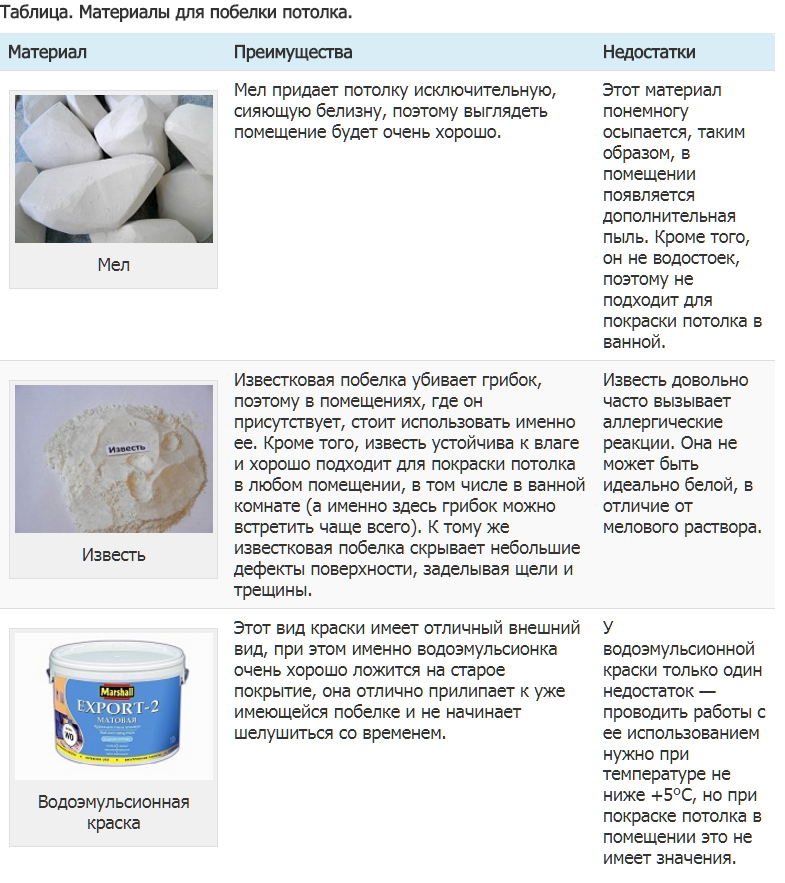
Chalk whitewash for the ceiling
It has the best resistance to moisture. At ceiling surface, whitewashed with chalk, good deep color. This type of finish is completely hypoallergenic, it is absolutely harmless to health.
lime whitewash
Its main plus is the contraction of cracks and crevices, masking small defects in the ceiling surface. The use of such a material as a finish, like lime, may be prohibited if a person is allergic to it. The drying speed of such whitewash is longer than that of chalky. Provided that the lime is sufficiently moisture resistant, then this option is best considered when finishing the bathroom.
Water based paint
This a good option what better to whitewash the ceiling. Unlike previous methods, the paint covers the ceiling dense layer, it is universal in use and serves for quite a long time.
There are three main varieties of this paint:
- matte emulsion. It has a dense structure, allows for deep masking of defects in the ceiling surface. Sufficiently long drying time;
- satin emulsion. Allows you to mask the imperfections of the ceiling due to varying degrees gloss;
- specific emulsions, selected for certain types of premises.
Chalk and lime benefit from the fact that the ceiling does not need to be primed before applying them.
They are selected depending on the dimensions of the room and the personal preferences of the person, if the ceiling is whitewashed with their own hands:
- roller or brush. They are suitable for work if the repair process is carried out in an apartment or a small country house.
- spray gun. It is used only if you have experience in handling such a device.
- ladder
- sandpaper
- hot water container
- spatulas. They are needed to remove the old coating
- drill or construction mixer
- container for paint
- means of protection. This is a mandatory protective mask, rubber gloves, respirators.
Brushes before work for several hours must be soaked in warm water. So they will not lose bristles.
Solution preparation process
When choosing how to whitewash the ceiling, it is worth remembering that dilution of water-based paint will not cause any particular difficulties. You can’t say the same about chalk and lime mortars.
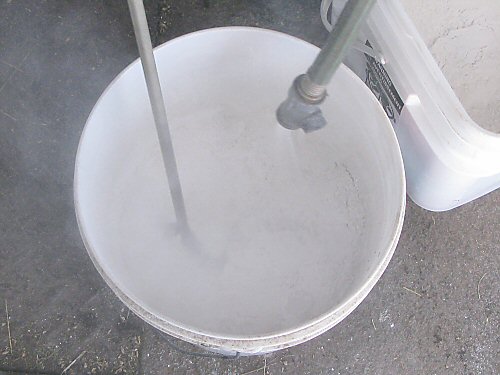
The solution is prepared in the calculation: 1 sq. m of the ceiling surface to be covered - 0.5 l of the mixture. Component compositions designed for 10 sq. m. It is better to knead such solutions with a construction mixer; they are stored for about 36 hours.
Chalk mortar
Take 30 - 100 ml of glue (carpentry, PVA), 50 g of rubbed laundry soap, 3 kg of chalk, sifted through a sieve, about 20 g of blue to enhance whiteness.
Initially, glue and soap shavings must be dissolved in water. Then, without ceasing to stir this mixture, you need to pour in the chalk, combined with the blue.
Mortar
Such whitewashing of the ceiling is prepared somewhat easier. In warm water, 175 g of lime (rubbed), 45 g, blue, 10 g of table salt are diluted. A snow-white ceiling covering in this case will not work, but its defects and irregularities will be hidden.
What is in the first, what is in the second case, 1 kg of chalk (lime) is dissolved in 2 liters of warm water. The optimal consistency of the solution is determined by using a metal knife: if, when it is immersed and pulled out, the solution flows down without leaving marks, then it is not thick enough.
The prepared mixture must be left for 15 minutes, and then passed through a sieve.
Room preparation
Before you whitewash the ceilings, you need to take out all the items from the room, remove the cornices, lighting. Furniture and other decorative elements (including large ones) must be covered with a film. Flooring it is best to lay it, saving time on subsequent cleaning.
Preparing the ceiling for whitewashing
It goes through several stages.
Removing old whitewash
If the previously applied whitewash has not cracked over time, it is still better to remove it. Now for this case there are many different special solutions, but it is more customary to use already known methods - warm water or a weak soapy solution using a spatula.
Before you prepare the ceiling, you need to protect your own hair and face.
Limescale removal
In most cases, it can simply be removed with a metal spatula, after tapping the specified area with a rubber mallet. You can also use a paste, which is applied thickly, and then removed with a whitewash with a spatula. It makes no sense to wet lime with water, as it forms lumps and is smeared.
Chalk whitewash removal
This is done thanks to hot water with the addition of 3% acetic acid. The sponge is wetted and the solution is applied to the ceiling. After the whitewash swells, it is scraped off with a spatula.
Surface cleaning, removal of irregularities, primer
Rust and stains can be easily removed with salt water. When the place dries out, it is better to use a solution of copper sulfate.
Grease stains are easy to remove with calcined salt, after which the surface is washed with water.
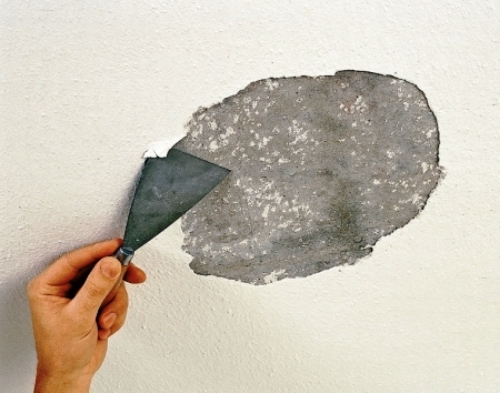
It is better to glue the joints on the ceiling with a sickle, thereby protecting the coating from further cracking. If there are defects in the form of cracks, recesses, cracks, then they must be treated with home-made adhesive putty.
To make it, you need 2 parts of glue with plaster and 1 part of chalk passed through a sieve. Such a mixture is dissolved in water, and then applied with a spatula to the ceiling. As it dries, the surface must be rubbed sandpaper then primed and left to dry for 24 hours.
With a properly prepared flow coating, it will be enough to apply two layers of whitewash on it. Before whitewashing the ceiling, it must be divided into zones. It is better to start the process from the corners or from the window and continue moving towards the door. The painted ceiling should be protected from drafts in order to prevent the shedding of whitewash.
One of the secrets of how to properly whitewash the ceiling is to change the lighting from natural to artificial. So it will be easier to identify flaws and irregularities.
Each next layer of whitewash should be applied only when the previous one is completely dry.
Different methods of applying whitewash imply certain nuances.
Carrying out the process with a roller
This option is the most preferable, especially for those who are worried about how to whitewash the ceiling with their own hands. It is necessary to make V-shaped movements. You can also apply the bottom layer perpendicular to the window, and the top layer parallel to it. The width of the overlap should be 5 cm or more.
If you are going to paint the ceiling, you need to make sure that there is no excess solution on the roller.
Hard-to-reach places are painted over with a brush.
Carrying out the process with a brush
It is completely similar to the previous version, but more labor-intensive. Therefore, when choosing how to whitewash the ceiling correctly, it is better to choose work with a roller.
The made snow-white ceiling will visually expand the boundaries of the room and emphasize any design.
Knowing how to whitewash the ceiling yourself, you do not need to worry about wasted money.
Before starting the process, it is worth determining the main surface defects (if any), and, based on this, choose how to whitewash the ceiling.
Repair - this word in many people causes only a lot of negative emotions. This is not surprising, because you have to run around specialized stores in search of the right materials, engage in endless cleaning of construction debris, puzzle over how to protect expensive furniture and equipment from possible damage. Of course, there are few pleasant moments, not to mention the material costs of repairs. Let's look at the repair problem from the other side: experienced owners will initially be able to repair their own square meters with their own hands no worse than professionals and in a short time, and they will still find an opportunity to save money. When you do something for yourself, you don’t want to hack at all.
There are situations when repairs were not planned initially, but simply became a necessary measure. For example, you were flooded with neighbors from above. Our experienced advice will help you learn how to whitewash the ceiling yourself, but at the same time with high quality and using materials available to everyone. Believe me, this work is far from the most difficult and time-consuming.
Good old whitewash
There is hardly a person who has never encountered whitewashing in his life. This simple way to improve the external and internal view dwellings have enjoyed enviable popularity for centuries. Agree, nowadays whitewashing for repairs in an apartment is used quite often. This circumstance is easily explained by the numerous advantages of lime whitewash: high environmental performance, significant disinfectant properties, economy, practicality. You can endlessly doubt the durability of whitewashing, but after all modern technologies for processing the ceiling also do not guarantee the eternal pristine whiteness of the surface. Renewing the whitewash layer with your own hands is not very long and easy, which cannot be said, for example, about another method of finishing - suspended ceilings.
The main stages of work with whitewash
But now all the torment and doubts are behind, the choice has been made: you decided to whitewash the ceiling. Let's briefly outline the main steps in this process.
- First of all, we will take care of the protection of furniture and household appliances from dirt and dust, which will certainly arise as a result of repair work.
- Next, we prepare the surface for applying whitewash, then we directly carry out the finishing of the ceiling.
- In conclusion, you will have to clean up the consequences of the repair and enjoy its results. The new is always better than the old. Let's consider each stage in more detail.
How to whitewash the ceiling with chalk and not stain everything around
The preparatory work includes actions aimed at carefully protecting the walls, floor and the entire furnishings of the room from chalk splashes. Even if you are 100% sure of your accuracy, do not be lazy and cover all surfaces that do not need to be whitewashed. Usually, cellophane, plastic wrap, oilcloth are excellent for these purposes. While working with the ceiling, it is better to free the room from unnecessary furniture. It is worth a little room, but how much later you will save time and hassle with cleaning.
We prepare the ceiling for whitewashing with our own hands
Carefully inspect the entire surface of the ceiling. Did you notice any cracks, yellowish spots? Excellent, all that is required is to remove the dusty upper layer old whitewash. Have you seen that the past whitewash has darkened and chips have appeared in some places? We'll have to work hard and completely clean it off.

First, moisten each section of the ceiling meter by meter (the easiest way to do this is with a roller), and then clean off the old whitewash to the ground with a spatula. The most difficult situation is if during the inspection deep cracks and cracks were revealed. It is necessary to remove not only the layers of whitewash, but also all the plaster and putty all the flaws, and then re-plaster and sand, achieving the effect of a perfectly even base. Do not forget about the primer, which will increase the moisture-proof properties of the plaster to reduce the consumption of white on square meter.
Important to remember: preparing the ceiling for whitewashing is the dirtiest stage of work, therefore, be sure to protect the respiratory tract and eyes. Wear protective goggles and a medical mask.
How to whitewash the ceiling
So, preparatory work finished, the most important stage is ahead: we apply whitewash ourselves. Perhaps relatives and friends will begin to advise not to take risks and seek help from the masters.
Here are approximate prices: how much does a square meter of whitewash cost? professional painter? The price will directly depend on the complexity of the work done (on average, from 200 rubles per square meter).
Do not worry, it is not difficult to complete the entire process of whitewashing the ceiling with your own hands. Put on your work clothes and get started. The best tool in this case is a roller with a long handle. It is necessary to carefully monitor the direction of applying layers of whitewash. Start applying the initial layer of whitewash parallel to the wall where the window opening is located, and apply the final layer perpendicularly.
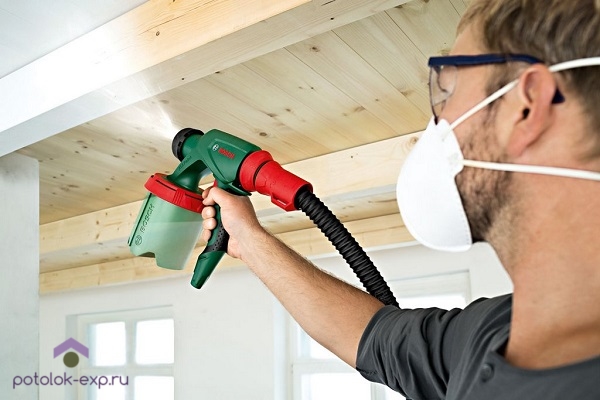
Another enough easy way- This is the use of a spray gun for applying whitewash with your own hands. No matter how much you search, you will not find a better way. Spraying allows white to lie on the surface evenly, which undoubtedly affects the speed and quality of work.
If you are doing the ceiling decoration in your own apartment for the first time, follow the basic rules and everything will work out. Here they are:
- Be sure to apply several layers of material, usually the number of layers of whitewash varies from two to four. Decide how many layers to apply, repeat your steps until you achieve the desired result.
- Wait until the previous layer is completely dry before applying another layer.
- When whitewashing the ceiling with your own hands, take care of the absence of drafts in the room, make sure that the ceiling surface is not exposed to direct sunlight. How long will it last new finish depends on the uniform and natural method of its drying.
- Never use lime and chalk whitewash together, otherwise decorate with your own hands own ceiling stains or stains.
- It is better to use ready-made whitewash, dilute them strictly following the manufacturer's instructions.
We hope that our article will be useful, because it is not known how many times in your life you will need to whitewash the ceiling. Any work is undoubtedly good, but the best of all is the one that is done by one's own hands. Good luck with the repair!
Whether you like it or not, sooner or later the need for repair arises. This event is quite troublesome and very costly. It will have to allocate free time and a tidy sum from family budget and also tighten the belt. But if you do it yourself, you can save a lot of money. Moreover, many construction and repair processes are not as complicated as they might seem at first glance. For instance, . What could be easier if you take ordinary whitewash as its finish! Therefore, let's consider such an issue as whitewashing the ceiling with chalk and lime.
A few words about materials
Why chalk and lime? If we talk about whitewashing, then they act as the main materials for this process, but there are simply no others. In addition, this technology has been known for a long time. And the materials themselves are of excellent quality:
- Both are natural and environmentally friendly. In addition, lime has disinfectant properties.
- The porosity of such a coating allows the ceiling to breathe, so it is always dry. Yes, and the moisture resistance of the ceiling is clearly increased. And if you properly dilute the chalky or mortar, 100% following the recipe, the strength and abrasion of the coating will be quite high. After all, a kind of protective film is formed on the ceiling.
- The service life of such a ceiling coating is from 2.0 to 4.0 years, and this is in rooms with an aggressive environment. For example, in the kitchen. But it is very easy to whitewash such a ceiling, because there is no need to remove the old whitewash. And therein lies the economy again. The whiteness of such a ceiling is also determined by several years.
- The cost of such a repair process will satisfy everyone. Perhaps that is why in many country cottages, and in city apartments for repairs, it is the whitewashing of the ceiling with lime or chalk that is used.
Many are not satisfied that the purity of the whitewashed ceiling has a rather limited period. But honestly, do other types of finishes serve you all your life? The answer is obvious. But this is the easiest and cheapest option. Let's not campaign for it much, because each property owner has his own priorities. Just be aware that such an ancient method of repairing the ceiling surface still exists, and in some regions it is quite relevant.
Stages and nuances of the repair process
So, you decided to limit yourself to whitewashing the ceiling. Thus, you tried to save a decent amount, but at the same time you hope to get a good result. What is the sequence of work?
Let's start with a recommendation. It is necessary to whitewash the ceiling skillfully. The whitewash solution is very liquid, so splashes and smudges are common. So that they do not stain anything, you need plastic wrap close the floor and walls. After all, whitewash is washed very badly, so you have to spend a lot of time and detergents to bring all surfaces into proper shape. Therefore, it is worth forking out a little for protective material.
Nozzle for whitewashing
It is better to take furniture out of the room. If for some reason this is not possible, it will also have to be covered with a film. Now you should inspect the ceiling for defects. Thus, we decide whether to apply whitewash over the old one or to do overhaul. In the first case, you will save much more, but this rarely happens, so get ready for major changes.
What determines their need? The presence of ceiling defects and flaws - cracks, spots of pollution and other things. From them for sure. cosmetic repairs don't get off.
Preparatory stage
First of all, you need to get rid of the old whitewash. To do this, the ceiling must be moistened with plain water using paint roller or brushes. You can also use a sprayer. Then, after a few minutes, they begin to remove the material, for which you need a spatula. But keep in mind that it is whitewash that needs to be removed, and it is better not to touch the plaster. If suddenly you scraped off a small layer of it, then the repair will be delayed for a couple of days, and the costs will increase dramatically. So be careful and don't rush.
After completing this operation, once again inspect the ceiling surface. As practice shows, this method is not one hundred percent, and in some areas, whitewashing still remains thin layer which cannot be removed with a spatula. Therefore, arm yourself with a foam rubber sponge or rubber-based washcloth and remove lime or chalk residue with this simple tool.
Attention! This process is very dirty and dusty, so be sure to wear protective gloves on your hands, goggles on your eyes, and a gauze bandage or respirator on your face.
Tools for the job
Now you need to repair ceiling defects. Cracks are expanded (expanded) and filled with putty mortar. These places must be polished after the leveling material has dried to maximum indicator smoothness. After that, the entire ceiling surface is primed. Please note that for different whitewash - chalk and lime - an appropriate primer must be used. This is very important point. If you have mixed everything up, then you don’t have to talk about quality.
FROM various stains fight differently. There are dirt that can be washed with a simple soapy solution. And there are those that will have to be eliminated in cardinal ways. For example, removing an entire section of plaster. This is a real overhaul. But if you want to get a ceiling with a high degree whiteness, you will have to go to such expense and action. Some people think that by painting over a contaminated area with white oil paint or enamel, you can get rid of the problem. Remember - whitewash does not fall on the paint.
The complexity of processing a defective ceiling lies in the fact that no matter what measures you take to get rid of defects, it may happen that after a while they will still manifest themselves. So advice. You still carry out a major overhaul of the ceiling surface, that is, you deliberately go to certain expenses. Add another inexpensive article to them - putty the entire ceiling. This will create over your head flat surface without any defects.
So, the question of how to prepare the ceiling for whitewashing can be considered closed. You yourself could see that this stage is not so difficult. In any case, you will definitely succeed in making it yourself. And the quality will be high level if you strictly follow the recommendations and take into account the nuances.
We whiten the ceiling with our own hands
whitewashed ceiling
The main tool that our ancestors used when whitewashing ceilings was a paint brush. Let's face it - working with her even in those days was inconvenient and difficult. But, unfortunately, there were simply no other tools. Today there is a roller and a sprayer. Their convenience lies in the fact that with their help you can reduce the time of work, and the quality is clearly improved.
For example, if you are whitewashing with a roller, it is best to increase its handle. This will simplify the process and not climb ladders, tables and other pieces of furniture to reach the ceiling surface.
Now you must decide exactly how many layers of whitewash you will apply to the ceiling. Why is it so important? The fact is that there is a certain technology for applying whitewash and paints, where the last layer of material is applied necessarily perpendicular to the wall with the window. This is done so that in the natural light falling from the window, small stripes of the applied material do not leave shadows. Then the ceiling will appear monolithic and evenly colored.
If the whitewash will be applied in two layers, then:
- Layer No. 1 is superimposed parallel to the wall where the window is placed.
- Layer 2 - perpendicular.
If the material is applied in three layers, then:
- Layer #1 and 3 will be perpendicular.
- Layer 2 - in parallel.
Removing old whitewash
There is nothing complicated in this technology. The main thing is to remember all this and not to confuse. If you decide to whitewash the ceiling with a spray, then you don’t need to remember anything. This is the simplest and quality way and also the fastest. More recently, 40–50 years ago, there were no sprayers on the market. But they were used in repair work. Our ancestors came up with a homemade sprayer, which was designed from an ordinary household vacuum cleaner. A jar of whitewash was connected with a hose to the outlet of the device, from which air was ejected.
At present, this has not been used for a long time, but on modern market building tools can be found great amount various sprayers and spray guns. For home use portable model required small size and weight, easy to handle. To whitewash the ceiling with this fixture, there is no need to adhere to any strict rules. The only thing you should pay attention to is the distance from the device nozzle to the ceiling surface. You can determine its optimal value experimentally. In this case, the material will lie on the surface evenly without smudges. So try first on small area ceiling or wall.
Solution preparation
- A prerequisite is that each subsequent layer of whitewash is superimposed on the previous one after it has completely dried. At the same time, the material applied to the ceiling must dry naturally, which will be a guarantee High Quality. Close windows and doors, keep out drafts and direct sun rays. These factors guarantee the appearance of bubbles on the ceiling, albeit not very large ones, from which the quality is significantly reduced.
- In no case should chalk whitewash be applied to lime whitewash or vice versa. You will get a ceiling with smudges and pronounced spots of different shades.
- If you want to change color scheme ceiling surface, then colors can be added to the white. For example, to get blue color blue is added, green - chrome green, ivory - ocher, red - minium, gray - bone black. There are many variations, so there is a choice.
- Currently, white in stores is present in two forms - ready-to-use and dry. What is better, everyone decides for himself. It is difficult to advise here, but keep in mind that ready-made ones are more expensive.
Conclusion on the topic
As you can see, you can whitewash the ceiling yourself without the qualified help of a specialist without any problems. Of course, this option for finishing the ceiling surface is not the cleanest, but the cheapest. In addition, it is possible to decorate using coloring pigments. Yes, and the savings are obvious if you do the whole process yourself.
Previously, all ceilings were whitewashed, because no other options existed. Chalk for painting ceilings is still used today, due to the very low cost of the material. Compared to even the cheapest water-based paint, whitewashing costs mere pennies.But those who decided to whitewash the ceiling should understand that they will create a real dust collector with their own hands. After all, the chalk will attract all the dirt that cannot be removed, since the chalk whitewash creates an absolute coating that is unstable to washing.
What water-based paint to choose
There are in stores big choice paints for ceilings, but you should not chase cheapness, because in this case the coating will not be durable. Yes, and under the influence of moisture, the paint will begin to peel off, which means that it is necessary to choose a suitable coating for each room.For example, a simple matte or deep matte paint is suitable for a living room and a bedroom, it will brighten up minor defects in the ceiling and visually make it smoother. For wet rooms experts recommend choosing waterproof paints with an anti-mold component
Before using water-based paint, the ceiling must be primed 1-2 times..
Big advantage water colors is their ease of application, they practically do not give smudges and splashes, unlike whitewash, it is a pleasure to paint them. Some compositions are so thick that they do not even drain from the roller. In addition, the ceiling, which is painted with a water-based composition, can be washed using various auxiliaries. This property is especially useful for rooms with increased exploitation: kitchens and hallways.
What composition to choose for the ceiling, the consumer decides on his own. Only a few note that, nevertheless, the chalky coating passes air currents well, which is especially important for rooms where small children live. Therefore, it is rational to use whitewashing in the nursery and bedroom, and in other rooms to make repairs using emulsion paint
Whitewash or water-based paint should only be applied with a velor roller to achieve a more even finish..
If the choice falls specifically on whitewashing the ceilings, it should be understood that the coating will have to be tinted every two years. But water-based compositions can serve up to 10 years without renewal.