Samples of bar counters for cafes. Both an evening cocktail and morning coffee: we make a wooden bar counter with our own hands
- Variety of bars
- Master class on creating a bar counter with your own hands
Many people dream of opening a cafe or restaurant. But the financial side of such a desire does not allow everyone to realize it. But creating a comfortable indoor bar at home for family and guests is quite a feasible task.
bar counter attached stylish design interior and is used for zoning the room.
Every owner understands the benefits of such an acquisition, because it will help not only to get an ergonomic work surface and decorate the interior, but also to designate the kitchen and dining areas. However, not everyone comes up with a completely feasible idea to build a rack at home with their own hands.
Variety of bars
Before you start the process of creating a bar counter for your home, you need to decide on its end view. After all, the type and location largely affect the purpose of the new attribute of the interior.

The bar counter "Island" is located in the center of the room.
The bar counter for placement can be of the following form:
- Island. Such a rack is placed in the center of the room, thereby marking its dominant position.
- Partition. This is the most popular type, especially for studios.
- High table. It's not in high demand design technique, implying that the bar counter will be adjacent to the wall.
There is a variety of bar counters not only by design solutions, but also by the materials used. The bar counter can be made of the following basic materials:
- wood;
- metal;
- glass;
- plastic;
- stone.
But the classification of design decisions in the house is as follows:
- Open or closed type.
- Rack top flush with top kitchen table and vice versa.
- Combined options are combinations with other attributes of the room (table, window, shelves, etc.)
After the stage of determining the type has been completed, you can proceed to recommendations on how to make a bar counter with your own hands.
Back to index
Master class on creating a bar counter with your own hands
To make a bar counter at home, you will need the following materials:

- wooden bars - 0.5x10 cm;
- board - 2x30 cm;
- ceiling molding;
- plinth;
- screws - 9 cm;
- nails - 5 cm and 7.5 cm;
- putty for wooden surfaces;
- sealant for painting;
- thin strips;
- dye;
- sandpaper;
- circular saw;
- cutting machine;
- saw blade;
- hammer;
- drill.
It is necessary to make a rack according to previously calculated dimensions in accordance with other elements of the interior in your home.
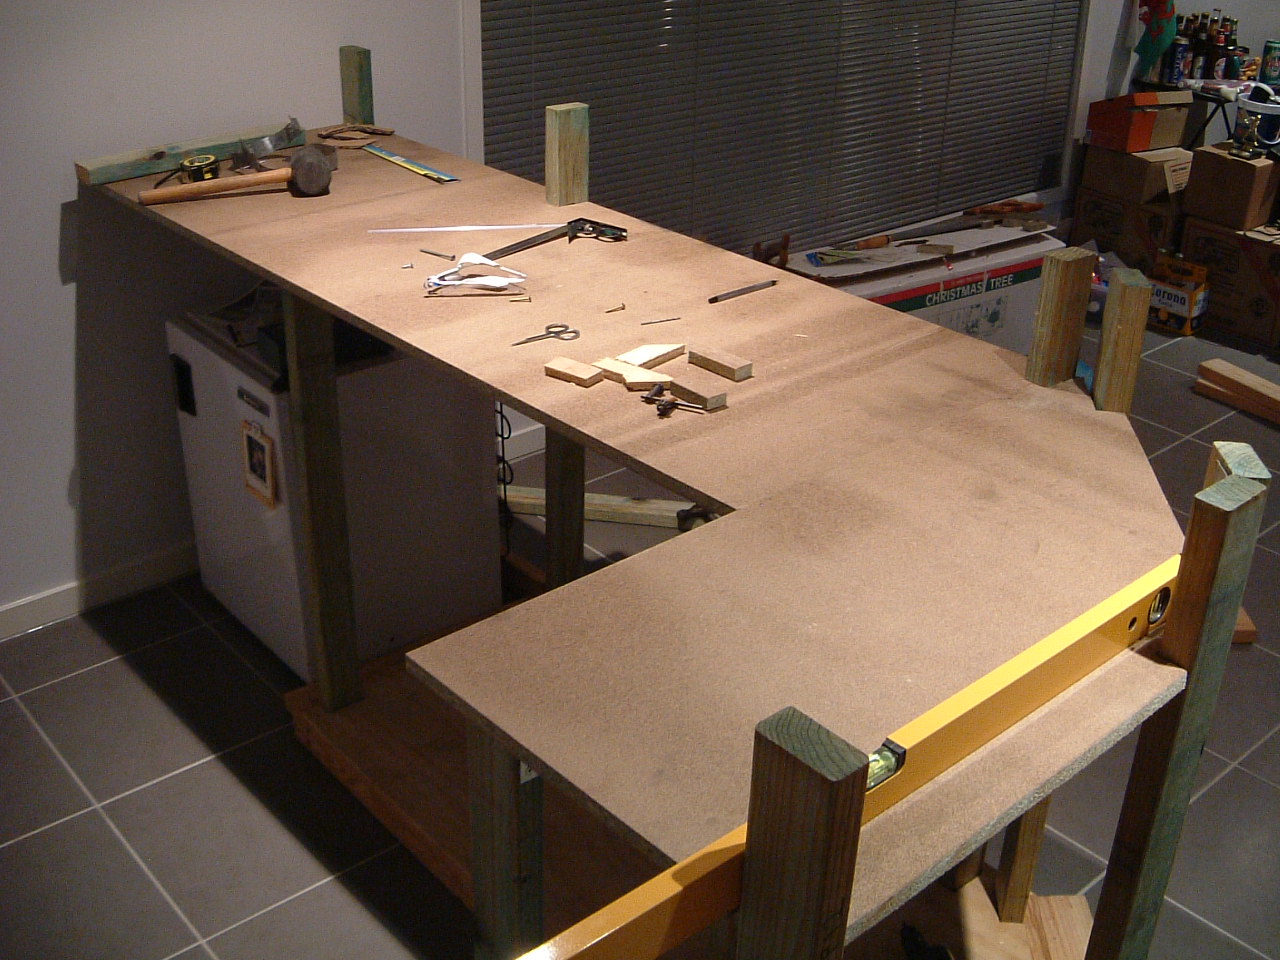
From the prepared beams, you need to make 2 beams 0.5x10 cm in size, as well as racks 95 cm high. It should be noted that one end of the frame will subsequently be attached to the wall, which is why racks from this edge may stand less often. Since the end of the bar counter will be loaded more, it is recommended to put the last 2 elements at a short distance. Using 7.5 cm nails, connect the beams and posts.

For a secure position of the frame, it is necessary to move it close to the wall, after which mark 160 cm from the wall on the lower beam, and 90 cm in height on the wall. At proper manufacture frame, the distance between the marked points will be 250 cm.
Once the frame is in place, use 9cm wood screws to attach the frame to the wall. Then, a piece of timber 5x10 cm should be laid on top of the installation, controlling the position with a level. If there are no problems with the level, the timber can be nailed.
From a fiberboard sheet (1.8 cm) you need to create bar fronts. If you want or need to lay wiring for the manufacture of facades, it is better to use drywall. After attaching the sheathing with 5 cm nails, sheathe the end of the post with 7.5 cm nails.
Any bar counter should have a countertop. To do this, you will need to put a 2.5x30 cm board on top. The length of this element is calculated by adding the width of the ceiling molding to the length of the base. finished item fasten with nails 5 cm.
The ceiling molding must be attached between the worktop and the facades, and the skirting, in turn, must be cut at the edges with a miter saw (45 ° angle). Seal the resulting cracks with sealant.
The final stage is the processing of all joints with sandpaper, sealing with putty and painting. Here is the bar counter and ready!
One of the most stylish details The interior, of course, is the bar counter. Appearing in the 1920s, over time, it only strengthened its position in the list of mandatory housing items. This element has not lost its relevance to this day and is able to decorate the kitchen, dining room and even the living room. This is the place where you can surprise a girl with a romantic cocktail, comfortably pass the time with a cup of coffee and, finally, cook the legendary Martin Lewis “for five dollars”.
Of course, a bar counter can now be purchased in almost any furniture supermarket. But having minimal building skills, it is quite possible to build it from wood with your own hands. We will talk about how to do this in this article.
Varieties
When choosing a design, several factors should be considered:
- functionality;
- the possibility of dividing the space of the apartment;
- good aesthetic appearance and convenience.
Bar counters can be angular, straight or curved. Most often, the material for their manufacture is wood or plastic, the countertop can be made of natural or artificial stone.
Possible different variants versions:
- classic - the rack is independent element, fastened with the help of special consoles, the height is 110–115 cm. High chairs with armrests, equipped with a crossbar for the legs, are well suited to this design;
- combining a rack and a dining table - the height of the structure is 90–100 cm. Most often there are two levels: high - a bar counter, low - a table. Low chairs (60–65 cm) are suitable;
- solid block located in the center of the kitchen. When designing, it is planned to erect a bar counter structure fixed on special consoles.
Types of bar counters (gallery)
 The bar counter located in the center of the room is typical for a classic English style, and for high-tech style
  In addition to its direct purpose, the bar counter can also perform the function of zoning a room.
  Due to the large width and relatively low height, the bar counter may well serve as a regular table.
What interior is suitable for
As for the interior that the bar counter fits into, then in the rooms made in the styles of art deco, loft, minimalism and others, it will feel “at home”. This design looks somewhat inappropriate except in country music, although here, if desired, it can be harmoniously entered.
The main thing is to carefully think over the design, choose the fittings well, then the bar counter will become a decoration of any room.
Necessary tools and materials
Before proceeding with the manufacture of a bar counter, it is necessary to draw up its drawing, determine the size and calculate the amount of materials needed.
Note! The material for the future bar counter should go well with overall design premises.
To build a veneer bar on a frame of wooden beams, you will need the following tools and materials:
- wooden bars or edged board;
- plywood sheets, oak veneer, fiberboard sheets;

Veneer is one of the most expensive, but at the same time the highest quality materials.
- self-tapping screws;
- decorative strip;
- wood glue;
- ceiling molding;
- decorative plinth or trimming plywood;
- brackets;
- wood putty;
- stain;
- wood varnish or epoxy resin;
- wood saw;
- screwdriver;
- plumb and level;
- hammer;
- chisel;
- sandpaper.
Instructions for making your own hands
Base mounting
First, the shape and size of the bar counter is calculated.
The fastening of the bar counter can be carried out both to kitchen set, and to the floor, if the frame is erected. Most often, the design is fixed with one edge on the wall, and with the other it rests on a rack, the role of which is played by a chrome-plated bar pipe.
For the manufacture of the base of wooden beams, two longitudinal beams are prepared, which are fastened together with racks (about 95 cm high). When the elements are fitted, they are nailed. Structure profiles related to the lower zone are exposed. The resulting frame moves towards the wall. Marks are applied to the lower beam, the distance from the wall is 160 cm. On one of the racks and on the wall, we also make marks that set the dimensions of the lower table.

The finished bar frame might look something like this
After the frame is created, it must be connected to other interior elements. The frame of the bar counter is attached to the wall, this can be done using screws with dowels. If you need to connect the structure to other items, bolts should be used, which should pass through the wall of the furniture and wooden blocks.
Spill areas must be cleaned sandpaper to give them a finished look and protect them from damage during use.
The frame is lined with veneer, chipboard or MDF sheets using 2.8 mm wood screws.
Fabrication and installation of solid wood countertops
The tabletop is the main detail and immediately catches the eye, so you need to take into account some requirements for its manufacture:
- solid wood strength;
- moisture resistance and chemical substances, to mechanical damage;
- aesthetic look.
To create the lower and upper tables with their own hands are used edged boards or chipboard sheets. Their length will depend on the width of the molding used for finishing, and on the length of the frame of the future rack itself.
We install the countertop and fix it with nails. On average, its width is 45–50 cm, taking into account the obligatory canopy. If the canopy is smaller (for example, 25-30 cm), brackets (metal or wooden) are installed below that match the style. FROM inside racks attached shelves.
If you are using raw chipboard as your countertop material, be prepared for additional costs for the purchase of finishes
The ends are pasted over with a material that will help protect the structure from destruction and deformation. For this, melamine end edges, which are attached with a hot iron, or plastic strips. In the latter case, you will need a tool to make a groove. Cutting is carried out along the end, then a plastic edging is glued into the groove. Using this method will ensure a long service life of the bar counter.
Water supply

Some bar counters are equipped with a sink
If you plan to install a built-in sink in the bar counter, you need to prepare a hole and install a mixer. Then a water supply is prepared and a drain is equipped. This requires flexible hoses or plastic pipes. The metal-layer is connected to the supply and sewerage. We check that there are no leaks. The space under the sink is sewn up with slats, if desired, you can install a door.
Lighting

The bar counter can be illuminated with both built-in and external lighting
In order for the rack to fit better into the interior, you need to choose good lighting. For this purpose, it is best to use halogen lamps, which can be placed in a special beam above the countertop.
Advice! When choosing lighting for a bar counter, we recommend paying attention to fixtures that can change the intensity of light. This will give you the opportunity to create a bar atmosphere in your kitchen.
You can also use mini-plafonds or small lamps suspended from the ceiling as lighting.
To avoid problems, it is better to install the bar counter near sockets and junction boxes.
Important! Do not forget about safety. All contacts and wires must be protected from moisture. It is better to carry out the supply of electricians on the floor, and not on the ceiling.
Finishing
The gaps between the frame, table and trim elements should be treated with a special sealant designed for working with wood. It is necessary to carefully sand the joints and prepare the structure for painting. All surfaces are stained and then varnished in several layers. Drying time is approximately 2 hours.
The bar counter is not only a stylish, but also a functional element. kitchen space, capable of becoming a real highlight in the interior. To create such a design on your own, it is not enough just to adhere to step by step instructions, it is necessary to study the types of racks and materials. We will consider all these points in more detail in our article.
The bar counter, in addition to being decorative, can perform several functions.
Structural Benefits
Bar counters - not only decorative element, but also a useful part of the kitchen space. Such structures can perform several functions at once. Let's consider them in more detail.
- Space separator. The design can serve as a zoning tool in small apartments, visually separating the eating area from the recreation area.

In the kitchen-studio, the rack can serve as a space divider
- Place for breakfast. Perfect for a quick breakfast or even for drinking alcohol. If friends or acquaintances often visit you, then it will be very convenient for your whole company to sit behind, drinking some kind of cocktail.

The compact design can serve as a replacement for the overall dining table
- decor element. The design contributes creating an easy, relaxed atmosphere (bar counter, soft light above from a lamp specially installed for this purpose, calm music will help create a romantic atmosphere in the room).

Stylish stand can decorate any interior
If you have small children at home, then in the kitchen you will also need to have a regular dining table, since it will be inconvenient for children to sit on high ones. The only exception is two-level racks including a dining table.
Bar counters for home: types and materials
Speaking of the bar counter, words such as cocktail, beer, good mood and nice company. But given element The interior has long ceased to be exclusively the prerogative of bars. Nowadays, it can be found in many home kitchens.

Bar structures differ not only in forms, but also in the materials from which they are made.
Home craftsmen, thinking about how to assemble a bar counter for the kitchen, look through various pictures on the Internet on this topic, come to the conclusion that this issue is not so complicated. The main thing in such cases is the determination of the size, as well as the location of this structure.
Given the abundance variety of options execution and placement, the question of which one should be preferred is quite expected. When answering, you need to take into account that this product should organically fit into the interior, without blocking the passage and leaving room for convenient location all households.

The design can be placed in the center of the kitchen, on the border between the dining area and the seating area, as well as in the corner by the window
Types of bar counters
When creating a bar counter with your own hands, you can implement the following types of structures:
- Stationary. It can be done with standard sizes, and in mini format (if the room is small). Max Height countertops in this case does not exceed 1.2 m from the floor. High bar stools with footrests, armrests and backrests are ideal for such furniture.

High chairs with footrests the best solution for fixed structures
- Two-level. In this case, the bar top should be adjacent to the dining table. This option is best used for zoning space in the kitchen combined with the living room. The higher part of the structure will be located in the living room, while the lower part will be in the kitchen.

Two-level models act simultaneously as working surface and table
- Combined. Fits well with decor small kitchen. In this case, the height of the working surface is approximately 90 cm. It is great to complement it with chairs with standard dimensions.

Compact combination rack - the best solution for a small kitchen
Materials for manufacturing
In this section, we will review the most suitable materials, which you can use as a basis for creating your own bar counter.
- Laminated chipboard. It is good because it is presented on the market in a wide range of colors and imitations of various expensive materials. A fairly durable coating that can serve you for more than one year.

Laminated chipboard - a practical and fairly durable material
- Plastic. The price for it is lower than for laminated counterparts, and the process of its processing will not cause any problems. It is also presented in a wide color scheme so you can easily find the perfect color. The main disadvantage of plastic is its low strength and fragility.

Plastic is one of the most budgetary, but also short-lived materials.
- Wood. If used while working natural wood, the result will surpass all expectations. That's just working with her without proper carpentry skills will not work. And the cost of solid wood can hit your pocket hard.

Texture natural wood fits perfectly into the classic interior
- Drywall. Its main advantage is the ability to create a design with any shape. It is easy to work with him even without special skills. In addition, drywall is easy to paint, which allows you to change its color and update the decor if necessary.

It is easy to work with drywall, besides, you can create structures of any shape from it.
- Brick. A bar counter in the kitchen with your own hands, made of brick, looks very advantageous in almost any interior. Decorative qualities this material is difficult to overestimate, but you will have to pay a lot for such a finish.

The brick base looks stylish, but also costs a lot.
Creating a bar counter with your own hands in 8 steps
We examined the materials and types of designs, it's time to talk about how to make a bar counter in the kitchen.

A kitchen with a bar counter with your own hands looks unique and very homely
To complete the work, we need the following materials:
- wooden bars measuring 50x100 mm .;
- edged boards 25x100 mm in size;
- plywood sheets;
- fiberboard sheets;
- nails and screws;
- decorative plinths;
- stain and varnish on wood.
When all the tools and materials are ready, it's time to go directly to the carpentry work.
| Illustration | Instructions for action |
 | Step 1. Creating a wireframe. We cut out the details of our frame from the purchased bars and fasten them together with 80 mm nails. We pay special attention to the fact that all joints are even, and the bars fit snugly against each other - this is the key to the strength of our design. |
 | Step 2 Installing the Guides. Having fixed the bars, we proceed to install the boards, which are the guides to which we will attach the rest of the elements. The boards must be the same height. They should be placed strictly vertically so that the whole structure ends up being even. To do this, when installing, we use the building level. |
| Step 3: Create the deck. We nail sheets of plywood to the base of the structure. They will compact it. At the same stage, it is worth considering the connection of communications (if they are required). |
| Step 4 Attaching the Bottom Tabletop. From fiberboard sheets we make the bottom tabletop and fasten it to the frame with self-tapping screws. We make partitions from plywood sheets inside our structure, forming several departments in it. |
 | Step 5 Install Shelves. Using the same plywood and self-tapping screws, install required amount shelves for storing small accessories. |
 | Step 6. Structural sheathing. We close the unsightly frame and the lower tabletop with even sheets of plywood. |
 | Step 7. Installing decorative skirting boards. At the joints, with the help of clapboard nails (nails with a small head), we fix decorative skirting boards. We also attach them at the corners to give our product a more beautiful and aesthetic appearance, as in the photo. |
 | Step 8. Decorating the surface. In order to decorate the result of our work and protect it from harmful influences environment we will cover our product with stain. After it is completely dry, apply several layers of varnish on top (at least two). The drying time of each layer is approximately two hours, that is, each subsequent layer is applied two hours after the previous one. |
You can learn more details about how to make a bar counter in the kitchen with your own hands from the proposed video.

As a result, you can get a very stylish design, which is difficult to distinguish from the purchased one.
Bar counter lighting
Work directly with the product itself is finished. But that's not all we have to do. If we want the product of our labor not to be dissolved in the interior of the kitchen, we need to place an appropriate emphasis on it.
How? With backlight. Assembling bar counters for the kitchen with your own hands, you can also do the lighting yourself. This is best done with halogen lamps. To do this, you need to prepare a small beam and fix it above the rack.

Long pendant lamps add originality to the rack
If this is not possible, then it is quite possible to limit yourself to lighting lamps suspended directly from the ceiling. Examples of such lamps can be seen in any billiard room. Instead of conventional switches, it is better to use dimmers.
They will help, if necessary, to dim the light, thereby creating a relaxed and romantic atmosphere.
Finally
Now you know about existing types bar counters, materials that are used for their manufacture. You also learned how to assemble a bar counter with your own hands. Put the acquired knowledge into practice and you will get an excellent decorative and functional element of the kitchen space.
It is customary to think that the bar counter is not the most useful element interior in an ordinary city kitchen. On the one hand, this is true - it requires free space, and it’s hard to imagine a full-fledged family dinner at the barque. But on the other hand, a do-it-yourself bar counter for a kitchen can be very interesting. design decision Because exclusive never goes out of style!
What are the advantages of the bar counter, which are manifested even when it is installed in an ordinary small-sized kitchen?
- This is a good alternative to a dining table. Of course, the whole family gathered for lunch with the first and second ones will look somewhat comical, but it’s quite possible to have a quick bite to eat before leaving for study / work for her and everyone together.
- Properly positioning the bar counter, you can significantly save kitchen space. To do this, it is enough to harmoniously fit it into the interior, connecting it with a kitchen set.
- In a small studio apartment, a bar counter may well replace dining table while separating working area kitchens from the rest of the space.
- Do-it-yourself bar counter in the kitchen is quite simple to manufacture, which is available to everyone home master, which has the minimum set of tools necessary for this business.
What are the bar counters for the kitchen?
The bar counter in the classic version is most often made as a separate element, fastened with one side to the wall. The other side is fixed with metal pipe, which is connected with special heels to the countertop, as well as the floor (and the ceiling, if the design provides for such an attachment). The classic is quite high, its working surface is at a height of 110-115 centimeters from the floor. It is proposed to sit at such a counter on high stools or chairs with a crossbar for the legs.

A more popular version for the kitchen is something between a classic counter and a dining table, its height coincides with the main height of the kitchen worktops (average 90 centimeters). A big plus of this approach is that there is no need to buy special ones, which are also difficult to use somewhere else.
A more complex combined version combines the advantages of the first two types, but it is intended exclusively for spacious kitchens and separates the living area from kitchen area. The tabletop of such a "barge" is made in two levels: the high one is located on the side of the living room, and the low one, respectively, on the "kitchen" side.

Another interior solution for large kitchens- "island" bar counter, which is made in the form of a separate block, located in the center of the room. Such stands are ordinary apartments are much less common.
We make a bar counter with our own hands: what do we need?
A do-it-yourself bar counter in the kitchen can be made from the most various materials. The easiest to process and therefore the most popular of them is chipboard. To work with it, you only need a drill and a jigsaw, which any fan of the "do it yourself" method has. Can be used for work surface kitchen worktop, but for its trimming it will be required special tool. Another popular material is stone, but in the absence of experience with it, it is better not to risk it.

Chipboard is sold on the market with the design "under the tree" and "under the stone" of various colors, so it can easily replace these materials. For finishing the edges of the base furniture chipboard Great suitable tape on a melamine base, which is very easy to fix. Appropriate fittings are also needed for attaching the rack to the wall, as well as a chrome-plated pipe that acts as a support. If you want to decorate the counter, it is easy to do it with the help of the same pipes of a smaller diameter, and it will be possible to attach bar accessories and ordinary dishes to them.
All this is purchased in a specialized store or in the construction market, where they will always tell you what type of fasteners will be optimal in the conditions of your apartment, and also tell you about the intricacies of its installation.

except electric jigsaw you will need a drill driver, a hacksaw, and a regular electric iron.
Making a bar counter: action plan
As in any other business, before you work with your hands, you should work with your head. It is necessary to think over everything to the smallest detail, from the shape to the smallest structural elements. There are a lot of variations in the manufacture of a bar counter, so in this article we will focus on the most popular of them: a bar counter made of furniture chipboard, which is mounted on a rack made of chrome-plated pipe.
How to cut a countertop correctly?

If you are thinking about how to assemble a bar counter for the kitchen, start by marking chipboard sheet from which the countertop will be cut. When cutting it, you must follow three basic rules, and then the cut will turn out to be even, beautiful and without chips:
- A new file should be installed on the jigsaw. If the canvas is even a little dull, it can lead while working with chipboard, because the condition of the file is critical when working with this material. As a result, you will get either an end face that is not perpendicular to the surface, or an uneven cut.
- Choose a file with fine teeth that should point upwards. If you do the opposite, the edges of the cut will be torn, which will be almost impossible to fix.
- Do you want to get a perfect cut, which will not even have small chips? Little secret: glue the place along the marked line with the most ordinary tape, and you will succeed.
Now you need to think about the processing of edges that are glued either special plastic or melamine tape. It is much more difficult to fix plastic at home, for this it is desirable to have a special building hair dryer, because heating it with an iron can easily lead to edge cracking. Melamine tape is attached much easier - it is applied to the chipboard, after which it is heated with a conventional iron. Adhesive base at this moment, it melts and securely fixes the edge, which, after cooling, is already firmly held.
Fixing the bar
The finished tabletop needs to be fixed. The easiest option for attaching to the wall is wide metal corners, fixed with dowels on one side and self-tapping screws on the other. If you are more concerned about the aesthetic side of the issue, you can purchase hidden shelf supports, for which you will have to drill holes in chipboard end. But keep in mind that such fasteners can withstand a smaller load.
The bar counter, made in the form of a console, is attached to a pole with the second end, which can either simply support it from below, or pass through to the ceiling. rack standard height in the form of a chrome-plated "leg" you can immediately buy complete with fasteners. The second option is more reliable, but you will have to perfectly fit the size of the pole by sawing it to the desired height with a hacksaw. The pole is attached to the tabletop using standard heels with threaded connection. In the case of a through pipe, you will need four of them.

It is also necessary to make a hole for the diameter of the pipe. If you're doing this with a jigsaw, be sure to use the smallest file you have and work very slowly. It is best to make such holes with manual router, sometimes you can make a “hole” with a milling cutter right on the construction market when buying a chipboard sheet.
When fixing, pay special attention to the height of the countertop - it must correspond to the height of the other work surfaces.
Variations in the manufacture of a bar counter
We have described the easiest option, but you can come up with your own. individual project: a kitchen with a bar counter with your own hands can look completely different. Someone prefers to equip the “barque” with shelves and cabinets, someone decorates it, and the base is made from the most different materials- up to drywall and brick.

But whichever original project whatever you think of, remember that the material of the countertop must meet the following requirements: it must not be afraid of scratches, high humidity, grease, do not absorb kitchen odors, and also be resistant to any influences that may be exerted on it in the kitchen.
Let there be light: lighting up the bar
Having figured out how to make a bar in the kitchen, you should think about lighting it. Such an exclusive piece of furniture, and even made on its own, needs a good selection of light. Perfect option for this - the use of halogen lamps mounted in a beam located above the tabletop.
If there is no possibility to mount such a beam, they are suitable special chandeliers or plafonds, which are hung directly from the ceiling. It is best to connect them not directly, but using dimmers - lighting intensity controls. By setting the dimmed backlight at the right time, it is easy to achieve the perfect resemblance to the bar atmosphere.

It will be correct to mount the bar counter in the immediate vicinity of the junction box and electrical outlets, but you can also use an extension cord, which will not look so aesthetically pleasing. If you do not want to spoil the interior solution with extension cords, but there are no close sockets, a separate circuit is drawn to the rack.
It is recommended to think about this before the start of the repair of the premises, planning simultaneously with its implementation and the installation of a bar counter. In this case, you can hide the wires under the surface in prepared strobes. But if you realized it too late, it is enough to purchase special boxes for wires.
Cable routed? You just have to mount junction boxes and bring out the wires for connection lighting fixtures. After checking the wiring for operability, the switches are mounted, and - voila - the lighting is ready.

- The best bar stools are height-adjustable, with backrests and footrests.
- We decided to use a stone for the countertop - order its sawing to a specialist.
- If you want to save space, consider a storage system in the form of shelves for accessories and hangers for glasses.
- We chose an "island" bar counter - make sure that the area of your kitchen is at least 15-18 squares.
- The most popular solution in the form of a console with a pole to the ceiling is at the same time the most reliable.
How to make bar counters for the kitchen with your own hands - rather, a matter of design, and not optimal performance with material and tools. Do not limit your imagination, and a bar counter made by yourself will be a real source of pride for you among friends and relatives!
Also check out the article.
The bar counter today is not only a tribute to fashion, but, in some cases, the need to save living space. With its help, the cooking area is often separated from the combined living room. Another use is as a narrow long table along the wall if there is no room for a standard dining room. But, as you might guess, the design of the bar
, erected by one's own hands, saves not only space, but also money. And by connecting your imagination, you can make a very presentable rack from improvised materials.Today we have an unusual post. Our example was built not in an apartment, as usual, but in a basement converted into a beer bar.
So, the idea was to equip a sports bar in a small basement. Centerpiece interior, of course, will be bar counter, do it yourself built from boards and plywood. We complement it with high chairs, large TVs and sports paraphernalia on the walls - and stylish interior ready.
The material was chosen according to the principle of "cheap and cheerful". On the one hand, plywood available material, on the other hand, plywood has a noble wood texture and, properly processed, looks beautiful and expensive. In addition, a bar counter made of plywood, varnished, is not afraid of moisture, which is important for both the bar and the kitchen.
The height of the bar counter was chosen as 120 cm, length 3 m, width (along the frame) 60 cm. The total width of the countertop is 75 cm (15 cm is the overhang from the front side). 
The frame was made of boards on nails. Two flat gratings were connected to each other and rigidly fixed to the wall and floor. The most difficult thing at this stage is to keep the upper edges of the frame in a horizontal plane. In our case, the floor was carefully leveled in the room, so the task was to create even rectangular frames. Otherwise, I think, we would have to carry out constructions in place. 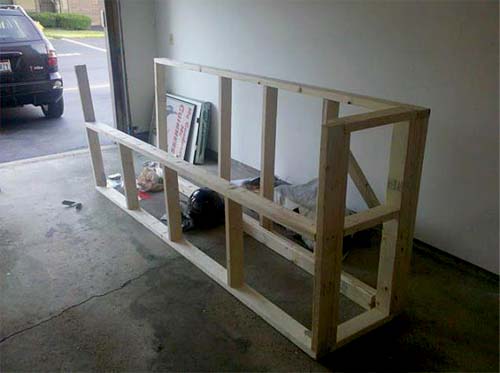

Since the renovation affected the entire interior of the room, the walls were painted in parallel. Behind the bar counter, the bottom of the wall was sewn up with plywood in order, on the one hand, to protect it from damage, on the other hand, to withstand uniform style premises. The plywood was pre-tinted. 
We already talked about how to tint plywood in an article about making bathroom furniture with your own hands rooms, but again. The best option for application at home - a warm lamp mixture of oils and waxes. For example, brandsOSMO. It is applied in several layers with a roller (usually 2-3). Before and after each painting, we skin the plywood, after the last one, we polish it.
We sew up the vertical edges of the bar counter. Actually, we sew up the front “facade” and the side face, since the space inside the bar structure will be used for storage. In addition, there will be a shelf below the drawers - a table for the bartender. 
We install a plywood shelf, build in a sink (the hole for it was cut in advance).
To give the interior respectability, we imitate expensive panels Weinsko. To do this, we fix square frames made of wooden profile rails on plywood, decorate the bottom of the panels with a high wooden plinth, top wall panels also close with a profile rail. All elements are pre-tinted. 
Let's move on to the construction of the bar countertop. It consists of two sheets of plywood. To make it convenient to use the built-in sink and shelf space, it was decided to make a countertop in the form of a squat letter "P". The edge of the tabletop will decorate the wooden board. We will make it from a plinth with a beautiful curve of the front face and a flat back plane. 
To make such a countertop, two sheets of plywood are stacked on top of each other. Please note that the top sheet is smaller than the bottom sheet so that there is room to install the bead. We glue the sheets of plywood with casein glue and leave them under load for two days. Then, for reliability, we connect the plywood sheets together with screws from the wrong side, having previously drilled required holes. We choose the length of the screws slightly less than the total thickness of the countertop. A total of 5 screws were screwed in: 4 close to the corners, one in the middle. We drank in an already glued tabletop with a single cut of an electric jigsaw. We drank the butt end with a wooden profile.
We install the countertop on the structure and fix it to the frame. Installing the board. 
The remaining white ends of the rack are carefully skinned and painted, we frame the corners with corners. Joints between wooden elements and plywood is sealed with putty on wood to match. After the putty has dried, we cover the structure with two layers of varnish. On this do-it-yourself bar counter ready.
Installing a beer tower. For those who are interested in how it works in general: we, of course, took the equipment from the factory. In the next room there is a refrigerator, where kegs with beer are installed, and a cylinder with carbon dioxide, which creates pressure in the system. Hoses run through the wall to the beer tower. Nothing complicated) 
And now the promised interior decorations: three large TV, themed posters, decorative shelves with beer mugs. 


 One more interesting idea to create a bar counter with your own hands in this video.