Flowerpot from tires with a disk. How to make original flowerpots from tires yourself? Stages of work on the manufacture of vases
You can dispose of old tires from cars in different ways. Flower vases made of tires, made in the form of a variety of shapes, are very popular.
When creating such homemade products on garden plot we should not forget about the non-environmental friendliness of the material: flowerpots and flowerpots made of tires are only suitable for growing flower and ornamental plants. It is necessary to avoid using them as mini-beds for greens, vegetables and berries due to the high content of cadmium salts in the tires, which move well into the soil and enter the plants.
How to start making a flowerpot?
Since tires can be assembled and green wall, and a multi-level flower bed, and a single flowerpot, then you should first determine why such a design is needed. If you need to close or decorate an unattractive vertical surface in the garden, you need a type of flowerpot that can be placed on it or next to it. If the recreation area is very small, but you want to have unusual flower bed, then a decorative flowerpot will do small size. In the case when it comes to recycling a certain amount of accumulated tires, any option will do, where there are enough of them to create a flowerpot.
Based on these needs, you can take care of the acquisition of material, that is, actually old tire suitable dimensions. You can find them in your own garage, in any landfill, in the forest next to settlements or from a neighbor who has a car. In addition to the tire, you will need:
- sharp durable knife or electric jigsaw, hacksaw, other cutting tool;
- brush and paints of bright colors;
- related materials: wire, self-tapping screws, plywood or plastic, etc.
Back to index
Simple flowerpots can be beautiful too

Even a tire left without noticeable changes can look like an original flowerpot. It is enough to paint it in the desired color and highlight the tread pattern in contrast or create an ornament based on it. If it is possible to remove part of the side surface of the tire, then you can get large area for planting flowers.
A vertically mounted tire is turned into a fish with the help of additional parts from scraps of other tires, paint and plastic eyeballs. Its lips are formed from the tread of another tire, attached with self-tapping screws at an angle, and the fins and tail are made from the remnants of rubber and plastic.
Decorating tires with auxiliary elements in the form of paws, eyes, muzzles of animals, you can create various flowerpots for the playground or use them as garden sculpture. Several of these tires, stacked on top of each other in the form of a column or slide, painted in bright colors, will create a vertical composition. It can divert attention from an ugly wall or fence.
The flowerpot resembling a tea or coffee pair looks original. It takes a little more effort to make it:
- Pick up 2 tires different size and have a larger cut side surface(in the form of a circle with a hole).
- Lay the cut out part in the place chosen for the flowerpot.
- Lay a tire with a smaller diameter on a rubber circle, attach it to the base with self-tapping screws. Before attaching, you need to make sure that the cover is located on the base in the center, so that you do not end up with a cup standing crookedly on the saucer.
- Place a second, larger tire on the installed tire. The side from which the side part was cut should be on top. Align the structure and connect 2 tires to each other with self-tapping screws or wire.
- The cup handle can be made from a piece of hose, plastic pipe or use tire scraps from other products.
- Paint the "cup and saucer" to your own taste and fill the flowerpot with earth.

In vertical compositions and small flowerpots, you can use any ampelous plants that will gracefully hang from them. But you can just sow such a flowerpot with grass.
To create a similar design, small stools were used, on which tires with a removed side surface were screwed. The result is a flower bed with legs or a green table or seat.
To decorate a vertical structure, you can use tires cut in half across, suspended on strong cords. You can also mount a whole tire on the wall. In such cases, pour the soil inside the rubber ring or arc so that it fills it up to the rim.
It is necessary to provide for a reliable fastening of such planters to the wall, since even an empty tire is quite heavy, and the additional load in the form of soil adds weight.
Back to index
How to make a flower bed more complex design?

Interesting flowerpots are obtained from "turned inside out" tires. Their production is based on the general principle:
- On the side surface, around the rim, mark the drawing of the future edge of the flowerpot. It can be a straight cut along the tread line, a zigzag line, rounded petals, or more complex outlines.
- Cut along the marked line with a sharp knife or saw the edge of the flower bed without damaging the inner rim - it can come in handy as a decorative element. If the tire is not removed from the metal disk, then the curly rim will serve as a beautiful base for the flowerpot.
- Now the tire must be turned inside out. This action requires the application of physical effort. Gotta try to get it out first small plot stepping on the edge of the rim or disc, after which the process will go easier. If the tire is removed from the rim by turning about 1/3 of the circumference, you can squeeze it a little to facilitate the operation.
- When the tire is completely turned out, it must be straightened, the outer side must be cleaned of dirt and painted. If there is a disk, then it will serve as a curly leg-stand for such a flowerpot.
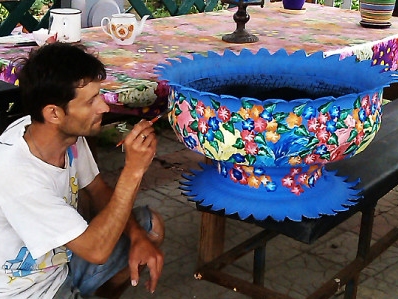
You can decorate a flowerpot from a tire with your own hands in different ways. It can be a painting in folk or ethnic style, and several smaller ones placed inside the largest tire. Edges carved in the form of large petals create an effect double flower or roses.
You can make a flower bed in the form of a swan using the same principle of turning the rubber walls of the tire inside out, but to make the neck and feathers, you must use the markings shown in the diagram.
A slightly different principle for making flowerpots in the form of baskets with handles. Compared to the previous one, this is a less labor-intensive method that is within the reach of a woman. For making baskets different type you need to divide the circumference of the side part into 3 identical sectors so that the markings are the same on both sides of the tire. The bottom 1/3 of the circle remains intact and attached to the rim. On the remaining 2/3, it is necessary to mark out to remove part of the side surface of the wheel.
Draw a line through the center of the saved lower 1/3, the center of the wheel circumference and mark at the intersection of this line with the tread line. Draw a line along the tread: here it must subsequently be cut. Remove the "excess" part of the sidewall, keeping the inner rim ring and tread pattern on the outer edge of the sidewall on both sides of the tire.
By cutting the tread along the intended line, you can get 2 rather long tapes. They can be bent outward, under the "bottom" of the flowerpot, make curved decorative elements on the sides of its body or bend them inward, forming 2 small containers for small plants.
Combining the principles of cutting the sidewalls and turning the tire inside out, you can make flowerpots in the form of bird figures. Having marked the bus into 3 sectors and designating one as “lower”, the remaining 2/3 do not need to be removed, as in the previous version. On their surface and on the surface of the tread, it is necessary to arbitrarily draw the outline of the head and tail, divided in half along the length, and try to reproduce exactly the pattern on the other side of the wheel. You can use a template made of cardboard or thick paper for this purpose.
By cutting the tire along the markings, keeping the rim intact, and turning out the remaining 1/3 intact, you can get a rubber container with a suspension from the rim rings. Attaching eyes, beak and other elements to the figure is not difficult.
If flowerpots are installed on the ground, then it is advisable to put a layer of spunbond or geotextile under them to protect the area next to it from weeds. When hanging planters from tires, you need to take care of the reliability of the suspension. A heavy structure, falling, will not only collapse itself, but can also injure those who are nearby.
They can be easily made by hand, or can be purchased at gardening stores. Both the first and second options are very good.
Flowerpots from the manufacturer are created from various materials: wood, clay, stone, plaster and even plastic. The advantage of such flowerpots in their good quality, durability, the presence of many color solutions And designer finishes. In other words, you can choose a ready-made flowerpot for a garden of any style and to your liking. The lack of such products in high price, which depends on many different factors (material, size, country of origin, etc.)
As for homemade flowerpots, they, of course, win in that they have a low cost and can sometimes decorate garden decor much better than store-bought products.
Most often, homemade flowerpots are created from concrete, gabions and car tires. Last option allows you to immediately "kill two birds with one stone": give a second life to an unnecessary tire and give landscape design plot more creative look.
There is also such an option as acquiring a ready-made ordinary lawn (for example, clay) and further decorating it with your own hands (with beads, natural stone, waterproof paints, etc.)
Now we will look at how to make a pot of tires with your own hands.
Making a flowerpot from tires
Necessary materials and tools
In order to make a pot of tires you will need the following materials:
Primer
soap solution
Small stones (pebbles or gravel)
Plaster mesh or wire
car tire
Of the tools you will need:
Electric jigsaw
sharp knife
Sander
Construction trowel
Brush for painting the finished flowerpot
Concrete Mixing Tank
Brush (preferably hard-bristled)
Main process
So, first you need to cut off one of the side parts of the tire (the second must be intact). It is recommended to cut off the sidewall not strictly along the contour, but creating a figured border, which will make the flowerpot more original. Before starting work, it is recommended to draw a line along which you will cut, and then moisten the knife blade with soapy water (this will make it easier to cut).

It should be noted that if you want to make a complex curly cutout of a flowerpot, then it is best to use electric jigsaw. As with a knife, it is recommended to lighten the cutting process with a soapy solution.
After the sidewall is cut off, the tire must be turned inside out. In this case, again, you can make the job easier by cutting through the metal cord a little with a grinder.

Please note that turning the tire around will require some effort, so it's best to start at one end and work your way up to the other.
When the tire is turned inside out, it is necessary to bring the cut edge to perfect condition. To do this, use a grinder.
Next, we move on to the leg of the flowerpot. Ideally, a rim should protrude from the tire as a leg for a flowerpot. All that is needed is to mount the two parts of the tire (the cut off sidewall and the remaining piece) onto the rim, as shown in the picture:

Finished "body" flowerpot
Now, when the "body" of the flowerpot is assembled, we proceed to the design of the product. The rim together with the "rubber" must be carefully primed and painted in suitable color. We recommend that you use light colors, as they will not fade in the sun.
In order for you to see more clearly how to make a flowerpot from a car tire with your own hands, we bring to your attention this video tutorial:
Tire flowerpots: video tutorial on creating
Creating a concrete flowerpot leg
The process of creating a flowerpot from a tire with your own hands could be completed by simply painting the product, but if you want to give flower containers even more decorative look, we recommend that you additionally decorate the rim with concrete mortar and natural pebbles.
First you need to wrap the rim plaster mesh or wire. This is necessary in order to cement mortar held well on a metal base.
After thoroughly mixing the solution, apply it to the disk with a trowel (we throw it).
In order not to stain the flowerpot, the disk must be placed separately on some surface (for example, on a metal sheet), and then proceed to pouring the cement mortar.
As soon as the solution is completely applied, we immediately proceed to the design of the legs natural stones. It is best to use small pebbles, although broken ones will look just as beautiful. colored glass.
When the solution “grabs” a little, the decor elements (pebbles) must be thoroughly rinsed with water and the stains stained with cement should be removed with a brush.
Buying flowerpots in the store is not cheap. Flowerpots made on their own from old car tires can be a great alternative.
This material is always in abundance: even if you do not have own car, worn out wheel tires can be obtained free of charge at the nearest tire shop. So you give the old protectors a second life and at the same time help the environment - do not let the landfills fill up with slightly decomposing rubber.
Necessary materials and tools
To create the basis of creative flowerpots from tires with your own hands, you will need:
- Car Tires. It is preferable to choose older tires or winter tires without studs, because their thin and elastic rubber is more easily affected. In order not to dull the tool in the future, it is recommended to clean the tread pattern from earth and small pebbles clogged into it before work.
- Chalk for drawing the outline for the future preparation of the flowerpot.
- Electric jigsaw or sharp shoe knife.
- A glass of water or soapy water, where you can dip the knife so that the blade slides better on the rubber.
- Primer, enamel or oil paints(fade less in the sun) light shades and brushes for coloring the finished flowerpot.
- Small pebbles or colored glass and glue for decorating a flowerpot.
Optionally, the flowerpot can be supplemented with a concrete leg, for the manufacture of which you will need:
- cement, sand and water;
- container for mixing mortar from cement;
- plaster mesh or wire;
- construction trowel;
- brush with hard bristles.
How to plant and care for cotoneaster brilliant, read in.
Making a flowerpot step by step
Step 1. We outline the contour and cut out the workpiece.

Draw an outline - the shape of the flowerpot that you want to make
First you need to decide what the edges of the flowerpot will be: rounded, serrated or rectangular. Depending on this, a cut line is applied to the tire with chalk.
It must be borne in mind that if the width of each petal exceeds 12 cm, the blank may not take the desired rounded shape during subsequent turning.
According to the resulting contour, we cut out the middle of the tire and set it aside (it can be useful for creating a leg). The cutting process is easier if you periodically lower the knife blade into soap solution.
Tip: If you leave a car tire in direct sunlight for a couple of hours before working on it, the rubber will become softer and easier to work with.

Cut the tire and turn it inside out
Step 2. Turn the tire inside out.
The first half of the tire turns out without much difficulty. The remaining half can be turned out easily and quickly only if you first fix the turned-out petals on a workbench or stump, on which you then need to “turn over” and, as it were, put on a tire.
Tip: The cut edge of the tire can be made perfectly smooth using a grinder.

After turning the tire inside out, fix its bottom with self-tapping screws.
Step 3. Making the bottom of the flowerpot.
Between the walls of the tire, it is necessary to fix the bottom with self-tapping screws. At the bottom it is recommended to do drain holes to remove excess water from the soil.
Step 4. Add a concrete leg.
The wheel disk can be given additional strength by installing it on a concrete leg.
To do this, wrap the tire with wire or a special mesh for plaster. On this basis, the cement will hold better. We measure three parts of sand for one part of cement, add half of the water. kneading concrete mortar so thick that it adheres well to the metal frame.

The leg of the flowerpot can be made from cement or from a tire.
In order not to stain the future flowerpot, we place the rubber blank on a specially selected surface. Now, with the help of a trowel, we cover it with a carefully mixed cement mortar.
While the cement has not hardened, you can start decorating the legs with stones or a mosaic of colored glass. As soon as the concrete begins to set, the pebbles and pieces of glass should be washed with water and carefully brushed off cement stains.
The finished leg dries within 2-3 days. At this time, it must be periodically moistened with water to protect it from cracking in the sun.
It is possible to fill a flowerpot on such a leg with earth and plant plants in it only after the concrete has completely hardened.
Tip: the leg for the flowerpot can also be made from the rim itself. To do this, it is enough to attach a previously cut core to the workpiece.
Step 5. We paint and decorate the flowerpot.

The final touch - painting and decorating the flowerpot
The resulting flowerpot does not need to be painted. However, if you leave it in black, it will attract more sun rays. Plants in such a flowerpot can quickly die due to overheating of the soil. Therefore, it is more practical and more beautiful to decorate a flowerpot.
The rubber base must be primed in several layers, after which the flowerpot can be painted in the main color and covered with ornaments and decorative elements.
Ethnic ornaments look spectacular on flowerpots made from tires made by hand. A suitable stencil can always be selected on the Internet. But it is best to show your own creativity and imagination, then in your flowerpot no one will be able to recognize the old car tire, the place of which was in a landfill.
About planting astilba in the garden, readoriginal frames for garden plants can even be created from waste material: and the yard is decorated, and for the benefit of the environment. Learn how to make flower beds out of flower tires with your own hands in the country or in the yard. Evaluate the feasibility of such work, familiarize yourself with the methods of cutting, turning and painting car tires, with the nuances of their competent choice. Compare photos finished products and choose the master class for making an unusual flower garden that is suitable for the degree of labor intensity.
The feasibility of making flower beds from tires
Used tires are a material in which any landscape designer who imagines how to make flowerbeds from tires with his own hands opens up new possibilities. It is the tire, and not just a sheet of rubber, that has certain advantages that make it easier to work with it:
- Rough cost. Surely among the neighbors there are car owners who dream of parting with old tires. For them, this is rubbish, but for the artist, it is a future work of art that can only be rolled to the site or brought in the trunk.
- Ease and speed of processing. Chalk, a sharp knife or a jigsaw, a grinder and a spray can of paint - these are all the tools needed for such creativity. A the simplest flower bed it is constructed from cylinders in half an hour at all: the tire is placed on the ground and “stuffed” with soil.
- Durability. A rubber bed does not attract bacteria and fungi, does not rot, is not afraid of accidental impact and does not collapse under the influence of precipitation. If it cracks after especially severe frosts, it is easy to replace.
- Mobility. Flowerbed from old tire- one-piece design, which, if necessary, can be easily moved to another place. To do this, you just need to remove the soil from it.
- Possibility of transformation. Even handmade flower beds of tires over time can get bored. The easiest way to avoid this is to repaint outside and plant other types of plants.
Figured flower bed from an old tire
Doubts about the advisability of decorating the garden with flower beds from tires are usually associated with the dimensions of the cylinders specified by the manufacturer. For a very humble plot they, indeed, may look foreign, and in a large area - get lost. The problem is solved by combining tires with paths, benches, lighting elements, as well as building flower beds from several tires and multi-tiered compositions.

Lazy option: potted plants placed on a stand
How to cut tires and how to do it right
When looking at a wheel that is so huge and rigid, capable of withstanding the weight of a loaded Gazelle or a powerful SUV, the question arises of how to cut car tire for a flower bed. In fact, rubber is even easier to deal with than plywood if you choose right tool for each stage of work, of which there are three:
- Ripping of rubber. Best Tool for the first cut - a shoe knife. It can be made independently from the blade of a mechanical saw or a planer blade. The handle of such a knife is wrapped in several layers. insulating tape which allows the knife to sit firmly in the palm of your hand. This is important as the rubber will resist the blade. The knife is inserted into the incision and moves upwards with the other hand, bending the rubber layer to the side with the other hand.
- Side processing. You can cut the tires for the flower bed evenly or in waves. In the first case, a shoe or other is enough sharp knife with a thin butt, in the second it is better to use an electric jigsaw, the file of which is periodically lubricated with grease or a solution laundry soap. Some masters use a grinder with a small disk, but high speed entails strong heating and even burning of rubber with smoke and bad smell.
- Cord cutting. Steel cord reinforcement (breaker), which serves as the basis of the tire carcass, is cut with a grinder, less often with metal scissors. You can recognize the presence of steel in the breaker by marking Steel. The absence of such a marking indicates a nylon cord, which is cut with a strong sharp knife.

A car tire is more complex than it looks

Electric jigsaw - the perfect tool for cutting old wheels
To cut a tire for a flower bed and not injure yourself, be sure to use tight gloves and goggles. Especially carefully should be handled with sharp metal cord threads - splinters from them are very painful. You need to work on a wide solid surface: a table or a piece of plywood laid on the ground. At in large numbers rubber dust, which distinguishes Chinese tires, a respirator will be useful.
How to choose and prepare a tire

Working tool for steel cord - angle grinder
If it is possible to choose the material for the flower bed, you can greatly simplify the work of processing rubber with your own hands. To do this, you need to use the data:
- origin of tires: imported ones cut better;
- seasonal appointment: winter more plastic;
- service life: the more worn out, the more pliable;
- cord material: metal will require more effort than polymer.

Well-preserved and brightly colored tread
The degree of wear of the tread should also be taken into account. A clear pattern of checkers will give additional expressiveness finished flower bed. But if you plan to turn the tire inside out, you need the tread as "bald" as possible.
In any case, the first operation to turn a tire into a small sculptural form is the cleansing of dirt. The tire is washed under a powerful jet of water from a hose. This will not only add aesthetics, but also protect cutting tools from rapid blunting.
Variants of flower beds from tires and master classes
The fantasy of home craftsmen knows no bounds - lovers of equipping personal plots with their own hands have come up with dozens of options for decorating flower beds from tires.
Classification by shape and method of manufacture
Flowerbeds from old tires are conventionally divided into several groups:
- horizontal single-tier - the most simple and unpretentious;
- horizontal multi-tiered - the first floor of such a flower bed consists of 5-7 tires, three more on top of them and the last one crowns the composition;
- vertical - a tower is made of tires, flowers are planted in the top and in pockets cut out on the sides;
- in the form of agricultural items: teapots, carts;
- in the form of various animals.
Another one interesting variety flowerbeds of waste rubber - hanging planters, with which you can diversify the wall of an outbuilding.

A dull brick is simply unrecognizable
How to mark rubber
To make a flowerbed of tires even, before cutting, you need to outline a line along which the knife or jigsaw will move. It is convenient to do this with chalk or a bright marker that will stand out against the graphite background of rubber.

The brighter the markup, the more convenient it is to work
The first line should be in the shape of a ring. It is carried out in two ways:
- Measure with a tape measure equal distances from the outer or inner edge of the tire, apply strokes (about every 10-15 cm) and connect them.
- Holding the chalk large or index finger, cling to the protector (or bead ring) with the little finger and lead the line.
To mark the petals, you will need an inner and outer line. Marks are applied to each, then they are connected with a wavy line of any style. At this stage, it is important to consider that petals less than 7 cm wide do not hold their shape well.

Four wheels and some paint - the result is a bright flower garden
Flower - quickly and reliably
The options presented in the photo in this section are among the easiest to manufacture, but quite effective due to competent floral decor. Make a flower bed out of tires for a beginner landscape designer the next one will help step-by-step instruction.
- Take four identical tires and rinse them thoroughly under running water.
- Set aside one for the time being, and on three, draw a line with chalk dividing each exactly in half.
- Cut the three marked tires with a cobbler's knife or a jigsaw.
- Paint all tires using a paint brush or spray can. Choose a color that matches well with the plants you plan to plant.
- Lay the tire halves in the form of petals, fill the flower garden with prepared fertile soil.
- Place the whole tire in the center of the composition and also complete with primer.

Flowers can also be cut from tires
Turtle - feel like you're in the Galapagos
To make a flower bed out of car tires with your own hands turned into genuine creativity, try making a turtle figurine:
- Prepare two tires for the flower bed. Leave one intact, and cut the protector from the other.
- Divide the protector into four equal parts, which will become the legs of the turtle.
- Make a short triangular tail from a piece of tread.
- For the head, take a flat bottle from household chemicals, for example, from "Mr. Muscle". Its neck will become the turtle's neck.
- Make cuts in the whole tire and insert paws, tail and bottle into them. Fasten with screws.
- Color the turtle, draw her face.
On a flower bed-turtle in the garden look good low bright flowers: tagetes, nasturtium, ornamental cabbage.
Frog - from princess to traveler
If the garden has a pond, plant a cute frog figurine on its shore. This idea is good in that the frog can be made without the laborious cutting of the steel cord. The main thing is not to regret the rich green paint.

Eyes from plastic bowls, paws from a hose and rubber mat
The body of the animal is laid out from three solid tires in the form of a two-tiered flower bed. For the eyes, take tires of a smaller diameter and install them vertically.
Depending on the desired degree of glamor, glue rubber glue or screw long or short eyelashes with self-tapping screws, draw “bow lips” or a simple smile with red paint. You can complement the image with an arrow, a crown or a pair of ceramic ducks.
Flowers in such a flower bed are placed behind the eyes and in lower tier. Grasses and sedges are appropriate around the figurine, hinting at marsh vegetation.
Video: One hundred DIY garden frogs
Swan - white grace on a green lawn
If you have learned how to cut flower beds from tires with your own hands to decorate the garden, you can try to make a swan. This work requires some skill, since the part of the tire in such a figure must be cut, turned inside out and reinforced in a certain way. Consider the step-by-step process of the birth of a beautiful bird from rubber scrap.

Cutting tires - the most crucial moment
- Choose a tire with the most worn out tread for the flower bed, since curly cuts will have to be made on it.
- Using the pattern in the photo, apply the lines of the head, neck, wings and tail to the protector. Pay attention to the shape of the beak - this is the most difficult area. Some craftsmen make the beak in the form of an ordinary triangle, which makes cutting easier, but the bird loses its realism.
- At the nodal marking points, drill holes with a diameter of about 10 mm.
- Cut the rubber along the markings with a shoe knife or electric jigsaw. Start work from the base of the neck of the figure, leading the cut line to the head. To prevent the rubber from vibrating, it is recommended to cut both sides in parallel, 5-10 cm from each alternately.
- Finish the edges of the parts: clean the rubber and the ends of the cords. Flowerbeds-swans from tires attract children - you should take care of their safety.
- Turn the wings inside out.
- Strengthen the neck with a steel bar. To do this, drill two rows of holes in it and further through the entire body to the base of the tail at a distance of about 15 cm from each other. Pass the wire staples through the pairs of holes.
- Attach a steel bar to the base of the tail and fix the chest and neck of the figure on it, twisting the ends of the wires with pliers. Cut off the excess and give the swan neck a regal twist.
- Color the finished figure, emphasizing the beak and eyes. It will look especially impressive if it is planted (and attached with screws) in a lake from a tire painted blue.
Instructions in the photo:

Swans on stands, as if on waves
Vase - build a small Peterhof in the garden
The aerobatics of the transformation of tires is considered to be the manufacture of flowerpots with legs from them. It is worth turning the unsightly wheel inside out and painting it - in front of you is a masterpiece of gardening art, in which it is difficult to recognize the source material.

Elegant flower pot
To create flowerbeds in the form of flowerpots, “bald” winter car tires of foreign production are taken - they are the softest. Serrated or rounded-wavy petals are marked on the sidewall, along which rubber is cut. At this stage, it is important to try to keep both sides of the cut neat, since one of them will become the edge of the vase, and the second - the edge of the stem.

Stages of turning a tire into a flowerpot
Turning the wheel is better with two people. It is placed with the cut down, for emphasis, they step on the disk with their foot, take the edge of the cut with both hands and pull it towards themselves. Gradually move in a circle, pressing down the protector in its most convex part. If there is a chamber inside the wheel, it is cut off at the end of the eversion. Due to the laboriousness of the process, it is recommended to watch a video on how to unscrew the tire for a flower bed with your own hands.
Video: How to turn out car wheel
The tire vase flower bed is almost ready, but it looks like it was taken from seabed. The rubber walls and the disc are cleaned, degreased and painted, and with inside also about a quarter of the height, since the ground level will be below the petals.
Geotextiles are placed at the bottom of the flowerpot so that the earth does not wake up in the holes of the disk. Drainage, soil are poured over the fabric and flowers are planted in a flower bed.

Gift for the Mistress of the Copper Mountain
Painting flowerbeds from car tires
Now about how the wheels for the flower bed are painted and how to turn a boring tire into an interesting flower garden. The main requirement for paint is resistance to weathering.
Paint selection and technical points
They paint tires with enamels, oil, acrylic and automotive paints, nitro paints. To beautifully paint tires for a flower bed, you need to follow a few rules:
- select light colors so that the soil inside does not overheat along with the roots of plants;
- don't put too much thick layer paint, otherwise it may crack, especially in harsh winters or in the heat;
- remember the primacy of plants and not let the pattern dominate the flowers.

Bright colors set a festive backdrop for the yard
The design of flowerbeds from tires begins with their degreasing with acetone, white spirit or special liquids for rubber. When the used product has completely evaporated, the surface is cleaned with a very fine sandpaper. Then, as a primer, a thin, but continuous layer of white is placed - this will allow any shade to play in full force.
It is better to apply the paint with an aerosol can, then it will penetrate into all the relief areas of the tread, but there is a high risk of staining the grass around. Therefore, the tire is painted with a spray can, laying thick polyethylene under it. Each layer is given time to dry for at least a day.
You can decorate a bed of tires with your own hands with a brush. This is longer, but you can work by first installing the product on permanent place. With the help of a brush, they also create more subtle patterns and drawings, emphasizing details and shapes.

Folk painting: bright, original, spectacular
Taking into account the general concept of garden decor will allow you to properly paint the tires for the flower bed, while they can:
- leave monotonous;
- decorate with stripes;
- cover with a pattern using a stencil;
- paint on the checkered tread;
- turn into an ethnic flower garden.
Do not rush to throw away unusable tires. They will be burned, adding pollution to the air. Try to turn them into a unique man-made flower garden, which will decorate the garden and warm the soul. Bright, solid and almost eternal flowerbeds of used tires are a wonderful use for the creative impulses of a person living on their own land.
Currently, it is possible to buy a country flower pot in special garden stores. However, such an element of decor for giving can be made independently.
As a rule, flowerpots for plants are clay, wooden, plastic and plaster. They are of high quality, various shapes and colors, and also have a long service life. The cost of such devices for the garden depends on the type of material, size and manufacturer. Alternative solution savings is a flowerpot that looks just as good on personal plot. Such unusual craft can be made from a car tire.

To work you need to have:
- a tire from a car;
- cement with sand and primer;
- paint and soap solution;
- mesh for plaster or wire;
- crushed stone or pebbles of small size.
You should also have the following tools in your arsenal:
- knife, hard brush;
- electric jigsaw;
- brush and trowel;
- Grinder;
- concrete mortar bucket.

Master class flowerpot from tires
First, we cut off the side of the tire, giving the contour a figure for originality, and leave the second part intact. Before starting work, draw a border, you will need to cut off the tire along it, then dip the knife into the soapy solution so that it cuts better. For a more complex shape of the edge of the flowerpot, use a jigsaw.


Now you can start making the legs of the flowerpot. For this, a disk from a wheel is suitable. We mount two parts of the tire (sidewall and the remaining piece) on the disk. The base of the flowerpot is ready.
Let's start decorating the base. To begin with, the rubber and the disk must be coated with a primer, then painted with the desired tone. It is worth noting that light-colored paint does not fade so much under the sun.

In the first case, an ordinary flowerpot from a tire is already ready for use, but for a more attractive look, we advise you to decorate the disc with a mortar of concrete and pebbles.
First, winding the disk with a wire or plaster mark is required so that the solution is securely fixed to the rubber. It is necessary to knead a solution of water, cement and sand - 0.5 / 1/3. Make a solution of a thick consistency, then it will better attach to the disc. Using a trowel, apply the solution, as if throwing it. During the priming of the disc, the flowerpot should be removed to the side so as not to stain it. Immediately after applying the cement, you can decorate the leg of the flowerpot with pebbles.
To do this, you need a pebble or broken glass different colors. After bonding the mortar, the pebbles must be washed and excess cement removed with a stiff brush.
So that the concrete leg does not crack, you need to moisten it with water for 3 days. Now fill the flowerpot with black soil and plant the seeds of beautiful plants!
Also see a photo selection of how to color flowerpots from tires
