Pattern of floor tiles in the kitchen. Non-standard options for laying tiles in the kitchen: tile creative for those who like to have more fun
To make a choice finishing materials for the kitchen is taking into account the peculiarities of the processes occurring in this room. Since the kitchen floor is often contaminated with grease, food residues, it has to be washed frequently. In addition, the surface must have high moisture resistance and wear resistance, because the hostess often has to walk in this room. All these requirements are met by one material - ceramic tiles. You can do it yourself on the floor in the kitchen, but before that you should learn some of the features and subtleties of this process.
Material selection
Today on sale you can find many varieties of tile materials. With their help, you can decorate the interior of the kitchen in any style. However, when choosing a product, you should pay attention not only to its beauty, but also to specifications, because not all types of tiles are suitable for laying on the floor in the kitchen.
Today on sale you can find the following types of tile materials:
- Tile. Distinctive feature tile is that it has a porous structure. Glaze is applied to the front surface. Tiling can only be done indoors. With the help of tiles you can lay out kitchen apron or clad the walls, but this material is not suitable for the floor.
- Ceramic tile more durable and solid in comparison with the first option. It also has a glazed coating that reliably protects it from moisture and increases the wear resistance of the coating. On the kitchen floor, you can put a special ceramic tile marked for the floor. The advantage of this material is big choice colors, textures, patterns. Also available various options styling.
- Porcelain stoneware products are considered the most durable and durable. This material is characterized by high moisture resistance and wear resistance. It is durable and practical. Its only drawback is the high price. Also, porcelain stoneware products do not differ in a wide range of colors.
Foundation preparation

If you decide to lay the tiled material on the floor in the kitchen with your own hands, then you should carefully prepare the base for laying. As a basis, you can use a wooden or concrete floor, a surface from an old finishing material, a cement screed. However, it is best to put ceramic products on a level prepared floor. To do this, the base must be leveled, therefore old finish, it is better to disassemble the uneven screed.
align concrete slab can different ways: cement screed, self-levelling compounds or dry screed. To level the wooden subfloor, you can use plywood or chipboard.
Before laying tiled products with your own hands, you need to calculate and purchase the right amount of material. We will describe in more detail how to calculate the tile, since the price of this material is rather high and it is unprofitable to buy extra products.
Calculation of the number of tiles

To calculate required amount tile material, you need to know the area of \u200b\u200bthe room. By dividing the area of the kitchen by the area of one tile, you get the number of elements. However, everything is so simple, sometimes, in order to accurately calculate the number of products, you need to take into account some points:
- Sometimes tiling is not done under the wall where the furniture and equipment will be located. This will save you some money. In this case, the area of \u200b\u200bthe room must be reduced by the floor area occupied by the furniture.
- Before calculating the tiles, you need to think about the future pattern on the floor. You may need to buy items different color or a panel set. In this case, it is better to count the number of tiled products piece by piece by performing a layout on a computer or a sheet of paper.
- Before calculating the tiles for the entire kitchen, consider how many items will be in one row, and whether they need to be cut. Round the result up.
- You can accurately calculate the tile only after you choose the layout option. There may be several.
Layout options

There are the following options for laying tile products with your own hands on the floor in the kitchen:
- Basic layout. This is the most common way, ideal for doing it yourself. With this method of the product, you need to put a seam in a seam. Rectangular and square layout options are available. It is better to make such a floor in the kitchen from plain tile products. It will not attract much attention to itself and will allow you to highlight the decor and accessories.
- "On the run". This method is very similar to brickwork, in which the seam between adjacent elements is shifted relative to the transverse seam in the previous row to the floor of the product. This option can be done using a plain rectangular tile.
- Diagonal styling . It's over hard way than previous options. It is more difficult to do it yourself, in addition, the material consumption will be rather big. It is worth laying tiles diagonally if you want to visually expand the room. In addition, this layout will visually align the walls.
- Checkerboard involves the use of elements of two different contrasting colors. Moreover, tiled products can be put "seam to seam" or "with a run-up".
- Modular option laying is done by alternating tiles of different colors and sizes in order to create a specific pattern or even a whole panel. Since the products different manufacturers hard to size up. It is better to choose special modular collections with selected colors and textures.
- Stripe styling. It's pretty simple and economical option suitable for DIY. To do this, it is enough to choose several colors of tiles. Products can be laid in the form of parallel or intersecting strips, decorative borders, geometric patterns. There can be many options, it all depends on your imagination and the dimensions of the room.
Laying tiles

Apart from different options layout tiles in the kitchen can be laid in different ways. To do this, you need to find the center of the room by drawing lines on the floor from the middle of the walls. Having found the center of the kitchen, tiles can be laid in the following ways:
- tiled products can be laid so that the center of the room coincides with the center of one of the tiles;
- elements can be aligned so that the center of the room hits the point where the corners of the four products converge;
- the central point may be in the middle of the end joint of two products.
Attention: when choosing a layout method, please note that part of the floor will be hidden under the furniture and kitchen equipment, so the center of the room and the pattern can be shifted in the direction you need.
Laying tiles on the floor in the kitchen is carried out in this order:
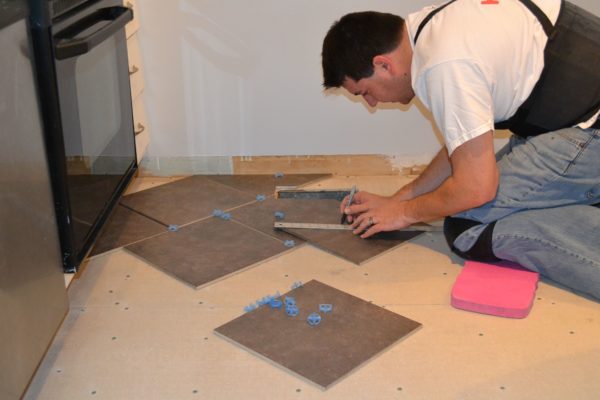
- First you need to lay the tiles on the floor in the room without gluing. This will help you choose best option laying and determine the width of the extreme elements (it must be the same).
- After that, we remove the tiles, and divide the room with a wooden slat into two parts. We attach the rail to the floor with nails. We begin laying tiles close to the rail, moving along the wall of the room farthest from the entrance.
- We apply special tile adhesive to the product using a notched trowel. Instead of tiles, glue can be applied directly to the floor, and the product can be laid and pressed down from above. We install crosses between adjacent elements in order to maintain the same gap.
- After laying, the horizontality of each element is checked using a level in different directions.
- We use a tile cutter to cut to size the extreme elements. To do this, the tile is laid on the last whole element in the row, a line is drawn on it along the edge of the bottom tile. Then an incision is made on the tile cutter with front side products, then with the help of a lever we perform a break along the notch.
Important: the last products in a row cannot be laid close to the walls, a small gap must be maintained.
The options for laying tiles in the kitchen are diverse, among them there are both simple and complex. How to choose the right one? Let's figure it out together.
Tiles and porcelain tiles are the most favorite materials for craftsmen who want to make not just a floor in the kitchen, but a small work of art. A variety of shapes, a large selection of colors and patterns, plus the ability to create patterns and entire thematic panels - all this allows ceramic tiles to firmly hold the first place in the list of popular flooring.
The layout of tiles on the floor can be done in the following ways:
- traditional (axial);
- diagonal;
- brickwork;
- parquet (herringbone);
- with a shift (not to be confused with masonry "with a shift")
- modular;
- mosaic (carpet).
About the differences and features of each of the installation methods floor covering we will tell separately. In the meantime, we note that in addition to the types described, the tiled floor in the kitchen can be single-color and multi-color.
Designers and stylists recommend not using more than 3 primary colors for surface decoration. This will create variegation and discomfort in the kitchen. Combinations of 2 contrasting colors (black-white, blue-yellow, and so on) or shades close in tone will be ideal. For example, several shades of brown, from the color of coffee with milk to chocolate.
Choosing the type of layout depending on the size of the room

- Rule 1 - do not use complex patterns in small rooms. And refrain from using large format tiles in them. In a small kitchen, large rectangles will distort the perception of furnishings, making the space seem even smaller than it really is.
- Rule 2 - laying out tiles on the floor can make the room visually longer or wider. To do this, use rectangles, not squares. And the installation of the coating is done so that the long side of the tile is perpendicular to the longest of the walls of the kitchen. If you need to "stretch" the room, then the long sides should be parallel. A diagonal stacking in the form of a "chessboard" will help to visually expand the kitchen.
- Rule 3 - the floor pattern and its color should complement the overall kitchen design. Excessive variegation will spoil the impression and will be annoying.
If the kitchen is connected to the dining room and the corridor and does not have common walls with them, you can use different types masonry, in addition, tiles of different colors and shapes. This will create a conditional distinction and add variety to the design.
You can achieve a dynamic pattern by using tiles to cover different size. They can make up a common pattern (stacking with a shift) or they can make up some kind of "organized chaos" (modular system).
With seam or without seam
For many years, the floor in the kitchen was tiled using the same technology as on the walls. That is, with seams filled with grout. However, if such a technique was reasonable on the walls, then for the floor, where water flows from time to time and products fall, the issue of tile joints turned out to be very painful.
The fact is that the kitchen floor is a “risk zone” for the hostess. Dust, drops of moisture, oil and fat settle here, in addition, vegetable peelings fall.
Therefore, through time, clean and beautiful seams became dirty. Cleaning them is more difficult than washing a tiled floor. And the owners of an apartment or house had to mess around with removing the contaminated layer of grout and restoring its original appearance.
With this in mind, manufacturers offer special types of coverage. During installation, there are no seams between them, so the need to fill them (which, by the way, requires time and money) has disappeared.
Ceramics of this type can be used for all types of masonry. And now let's go directly to the consideration of each type of installation. ceramic tiles on the floor in the kitchen.
classical traditions
Sticking tiles in the traditional (classic) way is the easiest and most reliable option for creating a floor covering. The tiles should be laid in even rows parallel to one of the walls, without shifting the rectangles relative to each other.
For this finishing method, both square and rectangular ceramic plates can be used. In addition to a single-color pattern, use " chessboard” or ceramics with a ready-made pattern of a large format, which is made up of small elements.
The advantages of this type of installation include simplicity and ease of gluing elements, speed of work and a small amount of waste.
And so that the percentage of surpluses is even smaller, experienced craftsmen It is advised to calculate the number of tiles before starting work. To do this, you can determine the area of \u200b\u200bthe kitchen and the area of \u200b\u200bthe tile. Then divide them into each other, and the result is rounded up to a larger integer. This will be the right amount of tiles on the floor in the kitchen.
Professional builders advise starting such masonry not from the corner, but from the middle of the wall. Thanks to this approach, the pattern will be uniform, without whole tiles on one side and edged tiles on the other. And even if you have to cut the tile, then half will lie on each side. And this will significantly reduce consumption and eliminate a large amount of waste.
In addition, before starting work, you need to make sure that the wall along which the first tile row will lie is flat. If it has flaws, it is better to start installation immediately from the second row, aligning it with the cord. And next to the wall, glue the tiles in the second place, cutting the edges and aligning them according to the existing standard.
Diagonal floor tiles
Many people perceive this type of flooring installation as difficult and inconvenient. Indeed, the layout of tiles on the floor diagonally requires familiarity with the basics of geometry, the ability to cut ceramics and developed spatial thinking.

In addition to the laboriousness, this method is also characterized by rather large quantity waste. In addition, tiles have to be cut diagonally, and not every home master can cope with this task.
There are 2 types of masonry. In the first case, the first row is assembled according to the traditional pattern, parallel to the walls. From it begin to create a diagonal tiled pattern. In the second case, the creation of a drawing begins immediately from the wall.
For coverage, both squares and rectangles are taken. They are placed at an angle of 45 degrees relative to the plane of the wall. Note that in the process, the elements can be stacked as in classic version, and by type brickwork with an offset.
Room designers note that the angular pattern visually expands the space. AT small apartments tile layout diagonally kitchen corridor entrance hall will visually increase the size of the premises.
The number of materials for work in this case is best considered by the piece. To do this, measure the width of the room and the length of the tiles diagonally. The results are divided by each other, and the resulting number is rounded up to a larger integer. Then the number of rows in the length of the kitchen is also calculated, with one row consisting of whole tiles, and the next row will include one divided into halves.
There is a way to mount the cover diagonally with a "lock". That's what they call small square, which is inserted between large plates, in which the corners are cut off during manufacture. This kitchen floor looks stylish and elegant.
Offset brickwork
To add variety to the interior, some owners use a scheme that repeats the brickwork of the walls. It got its name because the elements of each next row are shifted relative to the previous one.
The offset value can be different, by half a tile, by a third or even by a quarter. The latter is called "deck" because of the similarity with the coating of ship decks. The choice depends on the taste of the owners of the apartment.
Note that this type of installation is suitable for rectangular tiles. With it, you can create a beautiful "parquet" tile pattern. It is especially good if the ceramic surface imitates natural wood.
Stylists do not recommend using tiles in 2 contrasting colors in this way.
Note that installation with an offset can be done both with a parallel installation method and in a diagonal one.
In order for the floor surface in the kitchen with this type of coating to be even, the master must strictly maintain the same distance between the masonry elements.
Tiles like parquet
The parquet type of installation (it is also called the "herringbone") is suitable for an elongated room. It also looks good in kitchens with ledges, niches or non-standard projection on the plane. For work, only rectangular tiles with an aspect ratio of 1: 2 are used so that the pattern is uniform and proportional. They are placed alternately to the left, then to the right.

Tiles are located at an angle of 45 degrees to the plane of the wall, so the assembly process is quite laborious and requires professional skills from the master. At the beginning of the row parallel to the wall, the overall pattern will turn out to be quite original. But there will be much less waste.
As a material, ceramics with a single-color pattern are taken. Or with a surface that imitates natural wood.
Variety parquet laying is a "braid" with insert elements (or "herringbone with attachment"). To create it, rectangular and square elements are used. The square is inserted into the center, and rectangles are placed around it, creating a pattern similar to weaving birch bark baskets. The pattern is repeated, resulting in a very original composition.
Model masonry on the kitchen floor
Such a layout of tiles on the floor in the kitchen owes its name to the repeating sets of small elements that make up the overall floor pattern.
Several tiles make up a pattern, a module. Then it plays next to the first one, filling the entire space of the kitchen.
This type of masonry will add variety and make the design of the room dynamic. However home master you should not be led by those who consider this method of installation simple and easy. To create it, you will have to buy several varieties of ceramic tiles. And then for hours to sit over a sheet of paper, composing a composition.
Therefore, it is better to buy kits to which manufacturers attach drawing mounting diagrams. Or ready-made blocks with imitation of modular masonry. They will easily fit, creating a beautiful pattern.
If the master is eager to try his hand at new technology, experts advise taking two types of square tiles - a large one and two smaller ones, the total height of which is equal to the height of a large one. From them you can add simple modules that look good in a small kitchen.
Carpets, mosaics and other artistic representations
Concluding our review, let us dwell on the so-called carpet masonry. It is sometimes called mosaic, by analogy with old drawings. But today manufacturers offer turnkey solutions, which will save the master from the need to select tiles by color, make a drawing.

In order to get a pattern such as "carpet", "kaleidoscope", it is enough to purchase a ready-made set in a specialized store. If the owner of the house decides to make a pattern on his own, he should first draw a draft drawing and calculate the number of tiles of one color or another needed to work in the kitchen.
The carpet patterns use borders, which are not only a decorative element. They create the logical completeness of the object. Therefore, when calculating, you need to take into account their number.
Knowing various techniques masonry, understanding all their features, the master will create his own unique kitchen floor.
The design of the kitchen has specific features due to the characteristics environment. Here, air humidity can increase, temperature drops can be observed. It is influenced by the presence of a variety of products, liquids, sometimes quite aggressive.
For this reason created design obeys not only aesthetic ideas about the image kitchen interior but also practicality.
As follows from numerous photos, ceramic tiles have been one of the finishing materials that adequately resist negative influencing factors for many years.
Tile selection criteria
The key criterion for the competent selection of durable tiles for the kitchen is heat resistance. It is especially important to take this indicator into account if an apron design is created that directly borders the hob.
By structure ceramic cladding should not be excessively porous, as it quickly begins to deform due to the ingress of drops of fat, hot steam. If flooring is to be done, the texture is preferably rough to ensure safe stability.
There are a number of other criteria that are taken into account when making a decision:
- resistance to shock and mechanical loads;
- anti-corrosion reliability, allowing you to keep the splendor of the decor in sufficient difficult conditions with changes in temperature and humidity, exposure to grease, detergents.

Kitchen tile design features
A well-chosen design allows you to highlight several role-playing functions of tiles performed in the kitchen.
- Zoning space using different techniques: color combinations, laying pattern, texture.
Analyzing the photo, you can see that most often the tiles are placed in the sector where the work surfaces are concentrated. She may be square shape different sizes, but a special mood is created by a rectangular configuration elongated in length, with the help of which a dynamic composition on the wall is visually formed, imitating the parquet pattern. An amazing three-dimensional effect is created by the diagonal orientation of a square monochromatic tile with wavy edges.
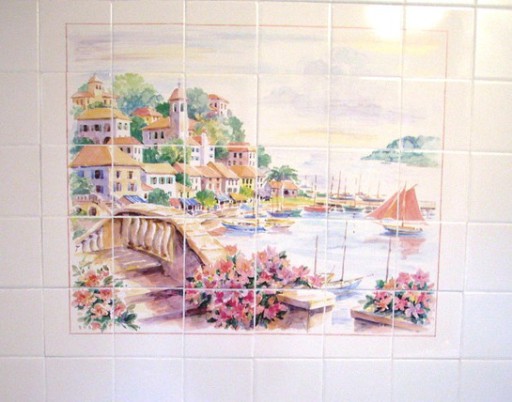
Intricately complex patterns created by the designer's imagination through the use of mosaic tiles effortlessly turn the kitchen into the center of the entire home. It can be laid out not only on an apron or walls, but even, as you can see in the photo, on the ceiling. To facilitate the work of home craftsmen, you can diversify the design with ready-made art panels made according to the canons of mosaic technology.
- Decorative design of individual elements of the kitchen surroundings.
To create a holistic image, tiles selected from durable varieties can flow from an apron to work surface. Traditionally, the floor in the kitchen is tiled - completely or only the part that belongs to the cooking area.
Color and ornamental variations of kitchen tiles
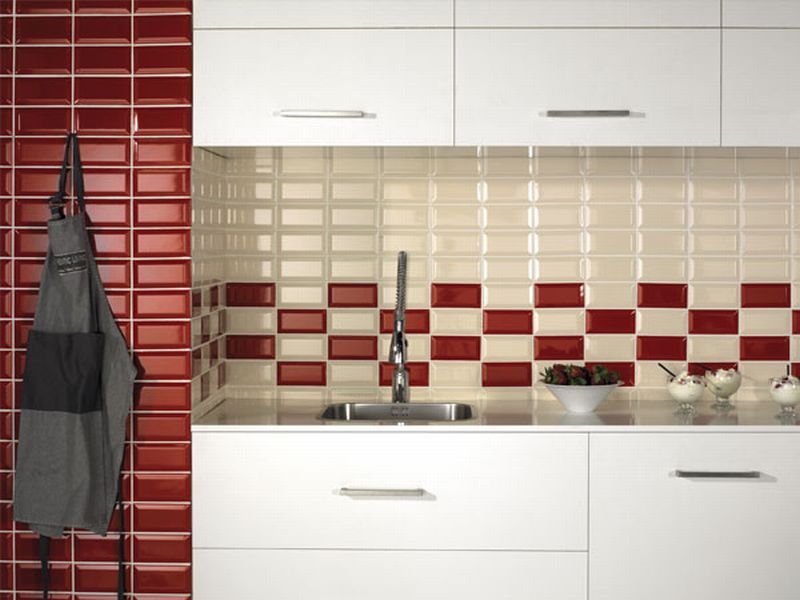
Even a restrained space acquires amazing elegance, liveliness, fresh breath, reflected in the photo, if you manage to find special, successful color solutions. If we are talking about an apron, then here, according to experts, the tile should not have a rich bright color if the kitchen is small. A checkerboard arrangement of tiles in two contrasting shades gives a special flavor, which looks no less impressive on the floor. A classic is the alternation of achromatic tones - black and white, which always attract attention, remaining winning and spectacular.
Various photographs show that big role plays color design finishing, if it is decided to use the usual method of laying out rectangular tiles in the form brick wall. In order not to create the feeling of a dull, inexpressive space, the color scheme is selected from an arsenal of mysterious, enchanting shades with a glossy sheen.
Remains appropriate in interiors with classic and retro elements, the texture of tiles with imitation of stone - aristocratic marble, balanced granite, unique malachite, as well as wood. Similar finish good on different planes - countertop, island facade, apron, floor and even window sill. Special attention and the presence of artistic taste is required if it attracts attention unusually Beautiful design kitchen tiles with patterns. As the photo shows, such products allow you to create an expressive decor in a separate part of the wall, floor. Often laid out decorative border along the perimeter or the alternation of plain and patterned tiles is practiced.
Inspired by the folk motifs characteristic of patchwork, you can recreate this bright folklore beauty on one wall of the kitchen, but you should not immediately try to embody the idea in kind. First, a schematic image in color is developed in order to understand all the subtleties of color combinations. The easiest and safest option is white apron, which looks organic in any color environment. The design is good with a noble beige color scheme, bringing it closer to nature and smoothing out the brightest accents, capable of creating a balanced interior. A refined floral ornament always remains in demand, which is successfully demonstrated by the presented photo, as well as images of flowers, both delicate meadow and bright exotic ones.
Images of fruits, teapots, samovars and other items close to the kitchen theme find their connoisseurs.
It will allow you not to make a mistake in the selection of tiles, the recommendation of experts to withstand its color scheme in accordance with the facade or countertop of the headset. You can choose contrasting combinations if there is a desire to bring a dynamic decor to the kitchen, but in similar situation you need to get acquainted with the basic concepts of color science. We must not forget that the colors present on the tiles should appear in some elements - on the upholstery of a chair, curtains, wall decorations so that a holistic image of the room is created, and the tiles do not look alien and do not create dissonance.
An ethnic pattern spread out on the floor will be appropriate in spacious kitchen. But in such a situation, as numerous photos testify, the remaining surfaces are solved in a monophonic and restrained form. An interesting effect is created by contrasting tones in relation to each other of the apron and the floor.
Methods for updating kitchen design
High-quality tiles on the wall remain in perfect condition for a long time, but over time it may be necessary to introduce a different color sound into the interior, for example, when deciding to change the curtains. It will take money and time to do repairs to dismantle the tiles and create a new coating. Meanwhile, you can update the design of any vertical tiled area, including an apron, using simple tricks.
Moisture-resistant stickers are purchased, which are offered in a wide variety of shades and can be thematic, abstract, achromatic. There are varieties of stickers that represent a small element - a flower, a figurine, a stylized image of cutlery, fruits, favorite vegetables. Individual tiles are made out with such details or they are attached with a certain algorithm.
To give your kitchen an updated design, you can purchase a set with a pattern printed on the entire surface of a square or rectangular sticker. Correlating the existing tiles and decor in size, it becomes possible to create bright accent, focusing on principal features patchwork, quickly and without large financial costs.
Ceramic tiles can't be boring. Well, if only she's gray and you lay her down traditional way, breaking the gloomy space of the walls into smaller, but no less dull squares with flat edge. Meanwhile, there are a great many options for laying tiles: “herringbone”, “ladder”, “diagonally”, modular and combined laying, relief laying, etc.
In stores you can find tiles with amazing patterns.
Classic style of styling
Probably, this way of decorating the walls in the kitchen appeared along with the advent of this wonderful material - ceramic tiles. So fitting tiles with even, clear seams that cut the wall into perfect squares or rectangles is one of the classic varieties of tiling.
White tiles, laid in the traditional way, looks attractive, but too simple by today's standards
When is the best time to do this
1) When a tile with a complex pattern. In this case, the inter-tile seams do not attract attention at all, all of it is devoted to examining the relief or image.

Patterned tiles, combined with the rest of the interior, can become a real decoration of the kitchen.
2) When the designer has several matching types of tiles.
Accommodation decorative tiles according to the given drawing scheme

Tiles laid according to the scheme give the impression of a complete ornament
Placement of decorative tiles without any pattern

Laid without a pattern, tiles with random inserts are suitable for a frivolous and fun environment.
3) When available decorative panel from tiles, attracting the eye of the visitor to the kitchen in the first place.

Panel of tiles decorating the wall near cooker, designers are increasingly using in the design of kitchens
Rectangular tiles can be laid the classic way, but with a vertical or horizontal tile orientation relative to the floor/countertop line.
Cladding rules in the classical way:
- laying tiles start from the second row from the bottom. The bottom row is laid last, as the floor line may be uneven.
- laying does not come from the corners, but from the center of the wall space. If the tile has to be cut at the end, the path will look symmetrical, and it will be cut on both sides.
Laying tiles diagonally
Most best options laying tiles in the kitchen - just the same diagonally. Ceramic tiles laid at an angle of 45 degrees look much more attractive and arouse genuine interest. The method is considered difficult.

A border of tiles laid diagonally emphasizes decorative possibilities tiles
When is it better to choose diagonal styling
1) With plain tiles
2) When combining pattern
3) If there are two matching types of tiles. Laying in a checkerboard pattern will look even more elegant and elegiac. For classic kitchens and for experimental interiors - just right.

Laying tiles in a diagonal checkerboard pattern is still considered good option that fits into most interiors
4) When the tile is rhombic, it is difficult to revet the wall in a different way.

Rhombic tiles thanks to small size and unusual shape has high decorative characteristics
Looks brilliant when laid diagonally rectangular tiles.
In addition, it is possible to lay tiles diagonally with an offset, or in a classic way, with strictly parallel seams.
The diagonal laying method has one inevitable drawback: at the end of the row, the tiles always have to be cut.

Diagonal laying of tiles on the floor in the kitchen will expand the space, hide the unevenness of the floor surface.
Usually the first row of tiles is laid straight, and then they begin to lay out the second row of triangles, which is a tile cut exactly in two diagonally.
Bricklaying
The walls in the kitchen, as well as the floor and work surfaces, can be faced "in a run", when the middle of the tiles of one row is exactly above tile joint another row. An ordinary rectangular tile is perfectly suitable for the method.

Laying "in a run" is also suitable for the "modern" style
If you plan to decorate the interiors of the kitchen in one of the historical styles, then laying "in a run" will emphasize authenticity.

The use of decorative inserts enhances the appeal of this antique style kitchen.
Laying "in a run" in an inclined row can lead to a slight visual "skew" of the space in the direction of the laying. But if in the kitchen there is furniture with oblique lines and triangular decorative elements, as well as a lot of metal, then the diagonal run method is suitable.

Metal-look tiles for kitchen decoration can be a good option
It is vital to level the surface of the wall before laying “in a run”, because if the seams are uneven, they can turn out to be of different sizes, and the “run” will be with an ugly shift.
Herringbone style option
The Christmas tree can be seen not only in the forest, but also on the floor, if you use your imagination. The method of laying ceramic tiles at an angle to each other is also called herringbone. Looks good on kitchen floor but also suitable for walls. Only a rectangular and elongated tile is suitable for a Christmas tree; it is impossible to make such a pattern from squares.

Herringbone tiles create a unique and unusual visual effect based on the play of light.
There are two varieties:
1) The usual "herringbone".
2) "Herringbone" with attachment. In this case, a square tile is also suitable, but either you will have to cut off pieces “for attachment” from it, or use other tiles of a different shade.

Christmas tree with attachment for square tiles- one of the most popular ways to design the floor today
The herringbone is best used when:
1) Walls irregular shape, with irregularities.
2) The tile goes "under a tree" or "under glass". "Under the stone" in this order is not recommended to be laid by designers.
Modular tiling
To make it clearer, look at the diagrams of a simple modular tiling.
![]()
Variants of modular grids will help you choose the best option
Usually a designer helps to choose a tile pattern, but you can also dream up. At the same time, one should not forget about extremely accurate calculations (with the dimensions of tiles, seams) and designing the design of the wall surface that will have to be faced.
Modular styling decorates small spaces. In stores, you can pick up modular tiles with suitable patterns. Usually these are paintings, the buyer is given a scheme for laying the module to the tile.
Modular tiles with an elegant pattern will fit well into many interiors
A modular effect can be achieved by using large tiles that show smaller tiles. Laying is done in the traditional way.

Modular effect at correct selection colors has high decorative characteristics
A combination of several methods
The use of several ways of laying tiles on one surface will make the impression of the kitchen interior more vivid. For example, upper part the walls can be laid out “in a run”, and a “module” can be used above the slab, diagonal rows and a “herringbone” can be combined, etc.

Combined laying of tiles allows not only the use of exquisite patterns on the borders, but also other decorative possibilities of ceramics.
Embossed styling
A different way from others is embossed styling. In this case, one tile rises above the surface level of the other. Suitable for stone-like, brick-like tiles, which are often used in urban kitchen design styles.

The tile laid in relief looks very impressive
Relief laying can also be called gluing a mosaic over a tile. The example uses a glass oblong tile.

glass tiles over ceramic is able to decorate even the most ordinary tile
Here are the basic ways of laying tiles, which, with some skill, you can master on your own. You can also use non-trivial ones. Let's say laying tiles, cutting them out in a pattern. Or invent something unique.