Options for laying tiles in the kitchen. Everything you need to know about laying kitchen tiles
Ceramic tiles are deservedly considered one of the the best materials for decorating the kitchen. Such "clothes" are beautiful, durable, resistant to moisture and high temperatures. Manufacturers today offer many tempting options for decorating the kitchen space, however, the cost of laying often exceeds the cost of the material, so the question of how to lay tiles in the kitchen does not lose relevance.
The problem that anyone who decides to tile the kitchen will inevitably face is which tile to choose for the kitchen? The presented assortment is diverse: customers are offered matte and glossy, smooth and embossed tiles of various shades. What should you pay attention to when choosing first of all?
Kitchen tiles must be heat and moisture resistant, not be afraid of aggression chemical solutions and mechanical impact. Pay attention to the size and weight - the lighter the tile, the easier it will be to glue it on the wall, a large tile fits twice as fast as a small one.
It is important!
According to standards, when saturated with moisture, the increase in the weight of a tile should not exceed 1%.
As for the dimensions, for small kitchens in small apartments best option- 10x10. However, do not forget that small tiles are more difficult to lay and level. Large spaces can be finished with larger specimens - 20x20 or even 30x30 cm.
Think in advance about the color of the tile and texture, consider overall design premises. You can calculate the amount of material as follows: determine the area of \u200b\u200bthe wall and add 10% to the resulting number (for pruning and a possible battle).
Video instruction
Getting Started
To please the result for a long time it is necessary to prepare tools in advance and strictly adhere to the sequence of work.
Tools
- grinder or tile cutter;
- a hammer;
- crosses;
- glue;
- ruler, level;
- metallic profile for drywall;
- bucket with water;
- spatulas (small rubber and wide notched);
- dowel-nails;
- pencil.

Surface preparation
Beautiful and reliable styling begins, first of all, with preparation. working surface. Walls must be cleaned and primed deep penetration and then sand-cement mortar.
It is important!
Clay, lime and gypsum mixes not suitable for surface treatment.
You can prepare the walls in 2 ways: we level with plaster or drywall sheets. Consider the sequence of actions of the first and second methods.
Plaster leveling
- clean the walls from dust, remove the old coating;
- roughen the surface wooden wall stuff shingles, on concrete - apply notches with a chisel);
- treat the working area with a deep penetration primer or betokontakt, which will help to avoid peeling of the plaster;
- install beacons, outside corners attach corner profiles;
- cook sand-cement mortar and 20 minutes after kneading, apply it to the walls with throwing or spreading movements;
- prime the surface.

Leveling with drywall
- with differences of more than 5 cm, standard sheets of drywall should be purchased for gluing onto mounting glue;
- make sure there are no crumbling areas;
- apply primer;
- cut drywall for sockets and ventilation;
- take care of concealed installation wiring (sockets and boxes for switches should protrude 20 mm above the base);
- apply gypsum or mounting glue to the cut sheets and glue the drywall to the wall;
- until the glue has hardened, level the sheets with a level and a rubber mallet;
- prime the walls, putty the seams.

Important Points
Please note that tiles wall cabinets and kitchen tables do not put, because in this case, material overrun cannot be avoided. If you decide not to deviate from tradition and want to tile an apron, then draw a horizontal line in the place where the countertop will end. Attach along this line a metal profile for drywall sheets with a margin of 3 cm, on which the bottom row of tiles will be based.

Plastic crosses are used to adjust the position of the tiles and the thickness of the joints. Thus, if you need seams 3 mm thick, then you should choose the appropriate crosses.
The dimensions of the spatulas also depend on the dimensions of the selected material. For laying large tiles, you will need a spatula with a tooth width of at least 10 mm, for small tiles - 6 mm.
Sequencing
The process of laying tiles is simple, even for a beginner who has encountered this task for the first time, it is possible to lay tiles with high quality. However, it does not hurt to get acquainted with some of the nuances.
We knead the glue

Glue after kneading is not used immediately - it must gain plasticity. This usually takes 15 minutes. The adhesive composition is applied with a conventional spatula, and the excess is removed with a notched one. To prevent glue from accumulating on the spatula, dip it into a bucket of water from time to time. If possible, try to keep the tool perpendicular, without tilting.
We glue the tiles
We fix the tile to the surface - if preparatory work carried out correctly, then the tile lays down as it should. Glue the second tile next to the first one and insert crosses between them from below. Do not forget to check the plane with the rule - there should be no intervals. By the way, after an hour after the completion of the work, the crosses should be removed - otherwise it will be problematic to do this later.

Some prefer to first apply the adhesive to the wall or floor, and then glue the tiles. Undoubtedly, this way the work will go twice as fast, but it will not be easy to achieve perfect masonry.
Check the verticality of the rows with a building level. If there is an obstacle, for example, a socket, draw the contours with a pencil and attach the tile to the socket from above and from the side - so you will accurately determine which of the contours should be cut. Please note that the cut line should be on the wrong side.
It is important!
Do not glue the tiles immediately after trimming - check if you did everything right.
It is easy to increase the adhesion of the material and the surface - just tap on the tile with a rubber mallet or mallet. It is most convenient to cut tiles with a tile cutter; curly cutouts can be obtained using a grinder.
For a neat finish window slopes or corners, plastic corners are used, which should be 2 mm thicker than the tiles.
Grouting
Grouting powder, chosen to match the color of the tile, is diluted with water and applied rubber spatula between tiles. To simplify the work, you can use an extrusion gun or empty pipe from under the sealant.

Excess grout is removed with a damp sponge. Act carefully so as not to remove the fruits of painstaking work cleanly. After a few hours, wipe the tile with a cloth and admire the result.
The work is completed, the tiles are laid and pleases with even masonry. As you can see, laying tiles in the kitchen with your own hands, if you wish, is quite simple. The main thing is to keep simple rules that will help transform kitchen space and bring beauty to your home.
The most common way to finish the kitchen is ceramic cladding. If, in order to save money or wanting to try yourself as a finisher, you decide to tile the walls of the kitchen with your own hands, you need to know that laying tiles in the kitchen has its own technology and rules.
Let's break the whole laying process into separate stages:
- Making a sketch of the location of tiles on the walls.
- Choice of ceramics.
- Calculation of the need for tiles.
- Removal of old coating from the walls and preparation of the surface for laying.
- Laying tiles.
- Seam grouting.
Consider each of the steps separately in order to lay out the tiles in the kitchen correctly.
Kitchen wall design sketch
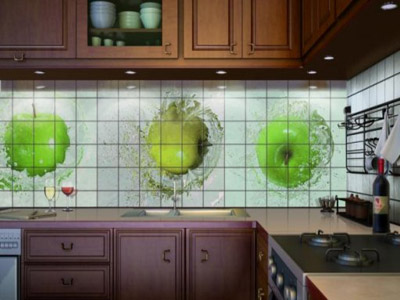
When repairing a kitchen with your own hands, you need to take into account that ceramic tiles are not only a protective lining of walls from moisture and grease, but also an aesthetic element. Wall tiles should be an organic addition to general interior kitchens.
Whether to lay tiles on the walls behind the furniture, everyone decides for himself. Refusal of laying will save money, but it will tie the existing furniture and its location to this particular finishing option. When rearranging furniture or replacing it, the aesthetics of the room will be violated. Finishing the walls with a uniform, but original pattern or ornament will allow you to manipulate furniture painlessly for the aesthetics of the room.
To lay tiles in the kitchen, you can use the simplest methods of uniform laying:
- Traditional - provides for the arrangement of rows of ceramics parallel to the floor.
- Diagonal - a kind of traditional styling, important correct markup diagonals along which laying is carried out.
- Offset (off-center) - reminiscent of brickwork, does not create a feeling of monotony of design and hides surface defects.
With a large area of \u200b\u200bthe kitchen, tiles on the walls can be laid using combinations of these laying options, especially when dividing the room into zones.
Tile selection
Tiles on the walls of the kitchen must be moisture resistant, durable and resistant to chemical attack. Any glazed tile has the moisture resistance necessary for facing the walls of the kitchen.
To indicate the strength characteristics, there is a strength classification, denoted by the abbreviation PEI (Porcelain Enamel Institute). According to this classification, kitchen wall tiles are labeled PEI-1, which stands for "walls only". If the selected material does not contain a PEI label, then there should be an icon in the form of a shaded image of a palm, which also indicates the characteristic “for walls”.

According to the degree of resistance of tiles to impact chemical substances correctly use material marked A - high resistance to chemicals and AA - resistance to chemicals.
The format of the tiles must match the dimensions of the kitchen. In kitchens of a small area, it is advisable to lay tiles with a combination of sizes of 10, 15, 20 cm. If the room is spacious, then lay the tiles in the kitchen in a larger format.
Calculation of the need for tiles
When decorating the kitchen with one of traditional ways laying tile consumption equal to area veneered surfaces with the addition of 10% for waste and scrap.
With more complex combined, decorative options design, the calculation of the need for material must be done for each type of tile used separately, making preliminary markings on the walls.
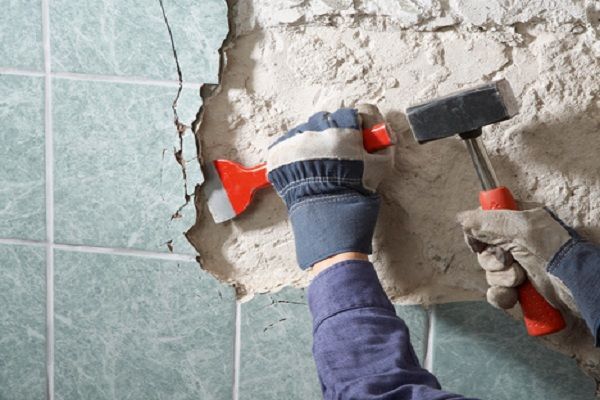
Removing old finishes from walls
Taken off the walls old finish. If it is a tile, then to save time and effort, it is better to do it yourself with a puncher, choosing a chisel from its nozzles. After working with a perforator, clean manually with a paint spatula. Then, with a construction plumb line, the deviation of the walls from the vertical is measured and, if necessary, leveled by plastering. After plastering, the walls are allowed to dry for two to three weeks, and then their surface is primed.
If the walls are painted with oil paint, then the best way out is to remove it. The removal of paint from the walls is carried out with a grinder (grinder) with a disk designed for cutting stone. layer of paint along with thin layer old plaster cut off, holding the disk at an angle of 15-20% to the wall surface.
Work with the grinder is carried out in goggles, a respirator and gloves.
However, if the paint is oily, it adheres firmly to the walls, then the tile can also be laid on such a surface, having previously prepared it with your own hands. On the wall, you need to make frequent notches with an ax and prime it with a layer of any oil paint or oil varnish mixed with sifted sand. Half a glass of sand is needed per liter of paint. When this primer dries a little, you can lay the tile on tile adhesive or thickly grated oil paint with the addition of cement.
Laying tiles
After leveling and priming the surfaces, they begin laying the tiles. For laying tiles on walls there are different kinds mixtures. The most popular and high quality brands are Knauf, Unis and Ceresit. Ceresit is suitable for various internal works for laying ceramics, including on walls. The manufacturer positions its product as a high-quality waterproof adhesive that is resistant to the "creep" effect.
Tiling is done from the bottom up. Before laying, at a height of 3-5 cm from the floor surface, a metal profile or rail is attached to the wall strictly horizontally to support the first row. On the reverse side The tiles are marked with an arrow indicating how they should be positioned correctly when laying. At the end of the tile, you need to make a mark opposite this arrow with a pencil with your own hands so that the solution does not cover it.

A layer of glue is applied with a flat spatula to the entire back surface of the tile, and then the excess glue is removed with a notched trowel (comb). A notched trowel is selected with rectangular teeth of 8 or 10 mm. The spatula freed from the hands is placed in a bucket of water, this will prevent glue residue from drying on its surface.
The first tile and the first row are set very carefully. The masonry is leveled using a level and tapping on it with a mallet with a rubber knob. If the tile "failed", then it is removed from the row, glue is added and reinstalled. Between the tiles, delimiting crosses are installed for a fixed width of the joints, which is selected depending on the size of the tiles.
Use of seams of various widths and grouts different colors allows you to create decorative ornaments from a plain tile with your own hands. The seams must be periodically cleaned of excess glue in order to subsequently produce a high-quality grout.
The characteristics of modern adhesives allow you to lay out a wall from floor to ceiling in one day, if an emphasis is fixed under the first row. The support of the first row is removed the next day after the start of laying.

To facilitate the formation of ceramic joints on the outer and inside corners walls, decorative plastic or metal corners (trims) of different colors are used, which have numbers from 6 to 12.
To choose the right trim, you need to know that its number must be one more thickness tiles in millimeters, for ceramics 6 mm thick, trim No. 7 is needed.
Tiles are cut with a manual tile cutter, which is easy to use and does not require special skills. The holes in the tiles are drilled with core drills or a tool called a "ballerina".
Grouting
After the tiling is completed, the seams between the tiles are rubbed with special grouts. Manufacturers Unis and Ceresit produce grouts that meet the requirements in each specific case. For kitchen walls the right choice will be grout CERESIT CE 40 Aquastatic.

Before starting, you need to make sure that the tile is already dry.
The method of preparing a grout solution from ready mix described on the packaging and is not difficult. The grout is kneaded in small portions, the seams are filled with grout with a soft rubber spatula, and after an hour, excess glue is removed from the surface with a damp cloth. After a day, the grout will finally harden.
Laying tiles is a popular solution for finishing the kitchen, so it is important to figure out how to properly prepare and install this coating.
Tiles are one of the most popular finishes.
Material Features
Advantages of ceramic tiles in facing surfaces in the kitchen:
- strength;
- not afraid of moisture;
- environmental friendliness;
- hygiene;
- durability;
- wear resistance;
- big choice;
- a variety of layout methods;
- a wide range of applications;
- easy care.
To lay out the tiles in the kitchen with your own hands you will need:
- special glue or sand-cement mortar;
- a set of spatulas;
- grout for seams;
- crosses;
- level and plumb;
- primer and brush;
- antiseptic;
- rubber mallet;
- construction mixer.

Basic tools
Design Options
There are many ways to install floor and wall tiles in the kitchen. The design is based on the following criteria:
- Color. Fitted under general style, can be both monophonic and contain drawings, decorative inserts, photo printing. Universal option for walls - white, and for the floor - with stains and inclusions so that pollution is not conspicuous.
- surface type. On glossy, stains and drops are noticeable, but matte is more difficult to clean off. Dirt accumulates in relief and rough tiles, but it does not slip.
- Size and shape. How less room, the less overall tile. Extend the wall using rectangular elements. Too small a tile is not always appropriate. Mosaic is best used only for an apron.
- Layout scheme. To visually expand the room use a diagonal orientation floor tiles. Tiles on the walls are mostly laid in even rows, but rectangular options are glued with an offset dressing, vertically, horizontally, etc. on the floor - like parquet, for example, herringbone.

Beautiful tiles create a mood
Wall preparation
Before laying tiles in the kitchen, first treat the surface. Remove the old coating not only from the walls, but also from the floor, that is, carry out all the rough work. The second step is wiring. After proceed directly to leveling the surface, for this purpose, start and finish putty is used.
Since the kitchen is a room with high humidity, pre-treat the walls with a special antifungal impregnation and prime.
at first starting mixture smooth out rough edges. Several layers may be needed. After this, a perfectly smooth coating is achieved using finishing putty, as the tile is laid only on flat surfaces.
Walls
First, decide how to lay the tiles in the kitchen: over the entire area or on separate sections. Often create combinations with other types of coatings: paint, plaster, wallpaper, wall panels.

The quality of the cladding and durability directly depend on a well-prepared surface.
Laying tiles on the walls is as follows:
- The approximate number of whole elements is calculated, taking into account the seams. Markup is being done.
- Installation starts from the corner of the bottom row from the first whole element.
- The adhesive is applied to the wall or tile and leveled with a notched trowel.
- The distance between the fragments should be about 2-3 mm. Joints are controlled with plastic crosses.
- For sockets, cut a hole of the required shape so that it is 1-2 mm larger than the box itself.
- To tamp, tap on the tile with a soft mallet.
- After each row, check the evenness with a level, plumb lines and control beacons.
- At the end, the bottom row is laid, while the tile is sawn to the required size.
- After drying, grout the seams.
Apron
Consider separately the laying of the apron. When marking, keep in mind that the coverage area should be a couple of centimeters larger in each direction than the remaining wall after installing the headset. In place of the hood, the masonry goes up.
How to put tiles on an apron in the kitchen:
- Mark the position of the control tiles and set the level.
- Start working from the bottom corner, which is visible first. The solution is applied in a small layer with a notched trowel.
- Move in rows from bottom to top.
- First, all whole elements are glued.
- Holes are made under the sockets in the tile.
- Lastly, cut fragments and corners are laid.
- After drying, the seams are rubbed with an epoxy mixture.

Tiled apron - a style-forming element of the entire interior solution
Floor preparation
Laying floor tiles in the kitchen is possible only after careful surface treatment and creation of a project.
Here you should take into account several nuances:
- Coating load. The kitchen is one of the most visited places in most homes, especially if it combines the functions of a dining room. In addition, the floor must withstand large household appliances and massive furniture filled with dishes and products.
- Slip. If water gets on the surface of the tile, it is easy to slip and fall, so choose a special non-slip coating.
- Heating system. When installing a warm floor, it is necessary to make a screed. First, place the electrical mats on a heat-reflective substrate and fill with self-levelling compound.
- Layout method. With the help of various schemes, you can visually expand or reduce the area of \u200b\u200bthe room. First, make an example on the floor to visually evaluate the options and choose the appropriate one.

Tiles in the kitchen, as in any other room, start from the corner.
Floor laying
- Mark up with beacons. Designate the position of the control tiles.
- Treat the surface with an antiseptic and primer. Install a vapor barrier if necessary.
- Installation starts from the far corner, which is most striking. Step back from the wall about a centimeter, then this space will be closed with a plinth.
- Apply adhesive with a notched trowel to small plot gender. In case of strong irregularities, the composition is additionally applied to the tile.
- Two rows are laid in parallel, moving to the exit.
- Keep an eye on the level and set the crosses to align the seams.
- To compact the mortar, tap on the tile with a rubber mallet.
- After a day or two, start grouting the seams. Every other day, clean and arrange furniture.
Installing tiles seems like a difficult task, but follow the basic rules, and then things will go like clockwork. The kitchen will be transformed, but the main thing is that this will be your merit.
It is worth spending a couple of days to lay the tiles. He is considered good decision due to low cost, moisture resistance and practicality. When choosing a material, external indicators, quality, country of origin, etc. should be taken into account. There are a number of special requirements for floor tiles, as for the kitchen are important performance gender.
Today there is a huge selection of floor tiles. The variety of styles and trends never ceases to amaze. Classic style, minimalism, bright interiors- you can implement the most different ideas. floor tile creates right mood and solves any problems when creating a specific idea.
In addition to the appearance, the coating must be of high quality and practical. It must have good technical characteristics.
Tiles are fundamentally different from wooden ones. finishing materials. It is made from clay and contains various additives. After shaping, it is pressed and fired. As a result finished tiles vary in strength and appearance. Then outer surface painted and acquires a glossy or matte finish.
Floor tiles in the interior of the kitchen
The tile is usually quite porous and glazed. It can only be used indoors and for decorating walls. Tiles are usually used to decorate the walls in the bathroom or create an apron in the kitchen.
Ceramic tiles have their own characteristics. It is also glazed on one side. This glaze not only has a decorative value, but also protects from moisture. ceramic product stronger and harder, it is resistant to mechanical damage and active abrasion. by the most durable material considered to be great for the floor. It has practically no flaws, except for a small range of color solutions.
Tools and preparatory work
Even hardwood flooring enthusiasts prefer tiling in the kitchen. It will perfectly complement any kitchen interior. It can give a calm tone or, conversely, a bright mood. Depending on the dimensions of the room and furniture, the installation method is chosen. Dismantling tiled flooring quite complex, so it is better to think through all the nuances before the first tile lay on the floor. Leave comments and share your experience! Finally, some useful videos:
Repair of any premises carries a colossal amount of work, which involves not only the repair process itself, but also preparatory work, the choice of design and finishing materials. How to lay tiles in the kitchen on the floor correctly?
Material selection
Kitchen renovations are no exception. Among the many finishing materials, ceramic tiles stand out. Its use in the kitchen is due to its characteristics:
- moisture resistance,
- reliability,
- resistance to pollution and chemical (cleaning) substances.
Decoration with ceramic tiles in the kitchen is used for walls, aprons and floors. It is possible to veneer both all these surfaces, and some of them. For this article, it is of interest flooring.
How to lay tiles in the kitchen - more on that.
Floor laying step by step
The laying process itself can be divided into two parts: preparatory and laying itself, directly.
Step 1: Preparatory stage
The preparatory stage also includes the choice of design, the selection of materials and tools, as well as the process of preparing the surfaces and materials themselves for work. It is worth considering all kitchen interior all in all.
It is very important to choose the right tools and materials. It's better to have your own set of tools - it's never superfluous. For work you will need:
- Protective equipment (gloves, goggles, mask). They are needed at the stage dismantling works with the old coating, and for working with the new coating.
- Roulette, ruler, building level;
- Electric drill or other similar tool with a mixing attachment;
- Rag or microfiber cloth;
- Grout for seams;
- Glue;
- Waterproofing;
- Tile cutter or other tool that allows you to cut the desired shape and size;
- notched trowel;
- Brush;
- Crosses for seams (they will allow you to lay more evenly and accurately);
- Primer.

When choosing the tile itself, it should be borne in mind that the kitchen is one of the most popular places in the house, which means that the floor carries a significant load. Do not forget the fact that there will be a heavy Appliances and kitchen furniture. In addition, the tiles must be non-slip. Otherwise, when water gets in, the floor will look more like ice, which is not good, and even dangerous.
If necessary, under the tile, you can install a floor heating system. The tile itself is cold, and if the floor in the house is cold, then you can’t do without it.
It is worth considering in advance the options for laying tiles in the kitchen, everything design solutions to correctly calculate the amount required material and styling strategy. Laying floor tiles in the kitchen is a time-consuming process, but worth it.


Step 2: Prepare surfaces and materials
The surface of the floor must be smooth and without flaws (cracks, depressions, protrusions, etc.).
The first and most important thing to do is to level the base. At this stage, the subsequent process of laying tiles is maximally facilitated, high-quality and reliable fastening to the floor is guaranteed.
The floor surface must be cleaned from the old coating, remove all debris and those elements that can be removed.
This step of surface preparation is very important as it will allow the tile to better adhere to the floor in the future.

alignment
If the surface has significant flaws and differences, then it must be leveled.
- To do this, you need to set the level horizontal surface. You can use the building level. It is placed on different parties and make markup.
- There is another option. Using a level, make markings on vertical wall the bottom row, and, by analogy, make markings on other walls.

The dots are connected by a common line, which will indicate the placement of the first row. If the gap from the line to the floor is the same everywhere, then the floor is even. If there are small or large fluctuations in size, then it is necessary to level the surface.
If in bathrooms the floor is often made with a slight slope, so that moisture accumulates in one place, then this method is not common in the kitchen.

Surface leveling can be done with a partial or full screed. For this, special mixtures are produced, which include cement and plasticizers. The diluted mixture is applied to the floor with a spatula and leveled. Use a roller to remove air bubbles.

Primer
An important step in surface preparation is the primer. Dried up flooring. Cleaned of debris and dirt, treated with a primer. The primer makes the surface more durable and allows the adhesive to better adhere to the surface.
The primer solution is applied to the surface with a brush or roller.
If the area is large, then the corners are treated with a brush, and the rest of the space with a roller.
Step 3: Laying process

Step 1: Put in water
Before starting work ceramic tiles put in water for 10 - 20 minutes. This is done so that it does not absorb water from adhesive mixture, which, in the end, will allow it to stick better. After this procedure, the tile is removed and dried a little.
Stage 2: We make an adhesive solution
The adhesive solution is made strictly according to the instructions. When kneading, a drill with a mixing nozzle is used, with the help of which a homogeneous and plastic material is obtained for work.
![]()
Stage 3: Starting from the corner
Work begins from the corner that is immediately visible from the entrance. Laying tiles yourself with your own hands is not difficult, but you need to adapt.
Glue is applied to the floor and leveled with a notched trowel. The thickness of the adhesive on the surface should be approximately 10 mm. A smaller thickness will not give a reliable connection, like a large one. 10 mm is the optimal amount of glue. When leveling with a notched trowel, grooves will appear. They are needed for better adhesive adhesion.
Step 4: Start posting
The next step is laying out the tiles. It is very important to lay out the first piece evenly and correctly - the whole work in general depends on this. You can use markup.
The tile is easily pressed down, as a result of which the adhesive fills the entire space and ensures high-quality adhesion of the surfaces. We put it carefully and slowly so as not to damage it.

Step 5: Check the surface with a level
Immediately you need to check the surface with a building level. When revealing slopes and irregularities, the tiles are leveled. Invest given material in the kitchen you can have several various options. The simplest is parallel to the walls, the other option is diagonally. Tiles on the floor in the kitchen can be put with other, more complicated ways. But if the work is carried out independently, then it is better to refuse them.

Tile work is always controlled with a level. With the help of a short level, deviations in the horizontal position of individual elements are detected tiles, and long - the general horizontalness of the surface. Do not forget about the design of the floor, always follow the given pattern. It is like a correctly folded puzzle - it has its own special pattern.

Stage 6: Use crosses and a tile cutter
Special crosses must be placed between the tiles. Crosses adjust the width of the seams. Laying them is very simple - in the corners, at the junction of four plates.

For those places where the tile needs to be cut or cut a certain hole in it, a tile cutter is simply needed. For curly holes, a puncher with special nozzles with diamond edges is used.

With the help of a tile cutter, the excess is carefully cut off and the necessary shape is given. If there is no tile cutter, then you can use a grinder, for example. When working, it is very important to use goggles and gloves so as not to get hurt by splinters.

Step 7: Don't forget to remove the dirt
As the rows are laid, it is very important to remove dirt and excess glue in a timely manner with a rag soaked in water. So the coating will be clean and you will not have to scrape off the glue at the end of the work.
The glue dries in about 24 hours. After this time, you can proceed to the next stage of work.
Step 8: Sewing the seams
After the time required for the glue to dry completely, you can start grouting the joints. The seams are rubbed with special mixtures that fill the space between the seams, forming a protection against the accumulation of contaminants. Excess grout is removed with a damp cloth.

The grout dries in about a day. After 24 hours, you can start arranging furniture and appliances. It is recommended to treat the laid tile with special impregnations, which will make it even more durable and wear-resistant.
The laying process is a very difficult and time-consuming task, but if everything is done according to the rules, with sense and arrangement, then such a floor will last long years and will please not only the eyes, but also the legs.
Laying tiles in the kitchen with your own hands can be the beginning of repairs in the bathroom, in which tiles are the main element of coatings.

Finishing the floor is similar to working with an apron. But for a tile backsplash, you need more patience and caution, since the work is done on a vertical surface that will be visible from anywhere. A tile apron in the kitchen looks original. But it also carries the function of protecting the wall from splashes, pollution and much more.
In conclusion, I would like to say that tiling the kitchen is very profitable solution. She possesses high level wear resistance and resistance to dirt, which is very important in the kitchen. In addition, you can find many various videos, which details and shows how to lay tiles in the kitchen. The tiled floor will perfectly cope with the loads.


