Can the oven be tiled? Instructions for tiling stoves and fireplaces - decorative finishing of old and new stoves. Necessary tools for work
AT modern interior kilns are rare. Recently popular Western high-tech design is replacing the original Russian style. Most often, you can find a stove in the rural outback or in summer cottages. At the same time, little attention is paid to the design of this part of the house.
If you overlay the oven with ceramic tiles, then it becomes the main attraction of the house. Ceramic never goes out of style and is a reliable and durable material. Therefore, facing furnaces with ceramic tiles is an excellent option for country house. And the lined chimney that goes to the roof will certainly attract the attention of passers-by.
The configuration of stoves and fireplaces allows you to fit it into any interior, tiles will always be a successful element of decor. There are a lot of options on how to lay a stove with tiles. Furnace finishing responsible and important point which must be taken seriously. By entrusting the lining of stoves with tiles to professional craftsmen, you can be completely sure that laying tiles on the stove will be fast and of high quality. The downside is the high cost of doing the work.
You can line the oven with ceramic tiles and do it yourself. It takes patience and care, but anyone can do it.
What is this article about
How to tile a stove
Facing the oven with tiles needs careful preparation. It begins with the preparation of tools for work and the acquisition of materials. This stage is carried out regardless of who will lay the tiles on the stove - a professional or home master.
Let's start with the tool:
- Roulette. Required for frequent and accurate measurements;
- Marker, pencil, chalk. For marking tiles and surfaces;
- Level. It can be simple or laser. Furnace lining with ceramic tiles requires high precision. Laser level it is preferable, since it is more convenient to work with it, it is a high-precision device;
- Tile cutter. Required Tool for cutting tiles. What size and what thickness it is suitable for a tile cutter depends on its model. You can also purchase a “ballerina” as an additional nozzle for the instrument. It is designed for cutting round holes;
- Pliers. Used when "biting" from the edge of small parts of the tile. For example, under the hinges of oven doors;
- spatula. It is desirable to have several of them. Be sure to need a notched metal spatula. The height of its teeth determines how thick the adhesive solution will be applied to the tile. For ease of use, you need an ordinary metal spatula, no more than 15 cm long. They can both apply glue and clean a notched trowel from excess solution. Rubber spatula about 5 cm, for grouting;
- "Trowel" and a long spatula (from 50 cm). They are required for pre-plastering;
- Mallet. Rubber mallet. Laying tiles on the stove requires good adhesion to the surface; for this, a mallet is used. She taps the stacked tile for better distribution of glue.
On this, with the tools that are required for tiling, we are done. At professional craftsmen it is available, therefore, if it is not planned to ask the question “how to tile the oven with tiles”, then you should not pay much attention to the need for inventory.
But consumables will have to be puzzled by the owner of the object being repaired.
- Crosses. They ask required distance between tiles. by the most the best option will lay out ceramics with crosses, the size of which is from 2.5 to 3.5 mm.
- Rags. Facing the stove with tiles involves a lot of dirt, so you should always keep rags nearby for timely cleaning.
Tile selection
Its diversity is amazing. Colors, design of ceramics allow to satisfy any taste and aesthetic preferences. Thanks to this choice, the tiled stove will become the queen of the house.

Furnace lining is done on long years, so the acceptance design solution requires consideration of all the nuances of the interior. Facing the stove with tiles will become a more pleasant procedure when the expected result will please.
You can veneer with any kind of tile and mosaic, except for glass options, but it is better to give preference to refractory ceramics. A slightly rough design is obtained if a facing stone is used.
The most expensive and beautiful is the tiled version of the tile.
A tile of a mosaic type or a small size, about 10 * 10 cm, looks more beautiful on the stove. Unusualness and originality can be achieved by combining several types and colors. And the glued decorative element will become the “highlight” of the whole composition.
If you know how to properly tile the oven at home, then there will be no problems with the choice.
Glue and mixtures
The adhesive composition should be given special attention. When tiling the stove with tiles, it must be borne in mind that it heats up very much, so ordinary glue will not work.

For the purposes of laying ceramics on heated surfaces, there are special compositions. Glue bags are always labeled accordingly.
- Grout. Applied at the last stage of work. Fills the seams, making them neat and beautiful;
- Net. For a stronger adhesion of the plaster to the surface of the furnace, it is advisable to lay a metal mesh, fixing it on the base;
- Stucco mixture. For the initial plastering of the walls, you need a special solution. It can be made using clay, sand and cement, or you can buy a ready-made mixture for plastering ovens. The latter option is preferable, since it has a measured proportion of components and has increased strength and thermal conductivity.
When the tools and materials are ready, it's time to get to work.
Before we learn how to put tiles on the stove, we decide on the artist. If a professional is hired, then the work process is known to him, and if finishing the stove with tiles is supposed to be done by hand, then the next section is about that.
Carrying out tiling work
The whole process of lining furnaces with ceramic tiles, including with your own hands, is carried out in several stages.
Stage one. Preparing the surface of the furnace for work.
- First of all, all layers of old plaster are removed. Preferably to brickwork. A hammer with a chisel will help to cope with this task. As a result, nothing should crumble, fall off;
- Further fastened metal grid on the entire surface of the furnace;
- After that divorce plaster mix according to the instructions on the bag. Compliance with the exact recipe when mixing any solutions is very important, as well as the timing of the work (how much it dries, when and how it can be operated);
- With the help of a "trowel" and a spatula, the prepared solution is applied to the oven and leveled. The smoother the result plastering works, the more economical the tile adhesive will be consumed, and the work will be faster and more convenient. At the same time, ideality should not be achieved, the surface will level out when it will be necessary to stick the tile. Depending on the initial condition of the repair object, it may be necessary to apply several times plaster mortar, with drying of each layer, according to the instructions for the mixture;
- The base must be completely dry. All bulges and other bulges are removed. The level checks the vertical. The deviation should be no more than 1 cm, since thick layer composition, when lining the furnace with your own hands, will greatly complicate the work and reduce its quality.
Stage two. tiling

Knowing how to glue tiles on the stove, you can experiment with different patterns, combining different forms and tile colors.
- On the completely dried surface of the oven, horizontal markings of the first row are applied. The lining of the furnace occurs from the bottom up in a circle. For marking, the height of the tile is measured from the floor and a point is placed, then a line is drawn through it with chalk along the level;
- Before gluing the first tile, you need to decide on the location decorative elements, lay out large decors on the floor in advance. And also, take into account the forced cutting of tiles to size and determine their places, so that they are not in plain sight. Particular attention should be paid to the stove damper and places around the door;
- When breeding adhesive solution compliance with the rules for the preparation of this dry mixture is strictly required. The resulting consistency should not contain lumps;
- Now you can start lining the oven with tiles with your own hands. To do this, take the usual small spatula. Then a solution is applied to the wrong side of the tile, then it is carried out with a notched trowel to remove excess. This moment is best done over a container with a solution so that excess solution does not fall to the floor. For ease of understanding, the process of applying the composition is comparable to spreading butter on bread.
The finished tile is placed on the stove, according to the markings, with a little pressure on it so that the glue is evenly distributed over the entire area. With a mallet, gently pounding, the solution is finally distributed, filling all the irregularities of the base.
The horizontal and vertical are measured by the level, if necessary, it is corrected. All tiles are installed in the same way. Crosses are placed between them.
Advice! It is better to apply a little more adhesive to the surface of the tile than necessary. The remains will come out from the sides and can be removed, but there will be no voids left.
Having laid out the first row, it is given time to dry a little, about an hour. It will be easier to work on after that.
Putting the tiles on the stove, no more than 4 rows, left for a day. Then you can continue further, the tile laid the day before will not go anywhere else.
We must not forget to remove the solution from the surface and a little from the seams in a timely manner, making indentations in them. If you do not do this during the installation process, then at the last stage you will have to spend a lot of time cleaning.
Stage three. Completion of work

Already theoretically knowing how to lay tiles on the stove and having practiced, you can proceed to the stage of bringing beauty.
- First of all, the solution should dry well, it takes at least 2-3 days. Then all the crosses that are not deepened are carefully removed. Then all surfaces are thoroughly washed. The depth of the seams as a result of cleaning should be at least 3 mm;
- The grout is diluted according to the instructions in a small container;
- The joints are grouted by filling them with a mixture using a rubber spatula.
Advice! 10 minutes after applying the grout, you need to gently run a wet sponge along the seams, thereby removing excess mortar, deepening it a little. Get even, beautiful seams, which will hide some of the flaws.
- After a day, you can wash the entire tile in a good way. The work is done. You can start operating the oven in a month.
Now that you have figured out how to overlay any stove with your own hands, you can take on more complex projects, turning your home into the embodiment of a design dream.
The stove in houses has been standing for many years and over time, the lining loses its appearance. Therefore, repairs are needed. You can simply cover it with a new layer of plaster or renew the brick. But tiles look more attractive, an assortment that is full of various options on modern market. The material does not belong to the budget, so in order to save money, many try to manage on their own, which is possible even without skills, but quite difficult. How to overlay the oven with tiles, we will consider in the article. We also recommend reading.
There are several options for attaching tiles to the stove. The first method is the most famous - mounting on glue. But it is also possible to install without an adhesive mixture - on a metal profile. The second option is more mobile. If you need to remove one element, it's easy to do.  Depending on the chosen installation method, the necessary materials and tools will also change. Preparation of everything you need should be done in advance, since in the process of work you can not be distracted by trips to the store. What you need:
- Sander;
- Tile cutter. In the process of cladding, you can not do without cutting the plates. Do it special tool the easiest way, but in extreme cases they use a grinder. True, there will be a lot of dirt and dust, you will have to work in a respirator and glasses and on the street;
- Putty knife. Several spatulas are needed. Toothed for taking and applying the solution. Flat and angled for comfort and rubbery for seams. You can use other options for filling the seams: a construction gun or a simple version with a plastic bag;
- Level and plumb. These tools are needed to check the evenness of the rows. You will also need a ruler, tape measure and a rule;
- Master OK;
- A bucket for preparing mortar and grout. You won’t be able to knead all this by hand, so you need a drill with a mixer nozzle;
- mallet for adjustment;
- Spray;
- Sponge for wiping excess;
- Primer and brush for its application.
If you plan to install on a profile, then the solution and the container for mixing it will not be needed. In this case, prepare metal scissors, a wooden beam and a steel corner. In addition to all of the above, you will need the tile itself.
Keep a spare material in case of damage during transport or work. Plaster and glue, grout.
Wall preparation
Before the actual finishing of the furnace with tiles in a private house begins, there is a stage of preparing the surface of the walls. This seemingly insignificant step cannot be neglected. It depends on the quality of the preparation how well the glue and the tile itself will fix and how long it will all last. 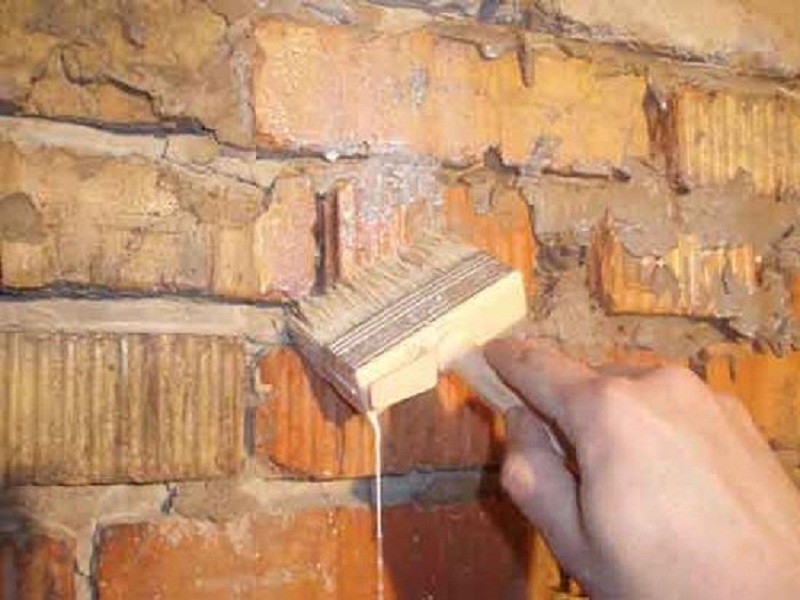 First, the stove is cleaned of the old layer of plaster. If this is not done, it may begin to peel off, if it has not already begun, which means that the tile will also begin to fall off. In a wet state, it is removed better, so it is pre-sprayed from a spray bottle several times with water.
And the layer itself is separated with a spatula. The field of complete disposal of the old layer, you can proceed to the next step. The surface is again abundantly wetted. Go over it with a wire brush to remove any remaining particles. The seams need to be deepened. It can be done grinder, but only if you have extensive experience with the tool.  You can not calculate and make the recess too deep, but it should not exceed 8 mm in depth. More laborious but the right way do the work with a chisel.
If the oven is new, then you need to wait for complete shrinkage before proceeding with the cladding. This will take about half a year. After the seams are deepened, the surface is primed. The solution must be deeply penetrating. Do not spare time and effort on this, the primer provides additional protection and improve adhesion.
If the base absorbs liquids well, then the primer should be applied twice and wait for each layer to dry completely. This affects the adhesion of the solution.
The surface can absorb all the water from it, which leads to subsequent cracking. The surface must be flat, otherwise the tile will rise crooked. You can check this parameter using a plumb line and level. If the differences are more than 1 cm, then they need to be eliminated in without fail. First, beacons are installed on the clay solution. The mixture is applied in a layer of 1 cm, if the depth of the cavity is greater, then it will have to be applied in several layers, gradually.  Preparing the solution is simple: clay is poured into water and kneaded until smooth. Ready mix applied with a trowel and leveled with a rule. Metal corners are used to strengthen the corners.
After the entire wall is leveled, the reinforcing mesh is laid while the layer is still wet and pressed into the mortar. Then it takes time for the solution to dry and after that the final layer is applied. After drying, the wall is primed again and left to dry completely. 
Furnace cladding with ceramic tiles
How to tile the oven with tiles so that it does not fall off? It is important to follow all measures for the preparation of the base. Only after they have been carried out can you proceed directly to the lining. If the work has not been done, the adhesive will not set properly and the tile will not stand up straight.
On glue
Not only the stove tiles in a residential building must match, but also the adhesive. The stove heats up to high temperatures, and in the furnace it even reaches huge scales. Therefore, the adhesive must withstand all these conditions. Can buy ready-made version or make your own.  One of the homemade options: PVA glue, salt and Portland cement. But before choosing the option with self-manufacturing think well. It is quite difficult to choose the proportions and observe all the stages of the technology exactly, and the strength of the fixation depends on the glue. Perhaps it is better to spend on the finished mixture.
Another difficult stage is cutting the material. The material is hard and durable and this part of the job does not seem easy. And cutting is a must. First, practice on unnecessary material and only then proceed to facing.
The first row is the basis for all the rest, so it is he who needs to be given special attention. Therefore, no fittings by eye. Take the cord and, using the building level, pull it from above along the level of the first row.
The first row comes from the corner. First, the elements on one side, then on the other, and only then the tiles are laid between. Check the very first tile with a level and if you need to adjust its position, use a mallet. Check the first row with a building level. And already the rest level on it.
Seams are left between the tiles. To make them even, special plastic crosses are needed. For the convenience of work, they are bought more and not drowned, but placed across. It's easier to get them that way. You can use whatever comes to hand, at least pieces of the tile itself, but the main thing is that all elements should be the same in thickness. 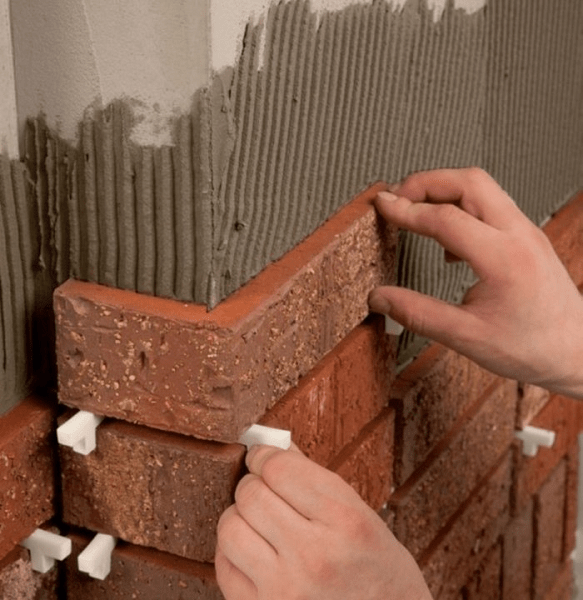 The adhesive is applied with a notched trowel. It is applied to the tile and leveled. With effort, press the tile against the wall, and immediately insert the crosses. Correction of the position of the tile is possible only immediately, because the glue begins to set after 10 minutes. Remove excess mortar immediately. Keep a sponge or rag handy, otherwise the mortar will clog into the seams.
After the entire tile is laid, you need to wait for the adhesive solution to dry completely. And then the turn of the grout. Get all the crosses and proceed. Grout can be applied in three ways. rubber spatula work less comfortably. A more suitable option is a construction pistol. It is quick and easy to work with him. And you can make home version from a plastic bag, a solution is added there and a corner is cut off.  Excess mortar that has fallen on the tile must be removed immediately. Keep a sponge handy, but dry. Try to avoid the seams themselves. You can choose any color of the grout, but make sure that it is in harmony with the overall interior and the color of the tile.
Without glue
Facing the oven with tiles by the dry method differs dramatically. This option is more durable, because the tile is not glued, but installed on the frame. She doesn't care about exposure to temperatures or old plaster. In addition, the gap between the stove and the tile allows it to cool longer, which saves heat consumption.
The tile can be changed without the need to completely dismantle the coating. Simply remove the material from the profile and insert a new one.
This is convenient for those who like to frequently change the interior and saves in case of damage to one element.
The metal frame is the basis of the structure. First, markup is applied with a cord and a level. The lower guide is placed from below. The distance from the floor is equal to the width of the skirting boards. And then the upper line of the end of the masonry is marked.
Then the surface is lined along the width of the tile plus 2 mm. Aluminum corners and strips are attached to anchors.
It turns out a frame, and then vertical guides are attached along the marking line. After the frame is ready, check it by driving the tile along all the guides. She should walk freely, but not too much, not stumbling, but not driving. Then all rows are filled with tiles. After filling, a vertical corner profile and corners are attached. They are fixed with self-tapping screws.
In modern life, despite the wide variety of heating systems that “work” without distracting a person from his daily affairs, brick stoves and fireplaces, which adorned not only the houses of ordinary people, but also the palaces of aristocrats, are returning more and more confidently and taking their place of honor, warming them with living warmth. Since ancient times, the hearth has symbolized the well-being of the family. These heating units were built soundly, for centuries, and decorated with various kinds of tiles. Now, tiles are used to finish brick ovens. In this article, we will find out which tiles to lay over the stove so that it truly decorates it, and does not fall off at the slightest movement, we will consider the stages of lining the stoves.
- no cracks, special ceramic mixture, from which stove plates are made, allows you to increase heat transfer;
- through the ceramic cladding, toxins and other combustion products of the furnace furnace cannot pass into the room;
- the structure lined with ceramic tiles looks aesthetically beautiful and does not “spoil” the interior of the room;
- it is much easier to clean smooth ceramic tiles from dust and dirt than rough plaster.
Naturally, for facing heating devices, it is necessary to buy a special heat-resistant tile, and as a connecting element, use a clay solution, which over time, under the stable influence of high temperature, becomes even stronger.
Types of heat-resistant ceramic tiles
Since the stove (fireplace) is an object that heats up to very high temperatures, the finishing material with which it is lined must have certain characteristics:
- resistance to high temperatures;
- strength;
- resistance to mechanical stress;
- the thickness of the tile should not be less than 6 mm;
- the structure should not be porous.
Not every ceramic tile corresponds to the characteristics listed above. There are few of them:
- terracotta;
- clinker tiles;
- tiles;
- majolica;
- porcelain tile.
Characteristics of facing tiles
Before tiling a brick oven, we recommend that you study the properties of each of the listed types of facing material.

Terracotta tiles are one of the earliest facing materials used by the ancient Greeks and Romans. It is a fired unglazed product made of clay of a certain grade, which has a highly porous structure. Terracotta was also used in the manufacture of tiles and as a decorative element. This material is characterized by high strength and rich bright red-brown color.
Tiles are a unique material specially created for lining stoves. The uniqueness of the tiles is that they are piece material and have come down to our days since the time of Babylon. This is a ceramic product made of clay of certain varieties, which differs from others in a box-like shape. This cladding material owes its shape to its increased thermal properties, and the very heat transferred to the room from a stove lined with tiles is considered the most beneficial for human health and environmentally friendly.
At its core, majolica is, more advanced, glazed terracotta. The technique of painting with tin-lead glaze came to us from Mallorca. Majolica products were hand-painted by talented artists, so they were always a luxury item, and they could only be found in wealthy houses.

Furnace tiling
To overlay the oven with ceramic tiles, you need to choose a quality product; on the wrong side there should be special notches that provide stronger adhesion to the mortar. Some manufacturers produce finishing tiles with a locking system that allows you to lay it without visible seams.
If you know how to properly tile the oven, then facing your heating unit will please your eyes for a long time. First you need to clean the surface of the furnace and embroider the seams, remove dust and dirt, if the cladding is a repair stage old oven, are also removed old plaster and paint. In order for the facing tiles to sit firmly in their place, the oven is covered with a special metal wire mesh, which is attached to the masonry with large nails or self-tapping screws. Aluminum reinforcing strips are also used, which provide strength to the masonry.
After that, a layer of mortar and cement and clay is applied to the masonry covered with mesh. Clay grade special significance does not have, but the cement must be 400 grade. Wait for the plaster to dry before you start laying the tiles.

Laying tiles starts from the bottom, the mortar is applied to back side tiles and applied to the plaster, slightly pressed, and uniform tapping distributes the solution over the entire surface of the tile. In order for the seams to have the same width, restrictive crosses are used. The evenness of the lined surface is checked with a rail.
After completion of the laying work, grouting is carried out three days later. You can use the stove in a day.
Tiling
If a person doubts and wonders if it is possible to overlay the stove with tiles? There are practically no doubts regarding the lining of the stove with tiles. Since the tiles are ideal material for facing furnaces.
Facing the stove with tiles is akin to a work of art, and craftsmen who know how to do it always enjoy special respect. Unlike other facing materials, tiles are installed during the construction of the furnace. We do not recommend taking on the laying of tiles on your own, without mastering the techniques of this ancient craft.
Before facing the stove, the tiles must be sorted. Since these are piece products, therefore, tiles with a darker pattern are disassembled from tiles with patterns light shade. In addition, it is necessary to set aside tiles with defects or cracks. After all this procedure, the tiles are adjusted in size by grinding and trimming the edges of the sides. It is customary to equalize the tiles under one reference sample. Tiles are laid in such a way that the glazes of two adjacent tiles do not touch during laying. For better adhesion to the solution, the tiles are soaked in water before laying.
They begin to lay the stove with tiles: first the tiles are laid, and then the bricks of the stove body are attached to them.
If you do not know what needs to be done and how to fold a tiled stove, contact the experts, so you will not spoil expensive material and get a stove that will be a masterpiece of stove skill.
Many private homes have a stove or fireplace that can be decorated with tiles. It is worth noting that not every tile will be suitable for these purposes.
Facing the furnace with tiles puts forward a number of requirements as a technology facing works as well as to the material.
Which tile is suitable for lining stoves in a house, in a country house or in a bath, we will figure it out within the limits of this article.
Before proceeding with the choice of tiles, you should figure out which one happens, what properties it has and determine which one is better to use in certain conditions to be safe and beautiful.
 What are the functions of the lining of the furnace.
Increasing the heat capacity and heat transfer of the stove or fireplace;
Reducing the warm-up period of the room in which the oven is installed;
decorative design;
Simplify oven maintenance. The surface of the tile is easier to clean than, for example, a plastered surface;
psychological component. Replacement heating appliances on a real classic stove, has a positive effect on the mood of a person and the general atmosphere of the room.
Note. Tiles for finishing the stove are primarily a heat-resistant finishing material, which means that they may not be used on all surfaces.
What kind of tiles is better to overlay the oven in the house.
The choice of tiles primarily depends on what type of stove it will be installed on. Furnaces are classified according to their purpose, the heating temperature of the outer wall, the shape, material of manufacture, the fuel used, the pattern of movement of combustion products, etc.
 From the point of view of the purpose of the stove, several types can also be distinguished: heating, kitchen, heating and cooking (kitchen), fireplaces. Each of these types has its own duration of the heating/cooling cycle. Therefore, stoves differ in heating temperature: moderate (up to 100 s), high (100-120 s), high (over 120 s. It is logical that the heating temperature determines the material from which the stove is made and leaves its mark when deciding which tile better for lining ovens.
 What properties should tiles for a fireplace and stoves have?
When deciding which tiles to lay over the stove in the house or in the country, you need to know that the tile suitable for lining the stove must meet a number of conditions. The main ones are:
Heat capacity. The ability of a material to store and release heat.
Resistant to high temperatures. Theoretically, the oven can be overlaid with any tile. However, not all types of tiles are suitable for these purposes. For cladding, you need a special heat-resistant (refractory, heat-resistant, heat-resistant) tile for the furnace. Its coefficient of thermal expansion should be within 7-8%;.
Note. The coefficients of thermal expansion of the tile and the material of the furnace must be approximately the same, otherwise the tile will move away from the base.
Strength. Some types of tiles have a strength index of 300 Newtons / mm. sq. or 30 t./m. sq. According to this indicator, facing tiles are much higher than concrete.
Rigidity. Allows the product not to deform under load. In general, the thicker the tile, the stronger (harder, more stable) it is.
Environmental friendliness or chemical inertness. When heated, the material can release substances harmful to humans, therefore, special attention should be paid to the chemical composition of the tile;
Resistance to wear, scratches, abrasion, etc. since fireplace and stove tiles are installed for a long time, it is desirable that they do not change their aesthetic qualities during operation;
Small porosity of the structure of the tile material. The higher the porosity of the product, the lower its strength;
Low moisture absorption coefficient (up to 3%. An increase in the photoabsorption coefficient increases the porosity of the structure and reduces the strength of the tile;
Fire resistance. It is welcome to have a certificate containing data on the temperature conditions at which the facing tiles (refractory tiles) can be used.
How to choose tiles for lining stoves and fireplaces.
A visual assessment of the facing tiles will help you make the right choice. Professionals recommend paying attention to some parameters:
The thickness of the tile and its elements must be the same. For different types tile thickness may vary. But on average, cladding tiles have a thickness of 6-8 mm;
Identity of geometric dimensions. To check, you need to attach the tiles to each other, first with the front, then with the inside. They should fit tightly so that there are no gaps. Roughness of the front part will create a visual defect. From the wrong side - will lead to the fact that the tile will not fit well on the surface of the stove, which in turn will affect the quality of the finish.
Note. Experts say that the most preferred shape for tiles is a square with dimensions of 120 x 120 mm. Because with increasing length, the rigidity and strength of the tile decrease.
In terms of color and shade, tiles and decor elements should not differ from each other.
Advice. When buying tiles, you need to take 15-20% more. Part will be spent on trimming the material, and part will be replaced during operation. The safety stock will avoid the situation of buying from different batches, when the shade will be different.
The presence of cracks, chips on any side of the tile indicates that it is easily damaged (brittle);
Note. Cracks on the wrong side will lead to the fact that, under the influence of temperature, the front of the tile will also burst.
Tile marking (designations).
The marking (designations on the tile) printed on the package will help you to tell which tile to use for lining the furnaces. Depending on the type of tile can be used:
The letter "T" stands for heat resistance.
The numbers 1 and 2 against the background of the flame indicate the number of firings. The higher the better.
The letter "E" and the number - water absorption is marked. The higher the number, the more moisture the surface can absorb. For a furnace, the indicator should not exceed 3%. For comparison, the water absorption of granite is 0.5%.
The designations "A" or "b" on the packaging or the wrong side of the clinker tile indicate the technology of its manufacture. Option "A" is more technologically advanced, has clear dimensions.
The PEI index in gradation from I to V will indicate the wear resistance of the tile. Any oven can be used.
The EN 122 standard, in variations from a to D, indicates the resistance of the product to chemical attack.
Tile cost.
The price of facing tiles and the reputation of the manufacturer are far from the last argument when choosing. Masters advise not to save on purchases, because the constant replacement of cheap tiles will ultimately turn out to be more expensive. The cost of tiles by type is shown in the table.
Based on this, it is easy to decide which tile is needed for facing furnaces. But do not forget that the selected tile must match general style room interior.
Types of facing tiles for stoves and fireplaces.
We also note that all facing tiles for the stove are divided into two types: natural and artificial. Natural include: dolomite, quartzite, marble, granite, basalt, diabase, pebbles. As well as some types of semi-precious stones: onyx, jasper, serpentine. Artificial tiles are those that have gone through a complex production cycle: extraction of raw materials, mixing of components, pressing, shaping, firing, painting, etc.
After reviewing all proposals facing tiles, existing at the moment, we can conclude that only artificial refractory tiles for the furnace meet all of the listed requirements.
1. terracotta stove tiles (terracotta).
Terracotta tiles are made from a certain type of clay (kaolin clay). Terracotta heat-resistant tiles have proven themselves as a facing material for stoves and fireplaces. After all, it belongs to the oldest known types of tiles. Its specific characteristics are:
Terracotta color in various shades. Terracotta is produced in two types: glazed (two-layer consists of a base and a layer of glaze) and unglazed (single-layer has a natural or pigmented color. Due to the greater attractiveness, glazed terracotta tiles are used for lining stoves.
High strength.
Note. Due to its structure and vapor permeability, terracotta is recommended for lining stoves in a bath or sauna.
Ease of maintenance. In addition to aesthetic properties, it is easier to care for.
Excellent adhesion to any surface;
Fire resistance (heat resistance.
Note. The thermal expansion of terracotta tiles corresponds to that of heat-resistant bricks, from which stoves and fireplaces are most often equipped.
Relatively low cost. Compared with other types of products of a similar purpose.
Various geometry and texture. Allows you to create a drawing of any complexity.
2. majolica tiles (Majolika).
This heat resistant kiln tile is essentially a superior version of glazed terracotta tile. Therefore, their characteristics are similar. Terracotta and majolica differ only in the appearance of the front side of the tiles. At the same time, due to the fact that the majolica pattern is applied very thin layer surface cracking is virtually eliminated.
Note. The porous structure of majolica excludes its use for facing the stove in the bath, in the kitchen or other rooms with high humidity.
3. tiles for stoves and fireplaces.
Glazed tiles can also be considered a type of terracotta tile. But their peculiarity is in the form of a box. That is, the wrong side of the product has a ramp (side), due to which the heat-saving properties increase significantly.
Tiled tiles for the stove are considered the most environmentally friendly, again, due to the shape and, of course, the composition. Because the tile has complex shape, it comes to the market with a significant number of additional elements.
Due to the variety of elements and decors, tiling looks great even in a modern interior.
In practice, glazed tiles are suitable for facing the front of a stove or fireplace, while unglazed tiles are used for the inside of a fireplace.
Tile properties:
Heat resistance;
Increased heat dissipation;
Durability;.
Ease of maintenance;
Aesthetics and environmental friendliness;
Rich palette of colors and colors.
Due to their properties, tiles can be used in rooms that are not heated all the time.
It is important to know. The tile lowers the surface temperature of the stove, so you can touch it without fear of getting burned.
In addition to being used for its intended purpose, stove tiles can also be used for finishing other surfaces (for example, on a kitchen apron.
The cost of tiles is perhaps the only drawback of this type of tile. But, many craftsmen level this minus - making tiles for the stove with their own hands.
4. clinker tiles for stoves and fireplaces.
This type of tile is available in two types: glazed and unglazed.
Characteristics of clinker tiles:
Naturalness. Unglazed kiln clinker tiles without additives and pigments are produced. This gives the tile the ability not to change color during the period of use;
Low water absorption (up to 2%);
High strength;
Resistant to low and high temperatures. Therefore, clinker tiles can be used for facing the furnace both indoors and outdoors;
Resistance to mechanical damage;
Possibility to realize any design - project.
Note: the clinker is not calibrated, therefore deviations from the indicated size within /- 3 mm are permissible.
Advice. It is not recommended to use clinker tiles for facing the internal walls of fireplaces. Too high a temperature and the inability to expand in the right direction will cause the clinker to move away from the surface of the fireplace.
5. porcelain stoneware for the oven.
Characteristics of porcelain stoneware:
monolithic structure;
Strength;.
Low moisture absorption. The lowest among existing materials. It is only 0.05%;.
Resistant to low and high temperatures;
Wide range of colors and textures. Porcelain stoneware is able to imitate any material: marble, granite, terracotta, majolica.
The presence of additional corner elements.
Porcelain stoneware is a heat-resistant stove tile that can be used in baths, saunas, for lining stoves in the open air. And also in rooms with intermittent heating.
Is it possible to use tiles for stoves.
There is no single answer to this question, since the possibility is determined by the purpose of the furnace and the temperature of its surface. After all, the tile is not intended for operation in conditions of temperature extremes. Such tiles are placed on special compositions. In addition, the tile for the oven must withstand high temperatures. Usually such information is indicated by the manufacturer. Thus, it is possible to tile the oven with tiles, but the result is not guaranteed. Note. Attention! Only in the event that it is decided to use tiles for facing the furnace, then professionals advise using square tiles for this with a size of no more than 200 x 200 mm. Conclusion hope that the review existing tiles for lining stoves will help you make an informed choice and create not only beautiful, but also durable lining for your stove with your own hands.
 Such tiles for a fireplace or stove are obtained by mixing fireclay powder, several varieties of slate clays and other additives. The surface of the plate is not glazed. The surface color varies from white to beige, from orange to red, from light yellow to chocolate brown. The final tone is set by mineral dye.
The clinker plate has more high density than terracotta or majolica, which causes less water resistance and better frost resistance. These characteristics make it possible to use such a coating where temperature changes are observed.
Tiles for finishing the stove in the house. What functions does the lining of the furnace perform?
- increase in the heat capacity and heat transfer of the stove or fireplace;
- reduction of the warm-up period of the room in which the stove is installed;
- decorative design;
- simplification of care of an oven. The surface of the tile is
easier to clean than, for example, a plastered surface;
- psychological component. Replacement of heating devices
on a real classic stove, has a positive effect on a person’s mood
and the general atmosphere of the room.
Note. Tiles for finishing the furnace, this is the first
heat-resistant finishing material, which means that it may not be used on all
surfaces.

Terracotta tiles

Majolica
Clinker tiles

Porcelain stoneware
Tile

Modern ceramic tiles for stoves and fireplaces are available in several types. The main ones are:

Each of these types has a certain superiority: so the terracotta version has a different texture of the elements, so you can show imagination in the cladding process. Clinker tiles for stoves differ from others in high frost resistance, so summer residents who spend only a few months a year outside the city choose it.

Porcelain stoneware material is the most durable, and majolica is resistant to shades and colors, it is heat-resistant.
Tip: the amount of cladding material that contains gloss in the coating should be kept as low as possible.
The reason is the poor heat resistance of the glass included in the composition. The best tile is matte, as it does not contain glass impurities.
- Quality materials to get the job done
- Using hot glue when laying tiles
The tile is protection against destruction of a surface by moisture, alkali. With its help, you can easily clad stoves, increase their heat transfer and protect the room from combustion products. If you learn how to lay tiles on rough correctly, you will achieve a good result.

Scheme of laying tiles on a rough.
It should be noted that rough, tiled tiles can be very easy to care for. For example, soot from the surface can be wiped off using only a wet rag. To put a tile on a rough one, it is not at all necessary to turn to a professional, because all the work can be done by yourself.
The main advantages of the tile are that it is not subject to combustion, toxic components are not released during heating, the material is not deformed.
If you decide to lay the tile on a rough one, then keep in mind that it will take a very long time to cool and heat up quickly. The instructions below will help you get started.
Opponents of the use of clinker in such types of lining argue that clinker tiles have low thermal conductivity, so its use will lead to a deterioration in the heat transfer of the furnace. They are exactly half right. Yes, the thermal conductivity of tiles is quite low due to the particularly dense structure of the material. But  it is this quality that provides another thermotechnical indicator, namely the heat capacity. According to this indicator, clinker tiles are close to many others. ceramic products and some even surpass. Thanks to this, the clinker tiles will allow the kiln to maintain a certain, sufficiently high temperature for much longer after heating.
Proponents of clinker tiles claim that it is able to withstand high temperatures, because it was subjected to high-temperature firing, so this material is the place on the kiln. And in this case, they are only partly right. Clinker tiles for kilns are indeed obtained by firing at high temperatures(up to 1300 degrees). But, after all, you are not going to lay out the firebox itself to her, so this indicator is also of little importance in the possibility of using clinker in this area.
Much greater value has such an indicator as the coefficient of thermal expansion of the tile, and we'll talk about it.
Video Tiles for the stove, which one to choose?
Before tiling the oven with tiles, make sure that it is designed for this kind of work. The fact is that the material will certainly be exposed to high temperatures, and therefore it is better to double-check in advance whether it will withstand such a test.

Stove lining tiles must withstand high temperatures
How to glue heat-resistant tiles on the stove:
- Prepare the solution and let it brew a little.
- Spread a small area of the stove with glue. Approximately this should be enough for laying 3-4 tiles. Smooth out with a notched trowel. If the surface is not too flat, you can add another layer of grout to the tile itself.
- Glue the tile to the place intended for it, tap with a mallet and trim.
- Dry a few rows and only then proceed to further work.
- After the tiles have dried, the seams must be sealed. To do this, use a special heat-resistant grout.
Tiling a stove is much more practical and easier than plastering and painting it. The tile is easy to clean, does not lose its decorative properties and does not require frequent cleaning. cosmetic repairs. When choosing a material for decorating a stove or fireplace, it is important not to forget about the constant exposure to high temperatures. The main requirement for finishing is fire resistance and moisture resistance, if it is planned to lining the furnace in the bath.

Tiles can be overlaid with both a new and an oven that has served for many years
Some manufacturers produce a special line decorative tiles for lining furnace equipment. This series has a special edge with a tongue and groove locking system that simplifies fastening and avoids grouting. tile joints. The following is a brief overview of the recommended materials.
Terracotta tiles
Ideal for an upgrade appearance stove, working as intended, its heat resistance is more than 1000 degrees. The basis for the production of terracotta tiles is kaolin clay, which has been fired at high temperatures. The use of various types of clay allows you to get a wide range of beige and brick shades without the use of chemical dyes.

Terracotta tiles - a classic of the stove genre
Majolica
This is a pressed glazed tile with a colored base, decorated with drawings and patterns. The production technology of majolica is no different from the manufacture of terracotta tiles, the difference is only in the subsequent application of glaze, which gives the finished product a luxurious look. Majolica is ideal for lining the stove in a wooden house, as well as in a luxurious country mansion made of stone.
Clinker tiles
Able to withstand any temperature, and due to the high heat capacity, this material retains heat for a long time after heating. A huge selection of clinker tiles in no way limits design fantasies - the result can be a stylish white stove, a classic brick hearth or an antique fireplace decorated with hand-molded products.

Original clinker tiles
Porcelain stoneware
Practical finishing material based on clay, quartz sand, marble chips and oxides various metals with increased impact strength. Porcelain stoneware imitates any natural stone and tile, including all of the products listed above.
Tile
The classic solution for lining stoves and fireplaces, known to the ancient Romans. A tile can only conditionally be called a tile, since it has the shape of a box, due to which its heat-saving characteristics are significantly increased. front side covered with a decorative glaze that turns the finish into real masterpieces. Facing stoves and fireplaces with tiles is expensive difficult process which is best left to experienced professionals.

If there is a stove in a private house, then it, like all other interior items, should be ennobled. When facing and finishing the stove, the preferences of the owners, the style of the room design and practicality are taken into account. You can give a presentable look to your favorite means of heating with your own hands and with the help of various materials, which you can choose based on preferences and material capabilities.
Facing the furnace and its purpose
Furnace lining is a process of changing its appearance. At the same time, the furnace itself and the lining can be made from different materials.
Facing allows you to solve the following tasks:
- decorative;
- functional.
The decor of the stove can be completely different, it depends on the materials used and on the ideas of the designers. As for the functionality of the cladding, they must be taken into account when carrying out work independently.
It is very important that after changing the appearance of the furnace, its ability to perform its main task, which is to heat the room with high quality, is not lost. The heat transfer of the furnace with proper lining increases. The possibility of penetration of combustible materials from the firebox into the living room is excluded, because when facing the master of the furnace business, they do not leave any cracks or cracks in the furnace structure. Some flaws (for example, cracks that have appeared) can be completely corrected by performing high-quality lining.
An unlined furnace device becomes a source of dust accumulation. The surface of the “original” appearance of this heating device is much more difficult to care for, and the lined stove can be wiped down and any dirt removed. This allows not only to monitor its appearance, but also relieve allergy sufferers from problems.
The beauty of facing materials can make a big difference in the look of your oven.
Metal ovens
Be sure to note that it is not worth tiling metal furnaces with ceramic tiles due to the difference in the heating coefficients of these materials. Different times for heating and cooling metal and ceramics will lead to the fact that the outer ceramic layer of the furnace will become unusable - cracks, crevices, etc. will appear. The only way out in this case is to create a movable bond between the tile and the metal furnace. For such furnace structures, the technology of using clasps is common among professionals.
Brick - suitable material for furnace lining made of metal
brick ovens
Double-circuit brick ovens are most often lined with ceramic tiles. On the outer contour of this design, the tile keeps very well and at the same time does not need to be replaced with different brands. All work can be done with one material.
Single-circuit brick ("bath") stoves are lined with different solutions, adjusting both materials and bonding mixtures under different areas ovens, paying particular attention to local areas of high heat. Porous durable material - porcelain stoneware - is best suited for "bath" stoves, as it is most suitable for rooms with frequent changes in temperature and humidity.
A variety of designs of ceramic tiles will help ennoble your brick oven
Types of lining of furnace devices
Before carrying out work on lining the furnace, it is necessary to carefully select the material to change the appearance of the furnace device. Properties to consider when choosing materials:
- high temperature resistance;
- good heat dissipation;
- mechanical reliability, practicality;
- adhesion strength with mortar;
- aesthetic appeal.
Most often, materials with a thickness of at least 6 mm with a low-porous structure are used for lining the furnace.
Since ancient times, brick, natural stone, tiled material, ceramic tiles have been used to change the appearance of the furnace. Modern industry offers artificial stone, as well as soapstone, for such work.
Application of brick
Brick cladding can be done simultaneously with the laying of the furnace itself. She can compete in beauty with such expensive materials as granite, marble.
For better adhesion, one of the brick surfaces should be rough, the outer side, on the contrary, should be even in order to look the most aesthetically pleasing. Of course, refractory bricks should be used for such work. This material is also used to work on decor. metal furnace. To "smooth out" different characteristics heating metal and brick surfaces, a layer of ballast of dry sand of fine consistency is laid between them. This step will prevent the decorating layer from deforming when the heated metal expands and increase heat transfer.
Brick cladding drive the oven to the look that is most familiar to perception
Use of ceramic tiles
Glazed type ceramic tiles are suitable for cladding devices for space heating, but have limitations in use. This is due to the fact that it will not be able to withstand temperature deformations, because it is not equipped with special hooks and locking joints. Some craftsmen combine brickwork and ceramic fragments when lining the furnace. The neighborhood of these materials looks good and is practical way improve the appearance of the oven.
There are several types of ceramic tiles that can be safely used to decorate the stove:
- terracotta;
- clinker;
- majolica;
- porcelain tile.
Terracotta tiles
Terracotta tiles are famous for being able to withstand super high temperatures (up to 1000 o C). This tile is environmentally friendly, because no chemical substances even as dyes. Natural shades of different clays give a color that is pleasant to the human eye. Using it, you can achieve optimal thermal regime, because this material has a porous structure that retains heat well.
Many years of service life, relatively low price - the properties of this material that attract to use it for lining stoves and fireplaces.
Clinker tiles
Clinker tiles do not have such high heat transfer rates as terracotta type. But the masters of the furnace business also use it for cladding. The undoubted advantage of this material is the long-term preservation of heat, although there is a significant disadvantage - slow heating. The oven lined with clinker tiles can be heated up to 1300°C.
Majolica
It is named so in honor of the island of Mallorca, from where this material was imported to Russia. The very expensive decoration of fireplaces and stoves with this tile spoke of the high prosperity of the owners. The production technology is similar to the terracotta type of tile, except that a decorating layer of different colors and patterns is applied over the clay base. This fact significantly increases the cost of the material.
Porcelain stoneware
Porcelain stoneware - durable material with good moisture-proof and toughness characteristics. Porcelain stoneware coating is resistant to various chemicals, so this coating can be washed with modern detergents.
Tiles
Furnace masters struggled for a long time to create universal material, resistant to temperature extremes, and hence to temperature deformations. Tiles “provide” significant assistance to stove-makers, since their special configuration made it possible to use clay tiles for lining stoves.
The back side of the tile was equipped with special ledges (rumps), which made it possible to reliably connect the array of masonry and tiles.
Special clips-hooks are used to connect the tiles to each other, for the same purpose, a solution is used, placed in the inter-tile space and ramps.
To work with tiles, certain skills are required, therefore, for facing these materials, it is best to turn to qualified specialists.
Facing a home stove with stone
For the exterior of the furnace, you can use both natural stone and its artificial imitation. Environmental friendliness, strength, durability, compliance with all requirements of the furnace device - these are the main characteristics that allow the use of natural stone for lining stoves and fireplaces. This decor looks beautiful, elegant, luxurious. Of course, the cost of natural stone is quite high, so not all stove owners can afford such a finish.
When budget option you can use an artificial stone, in appearance not inferior to the natural "brother". Production artificial stone less expensive, so the price of this material becomes much lower. However, many properties natural material preserved - a beautiful exterior, a wide range of colors and textures.
Soapstone
This modern finishing material is a volcanic rock with excellent qualities suitable for oven lining:
- heat resistance;
- strength.
Its cost is high, most often due to skillful marketing. There are more economical and practical materials that can be used to improve the appearance of the stove.
Soapstone cladding material fits perfectly into modern interiors
Wood
Some wooden inserts also suitable for facade decor, but no more. Such cladding does not conduct heat well and is fire resistant. Wood for lining the stove is best used in fragments, making elements adjacent to the stove out of this material: shelves, benches, corners. Wood for lining the stove is best used in fragments, making elements adjacent to the stove out of this material: shelves, benches, corners.
Wood looks great as a decoration when decorating a stove
Video: how to make a Russian stove lining with tiles
Necessary materials and tools
Before proceeding with the self-facing of the furnace, it is necessary to prepare all materials and tools. Depending on the facing material, materials for fastening and tools are selected.
Of the tools for tiling, it is advisable to take:
- Master OK;
- spatulas from different materials (rubber, metal) and different sizes;
- measuring instruments (ruler, centimeter, plumb line, level, etc.);
- devices for cutting tiles, grinder;
- rule;
- drill with a special nozzle for stirring the solution;
- rubber or wooden mallet;
- shovel;
- solution container;
- metal brush;
- brush.
Materials that will be needed for ceramic tiling:
- special composition for gluing;
- grout for seams;
- actual tile;
- Rabitz.
Preparatory stage
To ensure that the ceramic tiles used in the cladding do not fall off and serve for a long time and with high quality, the work surface must be prepared. The preliminary stage consists in removing any old stove coating - whitewash, plaster, varnish, etc.
If the stove masonry is old, then it is worth carefully inspecting and eliminating it. possible defects. All cracks, holes, cracks must be covered up, wait for complete drying and then sand this surface. You will have to resort to leveling the walls if the device is slanted. A curved surface is unlikely to serve as a good "platform" for strengthening the cladding. For alignment, use sand-cement mixture(at the rate of 3: 1), cement is suitable with a brand of at least M400. To make the walls even and beautiful, do not forget to pick up a plumb line or building level more often.
The seams between the bricks should not be thick and protruding. It is best to deepen them with a grinder with a special nozzle. 10 mm will be enough. If there are no such devices, then you will have to use the "old-fashioned" method - a chisel with a hammer. After this procedure, clean the edges of the recesses with a metal brush.
Netting mesh placed between brickwork and ceramic surface, will help to avoid various troubles that appear from temperature changes (cracks, chips, distortions, voids, etc.). To keep the metal mesh firmly on the brickwork, use dowels (or nails 70–100 mm) in brick joints with a fastening step of 50 cm. The fasteners should protrude ten millimeters from the surface.
To give the working surface greater adhesion (adhesive properties), a primer layer is applied over the netting deep penetration. Wait until the layer is completely dry, clean it and start laying ceramic tiles.
The stage of attaching the chain-link mesh will help in the future to better dock the ceramic plates
Do-it-yourself oven decoration
There are several types of do-it-yourself work on finishing a furnace device: plastering, ceramic tiling, painting, stone cladding, etc. It is not uncommon to use several materials at once.
Do-it-yourself ceramic tiling
After the preparatory work and collection necessary materials and tools, you can get to work.
- Select the location of the furnace from which the ceramic plates will be glued. It is best to start from the right or left corner at the bottom. When laying out the tiles, check each of them for evenness, and also do not forget about the plumb line, using it to lay even rows. Use a notched trowel to apply the adhesive to the tiles.
- Before laying out the lower first row, install a steel profile in the form of the letter "G" or an ordinary wooden lath, on which the first row will "lean". Fixing the bottom row in this case will be more reliable.
- To make the seams between the tiles even and beautiful, use special mounting crosses.
- You can adjust the position of the tiles using rubber mallet lightly tapping the ceramic surface.
- Having laid out the main part with tiles of full size, you can start facing the areas where whole tile does not fit. Using tile cutters, lay out all remaining areas of the oven gradually.
- Try to erase the traces of the adhesive mass remaining on the tile until they harden, otherwise it will be much more difficult to do this.
Do not rush to grout the seams between the tiles until the glue is completely dry. Leave the oven alone for 2-3 days, and only then start grouting the seams. If you want to give the ceramics an even more presentable look, then coat the cladding with a colorless stone varnish with a soft brush (1-2 coats).
Facing with ceramic tiles helps to change the exterior for the better
Plastering
Applying plaster to the oven is the most easy way transforming the appearance of this device for warmth. Before proceeding to finishing work, all owners of "newly made" stoves must meet a one-month period.
The most commonly used materials are dry heat-resistant mixtures. The prepared solution is applied in layers with a time period between them of at least four hours. The mixture for the first layer can be used in more than liquid state than for all subsequent layers. In total, 3-4 layers can be applied.
Plastering the stove is used by many of their owners, because it is much easier than lining
Coloring
For coloring, you can purchase various paints and whitewash. Moreover, the surface to be painted can be either brick or plastered. Whitewashing is most often used chalk or lime. So that the layers do not crumble in the future, masters of the furnace business are advised to add ordinary salt to the whitewash. This coloring option is suitable for adherents of the use of environmentally friendly materials.
There are also heat resistant chemical compositions, which you can use to paint the oven yourself: alkyd, silicate, silicon.
The color for painting the furnace device can be selected depending on the style of the room
stone finish

Furnace finish
The firebox is finished with the same materials as the stove itself. The main condition when choosing materials is safety, fire resistance, reliability, strength. When designing a firebox, special attention should be paid to the rules fire safety, because this part is most directly connected with fire.
It is very important to leave a gap between the firebox and the stove lining. This is necessary for the free circulation of air, which affects the efficiency of its work as a whole. It is undesirable to fill this gap with sand or heat-insulating material. It will become a reliable obstacle to the deformation of the facing material. If there is a gap, then the finishing material will not crack, voids and other negative aspects will not appear in it.
When using drywall constructions, leaving a gap will become an additional means of preventing fire. 10 centimeters is the smallest gap that must be left between the firebox and the stove for safety reasons.
Decorating the stove in the house
The techniques that craftsmen can use for decoration are very diverse:
- painting;
- decoupage;
- use of stencils-stamps;
- decoration with decorative stone.
Various fragments of decorating elements introduced in certain places of the stove can make this heating device unique and memorable.
The use of shelves to decorate a wall-mounted device is not only beautiful, but also functional.  To decorate the stove, you can use ready-made stamps or create your own.
  Painted decor can be created by craftsmen with artistic skills
  Simple drawings will significantly improve the visual perception of the oven
  You can add the intricacy of the oven using stencil technology - it can be facilitated by the use of a roller with a printed pattern
  Real masterpieces in decoration will be able to create masters of furnace business
Furnace lining is an interesting and exciting process. Using imagination and applying your skills, you can create samples of unique heating devices. The stove, which looks like an orphan and miserable means of heating a room, is becoming a thing of the past. Currently, this device is becoming a full-fledged subject of any interior and, like all other elements of the interior, needs decoration.