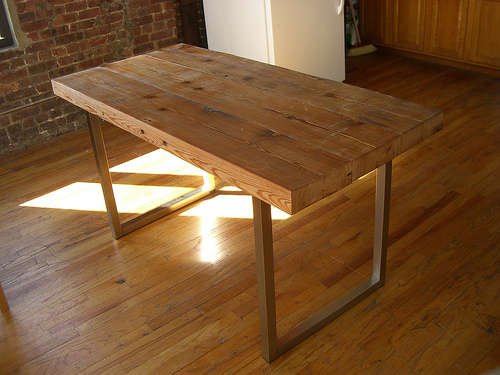
A table of their own from the passed board. Technological subtleties and innovations. How to decorate a table in the country. Proper serving.
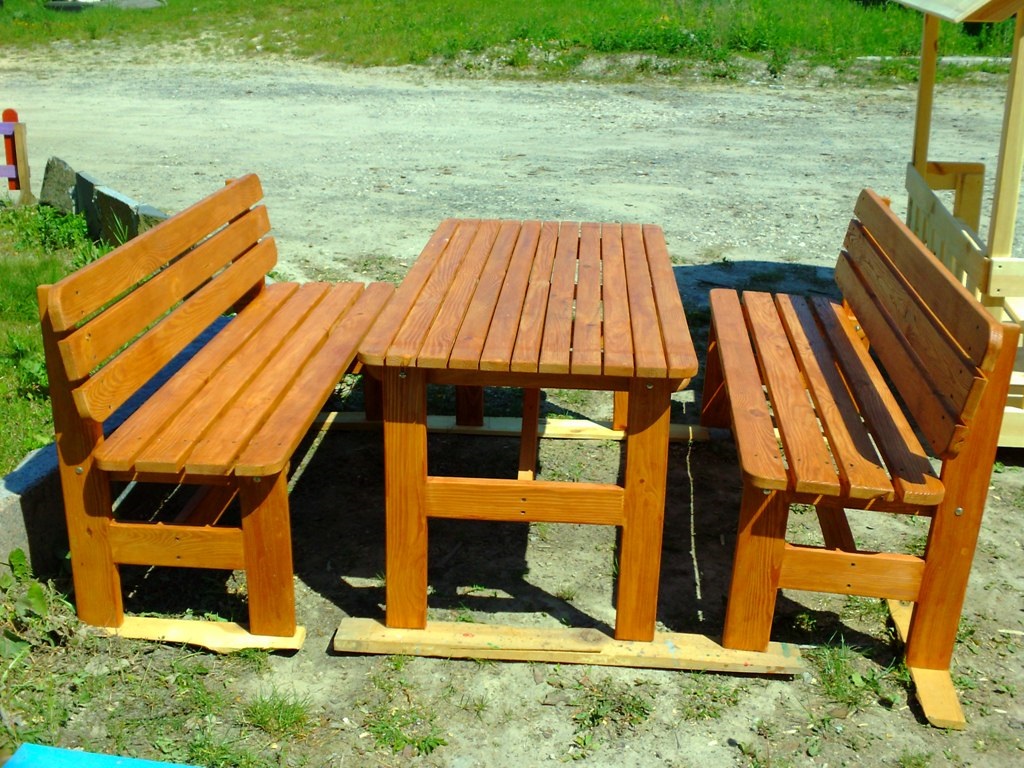
I suggest you consider a small manual for making a wooden table with your own hands. Making such a table is quite simple. There are no complex elements, only ordinary boards are used. As a result, you will get a nice table for giving, such as in the photo.
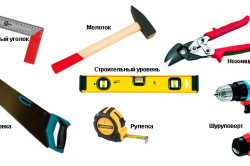
To make a table, we need the following tools:
- roulette;
- pencil;
- saw;
- drill or screwdriver;
- level;
- safety goggles and gloves.
Materials:
- board:
- nails, screws, bolts;
- wood glue.
- 850x100x25 mm - 2 pcs;
- 1680x100x25 mm - 4 pcs;
- 950x100x25 mm - 17 pcs;
- 1530x100x25 mm - 2 pcs;
- 750x100x50 mm - 4 pcs.
Now consider the drawings and the procedure for manufacturing a wooden table.

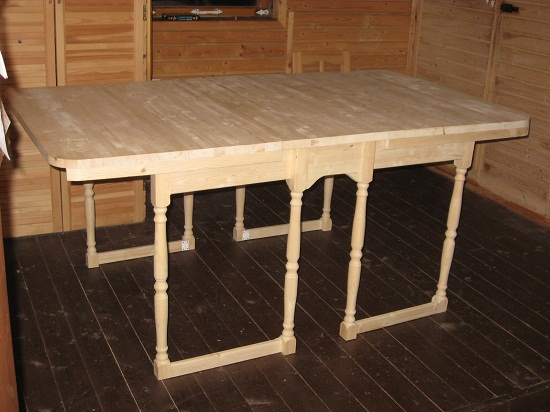
First you need to assemble the table frame, to which the tabletop boards and table legs will be attached. The frame consists of four longitudinal boards measuring 1680x100x25 mm and two end boards 850x100x25 mm. Exhibit on flat surface longitudinal boards and fasten them with self-tapping screws and glue end boards. You need to make sure that the frame does not warp. To do this, you need to periodically measure the diagonals.

From the sides we attach additional boards 1530x100x25 mm, which will give additional rigidity and allow you to slightly hide the places where the table legs are attached.

Now we make a table top from boards 950x100x25 mm. Boards can be either nailed or screwed on with self-tapping screws. Between the boards you need to make a gap of 5 mm.

Fasten the table legs. They can be mounted on self-tapping screws or on bolts, then they will be removable and the table can be folded and transported without any problems.

If you try hard, you will get a wonderful table for giving, which can be installed on the veranda or in the gazebo.
On a summer cottage or in the courtyard of a private house, it is simply necessary big table. IN summer time you can sit behind it in the family circle or surrounded by friends, enjoying the coolness of the evening. Buying a ready-made table in order to install it in the yard is not an option, since such a product will quickly become unusable from rain. It remains only to make it yourself.
Make a table of logs with your own hands, and this design will last for many years. Boards can also be used. Both options will be discussed below. The manufacturing scheme is quite simple, and anyone who knows how to hold a planer and hammer nails can make such furniture.
Making a table from a log with your own hands
This will require:
- logs without bark;
- timber;
- planer and jointer;
- hammer and nails;
- shovel;
- bitumen, drying oil and oil paint.

It is necessary to choose even logs with a minimum number of knots. If it is possible to use a sawmill, you can cut them along.
If this is not possible, then half of the log should simply be cut off. Of course, there will be a lot of waste, but one part should be even. You need to go over the surface with a jointer to make it as smooth as possible.
The logs must be placed side by side and connected to each other with a beam from the bottom side. Get a table top. The beam is nailed across the logs, along the edges of the countertop and in the middle. It is necessary to nail from the bottom side, from the side of the beam, choosing such a length of nails so that they do not pass through the countertop. Here you go, top part the table is ready, it remains only to install it in the yard.

To do this, 4 logs are dug into the ground to a depth of at least half a meter. Those ends of the logs that will be in the ground are recommended to be coated with bitumen to protect the tree from rotting. After the pillars are dug in, the countertop is installed on them and nailed. Nail heads should be sunk into the wood.
But this is far from the only option. For example, instead of logs for the tabletop, you can use boards, and in the manufacture of legs, use log trimmings, fastening them to each other.
Back to index
How to make a table from boards with your own hands?
Such a product is lighter and can be made portable, unlike the previous design.
For manufacturing, well-planed boards are taken and knocked into the countertop. You can use good quality floor boards.
Tongue-and-groove connections allow maximum smooth surface which will make such furniture even more attractive.
First, a rectangular or square frame is knocked out of the timber, on which the boards will be stuffed. If there is no experience and there is no way to make spiked joints, metal corners can be used. Boards are stuffed onto the frame. If the boards are ordinary, then you need to nail the nails from below, making sure that they do not pass through the countertop.

If floorboards are used, then it will be more convenient to drive nails from above, since it is necessary that the comb enter the groove. The boards are pressed against each other, and the nails are driven in at an angle, additionally pressing them. If everything is done correctly, you will get a flat surface of the table, without cracks. If the nails are hammered from above, then their hats should be drowned in wood, and the holes filled with putty before painting.
Now it remains only to fix the legs - and the product is ready. The legs are made of wooden bars, which are attached to the frame with metal corners. Such a table made of boards has much less weight than made of logs. It can be moved from place to place, installed about summer kitchen or in the garden gazebo.
You can make benches or stools for such tables with your own hands, which will fit the design.
There are many options for making such garden furniture. Each craftsman uses his imagination to make his brainchild look original and at the same time be comfortable.
In contact with
classmates
ABOUT
the role played dinner table in the country, you can talk a lot and for a long time: it is simply necessary. Indeed, without this piece of furniture, lunch turns into a banal "meal", and it is simply impossible to adequately accept friends who have come to relax. As always, there are two options for solving the problem: you can buy garden furniture, Can i make a good dinner wooden table
with your own hands. In the first case, you can buy plastic strawberries for harmony, and in the second, you can proudly demonstrate your own creation by exposing everything that is grown in the garden on it.
Content
1.
1.1
1.2
1.3
1.4
2.
2.1
2.2
2.3
Making a wooden table with your own hands
as the most simple option you can consider a wooden table with your own hands 75 high, 120 long and 70 centimeters wide from planed edged board 40x140 mm or floor rail right size, for example, 36x135 mm.
Materials and tools necessary for making a wooden table with your own hands
You will also need:
•
two bars with a section of 40x60 mm and a length of 70 centimeters.
•
self-tapping screws,
•
furniture screws (4 pieces) 100 mm long, with a flat head with a diameter of 8 - 10 mm.

From the tool it is enough to have:
•
electric jigsaw (hacksaw),
•
plane,
•
chisel
•
grinder or a bar with sandpaper fixed on it,
•
screwdriver,
•
set of drills.
Do-it-yourself wooden table top
Consider how to make a wooden table with your own hands in more detail. The tabletop is assembled from five boards, cut to size, which are attached to the bars and using self-tapping screws.
The length of the self-tapping screws should be selected in such a way that they securely fasten the tabletop board to the bar and do not go to its surface. If you use a tongue-and-groove board, then the tabletop is going to be solid, and it is better to remove the tongue from the edge board with a jigsaw and cut the side.
When using a planed board, a gap of 3-4 mm can be left between them when assembling the tabletop, which will not interfere with the use of the table, but will facilitate maintenance and prevent dirt from accumulating at the place where the boards that make up the tabletop fit. It is easy to ensure the identity of all gaps: it is enough to lay a rail of the required width between the boards when assembling the countertop. You can use a metal corner for this.
DIY table legs
The legs of the table are made of the same material as the tabletop, with two parts of one leg connected “in half a tree”. You can mark the boards for the manufacture of "legs" as follows.
• On a sheet of plywood or fiberboard, you need to draw a rectangle with a size of "A" x 600 mm, where A \u003d 750 - b (tabletop thickness in millimeters);
• By placing the board along the diagonal of the rectangle in such a way that different edges of the board are in opposite corners, you can easily mark the cutting line of the boards and the “junction node”, both on one board and on the other.

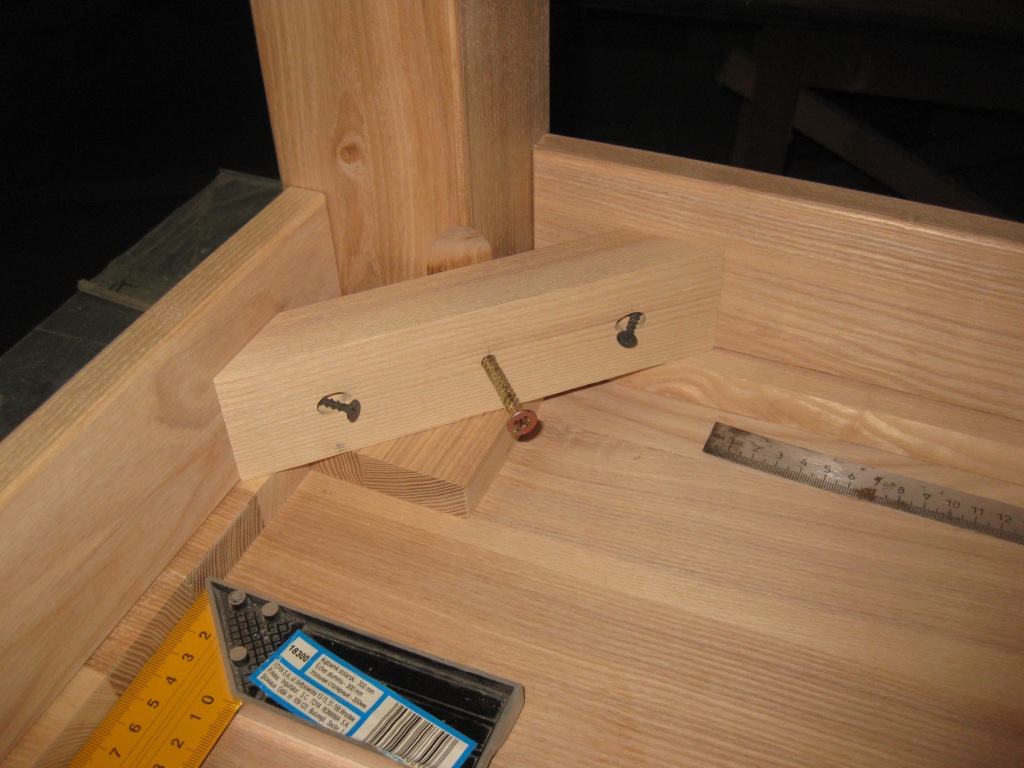
The marked parts of the legs should be cut to length, select a “half-tree” on each, fit and assemble with PVA glue with fine sawdust and a pair of self-tapping screws. The assembled legs are attached to the bars of the table top with furniture screws, the stiffener between the legs of the table is attached with long self-tapping screws. Both ends of the tabletop can be closed with bars, securing them with nails with “bitten off” hats and sunk into the wood with one blow of a hammer on the punch (Fig. 1).
As an addition to such a table, you can make a bench from the same material and in the same way (1400x420, 450 millimeters high). You can also do it yourself
Necessary materials for making a classic wooden table
The set of tools will need the same, but the list of materials that should be prepared has changed, since the table will have four legs. All you need.
• four pieces of timber with a length of 710 mm and a section of 100x100 mm;
• a board with a section of 100x20 mm, cut as follows: two pieces of 1600 mm, two pieces of 800 mm and two more of 750 mm;
• board with a section of 250x40 and a length of 2 meters - 4 pieces.
Making classic table parts

Since the two sides of the tabletop have rounded shape it is necessary to give this form to the tree. For marking, an aluminum gymnastic hoop is used, or another object having a suitable shape and size, which is placed on boards laid out tightly to each other, first at one end, then at the other, after which each board is cut from both ends with a jigsaw (Fig. 2).
Now all the details of the table have the required size. They are cleaned with coarse sandpaper, polished and (three times). Then several layers of varnish are applied, which will provide resistance to moisture.
Do-it-yourself table assembly
A wooden table with your own hands is assembled in a strict sequence.
1. From parts with a width of 1600 and 800 mm, a base box is assembled. Galvanized self-tapping screws "for wood" 4x60 are used. Before assembly, the joints are carefully coated with good wood glue or waterproof glue PVA. It is worth noting that the short parts of the "box" are attached to the "end" of the long one;
2. Tabletop boards are laid out on a flat table or other surface with gaps working surface down. The finished box is placed on top, centered, its inner contour is outlined with a pencil, after which the box is removed;

3. Inside the outlined contour, stepping back from the corners of 110 mm (place for table legs), boards are attached to the boards of the tabletop to ensure its integrity with glue and galvanized screws 4x45;
4. The box is installed on the countertop, taking into account the previously drawn contour and fastened with 4x16 mm self-tapping screws using steel corners, remembering that the place for installing the legs should remain free;
5. The legs of the table are installed in the corners of the box with glue and are “screwed” from the outside with self-tapping screws (4x60). The durability and strength of the structure depends on how tightly the table leg is placed in the corner of the box, therefore, before using self-tapping screws, you should try to fix the leg in the corner with a clamp or in another way.
Or another! Good luck to you, Good to your House!
If you dream of having a good time on your personal plot, then you just need a large table that can accommodate a company of your friends and relatives. And you can do it yourself, spending quite a bit of time on it. In some cases, you may need an assistant, sometimes an extra pair of hands will not hurt.
This article is a detailed step-by-step instruction for making a wooden table for a summer residence.
So that you have a choice, we offer you four project options at once country table- two ordinary picnic tables, a table with benches, which are a single structural unit, and, finally, a round table. You must think through all the details in advance and choose the type and size of the table that suits your needs and matches the style of decoration of your backyard.
Folding picnic tables - mobility is paramount
Folding tables are very convenient, and most importantly, practical and simple. They don't take up much space. At any moment, such a table can neatly fit folded into the garage, and if necessary, move again to the street. Furniture mobility is especially appreciated in small areas.
How to make a garden wooden table with your own hands
A dacha is the place where a master wakes up in a person, a carpenter, a carpenter, a gardener, in general, a master. Buy furniture for suburban area- a simple matter, but not everyone can make a wooden table for a summer residence with their own hands. You should immediately be ready to make a garden table with your own hands for several days. But the tips below will help you make a solid table yourself.
Today we will design a fairly simple country table with our own hands in Provencal style. Such tables not only look great, but also have a fairly reliable design. It is worth paying attention to the boards. They must be even, since the appearance of our country table will directly depend on this.

When designing a table for a summer residence, it is necessary to prepare lumber in three dimensions:
- Bearing frame - section 38 X 90 mm.
- Tabletop - section 38 X 140 mm.
- Supporting bars - section 19 X 64 mm.
- Drawing
Before starting work, the most important thing is to find it on the Internet, or to independently make drawings of a table for a summer residence with your own hands. Exact schematic symbol will allow you to select lumber that will be most suitable in cross section to the dimensions indicated on the diagram. It doesn’t matter if the dimensions don’t exactly match each other, because you can always make an adjustment with an electric planer.

- Material preparation
When deciding how to make a garden wooden table, approach the issue responsibly, as the life of the furniture will depend on this:
- purchase of blanks. Professionals advise to purchase lumber from coniferous trees, which was previously well dried. Its main advantages are:
- price;
- simplicity and ease of processing by hand;
- beautiful structure;
- glue for furniture;
- 4 X 65 mm screws;
- 3 mm drill;
- drill;
- tape measure, pencil, sandpaper for grinding.
- Further actions
We will need:
- two upper transverse beams, dimensions 38 X 90 X 978 mm;
- four legs for a country table with your own hands, size 38 X 90 X 695 mm;
- two bowstrings - 38 X 90 X 921 mm;
- one longitudinal lower and one upper beam - 38 X 90 X 1575 mm and 38 X 90 X 1473 mm, respectively;
- two pieces of braces of 38 X 90 X 772 mm;
- blanks for countertops - seven pieces, size 38 X 90 X 2337 mm;
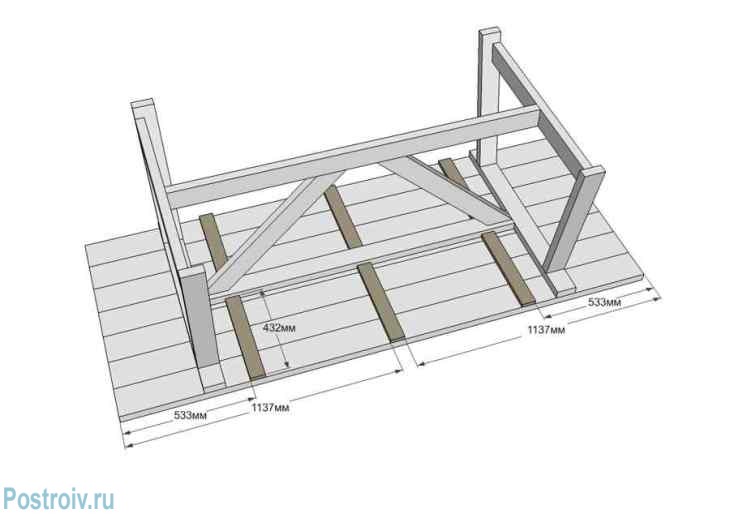
- six support bars - 19 x 64 x 432 mm.
Tip: Start work on a level surface. It is imperative to observe the angles of joining parts. The blanks, which will later become the legs of our country table, should be cut on both sides at an angle of 10 °. The slices must be parallel. But the blanks of the bowstring, which are similarly cut at the same angle, should be cut one towards the other.
Stage 2. The legs of our country table should be attached to the cross beams and fasten this entire structure with screws. Each connection has two screws.

Diagonally fasten the bowstring to the leg with inside, in the same way fastening the structure with two screws.
The lower beam must be connected to each other by both bowstrings. As mentioned above, with the help of screws.

Further in the upper longitudinal and cross beams first, holes are made for a fastener, called a dowel, after which, again, we diagonally connect the blanks of our country wooden table with the available screws.

Tip: when connecting all the elements, use glue for extra strength. Remove excess immediately.
We plant the braces on the screws.

Tip: workpieces intended for braces should first be cut at an angle of 45 degrees
Do-it-yourself blanks for the table top are fastened with screws to the transverse beams.

How to make a rectangular table for a summer residence
After developing a work plan and approving the drawings of a table for a summer residence, purchase all the materials needed for this project. Choose outdoor woods such as pine, cedar, mahogany, or pressed wood. When buying, check each board: they must be perfectly even and without any visible defects. Do not save on the quality of lumber, because your structure will have to withstand all the weather.

There are some important points, which you must take into account if you want the result to be high professional level. Do not forget about measurement accuracy and use professional tool when cutting boards and bars and drilling holes. To increase the reliability of the design, you can additionally use waterproof glue to fasten the parts. Round open edges with a router or sandpaper.
Attention! Sizes are converted from inches and may not match metric measurements. Choose lumber that is as close as possible in size. Or just customize yourself.
Tools needed to implement the project:
- hacksaw, jigsaw;
- milling cutter;
- drill and drills;
- chalk cord, tape measure, spirit level, pencil;
- safety goggles and gloves.
Time:
- From one day to a week, depending on the chosen project. If you have power tools at your disposal, you can finish the job even faster - in just a few hours.

Adviсe:
- A milling cutter will help smooth the edges of wooden bars and boards.
- Before driving screws and self-tapping screws, drill into wooden elements design guide holes.
- The heads of the screwed self-tapping screws should not protrude above the wooden surface, and for this the inlet parts of the holes must be countersinked.
- Do not use cracked or warped lumber.
- Do not apply excessive force when tightening the screws, otherwise the wood may crack.
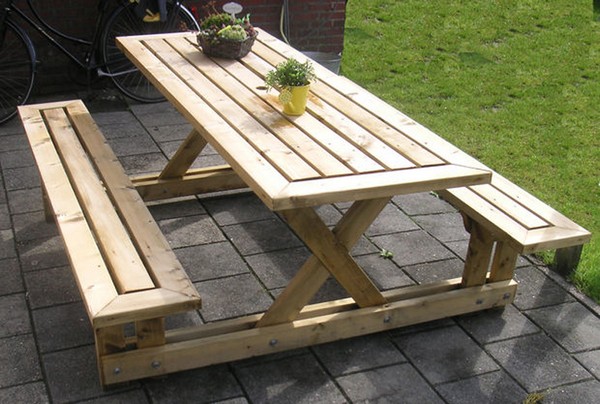
DIY picnic table. Step-by-step instruction
Materials:
- A - Legs: bars 5×10 cm, 106 cm long (2 pcs.), 43 cm long (2 pcs.) and 56 cm long (2 pcs.);
- B - Frame: bars 5 × 10 cm, 87 cm long (2 pcs.);
- C - Table top: boards 5×15 cm, length 180 cm (6 pcs.);
- D - Table top base: boards 5x15 cm, length 87 cm (2 pcs.), bars 5x10 cm, length 62 cm (2 pcs.).
The first stage of the project is the manufacture of table legs. saw off the bars required dimensions. To speed up the process, you can use circular saw. Smooth out the edges of the bars and saw-off lines with sandpaper.
Connect the bars so that you get an X-shaped structure, and fasten them with 60 mm self-tapping screws, remembering to pre-drill the pilot holes. Lubricate the joints with glue. Make sure there are no cracks or gaps left.
Fasten each pair of legs with a horizontal bar using 60 mm self-tapping screws for this purpose. Cut off the ends of the bars, as shown in the figure.
Lay the boards intended for the manufacture of countertops on a flat surface. We advise you to place pieces of 6 mm plywood between them, this will allow you to form uniform gaps. Place the assembled table sides on the table top and secure them by screwing in the self-tapping screws at an angle of 90 mm. Before fixing, make sure that the legs and the tabletop are perpendicular using a spirit level.
Place the sawn pieces of 5x15 cm board on the underside of the table top and fix them with 60 mm self-tapping screws.
Saw off the ends of the bars, which will act as reinforcing supports for the structure, at an angle of 45º. Install the supports in their place and secure with 90mm self-tapping screws at an angle.
And finally, last but not least: check if the heads of the screws protrude above the wooden surface, and fill all the cracks and holes with wood putty.
Tip: To protect wooden surfaces from the damaging effects of atmospheric moisture, cover them with several coats of exterior paint or stain.
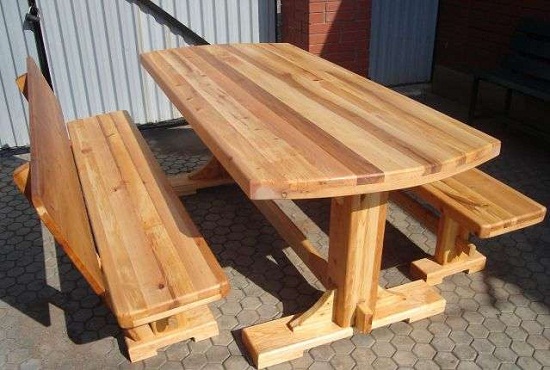
Table with benches. Instruction with drawings
Materials:
- A - Legs: bars 5x10 cm, length 95 cm (4 pieces);
- B - Crossbeams: bars 5 × 10 cm long 160 cm (2 pcs.);
- C - Tabletop fastening: bars 5×10 cm, 75 cm long (5 pcs.);
- D - Inclined supports: bars 5 × 10 cm long 84 cm (2 pcs.);
- E - Worktop: boards 5×10 cm, length 180 cm (14 pcs.).
It is worth starting work with the manufacture of legs. Since the legs of this table will be inclined, the ends of the 100 cm long bars should be cut at an angle of 30º. Connect the elements with 90 mm bolts.
Make sure the surface you are working on is fairly level. The mounted sidewalls of the table must be identical, only in this case you can hope for an excellent end result.
When the sides of the table are ready, you can start making wooden tabletop. We recommend that you put it together on the ground (floor), and then fasten it to the legs with self-tapping screws.
Tip: Remember to check the verticality of the side walls of the table with a spirit level, otherwise the end result of your work is unlikely to satisfy you.
Rigidly fix the entire structure with inclined supports. Their ends must first be cut at an angle of 26º.
Now it remains only to build benches. saw off the boards right size, place them on both sides of the table and, having previously drilled several pilot holes at a distance of at least 1 cm from the edges, secure with self-tapping screws.
Tip: To keep the seat boards evenly spaced, place studs or pieces of plywood between them before fixing them. Thanks to this little trick, all the gaps will be the same.
At the end of the work, pay attention to small, but very important touches. Fill all cracks and holes with wood putty. After the putty has dried, sand the wooden surfaces with medium-grit sandpaper.
Tip: Be sure to apply several coats of paint or stain to protect wood surfaces from water and sunlight.
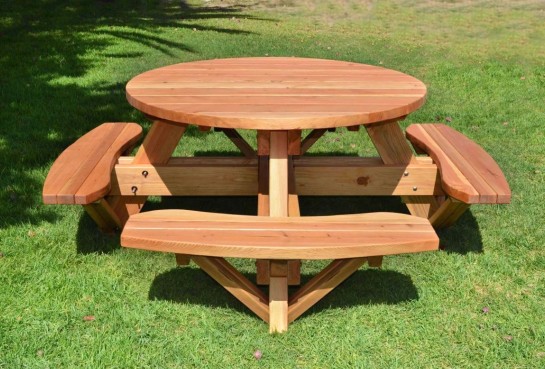
Round table. We do it on our own in the country
Materials:
- A - Base: bar 5x10 cm long 102.5 cm (1 pc.) and 47 cm long (2 pcs.), bars 2.5x10 cm 9 cm long (4 pcs.);
- B - Racks: bars 10 × 10 cm, 60 cm long (4 pcs.);
- C - Tabletop base: 5x10 cm bars 82.5 cm long (1 pc.) and 52.5 cm long (2 pcs.), 2.5x10 cm bars 47.5 cm long (4 pcs.) and 60 cm long (2 pcs.) ;
- D - Tabletop: boards 2.5×15 cm long 195 cm (9 pcs.).
The first stage of the project is to create the base of the table. To articulate its constituent elements, use waterproof glue and self-tapping screws. Make sure that the corners formed by the joined beams are straight. To protect the assembled table base from rotting from rainwater, place it on small stands made from 2.5x10 cm board scraps.
Now you need to attach four racks made of bars to the base square section. Before fixing, make sure they are vertical with a spirit level. The height of the legs may differ from those proposed by us, in this case, you should, first of all, focus on your own needs.
The most difficult stage of the project is the manufacture of countertops. Place the boards on a flat surface and mark the center of the square. Fasten one end of a 60 cm rail at this point. Rotating the second end of the rail, mark the outlines of the circle. Jigsaw with sharp blade will allow you to make a circular cut at a high professional level.
After sawing the boards of the future tabletop, we recommend that you fasten them together with waterproof glue and additionally fix them with a few clamps. Attach the bars that serve as the base of the tabletop, as shown in the picture (yellow elements should be made from 5x10 cm bars, green - from 2.5x10 cm bars).
Tip: Use waterproof glue and galvanized self-tapping screws (30mm self-tapping screws for 2.5x10cm bars and 50mm screws for 5x10cm bars) to fasten the bars to the countertop.
After the glue has dried, you must attach the legs to the base of the tabletop with 90mm self-tapping screws, pre-drilling pilot holes. Use a spirit level to check the perpendicularity of the legs and the tabletop.
To ensure that the result of your work corresponds to a high professional level, make sure that the heads of the self-tapping screws are recessed deep enough. Cover all cracks and holes with wood putty, after it dries, sand the surface with sandpaper.
Tip: Apply several coats of outdoor paint or wood stain to protect the table from moisture damage. To ensure that the base legs are also untouched by water, place the table on concrete surface and seal them tightly.
Now you know how to make your own picnic table. One has only to make a little effort, which will subsequently be rewarded with enthusiastic exclamations of friends and pleasant summer evenings spent with the family at a large table.
Table types
Everyone has different tastes, as well as ideas about beauty and comfort. But each landowner has the right to equip his summer cottage at his discretion. You can start with exactly how to make a table in the country.
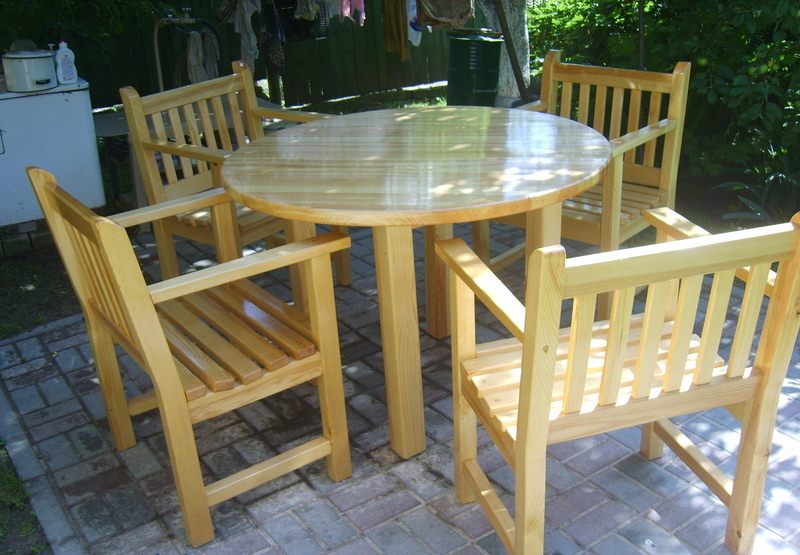
Round picnic tables
Round tables look very neat at their summer cottage and fit very harmoniously into the surrounding landscape. Their only drawback is that they take up quite a lot of space.
Rectangular tables for a summer residence
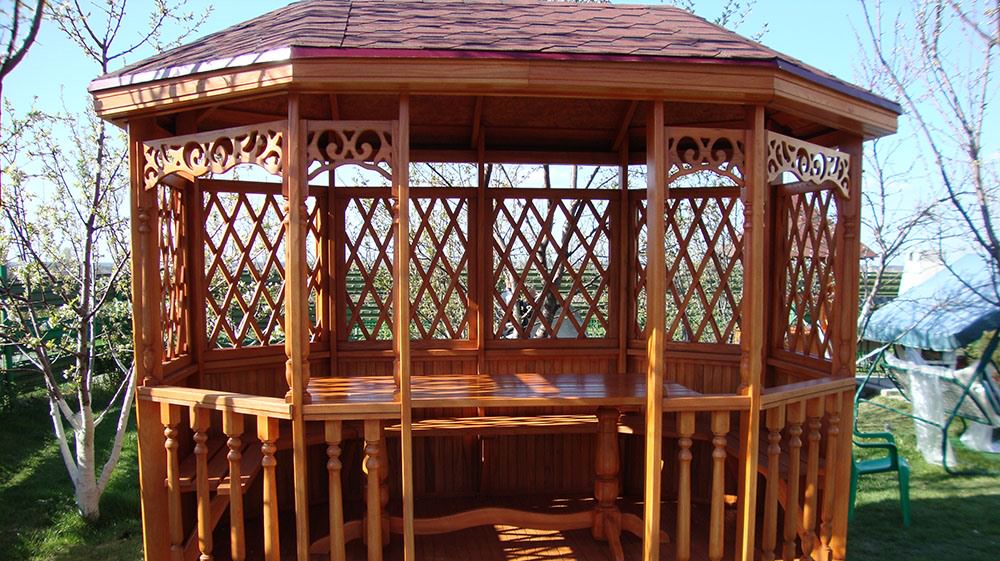
A rectangular table can easily be placed both on the lawn of a suburban area, and, if necessary, settle in a gazebo or on a veranda small size. Classic rectangular shapes have always been and will be in fashion, so that the tables will successfully fit into any interior, and will not irritate with their dimensions. In addition, such a table will perfectly withstand the entire range of dishes that constantly do not have enough space on round tables.
![]()
Enough space for everyone, or polygonal garden tables
Polygonal garden tables although they take up a lot of space, they are indispensable when a large company of people gathers at the dacha. Here there is enough space for everyone, and the elbow of a neighbor will not fit into your plate.

How to decorate a table in the country. Proper serving
When making holiday table in country house don't have to focus on the smallest details and take into account all the subtleties of serving, as, for example, at social events, pretentious parties. It is enough just to catch the mood of the invited guests. And, nevertheless, there are certain rules for preparing a table at their summer cottage for the event.
The event is best held on the street, respectively, and the table should be set on fresh air, for example, in the gazebo, of course, if available. It would be useful to prepare two baskets, which we will later put on our table. In the first one, cutlery should be carefully laid, and in the second, fruits, vegetables and herbs - the main food at country festivities. Your invited guests will be able to put their favorite food on their own, and then settle in a cozy place and enjoy the meal.
To decorate a table for a summer residence with your own hands before the holiday, you need to use more bright colors. A colorful tablecloth and colorful napkins, which should be in harmony with each other, will make the atmosphere even more relaxed and friendly, and chinaware Perfect replacement for disposable plates and mugs.

When organizing parties in a country house, table setting should be complemented by items such as flowers in vases and candlesticks with candles.
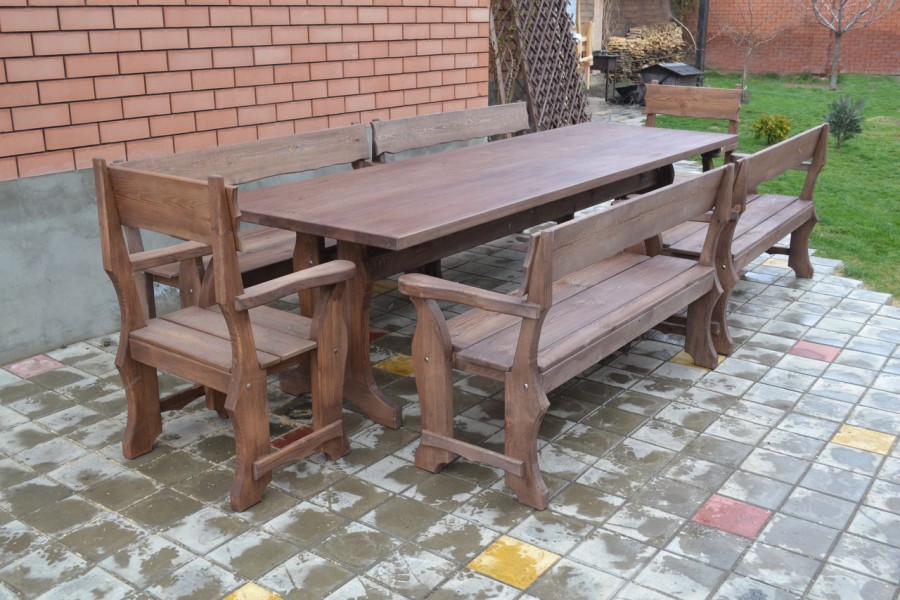
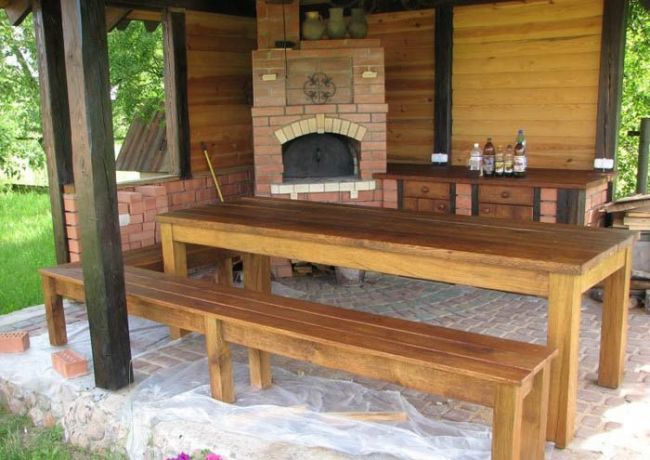
Table for suburban area- not just a piece of furniture, it is a ritual place where all household members invariably gather. In the summer, no one expresses a desire to go into the house to drink tea or have lunch. In the fresh air, the appetite is better, and the food is tastier. In order not to carry furniture from home for gatherings, you can make an outdoor table for giving with your own hands, at the same time taking care of the benches.
garden table with built-in bench
The country table does not imply the complexity of the design, so there will be no problems with its assembly, even far from carpentry and creative works personalities. We will present you some very simple and at the same time original ideas its creation, perhaps some of the proposed by us, will decorate your site.
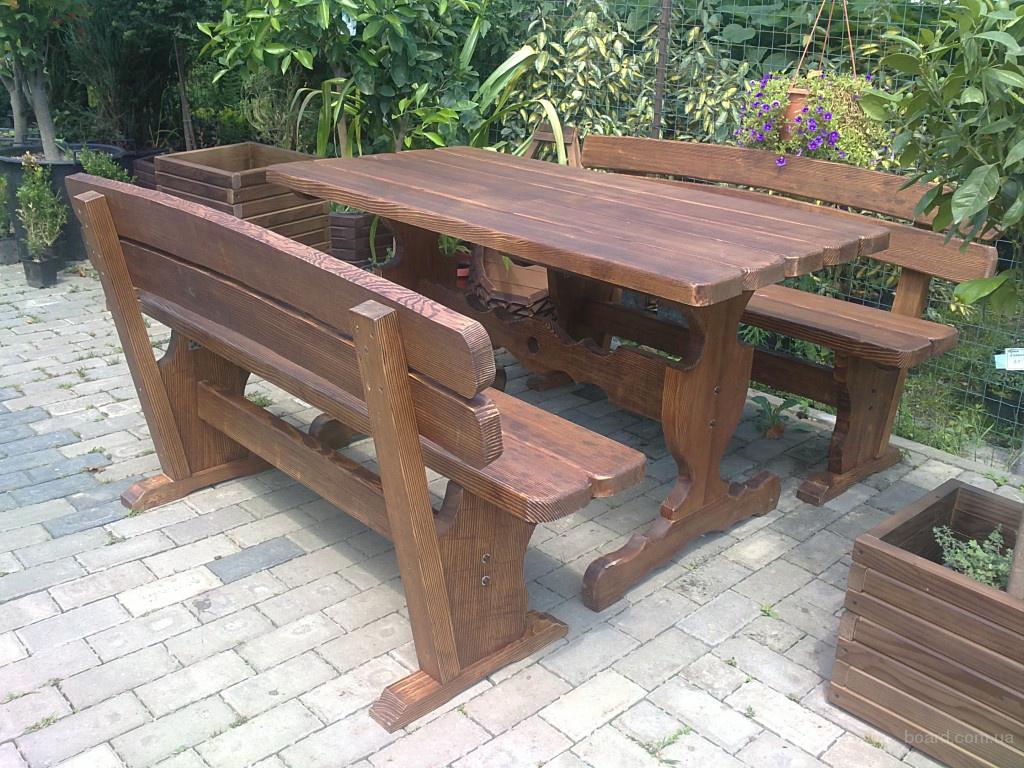
the table for giving should be durable
Outdoor furniture is subjected to serious tests, so it must be made from durable materials. Specifically for the table, you can take:
- Stone.
- Wood.
- Metal.
- Handy materials.
The tables from the latter look especially interesting. But first things first.
Wooden table

outdoor dining set
When choosing a material, pay special attention to the type of wood. Board board - strife and use, in our case, not all are suitable. Flexible and easy to work conifers unfortunately they won't fit. In addition to the fact that they need special impregnation, because they are too flammable, the resin they release will also spoil the tablecloth and dishes.
The necessary elements must be sought among hardwood blanks. On the countertop it is necessary to collect boards with a thickness of 30-50 mm. For greater strength, they are stuffed on the frame. The legs of the structure can be saddled straight or X-shaped. It is important to process all the details well so that there is no danger of driving a splinter while wiping the table. Mandatory processing of the finished product with protective impregnations.

folding wooden table at the cottage with their own hands
In order to make a table “for centuries”, varnish it, and do it, as they say, without sparing the brush. The composition must be literally rubbed into the wood, and this will be possible only if you slightly heat it in a water bath. Lacquer coating is made in three layers.
stone table

a round table and benches made of stone will last for decades
You want to do monolithic structure that strikes the imagination and creates a special mood for meals - try working with a stone. You can create a table of this type for a summer residence with your own hands or buy ready product. Shops offer granite and marble options in a wide range. There you can also pick up benches made of the same material as a set for them.

to inspire life in old table, it is enough to tile the countertop with tiles
It will not be cheap, but if you really want to have such luxury in the garden as stone table try to make it cheaper. Lay out the bases of the benches and the table yourself. For this, it will fit perfectly:
- Flagstone.
- Brick.
- modern blocks.
- Regular cobblestone.

stone stump table
These materials will be much easier to fit into the overall concept of the garden and combine them in existing buildings. On the tabletop, seats and backs it is quite possible to take fake diamond. The view from this, the composition will not lose.
metal tables
Those who are "friends" with iron and have at hand welding machine, may be interested in the option of metal furniture. Products are elegant and aesthetic, with openwork decor inserts. metal table also need to be protected from early destruction. This is done by priming the metal before the final painting.

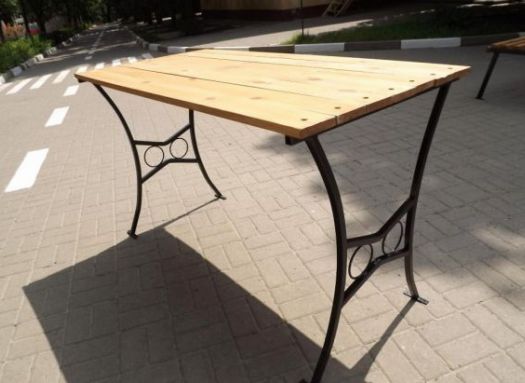
round table for summer cottage stone countertop and figured metal legs
Forged tables will satisfy the needs of respectable owners, but it is unrealistic to make them with your own hands. Similar designs are ordered by professionals. Forging requires the conditions of a forge. However, given that products of this type can be wonderfully combined with wood, stone, glass, you can only purchase a forged table base and complete it with a table top yourself.

stylization of a table and chairs under a mushroom meadow will create some zest in landscape design suburban area
If you are determined to work on creating a country table yourself and are ready to make it non-standard, look at the "unnecessary" things in each shed. Perhaps among them there are items that can become consumables for creativity.
Mixed assortment
Not less than practical option country table, along with wooden, metal, rattan, stone products, is a team of all sorts of "hodgepodge". This creation will become a multicolored "character" of your garden and will never go unnoticed. What to make it from? You will not believe! Your starting materials will be:
- Broken flower stand.
- Metal barrel lid.
- Colored plastic scraps or round glass.

a set of timber
Take a sheet of paper and try to draw on it a circular ornament in the spirit of the Moroccan style. Enlarge the creation to the required size. A photocopier will help you do this quickly.
We put the resulting blank under the glass and draw lines with a copper contour. Let it dry for a day or less. The recommended drying time is indicated by the manufacturer.

it is enough to decorate the side parts of the bench and chairs with wheels to get original garden furniture for a summer residence
Now it's the turn of painting the marked glass with stained glass paints. The main thing here is that the colors are evenly located inside the area allotted to them. If you have never worked with specific paints, it makes sense to practice on a separate piece of glass in order to understand how much you need to take for high-quality coloring of fragments. The completed painting must also be thoroughly dried.
Finished glass can be additionally decorated with elements drawn with a copper outline.
Cover the barrel lid with white paint, which will hide traces of rust, and proceed to the preparation of the main part of the countertop.
table for giving from a vazyanka of firewood
The metal part of the flower stand, which will serve as a supportdo-it-yourself table for a summer residencemust be primed, painted acrylic paint in copper color and partially patinated.
After the footboard is ready, glue the points of contact with the glass with a window seal. This is necessary for its best fastening.
Now the final stage. Putting all the pieces together: put glass top into the lid and put the composition on the stand.
It may not be very comfortable to dine at such a table, but it will be very pleasant to drink coffee in the evening cool.
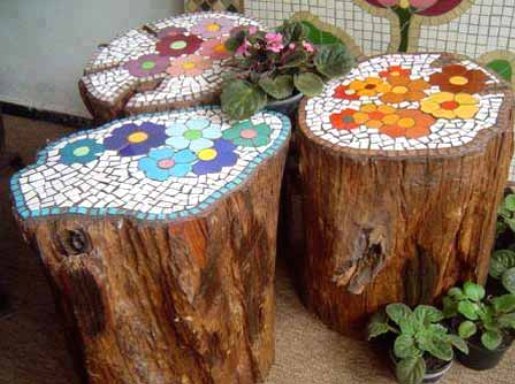
decorating an ordinary stump with a mosaic, you can get an original table
pallet models
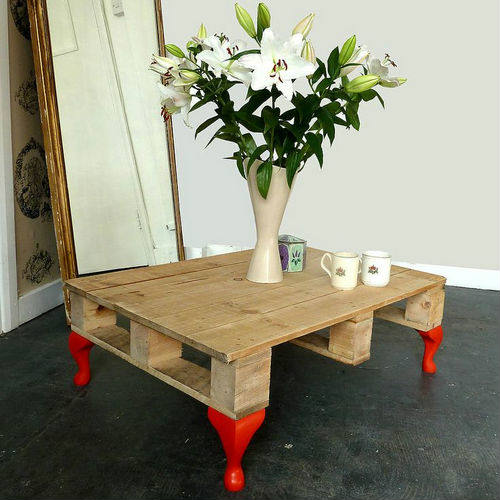
After construction country house you probably still have at least a few pallets on which packed bricks were brought or building mixtures. You do not even suspect what kind of magic wand it is for finishing the dacha. With their help, the table will be ready in a few hours, and it will have such a look that it will not be a shame to put it not only in the garden, but also in home interior. At the same time, note that you will not even incur special financial costs.
![]()
pallet garden table
A do-it-yourself table made from pallets can be designed in several ways. For example, for the simplest option, you will need:
- Screwdriver.
- Brushes.
- Sandpaper.
- Swivel wheels.
- Colored antiseptic stain.
- Screws.

mobile table for giving from pallets
The first step is to sand the pallet. At the first stage of removing the rough layer, use coarse-grained sandpaper, fine-grained sandpaper will be required for final processing. If there is a grinder in use, which is equipped with grinding wheel, use it instead of sandpaper rolls. This will speed up the preparation process.

master class for making a table for a summer house with your own hands
Turn the pallet over and attach small swivel wheels to the bottom. This is done with ordinary screws. For greater reliability of fastening, place under the last washers that can be removed from similar screws used for working with metal tiles. Don't disregard this advice. Wheel bases have enough big holes, and a screw without a lining will not be able to fix the part to a wooden surface with high quality.

step by step table making process
Now it remains to open the finished product with a wax-containing antiseptic. If you want to highlight the structure of the tree, use a transparent composition. To give color, stain is required. You can style the table:
- under oak;
- larch;
- rosewood;
- nut;
- pine.
A low wide table would be appropriate on the veranda, in attic room, bath interior.

If you want to make the summer recreation area more comfortable, make not just a table from pallets, but a whole set country furniture, supplementing it with permanently fixed benches. Such a kit can be made portable and, if necessary, moved from the barbecue, say, to the pool or to the pergola.

bright pallet table for the whole family
A creative option for a country environment would be a pallet, transformed into a countertop and equipped with vintage legs left over from an old dresser, table, cabinet. This detail needs to be highlighted in a contrasting color.
You can use such furniture in the bedroom, gazebo, on the terrace.
Reel table

vertical planks allow you to place various items
“The coil is heavy in itself, but it is easy to construct a lightweight version from it. table for giving and again, do it yourself »
Cable spool too great material for creating cottage design. Look at it - it's almost a finished table! A little decor and it's ready to use. The easiest way to decorate the coil is with twisted twine. To do this, simply wrap it tightly around its trunk. The upper disk of the structure is ground and varnished. If you want to add functionality to the product, install vertical rails around the circumference. They can also be decorated with a rope. With the advent of the crossbars, you can store the necessary items under the table.
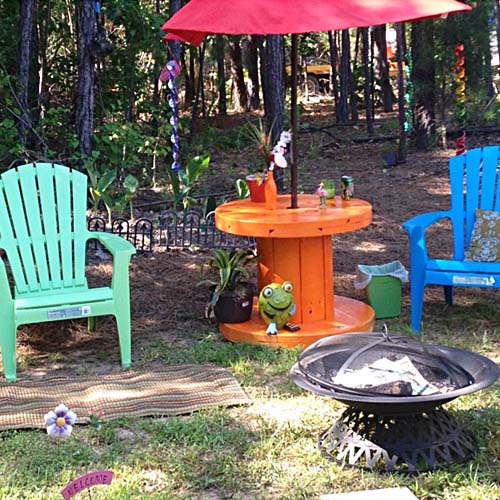
reel table with umbrella mount
The coil is heavy in itself, but it is easy to construct a lightweight version of the table for giving and, again, do it yourself. You will only need the top disc from the product, which will act as a countertop. The frame frame for its installation can be made of metal.
If in shady garden there is a stump of a suitable height and strength, then it can also be converted into an impromptu table with the help of a reel disk. This idea will be good not only for the playground, it is also rational to use it when organizing a relaxation corner for adults. By sawing a wooden disk in half, it will be possible to assemble original armchairs, which can also be put on stump legs. Get a good garden set.

the reel table can be decorated with any pattern
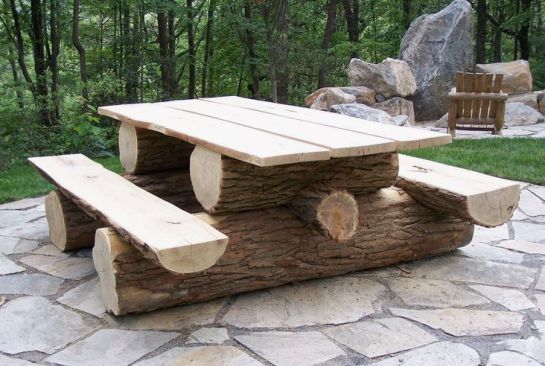
Wood table?
Why not? Such a brutal option can become a decoration for a barbecue area and even a living room. Work is nothing. We find an old thick log, impregnate it with stain and level the lower part, giving the product stability.

stump table on wheels
No less easy to manufacture and attractive in design is a mobile hemp table. By the way, its functionality can be expanded if you are not too lazy to sew a foam seat on it, which will allow you to easily transform the structure into a comfortable pouf.
Not in short supply in the country and chopped firewood. Of these, it is also not a problem to quickly build a comfortable table design for a summer cottage with your own hands. Assemble the flat base and fasten the split timbers into the countertop with a belt tie. Put it all on its feet and enjoy communication with primitive nature in full.

table for a living room cottage from an old log
Tire garden composition
Do not rush to get rid of old tires. You can make them look great landscape decor extended functionality: to use the table not just as a table, but the pouf next to it not only as a pouf, but to arrange a place for garden tools inside them, for example.

table and chairs are made in a single design style from old tires
Paint the tires in a color acceptable to you, dry, fold in a column, fastening the elements silicone sealant or other suitable composition.
Now take care of the countertop and seat. It's good to make the first durable plastic or cut them out of wood. For a pouffe, also saw out a plywood disc of a slightly smaller diameter than that of tires, glue foam rubber to it and cover it with a cloth. Removable parts are ready.
Distillation table

movable table made of old boiled wood with a wooden top
Did you find grandmother's brew in the bins? Fabulous! We transform it into a mobile storage table. We equip the bottom with wheels, and for the upper part we assemble a countertop from the boards. Having cut the boards to size, we collect them together on transverse strips, the length of which should correspond to the diameter of the welding. This will help the countertop to stay firmly in place, and not move out of the way and not turn over at the slightest load. There will be enough space inside the impromptu table to organize a mini-bar.
By the same principle, empty boxes, barrels, etc. can be converted into useful items.

original table with large metal wheels instead of legs and built-in benches
Conclusion
As you can see, assembling a table for a summer residence with your own hands is a very exciting and absolutely not labor-intensive activity. Here, even beginners do not have to be afraid to spoil something, because, initially unsuitable programs go into work. direct use objects and elements. Try your hand at an unusual business for you. Perhaps the final results will be an incentive not to stop there, but to go further. From the materials presented, you can make many more unusual and necessary things in the country everyday life!
Photo gallery - do-it-yourself table for giving:


 digital camera


![]()


 without additional processing the table will last at least two seasons