Rules for installing hinges for a cabinet door, the nuances of the process. Modern storage systems for kitchens How to install a basket in a cabinet
Furniture assembly work is considered complete as soon as the hinges on the cabinet door are installed, because the front side is very important. They always pay attention to it when entering the room, so a self-respecting owner will not allow flaws in the installation. A millimeter of inaccuracy in the calculations - and the whole effect of the new furniture down the drain. However insignificant and simple the work may seem, it is an illusion. To do it well, you need to be a master. The aesthetic perception of finished cabinet doors is only 50 percent of success. It is important that they are installed correctly: the period of operation of the cabinet without repair depends on the balance of the doors.
You need to start assembling furniture with a selection of materials and tools that will be needed for work. It is necessary to take into account the structure of materials, because there are different kinds wooden surfaces. They will require different fastening devices and fastening methods. The main methods of fixation are the lower and top position. For massive sashes over a meter long with heavy weight, add another loop in the middle. For mounting doors over nine kilograms. The maximum number of loops with a product weight of 20 kg will be 5 pieces.
Assembling furniture does not require complex mechanisms. Required set tools consists of simple, familiar things. The following tools are required to mount the door fasteners:
- self-tapping screws (4x16mm);
- roulette;
- a hammer;
- drill;
- screwdriver;
- screwdriver;
- pencil;
- level;
- chalk.
Before installing the hinges, you need to select the material for work. The main material is the fastening device. There are many types of hinges on the hardware market, they may differ:
- construction;
- material;
- design;
- functions;
- style.

They are selected based on the types of material, dimensions, type of furniture. Separate fastening devices are used for furniture that meets certain design styles. For doors of conventional cabinets, standard semi-overlay and overhead fasteners are used.
When choosing fasteners, it is better to give preference to industrial certified products. This will extend the life of the furniture. The selection of loops should be comprehensive, taking into account all the materials necessary for fastening:
- fasteners for large cabinets perform the functions of opening the doors. By technical specifications these are mechanical parts;
- the materials from which the doors are made are of no small importance, one of the significant indicators is their thickness;
- the material of the loops is also taken into account: they are made of alloys that are resistant to deformation and corrosion.
Overhead fasteners with four hinges have one fastening principle:
- the cups lying at the base of the mounting device are connected to the panel;
- the liners are placed in the base, mounted on the side of the body.

Decorative

With closer

Card

Without tie-in
The operating life of these mechanisms exceeds allowable norms thanks to reliable connections. To better understand the process of attaching a hinge to a cabinet, you need to have a good understanding of the types of fasteners. Universal hinges on four hinges have a good margin of safety:
- the interval of their opening angle when mounted on cabinet doors ranges from 90 to 165o;
- they can be adjusted in three different planes;
- the fastening device consists of two elements:
- planks will be installed on the side wall of the furniture;
- hinges are screwed to the cabinet doors.

Varieties of fastening loops
In the assembly of cabinets, various hinges are used. More often than others, there are fasteners with four hinges. In everyday life they are called frogs. These fasteners fit all cabinets with doors:
- clothes;
- children's;
- kitchen;
- for equipment;
- bookstores.
They are divided into subspecies, depending on how they will be installed. Products have a wide scope, are used for all types of cabinets.

For children

For kitchen

For bookstore

For clothes
Before installing the fastening device, you need to take into account the features of the doors:
- for corner cabinets or pedestals of any configuration choose hinges that, during installation, will be fixed at an angle of 45o;
- for a cabinet in which the doors are installed on the inner walls of the furniture without closing it, you need to choose an internal hinge;
- for cabinets in which both doors are superimposed on a common side wall, you need to cut in a half-overlay hinge;
- a door designed to close the sidewalls of a niche is fixed with overhead hinges;
- in addition to hinges consisting of 4 hinges, in the practice of assembling furniture, fasteners are used, consisting of 2 parts that connect the axis;
- so that you can open the doors at an angle of 180 °, you need to fix the device with inverse hinges;
- piano loops with simple mechanism used for kitchen cabinets. They consist of steel or brass bands connected by wire. This type of fasteners can only be installed in kitchen cabinets, since for other furniture this mount will be fragile.
When choosing furniture fittings, it is important to remember that when installing hinges with four hinges, they are mounted to the side walls of the cabinet with self-tapping screws, 4x16 mm in size. At the same time, the mount in the cup should have a diameter of 26 mm, the holes will have the same diameter.


How to markup
Before installing furniture hinges, marking is carried out and blanks are made for the subsequent stages of work: drilling and mounting the fastening device. For marking, it is important to know the number of loops per door. The answer to this question follows from the weight and dimensions of the cabinets. To withstand heavy, bulky cabinets, you need 3 or more hinges. Lightweight cabinets can withstand two fasteners. Taking into account the recommendations given in the table will allow you not to worry about the strength of the fasteners.
You need to mark with a level, pencil and tape measure. Compliance with the following order of work will help to make accurate calculations:
- fasteners will be mounted 20-22 mm from the edge;
- the distance of the hinges from the ends of the door should be 70-120 mm;
- if more than two fasteners are to be supplied, first mark the extreme points, then evenly mark the remaining ones.
To make the markup more accurate, special templates are used. When placing several fasteners, make sure that they are not at the level of the internal elements of the cabinet (ends, shelves).

Correct markup
After completing the markup, drilling is performed. When assembling furniture with your own hands, rely on the following recommendations:
- holes in the hinge bowl are drilled along the marking lines on the doors;
- the fastening device is placed in a niche, leveled up to 180o;
- carry out the mark of the installation points of the loops;
- drill holes that are needed to attach the mounting device to the door;
- the door is leveled where it will be fixed. Make notes on the closet;
- holes are prepared;
- holes are drilled for the striker plate.

Drill with 35 mm Faustner bit

Start drilling


finished hole
Installation of fastening loops
When installing the mounting device, it is important to know how to properly position it, this determines the life of the cabinet. We advise you to place the fasteners in one line so that the load on the hinges is uniform. In case of non-compliance this requirement loops will not withstand the operational life. All joints marked with an awl or sharp nail must be clearly visible. For these purposes, the working surfaces are wiped. All work must be done in detail: excessive fuss can cause marriage.
Before fastening, a thorough check of all parameters of the location of shelves, cabinet doors is carried out. The ideal option is to draw up a sketch of the installation. If all the elements are ready, you can begin installation:
- sashes need to be tried on to the sides of the cabinet at the marking places;
- secure the door in place. AT drilled holes insert into cups, connect to the door. Errors must not be allowed: all elements must be connected exactly in size so that the door opens effortlessly;
- striker can be connected vertically;
- when using fasteners, it is necessary to mount them “deaf”, they should not have errors. It is better to do the mount with an assistant;
- after installing the hinges on the door, try them on the cabinet. They must match exactly. Dots are marked on both sides. The correctness of the connections will make the operation of the doors hassle-free;
- finish by checking the connections.
There is no need to worry if the doors do not move easily when first opened. The door leaves will develop over time, and after completion of work, the hinges are lubricated with machine oil and wiped with a soft absorbent cloth.

Alignment with a square and designation of the mounting holes of the hinge with a pencil

Inserting a hinge into a hole


Self-tapping screws

Hinges installed on the facade
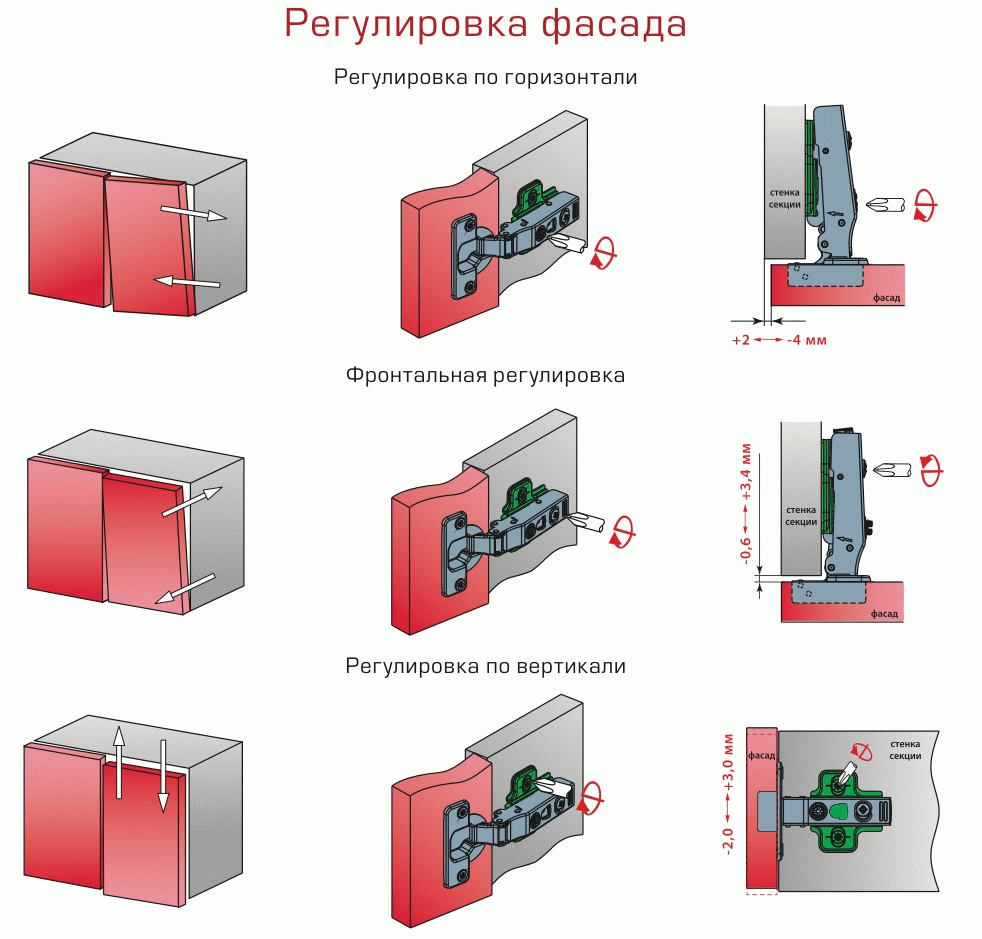
Types of adjustment of fasteners
What is regulation and why is it needed. This fixes the problem that occurred during the installation of fasteners. Before it is carried out, it is necessary to make a diagnosis in order to detect the problem. Having established the cause, you should slightly loosen the fastener bolt or tighten it more strongly. Adjustment should be made whenever the doors begin to sag. This procedure has three varieties:
- depth adjustment is needed in rooms with uneven floors, it is necessary to loosen the fasteners or tighten the self-tapping screw. For this work, an ordinary screwdriver will do;
- horizontal adjustment is required, especially if the floor is uneven, to eliminate the gap formed between the cabinet and the door;
- vertical adjustment is needed to hang the doors at the right level. The procedure is systematic: you need to adjust the position of the cabinet doors so that they do not sag.
The nuances of mounting on glass sashes
The type of fasteners, specially made for glass leaves, differs from previous devices. On the glass doors you will need to hang special hinges that have great design, adjustment in three different planes. The device includes:
- sealing ring to be screwed to the glass;
- decorative overlay, (it must be screwed to the side walls);
- fastening loop;
- a cap that closes the loop on the front side.
A simple option for glass doors can be hinges, which include 2 parts: plastic seal and a loop. It is attached to the hole under the hinge and on the glass.
Installation on glass doors must be carried out taking into account the characteristics of the material. It differs from other types of fastening, has its own characteristics:
- mark up for installing fasteners;
- drill holes in the cabinet frame with a drill;
- using self-tapping screws, insert a loop into the niche;
- connect fasteners with glass or mirror using clamps;
- to protect the surface from damage, install rubber gaskets between the glass and the mount;
- finally screw the mount.
It is best not to drill into the glass to prevent accidental chipping and damage. This is fraught with the loss of doors.
Installing wide hinges is advisable on the doors of cabinets made of chipboard, since this is a loose material that will begin to crumble over time. To keep the mechanisms in working condition, they need to be lubricated with engine oil from time to time to protect them from dryness and corrosion. In cases of drawdown of doors due to the location of the cabinet in a damp room with uneven floors, it is necessary to adjust the fastening mechanisms.
Mounting the mounting device on the cabinet door is a responsible job, but it is feasible to do it yourself. All of its steps are doable. Particular attention should be paid to the markup so that the product is pleasing to the eye and serves for a long time without failures and breakdowns.

Furniture hinge for glass

Installation furniture hinges on glass
Sometimes attaching a mirror to a cabinet can be quite difficult, because it is very important that it does not fall and hold tightly without trembling. In practice, the installation of mirrors can be performed in various ways:
- on the double sided tape;
- with the help of special stops;
- on silicone glue;
- for screws.
Experts advise buying such mirrors that have an additional protective bar with reverse side. Such a product will be much stronger, and even if it breaks, the fragments will not scatter.
Features of mounting the mirror on double-sided tape
Fasteners on double-sided tape is the most in a simple way. For this you need:
- measure the mirror in advance and draw with a pencil on the cabinet the border where it will hang, stick adhesive tape around the entire perimeter;
- glue several strips in the center at even intervals;
- carry out direct installation.
But too large mirrors cannot be attached in this way.
Other ways to mount mirrors
It is also quite easy to install the mirror with the help of the slats, especially if you need to place it horizontally. To do this, it is enough to clearly measure the mirror and attach special strips around the perimeter that will hold it tightly. To make it convenient, attach them in turn.
One of the most durable methods is the use of silicone. Immediately you need to draw a place where the mirror will be placed. Then silicone should be applied in strips - it is not necessary to apply it to the entire surface. Also, the stripes should not be placed too close to the edge. It is advisable to attach the mirror to the detached door, and install it back on the cabinet after the glue has dried.
Screws can also be used to attach a mirror. For this, special diamond drills are needed so that the surface does not crack. It is also best to moisten the product in advance, and place cardboard or fabric under the mirror.
If you're going to fit everything you need in your tiny kitchen, you'll need help. Check out our list of the best products to help you make the most of your small kitchen's limited space.
The Magnetic Knife Wall Hanger is a great way to keep your knives close at hand and free up drawer space. Pictured is a Grundtal pendant available from IKEA.

A kitchen utensil hanger is a great working kitchen tool. Hang one above your worktop and place anything you can hang on a hook on it. Or attach it to the wall to hang pots and pans on it. Now all the utensils that you often use. Will always be at your fingertips, and you. The hanger that you see in the picture can be found in any IKEA store, as well as any related parts (hooks and shelves).

It is possible to save a lot of space in the kitchen by attaching a trash can to inside cabinet doors. In addition, this bucket will not constantly annoy your eyes. The model in the photo is made by Simplehuman.

Not enough space on your worktop? Get a cutting board that can be placed over unused burners. Board pictured courtesy of Local Made.

Remove roll from paper towels from the countertop by hanging it on a special holder in one of the kitchen cabinets. This holder is from Plew Plew.


Magnetic spice containers are indispensable when you need to collect in one place all the little things in the kitchen, not just spices (although they are great for this). They can be attached to any metal surface or to the side wall of the refrigerator, as in the case in the picture. Similar containers can be found on Amazon.com.

Removable shelf for kitchen cabinet doubles usable space kitchen furniture and deprives you of the need to lift a mountain of heavy dishes to get what you need from the bowels of the cabinet.

Keep everything close at hand with the turntable, perfect for kitchen items like spice jars or tea. In the photo - a variant from The Container Store, consisting of two shelves.

Wine glasses are beautiful and it would be nice if they were always easy to get, especially if you have guests. The problem is that they always take up a lot of space in the closet. A wine glass hanger that can be attached to the bottom of your kitchen cabinet will help you save a lot of space. The pendant in the picture is designed for 9 glasses.

Nothing transforms a kitchen quite like a small mobile kitchen table, which we can easily provide you with additional workplace, and . The table in the photo is made by Target, but you can also get a similar version from IKEA Bekvam.

A basket attached to the cabinet door is a great place to store your cleaning products: they are much easier to get and give you extra space.

You probably don't keep a lot of magazines in your kitchen, but plastic tray for magazines and documents attached to inner surface kitchen cabinet is a great place to place narrow and tall boxes (for example, boxes with foil or cling film). Such a tray can be bought at any stationery store and independently adapted for kitchen needs.
It is problematic to store them together with dishes because of the clutter of space, and it is impossible to allocate a special place because of their non-compact shape.
Where do you store pot and pan lids? Until recently, I kept the pans in the cupboard, stacking them one inside the other, and attaching the lids somewhere nearby.
Keeping lids on top of pots, as most inexperienced housewives do, means cluttering up the entire kitchen with containers. And since in most apartments its area is very limited, this method can be immediately rejected.
In most cases, another storage method is also not suitable: a pile or a “matryoshka”. If for pans such an organization is quite justified, then the protruding handles of the lids will create a very unstable structure that will scare you with a roar every time you want to open the drawer.
I must say, it annoyed me terribly, because to find an object right size it was sometimes very difficult. And then I decided to organize the storage of caps "in a scientific way", using household appliances.
I have collected, in my opinion, the most interesting ways cap storage. And you only have to choose best option- depending on the size of the kitchen, the volume of cabinets.
Let's see what are the options?
Special boxes
In enough spacious kitchen, where at least 1 whole cabinet is allocated for storing pots and pans, or even more, it can be provided pull-out shelf(height from 5 to 15 cm along the sides), which can be located above or below the storage area for pots.

If your kitchen set has a similar design, feel free to load it with lids.


It is advised to arrange in one layer, because otherwise you will not optimize, but rather clutter up your workspace.

Compartment for storage of covers in a deep drawer
If you are making a kitchen to order or are ready to invest in convenient internal dividers (like Rationel from IKEA), pay attention to practical organization inside the boxes shown in the photo in this section. On one or both sides, a special narrow compartment is separated, in which the covers are ideally placed.

Ideal for deep drawers floor cabinets at least 60 cm wide, otherwise there will simply be no room for pots and pans.


Retractable sections
If you are ready to invest in retractable metal internal elements kitchen cabinets - look for those options that have special compartments for lids.

Pots and pans will be stored in the same cabinet, which, of course, is very convenient. Which utensils will be at the top, and which ones at the bottom, depends on the manufacturer.


An economical option is an analogue of the IKEA Variera drawer made of white plastic. 
A more solid one looks like a narrow mesh shelf with limiters. 
Both options move along guide rails, which are fixed to the lower inner part of the cabinet next to one of the side walls.
Table stands for a pair of lids and other utensils
If there are few kitchen utensils, and there is enough space on the countertop, you can store the lids in a similar table stand. And with them - cutting boards, flat dishes and even small pans.


We place covers on the shelves of wall or floor cabinets
It can be called a modification of desktop storage, but more capacious. You can use tabletop dryers for dishes or wooden racks for storing plates, or - look in stores special devices for covers of this type. All this economy is placed inside deep drawers or (more often) on the shelves of cabinets, usually floor-mounted.
 |
 |

Wall racks for lids
If you have nothing against open storage of kitchen trifles, pay attention to the possibility of organizing a place for lids from pots and pans on the wall.

These racks are quite economical in price, and the height (how many covers are designed) can be chosen according to your own needs.


And now let's talk about the most economical (and original) ways to store pot and pan lids. If instead of spending money you prefer to invest your own skills and resourcefulness, make your own organizer racks.
Rails for storing lids - on walls and cabinet doors
The simplest and a budget option. Suitable for storing lids on the wall or the inside of a kitchen cabinet door. Measure the distance of the surface allocated for this purpose, and then simply purchase the appropriate railing.

Mounting type and material - any. Screw on with the included (or custom-selected) fasteners and enjoy keeping your pot lids organized.
If you use roof rails to organize a large-scale storage system on a free wall, you can simply place covers there too: you can hang a variety of items on hooks. kitchen utensils, and behind the crossbars - store covers.


Storage with hanging shelves with delimiters: 
The method shown in the photo below is also easy to implement by hand. home master. you will need a perforated board of the right size + hooks to it. Frying pans can be hung on hooks fixed in the usual way. And fix the covers with hooks placed at an angle.

Now let's move on to closed storage, which, for sure, will be appreciated by the hostesses, who are sure that correct order only cabinets with doors can provide.

There are many ways here. The main advantage of any of them is hidden storage. How to choose? Focus on 2 parameters: the size of your closet and the budget allocated for these handy fixtures.
Lids on the cabinet door:
We are accustomed to using only shelves in cabinets. What about doors? From the inside, additional hooks and baskets can be attached to them in order to important little things were always at hand, and for them it was not necessary to climb deep into the locker.
In the photo, I offer only a part of the options for using this usable space, it's all up to your imagination!

In my opinion, it is best to allocate space for the covers just on the inside of the doors. Here are some hanging ideas: hooks, towel rails or other fixtures - the choice is yours, as long as they are as easily accessible as possible.

It is most convenient to use devices specially designed for hinged doors floor cabinets or the most compact of wall cabinets. Big choice such devices are in IKEA.
 |
 |

Several Yet original ways- for economical housewives:
Plastic hooks with a reverse adhesive layer. This is the mount I used :)

A container for one cover is made using 2 hooks attached in accordance with its diameter. 
You will need 2 pieces for each cover, they will support it from the side to the bottom. 
Mark and glue. That's all there is to it! 
A selection of ideas and tricks varying degrees convenience and aesthetics to help organize your home. Perhaps some of them will solve your problem. Enjoy!
Wire rack for organizing wrapping paper rolls. Instead of a lattice, you can use metal mesh, a wooden plank or even a cord.

Jars attached to the bottom surface of cabinets or shelves for storing fasteners, accessories, hair clips and elastic bands for girls or any other small items.

Attach an office clip to the back of your desk and finally keep wires and cables out of sight.

Add a board and wheels and you have a trolley for books, crafts, toys and more.

Attach plastic bags to the inside of the pantry door - they will not only be easily accessible, but also free up space on the shelves.

Dish dryer as a children's art center - for storing paper, coloring books, crayons, pencils and plasticine.

PVC pipe for organizing additional space in the closet. Ideal Solution for small apartments or children's clothing. By attaching the pipe to the spring cornice, you can even adjust the height.

Use photo frames to organize threads, cords and twine. Convenient and beautiful.

Add wheels to the drawers and they can be rolled under a bed or closet, freeing up space in the room.

Attach wire baskets to the inside walls of your closet and store gloves, scarves, and other accessories there.

Place a plastic basket at the front of the dishwasher and keep all those pesky jar and container lids in there. Simply run the line between the dryer bars and the basket holes.

Use rolls from toilet paper to organize your cables and cords. You can decorate them with ribbons and braid.

Hang baskets on curtain rods to make use of normally unused wall space. Baskets can be attached with S-hooks or ribbons. This is a great storage idea for towels, toys, tools.

Additional shelf above the door. This will be useful in the bathroom, bedroom, garage or even in the children's room to remove those items that should be out of the child's reach.

Cut a few holes in your bathroom shelf for extra toothbrush storage.

These are shoe organizers. However, they are great for storing any other things. Place them on cabinet doors for extra storage space for cleaning products, toys, yarn, scraps, and more.

This pocket is for cell phone made from empty plastic bottle from under the shampoo

Glue or nail clothespins to a wooden plank and use to store belts, scarves, beads. In addition, you can attach a small basket to the clothespins for storing other small items, such as bracelets.

Shower hooks - for storing bags.

A basket attached to the underside of a countertop to hide and remove the electrical cord from the floor.

Stick an envelope to the inside of your diary for temporary storage of notes, souvenirs, checks, business cards, etc.

The idea for a summer residence is mega-capacious coffee table from boxes. Attach them to the board and attach the wheels.

Store kitchen utensils in plastic containers inside cabinets and say "no!" excavations in search of the desired object in the depths of the shelves. It will also be useful in the pantry and garage.

The spines of old books as a decor for a secret storage box. Side walls is the front cover of one book and the back cover of another. Keep spare remotes, batteries, charging device- everything that should be hidden from the eyes, but accessible.

Elastic cords for storing balls and large toys.

Magnetic tape on the inside of the locker for storing hairpins, tweezers, manicure accessories.

Glue magnets to your children's glasses and stick them in a place accessible to children. This will save you from having to constantly take out glasses from a high shelf and wash them several times a day.

Tape dispenser from a plastic bottle. Connect the bottom halves of the two bottles and make a cut on the side. Use colored rubber bands to hold the bottle halves together and hold the ends of the ribbons in place.

Carabiner for organizing hair bands. Attach a hook to the inside of the cabinet to make the elastic bands easily accessible.

A great idea for those who need two jobs but don't have enough space in the house. The table is cut in half and attached to a rack shelf.

Attach the nightstands to the wall, they become taller and more comfortable to use, as well as allow you to place a basket under them for additional storage.

Shelving on the inner door of the cabinet in the nursery for storage board games and books. In the pantry, you can store spices or stocks of household supplies.

Tidy up your laundry system with these plastic baskets. Assign your basket to each family member and teach them to be responsible for their belongings.

Use wire hangers to store shoes. Just fold them into hooks and decorate with paper or cloth.

Additional cabinet storage with aluminum drink can lids.
