Drawings from plywood for artistic sawing with a jigsaw. What can be made from plywood? Novelties of the world of creativity Products from plywood drawings
Plywood - universal material, which is commonly used in furniture production and private construction.
With a little skill and creativity, with the help of this building material, you can make children's toys, decorative crafts for personal plot, small household items. It is noteworthy that this does not require special skills, knowledge.
Let's see what interesting products you can make plywood with your own hands, having some free time and patience left.
Why plywood
The choice in favor of plywood was not made by chance. Unlike ordinary wood, this material has the following advantages:
- strength . The structure of the sheet is multilayer, which provides a certain rigidity and resistance to deformation;
- availability . Available in any range hardware store and is sold in an affordable price segment;
- ease of processing. For cutting crafts, a power tool is not always required, it is quite possible to get by with an ordinary jigsaw;
- security . The material is environmentally friendly, so even toys can be made from it without fear that the child will develop an allergy.
Plywood initially has smooth surface, so no additional .
Products are divided into varieties, which differ not only in cost, but also in quality. For crafts, sheets of the 1st and 2nd grade are usually used, which do not have veneer delamination, chips and other defects. If the decorative decoration is supposed to be used in the garden, it makes sense to give preference to moisture-resistant plywood.
Figurines for the garden
Do-it-yourself plywood crafts for the garden are the most practical and inexpensive way decorate the yard. Here you can fully realize your creative potential by making the garden or flower bed more original and interesting.
Template selection
A key feature of plywood is its versatility. From a flat sheet, you can cut out almost any figure according to the template. A cat climbing over a fence in a country house, clutching a piece of sausage in its teeth; a curious person watching neighbors through binoculars; a herd of reindeer grazing in a flower bed. There are a lot of options, while crafts can be flat or voluminous.
Inexperienced craftsmen are better off starting with simple flat figurines, which are done in 1.5-2 hours, maximum - in a day.
As a sketch, you can use the ideas of other masters by looking at the design options for a personal plot on the Internet or create your own funny drawing. It is better to make a template drawing on tracing paper or graph paper, and then carefully transfer it to the plane of the plywood sheet. A good option is to create an image in Microsoft program power point.
Make a good sketch plywood crafts With this app, you can:
- move to working window programs like drawing;
- go to the scaling section and set the aspect ratio based on the dimensions of the existing plywood sheet;
- break the finished drawing into fragments;
- print them one by one on the printer.
After that, the individual fragments of the picture are glued into one sheet, the template is carefully cut out along the contour, applied to the plywood and outlined with a simple pencil. This operation takes no more than half an hour, but this technique allows you to create spectacular patterns, even without artistic abilities.
Manufacturing technology
After drawing a sketch on a plywood sheet, the figure must be cut out.
For thin sheets of plywood, a regular jigsaw is suitable; thicker material is faster to cut with an electric tool.
The saw cut should not be carried out strictly along the contour, but leaving a margin of about 1 millimeter. This is a common precaution so that the canvas doesn't accidentally slip to the side and ruin the pattern. If the decorative decoration involves through cuts, the starting groove is drilled with a drill, after which a jigsaw file is passed through the resulting hole.
After completion of work, the remaining irregularities are removed with a small file or sandpaper.
fine finish
Of course, even the most original figurine requires at least coloring to become brighter and more interesting.
Before applying the pattern, the entire surface that is supposed to be painted must be treated with fine-grained sandpaper, making the plywood a little rough. This will provide better adhesion of the wood to paintwork materials. Then you need to remove wood dust remaining after processing, degrease the surface with a solvent.
If the template is multi-colored, it is recommended to mark the dividing lines masking tape. Fragments of such crafts are best painted separately to avoid accidental mixing of colors.
The paint is applied in many layers, with each subsequent layer being applied only after the previous one has completely dried. Such a coloring scheme will make the drawing more durable: the paint will not fade in the sun, peel off after rain.
At the final stage, the finished surface can be varnished to make the figure more resistant to impact. environment. Lacquer is applied in a similar way: a multilayer texture with the obligatory drying of each layer.
Note! If the figurines are removed from the garden in winter period, you will have to update the paint about once every 3-4 years.
To increase the moisture resistance of the picture, it is recommended to choose acrylic paints for outdoor use. Materials for facade works more resistant to ultraviolet and moisture, reliably protect the tree.
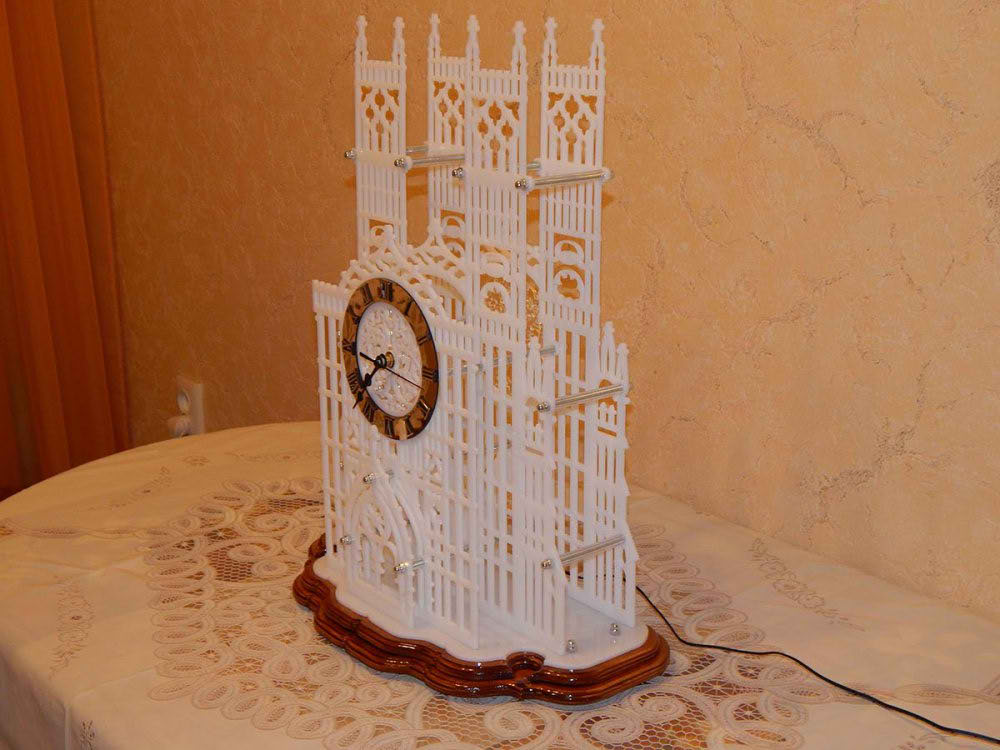
Volumetric figures from plywood
beautiful, voluminous crafts in 3D format, you can easily make your own hands. In general, such products are manufactured in a similar way to the scheme given above. The only caveat: the figure will consist of several elements.
For example, if we are talking about a rooster, which will serve as a good decorative ornament lawn, then the three-dimensional figure will consist of the following parts:
- torso, including head and tail;
- two wings: one on each side;
- a pair of paws.
Each element is cut out separately according to the drawn up sketch. After that, the figure is assembled into a single whole with glue or decorative nails. According to a similar scheme, you can make any animal (cat, dog, bear cub), mushroom, gnome, lantern and much more. Souvenir products of small sizes are also cut out, which are installed on a shelf.
Children's toys made of plywood
You can make almost any children's toy out of plywood. For the smallest, pyramids or mobiles that are hung over the baby's bed are suitable. For example, you can make a pendant from multi-colored stars that are attached to a fishing line and rotate slowly, evoking pleasant dreams.
For older children, various cars, tanks, airplanes, puzzles are suitable. It is noteworthy that a child can be involved in the creation of each toy, which will allow not only to have fun, but also to teach the boy how to handle the tool.
The girls won't be left out either. Can be cut out of plywood Dollhouse and do everything interior environment: beds, chairs, dishes. The appearance of plywood crafts for children is much more interesting than that of factory toys, because they are made with soul. They can be presented for a birthday, and it will be a very unusual and pleasant gift.
Such compositions do not contain toxic substances, therefore, they will not create health problems, even if the child pulls the toy he likes into his mouth.
We equip the kitchen
Given the specifics of the application, crafts for the kitchen are made of dense, waterproof plywood.
This material is not afraid of moisture and steam, so it can last for several years. Carved shelves, boxes for storing spices and other necessary trifles are usually made from plywood, cutting boards, hooks for oven mitts, souvenir fridge magnets.
If you have some experience, you can assemble a whole kitchen set, which will not differ from the products of furniture factories. To do this, use thick sheets of plywood, a jigsaw or a hacksaw. And of course, you need to have some free time and desire.
If your new hobby has become cutting out various different elements decor, pyrography or wood carving, then our advice would be to start with a material such as plywood.
There are several significant reasons for this:
Plywood is easy to work with.

If in your hands is good tool, and you will start with figurines small size, then their production will take you only a couple of hours.

The material is universal in use, so you can literally make anything you want from it: furniture, toys, small decorative elements.

All this can be a wonderful addition to the interior of your home.

Features of working with the material
What is a plywood sheet. It consists of several sheets of veneer at once, which are interconnected with glue.
Important: plywood can be different types: based on beech, birch, pine.

Not only the quality depends on which sheet you choose. finished product, but even its structure and color.

If you are going to cut out various figures with a jigsaw, then you need to choose the most quality varieties plywood.

They are particularly durable, which ensures that the plywood does not crack, ruining the entire appearance products at the most unpredictable moment.

If you are going to start work immediately, immediately on the day of purchase, then choose only dry sheets of wood.

They will not break a jigsaw file every 10 minutes.

To work with plywood, you will need to acquire a number of tools.
In principle, they are always the same for all types of products, so only a one-time investment is required:
- jigsaw
- Jigsaw files
- Hand or electric drill
- Ruler
- grinding machine
- Burner.

Framework
If you want to beautifully decorate your home or present to someone close original gift, make your own plywood frame.

The preparation process will not take you much time, because you only need to get the necessary materials.
Note!


They are standard for all cases, and we have already mentioned them before.

We will offer you workshops on light plywood crafts. You can make both a regular straight frame and carve various patterns and figures on it.
First you need to make a template, and after that you can cut it out, trace the outlines with a pencil on plywood and start the manufacturing process.

This stage is not only the most responsible, but also the most exciting. If you put a piece of your soul into the work, everything will definitely work out. Finished construction must be varnished. Ready!

doll furniture
This task will be a real test for parents.

Note!

The so-called test of acquired design skills.

Creation feature doll furniture is that children absolutely do not tolerate falsehood.

If they see that the furniture is not worked out in detail, but instead cooker for your favorite doll you brought an ordinary bar rectangular shape, then you simply cannot avoid serious insults and childhood disappointments.

The second feature of making such crafts from plywood using a jigsaw is that all this furniture must be carefully worked out with sandpaper or a grinder.

Your child will constantly be in contact with these self-made toys, and in the case of poorly finished edges, they may get hurt.

Note!

Well, the last feature of crafts from plywood and at home is that the materials for such furniture must be absolutely non-toxic and normal for constant contact with the child, because he can drag it into his mouth or take it to bed with him.
This is not a simple application or paper craft, so you need to take it seriously, following a whole list of actions that need to be completed.

Performing work from plywood
how simple furniture it is made in detail, and then assembled into one piece of furniture, so do-it-yourself plywood crafts should be done separately.

To do this, first of all, prepare special drawings of plywood crafts, on which you specify the dimensions of all parts and their fastenings.

Take the finished plywood sheet and attach the paper part template to it.

Circle the part with a pencil and cut along the contour with a jigsaw.

After that, each detail must be cleaned with sandpaper or a grinder, and only then must the piece of furniture be assembled.

When you're done with the whole set, open it up with varnish.

Below are provided different variants and a photo of plywood crafts. Choose the one you like.

Photo of plywood crafts


An electric jigsaw is used by home craftsmen to create beautiful products from plywood and wood. Such crafts are used for a variety of purposes. They can be decorative or serve as household items. Every home master who is interested in this activity should know the features of working with the tool.
How to use the "miracle jigsaw", and what can be cut with it, you should learn more.

The subtleties of working with a jigsaw
The jigsaw is a versatile tool that is used for cutting curly products from various materials. All that is required is to choose the right canvas. It is important to figure out how to cut shapes complex shapes. Many novice craftsmen need to figure out how the bevels of the boards and various components of crafts are made. Electric jigsaws work best when cutting wood conifers. However, the thickness of the elements to be cut must not exceed 3.8 cm.

The blades that will be inserted into the jigsaw quite often bend and leave beveled edges. A straight cut is usually obtained with a well-sharpened blade. In this case, do not put too much pressure on the tool during operation.

First, run the saw at the highest speed, and then select the angle of the blade. This will result in fewer chips. In materials with increased fragility, it is necessary to drill holes. This will allow you to saw off the workpiece without unnecessary risk. As a result, no chipping of the part is formed.

To cut quickly, use coarse blades. However, it should be borne in mind that when choosing such consumables, it will subsequently be harder to sand them. Blades for electric jigsaws are made in such a way that the cut is performed when the blade moves up.

Choosing the Right Blade
Choosing a blade for an electric jigsaw is a major consideration when cutting wood and plywood. Often a jigsaw lies idle in the household of a home master. However, when you need to perform a complex pattern, this tool is needed more than ever.
Quite often, an electric jigsaw is used as a tool for cutting a hole in a countertop or during installation. kitchen sink. Such a tool is also used for cutting metal. When using other saws, it is often impossible to complete the tasks. The jigsaw is a versatile tool. It can be used by both novice and experienced House master. As a result, you can get excellent results using different materials- plastic, wood, plywood.

How to work with the tool
The jigsaw is used for a variety of tasks. Its main function is to cut curved shapes into wooden products. Getting smooth curves with this tool is pretty easy. The base of the tool should be kept level on the workpiece. When the preparation is completed, you can start the main work. Then the engine is turned on and the device is slowly moved along the line marked in advance, at a distance of 2 mm from it. Fine grinding is done later.

The saw should be moved at such a pace that the blade easily cuts through the material without any deviation. The jigsaw works great for cross cutting boards. The stop must be used if you want to get a perfect cut. Bevel cuts using a jigsaw are fairly easy to make. Before work, it is necessary to firmly fix the workpiece.
If a bevel or vertical cut is being made, the distance between the blade and the stop is set to the same as on circular table. If it is necessary to perform an accurate and long cut, it is difficult to work with a jigsaw. In this case, first use circular saw. The final cutting of the element is done with a jigsaw. It must be pressed firmly against inside marked line.

Where to start
Well organized first workplace. Fulfilling this condition is especially important for high-quality cutting. If the space is arranged correctly, it will be convenient and comfortable to work. This condition is necessary to create a quality product.
The thrust structure is special machine. In the people it is called "dovetail". Such a table is made of a rectangular board. It has a wedge-shaped incision that goes into working area. The dovetail is attached to the edge of the table.

Work electric jigsaw carried out standing or sitting. The workpiece should be located at a distance of 40 cm from the eyes. It is necessary that the lighting lamp be installed in front of the master. It is placed at an angle to the surface.
Tool preparation
The saw blade in the jigsaw must be fixed in a strictly vertical position. The teeth should point down. Before work, it is necessary to stretch the canvas well. The degree of tension must be adjusted by compressing the frame. The device must rest against the edge of the table. Then you should tighten the lambs with pliers. When the frame is straightened, the canvas will stretch.
To cut small details with a jigsaw, or figures with sharp contours, you need to choose small files. In this case, it is required to use canvases with large quantity patterns per inch. When using them, the jigsaw does not jam when making turns. The saw cut is neat and thin. If large-sized plywood products are made, it is required to use canvases with large teeth.

How to cut with a jigsaw
To obtain an accurate cut, a number of conditions must be met:
- The hand that holds the jigsaw should only move vertically.
- All movements must be performed as smoothly as possible, without jerking. In addition, they must be performed with maximum amplitude. This is necessary to use the entire canvas.
- The workpiece smoothly rotates with the second hand during operation.
- Do not apply too much pressure on the workpiece. Side pressure on the blade is unacceptable.
- Artistic sawing is carried out only when the file moves from top to bottom. For this reason, the reverse movement must be carried out without pressure.

At work manual jigsaw it must be conducted not along the marked line. The canvas should be drawn along the inside of the contour. This is due to the presence of a cut after sawing. After completing the work, one of the clamps should be loosened. The frame of the device should not lose elasticity.
jewelry box
You can make a beautiful and roomy jewelry box for Valentine's Day or International Women's Day. To complete this craft, you will need to use precise drawing. The work is divided into several stages.

Work area preparation
Before you start cutting out the details of the box, you should prepare your working space. For this, a special table is installed. On it, crafts will be created. The following rules are followed:
- There should be no unnecessary items at the table while working.
- The cutting tool should always be at hand. There is a specific place for it.
- Workbench. It is placed in a ventilated area. The room should be light and spacious.

However, it is not always possible to install a jigsaw table in the right place. To ordinary apartment the workbench is usually placed on the balcony if it is insulated. At the same time, you can work on crafts in any weather.
Choice of plywood
For the box, you need to use a plywood sheet. When a workpiece is selected, attention should be paid to quite often appearing defects - cracks or knots. The workpiece is selected with a thickness indicated in the diagram. To transfer the drawing to the material, you should:
- Process the workpiece with sandpaper. You should start with coarse-grained material. This treatment ends with fine-grained sandpaper.
- The surface needs to be level. To do this, you need to fix the sandpaper in grinding device. If not, you can take a small bar and wrap it with sandpaper.
- Produce grinding along the layers of wood.
- The workpiece is polished until its surface is as smooth as possible.

After such preparation, the craft template should be transferred to it.
Transferring the template to the plywood sheet
Before starting cutting, transfer the prepared drawing to a plywood blank. First you have to print the drawing on paper. To transfer, you must have a tracing paper and a pen. First, the template is attached to the workpiece with adhesive tape. Having a blank in front of you, you should think about how to cut out different elements of the box, saving the available material as much as possible.

sawing out the casket
While cutting, you need to follow some rules:
- The jigsaw should be perpendicular to the product.
- It is necessary to ensure that all movements are performed as smoothly as possible. You should not rush while cutting - this way you can make a mistake and ruin a piece of material.
- A cutting table must be used.
- First you need to cut internal elements. Only after that they start cutting the contour.

When leaving the cut line, it is necessary to correct the line with a needle file during the assembly of the product.
Advice! In the process of work, the hands will get tired. In this case, performance drops significantly. Fingers and eyes are seriously tired. All this can lead to hand injuries. That is why it is necessary to take breaks at work.
Assembling the box
Before assembly, please read the drawing of the product. Combining the details of the jewelry box does not require fine work. Before gluing different elements, you need to make sure that they can be put together without problems. After several assemblies of the product without any difficulties, you should start gluing the parts. Usually, a PVA composition is used for this purpose. During operation, it is necessary to eliminate smudges of glue.

Assembling a locomotive model
When the material is prepared and the drawing is printed, the process of transferring the scheme to the workpiece should begin. In this case, it is necessary to take into account some rules of work. Many home craftsmen tend to transfer the drawing to plywood using only copy and pencil. However, you can use the "Black Ribbon". When this tool is selected, the drawing is glued to the workpiece. Then the scheme is washed off the plywood with water, which allows you to leave only the marking lines.
Then you can make holes in the details of the future steam locomotive. In the details of the locomotive there are parts of the grooves, sawn from the inside. To make such elements, holes should be made in them. hand drill or an awl. The holes must be at least 1 mm in diameter. In order not to spoil the surface of the table when creating holes, place a plank under the workpiece.

Now you can cut out the details. Do not rush when cutting. The basic rule is to hold the jigsaw at a right angle to the workpiece being processed. All elements must be performed smoothly, avoiding irregularities.
Wood and sheets (plates) based on it are one of the cheapest and most pliable materials. For those who like to work with a jigsaw, plywood is primarily of interest.
It is her home craftsmen who most often choose to make various crafts. If you organize the work correctly, you can create real masterpieces.
Crafts from this material are made for various purposes, but basically they can be divided into two groups - to decorate rooms or territories (for example, fences from the inside, garden plot etc).
Kind of plywood
If you focus on the optimal combination of indicators such as quality and price, then PSF or FC products are selected. It is characterized by resistance to moisture and temperature fluctuations. This alone is enough to ensure the durability of the handmade crafts. But between these varieties of plywood there are fundamental difference- in component composition glue that holds the layers of veneer together.
In the first case, it is toxic, so FSF sheets are used only for outdoor work. But for crafts intended for placement in the house, FC plywood is quite suitable. Its counterparts are much more expensive, and therefore are not considered as a material for simple, easy-to-perform crafts.

Type of sheet grinding
It is easy to understand: Ш1 and Ш2 - respectively, one- and two-sided; NSh - rough plywood. That is, the craft will still have to be “brought to mind”, polished. The choice for this parameter depends on how it is planned to be designed and placed in the future. A sample fixed on the wall and, for example, a figurine (stand, vase, toy or other), which can be viewed from all sides, are different things.

plywood texture
A lot depends on personal preference here. If planned when applying protective coating crafts to preserve the natural look of wood, then it is better to purchase plywood from birch veneer under varnish. But for subsequent coloring, it is desirable to choose pine.
For various plywood crafts, it is advisable to focus on oil or acrylic based. The explanation is simple - they are less prone to fading in the sun, and therefore do not have to be updated often. outer coating; it won't change original view for several years.
Plywood grade
When choosing a sheet for crafts, it must first be inspected for knotty and inclusions. Significant defects will not only complicate the cutting of the material, but also initiate the appearance of cracks or “pits” (as a result of the same knots falling out). Next - inspection of the end surfaces. During the cutting process, plywood is subjected to dynamic loads (vibrations). If at least signs of veneer peeling are visible on the side parts, such material should not be purchased, even if its price is too tempting.

In the future, in the process of making crafts, many problems will arise. As a result - rejection of plywood and its increased consumption. In total terms, this will come out approximately the same in terms of money compared to the acquisition of high-grade material, and in terms of the time spent and the quality of work - a big minus.
Sheet thickness
If crafts are cut out with an electric tool, then it is limited to 30 mm. For a manual jigsaw, it is advisable to use relatively thin plywood; maximum three layers. That is, no more than 9 mm thick.
What you need to work
jigsaw
This is a priori, since we are talking about making crafts using such a tool. The question is different - which one is better to work with. Electrical Models they are much more expensive than manual counterparts, but they have a lot of advantages. About in .

For example, high cutting speed and accuracy, edge cleanliness, the ability to change cutting parameters, and a number of others. If a plywood craft is not a one-time, short-term hobby, then it’s worth spending money on an electric / jigsaw. It is universal, and it will come in handy more than once on the farm, because, depending on the type of file, it can “work” not only with wood, but also with non-ferrous metals, plastics, and plexiglass.
A little more difficult with a manual jigsaw. Its design is quite simple - a frame with screw clamps and a handle + file.

The nuance is that cutting blades break quite easily (from excessive pressure, changes in position hand tool), and therefore it is advisable to purchase them with a margin; well, they are cheap.
Hacksaw
It is needed only at one stage - when cutting dimension sheet into separate pieces. Doing this with a manual jigsaw is an unpromising and unprofitable occupation; a lot of time and files will be spent.
Stand
No one will lead cutting plywood on weight; This is clear. Cut out the details by laying the sheet on the countertop - the risk of damaging it. It is in order to ensure the "safety" of the latter that the stand is needed. With your own hands, it can be made from cutting boards. What such a device looks like (one of the options) can be seen in the figure.

Fixing the stand on the base is done with clamps (on a non-working table) or self-tapping screws (in case there are carpenter's workbench). Although this is not the only mounting options. It is easy to understand how to proceed, in accordance with local conditions.

Skin
The ideal tool for fine woodworking -. But for plywood crafts that are no different large areas she doesn't fit. Therefore, only sandpaper; medium fraction - for primary grinding of workpieces and with fine grain - for finishing.
Additionally
- Files and files.
- Awl.
- A simple pencil and carbon paper.
- Glue, if the craft is created composite or multi-level, that is, with the fixation of two or more curly fragments on separate sections.
- Varnishes, paints, stains.
Examples of drawings and sketches of plywood crafts


Copying "one to one" in this case is hardly advisable. Any work done by one's own hands is a process with a creative component. That is why the dimensions should be determined independently, depending on where it is supposed to place (or how to use) the craft. For example, whether it will “look” in a particular place, whether it will organically fit into the interior of the room.
Even if you liked the drawing, it is not difficult to change the geometry of the figure by applying the scaling rules. Especially when it comes to drawing a contour on plywood with a simple pencil; correct any mistake, in some areas it is quite easy to correct something. It is not much more difficult to modify any sketch, bringing something original, original to the sample.


There is another solution - you can download from the Internet any picture that you like. Printing it in the right scale is not a problem. It remains only with the help of carbon paper to transfer it to plywood and shade the areas that need to be cut out. This is when it comes to curly crafts. With a contour sample it's even easier; cut exactly along the line - and that's it, you're done. The only thing left to do decoration products.


Basic rules for sawing with a jigsaw
- Laying under a sheet of rigid substrate. It is in order to ensure the hardness of the surface under the plywood that the stand is used. A sheet, even a small one, bends quite easily (under pressure), therefore, without this device, a high-quality cut, strictly along the line, will not work.
- The working body of the jigsaw (sawing) must be strictly perpendicular to the end of the sheet. And constantly, throughout the entire process of cutting the material.
- The tool is fed along the line in a translational motion, but without effort. Otherwise, the file will break immediately. As well as when it deviates from the "vertical".
- Sawing holes "deaf", that is, somewhere on a sheet of plywood, indented from its edge, is carried out as follows. At any point of the outlined contour, a "hole" is drilled with a slight offset to the center of the fragment. The diameter is chosen so that the file easily enters it. After attaching it to the tool frame, you can cut in any convenient direction.
- Figured drank in plywood involves sharp turns, smooth bends, and so on. First, at the point of change of direction with a jigsaw, without changing its position, it is necessary to make a small hole in the material. To do this, you need to continue the cut with a file, strictly maintaining the orientation of the tool, and at the same time turn a piece of plywood. As soon as the plane of the cutting part coincides with the required direction of further cutting, it can already be carried out along the intended line.
Having mastered the manufacture enough simple crafts from plywood, you can take on more complex options. As an example - self assembly furniture (racks, bookcases, original hanging shelves). With a skillful approach to business, plywood makes excellent countertops, cutting boards, window trims, and so on. It is easy to make a folding chair from this material, and various modifications. Who is interested in this.
Plywood also makes excellent frames for paintings and photographs. Those who have a plot will be able to do the decoration of outbuildings; the same gazebo, a house over a well, or something else. Lots of options. The main thing is to want to learn.
In the process of preparing for sawing with a jigsaw, one should not forget that all drawings and drawings are nothing more than the basis for developing your project. A little imagination, time, effort, and you can make a really real masterpiece out of plywood.
First of all, you should properly organize the workspace. Despite the seeming formality, it is very important condition. A properly equipped place provides not only comfort and convenience, which is important when working for many hours with a manual jigsaw, but also directly affects the quality of the project being implemented.
As a persistent structure, a special machine-table is used, behind which the name "dovetail" has stuck. It is a small rectangular board with a wedge-shaped cutout that turns into a working field for sawing. The dovetail is attached to the edge of a table or workbench with a clamp.
They work with a manual jigsaw while sitting or standing, placing the workpiece for cutting at a level of 30-40 cm from the eyes. The light source is placed in front at an angle to the work plane. Compliance with these rules will allow you to control the cutting line as accurately as possible, thereby improving the quality of the sawn project.
Which jigsaw to choose?
Despite the simplicity of their design, modern manual jigsaws have a number of features that you should pay attention to when choosing. It is better to refuse models with a sheet iron frame by choosing a jigsaw made of a metal tube. This option provides a better tension of the blade and eliminates its distortion, so that the file will not “take away” during operation.

The file is fixed in the frame by tightening the upper and lower wing nuts. When choosing a jigsaw, pay attention that it is equipped with high-quality steel lambs with wide ears. This will significantly increase the ease of use of the tool in the process.
How to properly prepare the tool for work?
The file in the jigsaw is fixed strictly vertically, with the teeth down. The fabric must be stretched. The degree of tension is regulated by compressing the frame: the tool rests on the edge of the table or is squeezed by hand, after which the lambs are tightened, if necessary, tightening them with pliers. When straightened, the frame will provide the proper tension to the blade.

For sawing with a hand jigsaw small parts, figures with sharp contours and complex patterns on wood use small files with a large number of teeth per inch. They do not stick on turns, creating a thin and neat cut, leaving no chips. To create large plywood products and long straight cuts, blades with large teeth are used, which cut an order of magnitude faster.
Let's get down to business. How to cut plywood and wood with a jigsaw?
To get an accurate and accurate cutting line, a number of basic rules should be observed:
- The hand with the jigsaw should only perform vertical movements.
- Up and down movements are made without sharp jerks and with maximum amplitude in order to use the entire working length canvases.
- The second hand in the process of sawing smoothly unfolds and moves the workpiece.
- No need to press the file on the workpiece and exert lateral pressure on the blade.
- Sawing occurs only at the moment when the file moves from top to bottom, so the reverse movement must be carried out freely without pressure.

Working with a manual jigsaw, it is not driven along the pattern line, but along the inside of the contour, since even the thinnest blade leaves a cut, the width of which should be taken into account. This is especially important when sawing products with precise fitting elements, for example, or.
When finished, do not forget to loosen one of the clamps so that the jigsaw frame does not lose its elasticity.
And what about the development of basic techniques?
The most intricate patterns are always based on a series of basic shapes and elements, having worked out which you will be prepared to complete complex projects. It is desirable to do this thin plywood up to 3 mm thick.
Obtuse and right angles : the jigsaw moves smoothly without pressure on the workpiece, as if idling; at this time, the second hand slowly turns the wooden blank to the desired angle.
Inner circular contour : for this, a small hole is drilled in the inside of the figure, through which the file is passed. When sawing a circle, the cutting line is drawn along the inner contour of the pattern. The stroke of the tool should be of medium intensity; the workpiece unfolds in proportion to the movements of the jigsaw.
oval outline : When sawing such a figure, increase the stroke of the jigsaw in steep sections, turning the workpiece in this place faster.
sharp corners: a neat sharp corner without chips and other defects is obtained by bringing together two cuts.

Advice! Sawing complex openwork patterns, start work from the center wooden blank, uniformly shifting to the periphery. This will greatly simplify the sawing process and avoid breakage of fragile work at the finishing stage.
You felt the jigsaw well, achieved a smooth ride and kept a neat cutting line, but here the movement of the tool is difficult and the saw blade is wedged in the workpiece. This is a typical situation that occurs when carving plywood with a hand jigsaw. It happens for the following reasons:
- Overheating of the file - when long work The fabric expands with heat. To avoid similar situations take short breaks or periodically wipe the canvas with a damp cloth.
- Features of a wooden blank. The movement of the jigsaw may be difficult due to the fact that the file has run into a denser area: a knot, a clot of glue in plywood, etc.
- On long cuts, the file can be clamped between two almost separated pieces of plywood. You can continue comfortable sawing by fastening the divided ends with a clothespin
What kind of plywood is needed for sawing with a jigsaw?
Practice shows that best material for work with a manual jigsaw - birch plywood with a thickness of 2 to 8 mm. It is affordable, easy to use and highly durable.
To create small details or a “dense” openwork pattern, it is more appropriate to use three-layer plywood up to 3 mm thick. It is easy to cut and at the same time it is quite durable. The probability that you will spoil the sawn curl at the next jamming of the canvas is much lower.

When choosing a material for crafts, pay attention to the fact that the plywood is even and without a large number knots. Examine the end for the presence of air chambers, their presence indicates uneven application of glue. It is better to refuse such low-grade plywood, otherwise you cannot avoid a large number of chips that will spoil the appearance of the product.
But what if you use wooden blanks?
For all its practicality, plywood does not have such an expressive texture as a board. When cutting plank projects, you can use these advantages: play on the difference in colors and shades, the orientation of the wood fibers (as in intarsia), etc. Crafts made of wood have a more attractive end (without a layered structure like plywood) and are much easier to process with a finishing compound.

For sawing with a manual jigsaw, blanks made of soft and hard rock up to 10 mm thick. When choosing a material, give preference to tangential sawn boards. Blanks radial cut use is not recommended, because. they have parallel annual rings, which, due to their hardness, will lead the jigsaw away when sawing.
What to do if chips constantly appear?
The number and size of chips depend on the type of plywood used, the quality of the canvas and how correctly the master cuts. Cutting with a manual jigsaw without chips will help a few tips and professional tricks:
- using low-quality plywood that is prone to chipping, cut more intensively by installing blades with a fine tooth;
- work with a file with a reverse (reverse) tooth designed to minimize chipping.
- glue the saw lines with reverse side adhesive tape or masking tape;
- moisten the back of the workpiece.
How to transfer the scheme to a wooden blank?
There are several convenient options transferring the printed drawing to a wooden base:
- using carbon paper and redrawing the template manually;
- gluing the sheet on double-sided tape;
- sticking the picture on the glue, the remnants of which are rubbed with sandpaper at the finishing stage.