How to make roller blinds for windows at home? Step by step instructions for sewing curtains. Video: curtain ties - master class
- Choosing a curtain model
- The choice of material for curtains
- Building a curtain pattern
- Making curtains for windows
- Tailoring a simple curtain
Modern publications are full of photographs from different options beautiful and modern curtains for windows. But not every novice craftswoman decides to make curtains with her own hands. Due to the apparent complexity of the design, people think that only professionals can realize the idea.
Even curtains that are simple in design can look fashionable and original, you just need to choose the right fabric and decorate.
In fact, any, even fantasy window curtains are assembled from simple geometric elements. And if you understand how the pattern is drawn up, then the work no longer looks complicated. You will need a little time and patience. And then your window will acquire an individual style that fully matches your taste.
Choosing a curtain model
Before proceeding with the manufacture of patterns, it is necessary to correctly choose the future design of curtains. Because the curtains, which look attractive on the page of the magazine, in reality can spoil the impression of the interior of the room as a whole. To prevent this from happening, you should follow a few simple rules:

- Lush, multi-layered curtains are appropriate in large rooms with wide and high window openings. For small rooms it is wiser not to use models with numerous frills, folds and ruffles.
- The lower the ceiling, the longer the curtains should be. Floor-length curtains visually increase the height of the room.
- The less daylight rooms, the lighter the curtains should be. If the windows of your room face the north side, then it is wiser to choose bright, juicy shades of the material. dark colors it is wiser to leave for well-lit bedrooms and living rooms.
- Lambrequin of any shape visually shortens the curtain. Here are the decorative vertical elements(for example, ties) visually lengthen it.
For small rooms, it is wiser to choose window curtains without a pattern or with a subtle geometric ornament. In this case, a narrow vertical strip or a cage made in 2-3 colors will look good. For a children's room, curtains can be decorated with cheerful "peas" or small images "scattered" throughout the canvas.
If you are decorating a living room or office in a classic, for example English, style, you can give preference to a complex but restrained ornament. But for the kitchen, the pattern of curtains can be almost anything. Here the choice depends on your taste and preferences.

Curtains in a teenager's room can be straight but brightly colored.
But it is worth remembering that what harder design curtains, the simpler the pattern of the material should be. For airy, lush French curtains, you can choose a plain or fabric decorated with small flowers. Such curtains will decorate a window in a living room or a room for a girl.
When choosing a bedroom curtain model for a teenager, do not forget to consult with your child. After all, he will have to live in the room, so in this case it is necessary to be guided not by your taste, but by the preferences of the little owner.
Back to index
The choice of material for curtains
As a rule, daytime curtains are sewn from light, translucent materials. Veil, tulle, organza, thin cambric or silk are well suited for them. These materials transmit light and air well, do not interfere with the ventilation of the room.
But the night curtains should be dense, preventing the penetration of light into the room from street lamps or car headlights. Therefore, it is wiser to opt for densely woven fabrics. In this case, curtains are sewn from velor, gabardine, poplin, satin and other fairly thick fabrics.

Curtains can be sewn from silk, tulle, organza, thick curtains are sewn from velvet, velor, satin.
But when choosing a material, it is worth remembering that the thicker and stiffer the fabric, the worse it drapes. Curtains made from the wrong fabric will not lay down with beautiful folds, creases will appear on them. Don't have to choose too much heavy materials, since they will sag on the eaves under their own weight.
In order to check exactly how the curtains will behave on the window, lift the edge of the material and evaluate the folds formed. Ideally, the resulting "swing" should lie in soft, rounded and deep enough folds. Make sure that the future curtain does not stick to your hands, does not become electrified and does not cling to clothes.
If you are a beginner dressmaker, then it is wiser to sew your first curtains on the windows from inexpensive synthetic materials which are easy to handle. But at the same time, it should be borne in mind that such a fabric does not pass air well and dust sticks to it. In addition, not all "synthetics" can be washed on their own.
Do not opt for slippery, loose materials. Sewing curtains from such fabrics is quite difficult. For the same reason, do not buy jacquard fabrics with embossed, woven patterns, intricate embroidery, sequins or beads. Choose a material with an embossed ornament. Be sure to ask the seller the rules for caring for future curtains.
Back to index
Building a curtain pattern
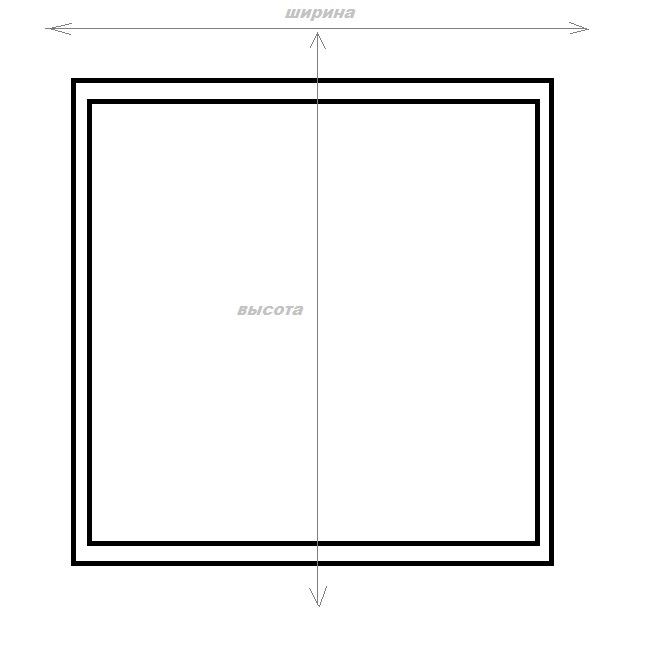
To build a curtain pattern and calculate required amount material you need to take measurements from the window. The following measurements must be taken:

Figure 1. Pattern of French curtains.
- height from the top edge of the eaves to the floor;
- the width of the window opening;
- the width of the eaves from one fastener to another.
If the width of the cornice is narrower than the window, then it is wiser to change this element, since in this case the curtains will not close the partition and an ugly gap will remain between them. Further, the width of the future canvas must be increased by 2.5 times. This way you form a supply of fabric for horizontal folds. It is not needed only if you are going to sew smooth japanese curtains or curtains with horizontal folds (for example, French). Then your pattern will look like shown in Figure 1.
After you have decided on the overall width of the curtains, you need to take into account the allowances for the hem of the fabric from the sides. Usually they are 1.5-5 cm. The thicker the fabric, the narrower the hem should be. Some novice craftswomen do not process the material, but leave the factory edge, positioning the canvas so that it is on the sides. But such a technique does not add beauty to curtains.
Next, you need to calculate the length of the curtain. It should be equal to the measure of the height from the floor to the edge of the cornice plus 10 cm. In addition, it is necessary to leave an allowance on top (3-5 cm) and bottom (7-10 cm). Most likely, such a curtain will be too long. But this supply of fabric is necessary to adjust the size of the curtains. It is much easier to cut the fabric later than to build up the missing material. The calculation of a simple canvas and the drawing up of a pattern is shown in fig. 2.

Figure 2. Fabric calculation for simple curtains.
Naturally, if your main curtain will consist of 2 panels, then allowances are added separately to each canvas, and the width of the window must first be divided by 2, and only then the resulting figure should be multiplied by 2.5 (additional material for the formation of folds).
You can make your own changes to the suggested measurements. But it is worth remembering that the lambrequin should not exceed 1/3 of the length of the entire curtain in height, and ties should not fall lower than 2/3. Otherwise, the composition of the curtain will be disturbed.
If you are planning to decorate your windows, then making kitchen curtains with your own hands will not be difficult for you. Each of the options is not difficult to manufacture and does not require as many materials as ingenuity.
Such curtains are made in a few hours. The top edge of the towels is folded so that their lower part barely touches the windowsill. Pin and sew the folded edges. Sew the buttons along the line and you can cling the curtains to the eaves.
Curtains for the kitchen from fabric napkins
You will need 2-4 napkins for one curtain, depending on the size of your window.
The top of the napkins needs to be adjusted by 8 cm to hang it on the ledge. Sew five buttons at an equal distance from each other, sewing them through all layers of fabric.
Attach the second napkin to the bottom of the first, with an 8 cm overlap. Secure these two napkins with the next five buttons. Repeat this for each napkin until the desired length is reached.

To create such classic curtains, attach rods to the window frame at the top and bottom of the window. After measuring the distance between them, add 30 cm to get the length of the curtains. To find out the width, add 5 cm to the length of each rod.
Mark 15 cm from each end, pull the threads across the entire width. Thread the curtains into the rods. Divide the fringe into pieces by tying it around the rods. Trim the ends evenly.

Tablecloth curtains
A tablecloth can always be turned into fun curtains. Such tablecloths can be purchased at various sales or in second-hand shops. It is also possible to purchase fabric with stains or scuffs, as you can cut them out and still save a significant amount of it.
You can hang such a curtain simply by threading its ends through special holes in the hangers. You can buy them at sewing and hobby stores.

Scarves as curtains
A faux silk scarf (approximately 0.5 x 2.3 meters) will add elegance to your window. Look for scarves in second-hand stores or consignment stores. Attach hooks to one end that will hold the scarf on decorative nails driven into the window frame.
It is better to hang such curtains in the room where you have breakfast, so water splashes or steam from cooking will not get on the scarf.

Vinyl curtains
Wide striped vinyl curtains will be the main decorative element of your kitchen. When painting vinyl curtains, spread them across working surface and press down with a load.
First, apply shellac to the curtains for glossy surfaces. This will allow the paint to easily lay on the curtains. Glue the tape.
Apply latex paint with a roller. Then remove the tape.
Bring out your collection of old-fashioned shawls by hanging them on a curtain rod covered with ribbon or fabric. Such curtains will look great over the sink, because the scarves are at a fairly high height.

patterned curtains
Decorate your window with patterned curtains
To decorate the fabric with patterns, apply paint to its surface on water based following the manufacturer's instructions. Before dyeing, the fabric must be washed, without the addition of fabric softener.
Stretch the fabric over the work surface with plastic coated, cover it with a stencil and apply paint with a sponge.
Patterned vinyl curtains
You can easily make beautiful patterned curtains from inexpensive vinyl curtains.
First you need to apply shellac. Then make the background cream or white color, you can also apply a primer as a base. Buy a stencil that matches the design of your room. For a vintage look, you can use special paint, after application of which the curtains will acquire the effect of light aging. These paints are constantly on sale.
For a more formal look to the room, hang long vintage or new curtains. The usual width of 1.4 m is enough for a window with a width of 65 cm. For more wide window you need to cut the fabric so that it gathers in loose folds along the eaves.

Sew on the edging on the sides and bottom of the fabric. Thread the rod into the fabric.
Pull the curtain to one side and tie it with a ribbon that is attached to the hook.
kitchen curtains
Corrugated curtains on rods on both sides will securely hide your kitchen from prying eyes. On the glass shelf on the brackets, you can put flowers or various decorative items.
If you want to open a window, you can simply remove the curtains from the rod below.
Such curtains hang on a thin rod and are held by cutlery with bent handles. Sew squares of fabric or napkins into one canvas. Find cutlery or old silverware on sales. Bend the forks and spoons into hooks. Make small slits in the curtain for spoons or forks and put the curved handles on our rod.

Wrap the cornice with a cloth, thus combining it into one piece with the window. Combine it with simple curtains, concentrating all the attention on it. As a result, your kitchen ceiling will become visually higher. In our example, the ball tips are covered with the same chintz fabric.

A creative approach to sewing curtains with your own hands
Replace the usual loops with buckles for attaching curtains to a draped rod. Buckles can be purchased at the fabric store.
For the buckles, sew strips of fabric 25 cm long and 8 cm wide.
Slip the buckle over the strip, then sew the other end of the buckle on the back of the curtain.
Sew the buttons to the front of the curtain, stepping back about 4 cm from the top edge.
Author's curtains
Give your kitchen curtains your own style by adding your own knots and loops. For buttonholes, fold lengthwise and in half 25x9 cm strips of fabric. Sew them up and turn them out. Turn and sew each raw edge at the end.
Fold the strips in half, sew their ends at the top edge of the curtain, evenly sewing on the loops.
From strips of fabric 70 cm long, make knots in the same way. Sew each strip into a loop and sew them together. Tie the stripes into square knots.

Country style garlands
If you do not need to cover the entire window with curtains, then you can decorate the window with fabric garlands. Although they appear connected on the surface, these curtains actually consist of oblong double-sided sections connected through a rod.
These curtains make the window look softer and allow the sun's rays to light up your room.
Decorated blinds
Wooden blinds are perfect for the kitchen. You can simply give them your own style by decorating them with bows.
Make the bows twice the length of the window and 18 cm wide.
Fold each strip lengthwise in half together with the right sides and sew the raw edges, leaving a gap to turn the strip right side out.
Turn it inside out and straighten it, then sew the gap by hand.
Tie the strips to the blinds at the desired height.
Ties for a kitchen curtain made of tea cups
These interesting ties will add a little mischief to your kitchen. Buy cups and take them to a glass shop to make 4 cm holes in the bottom. Pull a curtain through the cup.

Just curtains
A glazed door or window can be decorated with such an elegant curtain.
Simply sew two curtains together and fasten their top edge to an 2.5cm wide wood stained board.
Fasten a couple of ribbons to the board, stepping back 5 cm from each edge. One ribbon from each pair hangs behind the curtain, and the other in front.
Nail the board to the top edge window frame. Fold the curtain, fixing the height you need, tying it with ribbons.

Embroidered curtains
Buy embroidered curtains or make your own if you have an embroidery sewing machine. Words can be added using hot transfers or fabric paints and a stencil.
Such curtains are usually hung in the middle of the window. They protect you from prying eyes without blocking sunlight.
These curtains are made from unusual interesting fabric and are finished on the sides with strips of plain fabric. They sway casually on rings attached to the back of the curtains with thread or pins. To create game details, buttons are glued to the folds.

kitchen curtains
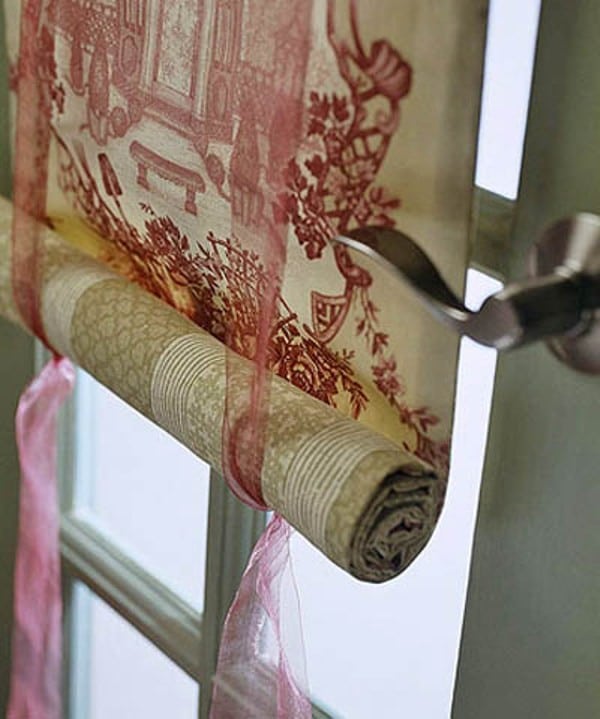
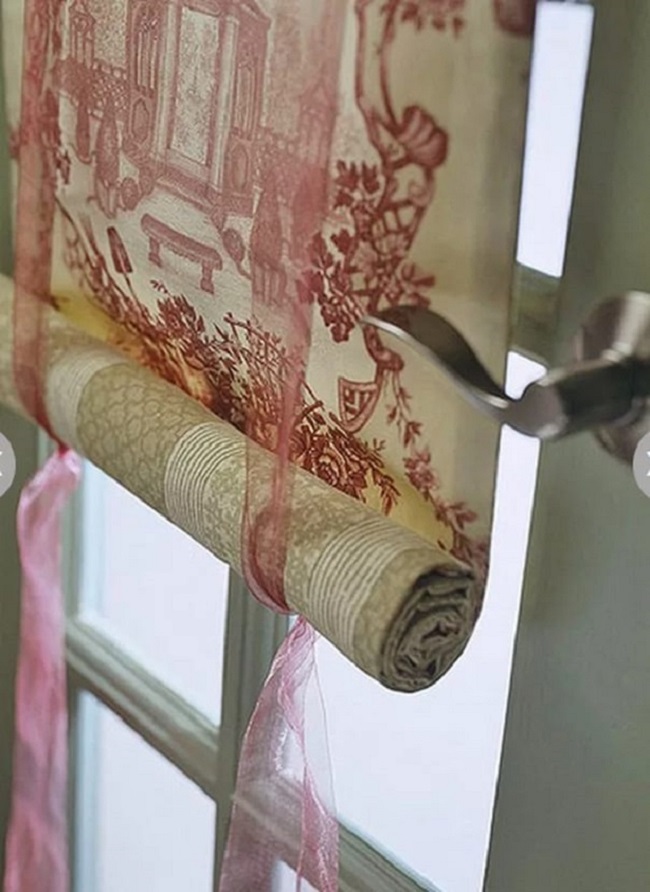
These softly draped curtains are made from old tablecloths and are reminiscent of London blinds.
Wind the tablecloth onto the rod and use wide strips of fabric or ribbons to control its length.
Roman blinds with towels
Decorate the window with colorful curtains made from assorted towels. You can combine colors or take towels of the same color and mix them until your curtains are the length you need.
Buy roman blind tape from a fabric store and attach it using the instructions. The upper parts of the curtains are fixed on a 2.5x5cm board, which can be installed on the window with screws or L-shaped brackets.
Combination of curtains with shutters
Such curtains let in sunlight and give a wonderful look to your window. Hang the shutters on hinges at a height up to the middle of the window. For curtains, Swiss fabric with a carved border is suitable. Fabric hang on glass door handles bolted to the window frame.
The core of the story so that the curtains barely touch the windowsill. These curtains will give your kitchen a vintage charm.

To make these curtains, take vintage embroidered towels and cut or sew them. Sew a strip of fabric to the top and bottom edges. Make loops from strips of the same fabric.
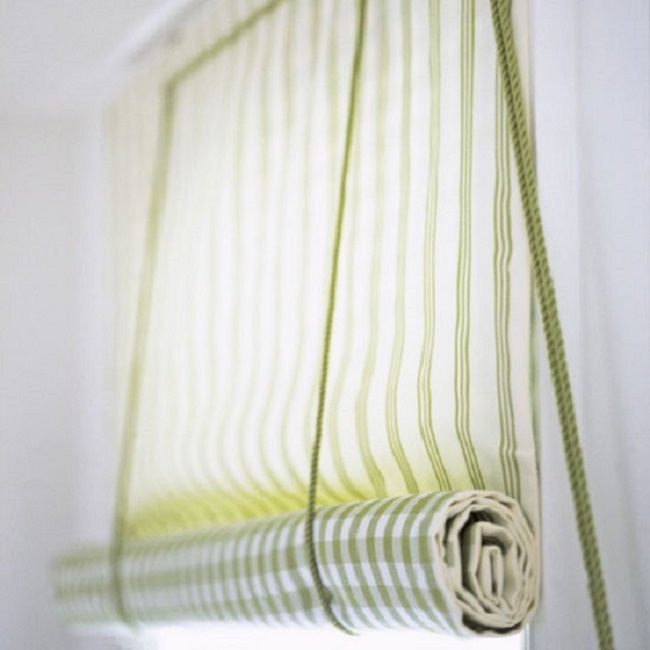
Roller blinds are suitable for connoisseurs of simple shapes, clear lines and laconic design. They perfectly cope with the main purpose of curtains - they close the window opening from sunlight and prying eyes, but at the same time they take up a minimum of space and do not overload the interior with an abundance of draperies, multilayer structures, ruffles, frills, puffs and other decorative elements. In addition, you can create unique roller blinds with your own hands - step-by-step instructions are attached.
But before we tell you how to make roller blinds, let's get acquainted with the principle of their work. Like everything ingenious, the principle of their device is as simple as possible: a smooth fabric with a sewn-in weighting agent is hung on the window and, when the cord is pulled, it is simply wound onto the drum.
Advantages of roll structures:
- Tightly close the window opening, excluding the possibility of looking into the room from the outside.
- Can be mounted on a regular cornice, metal-plastic or wooden frame - in any case, such curtains take less space than standard curtains.
- When mounted on a frame, they do not block access fresh air when ventilating the room.
- Suitable for any room and will be a great alternative to blinds, which many still consider to be an exclusively office decor element. Fabric curtains look more cozy and "home".
- Can be used both separately and in combination with other textiles - curtains, drapes, lambrequins, tulle.
- A huge selection of textiles and its colors allows you to find the best solution for any interior style.
Fabric roller blinds can be installed separately on each sash
roller blinds in various styles kitchen interior:


But such curtains also have their drawbacks. Unlike the same blinds, it will be possible to regulate the direction and intensity of light only by partial lifting or lowering - you can create light twilight only with the help of a special fabric with inserts varying degrees transparency. In addition, any textile absorbs odors and requires regular care- numerous washings, cleaning and ironing, especially when it comes to the kitchen. But the most significant drawback is the malfunctioning of the mechanism and frequent distortions of the fabric when opening / closing the window, so we will consider in detail how the roller blind mechanism should work.
Types of structures and device of the lifting mechanism
The main element of the roller blind is a rod with round section, which collects the fabric into a roll, and a decorative cord or chain, the tension of which drives the roller. The curtains are held in a straightened state with the help of a weighting agent, and when folded, they are fixed with garters or other decorative elements. Depending on the type of construction, the bar can simultaneously play the role of both a load and a roller, if placed below, or attached to a cornice or frame.
Although the principle of operation for all roller blinds is the same, their designs may vary. additional elements whose purpose is to improve appearance or provide more comfortable operation. Perhaps the most practical addition is the use of special guides or magnetic tapes that eliminate distortions and gaps when curtains are working. The closed box also looks good, in which the roller with the fabric roll “hides” - in addition to the aesthetic function, it also protects textiles from various damages and dust accumulations.

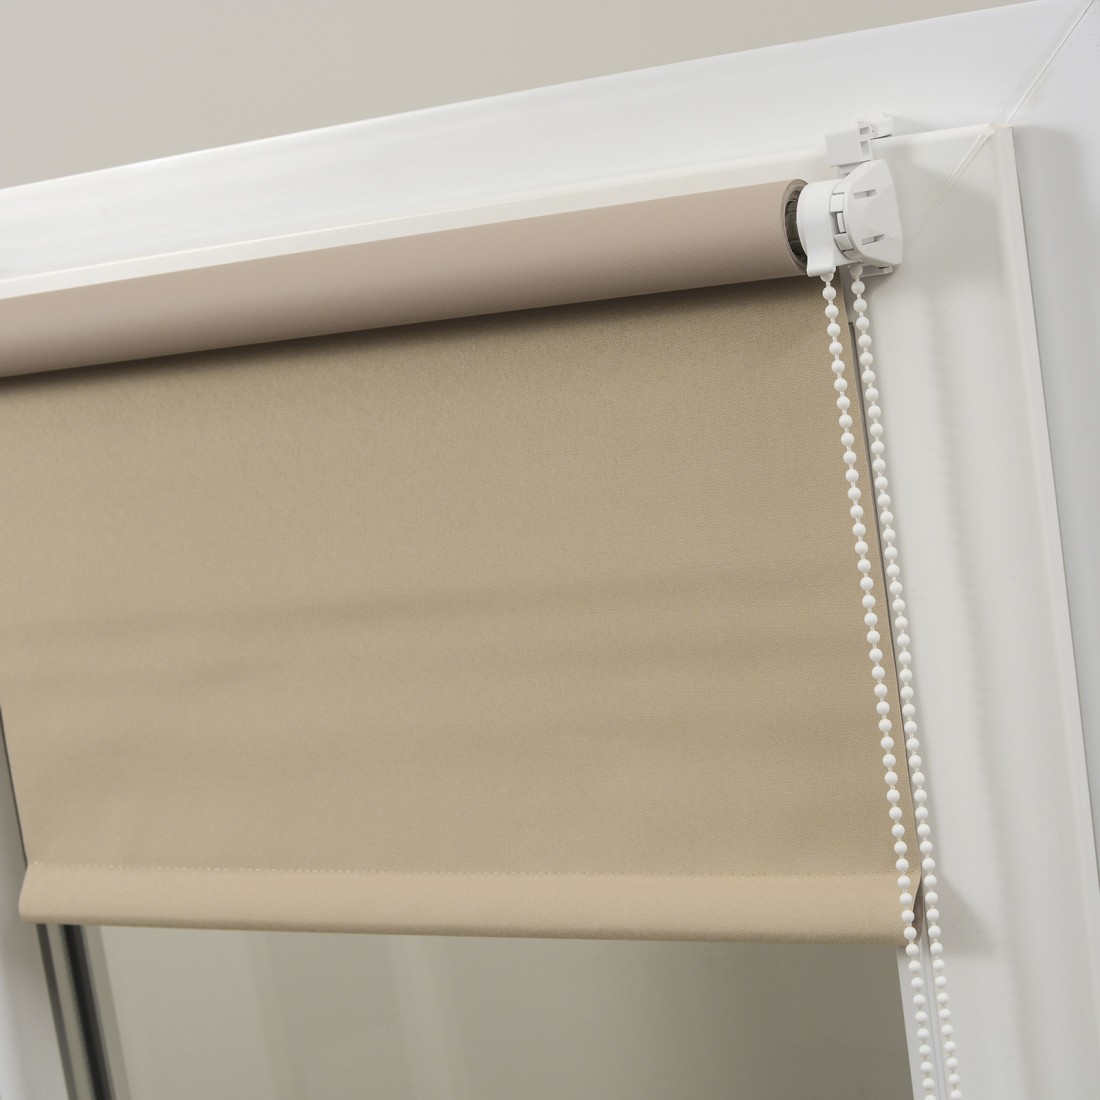
Curtains with closed box called cassette
The lifting mechanism control systems also differ:
- Chain - adjustment of roller blinds is carried out manually using a conventional cord, rope or plastic chain thrown over the drum and fixed to the bottom edge of the canvas. When the cord is pulled, the roller starts to rotate, winding or straightening the curtain. But to hold the canvas, you must additionally use clips, garters or other holders. Despite the simplicity of the device, such a system is considered the most reliable and affordable.

Chain mechanism - simple and durable
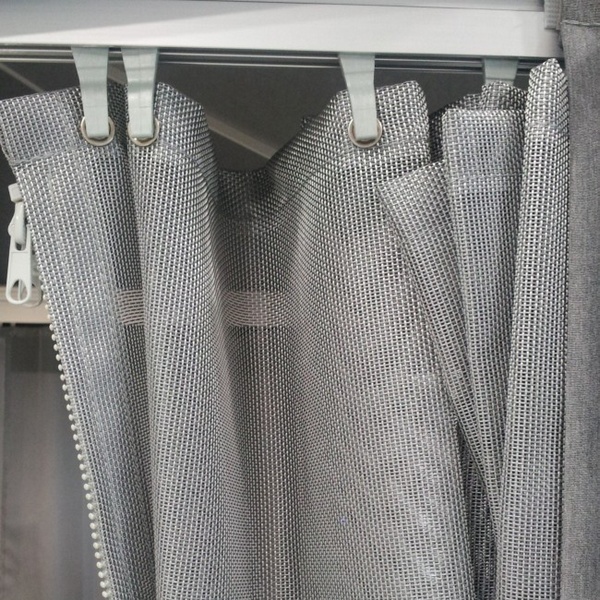
- Spring - the system is installed at the top or bottom of the curtain and closes quickly when the spring is straightened. In this case, the material is fixed automatically and does not require additional manipulations with the holders. True, the springs wear out quickly and require frequent replacement.
![]()
Fabric roller blinds with a spring mechanism can be installed both in the upper and lower parts of the window
- Electric drive is the most expensive and difficult to operate system, but the easiest to operate. The canvas in such curtains is rolled up by the efforts of an electric motor, which can be started remotely or by clicking the switch button. This lifting mechanism simply indispensable for large and high openings, on ceiling or roof windows.

Scheme of the device of electric curtains
The simplest mechanism for roller blinds with your own hands can be made from round bar wood or metal rod, providing it with a cord or plastic chain, which can be purchased along with mounting hardware. But if you want more functional curtains - spring or electric, then you should buy ready system and attach your favorite material to it.
On a note! Roman blinds are also often called roller blinds. But this is not entirely correct. When closed, they really look alike, but when raised roll structures wind the fabric on the shaft, and the "Roman" - are collected in horizontal folds.
Materials for practical curtains
Do roller blinds do-it-yourself can be made from wooden planks or thin bamboo planks. Such material does not fade in the sun, reliably protects from light and is resistant to mechanical damage. But it has two significant drawbacks: draft sound effects and impressive weight (even lightweight bamboo requires deep holes for reliable fixation of the structure - adhesive tape will not hold it for a long time). In addition, despite all the environmental friendliness and natural beauty of wood, it cannot boast of such a variety of colors as textiles.

Therefore, the most popular materials for roller blinds are fabrics: polyester, linen, cotton and nylon. Combined canvases have proven themselves well - fiberglass, polyester with the addition of viscose, satin or cotton, "screen" (polyvinyl chloride with fiberglass). All these fabrics are quite practical, easy to wash and last a long time. You can choose any shade and ornaments, depending on the style and color scheme of the room design.
It is worth paying attention to the degree of transparency - thin fabrics that transmit light well are suitable for the living room, kitchen and office. But for a bedroom or nursery, it is better to give preference to thick curtains that will reliably protect sleep from the bright rays of the morning sun, the light of lanterns and the reflections of headlights at night.

Blackout curtains - best defense from bright light
Important! Please note that when the curtain is lowered, its wrong side is visible from the street. Therefore, it is worth choosing a double-sided fabric, or sewing two one-sided layers into one canvas.

Types of fabric roller blinds according to the degree of darkening of the room
Fabrics with light effects:
- Transparent and translucent fabrics (cotton, satin, silk) - scatter the sun's rays well, but darken the room poorly, so for rest rooms it is advisable to combine them with thick curtains or curtains.

Transparent and translucent blinds will protect from prying eyes during daylight hours when the light is turned off in the room
- "Blackout" - opaque textiles with full blackout are ideal for bedrooms, skylights or skylights, home theaters. Such curtains will provide a perfect rest even on a sunny summer day.

"Blackout" - fabric with the effect of complete blackout
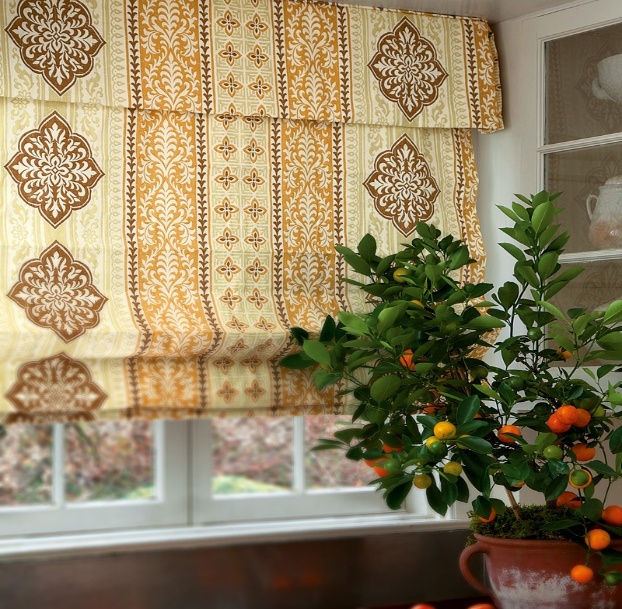
- "Dimout" - delays light by 70%, therefore it is considered one-stop solution for the bedroom, living room and nursery. But for the kitchen, where good lighting during the day is important and complete blackout is not required at night, it is better to choose a thinner fabric.

Dimout: medium shade
- "Day-night" or "zebra" - this textile is created by alternating matte and transparent stripes, which allows you to adjust the degree of darkening in the room according to the principle of blinds.

Roller curtains made of fabric with a day-night effect
Important! Roller blinds in the kitchen can be made of fabric impregnated special formulations, reducing the absorption of fat, odors and other cooking costs. Curtains with an antistatic effect are suitable for living rooms, repelling dust and reflecting heat. Such textiles help to create an air layer near the glass, which traps the cold in winter and the heat of the sun's rays in summer. But for impregnated fabrics, only dry cleaning is recommended.

In the kitchen, it is better to use fabrics with dirt-repellent impregnations.
Self-tailoring of curtains is a real saving when decorating a room, because on each window you can win about 2-3 thousand rubles (compared to ready-made models). Therefore, we will consider in detail how to make roller blinds with your own hands.
Correct measurements are the key to success
In order for the roller blinds to tightly close the window, it is important not only to carefully measure the parameters of the opening itself, but also to take into account the following nuances:
- Decide on the area that the curtain should cover - it can be the entire opening, only glass or individual sashes ( last option convenient for ventilation, but more laborious in execution).

Mounting options for roller blinds on the window
- The length of the fabric cut is calculated as the sum of the height of the window (or opening), an allowance of 3-4 cm for processing sections and 15 cm for “pockets” for the rod and weighting agent.
- For the width of the canvas, glass or frame measurements are taken plus an allowance of 3-4 cm (15-20 mm on each side) for bends.

Measurements for a curtain covering a window opening
Materials and tools for work
To make do-it-yourself roller blinds and assemble the structure practically from scratch, you will need the following set of tools and Supplies:
- An aluminum rod, a piece of a cornice or a wooden beam with a circle section of 2.5-3 cm is the future roller on which the canvas will be wound. It is important that its length is approximately 1.5-2 cm less than the width of the fabric (seam allowance).
- Mounting on a frame or window opening, for example, a wooden rail with a pair of self-tapping screws or metal corners for regular frame or double sided tape(option for a plastic window).
- Sewing machine and threads.
- A cut of the canvas according to the measurements taken.
- "Velcro" or fluff tape along the length of the bar.
- Plastic/metal rings and decorative retainer (silk, satin ribbon or decorative cord), the length of which is 3 times the length of the curtain.
On a note! The manufacturing process can always be simplified: buy a ready-made mechanism with a drum, brackets and a chain in hardware store and attach to it sticky tape fabric processed in the atelier according to your measurements (a special Velcro is already included with some rollers). So you can create a unique curtain design for your project with a minimum of labor.

Accessories for roller blinds
Step by step instructions for sewing curtains
After taking measurements and preparing everything necessary for work, you can begin to assemble the curtain itself. It is most convenient to engage in cutting and sewing on a flat and smooth surface– countertop, wide ironing board or floor.
Roller blinds with your own hands - detailed master class:
- The fabric is cut according to pre-made measurements. If this is a material with a one-sided pattern, you need to stitch two cuts with the right side to each other in length and on one side in width, then turn the resulting “pouch” and sew it up. If the canvas is double-sided, it is enough to process the edges, taking into account the allowance. After that, the fabric is steamed with an iron, paying special attention to the corners.
- At the bottom of the future curtain, you need to bast a “pocket”, place a weighting agent in it and then sew it on a typewriter, closing it from all sides.

On a note! If the curtain material is not impregnated with any by special means and is not intended for dry cleaning, you should take care of how to remove the weight before washing. The easiest option is not to sew the “pocket” tightly, but close it on one side with a small zipper, buttons or hooks.
- A wooden plank-holder can be wrapped with a cloth, fixing it with a furniture stapler or thread with a needle. The second option is to simply glue one part of the fluff tape on the front side (the second must be sewn to the upper edge of the curtain).


On a note! If the manufacturing process homemade holder seems too long, you can always replace it ready-made mounts and a cornice pipe on which the fabric is put on.
- Hooks are screwed into the wooden plank, to which a ribbon or decorative cord is tied. The latch is pulled along the length of the fabric, removed through the rings sewn to the top of the curtain, and fixed to a hook screwed into the wall. When pulling the cord, the curtain will wrap on the roller.


Curtain with decorative cord
Important! To make the fabric easy to roll, the rings should be hung at a distance of 15-20 cm from the sides and 5-7 cm from the rod. For this, 2 narrow strips of fabric are used, which are sewn to the top of the curtain. Another option is to make through holes in the fabric itself and close them with decorative eyelets. In this case, instead of using long cord two ribbons, tying them into beautiful bows.
- Now you need to hang the holder on the window. To do this, attach a plank wrapped in fabric to a frame, glass or window opening. To mark the attachment point, it is advisable to use a level so as not to spoil the appearance of the structure. AT wooden frame holes are drilled for self-tapping screws or corners are attached, for plastic windows You can use double-sided tape or special plastic fasteners.

Attachment of roller blinds plastic windows
- It remains to combine the two parts of the fluff tape and hang the fabric with the weighting agent on the decorative bar.
On a note! If the roller blind unfolds unevenly, replace the lower bar with a heavier one.
Video manual for the manufacture of fabric roller blinds
To make hand-made roller blinds harmoniously fit into the interior of the room, use the recommendations of designers.
- For rooms facing south or east side, fabrics from cold range. Emerald, turquoise, purple, ash pink will bring a little coolness and scatter blinding light. But the windows on the north and west sides are better to decorate with curtains of warm shades.

cold and warm shades colors
- It is desirable that the color of the fabric be either darker or significantly lighter than the walls, otherwise the curtains will be “lost” against the background of the finish.

Bright curtains will be an excellent accent element
- When choosing an ornament, you should not copy a pattern already present in the interior - choose a similar one in shape or color. But if the pattern is applied to the entire surface of the walls, it is better to choose curtains in monochrome, but in one color scheme with decoration or other interior elements.

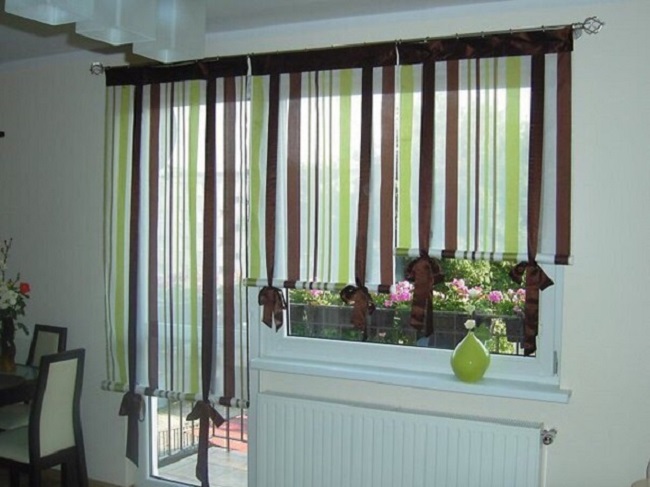
Spectacular striped curtain pattern "Day-Night"
- Although the design of roller blinds is quite concise, it can be varied with the help of various decorative elements, such as lace, flounces, fringe, playful bows, metal chain. Even a weighting rod can be an interesting accent for window decoration.

Forged bar as a weighting agent

- For living rooms, you can use various combinations, combining roller blinds with both thick curtains and transparent organza curtains, veils. And you can limit yourself to a spectacular lambrequin - it all depends on the interior style and your personal preferences.
An interesting ensemble of roller blinds and curtains:


- If you want to turn the window into original painting, then remember the photo printing technique - with its help you can apply any pattern to the fabric.


Fabrics with photo printing will be the highlight of the interior of any room
Roller blinds - perfect solution for modern interior. We hope that our advice helped you not only decide on the color and model of the lifting mechanism, but also inspired you to create with your own hands. If self-tailoring does not attract you - you can always buy finished model or order your favorite design of curtains from the masters.
HideEach hostess wants to create an original, and at the same time, cozy interior in own house. Not the last role in this process playing window decoration. It is worth noting that without textiles it is difficult to achieve the effect of completeness. And if you also prefer conciseness and economy of the family budget, then perfect option- make roller blinds on plastic windows with your own hands.
Product Benefits
Before you do it yourself, you should definitely familiarize yourself with the features of such crafts. First, let's take a look at their benefits.
The advantages of this alternative to conventional blinds are:
- Versatility, they can be installed on any window structures;
- ease of care;
- a wide range of fabric options, which allows you to plan the lighting in the room;
- perfectly adjoin to windows;
- design variety;
- roll curtains with your own hands will be a great addition to your favorite curtains.
Unlike Roman blinds, the mechanism for roller blinds, which is very easy to do with your own hands, consists in twisting into a roll and tying it up.
Let's start with fabric and colors
Before making your own , Take some time to choose the right fabric. In this matter, the following important nuances must be taken into account:
- fabric must fit into general interior rooms, or become its interesting accent;
- before choosing, be sure to measure the window frame;
- it is better to choose the density of the fabric, based on whether the room is located on the sunny side;
- translucent fabric has the ability to make the room visually wider, the presence of a transverse strip visually expands the walls, vertical - increases the height of the ceilings.
Choosing color scheme to make roller blinds with your own hands, be guided by the following rules:
- It is better to choose the fabric to match the color of the furniture. This also applies to patterns.
- Solid dark options can not be called best solution for the kitchen and dining room. For such rooms, colorful fabrics are more suitable.
- For southern rooms it is better to choose blue, green tint. For windows facing north, it is worth choosing warm colors- yellow, orange, red.
- If you do not know how to make a roll curtain with your own hands , to completely darken the room, give preference to a blackout material that does not let through at all sunnier rays. This is very good decision e.g. for home theater.
Successful combinations for all times there are chocolate and beige, red with white, blue with yellow. But in the end it all depends on your own taste preferences.
Bright shades of fabric for roller blinds
Required accessories
Before you make your own roller blinds , you will definitely need to prepare the materials necessary for work:
- canvases of pre-selected fabric and pre-measured sizes (if in window construction not two sashes, but more, to determine the required number of canvases, multiply the number of sashes by two);
- tapes, other decorative elements with which the canvases will be tied (the length of such a tape should exceed the size of the curtain itself by 20-30 cm);
- wooden beam or metal tube for fasteners;
- a metal rod or a regular wooden plank for weighting;
- furniture stapler;
- screwdriver;
- sewing accessories.

Marking for roller blinds

After preparing the materials, you can start creating the product
Step-by-step instruction
So to do it yourself , you will need to follow these simple steps:
- We lay out the fabric sheets prepared in advance inside out, sew them along the length, and on the one hand - along the width. The resulting bag must be turned out.
- The gap should be sewn up if the bar is placed in a special pocket. Otherwise, it is left open.
- When choosing the first method of action, it is necessary to make a special pocket, iron the canvas, and then install the prepared bar.
- If you went the second way, you need to place the weight inside the bag, and stitch the curtain at a distance of about 0.5 cm and sew up the gap.
- Next, the canvas is ironed and wrapped around the bar.
- After that, the fabric is attached to the bar with a stapler.
- Install prepared garters also with a stapler, or carefully stitch with threads.
- At the end, the beam is attached to the window.

We set the weight in a special pocket

Roller blinds with side cord

Roller blinds with tape
Fastener options
After roller blinds , handmade ready, you need to install them. To do this, you can choose several options for fasteners:
- Fastening on the opening. You need to drill holes in the ceiling and insert the profile there. In this case, the curtains will freely fall down.
- Frame mounting. If you choose this way, required holes do directly in the window frame /
- Installation technology without drilling. This method is the simplest and safest. Its essence lies in the use of construction adhesive mixture or tape.
Do-it-yourself roller blinds for plastic windows are a guarantee of attractiveness and completeness of the interior in any room. They are comfortable, concise, and will be the best solution for the kitchen, living room and even a children's room.
Thanks to ergonomics and varied design roller blinds or, as they are also called roller blinds and roller blinds, are only becoming more popular every year. The production of roller shutters today is very profitable and the market does not lack their range, but you can create your own unique interior only by adding elements to it. handmade, for example, make roller blinds on plastic windows with your own hands. Of course, they will resemble the roller blinds offered to us on the market, only lifting structure and conciseness, but will inevitably become the highlight of the whole decor in the room.
Sewing such curtains does not require large financial costs and time, and even a novice craftswoman will be able to cope with it.
The choice of textiles for the manufacture of roller blinds with your own hands according to the step-by-step instructions below is unlimited. On sale you can find fabrics designed specifically for window curtains of this type: thick and transparent, plain and printed, smooth and embossed, as well as new-generation blackout and screen opaque materials that provide complete shading in the room. They are ideal for the bedroom, and if you plan to update the curtains in the bathroom, give preference to fabrics with water-repellent impregnation. Before sewing roller blinds from such materials, do not forget to study the recommendations for caring for them: is washing acceptable, if so, at what temperature, etc.
If you wish, you can also make roller shutters yourself from ordinary curtain or cotton fabrics. They do not have high antistatic and dirt-repellent properties, but they are much cheaper. Moreover, the master class that we offer does not oblige you to choose only special materials for roller shutters. For curtains made according to it step by step, you can choose any textile fabric suitable for the realization of your design ideas: curtain fabric, satin, chintz, poplin, linen, cotton. The main condition is that the fabrics for the front and back sides must be of the same texture and not shed. Otherwise, when washing, they will shrink differently, the curtain will warp and lose its attractiveness.
How to make roller blinds with your own hands in a couple of hours: step by step instructions
To make roller blinds with your own hands, a minimum amount of fabric is required and at the same time a beautiful, stylish and most functional product is obtained. Such a curtain can close not only the window, but also glass door or use as original door for a small closet.
In order to sew roller blinds with our own hands, we need:
- sewing machine;
- two pieces of the same type, but different in design fabric;
- two wooden bars about 2 and 1 cm wide and equal to the width of the finished curtain;
- five ring screws.;
- three screws-hooks;
- screwdriver;
- cord, braid or tape for raising and lowering the curtains;
- scissors, centimeter, thread, pencil.
Our roller blind will be mounted on window opening. When unfolded, it should extend 10-12 cm beyond its borders in width, and go down to the window sill in length. Based on this, we make measurements. To the results obtained, we add 3 cm to the width for allowances for the side seams and 10 cm to the length, given that we will fix the curtain at a height of 7 cm above the window.
If the roller blind is installed above the upper slope of the window opening, its size must be wider than the opening by at least 10 cm or more.
As an example, take a standard window opening 146 cm wide and 140 cm high. So you need to cut out two rectangular pieces of fabric (since you plan to sew a double curtain) 149 wide and at least 150 cm long or more. By the way, if the width of the fabric is 150 cm, it is not necessary to cut the roller blind to this extra centimeter. Just cut out a square 150x150cm. If the width of the fabric you like is less than one and a half meters, you will have to sew a curtain of 4 cuts (2 for the front side and 2 for the wrong side), and decorate the central seams with decorative tape or braid.
Step 1: Sew the Curtain
We combine the pieces of matter with the front sides and sew them from the sides and from above, stepping back from the edges by 1.5 cm. Leave the bottom edge unstitched. We turn the product on front side, bend the bottom edge inward by 1.5 cm, sew and iron well what happened on both sides.
Now we need to sew "pockets" for the weighting and mounting straps. To do this, we decide which side of the curtain will be front (looking into the room), and which side and lay it out on flat surface wrong side up. Then we bend the top edge by 3 cm, the bottom by 1.5 cm, sew and insert the strips: the one that is wider in the top pocket, and the one that is already in the bottom one.

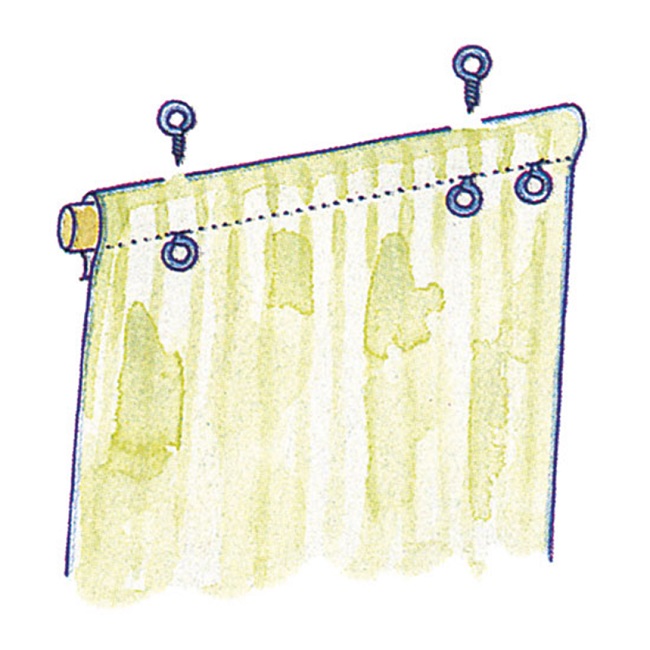
Step 2: Screw in the ring screws
We screw ring screws into the upper (fixing) bar at a distance of 10 cm from the edges through the fabric (two above and two below them on the front side). We also screw the fifth screw from the front side, from one edge, stepping back from it at a distance of 5 cm.
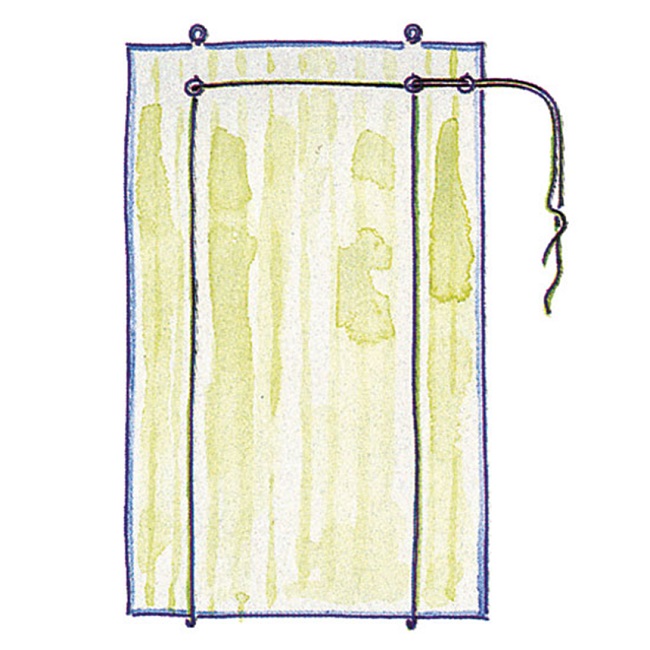
Step 3: Attaching the Lift Cords
To roll the roller blind, you need cords. What they will be depends only on your imagination: an ordinary cord, nylon ribbon, decorative braid, a ribbon made of fabric in a color contrasting to the curtains. Before cutting them to the desired length, we make simple calculations. The length of the first cord is three times the length of the curtain. The length of the second cord is exactly the same plus half the length of the curtain. In our case, it will be 450 cm and 525 cm.
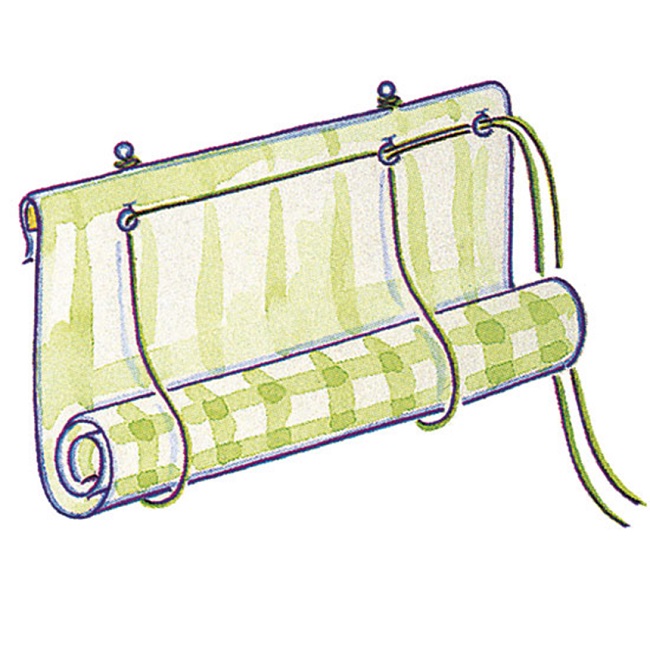
We pass both cords into the screw rings on the top bar and fasten as shown in the figure. In this case, a cord that has a longer length must be tied to a ring located further from a separate, fifth side screw.

Step 4: The curtain and the original lifting mechanism are ready
We lower both cords along the wrong side of our curtains, wind them through the bottom to the front side, pass through all three rings screwed on it and tie them together.
Step 5: Installing the Curtain on the Window
Before you hang our wonderful curtain, you need to screw two screw hooks over the window opening. The main thing is to screw them in so that they are located exactly opposite the upper rings fixed on the mounting plate. The same principle can be used to make not only curtains, but also blinds with your own hands.
To do this, we apply the curtain to the opening above the window and mark with a pencil the places where the hook-screws should be, screw them in and hang the curtain. On the side of the window, it is desirable to screw in another hook, for which it will be convenient to throw the cords when the curtain is raised, thereby preventing them from tangling.
Ideas with photos and videos for inspiration
Our master class on how to do it yourself is just a guide to action. With it, you can sew curtains completely different from the previous ones. They will differ in size, design, type of lifting cords. Changing them according to mood, weather, season, you can easily and simply transform the interior every time.

Curtains Hand Made bring the warmth of human hands and a sense of comfort and tranquility into the interior.
You can fasten such curtains not only on a bar, but also on a cornice using ordinary cornice stakes, and if the width of the fabric does not allow you to sew not one wide, but several narrow curtains
Such curtains can be installed not only on the opening, but also on each sash

or in a window opening. In this case, you will have to take into account that it will be possible to open the window only when the curtain is raised to the very top.

or turn on your imagination and come up with your own original mount
As lifting cords, you can use ordinary nylon tape

Instead of screw rings, ordinary plastic rings threaded through the ribbons are sometimes used to support lifting cords.

If the window is small, you can do without a lifting mechanism, and roll up the curtain fabric manually and fix it with one tape in the center
Every housewife can create a cozy and unique atmosphere in her house or apartment. The main thing that is needed for this is the desire to create, imagination and a sense of proportion. And you can start with the simplest - change ready-made curtains on handmade and on their own design.