Design of artificial decorative ponds in the garden. Do-it-yourself pond in the country: consider how to make a decorative pond step by step with a photo. Film pond - a universal solution
How to turn your suburban area into a real paradise? Just. Need to create beautiful place pleasing to the eye. And where the soul rests, there the mood improves, and the vitality rises.
One of the bright touches in landscape design can be a decorative pond in the country, comfortably located among the greenery.
Despite the fact that most summer cottages are limited in size to the standard six acres, and the owners do not have the opportunity to make a large pond, this is not a reason to deny yourself the pleasure of having an artificial reservoir on the site. Technical side the question will also not become an obstacle if there is a desire and competent instructions describing step by step how to make a pond with your own hands.
Stage 1 - Idea (types of ponds)
Before starting large-scale construction works and to build a whole lake with your own hands, you need to think about the goal of creating a reservoir on the site.
In terms of functionality (goals), four types can be distinguished:
 small pond.
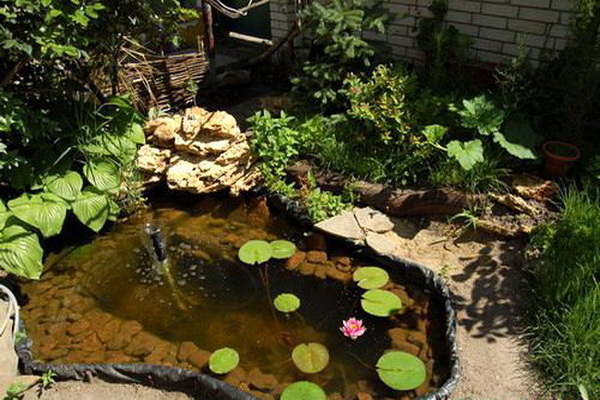
This is a reservoir, which is part of the landscape composition. Their purpose is to decorate a corner of the garden and please the eye. Active recreation near such a pond is not expected.
 decorative pond.
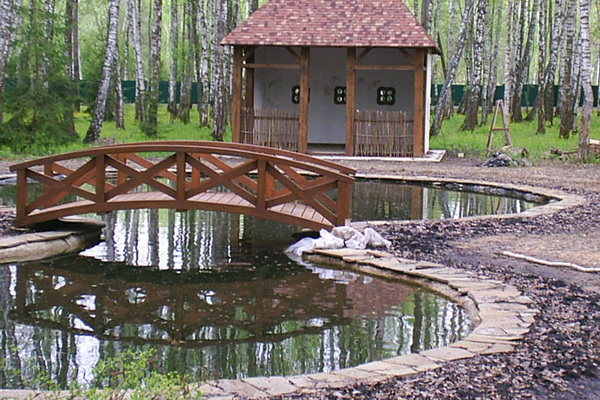
It is a deeper body of water. As a rule, they are decorated with bridges, fountains, and lights are mounted. Such a pond is equipped near country house, terraces or gazebos, benches, sun loungers and umbrellas (or awnings) are installed nearby. And the reservoir becomes the center of the recreation area for the inhabitants of a private house.
 .
.
A personal artificial lake in which fish swim is not only a dream of fishermen. Children, cats and other family members will be happy to watch colorful fish while relaxing in nature.
 .
.
They are also country ponds, which are designed, in addition to the aesthetic function, to provide an opportunity to refresh or even swim, depending on the size.
Based on the purpose and own capabilities, the location of the pond, its parameters and geometry will be determined.
Stage 2 - The style of the reservoir in the country
The garden pond can be made in two versions with an endless variety of different modifications:
 Formal (regular) body of water.
The name successfully reflects the essence of the pond, it is a structure that has a rigidly defined shape.
The geometrically correct shape of the pond is more suitable for areas designed in a classic style or in modern, minimalist or high-tech styles.
As well as rectangular shapes, round, square, and broken (symmetrical or asymmetrical) also refer to the formal type of pond.
 Landscape pond on the site.
A more popular option among users, since it has an irregular coastline, a natural look, creates the effect of being close to nature and does not limit the flight of the creators' imagination.
Tip: The shape of the pond is determined by the preferences of the owners, but the more complex the shore line, the harder it is to lay the film.
An important aspect that you need to pay attention to when choosing the style of the reservoir on the site is the terrain. A flat surface makes it possible to equip a reservoir of any configuration. Differences and irregularities require increased attention, but they allow you to make a reservoir with a waterfall or a cascade of ponds. On such a relief, a bridge or an artificial slide will organically look.
 You can also independently raise the pond above ground level. The only difference in the technology of work will be the construction of the foundation, which will avoid the distortion of the concrete bowl of the artificial lake.
 The high pond minimizes excavation, is easier to maintain and is suitable for families with small children (the edge is equipped with a fence with railings). Such a reservoir can be built near a covered terrace, making it not only an element landscape design but also a place of rest.
 Tip: If you're planning on making a pond with a fountain, opt for a tall pond.
Stage 3 - Place (location) for the pond
It is illogical to create a pond for the sake of a pond on the site. It is much more pleasant if the pond brings a zest, decorative accent in the color of the landscape of the site. So, you need to place it in a good place. It is the location that will allow you to admire the artificial lake from anywhere.
How to choose the right place for a pond in the country?
To do this, you need to take into account a number of factors:
- plot size. Directly affects the size of the pond itself and its configuration;
- relief. It also determines the shape of the pond and provides an opportunity to simplify the creation of fountains, waterfalls, or vice versa, to achieve a perfectly smooth water mirror;
- soil composition and groundwater levels. Have a direct impact on the depth of the pond, the complexity of the work and the need for additional materials;
- illumination. It is desirable that the pond is located in a shaded place. Direct exposure time sun rays should not exceed 5-6 hours. Otherwise, part of the water from the pond runs the risk of evaporating, and biological activity will negate all the beauty of the reservoir. Recommendation: after choosing a place for the pond, observe the solar regime for several days.
Tip: The deeper the reservoir, the more illuminated the place it can be located.
A pond intended for fish all the more needs thoughtful placement, because the level of oxygen decreases in very warm water.
- visibility. It is better to place the pond so that it can be seen from the window of the house or from the gazebo. Good visibility is especially important for families with children.
- reflection. The pond will only benefit if only clouds or beautiful buildings are reflected on its surface, and not a toilet or a greenhouse.
- degree of landscaping. The trees and bushes growing around the pond are definitely a very organic addition. But, these are also fallen leaves and branches, which, falling into the water, will pollute its surface and, ultimately, settle to the bottom in the form of silt. In addition, tree roots can damage the waterproofing of the pond.
Tip: you can ensure a sufficient amount of greenery near the pond by decorating it with plants in tubs (barrels).
- power supply. For those owners who plan to equip a fountain on the pond, lighting, etc. should consider in advance the possibility of electrifying this site and the yard.
Tip: it is better to supply electricity at the development stage and lay the wires in a protected and durable corrugation underground, and equip the connection points with a hatch for free access.
- the possibility of expanding the reservoir or arranging a recreation area. You need to plan ahead. In both cases, it is important that at least one side of the pond has enough space for possible redevelopment, adding a gazebo, barbecue area, installing sun loungers or a small waterfall.
- the compatibility of the pond with other buildings and the general view of the site.
Tip: it is better to start building a pond in the country with your own hands at the beginning of the warm season - in the spring. Thus, there will be a margin of time for the device and the reservoir will have time to fit into the design (“take root”).
Stage 4 - The size of the pond on the site
It cannot be said unequivocally that a large pond is a luxury, and a small one is a budget option or an opportunity to save money. A small pond does not always mean cheap, sometimes even the opposite. Each type has its own advantages. So let's focus on the key points:
- dimensions. Depend on the location of the pond in the country. On the sites there are recommendations on how much area the pond should occupy - from 3 to 10% of the total area of \u200b\u200bthe site. In fact, there can be no clear recommendations;
- width and length. Determined by the size of the site and the physical capabilities of a person. After all, the pit under the pond is most often dug by hand;
Tip: the aspect ratio will determine the harmony of the pond.
- depth. Depends on the dimensions of the pool, pond or lake and the purpose of the arrangement.
- zoning. Professionals recommend dividing an artificial pond into three sections:
- coastal zone (100-400 mm). Designed for planting plants and entering the pond;
- shallow (400-1000 mm). For plants growing deeper. Tip: Nymphea or winter-hardy water lily grows well at this depth;
- deep water (over 1 m). It is necessary in those ponds where it is planned to breed fish. The area of the deep-water zone depends on the type and number of fish, but should be at least 20% of the area of the pond.
Tip: The lowest point of the reservoirs should be below the freezing level of the soil. This is especially important for those ponds in which fish live. Thus, she can overwinter painlessly in a non-freezing pond.
- biodynamic balance. A pond is a place that is inhabited by living creatures, therefore, a balance must be ensured so that the pond can clean itself. Special water treatment such as chlorination or ozonation for the pond is not provided.
Tip: plants should not occupy more than 50% of the pond area.
- content complexity. It's a paradox, but the larger the body of water, the easier it is to maintain.
Ponds - from small to large
Stage 5 - Material for the pond in the country
Moving forward in the field of study summer cottages, we gradually got to one of the key questions, how to make a pond with your own hands. Any construction begins with the choice of material.
The market offers many building materials for creating a pond. And craftsmen advise making a pond from improvised materials, this will allow you to build a small reservoir in the country without any special financial costs.
Consider all the materials suitable for building a garden pond.
 Concrete pond.
Expensive option that allows you to operate the pond long time. Filling the pond with concrete (construction of a concrete bowl) is a method that is more suitable for building a pool.
 Plastic bowl (capacity).
 More suitable option. Made of PVC (polyvinyl chloride) or fiberglass, the form allows you to quickly complete all the work on the arrangement and operate the pond from 5 to 30 years, depending on the quality of the bowl.
The purchased form allows you to make a reservoir in 3 stages: dig a pit, install a bowl and fill the voids with sand.

The plastic bowl for a pond is characterized by simplicity of installation, durability and frost resistance.
Their minus is the high cost, the complexity of transportation (with a large volume) and the need to have basic installation skills. Otherwise, the bowl is very easy to damage. Please note that plastic bowls are destroyed under the influence of ultraviolet radiation.
Tip: the clear shape of the plastic bowl limits the possibility of creating a landscape pond on the site (subjective opinion).
 In this subgroup, the best option is a fiberglass pond bowl (form) reinforced with a rubber base. An absolute plus of fiberglass in reliability and maintainability.
 polymer film.
 Provides unlimited possibilities from the point of view of the choice of the shape of the reservoir. The simplest and most affordable material in this category is polyethylene film. It is affordable and cheap, but will not last long.
 More long life on PVC film. At correct installation With proper care, it will last more than 10 years.
  Tip: instead of PVC film, you can use advertising banners (transparents). They try to get rid of used banners and they can be bought inexpensively.
  Butyl rubber film for the pond. The most reliable material (rubber) for waterproofing a reservoir. Experts recommend a butyl rubber membrane (EPDM) for those who have a rocky bottom, many roots, a significant depth of the pool. The service life of butyl rubber is 50 years. It withstands repeated freezing.
 Folk ways to make a pond from improvised materials
 Bath pond
An old bathtub is the perfect container, specifically designed to hold water. It can be dyed in bright color and install in beautiful corner garden. Or you can deepen it into the soil and get a small country pond, even with a fountain.
 Tire pond (tire or wheel pond)
 Another easy way to make a mini pond in the garden.
How to make a pond from a tire with your own hands is shown in the photo.

 Basin pond
The method is so simple that women or even children are more often involved in its device. The basin holds water easily. Like a bath, it can be installed on the ground or deepened. The main thing in arranging a pond from a basin is decor. And then, a garden mini-pond will decorate the site no worse than a full-fledged reservoir.
 Decorative pond from plastic bottles.
Suitable for those who want to combine two in one: create a decorative pond and eliminate the buzzing of mosquitoes.
The material was prepared for the site www.site
Please note that the choice of material for the pond has a direct impact on the arrangement, appearance and its service life.
Tip: When choosing a material for a pond, make sure that it is environmentally friendly.
Stage 6 - tools and equipment for the pond
To make a simple pond in the country, you need to prepare a level, a cord (for marking), pegs, a hose for irrigation, a shovel and a cart for removing soil.
For a more technological (capital) reservoir, equipment for the pond will be required:
- filter for water purification. The installation of a filter in reservoirs where fish is bred is especially relevant.
- pond pump. Allows you to organize the supply of water under pressure. It is used for pumping / pumping water, watering the garden, arranging fountains, waterfalls, operating filters (cleaning);
- pond sterilizer. Needed to eliminate algae (will help make the water clear);
- compressor (aerator) for a pond. Important for fish and plants. Aeration of the pond allows you to saturate the water with oxygen. Compared to an aquarium compressor, it has more power.
Stage 7 - We build a pond in the country with our own hands
As you can see, there are more than enough materials that allow you to create a pond on your own. We will focus on how to make a pond in the country from PVC film. The choice is due to the fact that the film takes shape better, it is quite affordable, working with it does not require special skills, the film is subject to repair.
Tip: so that the film does not tear in winter time, it is necessary to provide for the deep-water part (below the freezing depth of the soil), which will serve as a kind of compensator.
7.1 Choice of pond film
PVC film colors:
- black - will turn the bottom of the lake into a mirror. In a dark pond, clouds, etc. will be well reflected;
- brown - perfectly imitates bottom soil. Suitable for creating landscape ponds;
- blue or cream - will give the pond a resemblance to a pool, but fish are clearly visible against a light background.
When choosing a film, pay attention to:
- compound. Polyethylene is fragile, PVC is stronger;
- thickness. A film with a thickness of more than 0.5 mm is suitable for a pond. The maximum thickness that is on the domestic market is 1.9 mm;
Tip: The deeper the pond and the more complex its shoreline, the stronger and thicker the film should be. The presence of stones or tree roots is also a reason to choose a stronger film.
- trademark (brand). According to reviews, as well as from practice, it is recommended to use film from the brands Gardena, Heissner, OASE;
- resistance to mechanical damage;
- UV resistance.
Tip: For pond depths over 1.5 m. best solution will use butyl rubber (EPDM or synthetic rubber, as it is also called). The rubber film is capable of stretching, resistant to UV and mechanical damage. Maintains from 40 to 80 °C.
- absence of toxic components in the composition of the film.
Calculation of the film for the pond
- film length = pond length + 2 x pond depth + margin (500-600 mm);
- film width = pond width + 2 x pond depth + margin (500-600 mm).
How and how to glue PVC film for a pond
The gluing of the pool film is carried out with a special adhesive (for example, Tangit (Tangit) PVC-U) or adhesive tape, for example, Quick Seam 3.
Tip: it is better to immediately adjust the geometry of the pond to the dimensions of the film.
7.2 Sketch and diagram of a pond in the country
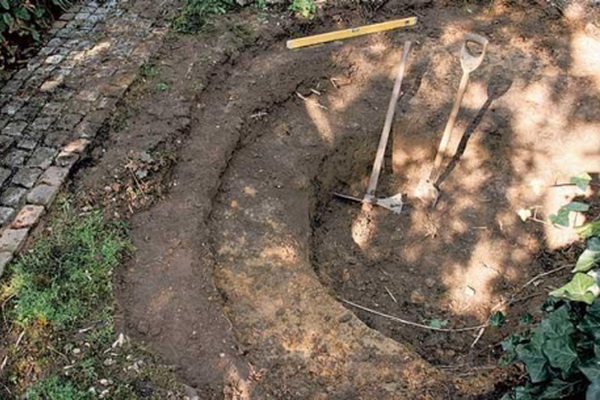
Before you start digging a pit for a reservoir, you need to draw a sketch on paper, and also transfer it to the surface of the soil. It is advisable to indicate the depth and width of the shelves for plants or steps. This technique will avoid problems in the process of constructing a pond. It is convenient to apply the marking with a garden hose (it is flexible, bright, it is easy to adjust it) or with sand.

Tip: after marking the ground, cover the resulting area with a light film and look at it from different parts of the site. You may actually have to make adjustments to the future pond.


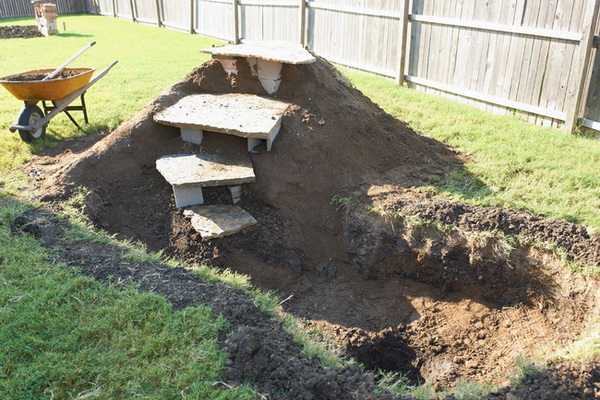
7.3 Digging a pond pit
The pit device includes:
- removal of sod (excavation);
- excavation pit. It is convenient to dig from the edge to the center, gradually deepening in the right places. For decoration, laying stone or laying turf, you need to dig a ledge 600-700 mm deep;
- removal of soil, as well as construction debris, roots, stones and everything that can damage the film.
Tip: since the excavated earth needs to be put somewhere, you can equip an alpine hill or level the surface of the area where there are depressions.
In the process of excavation, it is necessary to constantly ensure that the banks are on the same line. If a waterfall is planned, then you need to maintain the desired height difference.

Advice. If required building level(level) of great length, then you can do it yourself. To do this, you need to lay a regular building level 500 mm long on a long board.
7.4 Laying the pond substrate
After the pit is dug, its bottom and walls are well rammed (this is necessary for shaping) go to waterproofing. Pond waterproofing is needed to prevent water from escaping into the soil.
Tip: some users prefer not to isolate. In practice, this leads to the fact that the water has a variable level.
There are several ways to form a substrate:
- lay out the compacted pit with stones, gravel and fill it with sand. But after a few years, such waterproofing will cease to fulfill its functions;
- lay geotextile on the bottom and cover with sand. A more reliable method, but also more expensive;
- lay PVC film. It is about the film, as the most common option, that is discussed in this article.
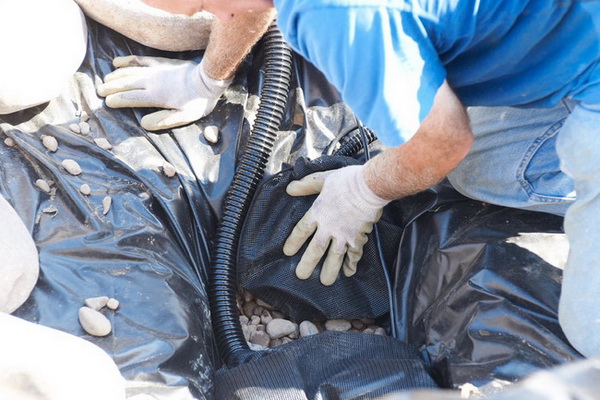
7.5 Laying the pond foil
Proper laying of the film does not exclude the installation of a sand cushion at the bottom of the future pond. According to professionals, such a pillow eliminates the possibility of damage to the film by roots or stones.
Advice. It is better to lay the film on a hot day. As it warms up, it will become more pliable.
Given the relief of the bottom and banks of the reservoir, everyone will be faced with the fact that the film will be laid in folds. At the same time, users are advised to make one large fold, and not many small ones. The formed fold can be pressed down with stones or glued to the main part of the film.
 It is important that the laid film lies freely on the surface of the pit, without tension. Otherwise, after filling the pond with water, it can stretch even more and tear.
In order to fix the film, it is enough to dig an auxiliary trench. After laying the film, you can fix it with rods and fill the trench with rubble.
After the film is laid, the pit is filled with stones.
Tip: choose a large stone for the bottom. The flat bottom of the stone will prevent the possibility of tearing the film. For walls, it is better to use rounded stones, since flat ones slide.
Upon completion of the work, the pit is filled with water. Moreover, it must be served without pressure in the middle of the pit.
Only after the water in the pit has stood for 1-2 days can the film be cut off.
7.6 Strengthening the banks of the pond
A homemade pond in the garden will look well-groomed and reliable only when there are beautiful and strong banks.
Depending on the type of soil, the bank of the pond should have a slope:
- with chernozem or clay - it is allowed to make vertical walls;
- with sandy soil - inclined.
Practical users believe that the optimal slope for the shore of the reservoir is 45 °. Such an angle will prevent the shore from crumbling and will prevent ice bulging during freezing / thawing.
When finishing and decorating the banks of the pond, take into account the plants that will be planted on them. Since they all grow at different depths, you should take care of the landing shelves formed at a certain depth.
In the process of digging a pit, each owner will inevitably face the question of how to strengthen the bank of the pond.
The following engineering methods are suitable for strengthening the coast:
For a gentle coast:
- geomat;
- geogrid (perforated polymer);
- geogrid.

Craftsmen advise using a more familiar chain-link mesh, the cells of which are clogged with earth with clover seeds (or other perennial grasses) or to strengthen the shore of the pond with plants and bushes.
For a steep bank:
- gabions;
- piles (sheet piling or ordinary);
- retaining walls.

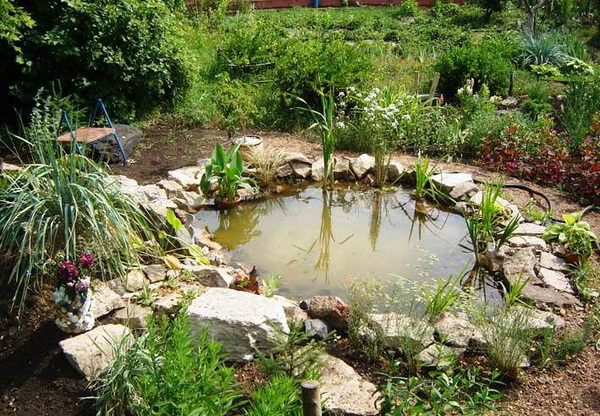
Biological methods can strengthen the coast just as well. The photo shows plants that can not only strengthen the shore, but also decorate an artificial reservoir.

Advice. For greater reliability, it is better to combine engineering and biological methods for strengthening the shore of a reservoir.
Stage 8 - Making a pond in the country with your own hands
 A pond in the country will become a full-fledged design element garden decor only when finishing it.
To make a country pond natural or decoratively decorate a shaped pond, you can use:
- plants planted directly on the bottom of the pond. To do this, you need to put prepared plants in special containers on curtains (pond steps). Tip: Native plants do better in a pond;
- plants in tubs. To do this, any plant is planted in a tub (barrel, bucket, pot) and placed on the shore of the pond. The advantage of this way to decorate the coast is that you can use any, even exotic plants and constantly modify the look of the coastline;
- to equip the island of "dream" in the middle of the reservoir. Install on the island decorative rock a boulder or put a plant in a flower pot;
- run bright fish;
- lay beautiful stones.
Tip: it is better to intersperse the laying of large stones with the laying of smaller ones, in this way, it will be possible to avoid uniformity in the design of the coast.
- pave comfortable and beautiful paths from natural stone, gravel, saw cuts of wood or brick;
Tip: gravel paths require more maintenance as they are washed away by rain and grass grows through them.
- throw a bridge over a pond;
- complement it with a waterfall;
- install beautiful fence from wood or stone;
- organize a night illumination of the pond. Moreover, you can install LED lights, or place lights in transparent glass balls on the water mirror. They can be lowered to the bottom with the help of weights;
- install deck chairs or a gazebo on the shore of the pond.


Stage 9 - Caring for a pond in the country
- protection of the pond from the leaves will provide a mesh construction on a light frame.

- cloudy water, which will stay in the pond for 2-3 weeks, settles over time. In addition, the biological activity of small inhabitants will soon make it transparent.
- a net is useful to clear the pond of leaves;
- to raise the water level, you need to periodically top it up (with a bucket or a hose without pressure);
- you need to monitor the rate of spread of algae, in order to limit their growth, you can plant cattail or nymphaeum (lily);
- shelter plants planted in a pond from the cold or bring them into the house;
- periodic cleaning of the reservoir will eliminate bottom debris;
Tip: The pond can be cleaned quickly and effectively in winter. To do this, it is enough to break the ice and take it out of the pond along with the silt.
- algicides - an emergency measure for cleaning the pond. But due to its high toxicity, you should not contact it unless absolutely necessary.
Stage 10 - Preparing the pond for winter
The pond, which is based on a special plastic bowl, can winter, because the bowl can withstand significant temperature changes. And so that it does not deform from the pressure created by ice, it is enough to place several empty plastic bottles in the container. Bottles must first be tightly closed with lids. To prevent the destruction of the bowl, 1 bottle per 1 square meter of capacity is enough.
But what about those who have a film pond - will the film crack from frost? If the depth of the pond exceeds the depth of freezing of the soil, you don’t have to worry. Empty bottles can also be used to protect smaller water bodies.
Important! All equipment and plants need to be covered for the winter.
Conclusion
In this article, we covered all key points creating a pond with your own hands, starting from the idea and ending with the care. We hope that we have dispelled doubts and given confidence in our abilities. Dare! And by the beginning of the season you will have a wonderful water spot in the countryside.
Almost every garden has a pond. And he definitely gets into the frame: the owners love their pond (or even the smallest pond), are proud of it and consider it perhaps their main garden achievement. And this is understandable. But the strict eye of a professional often notes the unfortunate blunders in the creation of reservoirs, which are repeated in many gardens with offensive constancy.

We asked landscape designer Valeria Ilyina to analyze some common amateur mistakes and talk about what you need to know in order to make a decorative pond, stream or waterfall in your garden with your own hands.
Are you building a pond? Make no mistake!
Perhaps it makes no sense to convince someone that a pond in the garden is good. Water like a magnet attracts everyone's attention and even in photographs it always looks mysterious and alluring. Is it any wonder that today the reservoir has become an indispensable attribute"gentleman's set" of any design project for the development of a new land plot or the reconstruction of an old one.
Unfortunately, as a result of a formal approach to business, one garden becomes similar to another. Professional designers churn out gardens like they bake pies, and they actually turn out to be cloned. To be honest, the gardens of amateurs are closer to me, which, although they sin with some dilettantism, still attract more with their ingenuous sincerity. All actions of an amateur come from the heart, and therefore the path is often tortuous, but in the end the truth is found, and not least thanks to intuition.
To make the path to beauty shorter, let's try together to analyze the characteristic mistakes that miraculously repeat in many reservoirs, and analyze their nature. And after that, we will gradually analyze all the subtleties and secrets of a quick, easy and economical creation of a reservoir that is ideal for your garden. So, the most typical misses.
Wrong size
This is the most common mistake: the pond does not match the size of the garden and its surrounding plants. A small puddle located somewhere near the fence or at the entrance to the garden and squeezed from all sides by lush and beautiful garden plants no matter how hard you try, it will always look ugly.
Wrong place
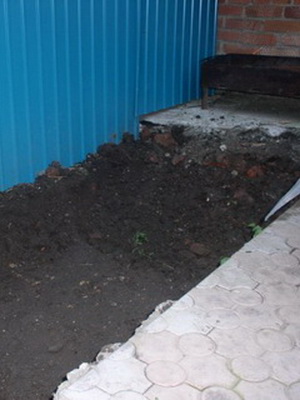
In no case do not place a reservoir against the backdrop of unsightly buildings, a sloppy garden, a pile of garbage, a rickety fence, and who knows what else.
old fence
- not the best background for a pond
Water always attracts the eye, so placing your pond in an unsightly place, you thereby focus on the shortcomings of the garden.
Mistakes in the selection of material
Purchasing garden supplies follow the law of similarity. If the house is made of brick or stone, then their color, texture, shape and size must be repeated in the material of the fence, paving, finishing of other buildings. The same applies to a wooden house or a house sheathed with siding.
You can often see a picture when certain corners of the garden are very good: beautiful plants logically grouped, the pond is carefully and imaginatively decorated - and the overall impression of the garden is negative. You start to analyze, and it turns out: the brutal appearance of the house is made of red brick with white architraves plastic windows, a powerful fence is assembled from ready-made concrete blocks painted with bright pink paint with white scallops on top, a carved gazebo is gilded with turned beams, an asphalt tape of the path leads to it, over which the rocker arms of openwork white arches for roses are thrown, the presence here and there of colored plastic , various-sized borders, flowerpots, and to top it off - like a gold medal for bad taste - a plastic water lily on a living leaf of a nymph. As they say, comments are superfluous.
Conclusion: while arranging the garden, introducing new elements into it, try to predict the end result, predict how the garden as a whole will look like. The body of water should always match the garden, buildings and surrounding plants in size and style, and be positioned in the most advantageous position depending on the image you choose.

Defeat in the fight against the plastic mold
Common misconception: the finished plastic mold is best choice if you decide to create a reservoir, as they say, with small means. Yes, indeed, manufacturers offer a large assortment such "baths", and it seems that you can choose a shape for every taste. But everything is not so simple. Even the largest of them (and they are very expensive) will not be big enough in the garden, and the small ones just look like a misunderstanding. At the same time, all of them, although obviously small in size, have an overly intricate shape that will never turn out to be natural in place.The edges of such forms have a rounded profile, on which it is impossible to fix neither soil for coastal plants, nor stone, much less gravel. Some more expensive forms have glued on the top edge. wide ribbon quartz sprinkling, but most often it is so strikingly different from our local materials that it still cannot be decorated.
Plastic molds are made by stamping, and cheap products often have an annoying defect - the edges are skewed along the periphery, due to which, no matter how hard you try, you will not be able to dig such a shape neatly and evenly in principle. Needless to say, a piece of black plastic sticking out above the water will negate all your efforts. For clarity, such a reservoir can be compared with a luxurious suit, in which a carelessly sewn lining is bristling in the most visible place. The sight of such a suit is at least regrettable.

Protruding black plastic of the finished form sticking out above the water- poor decoration of the reservoir
It is worth adding that transporting the finished form, especially big size, not easy and expensive, and as a result, the final cost of the structure increases significantly. I once had a chance to work with a plastic mold of small size and at the same time intricate design. She was hopelessly skewed. I spent a lot of time, effort and nerves to somehow neutralize this innate flaw, but, unfortunately, there are things that cannot be fixed.
However, rigid forms have a future. In Europe, plastic molds of regular geometric shapes have been produced for several years now: round, rectangular, trapezoidal. They have a wide, flat, horizontal edge, making them easy to mount under all sorts of flooring. It is advisable to use them for raised formal reservoirs, which are effectively decorated with stone, wood, plastic, metal; they can be located at different levels and combined with fountains and waterfalls.
Unfortunately, our trade so far offers only round shapes, but we must not forget: if there is a demand, there will also be a supply. The breadth of the horizons of consumers shapes the market.

Conclusion: before choosing one or another method of waterproofing, you need to comprehensively familiarize yourself with the positive and negative sides of each and carry out comparative analysis. The lack of information about the qualities of waterproofing materials in the presence of a large supply on the market leads to the wrong decision.
Trying to repurpose an old bath
Speaking of ready-made forms, it should be mentioned that amateurs often try to recycle enamelled cast-iron bathtubs. Once upon a time, in times of chronic scarcity and absence available materials, this simple way to create a garden pond was welcomed by many. However, few people managed to decorate white bath so that the enameled pond looked more or less attractive.
More often, such a structure looks miserable: greenish white walls, mounds of garbage at the bottom (after all, you can see everything against a light background!), round cobblestones are artlessly laid out along the edge, and a collectible beauty hosta is planted nearby. An unattractive spectacle…

But there are ways to embellish such a reservoir, you just need to move your imagination. The easiest way is to paint the bath with any dark or black paint. Visually, the container will look deeper, the reflectivity of the water will increase, and the edges will almost merge with the ground. In the presence of all kinds of plasticizers and modern mixtures (for example, Eunice-plus cement glue), the inside of the bath can be coated with a layer of 1–3 cm, give it texture, tint by adding mineral powder or liquid colored pigments or finely crushed brown peat to the solution. If desired, if such an image fits into the overall picture, a mosaic of colored pebbles or glass, pieces of a mirror, or simply glued pieces of crushed stone of different sizes can be laid on top of the cement.
If you have a whole arsenal of used household bathtubs, they can be dug close to each other in a chain or square-nest method, depending on the number, internal surfaces finish as mentioned above, and mount a decorative flanging made of tiles, clinker, wood, etc. over the joined edges. You will get a channel or a pool with separate cells, each of which can be decorated in a special way: somewhere there are plants, somewhere a spring or a small fountain, somewhere there are fish or lights - an unplowed field for fantasy.
Such a structure can be made partially raised over the entire area, or you can place the cells at different levels, and even arrange the flow of water from one block to another. So an old primitive idea can be applied in a completely new way and achieve a wonderful result.

Conclusion: old, used containers can be successfully used to create reservoirs, you just need to be creative and never leave the wrong side in sight.
stone beads
The most common mistake in decorating a garden pond is a rounded cobblestone laid out all over the edge, like beads. More often such beads lie in one row, but some manage to lay two rows on top of each other.
Such a way of laying a stone will never look natural, not to mention the fact that it is absolutely impossible to decorate a film or a board of a rigid structure. So the multi-colored "monists" lie on the monstrous black shores, and no matter what beauty you arrange around, such an aqua garden will serve as a mute reproach to the owner.
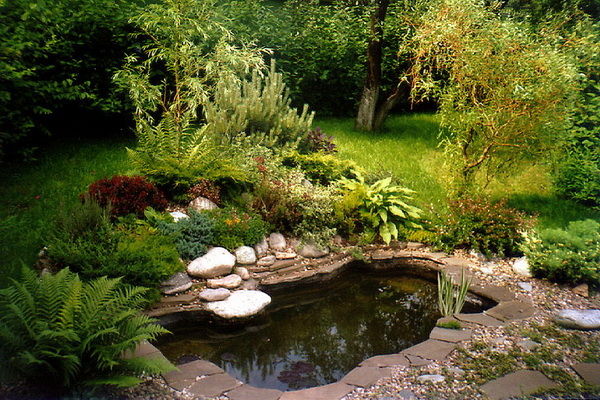
When relaxing on the banks of rivers and lakes, try to pay attention to how nature "lays out" the stones, and what you like and remember the most. Usually, small fractions serve as a background, while larger ones are textured by contrasting groups.

The stone for decorating the reservoir must be carefully selected. Photo by Valeria Ilyina
Conclusion: stone for decorating a reservoir must be carefully selected. It is desirable to use a stone that is uniform in rock and color, but varied in size. This does not mean that the pellets are completely unsuitable, just that they “play”, you need to work with them even more carefully.
Nothing decorates a summer cottage like an artificially created pond. It gives the area a natural look, filling it with wildlife.
The summer resident will be able to create his own pond without any problems, having dealt with his device and the main types.
Types of artificial reservoirs at their summer cottage
There are several main types of artificial reservoirs:
1. Pool- it is usually created not only for aesthetics, but also for practical purposes. For example, in summer you can have a great vacation in cool water, play with the kids.
The main disadvantage of this type of artificial reservoir is the organization on large territories and design complexity.
2. Waterfall- a distinctive feature is the presence of noise effects (falling water). It is arranged mainly only in areas with hilly terrain, if there is a necessary slope.
3. Pond- can be of two types (fishing and decorative). Making a pond in the country is the most interesting stage in its construction.
4. Swamp- naturalness and aesthetics of the site. It is best to arrange it in conjunction with an alpine slide or rockery.
5. Mini pond- a decorative element that will perfectly complement even the smallest summer cottage.
6. Fountain- one of the most spectacular and impressive elements in the garden.
Differs in the difficult device, are established on the territories, big by the size.
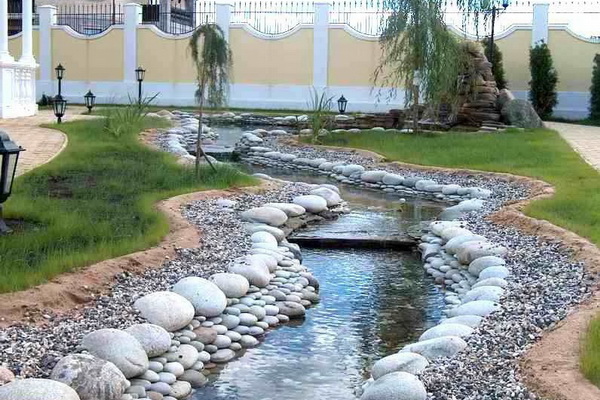
7. Brook- excellent highlight landscape style area, due to its diverse forms. Creates calm sound effects.
The device of all types is carried out from the design and determination of the location of the reservoir, the preparation of the territory, and, lastly, the strengthening and design of the banks, filling with water, decorating with plants, small architectural forms.
Arrangement of a pond at their summer cottage
The key to the longevity of the pond and its decorative effect depends on the quality of the work performed. Therefore, it is mandatory to have knowledge in the field of the device of the reservoir.
There are the following ways of arranging a pond:
1. Base made of butyl rubber or PVC film. This is enough difficult option, but in the end it gives an excellent result. Here you can show all your imagination, thanks to the ease of varying forms.
2. Most in a simple way is to use as a tank for pond bowl bath. It will be not only beautiful, but also economically beneficial.
3. Using a concrete base for arranging a pond is the most expensive option. Here you will need special equipment and certain knowledge in the field of construction.
The resulting design is reliable and durable. It is better to resort to this method when a complex architectural solution is provided in conjunction with the installation of sculptures.
4. One of the easiest to install is the use of ready-made molds, which can be purchased at various specialized stores. There are many different options with which you can revive and decorate any suburban area.
How beautiful to arrange a pond in the garden?
After the device of the pond, you can proceed to its design. This is where style comes into play. Their main types are distinguished, which help to decorate the pond and connect it with the environment.
For Chinese style pond decoration, emphasis should be placed on in large numbers vegetation. The reservoir itself should be large enough, with smooth and smooth outlines. To emphasize the Chinese style, it is better to install an island in the center, on which to plant a small tree, and put several stones of different shapes next to it.
You can connect the shore to the island with a small bridge and install a few lights.
Numerous fountains, waterfalls connected by ponds, observance of clear boundaries and the presence of geometric shapes, testify to the oriental style. It is suitable for people who love luxury and wealth.
Japanese style can be present in the design of any pond. It is necessary to emphasize all the elements. The main thing here is the design of the coast. A prerequisite is the planting of dwarf and small plants. Between them, boulders and stones should be laid beautifully, which can go directly into the pond.
French pond design becoming more and more popular thanks to modernity. The reservoir should be made as large as possible, based on the territorial capabilities of the site.
Shorelines should be clear and carefully arranged.
A bunch of bright colors expressed in vegetation- all of which testifies to English style pond decoration. It is very similar to Japanese, because it is a kind of offshoot of it.
To decide on the choice of style, you need to analyze the entire territory, and rely only on your own desire. If you want rigor and balance, then you need to choose french style, and if the brightness of colors, many plants - Japanese or English.
Arranging a pond with your own hands is becoming an easier task for every person. This is due to the fact that in almost all construction hypermarkets you can find the necessary materials. With proper observance of all stages, the reservoir will turn out beautiful and desirable.
Everything is based on design, which begins with viewing ready-made options on the Internet. If there is a desire to get fish, then it is worth increasing the depth at this stage, for their comfortable stay.
When the area near the house is large enough, with an impressive number of various plants, then it is necessary to make the reservoir appropriate in size. First, make sure that water does not stagnate in the pond. This can be achieved with the help of streams, which will carry water in a circle, from the bowl back to the reservoir.
As for the location, it is necessary to locate the pond in an open area, which will prevent its pollution. It is undesirable to choose sunny places, which will contribute to the heating of water and the development of harmful microorganisms.
The territory should be calm, which will preserve the integrity of structures and plants.
Plants, small architectural forms and natural stones will help to improve the garden pond. You can plant special aquatic plants in containers (water lily, lotus, mulberry, egg-pod, etc.). Without soil, drinking, water hyacinth and water paint are excellent. They can simply float on the surface, the main thing is the presence of all the necessary nutrients. To keep the pond constantly clean, you need to have several types specialized plants(hornwort and pondweed).
You can decorate the pond with a wide variety of sculptures. The main thing is to correctly fit them into the environment. Everything should look harmonious and beautiful so that you can constantly enjoy the water surface.
A small decorative pond will not only be an excellent decoration of the site and a place of rest. The construction of a decorative pond in the country is a very real undertaking, if you familiarize yourself with the technology in advance and pick up the most original idea for creating an artificial reservoir.
Ideas for building a decorative pond in the country with photos and videos can be found in this article. Via practical advice and original ideas you will be able to independently create a unique corner of nature on your site.
How to build a decorative pond in the country
A small pond in the country will be a wonderful decoration for your site, as well as create a comfortable atmosphere for a pleasant family vacation (Figure 1). To build such it is within the power and means of the owners of even the smallest plots.
 Figure 1. Design of a decorative reservoir on the site
 Having conceived the creation of a decorative pond, you should decide on its purpose. For example, it may simply be part of the landscape, and vice versa, a structure with streams or fountains may be part of a recreation area. garden plot. It is from the goal pursued that the size and specifications design, as well as filling and manufacturing technology.
Dimensions and location
Although such ponds have purely aesthetic and recreational functions, in order to create them, it is necessary to build an entire ecological system in order to avoid problems with operation in the future.
When choosing a location, pay attention to some points(picture 2):
- Illumination: Plants living in and around water need a sufficient amount of sunlight and warmth. On the other hand, strong heat is very destructive for the ecosystem, because under the influence high temperatures uncontrolled reproduction of algae begins, which leads to the death of other living organisms. Therefore, such a location is considered optimal, in which the reservoir is heated by the sun for no more than 6 hours (only in the first or only in the second half of the day). To determine the illumination, it is necessary to outline the boundaries of the future pond on the ground and trace which part of it will be illuminated by the sun during daylight hours.
- Shading: it is desirable that there be some kind of structure nearby that gives shade on a hot afternoon. However, it is not recommended to place it under trees, since fallen and decaying leaves can also disrupt the special microclimate.
- Relief features: it is easiest to build in the lowest and wettest places on the site. Natural height differences make it possible to revive it with a flowing stream. If the surface is flat, choose a place on the border of the garden or not far from the hedge. It is not recommended to place a pond in the middle of a lawn, but next to an alpine slide or rockery, it will look very impressive.
 Figure 2. Options for the placement of reservoirs on suburban area
As for the dimensions, they depend both on the goals of the future reservoir, and on the materials from which they will be made, as well as the possibilities of the garden area. For example, a huge pond in small garden will look inharmonious, just like a small decorative pond on a vast territory.
Project
The beginning of the construction of a garden pond should be preceded by the drafting of its project. So you can visualize your ideas and notice flaws.
Note: If it becomes part of the recreation area, you should also provide a place for the gazebo, barbecue, playground etc. You can try to create a project yourself, or enlist the help of professional designers.
 Figure 3. Main stages of construction
 The project of an ornamental pond, as a rule, contains the following list of drawings: a plan of the reservoir itself, its sectional image, a diagram of engineering communications and pumping station, as well as budget documentation (Figure 3).
Production material (capacity)
As already mentioned, everyone can build a small pond. In this case, some large expenses will not be needed, it is quite possible to get by with improvised materials (Figure 4).
Note: Very often, the owners of summer cottages turn ordinary water into a reservoir. cast iron bath. Special bowls made of PVC, which can be bought in specialized stores, are very popular. The main advantage of these containers is their easy installation and durability, and the disadvantage is a strictly defined shape and small volume. So, when using such a container, the area of \u200b\u200bthe intended reservoir should not exceed 5 sq.m. You will be introduced to the rules and features of their installation there.
 Figure 4. Material options for construction
 To create a "film" reservoir, you will need durable polyethylene made of butyl rubber or polyvinyl chloride. This material makes it possible to create a pond according to your own project, since the film is elastic and easily takes the desired shape. Most often, PVC film is used, which is very convenient to repair, because it can be repaired with ordinary glue. The thickness of the butyl rubber film is chosen depending on the depth of the future reservoir. So, if the depth exceeds 80 cm, then the film thickness should be from 1.2 to 1.5 mm. by the most convenient way the organization of the reservoir is the laying of a monolithic concrete pit, although in such a situation it is necessary to think carefully about everything, because it will be impossible to fix anything after pouring.
Necessary building materials and tools
The list of necessary building materials and tools depends on the capacity that is chosen as the tank.
If this is an ordinary bath, you will need a shovel and some materials to mask the protruding elements: tiles, pebbles, large and small stones. If you plan to create a larger body of water, you will need a film (polyvinyl chloride or butyl rubber), or such Construction Materials like concrete, clay, plastic, formwork, rebar and steel mesh, as well as sand, which fills the inner surfaces of the pit. Don't forget the various natural materials, and plants that will decorate your garden pond.
The video shows the main stages of the construction of an ornamental pond in the country.
Decorative garden pond: description
When thinking about creating a decorative pond at your summer cottage, remember that it should become an integral part of a single compositional whole. Therefore, think carefully about the purpose and style direction of the reservoir so that your artificial reservoir fits into the landscape of the garden (Figure 5).
Here are some techniques for matching the shape of the design with the style of the garden. So, for an English-style garden, a pond is ideal. round shape. The regular style is characterized by precise geometric shapes and strict symmetry (even plants on the shore are usually planted in a certain order).
 Figure 5. Pond styles in the garden
 In Chinese and Japanese gardens ponds of irregular shape look good. In natural-style gardens, the banks of artificial reservoirs are decorated with lush plants located among the stones, as well as various decorative accessories.
Illumination for decorative pond
Having shown a little imagination and diligence, as well as making small expenses, you can admire the beauty of a decorative reservoir not only during the day, but also at night, by organizing an illumination system (Figure 6).
There is limitless space for your imagination here. The only condition that must be strictly observed is the observance of safety rules when operating electrical appliances in a humid environment.
What is needed for this
Before purchasing lighting fixtures, you should determine the place where they will be installed: above or below water. It is from the purpose of the lamps that their degree of protection against foreign objects and various liquids depends. In this case, the higher the score, the better. Figure 7 shows how to mount the backlight.
 Figure 6. Illumination options for ornamental ponds
 In addition, there should be no visible damage to the lighting fixture, and its cables and power supplies should be well insulated.
Choice of lighting
When choosing lighting, you should be aware that all such products are divided into two types: underwater and surface (Figure 8). Underwater lamps look spectacular in ponds, at the bottom of which algae grow, or where ponds are decorated with decorative and natural elements. Such lamps are installed at the bottom of the reservoir, fixed on its walls or simply float on the surface of the water. At the same time, the color of the lamps can be any, but their impermeability and complete tightness are an indisputable requirement.
 Figure 7. Scheme of mounting the backlight of the reservoir
 Surface-mounted instruments only illuminate the surface and are therefore safer because they do not come into contact with water, although they are equipped with a waterproof coating.
Regardless of which type of lighting you choose, keep the following tips in mind:
- Low-voltage models (from 12 to 24 V) are considered the best;
- The range of lighting fixtures should correspond to the size of the reservoir;
- The design of the fixtures should be combined with the landscape of the garden;
 Figure 8. Types of fixtures: underwater and surface
 In addition, the shape, color and material of the hull should be selected in accordance with the size and depth of the future lake.
Drain on a decorative pond
As a rule, the decorative lake in the garden is small. Therefore, it is quite possible to fill it with water from garden hose or scoop out (pump out) manually. But it is also possible to provide for the possibility of supplying and draining water through pipes (Figure 9).
 Figure 9. Scheme for arranging a drain in a decorative pond
 For example, if a cast-iron bathtub serves as a reservoir for a reservoir, then before installing it in a pit, it is necessary to pour it on its bottom drainage layer consisting of gravel, crushed stone and sand. Under the bathtub drain hole, the drainage layer should be deeper so that water can be drained if necessary. Second drainer the bathroom should be cemented. As for large reservoirs, it is necessary to install a drainage pump and lay a line under a slope from the well to the place where the water drains. laying down drainage pipes, tear off the winding from them, and in the well, provide access to the drain tap and pump.
How to arrange a decorative pond in the country: photo
A decorative pond in the country can be arranged in a natural and design style(Figure 10). A pond in a natural style involves an arbitrary shape, decorated with natural stones (granite, river pebbles, decorative onyx) of different sizes and various ornamental plants.
The design reservoir is characterized by the clarity of forms and the rigor of design. It usually matches with common style the entire garden, so if your site does not have a certain style solution, then it is better to give preference natural style reservoir design.
Original design ideas are shown in the video.
Errors during construction
As you know, it is human to err, therefore, when building a decorative pond with your own hands, most often there are errors associated with the wrong choice of location, size, purpose of the reservoir, as well as the time of construction.
 Figure 10. Design options garden ponds
So, with a careless approach to choosing a place, gardeners are faced with the problem of flowering water and its constant pollution in the reservoir. In this case, it is recommended to simply fill up the failed option and try to find a better place for it. As a rule, all such structures are built in the summer. However, you should be aware that at this time it is difficult to determine the actual level of groundwater occurrence, which can lead to the release of the reservoir from the banks and damage to the waterproofing.
Note: It is recommended to measure the groundwater level in the spring and start construction in the summer. If the pit is in a lowland, it is necessary to provide for a runoff of water so that after heavy rain your lake does not turn into a swamp.
There are situations that fish are settled in a decorative pool planted with aquatic plants, that is, they are used for other purposes. As a result, the latter feel uncomfortable due to the lack of space. Some summer residents consider it prestigious to have a large pond on their site, forgetting that an artificial reservoir large sizes needs complex, thorough care and considerable financial costs for the purchase of the necessary equipment.
Continues the list common mistakes excessive savings on building materials: low-quality cement, plain film instead of special, the absence of geotextiles will not help to save cash and lead to costly repairs. Neglect of safety rules can lead to fatal consequences. Therefore, take a responsible attitude to ensure that the descent to a large reservoir is gentle, the banks are fenced, and the decorative elements are securely fixed. Remember, too much shore decoration doesn't make your pond prettier.
Many summer residents do not stop at arranging clubs, flower beds and mixborders on household plots. A do-it-yourself pond in the garden is the crown of an original design art. It is important here not only to know how to make a pond, a decorative swamp or a stream in the garden. It is very important to imagine how to arrange it correctly so that your pond does not become a banal refuge for tadpoles, but is the pride of the site.
Design of artificial decorative ponds in the garden
Before making your own garden pond, determine which style of water device will best suit your garden. If a pronounced geometry can be traced in the architecture of the house and the organization of the surrounding space, and stone is used in the decoration for facing the facades, it is appropriate to organize a formal reservoir from it. It can be a lake with a fountain, a canal that effectively cuts through beautiful paving, as well as a wall fountain like a mascaron.

If the house is closer to the country style, the design of garden ponds can be made in the form of a quiet stream or pond that looks like a natural one. But a small pond of simple geometric outlines is also suitable.

The design of a reservoir in a garden of regular geometric shape can be not only part of a composition made in the classical spirit, but also a fragment of a landscape idea. A successful mixture of styles sometimes gives amazing results, for example, lush vegetation will soften the strict impression of a reservoir of regular geometric shape. A beautiful sculpture on the shore of a decorative pond in the garden will give this place a special mood.
Arrangement and design of ponds in the garden
When arranging a pond in a garden, remember that water can act in two ways - standing, forming a horizontal surface and creating an atmosphere of relaxation and peace, or moving, murmuring, maybe even noisy, these are streams, waterfalls, fountains, giving not only visual, but also sound effects.
How to make a reservoir in your garden and how does the arrangement of all these garden mini-arteries differ? From a technical point of view, all ventures with moving water are closed cycles in which water moves in a circle. Most of it is stored in a storage tank, the role of which can be played by a pond, a fountain bowl, even a barrel dug into the ground, disguised with stones laid on a grate, and a pump gives it movement, delivering it through a hose to required space to the desired height, from where the water flow flows down and again enters the storage tank.

Do-it-yourself fountain in the garden is an element regular planning, there are no fountains in nature, but a fountain in the form of a beating key or a bell in a tiny pond looks charming. How smaller fountain, the closer to the house or to the place of rest it should be, you should not plant plants near a large fountain.
It is logical to do a waterfall or a stream in a garden with your own hands if there is at least a slight difference in height. The movement of water can also be arranged on a completely flat area by organizing a slight slope.

Artificial reservoirs in the garden not only decorate the site, but also connect various garden compositions, they are able to enliven any landscape, surprisingly they are near the recreation area.


Look at the photo of garden ponds: cool smooth surface pond, the murmur of a stream or fountain, the rustle of miscanthus near the pond, the play of dragonflies and water striders, the movement of a flock of goldfish - staying in such a place will allow you to relax, think calmly, let forget all the problems for a while.
The optimal size of the pond in the garden
Are there ideal dimensions pond on the site and the shape of the reservoir? Definitely - no. A waterway that looks wonderful in one garden may look ridiculous in another environment, next to another house. Do you have enough space to fit a pond of a minimum size of 3 m2, because only with such an area in the pond can biodynamic equilibrium be established, that is, water can purify itself? When arranging a reservoir in the garden, its location and size should be considered very carefully. Where should you plan it in the garden? If you arrange a pond in an open sunny place, algae will begin to flourish there. Nymphaeums will not bloom in deep shade, which should be illuminated by the sun for at least 5 hours a day. It is important to design the pond in an aesthetically pleasing location. The tree branches hanging over the water are very picturesque, but in the summer you will have to regularly remove the leaves falling into the pond that clog it, and in the fall you will cover the pond with a fine mesh.


Before you make a pond in the garden with your own hands, you should think about which side the approach to the reservoir will be from, because the entire coastal zone should be available to care for it. When designing ponds in the garden, you need to take into account that this is a decoration of the garden, it is good if it is visible from the house. Near the reservoir there should be a place to rest, at least a bench, sitting on which you can admire the life happening in the pond, dragonflies, fish, aquatic plants. A path should lead to the bench, the best view of the pond should open from the bench.
The optimal size of a pond in a garden should be such that its area is proportional to the area of the garden and the house, not too big and not too small. If the made reservoir turned out to be too small, there is a trick with which you can try to correct the situation - to attach another one to the already made pond, laying a bridge along the border between them so that the two ponds look like one. At the same time, it is very convenient to swim in one, and in the other, for example, to breed nymphs.
How beautiful to arrange an artificial pond in the country in a plastic form
It seems to beginners that making a pond from a finished plastic mold is easier than a pond using flexible waterproofing. This is an illusion. At first, the molds seem huge in the store, but after they are installed in the ground, they look about half the size, and when filled with water, they look very tiny. Such containers are good for raised reservoirs of clear geometric shapes, for installation on slopes.


The most durable plastic forms for a pond are fiberglass structures, they are not inferior in strength to reinforced plastic containers, but the edges of the latter can be deformed if the structure is not provided with a reliable external support to the ground. These forms are imported and quite expensive. Containers made of ordinary plastic are cheaper, but they are not rigid enough, often have deformed edges, and their dimensions are small. Only black forms are suitable for reservoirs.
Often, plastic molds for a pond in a country house are deformed after filling with water, this is due to improper filling of the gap between the wall of the pit and the wall of the mold with soil.


It is correct to do this: pour 5-7 cm of sand on the horizontal base of the pit, compact it tightly and install a plastic mold, then pour 10-15 cm of water into it, then pour sand into the gap between the walls of the pool and the pit to a height of about 20 cm, pouring it with water from a hose, or pour a mash of earth, sand and water into the slot and wait until the liquid mass hardens. Then pour another 10-15 cm of water, and into the slot - sand with water or a talker, repeating this until the pool is completely filled with water, and the slot is filled with sand or soil. As a result of these actions, the form will stand rigidly in the ground, and its coastline will be in a horizontal plane.
Water from plastic molds for an artificial pond never drains for the winter, this is an unnecessary and even harmful operation, in the spring an empty bowl will be squeezed out and crumpled.

The best way to arrange a pond in the garden, made in plastic mold is to decorate it with a rockery or a flowering retaining wall. AT modern gardens most often a pond is arranged in which aquatic plants grow, fish and frogs live. The shape of a natural pond should be as smooth as possible. The smaller the pond, the less there should be all kinds of bends, which is why reservoirs in rigid forms look so unnatural, the “shores” of which are excessively indented and resemble figured cookies rather than a natural structure. If such a reservoir turned out, the thoughtful planting of plants that camouflage the unnaturalness of the coast, in plastic form, can improve the situation. Do not forget that an excessive number of coastal plants, especially large ones, visually significantly reduces the size of the reservoir.

Another difficult task is the design of the shores of garden ponds: a lawn can come close here, in some places of the coastal zone you can plant coastal plants such as loosestrife, loosestrife, marsh and Siberian irises, daylilies, etc. The choice of coastal plants is inexhaustible, your taste, ennobled the study of nature and the best examples - that is your judge.
In the process of how to decorate a pond in a garden, remember that there should not be a lot of vegetation around a geometric pond, just one large plant architectural form, for example, curtains of marsh iris or large hosts.


Look at the photo, how to beautifully arrange a pond in the garden in regular style: around it, sheared shrubs and plants in containers are quite logical, if there is no fountain, you can plant a nymphaeum.
How to make and decorate a pond with an island in the garden with your own hands
To create an island, you first need to take out the soil, as when creating a regular reservoir, but in the intended location of the island, you need to take it out less or even not take it out at all. The edges of the island can be reinforced with stones, if necessary, and concrete mortar can be used to secure them.
Not a bridge can lead to the island, but step track from stones. In the place where it is supposed to be laid, the depth should not exceed 30 cm. The path should not be straight, but winding, but not excessively, it will be smooth and comfortable, so the stones for it are selected large and flat 10-15 cm thick. The surface of the stones should be at least 10 cm above the water level, they are laid on stands ( foundation) of concrete blocks or bricks. For each stone, its own individual stand is “built”, to which it is attached with concrete, the stand should not be noticeable, everything should look natural.
A good example of creating a large reservoir with a charming island is in the Moscow region. artificial pond made of butyl rubber occupies a large part of the garden, the water surface area is about 250 square meters. m. It is made on a plot of about 15 acres, located in the middle of a dense birch forest, with a spacious one-story wooden house for permanent residence. The island can be reached by passing through a pretty bridge. During the arrangement of the garden, extra trees were removed, a lot of birch and alder were left.

As you can see in the photo, the shores of a pond in a do-it-yourself garden are covered with flat pebbles of white color and various shades of gray. The pavement of the house is made from the same pebbles. The paving of gray and gray-pink paving stones and the facing of the basement of the flagstone house are perfectly combined with it.

On the diagonal of the site in relation to the house, a bathhouse was built, built from the same materials and in the same style as the house. Bridges were built near the bathhouse so that you can plunge into the water after the steam room, in this place the pond is quite deep (1.6 m). Thanks to the pump, the water never freezes here, although people skate on the opposite side of the reservoir in winter.
You can freely move around the pond, you can admire it, not only walking along the path, but also contemplating the landscape from covered veranda houses and large windows of the rest room in the bath.

Pay attention to the photo how to arrange a pond in the garden: a calm, peaceful atmosphere can be emphasized by a few plants with foliage of an interesting shape and texture, except for birches. It can also be deciduous shrubs (spireas, barberries), conifers, decorative and deciduous perennials (hosts, ferns). White birch trunks brighten the area, make it elegant. Water, paving and stones occupy a large area, shrubs and ornamental perennials predominate among plants, so caring for such a garden is not difficult and does not require much time. Two pumps are installed under the walkways, forcing the water to move quietly, next to it are skimmers that collect falling leaves. Approximately once every two years, the water descends, the bottom and stones are cleaned of silt and settled debris.
Such a project is good for those who like to sit quietly, enjoying the impressions of the garden or some of its details.
Design of garden ponds with a photo: a decorative swamp

The soil in the swampy place is constantly waterlogged. A decorative swamp can be an independent undertaking, or it can coexist with a reservoir of landscape outlines. A swampy garden does not require abundant watering, and a little drainage will provide oxygen to the roots of plants. Marsh plants have a superficial root system, so its depth is small.


After the place for the swamp is chosen, remove the soil to a depth of 30-40cm. Close the resulting pit with a piece of durable polyethylene of such a size that excess material is obtained above the edges. Pierce the polyethylene at the bottom with a pitchfork, there should not be too many holes, the water should seep through, and not go away too quickly. Pour a small layer of gravel or small pebbles on top of the polyethylene, lay the hose on top and bring it out above the soil surface. Make a few holes every 10-15 cm along the gravel part of it. Plug the end of the hose in the ground with a stopper. Fill the top of the hose with 5-8 cm gravel. upper layer soil is not saturated with moisture.
Place the excavated soil back on top of the gravel, removing weeds and adding compost or other organic fertilizer. After that, tamp and level the soil, cut off the protruding edges of the film and start planting moisture-loving plants. After planting, water them from above, then use a buried hose to saturate the soil with moisture. When decorating a swamp, use not only stones, gravel, but also snags, mossy stumps, a slight mess and neglect are quite appropriate here.
How to make a stream in the garden with your own hands (with photo)
The stream in the garden looks nice, but you need to carefully plan everything, think over not only the location of the stream and the shape of its banks, but also its design. If we forget about poetry for a while, then a stream is a water "band" flowing between its beginning and end (source and mouth). An artificial stream can “flow” from under a large boulder or a crack in it, a pile of stones, a picturesque bush will do, a waterfall can also be the source, technically it is just a disguise of a hose in order to give the impression of a natural source. The end of the stream is most often a pond, it can disappear under a large stone or a group of stones, under which there is a reservoir with a pump. You can arrange one or both ends of the stream so that they are “lost” in the garden. Of course, the stream is man-made, but it is quite possible to make it "natural", natural in appearance.


Before you make a stream, get all the necessary materials:
- 0.5 mm or 0.8 mm thick black PVC film or much stronger and more reliable, although more expensive, butyl rubber (EPDM membrane), they can be glued and repaired if necessary with special tapes and adhesives;
- sand or geotextile as an underlayment and shock-absorbing material;
- submersible pump, which will be placed in the lower storage tank, the longer the stream, the louder its sound is planned, the more power the pump needs;
- hose;
- stones for decorating banks and channels;
- plants for planting near the stream and in the channel itself.
At the base of the building artificial stream the same principle always lies: the pump pumps water from the reservoir pond, located at the lowest point of the water structure, to the highest point, from where the water flows down in accordance with the law of universal gravitation and the slope of the site. In order for the pump to function, it is necessary to bring electricity to it, that is, make a street outlet nearby.
See how great the streams in the garden, made by hand, look - here you can show all your fantasies:


How to make a waterfall in the garden with your own hands (with photo)
Any waterfall in the garden with their own hands is arranged on the shore of a water collector pond, into which water will fall, a submersible pump is installed at the bottom of the same pond.


Before you make a waterfall in the garden, you need to make a coastal zone at a level of 15-30 cm from the water level, in which they will be laid large stones. They must lie very stable, if this does not work without mortar, you can cement them. To increase the strength of the entire structure, you can first put a layer of mortar between the underlying material and the earthen wall, and then lay BK-rubber, then again the mortar and the foundation stones of the waterfall on it.


Then partially unroll the underlying material again and place a flat stone on top of the foundation stones, from which water will fall, so that its edge protrudes above them, and the water drains into the lower reservoir. This stone needs to be cemented and checked with a watering can if everything is done correctly.
Now, in the process of making a waterfall in the garden with your own hands, you can build a waterfall environment by laying stones around the weir stone, if necessary (to increase stability) attaching them to the lining material mortar. To prevent water from seeping under the stones, a fold of lining material should be laid at the height of the spillway stone and fixed. The shores of the catchment pond are decorated with stones.


After the construction of the waterfall, you need to install a submersible pump, bury the flexible hose coming from the pump to a shallow depth, install a tap in the hose if you intend to regulate the water pressure, and decorate it. After that, you need to turn on the pump and test the waterfall, if everything suits you, you can cut off the excess underlying material and mask its edges with low coastal plants or stones and pebbles.
It is possible to build a “weeping” waterfall on a limestone retaining wall, folded without the use of mortar, laying a hose behind it, at the end of the hose the stream from it is divided into as many parts as there will be streams of the waterfall. At the bottom of the retaining wall, a water tank is made from a film or a small ready-made form is installed. Turning on the pump, we close the system, so the waterfall started working.
For the construction of a waterfall, you can use ready-made forms fiberglass, the appearance of which is close to natural stone, it is important to mask their edges, fitting them into the garden environment.
Below are photos of do-it-yourself waterfalls in the garden - ordinary and "crying":


Making garden ponds with a photo: how to make a fountain with your own hands


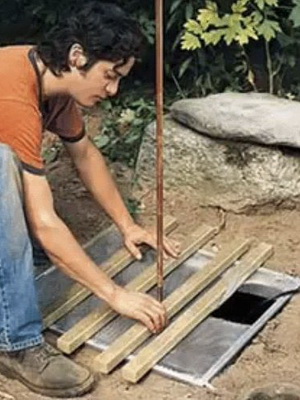

Making a fountain in the garden with your own hands is quite simple. It consists of a pump and a sprinkler through which water is ejected under pressure. The simplest sprinkler looks like a watering can nozzle. Other nozzles can create jets of water, foam, a spherical dome, etc. You can connect a submersible pump to statues, for example, a metal heron with a hole in its beak or other decorations such as a jug or a huge boulder (natural or natural) with drilled hole, an old millstone is also suitable. Pressurized water will splash out or silently drain from them into the tank. Before you make a fountain in the garden, it is enough to dig a small water container into the ground, decorate it and connect a pump that “drives” water in a closed cycle.

It looks interesting in the garden mascaron, a decorative relief in the form human face or the head of an animal with a hole for the release of a jet of water. A jet of water from the mascaron falls into a small reservoir and, with the help of a pump, returns to the "open mouth". Water structures built into the wall make rational use of space, are attractive, and emit a soothing murmur. They are organic not only for Italian gardens, but for gardens of any size in any country.
Except purely decorative effect, the fountain enriches the water with oxygen, and also increases the humidity of the air in its immediate vicinity, which makes it more comfortable to stay near.
An autonomous pump that will pump water only to the fountain is turned on only as needed, turning it off at night or when leaving.

As you can see in the photo, for a do-it-yourself fountain in the garden, it is better to raise the pump a little above the bottom of the reservoir by installing it on bricks. If the submersible pump is not completely in the water, it may fail. Not only the appearance of the fountain and its sound are important. The pressure of the water and, accordingly, its melody can be adjusted.
Now that you have an idea of how to make a fountain in the garden with your own hands, you can try to put your knowledge into practice.
