How to connect countertops. Chipboard kitchen countertop: types, features, installation methods.
If you have started a large-scale redevelopment of the kitchen, and want to make the most of the area you have, then one of the most good decisions there will be a choice of corner furniture layout. And for such a headset, we will definitely need a corner worktop for the kitchen - and in this article we will talk about the nuances of choosing and self-manufacturing similar structures.
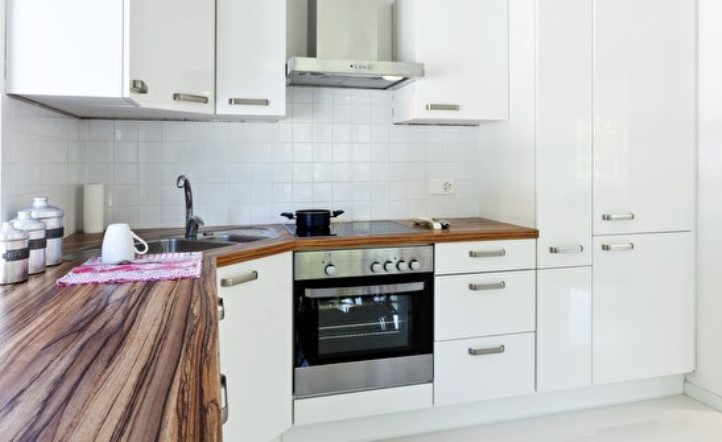
Corner countertops allow you to use every centimeter of usable space
Features of corner worktops
In kitchens of a small area, literally every square centimeter counts. That is why many experts in the field consider optimal installation in such small kitchens precisely the corner sets. So the space is used more rationally, and free space it turns out more.

Exactly corner set, as well as the countertop are considered best solution for small kitchens
Advantages
First, let's take a look at what the installation will give you corner tabletop. There are several advantages to such a solution.
- Ergonomic and space saving. Indeed, in the kitchen, the work surface of which has the shape of the letter "G", it is very easy to perform a wide variety of operations. At the same time, it is enough to take a position in the corner - and you can easily reach the farthest corners of the tabletop. In addition, you fully use the corner of the room, which is so important in small kitchens.

L-shaped arrangement allows you to use the corner of the kitchen
- Functionality. Modern designs kitchen modules allow you to place many more drawers under the corner worktop than under the straight line. And if you also make it angular wall cabinet– then the gain will be enormous.
- Separation working surface . The corner tabletop visually seems to divide working area into two areas. On one, for example, cutting or slicing of products can be performed, and on the second longer one, serving ready meals.

Corner top visually divides the work area into two halves
This advantage is most pronounced when two people work in the kitchen.
There is no need to push and demarcate work areas - just sit on the corresponding "wings" of the tabletop.
The main disadvantage of the angular location of the headset can be considered its remoteness from the window. But to solve this problem is very simple - it is enough to equip upper cabinets high-quality backlight headset.

Good illumination solves the problem of poor illumination of the work area
Worktop classification
There are several options for the layout of countertops for corner kitchens that you can use in the arrangement process.
- Monolithic. Most the best way, in which the coating is a single canvas. At the same time, there are no joints between the segments of the top, which guarantees the absence of leakage and moisture falling inside the kitchen modules.

Monolithic surface without joints prevents moisture from entering the headset
- Two piece worktops. Perhaps this is the most common type of coating. As a rule, such structures are shaped like the letter “L”, and their parts differ in size. The longer part has a length of 600 mm, and the shorter one has a length of 40-450 mm. In most cases, the short part is placed near the wall in which the door to the kitchen is located. For this reason, one of the corners of this part of the countertop is made rounded.

In most cases, the two parts of the top have different lengths.
- Three-piece worktops. They include an additional corner element (see photo) connecting two straight sections of the table top. The corner element can be either symmetrical or asymmetrical, and its front part can be either straight or rounded. As a rule, such a semicircular kitchen worktop is used in conjunction with curved facades from MDF.

The corner element can be either symmetrical or asymmetrical
Popular materials
Corner tops can be made from various materials with different characteristics and cost. Let's dwell on this moment in more detail.
- Chipboard. The most economical, at the same time quite light and durable option. During the manufacturing process, raw materials are processed special composition, which allows to increase the thermal and moisture resistance of the product. For decoration particle boards use a laminated film, which can qualitatively imitate enamel, wood, stone texture.

The price of chipboard products is the lowest among analogues
- MDF. More expensive than chipboard, but superior to it in terms of environmental friendliness. Material is different high strength, reliability and undemanding maintenance. Laminated MDF boards require a very high quality corner joint - otherwise there is a risk of moisture penetrating inside the tabletop slab itself, and as a result - it swells.

MDF is a durable and environmentally friendly material
For connection, special corner strips, which are additionally sealed using silicone or polyurethane.
- Fake diamond. It can be an agglomerate material, which contains a large percentage of natural stone chips, or acrylic stone, which consists of acrylic resins. Tabletop from artificial stone will serve you for many years, it is not afraid of moisture or high temperatures.

Countertops for a corner kitchen made of stone easily carry high humidity and high temperatures
- A natural stone. Option for those who prefer high quality, naturalness and luxury. One of the most expensive materials but also one of the most effective. Most often, granite and quartz are used to make the top.

Natural stone is one of the most expensive and spectacular coatings.
- Wood. natural, eco pure material, which even without additional decor looks amazing. Special impregnations increase the water-repellent properties of wood. Please note, however, that from time to time the coating will have to be re-treated with special compounds.
The tabletop for the corner kitchen made of wood needs periodic treatment with special impregnations.
Making your own concrete countertop
Prices for countertops are growing by leaps and bounds, so many people have a question about whether it is possible to make a top for a headset with your own hands. Of course you can, and in this section you will learn how.

You can create a concrete pavement with your own hands without special skills in construction
Preparation of materials
Before you engage in the purchase of materials and directly finishing work, you need to measure the headset. Based on them, you can draw an approximate sketch of the future product.

Rough sketch of a corner top
As for materials, for work you will need:
- formwork boards;
- aluminum or plastic profile;
- polystyrene foam sheet with a thickness of not more than 5.5 cm;
- fittings;
- crushed stone, sand and cement;
- concrete plasticizer.
In addition, you need to take care of the following tools:
- grinders;
- drill driver;
- hacksaws or electric jigsaw;
- trowel and spatula.
Master class on creating a concrete countertop in 5 steps
When all necessary tools and materials are collected, you can proceed directly to the creation of a cover for the headset.
| Illustration | Instructions for action |
 | Step 1. Formwork creation. Attach the sides of the structure to a piece of perfectly flat board or plywood. To do this, use bars with a section of 40x40 or 50x50. Attach a polystyrene foam sheet to the sides with self-tapping screws, lubricate it with drying oil or machine oil so that concrete does not stick to it in the future. |
 | Step 2. Reinforcement. After installing the formwork, you will need to lay the reinforcement mesh. For this purpose, a grid of wire rod with a thickness of about 6-10 mm and a mesh size of 5 cm is suitable. The grid must be laid out on plastic or metal supports with a height of 2 cm or more. The distance to the edge of the formwork should not be less than a centimeter. |
 | Step 3. Solution preparation. Mix one part of cement with two parts of sand and the same amount of gravel. Gradually add water to the mixture until the consistency of thick sour cream is formed. Mixing is carried out using a special mixer or an electric drill at low speed. At this stage, if desired, you can add a pigment for concrete. |
 | Step 4. Filling the solution. Pour the prepared solution into the formwork and level it with a spatula. Cover the structure with polyethylene for a day. Then remove it and apply a wet cloth to the composition (it will prevent cracks). After the final solidification of the solution, the formwork can be dismantled. |
 | Step 5 Sanding. With help grinder and a coarse-grained wheel, grind the surface. Then use medium and fine grain circles. Finally, attach a piece of suede cloth to the grinder and apply a special paste to it, which will give concrete pavement marble texture. And go over the surface with a filler, which can be purchased at any hardware store. |
Using this technology, you can make a countertop of almost any shape - while there will not be a single seam on it. You can follow the process of creating such a design in detail in the video.
Finally
Corner worktop - a convenient and practical design, with which you can most effectively equip the corner of the kitchen. In addition, as you could see from our material, it is quite possible to make it yourself. By resorting to our instructions, you can create a coating that is in no way inferior in quality to purchased products.
Problem
In addition to a special template and cutter, you will need a high-performance router to accurately and accurately produce a tabletop corner joint (Fig. 1). It is not profitable for a master who rarely has to deal with joining worktops to purchase such an expensive special tool. 
rice. 1 fig. 2
Decision
In such cases, both parts can be cut off at an angle and joined together. Using this method, you can easily cut workpieces at almost any angle. This is especially convenient if an angle of not only 90, but also 135 degrees is required (Fig. 2). Another advantage of this method is that the fibers of the texture of solid wood panels or wooden shields with decorative trim meet exactly at an angle. When processed in the manner shown in Fig. 1, the texture fibers of the two blanks are perpendicular to each other. If the surface of the countertop has a small pattern or is finished in stone, then even such a joint at an angle of 90 degrees is almost invisible. But still, in this case, the exact gusset noticeably harder than a 90 degree joint. The only drawback of the miter joints: the length of the workpiece for the manufacture of a tabletop with a width of 60 cm must be 60 cm longer.
To connect the countertop, you will need the following tool:
- Circular Saw: e.g. Festool TS 55 R
- saw blade Z 48 HW with fine teeth
- Guide rail FS 1400 or longer with two threaded clamps
-end stopper
- a milling cutter for making sockets for flat spikes and flat spikes, dim. 20
- drilling machine and Forstner drill ø 35 mm
- router OF 1400 and groove cutter ø 8-10 mm
- connectors for countertops - silicone (colour: transparent)


Dust extraction must always be ensured when working, so we need a dust extractor from the CTM series for industrial use in carpentry and carpentry. These vacuum cleaners can be connected to all Festool hand saws.

Preparation / setup:
First secure the tabletop to the trestle or workbench by placing blocks under it. At the same time, the excess part to be sawn off should not hang, it should have supports over the entire surface.
Use a pencil to mark the miter cut line on the top side of the tabletop. To do this, use a miter cut or a large setting angle or bevel.
If necessary, replace the saw blade of the saw blade with a fine tooth blade (48) in HW design.
If the splinter guard of the guide rail does not yet line up with the cutting line of the saw, first cut it along the entire length of the guide to a depth of approx. 6 mm at speed 1

Align the anti-splinter insert of the guide rail exactly to the marking and fasten the guide to the worktop with screw clamps.
Using a screwdriver, size 0.8 x 4 x 100, adjust without play the black guide stops on the base plate of the saw blade in relation to the guide rail.
Set (with a tabletop thickness of 38 mm) the depth of the saw blade to 48 mm (i.e. approximately 10 mm more thickness countertops).
Set the saw speed to the maximum value (6).

Procedure:
Cut the worktop exactly at an angle with the Festool TS 55 R circular saw using the Festool FS 1400 guide rail.
RECOMMENDATION
:
To cut a worktop with a width of 60 cm exactly at an angle, you will need: Festool FS 1400 guide rail with suitable clamps and a circular saw (e.g. Festool TS 55 R) suitable for the guide rail. As a snap, it is recommended to use the end stopper. It prevents the dust extraction hose and electric cable from getting caught on the end of the guide. The precondition for a clean, chip-free cut is the use of the correct saw blade. For sawing worktops with plastic coated and veneered worktops, you will need a fine-toothed saw blade (48 pieces) in the HW version.
In addition to a properly sized saw blade, a good splinter guard is required. At the first sawing, it cuts exactly along the cutting line of the saw and the stop bar. This ensures, firstly, the exact position of the guide and, secondly, a chip-free cut. If the anti-splinter insert is damaged, it must be replaced with a new one.
On the cuts, use a flat tenon socket cutter to cut four sockets from the underside of the tabletop and four from the top.
RECOMMENDATION
:
If the worktops do not match exactly in thickness, the flat spikes should only be inserted into the sockets from the top side, i.e. from the side of the covering. Due to this, at least from the upper side, the transition from one part of the tabletop to another will not be noticeable. The bottom side, as a rule, faces the cabinet elements, so inaccuracies are not visible here at all. Although the flat tenon can be moved slightly longitudinally, the sockets of both countertops must be positioned exactly opposite each other.
Worktop connectors are available in different lengths. In certain situations, long connectors may be more suitable for mounting. However, short ones are absolutely sufficient in the standard case. For inserting the connectors, you will need a Forstner drill or a heavy duty drill ø 35 mm and a router with a slot cutter ø 8-10 mm.
Using a square, mark three locations for the connectors.
RECOMMENDATION
:
With a tabletop width of 60 cm, you will need three connectors. One at about 11 cm from the edges of the countertop and one exactly in the middle.
Determine the distance from the hole to the edge of the countertop using the information provided by the countertop connector manufacturer.
For example, with a bolt length of 65 mm, the distance from the edge to the middle of the hole is 30-37 mm, with a bolt length of 110 mm, approx. 53-60 mm.
Mark the center of the hole according to the length of the connector
Use a Forstner drill or a heavy duty drill to drill a hole deep enough that the metal plates are completely recessed into the holes.
ATTENTION
:
The connector must never protrude.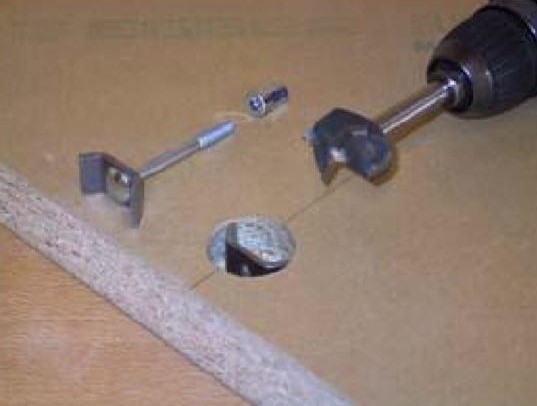
A small connecting groove for the bolt can be quickly made using a router and slot cutter ø 8-10 mm:
To do this, mark the exact position and width of the groove on the table top.
Then, along the marking, cut a groove with a depth of approx. 15 mm and a width of not more than 10 mm.
This will make it easier for you to guide the router in this position if you cut in two steps, each about 8mm deep. This will also reduce the load on the cutter.
In the case of installing short connectors for worktops, it is also convenient to cut the connecting groove manually:
First, use a jigsaw to make two cuts along the marking lines.
Then, with a chisel, select a groove-shaped recess.
RECOMMENDATION
:
When using long connectors, longer grooves are more convenient to cut with a router.
To protect the sections from water before mounting the worktops, they must be treated with silicone (colour: transparent).
Then flat spikes and corner connectors are inserted.
With a wrench, tighten the parts of the countertop using the connectors.
At the same time, silicone should protrude along the entire length of the cut, which must immediately be washed off with water using a napkin.
This is the only way to ensure sufficient protection against water and moisture.
Tools and equipment:
In that practical example using the following tools, equipment and expendable materials, at the link you can see the description, availability, prices, place an order / buy:
or :
The article was prepared based on materials from the manufacturer Festool.
Back to .
- Completion of the installation process
In the course of the repair work most landlords in addition to replacement finishing materials choose for your home new furniture. And often, in order for everything to end up in its place, the furniture has to be slightly modified. This problem very often concerns kitchen countertops.
For example, in the case of corner kitchen th. If you do not want to use the services of furniture assemblers, then this species you have to do the work yourself. Let us consider in detail how the countertops are connected and their correct installation.
Should you install a countertop?
If you understand in advance how to connect the countertop and how to assemble it, then, of course, you can carry out all the work yourself. If you do not have such experience, it is best to resort to the help of professionals. Otherwise, there is a risk of damaging the product.

- If you have experience, you can install such structures on your own from materials such as chipboard, MDF, and also from wood, since the listed materials are easy to process and no special tools are required during the connection and installation process.
- If your plans include installing a stone or tile system, then again, with experience, you can install and connect it yourself. In most cases, "home-made" devices have a longer service life than custom-made products.
- It is not recommended to mount and connect the countertop yourself if it is made of expensive material.
- Do you have experience in this type of work? Don't take risks.
- If the installation of the countertop is included in the cost of installing the kitchen set, then everything is fine. The masters themselves will install everything for you.
So, you can install and connect this product both independently and with the help of professional assemblers. It's up to you to decide.
Back to index
How to connect the countertop: the nuances
Separately, it must be said about what the countertop connections should be and how to protect them from moisture. In fact, this question arises quite often among people who purchase non-standard kitchen sets. It is possible to avoid joining the countertop only when its surface goes along a single straight line.

It must be understood that the term of its operation and, of course, an attractive appearance directly depend on how well the countertop is connected.
Before proceeding with the connection of the countertop, it is necessary to set all bottom cabinets as they will be placed later. It is important to check them for evenness. There must be a special level for this.
In addition to everything listed on each locker there are legs that can be adjusted to the required height. AT corner cabinet mounting brackets must be screwed on and all required holes. In the cabinets adjacent to it, holes must also be present, through which the countertop will subsequently be attached.
It is important to review all the available parts that come with the countertop and kitchen unit.
In most cases, you will find there three fragments and strips of aluminum, having a T-section, which have holes for the screws.
After that, you need to combine the side ends of the countertop with the ends of the cabinets. In this case, the T-bars must be inserted. If the countertop does not lie close to the wall and it was created taking into account the curvature of the walls, it needs to be cut a little.
Then fix the corner piece of the countertop to the cabinet. This must be done from inside the cabinet. In order for the subsequent connections of the countertops to be reliable, it is best to carry out this work together. This is due to the fact that while one will fasten, the other should strongly press the countertop against the cabinet.
After that, you need to fix the T-shaped strips at the junction of the remaining part. The ending of the plank, which must match the outer rounded edge of the countertop, needs to be additional processing. This means that the hard rib must be removed so that the end of the plank will then smoothly wrap around the outer edge of the countertop. After that, carefully lower the screw. Check if it sticks out. If, nevertheless, his hat sticks out, then increase the hole to correct the situation.
corner arrangement kitchen furniture always implies the need to connect the worktops to each other. More often, such work is performed professional craftsmen. Those who believe in themselves, but do not have sufficient skills, will successfully cope with the task with the help of special tool and mounting hardware.
Worktop connection options
Depending on the design of the cabinet elements of kitchen furniture, countertops can be connected to each other:
- at the joint. This option is also called an end connection, since the fastening occurs along the length. At corner location a headset, this method is applicable when a cabinet is used as a connecting element, as a rule, under a sink, back wall which has an L-shaped profile;
- across. In this case, the end of one tabletop is connected along the outer edge of the other.
Both methods are used equally actively. The choice in favor of one or another option is made based on the shape of the case corner element.
General Approach
Practice has developed a common approach to connecting countertops to each other - the use of screeds. For this, the length conjugation with reverse side according to the markup, cut out nests for fasteners. It is convenient to do this with a hand cutter. If there is no such tool, you can get by with a narrow chisel. Great precision is not required here. Nests, including a hole for clamps, are made free for fasteners. The task of the clamps is to ensure a high density of conjugation. Accuracy is achieved by other elements: connecting strips or dowels, depending on the connection option.
It is convenient to markup using a template. Its positioning with mating surfaces is carried out with the help of the metal stops included in the kit, which ensures high accuracy not only of the sockets for the ties, but, most importantly, of the holes for the dowels. On it, you can also draw a line of transverse pairing of tabletops without a connecting strip. This connection method is known as "Euro saw". The absence of a connecting strip creates the impression of a monolithic surface.
Before joining together the cut edges of the countertops are treated with sealant. If the connection method provides for the presence of a bar, its fastening to self-tapping screws is done so that the edges of the heads do not protrude above the surface. The design of the profile is such that the edges of the tabletops are centered relative to each other independently when tightening the clamps. Fasteners are screwed in until the sealing compound is squeezed out of the gap.
Assembly nuances and ways to solve them
Replacing countertops for the kitchen, especially when repairing it, sometimes requires a non-standard approach:
- the planes of the individual elements are deformed and when connected, an ugly drop is obtained. The defect is eliminated with dowels. It is possible that the tabletop plane is rigid and does not deform when docking is attempted. In this case, you can weaken inner surface shallow cross cuts;
- if the connection plane is distorted by an inaccurate dowel, it is not necessary to re-drill it. It is enough to cut off its outer part along the thickness of the protrusion and transfer it diametrically to the opposite side. Then carefully connect the countertops;
- far from always the corners in the kitchen are close to 90 °. If this circumstance does not create any special difficulties for the butt joint: a small trimming is required from the side of the corner element, with a transverse arrangement, the template will no longer help. The solution is simple - dandy. Easily made from improvised materials. The purpose of the device is as follows. If, during the adjoining of the tabletops, one edge has a gap, let's say 1 cm, it is necessary to pick up a bar of approximately the same thickness and tie a construction pencil at some distance from its end. Next, an impromptu tool is applied from the side of the gap and the place is washed down. Then the stroke of the front part, which has a complex profile, is carried out. Copying in this way can be done with high accuracy. It remains to connect the edges of the markup and make a neat cut.
We should not forget about such trifles as cutting with a saw with a fine tooth with a force directed to the plane, leveling the surface with sandpaper and everything that improves the quality of work.
Chipboard-based kitchen worktops covered with wear-resistant plastic have long been very popular due to their low price and decent quality resulting work surface. Today, on their basis, the lion's share of all kitchen sets is made. From the manufacturer, such countertops are supplied in the form of canvases about three meters long and several standard (fixed) widths. For this reason, in the manufacture of corner kitchen sets, there is a need to connect several countertops (parts of canvases) at a certain angle, dictated by the characteristics of the room. In the vast majority of cases, we are talking about internal right angle(90°).
The technology of joining worktops using decorative and functional connecting strips allows you to perform high-quality (durable) docking quickly and without specialized equipment. Constantly high density adjoining parts of the corner tabletop is provided by special furniture fittings - a screed (clamp) - hidden from the bottom of the tabletop.
To perform corner joining of two parts of the tabletop, it is necessary next fittings and consumables:
- Angular connecting (docking) level for a table-top. The height of the plank and the radius of the rounding of the corners are selected depending on the thickness and manufacturer of the countertop.
- Two couplers (clamps) for a table-top.
- Silicone sealant (preferably colorless).
Required tools and equipment:
- Electric drill.
- Faustner drill with a diameter of 35 mm (used for).
- Drills for metal with diameters of 5 mm and 8 mm.
- Milling cutter with an end mill with a diameter of 8 mm or a Faustner drill with a diameter of 8-10 mm.
- Hacksaw for metal.
- Phillips screwdriver or screwdriver.
- Wrench 10 mm.
- Pliers.
- Simple pencil.
- Cloth to remove excess sealant.


Connecting bar profile.


Preparatory stage.
Before marking the tie-in points (clamps), you need to make sure that the holes for future fasteners will not interfere with the installation of any equipment built into the countertop. For example, it is often necessary to accurately calculate the places relative position kitchen mortise sink and clamps, since in a corner kitchen the sink is very often located exactly in the corner (that is, close to the joining seam of the countertop). It is also not uncommon for the butt joint to be close to the built-in hob, and you need to try not to create additional difficulties with fixing it with the help of regular L-shaped brackets from the bottom of the countertop.
It is important to know that even a corner tabletop connected by several ties is much inferior in rigidity to a monolithic (solid) tabletop. In this regard, when designing the lower kitchen modules (on which the countertop will be placed), it is necessary to provide reliable support for the countertop near the docking point, both on one side and on the other side of the docking seam (in other words, the docking point should not hang in the air and " play" when pressing on the tabletop from above). Clamps work well for breaking, but not for countertop deflection! However, it is allowed to transport the worktop in a prepared for installation on kitchen set form (connected by clamps), if provided high rigidity docking points, for example, temporary fastening of the tire with chipboard from the bottom of the tabletop, which will reduce the likelihood of a seal failure of the joint seam to a minimum. With small dimensions of the corner tabletop, its most careful transportation without the use of tires is allowed.
Markup.
The indents for marking the places for installing screeds (clamps) depend on the specific model of the used screed for countertops. Below we will consider the option of using 100 mm ties, which are the most common and convenient to use in most cases.

On the bottom plane of the tabletop, it is necessary to mark up for drilling 35 mm blind holes (for C-shaped washers) and milling grooves for threaded studs.
The marking is carried out coaxially on the two parts of the tabletop that need to be connected. The distance from the docking end of the tabletop to the center of the blind hole is chosen to be 55 mm. This distance takes into account the presence of a docking bar with a thickness of about 1.5 mm. Depending on the presence near the joint of one or another kitchen fittings or appliances (built into the countertop), the distance from the edges of the countertop standard width(600 mm) it is recommended to choose from 70 to 150 mm. In exceptional cases, you can deviate from these recommendations, or use not two, but only one clamp, shifting it as close as possible to the center of the tabletop.
Connecting worktops without the use of clamps,
fixing the countertops only to the kitchen modules,
Not recommended!


Marking for screeds with a square.

It often happens that the location of the regular slots for screeds in the connecting plate is not satisfactory, you have to make additional ones. After marking for the screeds, you need to lean the connecting bar against the end of the countertop, align it and mark the places of the new slots on the bar with a pencil. Using a hacksaw for metal, we cut along the lines and break out the inside with pliers. Secondly, it is required to cut the bar along the length with a small margin of 1-2 mm with the same hacksaw (this operation can be done as a last resort). The last thing that must be done is to ensure that the heads of the self-tapping screws are securely recessed flush into the connecting bar (if necessary, perform additional countersinking).


Connecting plate preparation.

You can mark the positions of additional slots in the connecting plate
after production of seats for clamps.
Drilling and milling of seats for clamps.
An electric drill, with a Faustner drill with a diameter of 35 mm clamped in the chuck, selects blind holes to a predetermined depth. The depth of the holes is determined from the condition of the position of the tightening pin of the clamp exactly in the center of the thickness of the countertop. After all the blind holes are ready (4 holes for 2 ties), it is necessary to drill 8 mm holes for the studs in the countertop, which is connected at the end with a rounded overhang. For reasons of accuracy, it is recommended to drill with two drills, starting with a small diameter (eg 5 mm). In the countertop, which is connected by a direct overhang (that is, not rounded and not covered with plastic), open longitudinal cavities (grooves) are made into which the studs will fit. Cavities are most convenient to make manual router with a groove cutter with a diameter of 8 mm. In the absence of a milling cutter, you can use an electric drill with a Faustner drill of small diameter 8-10 mm, with which a row (straight line) of blind holes is drilled as close as possible to each other until a groove is formed.


Clamping of parts of the countertop with clamps.
After the seats for the clamps have been prepared and the correctness of their manufacture has been verified, we proceed to the final stage - fastening the parts of the countertop to each other. Firstly, it is necessary to fix the connecting bar to the countertop with self-tapping screws (with hidden caps), having previously covered the chipboard end with an even, continuous layer of sealant. Secondly, it is necessary to seal the surface of the connecting strip, which will adjoin the rounded (front) overhang of the table top, with sealant. It will not be superfluous to apply sealant to the surface of the seats for clamps (on blind holes and cavities). The final stage: put the pin in the groove, insert the pin into the hole in the counterpart of the countertop, and evenly (in turn) tightly pull the parts of the countertop to each other wrench. You should not pull strongly, an indirect sign of the end of the tightening is the extrusion of the sealant onto the front of the countertop. Squeezed out sealant is recommended to be removed immediately with a cloth.


Extruded sealant (photo on the left).
Connecting strip in the corner worktop (photo on the right).

With the proper approach to the manufacturing process of the corner tabletop, compliance with all the rules to prevent water penetration, the docking point will have the same, or even increased, operational properties in terms of wear resistance and moisture resistance, as well as a solid section of the countertop. The connecting strip protruding 1.5 mm above the top plane of the tabletop slightly reduces the aesthetic qualities. There is a technology for joining chipboard worktops without the use of planks, while the joining ends are profiled according to special templates with high precision for perfect closure. However, this technology has become less widespread due to the relatively high complexity of execution and the need for specialized equipment.