Do-it-yourself lampshade from ribbons. Beautiful do-it-yourself chandelier shades: a step-by-step master class (photo)
Any decor in the room begins with small things. So, by changing a few details, you can create a completely different interior. Try to change the lamp or lampshade on it, and you will see how the whole interior design will change. Depending on the chosen room, the lampshade can be classic, made of fabric and lace, modern made of plastic, buttons or paper, abstract, made of feathers or other improvised means.

With some effort, you can really get unique thing which you will not find analogues anywhere else. It is known that handmade designer items are not cheap, as they take a lot of time to produce, but the result is something unique and unrepeatable.

To make a lampshade yourself with your own hands, you will need cheap improvised materials:
- plastic spoons, forks and glasses;
- wooden sticks for ice cream;
- fabric scraps;
- ribbons and lace;
- buttons;
- tubes from magazines;
- beads and beads;
- cardboard and paper;
- shells and pebbles;
- clothespins;
- plastic straws for drinks;
- thread and twine;
- metal wire for the frame.
Typically, a lampshade consists of two metal rings interconnected by jumpers (from 3 pcs). The shape of the frame can be trapezoidal, cylindrical or curly.
Any metal wire is suitable for the frame: copper, aluminum, steel. With the help of wire cutters, it is necessary to cut off two pieces of wire and make two circles out of them - one larger, the other smaller.

It should be noted that the design for the lampshade hanging chandelier slightly different from the design of the lampshade of a table lamp, but in any case there is always one more inner ring through which either a cartridge or a cord from a chandelier is threaded.

To work with wire, you will need wire cutters and round nose pliers (in order to make a neat loop for clutching the wire together.

But, nevertheless, it would be most correct to buy a ready-made frame for a lampshade - fortunately, there are a lot of them in building hypermarkets.
You can make a pattern for a lampshade like this:

So, the frame for the future lamp is ready and you have to choose the most important thing - the decor of the lamp and the material with which to work. We offer several options for making a lampshade with your own hands.
Lampshade from patches of fabric

To make such a lampshade, you will need the following materials and tools:
- two pieces of fabric of different colors;
- lampshade frame (purchased or made by yourself);
- thread with a needle;
- scissors.


And more options for inspiration: fabric lampshades:


Ribbons and lace, buttons and beads, cuts of other fabrics and bows are suitable for decoration. Even old trousers or other clothing can give life to a designer item.
Most often, such lampshades are sewn according to a pattern: for this, a pattern is cut out of paper or newspaper, and then transferred to fabric:

The lower and upper parts of the product can be decorated by gluing or sheathing with a fabric of a different color or lace, braid.


Paper lampshade - options and ideas
No less interesting can be a lampshade made of paper or cardboard.
Suitable for work:
- pages of glossy magazines;
- old newspapers;
- old unnecessary book;
- notebook (can be written out);
- paper napkins with patterns.
Remember: paper is flammable, so you will have to use either energy-saving or LED bulbs - they heat up less than incandescent bulbs.

To make a simple paper plafond, you will need the following materials:
- base - a ceiling-ball made of paper of any diameter;
- paper for records in the form of squares;
- scissors and glue.
First, cut out circles from note paper (you can replace it with plain colored paper).

You need to stick decorative elements from below, row by row, until the entire surface of the ceiling is covered.

Instead of ordinary colored paper, you can use corrugated or velvet paper, or you can replace them with lace fabric - in this case, the lamp will look lighter and more airy.
More options for lampshades made of paper or cardboard, photo:


In order to change the look of the room, just a little is enough: change the pillows or the bedspread on the sofa, throw a bright rug or make a lamp with your own hands.
Decorating interior items can be interesting and addictive! Vases, napkins, panels, lampshades - these are the little things that change the face of the interior!
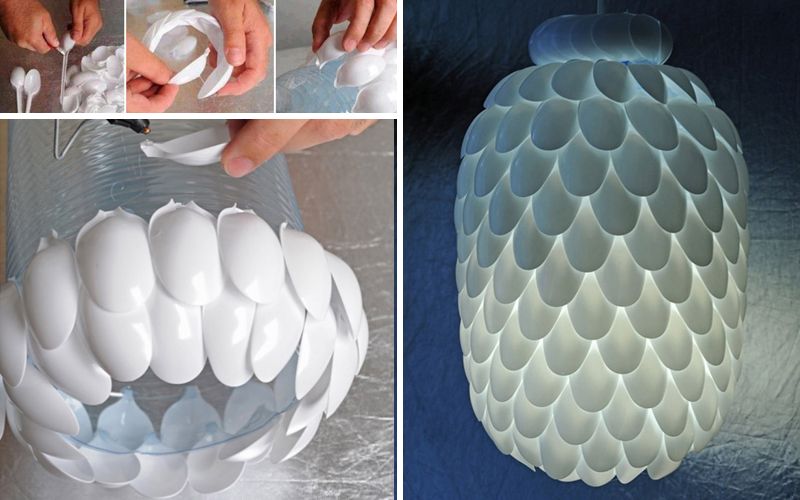
Not to buy designer lamp, make a lampshade from plates with your own hands. For this you will need:
- the basis for the lamp is a cylinder made of paper or cardboard;
- several sets of paper disposable plates;
- glue gun;
- scissors.
How to work: fold each plate in half and glue to the base along the fold line:

A similar lampshade can be used for sconces, and for hanging lamp, and for a floor lamp. If desired, you can use different colored plates or paint the whites in different shades.(42)
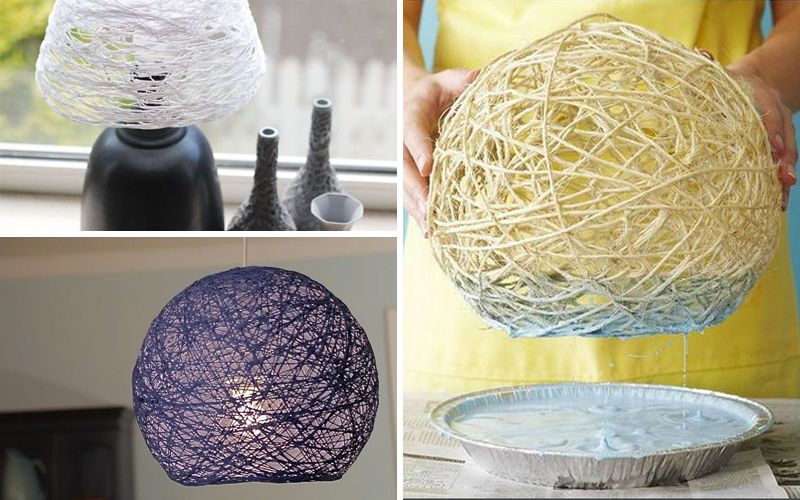
Such gizmos became popular a few years ago. Light and weightless balls of thread, depending on the diameter, can become either christmas toy, or a piece of decor, or a lampshade. Threads can be used in any color, or you can dye them when the craft is ready. From above, you can also decorate with ribbons and lace, beads or buttons - this way the craft will look more elegant.
How to make a lampshade from threads? For work, materials and tools are needed:
- balloon(or an inflatable ball that can be blown away);
- a skein of threads (the thicker the threads, the more reliable the lampshade will be);
- PVA glue;


Depending on how often you wind the threads, you can get either an airy and light lamp, or a denser lampshade.
Attention! Before winding the threads, the ball must be lubricated with petroleum jelly - this will allow it to be easily separated from the dried lampshade.
Operating procedure:
- To begin with, the ball must be inflated - what diameter the ball will be, this will turn out to be a lamp. Mark a hole at the bottom that will need to be left open.
- Wind the thread around the ball in random order. Between layers, as well as on top, coat the entire ball with PVA glue and let the glue dry for about 4-5 hours.
- Now the ball can burst and pull out. It remains only to thread the cartridge with the lamp and hang the lamp.

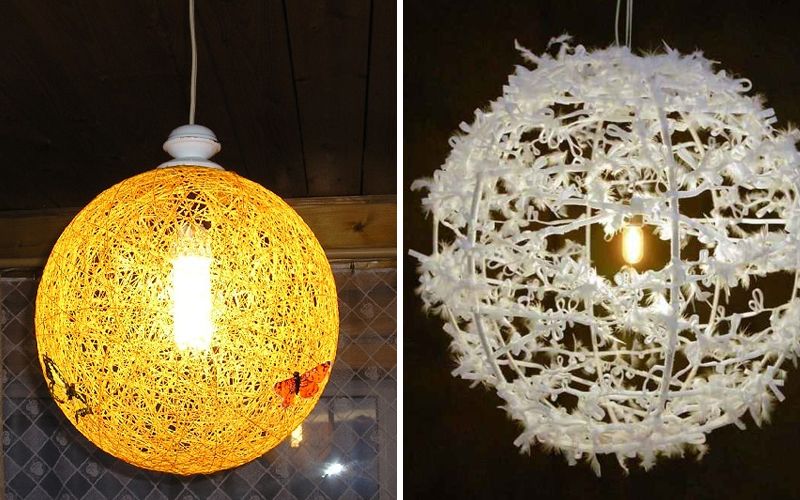
With the help of threads and glue, you can make a lamp in a different way: instead of a ball, use a plastic bottle, and take denser threads. Previously, the bottle must be pasted over with adhesive tape so that the dried lampshade is easier to remove. The shape of the lamp will also be different:


More lampshades made of threads, photo ideas:


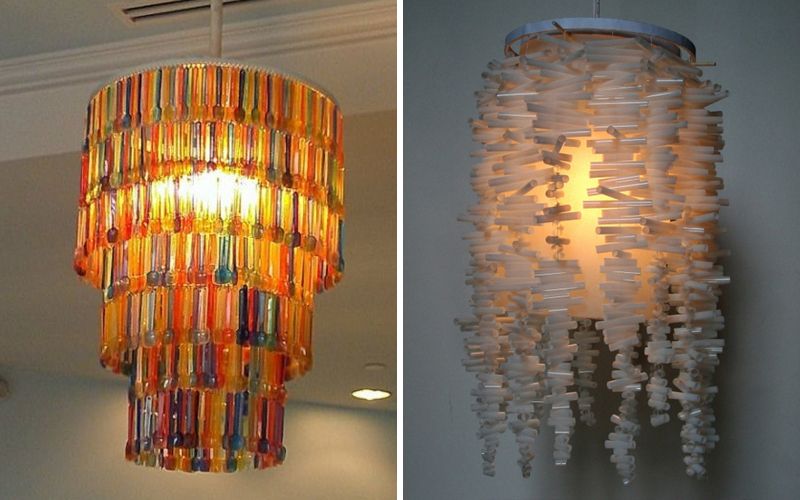
Using simple tricks and a few packs of disposable spoons or forks? you can create a great original lamp that will decorate your interior. Such lampshades can be used in almost any room - in the kitchen, in the hallway, on the balcony, and even in the bedroom.
To make such a lamp, you will need the following materials and tools:
- several sets of disposable spoons (table or tea - it all depends on the desired size of the product);
- plastic 5-liter bottle;
- scissors;
- glue gun or mounting universal glue for plastic products.
Operating procedure:
- At the cylinder, cut off the lower part (bottom) and degrease the surface.
- At plastic spoons, carefully break off (or cut off) the tips.
- Via glue gun glue the spoons to the balloon in rows, starting from the bottom.
- Then make a bezel and glue it on top.
- Pass the cord with the cartridge through the hole on top and screw in the light bulb.


If desired, spoons can be painted in any color. In this way, you can make a ceiling lamp for a floor lamp, wall or pendant lamp.
In addition to spoons, you can also use disposable forks or knives for the lampshade - the lamp will be a little different, lighter and more elegant:

Or from plastic cups:

Original do-it-yourself lampshades, photo
If desired, and with good imagination and skillful hands, you can make a lamp from other improvised means - wood, cocktail tubes, clothespins, burlap, packaging cardboard, even plastic bottle caps.
We have selected original ideas for DIY lampshades, we hope our ideas will help you choose what will suit your interior. So, a photo of lamps and lampshades made and decorated with your own hands:


Lighting plays important role in home. A well-chosen light source is a combination of the right brightness and power with beautiful design lamp. A good solution would be a chandelier, a floor lamp or a lamp under a lampshade. But if neither the stylization of the last century, nor modern product, you can make a lampshade with your own hands!

Popular materials
Interior elements, made according to an individual project, are conveniently and beautifully integrated into the home environment. They are made of those materials and in those colors that are combined with the design of the rooms and are key to a particular style direction.

But appearance- That's not all. Any product should not only match the interior, but also perform its functions. Before learning how to make a lampshade with your own hands, it is important to determine what to make it from. The choice of materials is influenced by the following nuances:
- Lampshade location. Several options are common: ceiling, floor lamps on a high leg, wall-mounted, table lamps. It is difficult to imagine the same overall design on the bedside table as under the ceiling. In turn, a small bedside lamp will not cope with the functions of a chandelier in the living room.


- Dimensions. The larger the diameter of the ceiling, the more difficult it is to make it from small elements. If for a fabric lampshade you need only a meter of material, then for a ceiling made of ice cream sticks you will have to eat more than a dozen popsicles.


- Appointment. Lampshades are suitable for many occasions. They create a romantic setting for a date, a cozy chamber atmosphere for friendly conversations, give the interior a zest and lightness. The more light the room needs, the thinner and lighter the materials should be, the darker the lighting is planned, the denser the materials and the richer the colors can be.


- Price. Not all materials will cost less than purchasing a finished lampshade. So, lace, velvet, and some other noble fabrics are many times higher than the cost of an item made from improvised materials.
Lampshades made of fabrics, leather, various types of paper, fragments of wood, ropes and ribbons, beads, metal are very popular. No less common are products made from "junk" things and "alterations" that have received a new life.


Textile
Not every fabric is suitable for sewing a lampshade. Conventionally, it can be divided into two types: transparent and dense.
Transparent is designed for chandeliers and floor lamps, which should illuminate large area. This fabric allows you to create beautiful designer shades without compromising the technical characteristics of lighting. Light veils, airy products made of fine lace, “knitted” openwork shades are suitable.
Transparent fabrics should be at a great distance from incandescent lamps, and lace fabrics should preferably be starched so that they retain their rigid shape even without a frame.


Dense fabrics are needed to create a chamber atmosphere. These include satin, jacquard, linen, matting, flock, silk, staple, fabrics with photo printing. There is also a fabric on a lighting canvas, designed exclusively for geometric lampshades.
Dense fabrics are more variable in terms of design. They come in any desired shade and can be patterned: geometric patterns, different kinds cages, plots, birds and animals, floral and plant motifs. Separately, it is worth noting products made of leather, corrugated fabric and the possibility of using adhesive tapes and ribbons to form folds of any shape.


Save on creation original lampshade reworking old things from fabric will help. Leaky jeans that the hand did not rise to throw away, a sweater that the moth ate, cuts from burlap and any clothes that have served their time will be used.
Wood
In the design of wooden lamps, the base is often made, and less heavy materials are needed for the ceiling. However, this does not prevent the use of small, light wooden details non-trivial shape to create a lampshade.

These can be braided products from strips of wood (like a basket or a box), flexible thin branches (willow, hazel, birch), thin wood saw cuts up to 10 centimeters in diameter, strung on ropes like curtains for a doorway. The lampshade looks more original, the frame of which is made of an old wastebasket, and the ceiling is decorated with even rows. wooden clothespins. From budget options - decoration for a lamp from chopsticks for sushi or a simple and elegant lampshade from a knitting hoop.
One-piece wooden shades are also found on the market. These are the thinnest cylinders that have preserved the texture of wood and let light through, but they are difficult to manufacture and require some skills. carpentry. In addition, due to the material and production technology, they are characterized by high cost.
Metal
For many, the phrase “metal lampshade” has associations with bulky candelabra under the ceiling from Gothic interiors, but modern technologies make it possible to make elegant and concise products from aluminum and metals similar to it in properties. They have a variety of shapes, the depth of the dome, can be solid or consisting of only "ribs", like a bare frame.

A budget option it is easy to make with your own hands from wire (aluminum or copper). Aluminum is larger in diameter, suitable for products of bizarre shapes, but without decorative elements. Copper wire is thinner and more flexible. From it, not only intricate shades are obtained, but also beautiful decor any degree of complexity. Ready product from wire can be painted in whole or in separate fragments.
To give the wire the desired shape, use a small bucket, a salad bowl with a leg, a curly vase, a fruit basket, or any other object that can be wrapped around the top and then removed.

Another option for home creativity- a lampshade made of coins. If old Soviet-era money is preserved at home, then these depreciated rubles can be turned into an original lampshade by gluing them with superglue with ribs. Circles of metal of different sizes should form a deep bowl into which a light bulb will fit.
It is important to consider that this is painstaking work, and you will need a lot of coins even for a small product, so you should not choose this option to decorate a chandelier in the living room. But as decorative ornament It will come in very handy for a table.


Gypsum
Gypsum lampshades are rare. More often used are semicircular and curly plafonds of sconces in interiors in a historical, especially antique, style.
It is easy to make it with your own hands. It only takes gypsum mixture, water, a medical bandage and the basis on which the future ceiling will be formed. The work takes place as in the papier-mâché technique, only instead of pieces of paper, small fragments of a bandage soaked in a plaster mixture are used.
After drying, the gypsum product will be textured and uneven. It can be left as is or sanded with fine sandpaper until smooth.


Plastic
Finished plastic products amaze with a variety of shapes, sizes and colors. No less original plastic lampshades can be made with your own hands using household items from this material. Among the popular ones are products from bottles, cups, disposable spoons and straws. The most convenient are drinking bottles of large volume.


Colored plastic is used to cut out small details from it. For example, you can make leaves, circles, ovals, diamonds, and then fix them on the frame. transparent plastic serves as a basis for painting with acrylic and stained glass paints.
From bottles of 5 liters or more, a ready-made ceiling is obtained if you cut off the bottom of the container. The remaining top already has a hole for the cartridge, and the lower edge can be figuratively cut off, set on fire (heated plastic takes on bizarre shapes), trimmed with other material. It remains only to draw.


Paper
Paper lampshades are one of the cheapest, most comfortable and easy to make. They are light weight and versatile. As in the case of textiles, they are more transparent or dense.
Lightweight, transmitting a lot of light, such shades are made of parchment or rice paper. Before cutting out the details, the sheets must be smoothed with an iron. Dense lampshades can be made from cardboard, wallpaper, newspaper pages using the papier-mâché technique.

Threads
The most popular and simplest option is a product made of threads (string, sisal, twine, jute), which are soaked in a large amount of PVA glue and wrapped around a balloon or an inflatable ball. Due to the fact that the glue becomes transparent when it dries, there will be no traces on the threads, even colored ones.
A rougher-looking and more complex lampshade is obtained from a woven clothesline or rope. give it to him round shape will not work, but the classic semicircular, cone-shaped or cylindrical ceiling will turn out ideal for rooms in nautical style and loft interiors. Wicker shades made of wicker, twine, using the macrame technique also look interesting.

improvised materials
With good imagination and skillful hands you can make a lampshade from less malleable materials: beads, beads, scraps satin ribbons, used discs, shells, book sheets or unnecessary music books, corrugated cardboard, cupcake liners and many other little things that are no longer useful.


Style direction
The choice of a specific style direction for interior design requires adherence to it even in small things:
- If the interior is dominated by one of classical trends , it is worth giving preference to high-quality materials and noble shades. Suitable fabrics, lace, bronze, gold and silver elements, graceful shapes, white, beige, burgundy, emerald, brown colors, as well as ivory and shades of valuable wood. The lampshade, which looks like it was inherited from an intelligent great-grandmother, will look especially advantageous.


- ethnic decoration implies the presence national flavor one country or another. European styles tend to stiffness and elegance, the Asian region is more characterized by lightness, airiness, simplicity, East style embodies fabulous motifs, bright colors, precious jewelry, a combination a large number shades.

- Russian style, contrary to ideas, is not a heap national symbols, but wealth, solidity, beauty and good quality; American - freedom of expression and original materials, for example, a ceiling lamp from tabloid pages.

- styles, close to nature, dispose to natural and simple materials- wood, straw, coarse thread.


- Modern directions as free from restrictions as possible. They allow the use of absolutely any materials, junk items and the most unexpected decisions: lampshades made of rope, candy wrappers, used discs with mirror surface, paper cups and cocktail tubes. And these are just a few variations on the theme.


Manufacturing master class
At first glance, making a lampshade on your own may not seem like an easy task, but detailed description will help you deal with it in a few simple steps. The easiest to perform are frameless paper products, twine, lace.
To assemble a paper accordion lampshade for a chandelier, floor lamp or table lamp, you will need:
- Prepare a piece of paper (you can wallpaper) 150 cm long and at least 30 cm wide;
- With a simple pencil along the ruler, outline the "ribs" of the accordion 3 or 5 cm each;
- Assemble the accordion, focusing on the intended lines;
- Using a hole punch, make holes in the ceiling along the upper edge and insert a ribbon or cord into them to adjust the width of the upper edge of the ceiling;
- Glue the two ends of the accordion with superglue.

To create the most popular spherical lampshade you will need: 20-25 meters of cotton-linen threads (thick) or soft rope, scissors, construction PVA glue, water, a container for glue, a marker, a dense plain balloon, medical gloves, vaseline, lamp base.
Actions are performed in stages:
- Prepare work surface. It is most convenient to perform actions on a table covered with a film;
- Dilute the glue with water in a ratio of 2 to 1, lower the ball of thread into the resulting solution. It should get wet through and through. If necessary, you can add more solution in the course of work;
- While the threads absorb the glue, inflate the balloon to the desired size, mark a circle around the tail of the balloon with a marker, the diameter of which is equal to the diameter of the light bulb. Lightly walk on the ball with Vaseline;

- Tie the tail of the ball with a thread and wrap it in a chaotic manner until the threads run out. It is desirable that the weaving is thin and cobweb;
- When the weaving is finished, the tip of the thread must again be fixed around the tail of the ball and cut off the excess;
- Hang the ball in a dry place for 48 hours until completely dry. It is important to consider that glue will drip from it, so a container must be provided below.
- Puncture or deflate the ball and remove it from the lampshade. The product is ready.


Lampshades made of round lace napkins look incredibly beautiful. They give the room sophistication and romanticism, and at the same time are very simple in execution.
Since the basis of lace is threads, the manufacturing technology is similar to the previous version:
- Prepare workplace and everything you need: scissors, white glue without yellowness or transparent, lace or lace doilies, water, contrast inflatable ball without pattern;
- Dilute the glue with water, immerse napkins in the mixture for decoration;

- Inflate the balloon, mark the hole for the light bulb, grease the surface of the balloon with petroleum jelly;
- Lay out the overlapping lace circles, moving clockwise from the intended hole for the light bulb;
- Leave for 24-48 hours to dry completely;
- Attach the socket and lamp.
Frameless lampshades also include products made of metal, plastic and wooden fragments that are glued together to form a semicircular or round shade. For example, from coins, gears, cups, branches.

The frame is necessary for more complex products made of thin paper or fabric. It allows you to assemble lampshades of different shapes, sizes and complexity.
How to make a frame?
The base from an old lampshade is ideal for implementing conceived ideas.
If not, you can make a new one from the following materials:
- Wire.
- Metal hangers for clothes.
- Plastic container from drinks.
- Plastic and wicker baskets.
- Embroidery hoop.

The wire frame is the most labor-intensive, but the product from it turns out to be reliable and strong. The main advantage of the wire is that it allows you to give the base any shape: cone, cylinder, square, tetrahedron.
For assembly, steel wire 2-3 mm thick, wire cutters, pliers (pliers), round-nose pliers, a hammer, a wooden chock, sandpaper, enamel for painting, a soldering iron are required.


Working process:
- Straighten the wire wooden chock with a hammer.
- Cut the wire into pieces in accordance with the diameter of the upper and lower rings and the height of the "ribs" of the frame.
- Clean the finished fragments from bumps and rust with sandpaper; using round-nose pliers and pliers, give them the desired shape. The classic frame is two round bases different diameter and 4-6 ribs.
- Cut the ends of the blank for the bases at an angle, set them aside.
- At the upper end of each piece of wire for making ribs, make a small buttonhole and thread them into the upper ring of the frame. Distribute evenly.
- Wrap the ends of the wire on the upper ring and the junction of the base with the ribs with a thin copper wire, press with pliers and solder.
- Bend the loops at the lower ends of the ribs with round-nose pliers, lay the lower ring of the base on them, adjust the distance, press with pliers, wrap with wire, press again with pliers and solder.
- Finished frame enamel light color so that after a while the wire does not begin to darken and does not leave dirty spots on the fabric lampshade.

The frame of old metal coat hangers is assembled according to the same principle as the wire one, but it requires less effort and is less durable.
To make it, you need to unwind the hangers into long wire strips, from which, with the help of pliers and round-nose pliers, parts of the desired shape and size are formed. Excess can be bitten off with nippers. The parts are connected to each other using building glue, thin wire or electrical tape.
empty plastic bottles with a volume of 5 liters or more can also serve as a good base for a lampshade if you remove the cover and cut off the bottom. The resulting ceiling can be painted, painted, decorated with plastic parts.
Three-penny plastic baskets for used paper and obsolete wicker baskets give great scope for imagination. They are almost ready to be used as a lampshade, all that remains is to make a hole for a light bulb in the bottom, and if you turn on your imagination and decorate them, then no one will recognize yesterday's urn in a luxurious floor lamp.
The last type of frame is also based on the use of a familiar object in an unusual way. To make simple and convenient wooden base all you need is a hoop for embroidery of different diameters. The rings are connected to each other with a rope, braid or cord with any convenient knot or through holes drilled around the perimeter. You can arrange them in size in ascending order for floor lamps and in descending order for ceiling chandeliers.


How to sew from fabric?
To sew a classic fabric lampshade in the shape of a cylinder, you will need a pattern, textiles, the upper and lower frame ring, PVC film for lampshades or white cotton, textiles and a spool of thread in color, sewing machine, iron, glue, scissors, clothespins, wet wipe, weights.

Step-by-step instruction how to drag old lampshade new fabric or sheathe a new frame with a cover, includes several stages:
- Workplace preparation.
- Creating a pattern drawing. It is enough to measure a cylindrical lampshade with a centimeter tape, and a conical lampshade needs to be “rolled” over a sheet of paper to draw a pattern. Having marked the beginning, it is applied to the line on the paper so that it coincides with the mark, and rolled over the sheet, marking a new point every 3-5 centimeters from above and below until the “beginning” mark touches the paper again. A second line is drawn at this point. It is necessary to add 2-4 cm to the finished drawing along the edges, then transfer the pattern to the fabric and PVC film. Cut out the detail on the film.
Agree, a lot depends on the light in the room, compare at least the “cold” hospital and “warm” home light. But not everything depends on the lamp: do-it-yourself lampshades will help to “domesticate” the light. Only in this article, you will receive full information how to make a fashionable lampshade quickly, inexpensively, beautifully! Read and enjoy!
How to make a lampshade with your own hands
Before choosing a design and starting to create a lampshade with your own hands, let's dwell on a few important points. So pay attention to the following points:
1. The greatest freedom will be given by the use of energy-saving or LED lamps, because incandescent lamps get very hot and can burn a paper or fabric lampshade.
2. When reworking the finished lamp, try to handle the wires as carefully as possible, and upon completion of the work, check their integrity.
3. When choosing a lamp, remember that they are often divided into “cold”, neutral and “warm” depending on the color temperature. For home lamp the best choice will become warm.  The difference in color temperature is clear. The higher the value on the package (higher temperature), the colder the light will give the lamp and vice versa.
A little about the frame
For your own lampshade, you will need a base. Often it consists of two rings on which a cardboard or plastic substrate is fixed to hold the shape.
 Such frames can be woven from wire using only pliers.
The frame can be bought at a needlework store, but since our stores do not always boast such a variety, it is worth looking for frames in hardware stores.
 The simplest solution: the neck of a 5-liter bottle holds the cartridge.
You can also buy an old lamp at a flea market or make a frame yourself from wire.
 Finished cylindrical frame hardware store(metal grid).
Green lamp... literally
A lamp can be used special, for plants, but a simple "housekeeper" or LED is also suitable.

It will not be difficult to repeat the design with your own hands, especially since it is very easy to change it, based on what materials you have at hand.

The main thing is that in the hanging version the pot should not be too heavy (in the desktop version this can be neglected). You also need to isolate the wiring well, you can run it along one of the supporting wires.

10 steps to a fabric lampshade

DIY fabric lampshade: master class
The process of creating a fabric lampshade begins with preparing everything you need, so that later you don’t have to look for the missing parts.
You will need:
- the cloth;
– masking tape;
- measuring tape and plastic ruler;
- chalk (or other material for marking fabric);
- pencil;
- scissors;
- thick self-adhesive film (from a needlework store);
– lower and upper wire rings;
- clothespins-binders for paper;
- PVA glue;
- brush;
- threads;
- paper strip.
1 step
Step 2
cut out self-adhesive film a rectangle of the desired size, and then a piece of fabric 5-6 cm larger at the edges. Glue the fabric front side table.

3 step
Select the part of the pattern that you want to leave on the lampshade, and using a ruler and something rectangular (like a book), draw the cut lines and corners.
Step 4
Flatten the fabric and start gluing the film on it. Do not tear off the entire backing from the very beginning: first separate 4-5 cm, stick them. After that, simultaneously tear off the substrate and level the pasted part of the film.

Step 5
Attach the lampshade to the frame, starting from the middle, using paper clips. When you reach the end, flip the lampshade over and start at the other end.

Step 6
Using a pencil, mark the line of contact and label the side that will be at the top. Next, glue the halves of the lampshade and let them dry.
Step 7
Flip the lampshade over, apply a thin bead of glue to the edge, and insert the wire ring. Secure it immediately with paper clips, let dry, and then repeat on the other end.

Step 8

Step 9
Also close the seam on the side of the lampshade.

10 step
Put everything together and enjoy the finished lampshade.

Advice: taking the lampshade given in this instruction as a basis, you can make no less interesting designs, for example: the ever-popular thread lamp.

Lampshade - both a photo album and a map
Marie Darby shared online her success in creating a lampshade - a photo frame. To do this, she writes on her blog, you need a base, such as the one in the previous section, or a ready-made purchased lamp with a white lampshade.

You will also need tracing paper (several sheets, you can buy in needlework and stationery stores), scissors, glue, pencil, ruler and printer. The result in the photo was obtained from the use of an inkjet, but you can also use a laser, the main thing is that it does not “chew” thin tracing paper.
You can make a collage from a photo on your computer using Photoshop or another collage maker such as Picassa. You can collage photos by cutting them with scissors.
Please note: if using an inkjet printer, allow the ink to dry. Also, you need to be careful with tracing paper and not bend it, otherwise the trace of the bend will always be noticeable.

In exactly the same way, anything can be transferred to the lampshade: children's drawing or your favorite quote, or even a map of your favorite place.
rope sun
Making a popular openwork lampshade for a lamp is actually a breeze. You only need threads (acrylic or natural), glue (PVA or wallpaper), as well as a balloon or ball that can be blown off, and petroleum jelly.

The inflated ball is smeared with petroleum jelly (so that the threads do not stick to it) and they begin to wrap it with threads previously moistened with glue. When the design dries, the ball is blown off and removed. Everything, the lampshade is ready!

Tip: before making a "clean" - make 2-3 small test lamps. Also, on the ball, immediately mark with a marker the place where the threads should not be - through it you will need to remove the ball and insert the cartridge.
Do-it-yourself room "night sky"

The pattern on the lampshade can be formed in different ways, each has its own advantages. But in originality, few people can compete with a perforated lamp.
To make this, you just need to prepare the base, on which you will make the first row of holes (contour) with a thin awl. After that, you need to add many smaller holes and fix the perforated blank on the lamp.
How to make a lampshade video:
Knowledge of English is not required, everything is clear and without words.
As you can see, in order to make a lampshade with your own hands (), you do not need a lot of resources or experience, but the result can be excellent. And if you attach a male colleague to the case, who will help you make a good frame, you can consider that the matter is in the bag.
To do frame, we need:
- Wire
- Super glue
- Sheet, ruler, pencil
- Textile
- white enamel
- Pliers
Having drawn a sketch, we can begin the main work. Wire is a convenient material, it will allow you to create any shape of the lampshade. For example, for a cylindrical lampshade, the top and bottom rings should be the same. Classic lampshade with a small diameter for the top ring and a very wide bottom ring.
How to make a frame for a lampshade - step by step instructions
1. We chose wire. Suitable for copper, aluminum and steel. It's easy to work with her. Calculate required amount wire, putting a few more centimeters on top of the connections. 2. We have to make three rings. The first, smallest, will be attached to the cartridge. Wrap this ring with additional thin wire. Close the ring and for greater strength fasten it with superglue. After that, we attach a suspension to the ring, which should compress the cartridge. 3. How to fix the light bulb holder? The suspension is done like this: we bend a loop of wire, it will wrap around the cartridge, and the free ends should move in opposite directions. We fasten the suspension to the upper ring. 4. Now we will make racks - without them lampshade frame will not work. We make ribs in advance. The length will correspond to our sketch, the number of edges is up to you. Add about 6 cm to the main length for the bond. The ends of the ribs with the help of pliers need to be bent to the side. For these ponytails, the ribs are then wound thin wire to the small ring. 5. Next, we do everything by analogy with the first stages of work. The second ring will be wide, the vicious circle is also fastened with superglue. We firmly tie the second ring with jumpers. 6. We do the bottom ring in the same way. We just close it with a margin of 4-5 cm. 7. So we practically learned how to make a frame for a lampshade with your own hands. It remains to paint the structure with white enamel. We paint everything except the central ring. After the frame is ready, it needs to be sheathed with fabric. You can not sheathe, but simply wrap. This is a separate procedure, which, however, is also not particularly difficult. If you are going to wrap the lampshade only with a cloth, first you have to wrap it with cotton tape. Only the suspension and fittings do not need to be wrapped. The calculation of the braid is as follows: the length of each rack + the length of each ring, we multiply everything by 3. Next, we make the winding. After all the braid has wrapped around the frame, you can proceed to sheathing with fabric. There is another option, how to make a frame for a lampshade. The answer is simple - use an old lampshade. The simplest solution ever. If you don't have one, buy old thing by ad. But if you are still determined to make beauty with your own hands, follow the above recommendations. Good luck!
As you know, a floor lamp is a lamp standing on the floor and supporting the lampshade with a rod. The word "floor lamp" came to us from French, which in translation means "torch". Of all the variety of lighting fixtures, floor lamps, without a doubt, are the most homely, cozy and comfortable. Soft, diffused light quietly flows from under the lampshade and pleasantly illuminates the space.
Since the time when grandmother's floor lamp with a shelf on a leg, the lampshade of which was decorated with fringe, was a family heirloom, passing from generation to generation, the calming light of a floor lamp has been associated with peace and home comfort. After some oblivion, floor lamps are experiencing a period of rebirth. Now they can be seen again in almost every home. Bright, sometimes even blinding light, like loud sounds, can not only tire, but also irritate, so twilight is sometimes simply necessary. A floor lamp in this sense, a miracle how good and quite capable of bringing to life peace of mind and tranquility.

Room lighting is practically the main aspect in the interior. By combining light with shadow, we somehow create a mood in the house. Central lighting, for all its attractiveness and economy - once and for all to illuminate the entire room, does not create comfort and some, hmm ... sincerity is a completely different matter, lamps with subdued light, all kinds of sconces, table lamps and, of course, floor lamps. The latter, well, just the same aristocracy among the lamps.
Of course, the main function of a floor lamp is to provide a certain level of illumination of a room or part of it, but their usefulness does not end there. Whatever it is, it will be remembered not for dinner, the designer would say that the floor lamp helps to “zone” the space. Obviously, the area in which the floor lamp is located is intended for relaxation - with a book, in easy chair and with a cat on my lap. In addition to the obvious functions, there is also an underlying functionality - decoration. You can choose an option for any style of interior. There are models that will successfully fit into the interior and will not distract attention to themselves; in contrast to them, there are many floor lamps that can become a sort of highlight of the interior of a living room or bedroom, and even a pantry. It all depends on what effect we expect from the presence of a floor lamp in the room.

If we talk about the advantages of floor lamps compared to wall or table lamps, they have a number of obvious advantages:
to install a floor lamp, there is no need to drill holes in the wall (as is the case with wall lamps - sconces);
the floor lamp is mobile, we can move it to any place, turn it in any direction, as long as there is somewhere to put a socket nearby;
depending on the height of the floor lamp, it is able to visually increase the height of the room.
Floor lamps with lampshade, this is the most classic version floor lamp, consisting of a stand, a high tripod and a lampshade fixed on its peak. It is the lampshade that is responsible for specifications device, the level of dispersion and background illumination. Well, the main contribution to the attractiveness of the lamp as a whole, as a rule, is behind it, behind the lampshade.
A lot of materials are traditionally used as a material for the manufacture of a lampshade - fabric, fiberglass, glass, paper, ceramics, metal and plastic, well, all sorts of designers with homemade ones not deprived of imagination, sometimes they will use such that at least take out the saints.
Having decided to make a small table lamp, we were faced with the task of making a lampshade. It was decided to make it rag, for this a wire frame was needed. Since it was available, I used it.
What was used in the work.
Instruments.
A set of small metalwork tools, a mallet, scissors for metal. Good cutters. 65W soldering iron with heat regulator, accessories. Definitely a circle. Jewelry jigsaw with accessories. Small brush for flux, sandpaper. For varnishing - dishes, brush.
Materials.
Galvanized steel wire with a diameter of 2mm. Solder POS-40, flux - "soldering acid" (zinc chloride). A small piece of galvanized steel. LMB, rags.
This kind of lampshade at the factory is traditionally made in the way resistance welding, here, for the lack of such, soldering is used.

The wire was first used galvanized steel. The previous frame and similar work was made of brass, for easy soldering. But the cost of a brass wire that went to one frame was approximately equal to the cost of a whole bay of galvanized steel, from which more than a dozen such gizmos can be made. Practice has shown that the assembly is no less convenient, soldered, galvanized steel, with the selection of the appropriate flux is good. "Soldering acid" was used - zinc chloride. And the usual tin-lead POS-40.

First of all, we form "parallels" - rings. The wire was sold in the form of a small bay, and the cut pieces strove to curl up into a ring anyway, it was only necessary to correct them a little. To fix the "parallels" in their places, in wooden pattern small cloves are clogged, they do not allow the rings to slip.

Rings-“parallels” are formed and soldered, we proceed to the “meridians”. It is convenient to measure the length with a string, I bit off the wire a little with a margin. Directly on the template "meridian" was molded. On the arcuate part, the workpiece had to be straightened a little, reducing its radius; in the lower part, the workpiece was straightened almost completely. Marks were made with a pencil on a wooden blank, the wire of the "parallels" in these places was cleaned with a medium-sized sandpaper and tinned with zinc chloride. Then the places of soldering at the blanks of the "meridians" were cleaned and tinned, and there was no need to mark them - two ends and a middle-bend. "Meridian" was applied in the right place, the middle was pressed with the left hand in a rag glove, flux was applied and soldering was done. Then the ends of the "meridian" were soldered, it was even easier, the workpiece was molded so that the middle almost reached its place. After soldering it, the ends were pressed tightly against their "parallels".

For simplicity, the workpiece was marked "visually", by eye, that is. Four "meredians" are soldered, two each, opposite each other. The angle of 90 degrees is well defined by the eye, further, the “meridians” are soldered into the middle of the empty sections, where the marking task is also very simple - to divide the segment in half.

Several times there were such difficulties - a new soldering, next to the old one. No “stepped soldering” with different solders, just “old” soldering was organized with an additional heat sink in the form of pliers sponges. There was not enough heat to melt the solder and everything that was needed remained in place.

Well, the whole disc is evenly covered with “meridians”, but, something is a little rare. I wanted the finished rag lampshade to not have a blatant “facetedness”. It was decided to add "meridians" in the intervals.


Well, this is more like a hemisphere. Let's leave it. Small carnations are pulled out and the frame is carefully removed from the blank.

Now you should take care of mounting it on the lamp. Socket in a lamp with a small E14 base, with a thread on the outside and a large carbolite nut on it. With this nut, the lampshade is clamped onto the lamp.

The platform for the nut was cut with a favorite tool - a jewelry jigsaw with a large nail file. From galvanized "roofing" steel 0.5 mm. A square blank is cut out with metal scissors, diagonals are drawn, at the intersection, the blank is slightly punched. The leg of the compass is installed confidently, without slipping, in this hole.

Paradoxically, straight wires turned out to be not so easy to get - I had to work pretty hard with a mallet on a wooden stump. It was decided to make fasteners at four points, so as not to measure the angles with a protractor (usually, they are made in three - they save wire and it is somewhat easier to get to the light bulb).

Trying on the light bulb showed that the most attractive would be its location not flush with the bottom edge, but somewhat recessed inside. The fastening wires were molded on a suitable block left over from some lathe work. Perfect fit and square shape, as long as it is even. By bending the wires, we achieve their uniform touch on the table with an iron ring lying on a piece of wood.

We place the mount in a regular place, it is convenient to control evenness by slightly raising the edge of the lampshade so that there is a gap of a centimeter or two between its lower edge and the table. By adjusting the position of the lampshade on the fastening wires, we achieve a uniform gap between the edge and the table. The wires on the second parallel from the bottom can be temporarily fixed with clothespins. We solder, bite off the excess.

We inspect the almost finished lampshade, bite off all the protruding wires, with a file we dull everything that you can scratch about.

The frame is ready and solemnly presented in lady's hands, for tailoring beautiful "clothes", as usual, with ruffles.
The manufacturing process itself is very simple, the materials are common and not expensive. It is not usual, only a blank form, however, if we slightly reduce the requirements for aesthetics and allow a straight generatrix (the shape is a truncated cone), the “blank” is significantly simplified and looks like two plywood circles with a “leg” stick between them.