How to make a mosaic of broken tiles with your own hands. Mosaic from fragments of broken plates Do-it-yourself mosaic from old dishes
If you want to decorate the walls of houses, garden paths, steps, garden furniture and many other items, then the ability to lay out a mosaic can turn a dream into reality. In addition, particles of wood can also be used, which can then be coated with stain and varnish. Before you start making a mosaic, you need to not only choose the material, but also decide on the pattern. Read more about this building needlework below.
Complete home renovations original mosaic from the remains of ceramics or broken tiles. Lay out a color pattern from the remains of ceramic tiles, adding others decorative elements, you can very simply, and thereby perform a beautiful and original decoration bathroom, kitchen or even garden.
It is best to lay out the mosaic on:
- Plaster;
- Drywall;
- Cement-sand screed;
- Putty.
Each drawing is unique, as it is made up of separate fragments, the color and shape of which cannot be repeated. A mosaic picture can consist of equal pieces of the same shape, fragments of an arbitrary shape, a combination of pieces different size and forms.

Tiled mosaic has many advantages in comparison with other materials, and among the main advantages are such as long service life, economy, practicality, the ability to create original and unusual paintings looks harmonious in the interior. Before starting work, it is necessary to prepare the tile. For this, both pieces of tiles and whole products, which will then be crushed, are suitable. Particular attention should be paid to the preparation of the walls, since the strength and durability of the mosaic will largely depend on this.
The selected area where the mosaic will be located must be cleaned of the old coating.
Using putty, you need to smooth out all the bumps, as well as repair cracks and holes. Draw a picture using pre-prepared templates. Spruce when creating a mosaic is used not only broken tiles, but also pieces of glass, then you need to fix all the elements with transparent glue. To fix the mosaic, a special adhesive mixture which is suitable for working with ceramic tiles. The most popular is the white glue mixture, which helps to maintain the clarity of the pattern, emphasizing its beauty and uniqueness. For the correct preparation of the solution, you must first study the instructions for use. So that the adhesive composition does not dry out very quickly, and the pieces of the tile firmly adhere to the wall, you need to apply the mosaic in small areas.
How to make a beautiful mosaic with your own hands
For the manufacture of mosaics, the most suitable various materials, in particular, such as fragments of a mirror, glass, broken dishes, ceramic tiles, pebbles, small stones. Often, after repair work, ceramic tiles remain, which can be used as a working material.
However, if the pattern is quite complex, then ceramic tiles in several colors may be required.
Mosaic is widely used to create an unusual and original decoration.

Making a mosaic and laying it out is very simple, you just need:
- Prepare the base;
- Make a glue mixture;
- Develop a drawing template;
- Prepare elements for making a mosaic.
Glass is considered to be a fairly common material for creating mosaics. It is quite easy to cut and easily fixed with glue, and when it hits the surface of the mosaic sun rays, the created ornament begins to shimmer beautifully. For beginners, it is better to choose the simplest drawing that absolutely everyone can do.
DIY creative mosaic: master class
To lay out a mosaic, you need a tile, from which it is necessary to make fragments small size. Part of the tile can be left intact, and the rest can either be cut with a glass cutter or split with a hammer, previously wrapped in cloth. The master class for making mosaics is quite simple, the most important thing is to clean the surface well and follow the technology clearly.
The use of tiles can be in absolutely any form, in particular, it can be:
- Smooth fragments;
- Geometric figures;
- Broken fragments.

To get perfectly even pieces or geometric figures, you need to use for this special tools. From old broken ceramic tiles, you can easily make the most various elements arbitrary shape.
To get a beautiful artistic composition, you first need to draw a sketch on cardboard, and then pick up pieces of tiles in shape and color to get a beautiful composition.
After that, you need to carefully prepare the surface and transfer the structure, gluing each piece of tile with a special adhesive. After the glue dries well, you need to carefully seal the seams using grout powder.
Budget mosaic from broken dishes
The mosaic technique is very often used to create beautiful decorative panels, and quite original and beautiful crafts are also created in this style.
Homemade mosaic of broken dishes must be done in strict sequence, and for this you need:
- Pick up an ornament;
- Select pieces of broken dishes by size and color;
- Degrease the work surface and mosaic pieces;
- Glue the mosaic on liquid nails or PVA glue;
- Rub the seams with a special grout for tiles;
- Wipe the surface with a damp and then dry cloth.

In the course of the work, you will need to adjust the pieces of the mosaic, making them smaller, for this you can use pliers. Special clarity and accuracy is not needed, but it is important that the pieces of the mosaic are not larger than the remaining space.
Important! When carrying out repair work, it is very important that the surface is absolutely even and smooth.
If desired, you can purchase a ready-made mosaic, which can be ceramic or marble. Modern mosaic production is represented by the most various options, that is why, everyone has the opportunity to choose for themselves the required product, which is completely suitable for all requests.
Various mosaic materials
The material used to create a mosaic is presented in the widest range, in particular, a mosaic can be ceramic, tile, glass, made of porcelain stoneware or natural stone. Mosaic is widely used in the interior, because thanks to bright, expressive colors and unusual textures, you can transform absolutely any surface almost beyond recognition.

Mosaic is widely used to create unique design in the interior and decoration of the facades of houses. The architectural compositions of Gaudi or Bai simply amaze with their splendor and sophistication. The free flight of fantasy under the guidance of the master turns into real masterpieces, in which almost incompatible things are very harmoniously combined.
Beautiful do-it-yourself mosaic (video)
It is possible to til with a mosaic absolutely any convex and concave surfaces, while you can use elements of only one color or mix several shades and colors at once, while collecting various original compositions.
LookBio tells stories that help you find yourself and make the world a better place. In this material you will get acquainted with a resident of St. Petersburg, a scientist, a lover of porcelain and jewelry Diana Kiknadze. She found a way to make jewelry and interior items out of broken dishes, which has now turned from a hobby into a business called ReFarforma.
Georgia, languages and prose of life
I was born and raised in Georgia, in Tbilisi. She came to St. Petersburg to continue her postgraduate studies. I am an orientalist, japanist, language teacher.
The dissertation was very difficult for me, I worked a lot, wrote at night, worried, tired. At some point, I acutely felt the need to find a new occupation in order to switch, unload my head. Washing dishes or doing some housework didn't save me the way it used to. We needed something polar different, heavy and complex.
How did you come up with the idea?
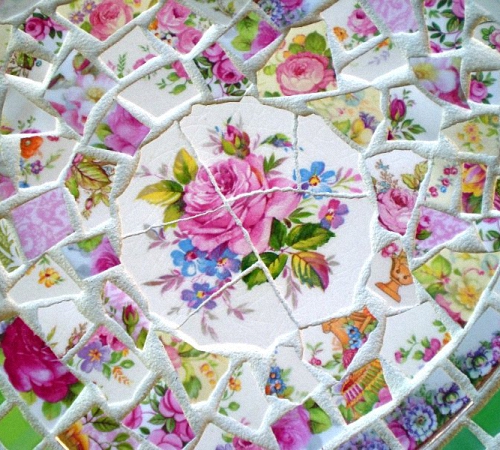
Mosaic from broken porcelain tableware- I was hooked by this idea, which I accidentally saw on the American site etsy.com. I love porcelain dearly, I collect it, I study the history of the production of different factories, this is a passion from my mother.
Of course, I was faced with the fact that my favorite dishes become unusable and the way for it, as it seemed to me before, was only in the trash, I was upset. Therefore, the idea of working with broken dishes was extremely fascinated by me, I understood how you can breathe a second wind into the fragments.

I have never been a needlewoman, and at the thought of working with porcelain, I was at a loss, not even imagining how to cut it, process it.
At home, I found some cracked, broken dishes. Friends and acquaintances helped, providing me with more material. Everyone was surprised by my sudden interest in seemingly useless fragments and shards, but I was happy and got a good collection of various plates and cups.
Rose can be killed
The period of experimentation began. I was inspired by the work of Western masters and laid out panels, frames, housekeepers, flower pots, everything that can be covered with mosaics. Of course, I did not have any necessary tools. I hit the dishes with a hammer. Aiming, for example, at a beautiful rose, I killed it, because the center of gravity fell on it, it crumbled all over. I was not a member of any handicraft communities and for some reason it did not occur to me to study if there are masters who work in a similar direction, to consult with them.

By chance, I saw a group dedicated to mosaics. Having studied it, I realized that there is a special inventory. Pliers that can cut cleanly glass mosaic. And what if not glass, but, for example, porcelain? I thought. After consulting, I received a treasured tool that I still use to this day. It became possible to accurately cut, preserve the pattern, achieve more small parts and this directly affected the quality.
I did not have teachers, but I bought the book "Mosaic with my own hands", an American authorship, which answered many of my questions, showed the existing techniques, techniques and methods. Of course, I very often bought the wrong things, made mistakes with glue, grouts, but gradually I mastered all this vocabulary, fell in love with construction hypermarkets.
First sales and new idea
For two years I was engaged in mosaics, giving only to acquaintances and friends. Orders gradually appeared and I dared to come to the conclusion that my works could be sold.
At the same time, the thought of making jewelry did not leave me. Sometimes such beautiful fragments came across that they literally asked for a brooch, earrings!

The idea of making jewelry out of fragments of dishes is not at all mine. It originated in the 18th century in Europe. The Chinese kept the secret of porcelain secret, exported their products to Europe for huge sums. Services and vases sailed to Europe on ships, crashed on the way, and since they cost a lot of money, they were then sold even in broken form. Jewelers framed beautiful fragments with silver and gold, and ladies subsequently wore brooches and rings.
"Tiffany" without breakfast
My supervisor gave me a wonderful gift, giving me a lesson of mastery to choose from. I became interested in the stained glass master class. Having attended this lesson, I got acquainted with the tiffany technique and realized that this is exactly what I need. This will help me make decorations!
I began to try, study the materials, again I was cruelly mistaken with the choice of tape, soldering iron, there were rare, scattered explanations on the Internet, or perhaps I didn’t know how to search, I didn’t know how and where.
The process was extremely slow due to the lack of special machines. Sanding the edge, for example, I did with a small diamond file that looks like a nail file. All this was done in water, the fingers hurt, the skin wrinkled, the productivity was low, the seam was not very even in the end, the soldering, respectively, too. Now, to confess, when I look at my first products, I am ashamed. I redid some.
I also didn’t really know where to buy materials, I chose many by the piece, at retail, which cost much more.
Too cheap?!
Having accumulated a certain number of works, I dared to enter my first designer market. It was a success! Sold out most of the collection! I remember one customer who, having collected a whole palm of jewelry, scolded me that I was selling too cheaply, that such works should cost much more. From that moment on, I realized that a hobby develops into a real full-fledged business. I saw that people like my work and believed in myself.
It became a business when I made serious investments in equipment for my craft. A porcelain cutting machine was purchased, which made it possible to create previously impossible, thin forms. There was a grinder, which freed up a lot of time and saved my hands. The desired quality appeared, beautiful soldering, in parallel I found a new one, good fittings. I equipped a workshop for myself, filled the pages of the shop in social networks and specialized sites for hand-made products.
What do I think about it
My work can be fully called environmentally friendly. First, vintage material is used. Secondly, this is a real second life in a new reading for an old saucer from your grandmother's service. This is the memory of bygone eras - colors, ornaments, hallmarks that I love.
Perhaps I will dare to master jewelry techniques. Now I have begun to use natural pearls, corals, antique porcelain buttons from Czechoslovakia in my works. I want my work to be not just cute, but conceptual, design, unique.

My customer is a woman in her 40s. She took place in this life, she certainly higher education maybe your own business, maybe some interesting, useful work. She spends her leisure time in museums, trips, good taste. She wears exclusively designer jewelry, looking for it in small authentic shops.
If a young girl, then she is a frequenter of designer markets, where you can find an original little thing.
I meet people in my jewelry on the streets of the city. It's very nice 🙂
A number of orders fly to distant countries, sometimes quite exotic, for example, to the city of Albuquerque; state of Trinidad and Tobago.
For those who like to beat dishes.
How many dishes have we broken in our lives? Of course, no one thought. Even at home, several cups without handles or with a chipped edge always dangle on the shelves. Throw away the hand does not rise. For those who are not afraid of work and love to decorate their own home, you can find a second life for such cups-bowls, using fragments of broken dishes as a mosaic.
Of course, it’s like in an old song from a favorite childhood cartoon: “If you take one brick, it’s of little use in it, if you take a couple of bricks, you won’t build a house.” So with us, things won’t work out with one cup, so it’s worth accumulating material, reviewing it. deposits" dishes. Maybe there are a couple of three saucers or plates that were left in proud loneliness and are no longer used. You can also ask relatives and friends, everyone in the house has at least one cup with a chipped edge.

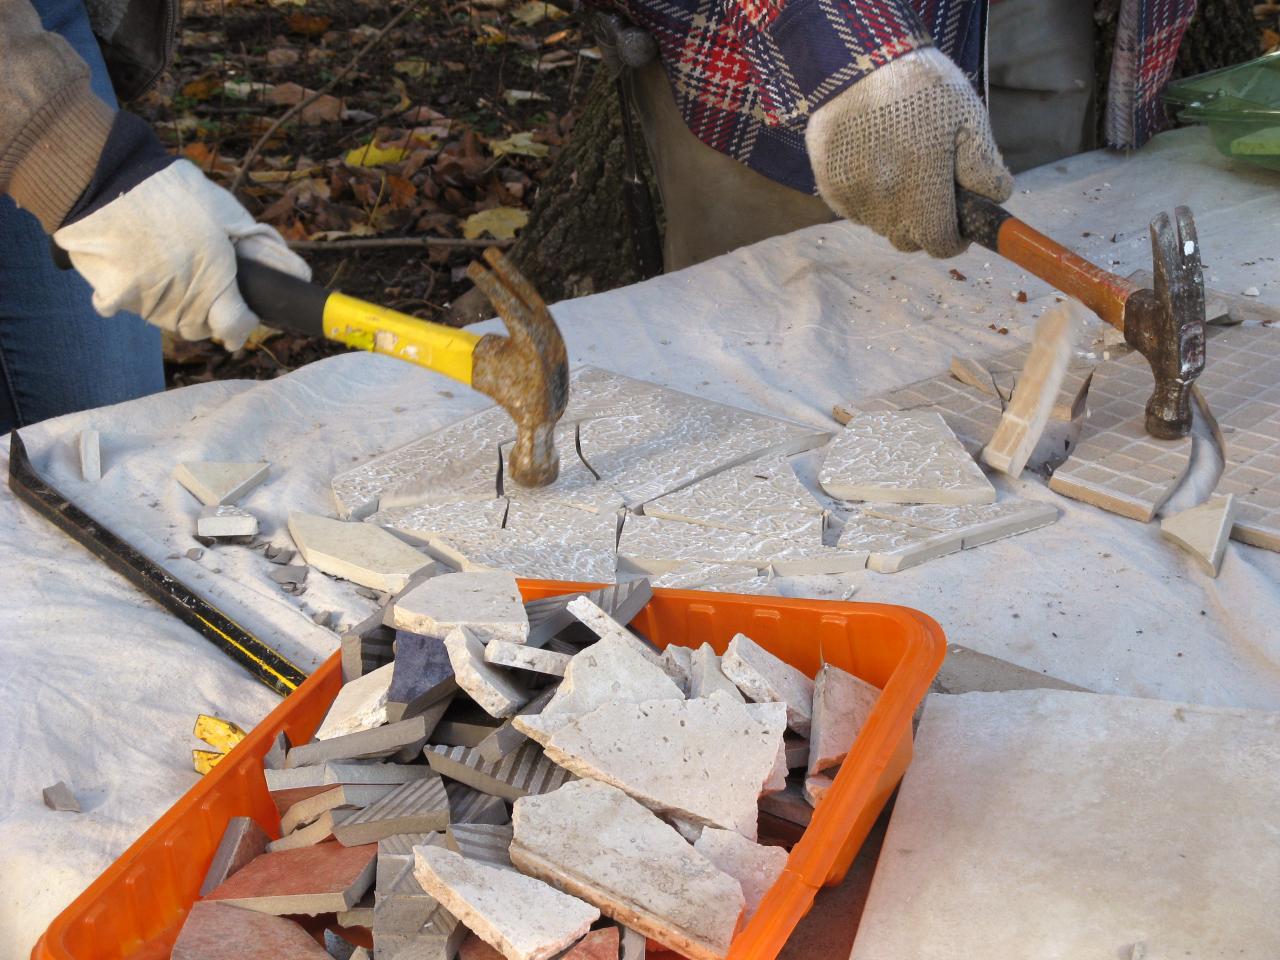
So the material was collected. Now let's break. Breaking is not building, but even here you need to act wisely and with some caution. Place the cup-plate in a thick cloth. And now you can, gently hitting with a hammer, split into pieces. If you need to get more even shapes or cut out a picture, then use a glass cutter.

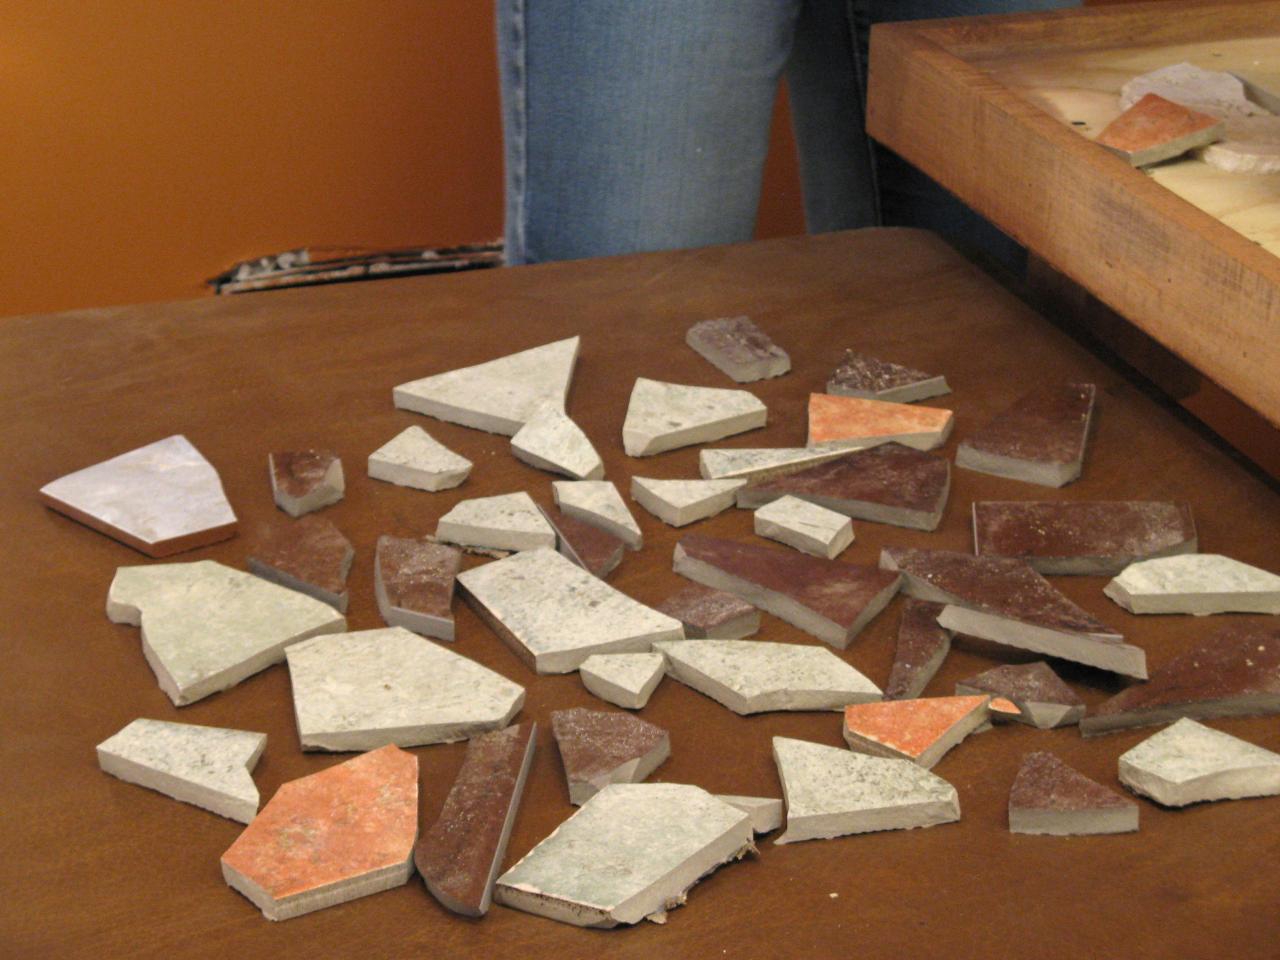
When the bowls are beaten, you can sort by color and size. The surface on which we will glue the mosaic is degreased, and the mosaic pieces too. We put them on PVA, on liquid nails. You can post them on concrete mortar. After the mosaic pieces are securely attached, we rub the seams with a special grout for tiles, wipe the surface with a damp, and then with a dry cloth.

The photo has different examples that can inspire creative "exploits".

Well, whoever likes to lay out and decorate surfaces with fragments, and their stocks are exhausted, then you can buy a finished mosaic to continue. It can be both ceramic, marble mosaic looks impressive. It can be used to decorate the walls in the bathroom, toilet, the surface of the window sill, the wall above working surface table. It is more difficult to lay out a mosaic made of natural stone with a pattern, then you need to take more contrasting shades, but the surface, laid without special selection, looks more uniform, calm color.
Most likely, you are not indifferent to the mosaic. Such is the nature of this art form. Surely you have admired a certain street panel by an unknown artist more than once. Perhaps your abode is not even deprived of factory mosaics. thousands miniature elements collected by a caring hand, invariably pleasing to the eye, but sometimes they bite the pocket. And they hurt pride - you have so many wandering, but bright, ideas. Why not try it yourself? Take a chance, do-it-yourself mosaic is an indispensable thing not only for the interior, but also for the soul.
At home, compositions are made from anything, the most incredible objects are used: a mosaic of tiles, fragments of dishes, pebbles, broken bottles, mirrors, and even.
Making a mosaic is divided into stages:
- tile preparation;
- surface preparation;
- planning and sketching;
- mosaic laying;
- grouting;
Quick article navigation
Tile blank
You may already have raw materials, but if you don’t, don’t worry. Any store will gladly sell battle and the remains of ceramics for a pittance. It is good if there is a familiar master tiler who is constantly faced with the need to throw away waste. Take on his "garbage" and find yourself with an inexhaustible supply of tiles. Stock up on multi-colored raw materials, a little bit of different shades is better than a lot of plain tiles. It’s even better to keep the future drawing in mind, it’s easier to navigate.

Broken tile mosaic requires small pieces different format. We suggest cutting a part of the tile - compositions often need rectangular pieces. Cut ceramics with a glass cutter or a professional tile cutter. If you plan to create regularly, get an inexpensive tool. High cutting accuracy is useless here. Simply break the main part of the tile into fragments. It is more convenient to do this with a rag in which you will wrap the fight, and a hammer wrapped dense layer fabrics. The latter is necessary so as not to unnecessarily crumble the material.
Stuff puzzle pieces of different sizes, it’s easy to follow a certain format. For the future: do not throw away the leftover tiles, broken dishes And so on. Postpone for later, the failed garbage will one day become part of the masterpiece.

Surface preparation
A suitable base for mosaics is a cement-sand screed or plaster, putty and drywall. They provide good adhesion to adhesives and ceramics. It is important that the surface is clean and even. Remove irregularities, repair cracks, if any. After that, treat the coating with a primer, it helps to strengthen the base and increases adhesion.
Sketch preparation

Even a trained eye is easier with a guide. An inexperienced artist, when working with a complex drawing, is nowhere without him. In order not to get away from the dimensions, contours and proportions, apply a pencil sketch on the base. If you have artistic skills, enough hands and eyes. Without such useful baggage (we are talking about skills), use the scale grid method, or even better, transfer the sketch using a projector.
Plan the color scheme and break the sketch into zones based on tonal representations. Consider how to make a mosaic according to your scheme optimally.
Stick to certain rules:
- Start from the center, so the composition will be better in terms of proportions and compliance with the sketch;
- Do the background last;
- Leave abstraction in the end too, first people, animals, plants - something that has complex geometry.
Mosaic adhesive
The mixture for laying out the pieces should have high adhesion to the materials that you use. It is best to work with white glue, regular gray is not suitable for aesthetic reasons. For typical concrete foundations white cement glue (, Kreps Reinforced White) is suitable. For laying on a non-standard base (for example, wood), it is better to use reactive tile adhesive on epoxy based(Litokol Litoelastic), liquid nails or epoxy grout.

Mosaic laying
If you plan to use tiles different thickness, start with the thickest. It will serve as a guide for others. It is desirable to spread the glue both on the base and on the ceramics, but one of the surfaces requires only light smearing. One that will not increase the thickness of the layer, but will positively affect the strength of the installation.
Apply glue to small areas, which were previously selected on the sketch. Lubricate light areas larger area, complex ones will require slowing down. Having smeared glue on the base with an ordinary spatula, remove the excess mixture with a spatula with teeth. If the pieces of the mosaic are uniform in thickness, the work will go easier. Otherwise, the difference must be compensated by adding glue. But even homogeneity does not always save. Pieces that are too different in size require different bonding forces, smaller tiles with the same layer of mixture will always sink a little deeper, so they need more glue. The comb is just a guideline, each element still has to be brought to the desired plane individually. 
Mosaic of broken tiles on the wall does not have to be in the same plane. Start from your own ideas of beauty. In addition to tiles, use other materials that diversify the composition and allow it to match the idea. The floor mosaic should be flat, irregularities and roughness will create problems when walking on the tiles.

It is difficult to achieve an even coating with only the help of hands and eyes. Use a flat sheet of wood, plastic, or metal to periodically press down on the laid out areas and thus level them. It is better to have sheets of different formats. The principle is simple: more complex drawing - less area covered at a time - less sheet.
Mosaic from broken tiles involves laying pieces with gaps. Do not lay tiles close to each other. A very precise fit of the parts will not only complicate the work many times over, but can also cause damage to the canvas later. Seams compensate for thermal expansion of materials resulting from temperature changes. But it’s also not worth making huge gaps, be guided by common sense. The final drawing should not suffer. Do not put pieces of the same size side by side. Too multi-format is also not a “class”, there should be differences, but within reasonable limits.
Worktop cladding

If the countertop is made of wood, clean it of paint with acetone or special washes. Then go over with sandpaper twice, first with a coarse abrasive, then with a fine one. These manipulations are needed to increase adhesion, do not start mosaic without preparation.
How ? This requires a different laying scheme:
- Start from the edges, gradually getting to the center;
- Compact the canvas as much as possible;
- Remove glue immediately high density implies a large number of seams; cleaning at the end will lead to unnecessary waste of time.
Video master class on decorating countertops with mosaics:

Grouting
Applies to floors with walls, and countertops. You can overwrite not earlier than one day after the end of the lining. The mosaic must dry evenly. If the room temperature is too high, cover the canvas with a damp cloth. Before jointing, remove any adhesive residue and wipe the mosaic with a damp cloth. To work, you need a rubber spatula.
A transparent grout based on epoxy resin with a chameleon effect () is best suited for mosaic panels. It will adjust to the color of each piece. cement mix much inferior to epoxy in strength and can literally fall apart.

Apply the puffer with a rubber grater, pressing it firmly into the gaps between the pieces. Remove residue with a damp foam sponge. Epoxy mixtures need to be washed off with plenty of water, and plaque is removed with special detergents(Litonet gel, Sopro ESE 548). 

Well, now you know how to make a mosaic at home. We hope that the master class served as a starting point. Remember that the mosaic requires regular care. Do not wipe it with substances containing phosphoric acid. Use products with a low percentage of acidity, but even after them, wipe the mosaic with a rag and water.
Do not get hung up on tiles, train your imagination and use unusual and interesting objects.
comments powered by HyperCommentsEveryone can complete repairs in the house with an original mosaic of broken tiles, especially if you familiarize yourself with the basics of work. Lay out a colored pattern from the remains of a tile, adding fragments of others decorative materials- one of the most simple methods creating an original panel in the bathroom, kitchen or garden design. This painstaking work is not very popular, but man-made panels in the interior will never go out of fashion.
What materials can be used for mosaic cladding
The original do-it-yourself tile mosaic provides great opportunities for the manifestation of imagination, especially when there is material and good ideas. In childhood, many tried to master the method of drawing by cells, when the grid on the portrait reproduces the sketch, increasing the layout several times. In the same way, you can reproduce any plot or portrait on the wall in one of the rooms - Viktor Tsoi, Marilyn Monroe, "the mask of a stranger", birds, an aquarium. good examples- mosaic of broken tiles photo.

Doing the job is not as difficult as it seems, and if you hire a specialist, it will be expensive. Step-by-step laid out drawing, none of the guests will be able to distinguish from the work of the artist. It will take more time than a craftsman's workflow, but it's a nice creative experience, and it's nice to share the work on social networks. If you manage to master the technique of laying out mosaics from broken ceramic tiles, this can become both an exciting hobby and additional income.
Mosaic panels - execution of thematic or abstract compositions from different elements. Each drawing is unique, because it is made up of fragments, the color and shape of which cannot be repeated. Mosaic may consist of:
- equal pieces of the same shape (circle, square, triangle, 6-sided);
- fragments of arbitrary shape;
- combinations of pieces of different sizes and shapes.
Construction supermarkets throw away tiles, ceramic tiles and other finishing materials or sell them as recyclable materials, and you can buy them at a reasonable price. For those who are interested in how to lay out a mosaic of broken tiles, it is important to know that various materials are suitable for these purposes. This is:
- broken colored glass;
- pieces of mirror and bottle glass;
- fragments of porcelain dishes;
- thin saw cuts of a tree;
- polished fragments of colored glass and mother-of-pearl shells collected on the seashore;
- original shells;
- smooth colored pebbles;
- pieces of gems;
- large smooth buttons, etc.

Tip: When laying out a colored pattern, there are not always pieces of the desired shape and size - they can be plucked with wire cutters from a large fragment or cut evenly with a tile cutter. When doing this work, protect your face from splinters and dust! When starting work, protect your eyes with goggles, and your nose and mouth with a household respirator. Work in a robe and gloves so as not to cut yourself on the edge of the fragment. It is important that during this process there are no casual spectators - sharp fragments chipped tiles able to hurt them.
Where can I put a mosaic panel
Mosaic from special tiles like smalt is an expensive pleasure, and it is also used for interior decoration. However, the most budget option will be a self-made mosaic made of broken tiles. This finish is widely used:
- on the floor - in the bathroom, hallway, kitchen or pool;
- in any surfaces intended for washing;
- on countertops and ceramic flowerpots;
- for garden structures;
- on the sides of a bench or bench made by hand;
- inside an old bathtub designed like a "seabed" pool.
If you're looking for finished work that inspires, look for views of Barcelona. The great Spanish architect Gaudi left many talented samples of mosaic panels to his descendants. But even gifted contemporaries left us a lot of artistic canvases:
- at the ends of multi-storey buildings;
- in the decoration of swimming pools;
- as a decoration for kitchens and bathrooms;
- monumental paintings in the foyer and cladding of public buildings;
- for registration of shops, offices, policlinics and sanatoriums.
This universal way decorative finishes today you can try it in your country house or in the country, in a city apartment or at the entrance. The bench in the yard, decorated with a mosaic of broken tiles, tolerates frosts and rains well, it will not lose its shape for years. original view, and the material can be collected from apartments for free. You can familiarize yourself with the basics of mosaics from broken tiles - a video that details all the stages of work.

How to start laying out a mosaic image
Mosaic canvases are not only fascinating creative process, but also original way savings. Against the background of a steady rise in prices building materials there is an opportunity to show resourcefulness, collecting elements for a picturesque panel from improvised materials. Shards of broken colored tiles helped Gaudi not only discover new facets of talent in himself, but also create famous masterpieces in Park Güell!
There are several options for choosing a theme for the panel:
1. Try to see your theme in colored fragments and color solution, then add some missing material.
2. Select ready scheme broken tile mosaics, based on personal preference.
3. Better mosaic from broken tiles to create according to your own sketch, but on the basis of acquaintance with highly artistic samples.

4. The picture that inspired you can decide to recreate it in a mosaic version using image enlargement.
5. Try to repeat the finished mosaic masterpiece with your own color scheme.
6. Review proposals for the sale of finished mosaic tiles, and choose the material that impressed you the most.
7. Using ready-made broken material, lay out an abstract pattern on any smooth surface that fantasy will tell you.
It is important to have an idea of artistic principles:
- symmetrical canvases are more difficult to lay out, but they are better perceived;
- in asymmetry, a larger fragment is placed on the left, and the right-sided placement of large fragments makes the image heavier;
- when laying out recognizable outlines and portraits without a stencil, it is important to observe proportions;
- if there is no artistic taste and creative experience, it is better not to experiment on a prepared surface, but to use a good sketch.
Fragments of broken tiles are also laid in the form of abstract canvases, using color contrasts. But the abstraction is built according to the principle:
- beautiful color combinations
- smooth color transitions;
- contrast options.
However, large natural elements look most impressive in mosaic canvases:
- birds and animals or their fantasy images;
- flowers - sunflowers, daffodils, poppies, irises;
- fish - aquarium, marine or animated;
- portrait elements - a profile of a girl in a hat, a carnival mask, a languid look, recognizable images;
- landscapes - schematic or highly artistic.
Before you start laying out a mosaic canvas on your permanent place, try to work out the layout on another surface, such as the floor or table. It is important to measure the dimensions finished work with the surface where the mosaic will be. Try to imagine the finished result with grout between the fragments, you may need to add pigment to it in the desired shade for a solid pattern. The black filler between large pieces of colored broken tiles will resemble a stained glass window, and white will give purity and freshness.
On the image future work it is better to think over all the options in advance so as not to regret the haste - it is extremely difficult to redo the mosaic. If a mosaic with a recognizable image causes difficulty, then it is better to start with a simple abstract composition.
Tip: When choosing pieces of tiles, it is important to sort them - better pieces are suitable for central elements and semantic accents, the rest of the battle goes to the brink. Cut off on the front side, chipped and defective pieces with cracks in the enamel are suitable for edges and chipping off missing fragments (filling voids). For mosaic tiles, the dimensions will be corrected with wire cutters. When the finished panel is dry, freshen it with glass cleaner and wipe it with a fluffy rag.

Preparation of surfaces for work
Mosaic is laid out on the wall in different ways:
- on the prepared wall, smearing each fragment with glue and fixing it on a reinforcing building mesh;
- lay out the main part of the mosaic on the grid and fix the finished pattern to the plane;
- it is important to prepare a rounded wall, to transfer the mosaic in fragments from a preliminary layout, otherwise the pattern will warp, and some of the tile fragments will fall off.
1. Before applying the markup for the mosaic sketch, clean the wall from the remnants of wallpaper, peeled paint, cement dust, and small particles.
2. Wipe the cleaned surface with a damp clean sponge and let it dry.
3. Fill everything with starting putty, apply a small layer on the entire surface under the mosaic panel, cover with a reinforcing mesh, and apply pieces of tile on it.
4. Mosaic fragments are well attached to a flat plane, if the pattern is initially laid out on a grid, it is applied to a perfectly plastered surface.
5. When transferring tiles, it is better to use 2 stencils - on one, the primary layout of the panel will be performed, and on the second, we apply markings on the wall or other plane. The most convenient way is with chalk or a marker. Do not be afraid that the lines will be visible, they will subsequently be filled special solution- grout.
Tip: When laying tiles and shards, protect your hands with gloves from small cuts with sharp edges. Tiles stick well only when optimal temperature- within +5°С - +30°С.

Mortar for tiles
Mortar for work with ceramic and tiles is in everyone hardware store. Give preference to light shades - it is easier to evaluate the preliminary results.
For cullet, a light or transparent solution is used; it will shine through under the fragments. In some cases, a little foil is placed under each piece of colored glass so that the mosaic sparkles like precious stones.
The finished solution is applied to the wall with a small spatula from the corner or central area, from where it is more convenient to lay out the panels. Each fragment is slightly pressed into the solution so that it attaches well.
Tip: The layout is best attached from below, and finished plots must be allowed to dry before the next step. Convenient for stencil drawing lay out pieces of the same color, for example, a sunflower petal. On a small panel, the solution will be successfully replaced by “liquid nails”.
curved pattern
Mosaic pattern from broken ceramic tiles - perfect option where there should be a curved washable surface that cannot be laid with ordinary tiles. It is good to fix small fragments along the grid with ordinary glue, and fill the gap with grout or finishing plaster.
This method is suitable for rounded and streamlined surfaces in the bathroom and pool, in the hallway and kitchen. Looks good:
- laid out in oriental style mosaic washbasin;
- the outer side of the bath and the inner side of the pool;
- rounded niches for small figurines.
Beautifully look in the bathroom, sauna or pool surfaces flowing one into another - from the floor to the walls and outside tanks, as in the photo. The greenhouse looks picturesque, a loggia for a winter garden with rounded multi-level terraces for plants, lined with a mosaic of broken tiles, shells and stones.

Technology of laying out a mosaic pattern
To master the features of laying out a mosaic, it is important to carefully study the master class on tiles from broken pieces. For this you will need:
- chipped remains of porcelain stoneware, ceramic tiles, other facing and natural materials;
- a set of spatulas;
- scissors for cutting the mesh and the mesh itself;
- fixtures and utensils for preparing the adhesive composition;
- grout for joints - in the color of the tile or contrasting;
- wire cutters and tile cutter;
- any tile adhesive light color, better special transparent or super-cement;
- suitable for laying mosaics on the floor cement mortar.
General rules:
1. It is convenient to lay out the pattern from the central semantic fragment, gradually covering new areas.
2. First, the laying of the main figures is completed, then the background and background of the composition. If a lot of mortar or glue has come out in some places, it is important to carefully remove it from front side each element, in between can be left.
3. At the final stage, the pattern is left to dry for a day. Then wipe the mosaic with a damp sponge to remove excess composition.
4. The final stage is the grouting of the mosaic canvas or filling in the gaps. Special grout for tiles can be purchased at a building supermarket or made from dry finishing putty. If you do it yourself, prepare the batch for small areas, working through each fragment.
5. If necessary, a pigment is added to the grout to match the tone of the mosaic.
6. After about 20 minutes, the grout seizes and darkens a little - you can remove its excess from the tile pieces with a damp sponge.
7. When the mosaic is completed - treat with glass cleaner and wipe dry thoroughly.

Tip: When the mosaic canvas is laid out on pieces of the grid in fragments, it is important to remove excess edges so that they do not overlap. It is better to immediately cut out individual fragments according to templates, lay out individual sections according to the sketch.
Mosaic for outdoor use can be laid on cement mortar with the addition of glue:
- decoration of fences;
- base of benches;
- garden paths;
- barbecue walls;
- fountains;
- multi-level flower beds.
After the cement base has set a little, they begin to decorate with mosaics. Horizontal surfaces don't forget to align building level, vertical - plumb.

Mosaic care is simple:
- do not use abrasive cleaning compounds, acidic substances and oily substances that spoil the grout;
- dirty areas of the mosaic in the kitchen can be lightly cleaned with a soft brush and soapy water;
- after any cleaning agent, the panels are wiped with a damp sponge, then dry;
- outer surfaces and garden decor can be processed clean water from a hose, but the jet should not be strong so as not to destroy the integrity of the composition.