Homemade convectors. Homemade radiator: features of registers, convectors, oil coolers, heaters from car radiators. Creation from stainless steel
A home-made niche for a convector built into the floor is more often done in private houses, during their construction. A home-made niche allows you not to buy ready-made heating channels, but to assemble a heating system built into the floor from standard radiators.
Niche for a convector built into the floor - device
The easiest way is to make a niche on the first floor in an earthen floor.
- The niche must be covered with a layer of waterproofing. Moreover, the waterproofing of the niche must be combined with the waterproofing of the main floor.
- The size of the niche must match the size of the radiators. There must be a distance of at least 100 mm from the walls of the niche to the edges of the radiator. The distance from the edge of the niche to the window should be 50-250 mm.

- The general design of the niche for the radiator is clearly visible in the figure. This diagram of a niche device for a radiator on the ground floor of the house.
- If a niche needs to be made on the second and third floors, it is necessary to provide for lowering the floor beams to the desired height.
- The niche can be plastered, but first you need to insulate it. It is better to use polystyrene foam. This is a hard insulation that will further strengthen the niche. Warming will reduce heat loss for unnecessary floor heating.
- The “trough” of the niche itself is best made of galvanized steel. It also serves as a thermal reflector. You can overlay a niche (instead of steel, with ceramic tiles).
- The edges of the niche must be trimmed with a corner for laying a decorative lattice.
Installation of radiators in a niche
We are considering the simplest convector built into the floor. This is a convector natural circulation. The niche for the convector built into the floor is already ready, we proceed to the installation of the heat exchanger.
The coolant moves through a two-pipe heating system. With one pipe it is supplied, with the second pipe it is removed from the radiator. A thermostat with a Mayevsky tap is placed at the input, and a shut-off valve is placed at the output. Everything is the same as when installing radiators on the wall, only in a horizontal plane.
Pretty new space heating equipment. Previously used only in commercial premises, today they are increasingly used in residential buildings for heating panoramic windows and metal-plastic entrance doors. Due to the use of convectors, it is effectively cut off cold air from residential areas, additionally heats the room and eliminates the appearance of condensate on the double-glazed windows. Condensation is most often formed on double-glazed windows of large area, and this can also occur at a relatively high air temperature in the room. Condensation creates many problems, and not only aesthetic ones. Water flows down and further onto the floor, constant humidity destroys the flooring material, promotes the appearance of fungi and mold.
Significantly increasing the temperature in the room to prevent the appearance of condensate is economically unprofitable, especially at the present time with the high cost of energy. Convectors built into the floor solve all problems with minimal financial losses.

Reliability and duration of operation is largely due to the simplicity of the equipment.

Regardless of the models, they all consist of several elements.
- Case (box). It is made of sheet galvanized or alloyed steel with a thickness of 0.5 mm. Some models are coated with polymer powder dyes to increase resistance to corrosion processes. The body is laid flush with the finish coating, precise adjustment of the spatial position is performed by special screw devices. Inside the box is all the equipment, plumbing shut-off and control valves, electrical cables etc. The specific list of elements depends on the type of convector. Housing dimensions vary widely, which allows them to be mounted under floors of various types. The appearance of the case does not play a role, it is completely hidden by a decorative grille.
- Heat exchanger. It can be a water radiator or an electric heater. To increase heat transfer, special technical solutions are used or the number of radiators is changed.
- Decorative lattice. It is made of stainless alloys, alloy steel, there are wood options. Through decorative grille Cold air enters the convector and heated air is removed. The grille is double-sided, after critical wear of one side it turns over.
Heating adjustment is carried out using manual or electromechanical devices, heat exchange is done by natural or forced method.


The decision to install a convector should preferably be taken at the planning stage of the flooring. What parameters should you pay attention to when choosing a heater?
Housing material
If the device will be installed at the entrance doors, then it is advisable to choose a model with a housing from of stainless steel. The point is that in winter period snow may fall into it, high humidity and elevated temperature accelerate the processes of metal oxidation by an order of magnitude. There is a lot of moisture in indoor pools, bathrooms, etc. Even high-quality galvanizing cannot withstand such difficult operating conditions for a long time. One more moment. A decorative closing grill rests against the body. If it will be subjected to significant loads, then the case must be selected from thick durable materials, it is on it that loads are transferred in the future.

Case dimensions
Manufacturers offer products various lengths, width and depth. How do these parameters affect the choice of a particular convector?
- Length. It is desirable that it be equal to the width of the window or doorway. If such options cannot be selected, then professionals recommend installing two convectors in a row, their total length must meet the above requirements.
- Width. particular impact on technical specifications does not, during the selection of a model it is recommended to pay attention only to the interior design of the room.
- Depth. Highly important parameter. For residential premises, it is recommended to buy low convectors, they are much easier to mount on thin ceilings of buildings.
Keep in mind that the linear dimensions of the case depend on the number and capabilities of the equipment and elements installed in it.


Heating method
Convectors can have water or electric heaters. Electric ones can be mounted on all types of floors, they have a completely autonomous control. Water, respectively, only in rooms the same with floor heating systems. This somewhat worsens the technical characteristics of the devices, the temperature of the coolant depends on the temperature in common system. This feature limits the possibility of built-in convectors.

Another difference between water and electric type convectors. Electric can be installed in any convenient time, for this you only need to partially dismantle the flooring. Water pipes are recommended to be installed only simultaneously with the installation of the floor heating system; if this condition is not met, the combined system will not function.

Radiator dimensions
The efficiency of heat transfer depends on two factors: materials of manufacture and surface area. All manufacturers during the production of devices use materials with maximum thermal conductivity, here special choice no. The change in heat transfer is mostly done by adjusting the size and number of radiators. But this parameter must be consistent with the size of windows or doors.

Type of ventilation
Air can pass through the heat exchanger by natural movement or by electric fans. The first option works more reliably, convectors can be installed in any premises, including those without electrical wiring. The disadvantage is the insignificant power of the convector, and the change in heat transfer occurs beyond the wishes of the user.

Forced ventilation is performed using axial or radial fans. The air flow rate does not depend on external conditions, the convector can change the performance, taking into account the specified modes. Disadvantages - the installation process is somewhat complicated, the noise in the room increases. When choosing, keep these in mind performance characteristics devices.
Lattice type
Lattices in most cases are made of durable metal alloys. Can be rolled up or be stationary. When choosing, it is recommended to pay attention to two parameters: physical strength and appearance. The greater the load on the flooring, the higher the strength should have the crate.


Operating pressure
For private residential buildings, this indicator does not matter, the pressure in water networks for various purposes does not exceed 3 atm., and the minimum operating pressure all types of convectors do not have less than 10 atm. Concerning apartment buildings, then buy devices with maximum crimping pressures. Before the start of the heating season, houses are tested plumbing systems high pressure, convectors must withstand it.
Additional control and monitoring equipment
To control and change the modes of operation, electromechanical or mechanical devices and devices. The elements are located directly in the case, and control can be from a remote control. Electronic Models allow you to program not only the temperature, but also the frequency of on / off. The choice of the type of convector depends on the wishes of use and the features of the operation of the premises.
Short list of manufacturers
To facilitate the choice, we suggest that you familiarize yourself with the most well-known manufacturers convectors, their products have positive reviews numerous consumers.
| Brand name | Technical specifications |
|---|---|
| Made in Poland, can be with natural or forced convection. The thickness of the aluminum plates of the radiator is 0.22 mm, the steel box with a zinc-magnesium coating. The diameter of the main copper tubes is 15 mm, the body dimensions are from 100 × 50 mm to 200 × 100 mm. It is completed with aluminum, wooden or stainless steel gratings. |
| They can be with or without fans, the depth of the box is 18–35 cm, the width is 9–20 cm. stained glass windows. The low mounting height allows the devices to be mounted on thin interfloor ceilings. |
| German floor convectors. Can have radial and tangential fans, there are options electric heating. Depth 7–19 cm, width 18–41 cm. A wide range of models makes it possible to increase the scope of equipment use. The maximum pressure is 16 atm., working 10 atm. Can function in one - and two-pipe systems of heating. |
| The box is made of galvanized steel, width 14–42 cm, depth 6–19 cm. Made in Belgium, small size significantly expand the scope. They can have natural or forced ventilation of the heat exchanger. Service life not less than 30 years. |
| Hi-End class devices, operate with forced or natural ventilation. Made in Germany, the company was founded in 1972. Depth 9–20 cm, low noise fans. The heat exchanger has aluminum fins and can withstand temperatures up to +120°C. |
| Produced in the Czech Republic, they have a reduced height (from 5 cm), which allows you to install devices on thin floor bases. The box is made of stainless steel. Have a wide choice of decorative lattices. |
| During manufacture, the most modern technologies, which significantly increases the coefficient useful action. Convectors are made in Germany, the box is made of painted powder paints galvanized steel. Width 10–42 cm, depth 8–20 cm. A wide range of sizes allows consumers to choose best option taking into account the size of the room and the specific installation site. There are options with natural and forced ventilation heat exchanger. |
| Devices manufactured by a domestic company, galvanized steel casing, there are options with and without fans. Depth 7–19 cm, width 20–40 cm. Copper heat exchanger tubes, aluminum lamellas. The thickness of the lamellas is 0.5 mm, the diameter of the tubes is 16 mm. Are calculated on working pressure of 15 atm., pressing 25 atm. Is there a manual or automatic control operating modes. |
| They are widely used in Europe and our country, the body is made of galvanized steel, options for the electric version of the heater are provided. They can work both for heating and for cooling rooms with natural or forced convection. Depth 9–20 cm, width 14–37 cm. |
| The manufacturer is a Polish company, they can have one or two heat exchangers, which increases the heat output. Body made of alloyed sheet steel, depth 7–34 cm, width 18–38 cm. Tube diameter 22 mm, coolant temperature up to +90°С, working pressure 10 atm. |


Each company produces a wide range of equipment for technical specifications, which makes it possible to find the most suitable option convector, taking into account maximum number various factors.
Violation of the installation technology can cause trouble during the operation of convectors. Especially big problems occur in case of breakdowns of convectors with a water coolant. It is for this type of device that we give step by step instructions. For installation, you will need a set of keys and a sealing thread. You need to start work with the assembly of the heat exchanger. The prerequisite is that the floor finish has not yet been installed.
Assembly of heat exchanger elements
Step 1. Bring the box into the room, open it. Before opening, pay attention to the top and bottom, otherwise it will be difficult to take out the parts of the convector. Check completeness. Inside the housing there must be a heat exchanger, adjustable legs, adjusting bolts and washers, a decorative grille, connecting, shut-off and control valves.


Step 2 Remove two valves from the package, unscrew the connecting nuts with fittings.


Step 3 Screw a special thread onto the thread for sealing, the number of turns is at least 5-8.

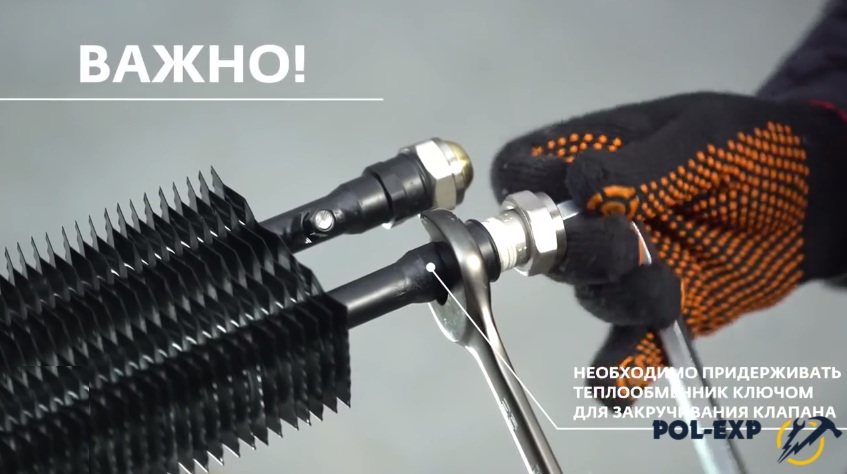
Important. The thread must be wound along the thread, while tightening the fitting, it must be tightened, not loosened. This is very important condition, if it is not followed, water leaks will certainly appear. You will have to disassemble the already installed convector and eliminate problems.
Step 4 With one wrench, hold the outlet of the heat exchanger pipe, and with the second, screw the valve tightly into place. The valve has a hexagonal key hole inside. There is no need to make too much effort, the thread reliably copes with its task. Assemble the faucet of the device in the same way.


The heat exchanger is prepared. It is advisable to pre-test the tightness of the connections. To do this, you can connect it to the water supply using flexible hoses and open the water supply. Everything is normal - you can start installing the case.
Enclosure mounting
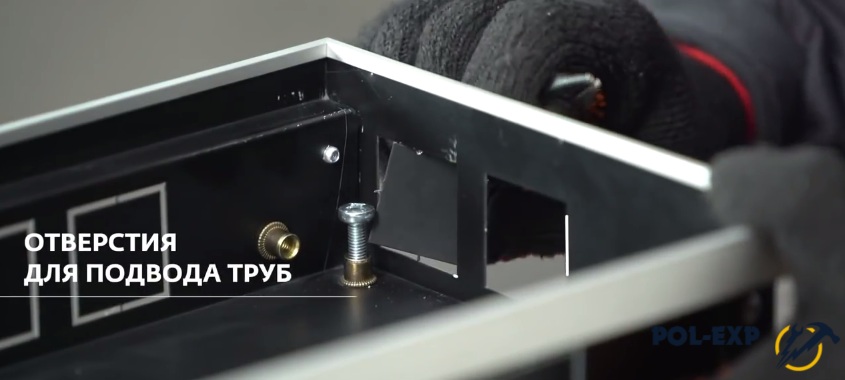
Step 1. Screw the adjusting screws into the thread, open the holes for the pipes of the floor heating system. They are closed with removable shutters.

Step 2 Place the case on the installation site, use a bubble level to set it strictly in a horizontal position. This is very milestone. If the heat exchanger is at an angle, then there are high risks of airing it, as a result, it will not work at full capacity. In addition, the grate will not be in the same plane as the flooring. Check the position in several directions, constantly tighten or unscrew the adjusting bolts.

Important. When installing the housing, take into account the zero mark of the floor covering. It is in this plane that the decorative grille of the convector should be located.

Step 3 After installing the housing, you need to fix its position. To do this, use adjustable feet made of perforated steel plate. Fix one end with bolts with washers on the body, and the other on the base of the floor. For fixing to the base, you need to use dowels of the appropriate length and diameter. After mounting, check the position of the device again and, if deviations are found, eliminate them.


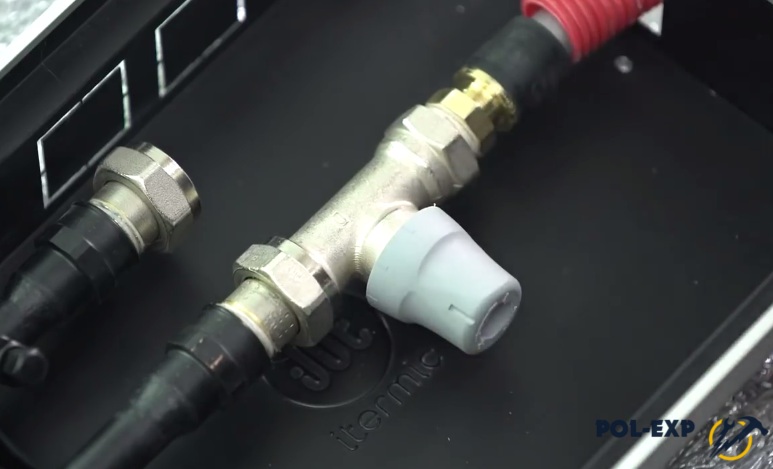
Step 4 Put the heat exchanger in the body, a special place is provided for it. Insert the plastic pipes of the floor heating system into the holes, measure their length and cut off the excess with a special secateurs.

Step 5 Special portable welding machine for plastic pipes, heat the ends and attach them to the faucet and valve fittings.


Step 6 Using a nut, screw the elements to the heat exchanger, while constantly holding the fittings with the second key. It is made of stainless alloys, and they have low physical strength. Exceeding the limit loads can cause cracks to appear. Another unpleasant property of such alloys is the low resistance to metal fatigue. This means that even not very strong tightening forces acting a long period time, becomes the cause of the appearance of cracks, the metal "gets tired".

Step 7 Connect electrical cables to the module. For this, a terminal block is installed, the connection diagram is in the instructions for using the device. The module provides automatic support for the convector operation modes specified by users. During the power connection, you need to turn off the network, perform all work in strict accordance with the requirements of the PUE.

Step 8 If you fix the convector body cement-sand screed or mounting foam, then be sure to insert special spacers into it to prevent deformation.

We considered an example of installing a convector with hybrid heat distribution, the device is connected to a common underfloor heating system. The temperature of the coolant in the convector is the same as in the system, which somewhat limits the capabilities of the equipment.
General tips for installing the convector after installing the final floor covering
Such situations may arise during production construction works, the place of installation of the convector should be provided during the installation of the floor covering and the heating system. The dimensions of the recess must correspond to the dimensions of the housing with a margin of 2–3 cm around the perimeter, the length of the outlet of the plastic pipes must guarantee a trouble-free connection of the device. They are always made with a margin, the excess length is then cut off.

Scheme of installation of convectors, indication of the dimensions of the niche for equipment

It is recommended to install the convector at a distance of no more than 30 cm from the window, otherwise the double-glazed windows may fog up - warm air will not heat their surface. The thickness of the thermal insulation layer under the convector body must be adapted to the overall height of the finish coating, it is advisable to use the same thermal insulators as under the main floor surface.

Most convectors have a standard right-hand connection, but you can change it yourself or choose the type that matches the existing wiring at the time of purchase. Place the fans in the case on the side of the window or doorway, they must capture cold air. Due to this placement, the efficiency of the device increases and the indicators of the microclimate in the room improve.
Be sure to connect the Mayevsky tap to the heat exchanger, it is located at the coolant inlet. Mayevsky's crane allows you to ventilate the convector, failure to perform this operation may cause the device to fail.

The power connection is carried out according to the scheme, and the fan speed can be changed with a potentiometer. After finishing electrical installation all open connections must be covered with special sealed covers. Pay attention to rubber gaskets had no mechanical damage. Mount the controller to the wall at a height of about 1.5 m from the floor, this position is convenient for use.
Video - Installing a convector
Rating: 488

Heating convectors, like any other developments for a heating system, exhibit high efficiency using. Do-it-yourself installation may vary depending on what is used as.
The heat carrier can equally be water in heating, as well as electricity or gas. The place of installation of heating convectors is highly dependent on the method of operation. preferably placed vertically. placed on the floor or hung on the wall, as is the case with a device that runs on water. Further in the article we will talk about how the installation of heating convectors takes place. various types.

Photo of the water convector device diagram
Copper and aluminum elements are usually the most expensive. But sometimes when installing a convector system, copper elements are needed, they help to facilitate the heating system. However, or metal alloys are much more affordable in price and are used much more widely. But in this case, you need to buy expensive auxiliary elements. There is absolutely affordable option- system heating appliances of steel. at the same time, it can be connected at the bottom or side.
Water-type equipment, first of all, requires preliminary suspension of the radiator on the wall. And before that, holes must be made in the wall for inserting holders that will support the heating battery. After drilling the holes and inserting the holders, the convectors are hung on them. Then, using pipes, the devices are connected to the entire heating system.
The water radiator is best attached to the structure thanks to pipes made of steel or plastic, fairly inexpensive materials.
However, if, when working with, it is possible to do the installation of the system yourself, then when you purchased it, it is better to consult a heating system installation wizard.
Equipment that uses electricity is just as efficient and convenient as water. Installing electric heating convectors with your own hands is a fairly simple matter, you can even do it yourself. You just need to follow the instructions, which is quite simple.
The procedure for this is as follows:
- The purchased unit must be properly unpacked.
- Then you need to carefully remove the protective film.
- Of course, it is important to find the most advantageous location for mounting the unit.

Electric convector device
Before proceeding directly to the installation of electric convectors, you need to familiarize yourself with the following nuances:
- The device must be hung at a height of at least 0.2 m.
- Between the walls and the device, space will also be required, but not exceeding a quarter of a meter.
- Don't hang too high either. You need to leave at least half a meter of space and more.
- The equipment must not be in close proximity to power sources. Keep a distance of 0.35 m or more.
Order self installation electric convector is as follows:
- First you need to turn the device over and build on it something like support legs that can be moved using the built-in wheels. To make this, you will need bolts from the standard package.
- In general, that's all. The device is ready to work, you can start working and adjust to your personal needs.
Installation of gas convectors for a heating system is not as simple as the previous types heating equipment, and you can’t do it exclusively with your own hands. Yes, and you should not experiment, since the system may not only not work, but also cause some harm.

Installation instructions
Experts know that before the main stage of installation of gas convectors, preparations need to be made.
For this you will need:
- Make support legs. They do not require special material, so leftovers from used pipes can be used to construct them. They can be made of steel or aluminum, these are the most suitable metals.
- If the diameter of the air outlet is about 15 cm, then a hole of a larger diameter, about 23 cm, must be drilled in the wall.
- Next, a shielding surface is lined, for which basalt is best used.
- The same shelter is erected on reverse side equipment.
- The unit itself is installed in a vertical plane and then attached to a gas source.
The installation of heating convectors may involve the use of some additional tools.
Necessary tools for mounting convectors:
- Drill with the ability to replace drills with others, larger or smaller caliber;
- Various types of bolts;
- Tool for metal processing;
- A hammer;
- Steel sheets;
- Basalt canvases;
- Welding tool for plastic;
- Angle grinder;
- Hand saw;
- Whole pipes and cuts of different pipes.
Your contacts in this article from 500 rubles per month. Other mutually beneficial cooperation options are possible. Write to us at [email protected]
Among various ways home heating, convector rightfully occupies not the last place. Its main advantages are that when using this method, it is not necessary to create a complex design of the heating system, and pipes and expensive water-heating boilers are not required.
Let's try to figure out what convector heating is. As the name implies, this is a method of heating a room, which is based on air convection in the room itself.
From the laws of physics, it follows that when heated, warm air rises, and cold air goes down.
Thus, there is a natural circulation of air and gradual heating of the room. It is this type of heating that is quite simple, but at the same time effective way heating.
What is a convector
The convector is a heater placed in a steel case. The air passing through the elements (fins) of the heater gradually rises. And from below, due to the fact that the heater is located in the housing, cold air comes in.
Thanks to this design, circulation occurs. From above the case has a lattice for an exit of heated air. In some cases, it is equipped with louvers to regulate the air flow.

What are convectors
According to the principle of working with energy carriers, there is a wide choice of such equipment. But now most convectors sold in stores have an electric heater. There are models that run on gas - gas convectors.
Electric convectors are best suited for heating apartments, as they are compact in size. Convector heating of a summer house or country house it is more profitable to operate, creating it on the basis of gas convectors - gas is much cheaper. Of course, subject to the presence of gas in the house.
According to the installation method, convectors can be divided into:
- floor;
- Wall mounted;
- Mounted in the floor or plinth.
- Floor convectors are installed on the floor, they can have wheels for moving along the floor surface, or they can be rigidly installed, without the possibility of movement. Photo from floor convector a little lower.

- Wall convectors for heating are mounted directly on the wall using special brackets.
- The third type of convectors can be installed in the floor or in the floor plinth.
Convector device
The convector has three main nodes. This is:
- Frame;
- A heating element;
- Control unit (thermostat);
Frame
- The body of modern convectors is made of steel. Thanks to the widest choice equipment on modern market, you can easily choose the design of the case that suits your room.
- Wall convectors, in addition, have special brackets (mounts) on the body, which allow you to remove the convector from the wall to clean the surfaces of walls and equipment.
- Modern convectors on the body may have blinds installed at a certain angle to direct the air flow. Very often, these blinds are not installed on top of the body, but on the side.
- Thanks to this arrangement, the air flow from the convector is more extensively distributed throughout the room and contributes to its better and more uniform heating.
Advice. Choose a convector with a small margin (10-20%) in terms of power if it will be heated corner room. Since the room is likely to be underheated.
A heating element
- Considering electric convectors, we can say that heaters are installed in them of various types. In the most inexpensive convectors, for example, spiral heaters are mounted. This type of device can be found in inexpensive models. Their price is about $30-$50.

Due high temperature heating coils (up to 160 C 0), they quickly warm up the premises. But this type of heating coil is very dangerous. Since dust intensively accumulates on it, and water can also get on the heating element, which can ultimately lead to a fire.
But due to their low cost, convectors with a spiral heating element are very popular. In addition, many companies, in addition, mount fans on the case, which, together with a high-temperature coil, makes the heating even more intense.
- In more expensive models mount a safer type of spirals, low-temperature type (heating temperature does not exceed 100 C 0).
The heater is an aluminum radiator-diffuser, a steel pipe is built into it, and a special heating thread is built into this pipe.
The aluminum body of the radiator contributes to more efficient heating. Some manufacturers install not one, but two heating tubes in such a radiator. Thus, allowing you to turn on the heating unit itself, both at full power and at half its power.
It should be noted that due to the difference in expansion during heating of aluminum and steel, there is a gradual destruction of the strong bond between the heating tube and the body. Over time, the radiator housing may completely lose connection with the heating tube. This can lead to local overheating of the tube and heating element out of service.
Currently, manufacturers of electric convectors are actively working on improvements and trying to eliminate this shortcoming.
The RX-Silence heater, developed and patented by NOIROT (France), has a unique design at the moment.
The uniqueness of the solution lies in the fact that in the silumin radiator housing, completely sealed, in a compacted filling of magnesia powder, there is nichrome thread heating.
The materials used have similar expansion coefficients. This solution allows not only to reduce energy consumption, but also to extend the life of the convector up to 15-17 years.

Electric convector control
- The most primitive control unit used in convectors is a thermostat mounted in the convector body. The thermostat is electromechanical and electronic.
The first type of control is the cheapest, and therefore the least accurate (the error can reach 2C 0) and noisier, since the bimetallic sensor clicks, including the heater. Usually, the temperature in an electromechanical thermostat is set by turning the knob with the calibrated nominal values of the convector power.
The electronic thermostat has a more accurate (error not more than 0.1 C 0) and silent operation of the convector. In addition, many manufacturers allow you to program the electronic control unit to turn on the convector in various modes, at different power in different time day and day of the week. Furthermore, electronic thermostat allows you to control the heating panel itself remotely, through a remote control and management unit.
This solution allows you to manage a large (up to 60 pieces) number of convectors in different parts at home with just one click. In the unit, you can install various built-in heating programs for each room individually or for the entire building.
- The market leader of "smart" convectors is rightfully the French company NOIROT and the German giant Siemens. The control units in the convectors of these manufacturers allow you to control the temperature even remotely, via the phone. This function will be convenient when you need to warm up the room in advance.

Manufacturers of electric convectors today produce equipment with a capacity of 0.8 kW -3.0 kW. Weight can be from three to nine kilograms.
Produced modern electric converters can be divided into types:
- High(height 450-670 mm);
- Medium(height up to 330 mm);
- Narrow(plinth), height 140-200 mm.
High convectors, due to the height, create a very active convection. In baseboard convectors, a heater of lower power is installed. To maintain the efficiency of the equipment, it is made as long as possible (up to 2.5 m).
In addition to electric convectors, there are also gas convectors. Their principle of operation is the same as that of electric ones. Only the heaters work not due to the spiral, but due to the combustion of gas.
The gas burns in a special chamber, the walls of the chamber heat up and give off heat to the radiator. He, in turn, already heats the air.

Gas convectors do not have complex electronic systems control, but due to the use of gas, their operation is cheaper than electric ones. But the complexity of their installation and the requirements for the presence of a chimney do not allow them to be used in apartments.
There are many videos on the Internet that will serve as an example for you to install a convector.
DIY electric convector it's not that hard to mount.
To work, you need quite a few tools:
- Perforator;
- Screwdriver;
- A hammer;
- Level.

Instructions for installing a wall-mounted electric convector:
- We assemble the convector, attach brackets to it;
- We apply the entire structure to the wall, set it according to the level;
- We mark the installation locations of the brackets;
- Disconnect the brackets from the panel;
- We apply brackets along the outlined boundaries;
- We mark the attachment points (drilling);
- Using a puncher, we drill holes at the marked points;
- Using a hammer, carefully hammer the dowels into the wall;
- We fasten the brackets with a screwdriver or screwdriver;
- We mount the convector panel on them;
- We connect the equipment to the outlet.
Results
Convector heating is very a good option for space heating. Convectors can be recommended for installation, as in small apartments, as well as in large country houses. They have good performance and efficiency.
Ready-made factory convectors, despite the fact that they have a rather simple design, are, unfortunately, very expensive. But if you wish, such a simple device, of course, you can try to do it yourself.
The design of the water convector
The main structural element of such heating devices is a heat exchanger, which is a pipe curved in the shape of the letter U or, for example, a four-pipe snake with plates put on it. Due to the presence of the latter, the heat transfer area of the device is significantly increased, and hence its efficiency.
Heat exchangers, in turn, are inserted into steel cases, the configuration of which depends on the specific purpose and installation location of the device. In order for the device to work even more efficiently, a fan can be additionally included in its design.
This device is inserted into the convector body and forces air through it. Heaters equipped with fans work even more efficiently than models with natural air circulation.
Also, special control sensors can sometimes be used in industrial convectors. The presence of such devices allows you to regulate the operation of the device, and therefore control the intensity of heating the air in the room.
Principle of operation
Such devices work, like conventional heating radiators, on the principle of convection. The air heated by them rises, creating thermal curtain for door and window openings.
Cooling down, the air goes down, passes through the convector again and heats up again. Thus, with convector heating, the same temperature is created in the room both under the ceiling and next to the floor, and, accordingly, a pleasant microclimate.
Types of modern water convectors
Three main types of convectors can be installed in private houses and city apartments:
- floor;
- wall;
- embedded.
A distinctive feature of the devices of the first variety is that their body is complemented by strong legs. The advantages of such devices include, first of all, the fact that they can be placed not only against the wall, but also in any other place in the room. Wall convectors are mounted in rooms using brackets.
Built-in models of such heaters are the most popular among consumers. Such convectors are usually used for space heating. non-standard layout. This type of device is most often installed inside the floor.
Very often built-in convectors, for example, are mounted next to panoramic windows starting from the floor. That is, they are placed where it is impossible to put conventional radiator heating.
How to make an underground convector
Devices of this type are installed in an apartment or a private house directly in the floor pie. In order to make such a heating device with your own hands, you need to prepare:
- a piece of polypropylene pipe;
- iron for mounting polypropylene;
- several fittings-corners;
- corrugated cardboard;
- a piece of tin;
- wooden slats.
In the manufacture of a home-made cheap convector, cardboard will be needed to assemble the heat exchanger plates. In order for these elements to last longer in the future, for their manufacture it is worth buying only the most quality material. In any case, corrugated cardboard for assembling the convector heat exchanger should be used strong and rigid.
Of course, if desired, the convector plates can be made not from cardboard, but from some other, more reliable and durable material. The main thing is to make sure that the heat transfer area of the finished device is large enough.
How to make a heat exchanger
The main structural element of the water convector is made in this case as follows:
- the pipe is cut into four segments, two of which should be slightly shorter than the other two;
- using soldered corners, one of the short and one of the long segments are connected to each other in the form of the letter P;
- cardboard is cut into plates of a not too large area;
- holes are cut in the plates with a knife with a diameter equal to the cross section of the pipe;
- plates with a small step are put on a U-shaped polypropylene product;
- in exactly the same way, the second part of the heat exchanger is made from the two remaining pipe sections.
On the final stage two U-shaped parts are connected into a single heat exchanger using corners or a piece of flexible steel hose through short lengths. When using this assembly technology, the result is a double four-pipe water serpentine heat exchanger.
How to make a body
The convector body is easiest to make, of course, from tin. From this material it is necessary to bend a narrow box corresponding to the dimensions of the heat exchanger assembled at the first stage.
Holes should be made in the end wall of the housing for supplying return pipes to the convector and supplying the heating system of a house or apartment. From above floor convectors are covered with decorative lattices. Therefore, shelves for mounting this element should also be provided in the tin box.
Do-it-yourself decorative lattice itself will be easiest to make using wooden slats. In these elements, holes must be made on both sides and metal or wooden rods passed through them. Next, the structure assembled in this way must be inserted into a frame, also made of wood or metal.
Convector installation
A do-it-yourself convector is mounted in the usual way, just like an industrial one. First, a housing with a heat exchanger is installed in a niche made in the floor. Next, the mains of the heating system are connected by soldering using couplings or tees.
When installing a convector, a niche in the floor should be made no further than 300 mm from the window. For example, the device should not be separated from the window by curtains during operation. Usually convectors are located at a distance of 50-250 mm from the window.
If the lower part of the window frame is high enough, and the body of the self-made convector itself looks aesthetically pleasing, this device can be installed simply on the surface without deepening into the floor. The convector mounted in this way, of course, needs to be fixed. You can use, for example, galvanized steel corners to fix the device case to the floor.
The convector must be installed indoors using building level. Incorrect installation can subsequently adversely affect the operation of the device.
Of course, you can make a convector using not only polypropylene. If, for example, the heating circuit in the house is steel, it is worth taking steel pipes. The same applies to plastics. In both of these cases, the convector will be inserted into the system by means of threaded connections.
How to make a convector from a battery
If you wish, you can make, of course, not only a built-in, but also an ordinary outdoor convector with your own hands. As a basis for the manufacture of such a device, it is easiest to use a conventional heating radiator. You can increase the efficiency of the battery by converting it into a convector by simply supplementing this device with several fans.
For the manufacture of such a device, you will need to purchase approximately 4-5 fans. In this case, you should choose high-quality devices that work as silently as possible. You will also need a steel or plastic corner with a not too wide shelf.
How to connect fans
Fan housings can be fastened together in a row, for example, using cable ties inserted into the holes in the corners. The two-pin connectors of these devices are best connected in pairs with pieces of cable, passing one behind the second.
This installation method will reduce the number of wires suitable for the power supply. Ultimately, a two-wire cable should fit on one side of the power supply alternating current, and on the other - constant wires from the fans.
If the heating radiator is located low, the structure assembled in this way can simply be placed under it on the floor. If between the battery and the floor there is a lot free space, the fan unit will have to be slightly improved.
To assembled structure in this case, among other things, you will need to attach the legs from the corner. To do this, you must first cut off 4 pieces 10-15 cm long from the corner. Next, the legs obtained in this way will need to be attached to the cases, having previously made holes for the screws.
Features of operation of convectors
Some disadvantage of this type of heaters, both floor-standing and built-in, is that they are capable of raising dust in the room together with air. So wet cleaning in the house when using such devices in the future, you will have to perform more often.
You will also need to periodically wipe the device itself with a damp cloth. In a home-made floor convector, in the absence of proper care, for example, the grate may even become clogged with dust. As a result, the device, of course, will stop performing its functions correctly.