Laying tiles in a small bathroom. Options for thoughtful layout of tiles when finishing the bathroom. How to choose bathroom tiles in different styles
Of all the ways of decorating walls and floor surface bathroom, has existed for a long time and does not lose its relevance tile layout in the bathroom. And this is quite justified, since ceramic tiles are the most practical material, having high strength and moisture resistance. Many consider this option a relic of the Soviet era and spend quite a lot of time looking for something special. But this opinion can absolutely change when you consider how wide the diversity modern models tiles, and what interesting combinations you can make with it. In this article, we will give examples of the layout of tiles in the bathroom (photos of which will also be presented in our article) and provide recommendations from experts on how to design a bathroom using this finishing material.


Bathroom tiling program
Bathroom design, the layout of the tiles in which must correspond to a certain stylistic direction, it is often quite difficult to think over for an inexperienced person in such matters. The rather small dimensions of the bathroom can also put in a difficult position. In this situation, many prefer the help of designers, although, in our time, a number of programs have been developed, both simpler and more complicated, allowing you to create finished project in 3D format.
An example is the Ceramic 3D bathroom tile layout program. This is software allows you to quickly, within 15-20 minutes, create a design for a room of any configuration with laying tiles of any complexity. The ViSoft Premium program is not inferior to it, which has a huge set of samples in its database and, using them, automatically makes a layout on the specified area. This bathroom tile layout program allows you to take a photo of the finished sketch, and also calculates the amount of material.
However, it is worth considering that such software is paid. Most online stores provide a free opportunity to create your project online. And this is also worth taking advantage of, since laying out tiles in the bathroom in the “online” mode can be no less effective.
You can also complete the project yourself. To do this, it is necessary to make accurate measurements of the entire room, taking into account the slightest ledges, niches, steps on the floor, the location of mirrors, as well as the placement of communications and plumbing installations. It is worth considering that it is possible different variants layouts for walls and floors, as well as many options for colors and pattern combinations.
Layout of tiles in the bathroom: photos of designs with general recommendations
The first thing you need to dwell on is the choice of the size and color of the tiles. The generally accepted division includes such size options as standard, large and mosaic. The most applicable option for decades has been and remains square and rectangular tiles medium sizes. Here it is worth considering the size of the room: if it is small, it is better to use light colors. The layout of the tiles in a small bathroom will look much more interesting if you use a combination of the main light color, which should be dominant, with its darker shade (white with gray, blue with blue, etc.) in its design. This technique will help to visually expand the space, and with the addition of vertical stripes, it will also give height. Tiles for small room should not be large, perhaps even a mosaic design.


Having ready plan tile layout in the bathroom, and understanding how much material will be needed, it is better to purchase it in reserve, taking into account possible damage during installation (approximately 15% more).
Laying tiles in different styles
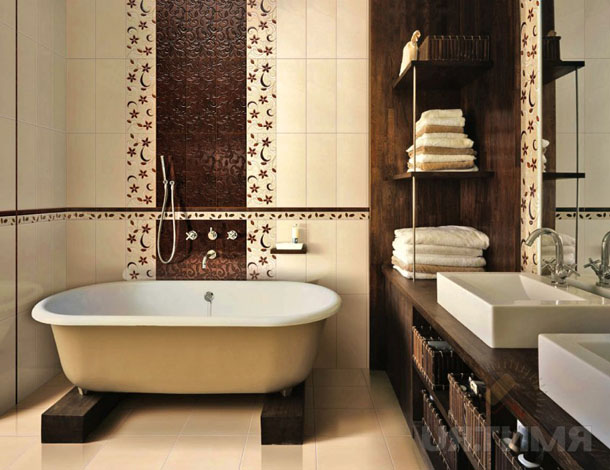
One of the classic types of tile layout comes down to decorating the upper part in light colors, and the lower part in dark colors, while such a tile layout in the bathroom (photos are presented in the article) suggests the presence of a dividing border. More fashion trend is clearance floor covering dark tiles, to which a row of the same wall will adjoin. And matte tiles for the floor it is much better than glossy, as it does not slip and scuffs do not form on it over time.

The generally accepted rules for tile layout in the bathroom say that its horizontal design can expand the space, but reduce the height, and the vertical one, on the contrary. Here it is also necessary to take into account the color palette. Of course, if the tile is small and light tone, then the seams on it will be quite clear and this principle will work, but if the tile large sizes and the seams are additionally processed with colored grout - the orientation of the laying will not play a role.
The layout of the tiles in the bathroom on the walls does not have to match the floor pattern. Often, the application various options can be quite advantageous, bringing some variety to the interior, as well as hiding the shortcomings of a particular surface and adjacent corners.
Bathroom design: tile layout in various ways
Recently, quite a few ways have been formed to design tiles in the form of various patterns. The options for laying tiles in the bathroom, examples of which are provided in this article, may be the simplest ones that do not require special skills, but there are those that never cease to amaze. There are no special recommendations on the use of one or another method for designing a design in any style, it all depends on the personal preferences of the owners.
Basic tile layout in the bathroom
This option is the simplest, existing for decades, when the tiles are laid parallel to the walls, seam to seam. It is quite beneficial for several reasons:
- both square and rectangular tiles are suitable for laying, which gives room for imagination;
- the process proceeds quite quickly, due to its simplicity;
- saving material with a minimum amount of scraps;
- the ability to carry out such work independently, without the involvement of specialists, which will lead to savings in material costs.
In order for the interior of the bathroom not to look dull, and not to resemble the bathrooms of the "Soviet times", it is enough to choose a tile with a beautiful pattern and texture, which is not at all difficult in the conditions of the modern market of finishing materials.


One of the subspecies is the layout square tiles in the bathroom, suggesting a combination of white and black colors. This method is called "chess". It creates quite an interesting pattern. However, other variations can also be used. color palette combining, for example, blue and yellow, red and white, etc.


Layout of tiles in the bathroom "in dressing"
This method is also called "out of order", since it involves laying out, in which the seams are displaced relative to each other. As in the previous version, rectangular and square models are used, which are stacked in horizontal rows. The difference is that the seams of each subsequent row are in the middle of the previous tile, which, as a result, develops into an original pattern resembling brickwork. Such a layout of tiles in the bathroom is also quite simple, but here it is worth abandoning the use of two contrasting colors, and the vertical design is categorically unacceptable, since the end result will look ridiculous. It is best to choose a rectangular tile option for such a pattern.


Rules for laying tiles in the bathroom diagonally
Beginners should not start with this method, as it is quite complex and relatively consumable. Here, absolute correctness of laying is necessary, so that all seams are located at an angle of 45 degrees to the floor and 90 degrees in relation to each other. In the process of work, it is necessary to carry out a lot of trimming, so the material must be purchased with a decent margin. But, on the other hand, such a layout of tiles in the bathroom (the photo catalog of the article contains similar examples) can help visually enlarge the space, hide the imperfections of the walls and uneven corners, besides, it looks quite original, giving the room depth and sharpness.


Modular tile layout in the bathroom
This type is one of the most modern, and requires painstaking work, consisting of laying tiles in the form of a clear or chaotic pattern. For this you need a tile different sizes(at least three), but with a uniform texture. The color of the elements can be very diverse. The process itself is quite creative and boils down to successfully combining different colors and sizes, laying out the original pattern. AT modern design bathroom interior, this technique is used quite often, since, almost completely absent standard solutions which makes the design more personalized.


Bathroom tile layout options: examples of combining different methods and colors
Having considered the basic rules for laying tiles in the bathroom, you should pay attention to more interesting designs, which can be found in modern bathrooms. One of these is the combination of horizontal and vertical stripes created using two colors: the main and its shade. At the same time, the layout of the tiles in the bathroom with stripes suggests their diverse arrangement. Both vertical and horizontal stripes may be from edge to edge, or not reach one of them, the vertical strip may not reach the ceiling or floor, and the horizontal strip may be a separate fragment. The width of the stripes can be any.
Look great in the bathroom and fragments designed to focus on the background of plain tiles. Such areas can be lined with contrasting or decorative tiles (panels), for example, in the area of a washbasin, heated towel rail, toilet bowl or shower cabin. It is worth noting that the layout of the tiles in the bathroom with bright accent fragments is good for large rooms, in small bathrooms, such designs should be treated with restraint so as not to bring chaos.


Another interesting way bathroom design - the use of a "kaleidoscope" or "patchwork" pattern, which provides options for laying tiles in the bathroom with a combination of several colors. At the same time, their combination can be both ordered and chaotic. This method is good for creative natures who prefer "creative mess" and a cheerful atmosphere that energizes.
 (26
votes, average: 4,77
out of 5)
(26
votes, average: 4,77
out of 5) 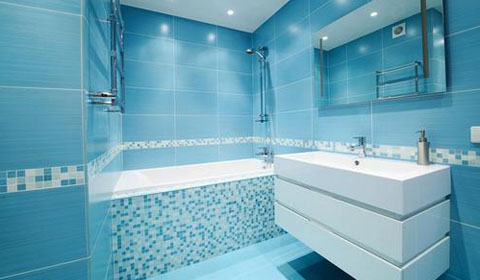
Apartment design
The variety of tiles for wall structures is very wide, there are a large number of colors, textures and dimensions. Tiles with square shape and the average dimensions are quite multifunctional - it fits perfectly, both in spacious and in small bathrooms regardless of their design.
However, it is now more popular rectangular shape facing tiles- with its use, a smaller number of "seams" and a greater variety of patterns are formed. Since a rectangular tile can be placed both vertically and horizontally, a combined version is also possible (vertical layout is combined with horizontal). Which method is preferred?
Vertical and horizontal tiling
Can the layout method affect the design of the bathroom? Yes, but only if the intermediate seams stand out against the background of the tile or tiles of different shades alternate. For example, if the tile is black and the grout is white, the direction of the layout becomes obvious and to some extent affects the visual perception of the room.
In the case when the seams are barely visible, there is virtually no difference in the vertical and horizontal layout.
 how to lay tiles horizontally or vertically
No effect is produced by a large tile close to square with a minimum difference in width from length. With different ways of laying out such a tile, it will look about the same.

How does the tiling method affect the interior?
The vertical layout of the tiles with contrasting seams visually makes the room appear taller while narrowing it down. Horizontal, on the contrary, expands the bathroom, making it lower.
To support the effect, accent inserts from tiles or other decor are often added to the finishing scheme. For example, make one or more horizontal rows for visual expansion bathroom. Vertical inserts can make the ceiling higher.

In addition, the stripes allow you to smooth out the effect of the tile layout. For example, if preference is given to the vertical direction, several horizontal stripes must be made contrasting. As a result, the vertical layout of the tile will narrow the room, but the horizontal insert will soften this effect. At the same time, the bathroom will not become either narrow or low.

This rule also works with the reverse scheme: the tile is laid horizontally, but one or a pair of vertical inserts is added. As a result, an increase in the perimeter is obtained, both in the vertical and in the horizontal direction.
The combined layout of tiles similar to panels (white top - black bottom or vice versa) will visually enlarge the bathroom. With this finish, the way the tiles are arranged will no longer have a strong impact.

Choose: vertical or horizontal tiling?
Horizontal tile laying is more familiar to the eye, as it looks more natural. Since the standard horizontal brickwork. However, if a non-intrusive grout is used, then attention is not drawn to the location of the tile.
The horizontal arrangement of a rectangular tile may allow the use of a standard brick layout with offset seams. This will bring zest to the interior.
 horizontal or vertical laying tiles
If the room is very small, and the tiles are elongated enough, the horizontal laying will look unsightly due to the large number of “pieces”. It is better to position it vertically and apply a grout that blends with the tile.
The narrowest fragments are stacked only horizontally.

To finish the screen under the bath structure itself, it is better to choose tiles of such dimensions that it does not need to be cut in height. Here the laying method is subject to the rule of practicality, and not the visual component.
A beautiful bathroom is a place of relaxation and rejuvenation. Walls shining clean and original design can relieve fatigue after a working day and cheer up, so the decor of the room requires a special approach, and a competent tile layout can emphasize the taste and originality of the owners. On the modern market is provided wide selection finishing materials for the bathroom, but ceramic tiles are the most popular. Due to its wear-resistant and waterproof qualities, given material occupies a leading position in the design of the walls in the bathroom.
Before starting the cladding, it is necessary to select the appropriate material. Color, tile parameters and layout method can visually enlarge or reduce the room. Most often, rectangular tiles are used for wall cladding, standard height which is 30 cm. The horizontal layout of light colors is able to visually expand the room, and the vertical one visually stretches.

- Pick up tiles of small sizes;
- Give preference to cool colors;
- Lay with glossy tiles so that light is reflected from the surface;
- Put ceramics diagonally on the floor to increase the volume of the room;
- Alternate vertical stripes in color.
For a room with low ceiling it is necessary to vertically position the frieze, highlight the corners of the room colors, set decorative details at eye level. Such small tricks will help hide the defects of the room, and give the room more space.
Possible tile layout options
Tiles can be laid out in different ways, it all depends on design idea and fantasies of the owners. by the most in a simple way cladding is the base laying. Each tile is glued next to the other, parallel to the corners in the room. With this method, a clear geometric pattern. To check the horizontal, a level is used, the vertical is determined using a plumb line. You can use modern laser levels. Even a beginner can cope with such a lining. The advantage is the economical consumption of material.

Basic layout options:
- Basic way;
- dressing method;
- Diagonal masonry;
- Chess drawing;
- Modular styling;
- Linear design;
- Masonry with an ornament.
The dressing method looks a little more interesting and contributes to the visual expansion of the walls of the room. The elements are placed in horizontal position, shifting the seams of the next row to the middle of the previous element. The diagonal layout effectively wins with the pattern, visually enlarging the room and masking its uneven geometry. This type of cladding requires experience and skill. The disadvantage is the high consumption of elements due to cutting tiles. Start the layout from the bottom row, cut diagonally. Next, whole elements are laid at an angle of 45ᵒ. The chess version is usually made from square elements of excellent colors. The execution method is based on the base method. Modular styling looks unusually interesting, but requires some skill.
Tiles of different sizes are used, from which all possible geometric shapes are made.
For the linear version, tiles of 2 or 3 colors are selected. Lay in the basic way, alternating color lines, which can be located both in a vertical and horizontal position. Ornament, as a layout option, can be used in basic and diamond-shaped cladding. Pattern and color depend on the tastes of the owners.
How to correctly and accurately lay out the tiles in the bathroom
To correctly lay out the tiles in the bathroom, you need to make a plan on paper. To do this, make measurements of the room, transfer to a sheet of paper on a scale, carefully observing the proportions. Further are defined with the size of a collection. The layout must begin with the central wall. The tiles are positioned in such a way that there are no narrow stripes at the corners of the room.

Location rules:
- Whole elements are placed on the surface, for example, 6 tiles are included, and a small gap of 10-15 cm remains;
- One element is removed, leaving 5 pieces, which are located in the center of the wall;
- In the corners it is necessary to place the cut elements.
In this case, the consumption tiles It will be a little more, but the result is worth it. The layout of the tiles from the level of the bathroom is considered optimal, so it is guaranteed to work beautiful cladding, and there will be no narrow stripes above the sides. The procedure for laying tiles in a small bathroom is not complicated.
Facing is carried out from the bathroom to the ceiling.
The first row must be started, stepping back from the side of 2 mm, for further grouting. Next, lay the rows in the rest of the room. The last step is priming the floor and laying tiles on the floor. If the layout floor tiles will go diagonally, work begins to be carried out from the corner of the room. When large area, flooring can be started from the middle of the room.
The original layout of the tiles on the floor in the bathroom
To create a unique effect in the bathroom, you can use a combined floor installation. Select the perimeter of the room more dark color, and in the middle apply the diagonal method. Combined options look very nice in large rooms.
In addition to the listed layouts of tiles, there are some more ways:
- Herringbone. This scheme is an imitation of a parquet floor. The lines of the Christmas tree do not run parallel to the walls of the room. Thin tiles, laid at an angle, expand the area of the room.
- Diagonal styling with small inserts gives originality and chic to the room. It helps to hide the irregularities of the perimeter and visually refracts clear lines.
- Combined. There is a combination of the above methods.
Interesting tile layout
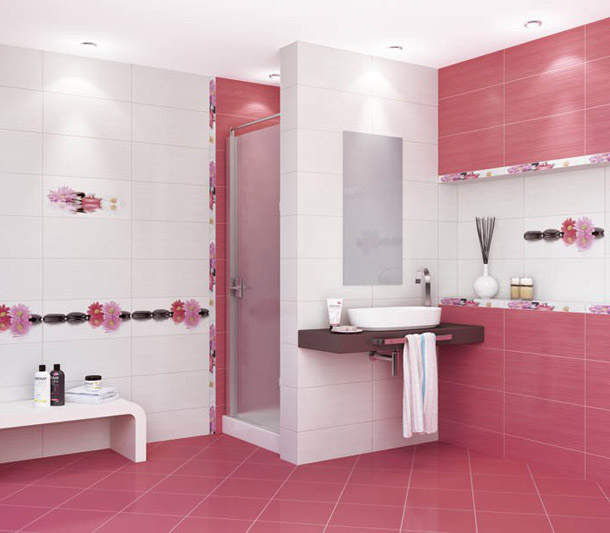
It is better to take bathroom tiles from one manufacturer, this guarantees the similarity and the same thickness of the elements. Before laying out the lining, you need to think about color scheme. Classic option counts dark bottom, light top, separated by a decorative border. The advantage is ease of installation and visual extension premises.
A fashionable trend is the highlighting of significant elements with the help of a color strip, when it starts on the wall and continues on the floor. This design makes the ceilings higher. You can combine stripes with 3 colors, adding height to the room. This design will make the room narrower. If you alternate horizontal and vertical lines, this effect can be avoided.

Location different colors gives a contrasting effect. You can highlight the bathroom with tiles of one color, and the opposite walls and areas adjacent to them in another. This layout will highlight the bathing area and the main room.
The bathroom looks stylish with splash effect. The main background is lined with plain Martinique tiles, and several colored elements are randomly added, similar to large drops. This design is suitable for large rooms. A kaleidoscope of colorful tiles 20x20 cm stands out in an original and random way. This solution is suitable for lovers of bright and cheerful ideas. A cheerful environment will charge you with positive energy. Recently, it is fashionable to use pictures with a 3D effect, which can be placed both on the wall and on the floor, creating great effects and influencing the visual perception of the room.
Beautiful tile layout (video)
Choosing a tile design today is not difficult. Examples of collections are exhibited in special stands construction stores. A rich assortment and different kinds ceramic tiles allow you to embody the most creative ideas.
Most often, the bathroom is tiled. This material is durable, hygienic, easy to clean. But the cost of such repairs is considerable, therefore they are trying to arrange everything so that the bathroom looks in the best way over an extended period of time. To solve this problem, a collection is carefully chosen, colors are selected, and a layout method is selected. About what options for laying tiles in the bathroom exist, how they are perceived - in the article.
General principles and rules
Everyone knows that light walls visually make the room more spacious. Nobody is going to argue with this, and this fact is taken into account when choosing options for laying tiles in the bathroom. But there are a few more interesting points, the knowledge of which will help to avoid mistakes when drawing up the layout and selecting the color of the tile, its location, and the color of the grout.

Vertical and horizontal layout
Recently, rectangular tiles have been more often placed on the walls. In this case, the first thing you have to decide is to place the tiles horizontally or vertically on the walls. It is believed that the horizontal layout visually makes the room wider, and the vertical one - higher. In fact, on colored, bright tiles, the seams between which are sealed with grout of the same or close color, the difference is very slight (pictured are a couple of drawings below). In this case, the laying direction has almost no effect on perception. In this case, you can choose the options for laying tiles in the bathroom based only on your preferences.

This effect is more pronounced when using light-colored tiles with contrasting grout (upper pictures). In this case, the eye “slides” along the seams, creating the desired visual changes. In this case, the vertical or horizontal layout really affects our perception.
Guide strips
To expand the room or raise the ceiling, when choosing the layout, vertical or horizontal "guides" are made. These are stripes of tiles of a different color, along which the eye glides. These stripes change the visual perception of the size of the room.
A lighter horizontal strip, which runs along the perimeter of the room approximately in the middle of the height, visually significantly expands the space. If to light walls add a dark band, no effect is observed. Rather, the room will look at its “own” volume, since the dark stripe neutralizes visual magnification space due to light colors in the decoration.

If necessary, make the ceiling visually higher, with a vertical layout, you can lay out a strip of lighter tiles on one of the walls (preferably opposite the entrance). Even with bright or dark tiles and matching grout, the ceiling will “lift up”. If on this wall you use a tile of a lighter tone, and even with a contrasting grout and a vertical strip of tiles with an ornament, the effect will be even more pronounced (in the figure below on the right).
Border
Another way to make the room look taller is to place decorative tiles in the form of a border closer to the ceiling. Being high, they attract attention, while the room seems higher. The border does not have to be done around the perimeter. It is enough to make one wall of a different light shade, place a border at the top. Moreover, this contrasting wall can be darker or lighter.

All these techniques are not difficult to implement, but they help to correctly compose the layout of the tiles. To visualize what you get, you can use special programs.
Tile layout examples
In addition to the layout examples above, there are tile laying options that can be considered classics, others, on the contrary, have appeared quite recently and, although they often go against many recommendations, they look very good.

Darker bottom
This technique belongs to the classics: the lower third of the wall is made darker, the upper one is several tones lighter. This method of laying ceramic tiles, to put it mildly, is not at the peak of popularity. It was popular about a decade ago. But there are a few tricks that give the classics a modern sound.
With this method of laying tiles, the room seems spacious, since most of the walls are decorated in light shades. In this case, the tiles on the floor are chosen in the same color as the tiles on the bottom of the wall. If you can’t pick up exactly the same, they are looking for a very close one in texture and color. In its “pure” form, this way of laying tiles does not look very modern.

To make this bathroom tile look more modern, you can add vertical or horizontal stripes to break up the monotonous design. Many collections offer not only darker and lighter tile options, but also decor of different sizes, from which strips are formed. different widths.

More often, not two, but three types of tiles are combined: two plain and decor that combines both primary colors. Decorative elements can be of different widths. Then from them you can make strips or columns of different widths. To top part was not so monotonous and boring, thin stripes of the same color as the lower part of the wall are added, and a floral or floral border is added below.

Most factories produce collections in which there are two basic colors of tiles - darker and lighter - and a set decorative elements. Such collections are usually not cheap, but it is easier to make a competent composition from them, and they are suitable in size, so there will be no problems with styling and fitting.
accent wall
If the division of walls by height does not appeal to you, but monophonic design evokes despondency, you can consider the option with accent wall. Most often, it is decorated with tiles of the same color, but of a different shade - several tones lighter or darker than the main one.

In this case, not one wall is trimmed with brown tiles, but it also comes into part of the neighboring one. This technique is suitable for narrow long rooms - it visually makes the room look more like a square.
The accent wall does not have to be tiled the same size. One wall decorated with mosaics or small format tiles looks great.

Mosaic looks great both on its own and in combination with tiles different format- square, rectangular, large and medium size. It is used when finishing curved surfaces - due to its structure, it fits even columns of a small radius.
Floral motifs
Recent design trends have resulted in most bathroom tiles being plain. Many collections are distinguished by an interesting texture, but are made in the form of monochromatic fragments. Not everyone likes this design - the interior turns out to be too “cold”. You can add fantasy with tiles with flowers or butterflies, floral or geometric motifs.

But with this type of decor you have to be careful: it's too easy to "overdo it" especially in a small volume. But a few single fragments also do not look good. So with floral decor it is desirable to work in programs that give a three-dimensional picture - it will be easier to imagine what you actually get.
Laying tiles on the floor
In addition to choosing options for laying tiles in the bathroom on the walls, you need to decide how to decorate the floor.

When using square tiles, it is usually laid in the form chessboard(checker diagram), the 1/2 tile offset method can be used. There are two laying directions - parallel to the walls and diagonally.

If a rectangular tile is selected, there are more layout options - with an offset (deck, wicker, herringbone).
There are also options for a combination of rectangular and square tiles - a labyrinth, if methods using fragments of different sizes.

It makes sense to implement all more or less complex schemes indoors big size- here unusual compositions can be appreciated. In small bathrooms, most often choose the most simple circuits- usually only a few tiles are placed, so there is simply no point in complicating the work.
More options
Commonly used in the bathroom decorative tiles as the most practical, economical, inexpensive material with a huge selection of colors, textures and shapes. It can be used both on the floor and for wall decoration. With this finishing material, you can create any design, depending on the style that you want to implement.


To date, there is a tile layout in the bathroom in in large numbers variety of options. Experienced craftsmen know many ways. But most of them are used 3-4. In the article, we will figure out what are the ways to lay out tiles in the bathroom, what are their advantages and weak sides what design they allow to carry out.


Pros of using tiles in the bathroom
Why most bathroom owners prefer to decorate these rooms with ceramic tiles:
- The material is very practical. Horizontal and vertical tiles are moisture resistant, long lasting and easy to clean.
- A large selection of colors, sizes, textures allows you to experiment with design, finding the right combination of shades, to implement any decor ideas, even in a small bathroom. For example, a very popular design with black and white tiles in the form of a chess board.
- Many tile layout options make it possible to combine various colors, thus achieving the individuality of the room, making it an original, author's work. Individual scheme there are layouts for every interior in the bathroom.


Options
What layouts are tiled and ceramic material in the bathroom on the floor and walls are the most popular today:
Standard without offset
This is the most popular layout plan. AT Soviet times this is how all the bathrooms in new buildings were finished, so for many this layout causes an instinctive visual rejection. Her example in that performance can still be seen in the apartments of the elderly. However, if it is done with large tiles, then the standard layout without offset looks quite stylish and original.


Diamond laying
Or diagonal. Also a very common layout option. Peculiarities:
- Creates a very interesting visual effect, looks stylish. With its help, the most original and stylish designs. Gives depth to the room, sharpness to the design.
- A rather time-consuming option, so only an experienced master finisher can carry out such a layout. Requires careful calculations and accurate cutting of the material. In terms of labor costs, it is comparable to laying a mosaic.


Wall panel
This scheme is a classic of the genre, when the lower third of the wall is laid out with dark tiles, and the upper two thirds with lighter ones. Place of docking different color tiles are usually still decorated with a contrasting border to match, it can also be made from mosaics. Often this way of designing bathrooms can be seen, as an example, in various public institutions. Such methods can be used for your own bathroom, but this gives the bathroom a little rigor and formality.


Features and rules:
- Such a layout project makes the room lower, while expanding it. You should carefully study the floor plan.
- In this case, the floor can either coincide with the walls or be completely contrasting with them. Each design is interesting in its own way.
- In some variations, you can see a combination light bottom and dark top. However, this layout of tiles in the bathroom lowers the level of the ceiling, so it is suitable for narrow and high rooms. And in most of our standard apartments, small and not too high bathrooms are still more common.
- The border on the walls of the bathroom can be made as a narrow strip, or as a fairly wide independent area, tiled in several rows. In addition, there may well be several of these strips, especially if they are narrow. Just do not forget that each of them will make the room a little lower.


with border
In this version of the layout, the tiles that are laid out on the floor continue on the wall. But not completely on the entire wall, but 2-3 rows above the floor. Above, it is desirable to make a tile of a different shade, most often lighter. Such a layout plan will make the design of the room lower and wider.
Fragments with an accent
A very popular layout plan today. But such tile layout options in the bathroom are only suitable for a decent-sized room. AT small room contrasting accents can create a visual imbalance that looks inharmonious.


- If you decide to choose such a bathroom tile layout project, then you should know that you do not need to focus on more than 2-3 areas of the bathroom. An ideal example of layout when accents are made in the area of the washbasin, heated towel rail and shower. Or in another similar way.
- If you do not want to increase the height of the ceiling, then the accent area should not be started directly from the floor, but it is better to do it at some distance. It is also not necessary in this case to bring the accent to the ceiling.
- You can make accents with mosaics.
- On the floor, such a layout plan does not apply. The accents made on the floor look ridiculous and out of place.


Equality of colors
In this case, they take several colors - contrasting or similar, usually 2-3 shades, and decorate the walls of the bathroom with them. In this case, the colors should not mix. One wall is laid out with one color, the second with another, etc. Be sure to choose harmonious combination colors. Peculiarities:
- Thus, it is possible to visually clearly separate functional areas in the bathroom. For example, highlight the area near the washbasin in red, and finish the area near the shower with black tiles. The layout can be both horizontal and vertical.
- The floors in this case are finished with tiles of the same colors, but at the same time they can be mixed. For example, it would be great to use a chess layout for the floor.
- This design does not look good in a small bathroom, as it will visually make the room narrow and small.