Plasterboard ceilings in the hallway. Plasterboard ceiling in the corridor: installation nuances and design options. If the ceiling is multi-level
Living in a house, we do not pay attention to the hallway, running through it in a hurry. But what has become imperceptible for us is the object of the first acquaintance with the house for the guests, and it is from it that they make the first impression. There is no universal answer than how to finish the ceilings. It all depends on financial condition and personal preferences. But now this type of finish is popular as suspended ceilings from drywall. What are their advantages and how to install them step by step on our own, we will consider in the article.
Suspended structures completely hide the ceiling. This property is used by many in order to close all the shortcomings. If you have an uneven ceiling with holes and cracks, then you can not suffer and bring it to an ideal state, but simply close it.
You do not have to spend money on additional preparation of the ceiling. Plastering and puttying is not necessary. But it is better to treat the ceiling with an antifungal primer. The presence of mold will be imperceptible, but it can spread to the structure and completely ruin the ceiling.
Drywall is not afraid of heat. In this it differs significantly from stretch fabric or plastic. For lighting, you can use any lighting fixtures. But still, you should not place open light close to the material.
Suspended plasterboard ceilings for the hallway will be inexpensive. They do not belong to budget types of finishes, but they are cheaper than tension or wooden structures. You can install the ceilings yourself, so you can save on the masters. But if your plans include a construction of several levels, then you should still invite specialists. For beginners, it is almost impossible to cope with such work.

Drywall does not support combustion and is not afraid of the weak mechanical influences. blows small force he is not afraid.
Some represent plasterboard ceilings as something boring and monotonous. In fact, the design of such structures provides a wide scope for imagination. You can do one level, or you can do several. There are options with a simple flat ceiling or a figured ceiling, frame, etc. Variety of colors and decorative elements decorate any interior.
It is especially convenient with the help of drywall to divide the room into zones. If you have large space and you feel uncomfortable in it, plasterboard ceilings will help you fill it.
If you liked such ceilings, then you should be aware of their disadvantages. Drywall will not withstand long-term use during wet room. He loves dryness. It should not be cleaned frequently wet cleaning will definitely deform it. In addition, despite the fact that such ceilings can last more than 10 years, you still have to update them periodically: paint or varnish.

Another disadvantage that applies to all designs hanging type- they take centimeters from the ceiling. It will be lower by 5 or even 10 centimeters. Other types cope with this due to mirror surfaces, but drywall cannot offer this. Therefore, before you install it in a small corridor, you should carefully weigh everything.
Ceiling preparation before installation
Surface preparation milestone before finishing, do not neglect them. Even considering that drywall construction hides it, since you have already begun to make repairs, then why not put it in order completely.
First of all, clean the surface of the old coating. Nothing should be left. Treat the surface with a primer. Use a primer that is waterproof with anti-fungal properties. This is done so that mold does not form on the ceiling. It is necessary to make a primer. Then fill the holes with putty and level the surface with plaster. These works are not required when installing suspended structures. Remove all lighting fixtures. If you plan to change their location, then the wires are adjusted to the place of the future location at this stage.

GKL sheets are attached to the frame, which is installed on the walls. Therefore, before installing the sheets, you need to mark the place where the frame is attached. Draw a drawing on paper future design. This will help you not to get confused in the future. Draw on the paper the location of the suspensions and lighting fixtures. Marking is applied using a level. If you have a laser, then use it, it is more accurate and more convenient to work with. Since the ceilings in apartments are often uneven, measure all corners. You need to lead the line from the very low angle. Marking can be applied with a pencil or with a rope.
After the markup is ready, calculate the area of \u200b\u200bthe room. This is necessary for the purchase of material. To calculate the length of the profile, add the length of all the walls, this will be the length of the profile. And buy sheets based on the entire area of \u200b\u200bthe ceiling. Do not buy back to back, it is better to buy 1-2 extra sheets, this will save time if you damage one in the process. After graduation preparatory work you need to prepare the necessary tools.

Necessary tools and materials
Installation does not require specific tools, so you can have everything you need at home. What you will need:
- GKL sheets
- Guide profile
- carrier profile
- Hangers
- screwdriver
- Perforator
- Self-tapping screws and dowel-nails
- Level
- Hacksaw
- putty
Do-it-yourself installation of a plasterboard ceiling in the hallway
According to the markup, holes for the profile are first drilled. You need to drill them at a distance of 40 cm. Then attach the hangers 60 cm apart. Now it's the turn of the carrier profile. The distance between them depends on the size of the sheets. Install them so that they are located at the junction between the sheets. The ears of the suspensions need to be bent. The frame is ready.
Installation of sheets starts from the corner. They are fastened to dowels, nails and self-tapping screws. If your sheets are larger than the frame cells, then they need to be cut. You can do this with a hacksaw. Lay all sheets on the floor to begin with. Make holes for chandeliers or lamps in the necessary ones. The seams between the sheets are closed with putty.

The role of the hallway is often underestimated, while the mood and well-being of the household depend on its interior. It's nice to come home after a tiring day if the hall welcomes you with the freshness of the walls, ceiling, floor and the soft glow of the backlight. You can transform your home beyond recognition, starting from the hallway in spacious luxury apartments or in small apartment, in which it is especially important to properly organize the space. Plasterboard ceilings in the hallway enjoy a special advantage, because they differ perfectly flat surface and a variety of finishes.
The popularity of drywall in the decoration of residential premises is due to its high operational characteristics, ease of installation, light weight, environmental friendliness, hypoallergenicity. The plasterboard ceiling in the hallway provides an excellent aesthetic appearance, sound and heat insulation of the room. Depending on the footage, you can design single- and multi-level structures, cut out shapes, organize open and hidden lighting.
Ceiling design depends on:
- the size of the hallway;
- materials and color design walls and floors;
- the general style of the apartment;
- fantasies and wishes of the inhabitants.
Plasterboard ceiling design in a small hallway
Small apartments significantly limit their owners in terms of choosing an interior design, but if you wish, you can achieve amazing results.
expand tiny square hallway or a narrow cramped corridor due to the transfer of walls is undesirable, since such actions require coordination with the BTI, but even if the decision is positive, they will not bring a noticeable result. It is better to solve this problem by visual magnification the space that can be achieved with the ceiling structure and color scheme. Many options in a small hallway with a photo can be found on the Internet or on the pages of glossy magazines dedicated to the repair and interior decoration.
Single-level plasterboard ceiling in a small hallway
Among the most common interior design options for a small hallway is a single-level plasterboard ceiling that can be decorated ceiling plinth and decorative elements made of expanded polystyrene. Spotlights built into the design contribute to a visual increase in the height of the room. Hanging chandeliers and it is better not to use lamps, replacing them with flat ones ceiling lights with matte shades or light panels. Holes for lighting fixtures should be made before the installation of the ceiling.
After the installation is completed, the surface of a single-level structure should be puttied, primed and proceed with further design. Any methods of finishing drywall are available:
- dyeing with water-based and acrylic water-based dyes;
- gluing with non-woven or glass wallpaper;
- finishing with decorative plaster.
Important! Do not neglect the putty and primer of drywall, since any paint and plaster will lie unevenly, and spots will appear on the ceiling that cannot be masked by anything. An unprimed surface covered with wallpaper will cause many problems in the form of deformation and the appearance of bubbles, and the next repair will require the replacement of the entire structure.
Two-level ceiling in a small room
Contrary to popular belief, it significantly benefits from the installation of a two-level ceiling structure made of plasterboard.
- A narrow rectangular, square, oval or figured second level gives a special sophistication to the interior, and the LED strip located between the levels visually expands the space.
- No less advantageous look recessed in the second level geometric figures or patterns with embedded spotlights.
- A visual increase in space is facilitated by pasting the first level of the ceiling light wallpaper with a glossy surface and a matte finish of the second two to three tones darker.
- White color goes well with cream, beige with light brown, pale pink with lilac.
- Contrasting combinations of light green with beige, sand with turquoise, pearl gray with aquamarine look great.
When choosing colors for decorating a ceiling structure, one should not forget about color palette walls, floor, hallway furniture. All elements should be in harmony with each other in color and style. To succumb to the temptation of a fashionable bright multi-color composition is risky, because unusual color combinations quickly go out of fashion, but even more quickly get bored and turn into a source of constant irritation.
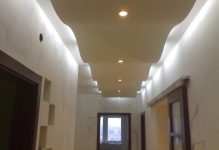
Multi-level plasterboard ceilings in a spacious hallway
Suspended plasterboard ceilings in a spacious hallway are diverse constructive solutions. Extremely popular are multi-level compositions using curly elements, different types lighting fixtures, including hidden lighting. The design of two- or three-level structures depends on the compatibility of the decorative elements of the composition with each other and on the overall style of the apartment.
- Clear straight and broken lines, geometric shapes with sharp corners, cold contrasting colors in the ceiling structure are suitable for the hallway in the techno and retro styles of the 60s of the XX century.
- Smooth lines, patterns, flowers of the figured ceiling fit perfectly into the design, decorated in classic, ethnic, Provencal, Mediterranean and other styles.
- Rounded shapes and wavy figures of the second and third levels can be used for conditional zoning of the hall - marking the entrances to the rooms and functional premises, allocation of wardrobe zones, wardrobe for outerwear, curbstones benches for footwear, mirrors.
Among the advantages of multi-level compositions is the possibility of combining cut-in decorative elements with suspended structures, which gives a special flavor to the interior. Making a hall in a large high apartment with your own hands is quite difficult, so it’s worth looking at how the plasterboard ceilings in the hallway are finished, presented in the photo of apartment repair and decoration sites.
The corridor or hallway refers to that part of the living space that the guests who come to you first of all encounter and from the assessment of which the general impression of the apartment as a whole begins to take shape. That is why the decoration of walls and ceilings in modern hallway should be given special attention today.
This article will discuss in detail the question of how to make plasterboard ceilings in the hallway with your own hands, taking into account the possible features of your apartment and in order to improve its design.
Preparation and marking of the ceiling is carried out in the following sequence:
- First of all, you need to decide on the height mark at which the plasterboard ceiling will be located, and in the event that the height of the room is small, try to mount it as close as possible to the main one. To do this, find the lowest point on the ceiling and, stepping down from it about 2.5 cm, make a mark at this level in one of the corners.
- After that, the applied mark should be transferred to all the remaining corners and niches of the hallway (using a water level for this, for example). The resulting markup will indicate the level of the frame; the ceiling itself will be lower by the thickness of the plasterboard plus putty.

Following this, between the applied marks, you need to beat off (with a thread dipped in blue) a line indicating this level. For this purpose, the thread is pulled between the marks, and then, after it is pulled, it is abruptly released. As a result of such an operation, an even line-mark is obtained on the wall. Similar marks are beaten across the ceiling, located every 50 cm.

To assemble the frame in the corridor, special structural elements, which are called CD and UD profiles. The UD type profile is attached directly to the wall, while its lower cut must coincide with the mark line. The profile is fixed on the wall with plastic dowels and screws 4-5 mm in size.
U-shaped suspensions are mounted along the marking lines marked on the ceiling at a distance of about 50 cm from one another, for fixing which it is best to use special dowels with a flared sleeve. This will eliminate the possibility of them falling into the voids that are always present inside concrete slabs ceiling covering.

All subsequent operations are performed in the following order:
- CD profiles are mounted in suspensions installed on the ceiling and joined at the walls with previously fixed UD profiles. It is advisable to choose the length of the CD profiles so that they are easily inserted between the wall fixtures and do not bend.
- To set the ceiling profiles at the same level under their lower cut, pull a strong thread, fixing it on the UD strips.
- In order for the CD profiles not to pull the thread, set each of them with a U-shaped suspension at the desired level, and then fasten it with self-tapping screws.
- Fix the joints of the CD profiles with the UD strips with small self-tapping screws, and straighten the protruding ends of the hangers to the sides.
- For ceiling lighting, lay the power wires inside the frame, placing them first in the cable channel, designed in the form of corrugations.
Mounting

It is desirable to mount plasterboard ceilings in the hallway together, which eliminates the possibility of accidental breakage of the workpieces. When laying well-fitted drywall sheets, pay attention to the fact that the cut of each of them falls exactly in the middle of the profile (occupies half of its width, since the other half should be occupied by the adjacent sheet).
At the same time, for one drywall sheet there should be at least 60 self-tapping screws, which are screwed in approximately every 30 cm.
The screws are screwed into the material in such a way that they are recessed into the surface of the drywall and at the same time do not break through the paper layer. To do this, when tightening screws, it is recommended to use a special nozzle, the lampshade of which limits the depth of penetration of the screw into the material and allows you to drown it in the sheet without tearing the paper.
At the end installation work the heads of the self-tapping screws are carefully sealed with putty, and to align the joints between the sheets of drywall, it is best to use not conventional materials, and with Fugenfüller putty, which significantly increases the strength of the joint.
During installation, do not forget that the wires for the fixtures must be output in the previously marked places. Whereas the lamps themselves can be mounted only after the completion of puttying and final painting of the ceiling. To organize temporary (working) lighting, you can hang a control light on one pair of wires.
Video
These videos will clearly demonstrate the process of installing a plasterboard ceiling.
In any house or apartment, we are always met by a hallway. It is from this room that both the apartment and the house begin. Therefore, by the appearance of the corridor, one can already judge its owner. Of course, it is problematic to give sophistication and a certain charm to this room, especially when its size is small, but if desired, everything is possible. Using such finishing material like drywall, you can create amazing beautiful ceilings even in the hallway.
Due to the specifics of the corridor, it is not always possible to decorate the walls in a decent way, so only the ceilings remain fantasies. Here you can show all your taste and surprise your guests.
single level ceiling
In the corridor of the apartment, everything should look harmonious and be combined in the general style and design: wall decoration, furniture used, various accessories, and, of course, ceilings. Here, the design should combine into a single whole all the elements of the design of the room.
The plasterboard ceiling in the hallway should look beautiful and solemn in order to immediately set the guests in the right mood. Therefore, the choice of its organization should be approached thoughtfully and carefully.
First you need to decide on the type of ceiling device. It can be of the following options:
- single-level. This type is most common, since in a frequent house or apartment a corridor is often given a minimum of space. At the same time, the design of the ceiling is very often executed in the style of minimalism or classics (as seen in the photo). Here the ceiling emphasizes the general stylistic line of the renovation;
- multilevel. They are used extremely rarely, since in any house, in a private or multi-storey building, such structures will look clearly unnecessarily in small corridors. They should be done in a private house, where quite a lot of space can be allocated under the corridor. Just here you can arrange a more grandiose ceiling structure without sacrificing size. free space(shown in the photo).
Note! Suspended multi-level plasterboard ceilings hide quite a lot of space, which negatively affects the dimensions of small rooms.
 Multilevel ceiling
But don't worry if you have small corridor. Thanks to modern technologies construction design of the corridor in a house or apartment can be the most diverse. In addition, even a seemingly boring single-level ceiling can also be presented very interestingly.
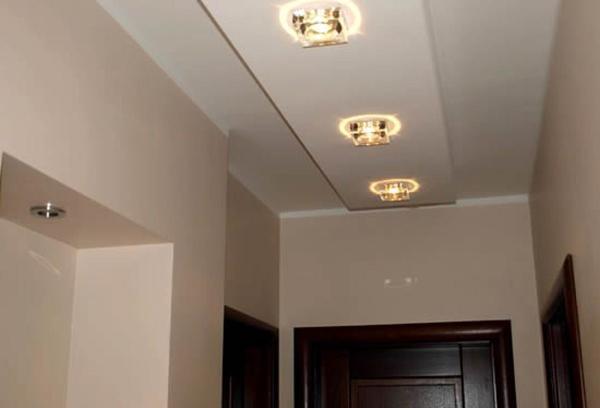
Additional lighting will play a special place in such a situation. Today, the design for the hallway often contains spotlights or LED backlight that replaced the chandeliers. As seen in the photo, the application additional illumination can give even a simple single-level design a sophisticated charm.
 Ceiling lighting
Playing with different lighting fixtures will help you create unique picture ceiling in the hallway.
For a small hallway
 good decision
As already mentioned, in a house, multi-apartment or private, the corridor usually has small dimensions. Sometimes it’s even difficult to fit several people of not the largest build in the room. In such a situation, a plasterboard ceiling in the hallway in an apartment or private house would be the best solution.
With the help of drywall, you will solve the following tasks (as you can see in the photo):
- make the room much brighter by using light colors paints for painting the ceiling structure;
- thanks to the use of spotlights, the room will become brighter;
- visually expand the space of the corridor;
- Decorate the environment with a beautiful ceiling.
With a rational approach to suspended structure and its minimal omission, you will achieve a visual increase in space, as well as create unique design in the corridor.
If you still decide on a multi-level design, then pay attention to the following tips:
- use clear contours of graphic lines;
- choose square or rectangular shape with center drowning in relation to the perimeter. So you get a visual expansion of the available space, as reflected in the photo;
 Increasing space
- in the presence of geometric elements of decor, they should be made in an elongated shape;
- for decoration, use light and warm colors paints.
At the same time, think over in detail the lighting that can harmoniously fit into the multi-level ceiling system. With it, you will get a really beautiful and functional ceiling, which will be perfect design solution for the corridor.
In the big hallway
Very rarely in a house, multi-apartment or private, you can find corridors that are quite large in size. Of course, in a private house built to order, this state of affairs is not uncommon.
Design loves when there is enough space. In this case, the design may contain any bold decisions and here you can safely design both single- and multi-level systems.
Note! A lot of space does not oblige you to build it up as completely as possible. Do not oversaturate the hallway ceiling with various decorative excesses. Remember that everywhere you need to know the measure.
When building multi-level structures in a house with a large corridor, follow these tips:
- think carefully about the design that you will use to organize the ceiling device;
- rationally use the steps, delimiting them with LED backlighting;
- use those geometric shapes that do not visually hide the size of the room. However, they should not be intrusive;
- it will be very beautiful to use several colors of paint to highlight different levels of the ceiling.
 Ceiling in a spacious hallway
In the presence of a large free space, you should not lose your head and rush to extremes. You can even use the minimalist style to profitably present the ceiling so that it becomes a worthy decoration of your corridor.
Designer highlights
To give the ceiling in the hallway a beautiful appearance and make it the highlight of the room, you can use the following design solutions:
- for spacious rooms, you can use a different color palette;
- no more than three colors or their shades should be used at once;
- ceiling structure can match both general style, and be its opposite. Such a decision will highlight the ceiling from the general context, making it the highlight of the corridor;
- according to the texture, the design can be matte or glossy, and also contain a combination of them;
- the original will be applied to the ceiling hand painted, photo printing or 3D drawing;

- a great solution would be to use mirror surface, which will create a feeling of endless space in the corridor;
- good location of spotlights or led strip will allow you to create a unique ceiling structure even in a small room;
- You can use several types of lighting fixtures at the same time. So you can create the effect of "soaring air" and illuminate all the dark sections of the corridor.
Using the above methods, you can achieve visual expansion space in the corridor, as well as shifting the accent from the walls to the ceiling. Remember that the choice of design for this room in the house should be based on its size, and not just on your desires. Right choice will make your corridor really beautiful and welcoming.
The whole problem is that the ceilings in the hallways are usually low, and I really would not like them to become even noticeably lower. No one wants the already small height to be “eaten up” by the ceiling structure, since what is often proudly called the “hallway” turns out to be just a corridor, and even then, quite small. But the ceilings in the hallway of plasterboard, as practice and many years of construction experience of many thousands of people show, is one of the most rational options ceiling finishes in this situation.
Far from all rooms, whether it be a house or an apartment, have perfectly even ceilings. And, probably, the secret dream of every homeowner is to correct this omission, and, if possible, cheaply.
One of the most acceptable solutions to this problem is suspended.
The curvature of the ceilings in the hallway is the most common thing for most apartments, because the "hallway" is an integral part of any apartment.
What gives drywall:
- The ceiling becomes perfectly flat;
- The ceiling can be easily painted in any color, which will allow you to optically change in better side dimensions of the hallway (corridor).
Thus, drywall is successfully able to fulfill its task of inexpensively leveling the ceiling.
Suspended plasterboard ceilings in the hallway: a very common option
Drywall in the hallways "captures" more and more square meters across the country.
Due to the cheapness of the material and components, as well as the simplicity of installing plasterboard suspended ceilings, all large quantity landlords choose this option as the most rational.
The corridor in the apartment, as a rule, is done last, although, to paraphrase Stanislavsky, the apartment still begins with a hanger. However, this principle is not always observed for a number of reasons. After the repair in the apartment is almost done, the repair in the hallway, as usual, is relegated to the background.

Causes:
- No funds left to complete the renovation;
- There was no strength and desire to make repairs;
- Vacation ends.
In order to get out of this situation, you need to gather strength, and still finish what you started. As for the plasterboard suspended ceiling, this option will take very little time, it will not take so much effort, due to the fact that the work is not difficult and does not fall into the category of expensive ones. By the way, it can be done relying solely on one's own strength.
The advantages of plasterboard suspended ceilings for the hallway: they are obvious
Someone may object, they say, what's the difference, and why is the plasterboard suspended ceiling for the hallway a priority?
A plasterboard ceiling will not take away almost anything from the height of the said room.
Even small hallway(in the world - a corridor), it can become optically higher and wider - it all depends on a competent ceiling device, and a plasterboard ceiling is a vivid example of this.

Advantages:
- Uncomplicated ceiling construction compared to other types of suspended ceilings;
- Under the false ceiling, you can hide the electrical wiring for them various communications;
- Low price for drywall itself;
- Inexpensive accessories;
- Easy installation;
- Possibility of painting in absolutely any color, including the possibility of computer selection of paint;
- Possibility of arranging lamps of various types and designs;
- The cost of a plasterboard suspended ceiling is much cheaper than, say, the same impeccably smooth concrete ceiling;
- The cleanliness of the work performed: if the ceiling is leveled with plaster or putty, then it will be dirty, as a result, not only in your apartment, but also in the entrance, which will not give you a rating among your neighbors;
- Wet plaster will require a considerable amount of time, compared with drywall, due to the numerous layers, and therefore their drying;
- The possibility of building a multi-level ceiling.
As you can see, the advantages that drywall ceilings have, compared to many other types of ceiling finishes, are more than enough.
Suspended plasterboard ceilings: do it yourself
Suspended ceiling allows you to radically change the design of your apartment.

Suspended ceiling does not have the most complex design, but, nevertheless, not knowing for sure how to properly arrange a plasterboard suspended ceiling, you should not undertake its installation without first reading the relevant materials that cover this topic in detail.
So, step by step:
- First of all, you need to prepare high-quality components. Practice shows that the best option is a Knauf product. To be consistent, it is desirable to use drywall from the same company.
- For high-quality markings, a hydraulic level is highly desirable. If there laser level, then, of course, preference is given to the latter. You can, of course, use the usual bubble level, but then the marking of the perimeter of the room will slow down significantly.
- With the help of a hydraulic level, we make markings in the corners, and then we connect it using a cord. The process is called beating. We markup, based on the lowest angle.
- We retreat 5-8 cm, depending on whether we plan recessed lamps or not.
- Now we fix the guide profiles on the walls. To do this, the profiles are applied to the wall with the lower part according to the existing markings. With a marker or pencil, we mark the future drilling locations in the wall through the perforations.
- The profile is fixed on the wall with impact dowels.
- Next, the axes of the main profiles are marked. Profiles, as a rule, are located across. The pitch of the profiles is about 40 cm.
- With such a step of the main profiles, the need for carriers arises only at transverse joints. Their step is 2.5m. The pitch of the suspensions, therefore, will be 50 cm. The first row will be located at a distance of 25 cm from the wall.
- The suspension mount is marked with a marker. The suspension is applied to the ceiling and markings are made for anchors. For one suspension, you need at least two of them.
- We attach hangers. Glue pre-sealing tape.
- Next, the main profiles are installed. Fastening should start from the corners of the room. The process is controlled by a two-meter level.
- At the joints of the profiles, we install the so-called crabs, fastening them with self-tapping screws.
- Bearing profiles are cut, and then we fasten them into crabs, again, fixing them with self-tapping screws.
- We sew drywall.
- We seal the seams using putty. In addition, of course, you should cover up the gaps between the wall and the ceiling. Putty and recesses in places of screwed screws. You can use special tape.
- Putty sheets of drywall.
- We paint.

Drywall sheets are best used with a thickness of 9.5 mm, which will not sag with a small hallway width.
Reviews of plasterboard suspended ceilings for the hallway: the opinion is almost unanimous
Numerous reviews of homeowners testify to the correct choice of a false plasterboard ceiling in the hallway.
Arrangement of the ceiling in the hallway "in drywall version”, fully justifies itself.
Simple false ceiling design - great choice for the hallway, as evidenced by consumer reviews.
Reviews:
- Made a false ceiling in the hallway of drywall. Everything is perfect, just wonderful! Painted in beige color, so beautiful, lighter and in general, the hallway has become visually larger than before the renovation, despite the fact that the ceiling has become a little lower! Now we will not do something soon, we believe that in ten years, and even then, most likely, it will be a simple painting.
- After much deliberation and wandering around the Internet, we decided to opt for drywall. There was not enough money to repair the corridor, so the choice fell on drywall. They hired a master who was recommended by friends, who, surprisingly quickly, efficiently, and, very importantly, did everything inexpensively. Arranged illumination with spotlights. The corridor is simply unrecognizable!
- Entrance hall - this is the room, which, as they say, cannot be passed by. And that is why, always, many times a day, you come across all sorts of flaws that should have been eliminated 30 years ago. Drywall is great budget solution this sore point!
From what has been said, it is clear that the hallway with their plasterboard ceiling suits the majority. There are a lot of reviews, here are just a few, in order to be more visible, the benefits of such a finish.
Installation of a suspended plasterboard ceiling (video)
And in conclusion, a few words about false ceilings in the hallway. By arranging such a ceiling design in your hallway, you save yourself on long years from all kinds of greases, putties and other routine and thankless work. You, moreover, forget about all the irregularities of the ceiling, which have been an eyesore to you for many years, if not decades. To make such a ceiling, as you already understood, is not at all difficult even with your own hands. And, of course, it is very important that such a ceiling system will take you not only a little space, which is called the height of the ceiling, but also quite a bit of money. Good luck to you!
Plasterboard ceilings in the hallway (photo)