Homemade tool case. Toolbox - a modern organizer for workers of various professions (95 photos). The materials from which the boxes are made
Every man will agree that a high-quality and multifunctional tool box is an almost indispensable thing in the household. Many masters prefer to buy a ready-made box in the nearest store, where a wide range is presented. But such a device can be made independently, in accordance with personal wishes. Moreover, the manufacturing process itself is not considered difficult, thanks to which even a beginner can cope with this task.
Classification of tool boxes
There are several main criteria by which multifunctional products can be divided into several main groups.
According to the material from which the case is made:

By type of stored instruments:

Construction of modern boxes
Speaking about the design of such boxes, we mean not their shape, but the way of opening and the presence of auxiliary sections. The following designs are considered standard today:

Making a plywood box
To make a do-it-yourself tool box out of plywood, you will need the following tools and materials:

Before proceeding with manufacturing, you need to carefully work out the design of the future product (the drawing can be made on a computer or on plain paper). Produced necessary calculations, the main dimensions are fixed. After that all marks must be transferred to a sheet of plywood. You can do this with a regular ruler, tape measure, marker or even a pencil. All blanks for the future box are cut along the marked lines. And also it is necessary to mark all the grooves and cut them on the blanks. The irregularities formed during the work can be processed with a chisel. It is thanks to the grooves that the final design of the box will turn out to be stronger and more durable.
The next step is to assemble the entire structure. To glue small parts use good quality wood glue. The main sides of the box are also glued together. To improve the result, they need to be pressed tightly against each other. The best way to do this is to use special strip from rubber. You can not remove it until the glue is completely dry. On the doors you need to round the corners.
 A convenient handle for boxing with tools can be made from MDF. Initially, the layout is drawn directly on the wood and only then cut out. When the handle is ready, the surface must be treated. It is attached with carpenter's glue and screws.. If you don’t want to make a handle yourself, then you can buy it at a hardware store. Main criterion right choice- high strength and reliability. Now you need to attach the outer cover of the drawer and the door. All parts are applied in their places, and then the areas for fastening the loops are marked with a pencil.
To organize the order in the box, you can make small compartments. All components are cut out according to the same principle as the box. Grooves are made and glued. On one side of the box, you can make a special compartment for storing screwdrivers. The most convenient option is considered where this function is performed by special inserts with plywood slots. Velcro is attached to the other side of the drawer to store cables and extension cords.
Wooden box manufacturing technology
It is this option that is considered a classic carpentry. Drawings of this portable storage were printed in magazines 50 years ago. For the manufacture of you will need a high-quality board with a thickness of 10 to 20 mm, as well as a hacksaw for wood. Thanks to the simple manufacturing technology, many craftsmen still choose this option.
 The classic design does not provide for the presence of separate compartments or special multifunctional devices. The final product will look like a neat deep box with a comfortable handle along the entire length. This shape of the handle has a practical purpose. After all, if the weight of the tools used is unevenly distributed, then you can always find the point of the center of gravity.
A practical addition can be an insert section with its own handle, the height of which occupies 50% of the entire drawer. This insert can be used for small tools(awl, screwdrivers, small keys), as well as consumables (screwdriver bits, electrical tape, drills). For its manufacture, you can use any type of wood.
Universal case made of plastic canister
If you want to make a do-it-yourself tool box, but there is no plywood sheet, then you can use a regular plastic canister. For work you will need:
- Hacksaw.
- Plastic container.
- fasteners.
The canister used must be rectangular shape with a comfortable handle, which should be located in the center. In addition, it must be equipped with a screw cap that will be used as a lock.
 The process of making a box is quite simple. Using a hacksaw, you need to make cuts in the canister. The first cut should fall on the center of the neck and the handle of the container, it is best to remove the cork and saw through the top wall. The second cut is made exclusively in the horizontal direction. It is best if it is located at the top of the canister, on the end sides. The plastic container itself needs to be sawn from the top wall at a distance of 4 cm, and on the sides by 3 cm.
When all cuts are made, the canister can be opened. To do this, you need to bend all the side parts of the top cover with the halves of the handle. In such a box, you can store various materials for fasteners: nails, bolts, screws, nuts. top must be closed by folding the handles together. Such a device is fixed with a screw cap.
To make the box as strong as possible, on the end walls it is necessary to make additional gaps. Small holes are drilled in the lid itself or in the walls, into which hooks are inserted, as well as bolts with nuts.
Metal box for tools
 This option is most suitable for experienced locksmiths who have necessary equipment and material. Factory metal tool boxes are made from lighter metals such as aluminium. As a result, the product is as light and durable as possible. But working with aluminum at home is much more difficult.
Even a beginner can make this version of a metal box. After all, the most ordinary box and special partitions will be made of metal. Initially, you need to prepare the main material - galvanized steel (0.4 mm thick). From the tools you need to prepare:
- Marking caliper.
- Metal square.
- Ruler.
- A hammer.
- Pliers.
- File.
- Sharpened core or marker.
- Anvil.
Next is drawing and marking. You need to mark only those places that will later need to be deleted. Now you can start trimming with metal scissors. After trimming all the excess, you should get a kind geometric figure(winged rectangle).
Next, you need to use the anvil. Tapping with a hammer, gradually bend the edges of the workpiece. It is better not to work in a chaotic manner, all actions must be consistent. First, one sidewall is bent, and then another. To wrap protruding parts, pliers are used.
After these manipulations, you need to go over the entire structure with a hammer to align it. In this case, you get a small metal box for storing tools. In the future, you can experiment not only with the sizes, but also with the shapes of such boxes.
Almost every home has one or another tool. When there are too many of them, you can independently make a multifunctional box for storing them. Experienced craftsmen believe that such a box is considered an essential attribute for storing various devices. Such boxes can be stored in the workshop and even taken with you on a long journey.
Every home master knows that it is much more convenient to store and carry a tool in a special tool case. If you do not have a separate workshop and workbench, then this becomes generally the only possible option in order to collect all the tools in one place.
It would seem: much easier - a tool box, what could be special here. However, this is only the initial impression of a person who has not encountered this problem in real life.

The tool box should be not so much roomy as practical, provide easy access, allow you to store not only the tools themselves, but also expendable materials or accessories that will help you need it in everyday work.


Its design must be strong enough to serve faithfully for many years. In this article, we will focus on all the implicit criteria for choosing a tool box, consider issues related to design features and help you understand the variety of products on the market.

If you look at the price lists of companies offering products for craftsmen, while paying attention to the presented photos of tool boxes, even the most sophisticated craftsman will note the variety of various designs. different size, capacity and made of various materials.

How not to get lost in this variety and choose exactly what you need, while saving family budget and get the best combination of price and quality - read about it in this article.

Modern tool box
If we use to store business papers and documents in Everyday life organizer, then the tool needs its own case - a special tool box. You can divide tool boxes into professional and universal, which are most often used in the household.


Our grandfathers generally made a tool box with their own hands, but today there is no need for this - on sale you can always pick up what you need and for quite acceptable price. Naturally, those who like to do everything with their own hands have the right to prove themselves here and assemble an original case that meets all individual requirements.

Professional boxes are generally made for specific tool kits, which depend on the type of activity.

Naturally, in this case, it is possible to distribute the contents in the most optimal way, to provide for everything that is needed: from special fasteners for specific devices and tools, to drawers for consumables and spare parts.

All tool boxes are divided into two types:

Cases. Such tool boxes are a flat suitcase with a drop-down design and compartments. certain form under specific tools: drills, wrenches, screwdrivers, etc. There are designs with custom partitions that allow you to change the interior arrangement.

Container box. This design, as a rule, has an opening top. Inside there are several compartments separated by a partition. The design includes separate lockable drawers.

Simple and small designs have a handle for transportation. More complex structures can be mounted on trolleys, have drawers, many compartments and individual boxes assembled into a single structure.

Container structures are more versatile, roomy and easy to operate, but they are inferior in terms of ease of access to boxes of the "case" type.


Homemade designs
It is impossible to unequivocally answer the question: how to make a tool box with your own hands, since there are a lot of options, unlimited by anything but your imagination. I would like to note that you can use old paper cases, bags, or completely make the box yourself. The material used is metal or wood.

Internal partitions are also made of wood or plastic. The lids are hung on hinges, it is necessary to provide a lock that will protect against accidental opening.


The finished box is painted or sheathed by an assistant and suitable material both outside and inside.

Not obvious aspects of choice
In the selection process, first of all, look at the material from which the case is made.


Plastic tool boxes are lightweight, easy to use and repair. For all that, they do not withstand mechanical stress and loads very well.
Stronger and more durable metal tool boxes made from aluminium, its alloys or steel. With a larger mass, they are more durable, but require periodic maintenance: restoration paintwork, cleaning from rust and traces of corrosion. Among other things, metal boxes are more expensive.

If you need to transport a bulky and heavy tool, then it is better if it is a tool box on wheels.


Homemade designs are most often a wooden tool box. Main disadvantages: bulky, heavy weight. At the same time, for wooden structures a specific advantage is characteristic, namely: the tree stores the metal instrument well, since it absorbs moisture from the surrounding space.

Remember about practicality: the box should provide free access to all tools. It must have a fairly reliable case, protect the contents from moisture, dust and external influences.

It is not always convenient when there are too many compartments and drawers inside: you can get confused in them and look for what you need for a long time.

Pay attention to the hinges and the lock - as practice shows, it is these elements that break most often.

Tool box photo


Many owners accumulate at home a large number of different instruments that need to be stored somewhere. Stuffing them into different cabinets and shelves is not an option, since at the right time the tool may not be found right away. In order to fully store a case for tools made by hand is perfect. Of course you can buy it in the store. But this will require considerable cash costs, since a quality tool box is expensive, and cheap cases will not last long. But you can make a tool box exactly the way you need it on the farm. Moreover, you can choose the design and material yourself, and less money will be spent. If you are a real owner, then you often have to do home repairs. And how nice it is to do this when you know that the necessary tool is always at hand, which greatly simplifies this very repair. See how to make a do-it-yourself tool case that is suitable for their full storage and transportation.
From the tutorial you will learn:
1. From what you can make a homemade tool case.
2. What useful departments can be done in this case.
Video lesson: DIY tool case
Lada Kalina Sedan › Logbook › Do-it-yourself suitcase with a tool
I've been thinking about this for a long time. There were keys from old stocks available, I bribed the heads as needed and everything ceased to fit in the box from under the first-aid kit, and the tool loves order. Good set rubles for 5 will pull at least - the toad is strangling, especially when part of the tool is available. And then my father presented me with a suitcase from someone sp ... th (stolen) drill. I bribed the insulation at the construction base, dermantin and go. Heads, etc. are placed in the lower part. A double-sided tab with keys and the rest of the tool is inserted from above.
Some inconsistency came out with the Soviet keys. Our standards differed from foreign ones, as a result, some sizes are duplicated after purchasing the missing keys. Wrenches are separately ring and open-end, so that in a situation where 2 identical keys are required, there are no problems. Combined only 2 - 15 and 21.
The suitcase has the possibility of expansion and space for storing new heads (half of which I have not bought yet). One extension cord for 1/2-250, a cardan joint, a knob and a few screwdrivers have not yet been purchased, but there is a place for all this. I tried to be guided by the set of tools necessary for viburnum + additional tools.
On this side, an extension cord with a wrench will still fit and I will try to place 4 screwdrivers.
Plans to buy a normal ratchet 1/2. Although to admit this Chinese, as in the photo, I turned the bolts 8 lightly.
A set, as is customary, if you stuff everything that is planned there, it includes more than 80 items, and this is already a decent set.
In short, we have a set of heads for 1/4 from 4 to 13, 2 extensions, a hinge, heads for 1/2 from 10 to which it will fit. Bit sets of all types, pliers, cutter. Open-end wrenches from 8 to 24, except for slow-moving sizes 16, 18, 20, 23, box wrenches from 10 to 24, combined 15 and 21.
In short, I'm happy. It is quite convenient and capacious to store the main tool in one place. As for quality, part of the Soviet-made tool and, accordingly, quality (most of the keys), part of the matrix (nothing like that), part of the force (optimally priced-quality), part lux tools(made for the OBI network. If anyone is familiar, how is it?), Well, the Chinese ratchet no name 1/2 and no name 1/4, and there is also lux tools 1/4 - I don’t know which one is more reliable, but luxury seems to be more convenient.
Do-it-yourself tool case

thanks for watching. My affiliate program VSP Group. Connect! https://youpartnerwsp.com/en/join?70576 Do-it-yourself tool stand. Do-it-yourself tool case from an ordinary diplomat. Do-it-yourself tool holders. small box. Bags and cases for Pro'sKit tools. Case-bag from China (aliexpress) for tools. Case-bag electrician. Do-it-yourself tool box from an old diplomat. Suitcase, electrician's bag. How to make a tool organizer. do-it-yourself tool storage in the garage. 9. DIY tool. Bor machine. What is the best way to carry the tool (case or bag). Organizer in a bag or backpack with your own hands. We are going to Delfino Lido beach in Italy. Convenient drawers for a tool made of plywood and fiberboard with your own hands.
YouTube copyright policies restrict this video from being played at this website.
[f] Share this video on Facebook


FunnyCat.TV © | 2014-2017
Best funny cat videos.
![]()
![]()
powered by
public API's
DIY suitcase
Making a suitcase with your own hands, as it turned out, is very simple. Much easier than restoring an old suitcase. This does not require any "reserved" elements and devices, and that's it. necessary materials available and sold in stores at fairly low prices.
background
As often happens in creative practice, the necessary things are usually in the trash, like our Soviet-era suitcase a little larger than a diplomat. Its dimensions were suitable for storing a pile of jewelry and trinkets, woven, but lying around idle. A very shabby, dirty and unaesthetic appearance of a useful thing in the household left no doubt: the restoration of the old suitcase was necessary.
At first, the fittings were carefully removed and placed to soak in a can of gasoline. Then the linings and the ancient torn leatherette were removed. It turned out that the side boards that make up the frame were rotten, and the walls of the lids were generally made of thick cardboard, pierced to huge holes in several places.


The cardboard has been torn off and thrown away. Planks were cut instead right size from hardboard. Wood frame sanded to white wood, a couple of walls were replaced with new ones and reinforced with glue and self-tapping screws. Covers made of hardboard are put on glue and nailed.
So, it can be argued that we began to design a suitcase with our own hands almost from scratch.
Exterior finish
Dark brown leatherette was used for decoration. Leatherette is marked strictly according to the size of each suitcase flap, taking into account the turn on the walls of the inner sides.


We carefully cover the surface of the leatherette with PVA glue, and, accordingly, one of the covers of the suitcase. We glue the material, carefully expelling all air bubbles and excess adhesive liquid, smoothing out irregularities. For this purpose, we have a felt squeegee in store.

We especially conscientiously roll the material around the perimeter of the edges so that the hand-made suitcase looks aesthetically pleasing, as if it came off the factory assembly line yesterday.

The hardest part is wrapping the corners. Patterns are deliberately not given, because we assume that each home master there is a vision of technology quality finishes corners when restoring an old suitcase. The main thing here is accuracy, a lot of glue and diligence.
We will show a number of photographs, which, we hope, will help to clarify technological process corner wrapping.


When the dermantine is stretched over the skeleton, it is recommended to walk over the seized glue with a warm iron in order to fix the gluing (bake). Be sure to iron through a rag, otherwise your synthetic material will melt.

At this, we consider the first stage of making a suitcase with our own hands, or restoring an old one, to be completed. Therefore, we will put back its fittings.


Interior upholstery
For interior upholstery, we will make pads on synthetic winterizer covered with synthetic velvet or any other suitable textile. The illustration shows the components of "velvet" pillows and part of the procedure for their layer-by-layer formation.


When the pillows are ready, we thoroughly glue the inner walls of the product with glue and glue the pillows inside.

This is how our “new” handmade suitcase looks like.

We did not attach the handle. The project is to make our suitcase wearable on a shoulder strap, like a sketchbook, but so far there is no time to look for suitable fittings and options for attaching it.
So, we have created a functional thing, the practical applicability of which is not limited to storing jewelry or tools. The master class not only clearly shows how to make a suitcase with your own hands, but will come in handy as an instruction, according to which the restoration of an old suitcase is also feasible.
Materials and tools used in the master class:
- suitcase frame with fittings;
- sandpaper, hammer, screwdriver, brush, scissors, mounting knife;
- hardboard and wooden slats (optional);
- PVA glue;
- shoe nails 10 mm long;
- leatherette, cardboard, synthetic winterizer, synthetic velvet.
Time spent on restoration:
- giving the product a look suitable for finishing, including grinding and puttying - 2-3 days;
- finishing - 2-3 hours.
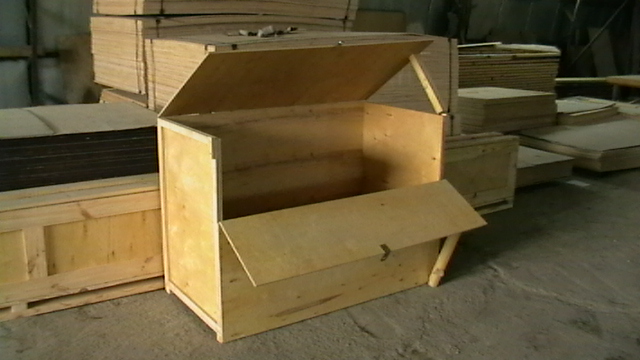
DIY tool box
Tools are an essential attribute of many who are engaged in different kind homemade. When there are a lot of tools and you have to take them with you outside the house due to duty or hobby, a case for storing them becomes a necessary attribute. Let's clarify, a portable case. For a person who is engaged in such work, making a tool box with his own hands becomes almost a matter of honor. In this we will help you. The result of hard work will be a box in which you can not only store all the tools in an organized manner, but also take them on a long journey.
Step 1. The very first thing you should do is create a toolbox project. The author of this master class used the Sketchup program, you can also refer to computer programs or draw the design of the box on paper. Make all the calculations and write down the main measurements.
Step 2. All measurements, using a tape measure, ruler and chalk, transfer to a sheet of plywood. Try to keep them as compact as possible. On the drawn lines, cut out all the blanks for the future box.
Step 3. Mark all the grooves with chalk, cut them out on the blanks. Clean out all the bumps with a chisel. The grooves will allow your drawer to hold on tighter.
Step 4. Now the structure needs to be glued. Take glue for the main part of the box. While gluing the sides, squeeze them with force. With rubber strips, you will need to pull off the box of the box and leave it in this form until the glue has completely dried.
Step 5. Round corners on drawer doors.
Step 6. From MDF it is necessary to make a strong handle. To do this, its layout should be sketched with a pencil on a tree and cut out. After the handle is cut out, process its surface. Attach to the box itself with glue and screws. If you do not want to devote time to this process, purchase a pen separately. When buying, pay attention to its strength.
Step 7. Now it's the turn of assembling and fastening the doors and the outer cover of the box. Mark the places for the loops with a pencil, fasten them.
To fix the outer cover, prepare a hole for the screw.
Step 8. In order for all the tools to lie in their places inside the box, compartments and departments should be made. According to the principle of creating the box itself, drawers should also be built, cutting out their component parts, making grooves and gluing them. For screwdrivers and other things, on one side of the case, make an insert with slots from a sheet of plywood. Use Velcro to secure other types of tools, cables, and extensions to another wall. You can also take self-adhesive Velcro or put regular ones on hot glue.
A good owner will always have a whole arsenal of tools at hand: from nails and screws to pliers, a level and a set of screwdrivers, not to mention a drill, puncher and screwdriver. Very often simple home repair does not start in any way due to the fact that the master cannot find all the tools he needs in the apartment or garage. To prevent this from happening, all working tools must be stored in a specially designated place - a tool box.
What are the tool boxes, what requirements do they have to meet, and how to make a tool box with your own hands - this is an article about this.
Varieties of tool boxes
In fact, a tool box is a box with or without a lid, divided into several compartments of various sizes and shapes. Small drawers are designed to store fasteners, they can contain drills, tips, or other small parts. As a rule, such boxes are divided into several compartments, each of which has a separate lid. Such boxes are easy to carry, because they weigh a little.

Larger cases are needed to store and transport large tools such as hammers, saws, drills or jigsaws. Quite huge boxes will be needed to contain perforators, levels or mallets. These tool boxes are often made on wheels so that they can be moved and transported.
Professional toolboxes can differ depending on the skill of the craftsman: so a plumber needs one set of equipment, and an auto mechanic needs a completely different one. You can find such boxes in building supermarkets or in specialized stores, they are often sold complete with the tools themselves.

The cases are divided into several categories. This takes into account not only their size, but also the design, as well as the material of manufacture. Structurally, it can be:
- Open boxes with handles for large tools and easy transfer from one place to another.
- Multi-tiered boxes with many small and large compartments for complex storage of working parts and their facilitated transportation. Such a box can be thrown into the trunk of a car or carried by hand.
- Compact cases with ergonomic handle containing all the tools needed for minor repairs or country trips.
- Chests of drawers, consisting of several drawers, as a rule, are used permanently at the place of work.
- Tool belts are needed for those who work at heights or in hard-to-reach places.
- Carts - a kind of tool boxes on wheels, differing large sizes. On such devices they move very large equipment, such as welding machines, Boers.

Important! When choosing a box for your tools, it is better to give preference to multifunctional boxes, where each part has its own place, and small compartments are closed with lids. Otherwise, all the tools run the risk of being mixed into one heap during transportation.
What are tool boxes made of?
Cases and boxes can be made from various materials, but the main requirement for them is the same - the boxes must be light, since the tools themselves weigh quite a lot. There are a few more nuances that you need to know about those who buy a case for their arsenal of tools:
- The bottom of the box should be as thick as possible, since it is on it that the entire mass of the contents presses.
- A full box should not deform when lifted - the walls remain perpendicular to the lid and bottom. If the walls sag, this indicates that the strength of the case is insufficient for such a set of components.
- Well, if the material of the box is fire-resistant, then expensive tools will survive even during a fire.
- If there are gaps in the box, dust and construction debris will enter the box and contaminate the tools. And in this case, the contents are threatened with oxidation and rust due to high humidity.
- Durability is an important factor, because a professional box costs quite a lot, and the load on it from metal components will be significant.

Today, the most popular materials for such boxes are:


Attention! All materials must comply with special standards, because if the box breaks at the very wrong moment, all heavy tools will fall on the feet (or on the head) of the unfortunate owner.
If a metal or wooden tool box can still be made by hand, then plastic boxes really only buy.
How to make a DIY tool box
If the owner has decided to make a box for his inventory on his own, first of all, he needs to determine the size and choose the design of the box.

To do this, you need to inspect all your tools, measuring the most dimensional elements and taking into account small things (bolts, nuts, washers, etc.). According to these parameters, the dimensions of the container itself and the internal compartments are calculated.
Tool box design
Speaking about the design of the boxes, they do not mean their shape, but the way they open and the presence of additional sections. The following designs are considered standard:
- Case - portable box rectangular shape with a handle. As a rule, cases are divided into many departments, have removable partitions that allow you to independently divide the space inside the box. The weight and dimensions of such cases are usually small.
- Container - a larger box for a variety of tools. As a rule, it has the shape of a trapezoid with a rectangular bottom. Inside this box there are also partitions, and there may be separate smaller boxes (folded like a nesting doll). Sections of such a container can be pulled up and to the sides, forming a whole "trellis" with tools and fasteners. Large boxes for tools of this type can be equipped with wheels, which is very convenient and practical.
- Multiboxes are arranged vertically and the drawers in them are pulled out along the guides, as in a regular chest of drawers.
With your own hands, it will be easiest to make a case for tools, because in this design there are no complex mechanisms and hinges with which additional sections come out.
Important! Although it is quite possible to build a container with boxes that fold over several floors with your own hands. To do this, each pair of "floors" should be fastened with metal brackets, providing mobility to the elements (as in the figure below).

Bringing an idea to life
Speaking of material for self-manufacturing box, then, of course, the easiest way to work with a tree. For the first experience, it is better to choose inexpensive wood - a planed coniferous board is quite suitable for boxing.

The whole process of making a tool box consists of several stages:
- Make a drawing of the future boxing. To do this, use a regular drawing paper and a ruler or professional program AutoCAD type.
- The resulting drawing is transferred to the wood with a simple pencil or marker.
- Cut out the details along the contour using a jigsaw or saw.
- The tree is treated with antiseptics or stains to prevent it from rotting and to make it “inedible” for insects and rodents.
- The box is being assembled. Now all the details need to be connected into a single structure, according to the drawing. To do this, it is best to use wood glue, which is applied to the ends of the parts and pressed against each other for a few seconds.
- It is better to additionally fix the elements of the box with self-tapping screws, making sure that the wood does not crack when screwing in the fasteners.
- Install the lid using conventional hinges or another device appropriate for the type of drawer opening.
- The lid is equipped with a handle for carrying and transporting the box with tools.
- Inside the box is marked into sectors, given the diagram and drawing. Additional partitions are cut out of the board and fixed in place with glue and self-tapping screws.
- The walls, bottom and lid of the box are sanded with several types of sanding paper, then painted or coated with several layers of varnish.
The box is ready to use, it remains only to fill all its compartments with the appropriate tools and fasteners.
The simplest tool box
Beginners in carpentry are offered more than simple design box for tools - an ordinary box with a handle, but without a lid. The advantage of such a box is that it is suitable for tools of various sizes, if desired, even a water level or a puncher can be placed here, or you can make a miniature box for an “apartment” master.
Such a box consists of only six parts:
- two long side elements;
- two short sides, the height of which should exceed the height of the long sidewalls, since the handle will be attached here;
- the bottom, which should be made from a single piece of wood, since it is the bottom that takes the load from the weight of the tools;
- handle, the role of which can be played by a bar, plank or piece round section- the choice depends on the size of the box and the estimated weight of its contents.
If desired, the design can be supplemented internal partitions or complicate it with compartments with lids or doors.

All elements are assembled into one structure, fixed with carpentry glue, then additionally fastened with self-tapping screws. Particular attention should be paid to the fasteners of the handle - it must be strong and reliable.
You can independently assemble a tool box not only from boards, depending on the arsenal of tools, plywood, chipboard, OSB, galvanized metal or aluminum sheet can be used.

There is nothing complicated in the manufacture of such a box, and the advantages of the product are obvious: tools and fasteners will be in a certain place, at any time it is enough to get the box from the pantry or garage and make the necessary repairs.
The business card of a true master is the box in which he stores the tool.
It is impossible to do without this accessory if you need to do the job quickly and efficiently, without wasting time looking for drills and screws, taps, screwdrivers and dozens of other necessary little things.
A wooden box with a handle that has served as storage for centuries hand tool, today you can only find it in the museum of wooden architecture.
It was replaced by light and durable cases, suitcases and organizers that amaze the imagination with a variety of shapes, volumes and sizes.
How not to drown in a sea of offers and choose a convenient, fairly compact and reliable tool box, we will consider in our article.
What is a toolbox for?
It performs three main functions:
- Optimizes storage space to fit in a minimal footprint maximum amount the necessary fixtures.
- Facilitates and speeds up work, since all the accessories in it are laid out in a certain order, clearly visible and easily accessible for use.
- Makes it easy to transport the tool with handles, shoulder straps or wheels.
It should be noted that the storage of tools is not the only function of such boxes. Since small fasteners are often required during work, the most “honorable” place at the top level is assigned to it.

Types of tool storage boxes
Depending on the method of access to the content, there are boxes of open and closed types.
The first ones resemble an ordinary travel bag. Their main plus is quick access to stored items, and the minuses are inconvenience when carrying (the contents spill out when overturned) and low level safety.

The most popular are boxes - durable boxes with a tight-fitting lid, equipped with latches and a lock.

Depending on the type of material used for manufacturing, tool boxes are divided into metal, plastic and metal-plastic.
Steel boxing is hardy and reliable. However, you can't call it easy. Therefore, aluminum is more often used in production - a lightweight, durable and corrosion-resistant metal. If you need a large portable tool box that opens its contents on several levels, then this material is better to give preference to.

Plastic is another material widely used in the toolbox industry. It has an affordable price, enough high strength and durability.
There are two main drawbacks this material- low strength of the “body-lock” connection and fragility in the cold. Therefore, in the cold season, such a tool case should be protected from strong impacts.

The search for a material that combines the lightness of plastic with the strength of metal led to the creation of galvanized metal-plastic. The boxes made from it are roomy, fairly light and can withstand very heavy loads.

Another hallmark toolbox refers to the way of use: professional and household. The former are characterized by large capacity, maximum reliability and high price. Household models are small in size, and for their manufacture they use inexpensive materials and accessories.
The "specialization" of tool boxes is also different, which must be taken into account when buying. The box can only be used for storage carpentry tool or plumbing supplies. The universal version combines in its design compartments designed for different types mounting equipment (screwdriver, drill, grinder, clamps, drills, couplers, self-tapping screws).
Often, all free space is allocated for a convenient layout of hardware. Such a box is called an organizer.

You can’t put a lot of tools in it, but all the small things necessary for work will fit completely.
How to choose the right option?
To get started, you need to answer the following questions:
- How many and what tool do you most often need to work.
- Will a standard compartment for hardware (self-tapping screws, screws, screws and nuts) be enough for your needs, or is it better to buy a separate organizer box for them.
- How often do you move the tool over long distances (option with wheels, shoulder strap or conventional handle).
Once you understand your needs, you can start choosing. suitable model focusing on the products of well-known companies. There are not very many of them on the "box" market.
Foreign brands are the most popular Stanley, Kroft, Keter, Fit, Blocker. Choosing a tool box domestic production, you should pay attention to the products of the Zubr company.
The American company Stanley (Stanley) produces professional and household tool cases. Its products are traditional high quality, for which you have to pay decent money. So for a standard 19 inch plastic box of this manufacturer (49x25x24cm), sellers ask from 2,000 rubles.

The average cost of a box made of metal-plastic (size 20 inches) is 2,900 rubles. Large boxes of this company, equipped with transport wheels, can be bought for no less than 8,000 rubles.

For domestic use inexpensive tool boxes manufactured by the already mentioned companies Fit, Keter, Kroft, Blocker are well suited. Depending on the size and quality of the material, the price tags for these products range from 400 to 3,500 rubles. Models with wheels are usually a bit more expensive.

The Zubr company produces suitcases for tools in different cost categories (from 500 to 4,500 rubles) and competes almost equally with the products of foreign brands. Therefore, among its products you will find for yourself suitable option and experienced master, and a simple lover of home crafts.

When choosing a tool case, pay attention to the quality of plastic soldering, its thickness and the reliability of fastening the latches. The last point is especially important, since a tool case with spontaneously opening or broken locks is extremely inconvenient to carry.
Those who use not only small hand tools, but also larger electrified tools, will surely like the model with removable partitions. By removing them, you can significantly increase the internal volume of the box.
How to make a DIY tool box?
Especially complex elements there is no such design, so it is quite possible to make it on your own. Simplest homemade box for tools - an open box with a handle.
For its manufacture, you can use a thin board, plywood or OSB board. Having cut out two ends with holes for the handle according to the template, the side walls and the bottom are screwed to them with self-tapping screws. After that, one or two partitions are placed inside. Their height must be chosen such that there is room on top for installing a shallow wooden or metal box in which small fasteners will be stored.

By putting on such a box a cover made of durable artificial leather with pockets sewn to it, you can significantly increase the amount of stored tools.

The wooden handle can be replaced with a strap, more convenient to carry.
More difficult task- make a folding tool box with your own hands. It is very roomy and easy to use.

The most interesting feature of this design is the system of levers (metal or wood) with which it opens its compartments on several levels.
After assembling the large lower and four upper compartments, place them one on top of the other, as shown in the figure, and then mark the places for attaching the swing arms.

Before finally fixing them, check the ease of movement and the accuracy of opening the entire structure. On the side walls of the upper compartments, you need to fix two metal carrying handles.
All the necessary fittings (locks, locks and hinges) for a homemade box can be purchased at specialized stores.