Snip on metal doors. Snip on metal doors
During installation, regardless of the door model, the door leaves are hung on hinges: internal doors- on two, for the outer (more massive) - on three. For this, detachable hinges with a hinged or removable rod are mainly used, one-piece hinges are used a little less often.
During the work of the company, we have accumulated vast experience in the installation of doors. Our specialists work with designers, designers, customer's PTO, helping to choose doors that meet operational requirements. We conduct a technical examination of the object for compliance with the actual state of the doorways to those laid down in the project.
]]> ]]> Having our own service department, we relieve the customer of the problems associated with finding contractors for the installation of doors. The well-established structure of the service department allows us to install doors with high quality and in the shortest possible time. The infrastructure of the service department allows the installation of doors not only in the Moscow region, but also in the regions of Russia.
The cost of installing doors and the order of work on installing doors.
1 . The calculation of the cost of door installation is calculated on the basis of the specification, indicating:
technical parameters of doors (cellular, soundproof, fire-resistant).
the presence of additives for fittings.
accessories used, the presence of door closers, automatic thresholds, peepholes, anti-panic locks.
the party producing the supply of consumables.
location of the object (to calculate the cost of travel for workers and engineers, delivery of equipment).
method of lifting doors to the floors (manually by the Contractor, using a lift by the Contractor, by the Customer).
the possibility of providing accommodation (except for Moscow) and meals for workers. For objects located outside of Moscow, the cost of workers' accommodation is added to the cost of work.
2.
The cost of work also includes:
3. After the transfer of the door blocks to the Contractor, the Contractor is responsible for the safety until the moment of transfer to the Customer, subject to the intermediate stages of delivery of the work performed (accumulative Acts) provided for in your contract.
We destroy the ordinary idea of door installation - this is not part of the contract work on interior decoration premises, and a special highly specialized mobile production.
Only professional equipment.
Maintenance of the facility until the moment of delivery to technical supervision.
Fruitful interaction with contractors performing finishing work at the facility.
Warranty for the work performed on the installation of doors - 12 months.
4.
We also provide services for technical expertise object:
During the technical expertise at the facility, our employees carry out the following work:

4.1. As a result of the technical examination of the object, we prepare information for drawing up a specification for the contract based on the processed data, including:
4.3. We coordinate with the Customer the order of delivery of door blocks (if necessary).
Preparation of doorways for the installation of a metal door, features of installation and installation of steel doors on their own.
Paradoxically, there are no official documents regulating the installation of steel doors. Some companies - manufacturers of metal doors are trying to install external steel door blocks to use some of the provisions of GOST 30971-2002 "Mounting seams of adjoining window blocks to wall openings" in terms of a three-layer assembly seams. But it should be noted that this GOST does not apply to the installation of doors and, in fact, is not mandatory. Moreover, for metal doors installed inside the building, three layers of the assembly seam, and especially the outer vapor-permeable layer, can be considered redundant - logically, this layer should duplicate the inner, vapor barrier.
installation of steel doors
One way or another, but the existing regulatory documents, in particular GOST 31173-2003, regulates only the maximum deviations of profiles door frame from the horizontal and vertical (1.5 mm per 1 m of length), the distance between the fasteners (at least 700 mm), the minimum allowable diameter of the anchors (at least 10 mm), the use of mounting foam, vapor barrier self-expanding tapes PSUL when installing, silicone sealants, mineral wool and recommends (!) to arrange assembly seams in accordance with GOST 30971-2002. In addition, the GOST requirements for the mandatory availability of sanitary and epidemiological conclusions for all materials used in the installation of a steel block can be considered important.
Considering the installation of metal doors in terms of the reliability of fixing the door block in the wall opening, it should be noted that the correspondence of the outer dimensions of the door frame internal dimensions opening, walls - vertical and horizontal levels, as well as the density of the wall material are largely determining factors in ensuring the required level of resistance to burglary. With significant mounting gaps and / or walls of weak strength, attackers simply take out the entire door block out of the opening, and the locks of the highest secrecy become useless. This creates significant difficulties in preparing wall openings for installation in situations where it is not possible to manufacture a door steel block to order and / or the wall material has low strength (walls made of cellular concrete, bricks).
It should be noted that the adjustment of the wall opening in size or vertical with the help of plaster solutions creates only the illusion of the reliability of fastening a metal door and cannot be applied to walls made of any materials. Some manufacturing companies of steel doors practice the construction of counter-boxes by first inserting and fixing in the wall opening a box-frame made of thick rolled metal, to which the mounting “ears” of the box ]]> ]]> of the metal door are welded during installation. Or they align the verticals and narrow the wall opening with separate, most often vertical metal inserts. But this method of correcting the opening can be considered reliable only for reinforced concrete, less often brick walls.
IN frame houses, built using SIP technology, houses made of gas or foam concrete, the problem is not solved due to the low density of the wall material, which does not provide reliable fastening of counter-boxes. Only possible solution reliable fastening of a steel door block for "weak" walls is the device of a counter-box of two parts, "putting on" the wall opening from the outside and inside and interconnected by metal strips welded to them (according to the type garage doors) or the implementation of the door frame of this type. Moreover, the rolled metal used in the construction (corner, corner welded rectangular pipes etc.) must have a shelf covering the wall from the inside and outside of the room, at least 50 mm.
Do-it-yourself installation of a metal door.
According to GOST 31173-2003, the installation of metal doors should be carried out exclusively by specialized teams, but if you are prone to extremism and extreme sensations, you can try to install a steel door on your own. Only the “ideal” case is considered here, when the walls are dense enough to securely hold fasteners, the door frame corresponds to the internal dimensions of the wall opening and has welded mounting “lugs” for fastening, and the walls of the opening do not have significant deviations from the vertical and horizontal level.
The main task of the installer is to install the door block on a plumb line (vertical level) in two planes - perpendicular to the opening and the opening plane itself. Otherwise, the leaf of a metal door will touch the floor when opened, spontaneously open, or even worse, close, which, if there is a latch, can leave the owner on the street without keys. Unlike wooden doors the steel door block has a significant weight and therefore it is better to remove the metal door leaf before installation.
Priority for any installation is the hinged riser of the door frame. It is he who is initially fixed in the wall opening along a plumb line in two planes. For an amateur, it will be more convenient to fully mount the loop riser using anchor bolts with a diameter of at least 10 mm. When installing a loop riser on a plumb line, thanks to a rigidly welded box, the horizontals themselves will be set according to the level, and inserts made of dense material should be placed under the lower horizontal of the door frame.
You can temporarily fix the feigned riser of the box with wooden or plastic wedges, after which the steel door leaf is hung on the hinges. Now the installer must fix the feigned riser of the box “along the door leaf” in the opening, achieving the maximum density of the porch and matching the bolts of the locking mechanisms to the holes prepared for them in the box. Usually, the length of the holes in the mounting "lugs" and the screw-in anchor bolts allow you to pre-adjust the tightness of the porch after fixing the rib riser.
The final adjustment of the porch is carried out by adjustable hinges. If, in addition to amateur editing steel door is not equipped with adjustable hinges, then you can “fit” the canvas in the “old-fashioned” way. If there is a gap between the upper corner of the leaf and the frame, a thick wooden beam is laid between the lower corner of the leaf and the door frame, and the upper corner is pressed, slightly deforming the leaf. This "method" allows you to remove the gap of 0.5-0.8 mm with virtually no damage to the door block.
Installation of GOST doors
This standard applies to wooden doors for residential, public, industrial and auxiliary buildings and structures.
]]> ]]> This standard does not apply to wooden doors for buildings of special architectural significance.
1. CLASSIFICATION
1.1. Doors are classified according to the following main features: purpose; constructions; the number of paintings; directions and methods of opening; the presence of glazing; moisture resistance; type of finish.
1.1.1. By appointment, the doors are divided into: internal, including entrances from staircases to apartments and premises of public, industrial and auxiliary buildings and structures, as well as doors for sanitary units; outdoor, including entrances to buildings, vestibules and garbage collection chambers; special, including soundproof, fireproof, smokeproof, insulated, increased strength; manhole doors for access to the roof and into the premises technical purpose; hatches for passage to cellars, attics and flat roofs.
1.1.2. According to the design, the doors are divided into: panel construction with solid or small-hollow filling - canvases, including honeycomb; frame structure; with threshold and without threshold; with transom and without transom.
1.1.3. According to the number of door panels, the doors are divided into: single-floor; double-sided, including with canvases of different widths.]]>  ]]>
]]>
1.1.4. According to the direction and methods of opening the canvases, the doors are divided into: hinged, opened by turning door leaf around the vertical extreme axis in one direction, including the right ones - with the opening of the door leaf counterclockwise and the left ones - with the opening of the door leaf clockwise; swinging - opened by turning the door leaves around the vertical extreme axes in both directions; sliding.
1.1.5. According to the presence of glazing, doors are divided into glazed and deaf.
1.1.6. According to moisture resistance, doors are divided into: increased moisture resistance for rooms with constant relative humidity air more than 60%, as well as vestibule and installed in the outer walls of buildings; normal moisture resistance for rooms with a relative humidity of not more than 60%. ‘
1.1.7. By type of finish, doors are divided into: with opaque finishing coating finished with enamels, paints or lined with decorative sheet or film materials; with a transparent finish, finished with clear lacquers.
1.2. The surfaces of assembly units and door parts are divided into front and non-front. The front ones include the surfaces visible during the operation of the door installed in the opening.
1.3. The types, sizes and designs of doors, as well as their areas of application, are established in the standards and specifications for specific types and sizes of these products.
1.2, 1.3. (Revised edition, Rev. No. 2).
2. TECHNICAL REQUIREMENTS
2.1. Doors are manufactured in accordance with the requirements of this standard for standards and specifications for specific types, sizes and designs of these products and working drawings approved in the prescribed manner.
2.2. Deviations from the nominal dimensions of products and their assembly units are established in accordance with GOST 6449.1 and their values \u200b\u200bshould provide deviations from the nominal dimensions of the gaps in the porches no more than +2 mm, and for products of the highest quality category - no more than +1.5 mm. Limit deviations from the nominal dimensions of products and their assembly units, from the dimensions of studded joints and free dimensions of parts should not exceed those specified in Appendix 1.
2.3. Doors, their assembly units and parts must have the correct geometric shape. Warping of parts should not exceed the values limit deviations from the nominal dimensions of the parts according to the free dimensions specified in clause 2.2.
Deviation of door panels from flatness should not exceed 2 mm in height, width and diagonal. .
The deviation from the perpendicularity of the sides of the door leafs should not exceed 2 mm per 1 m.
We install an interior door with our own hands
What is the "Finnish door"? These doors began to gain popularity in Russia in 1992-93, when they began to be imported from Finland. Hence the name "Finnish doors". Today they are produced by factories in Russia using imported equipment and imported technology. As a result, the doors are of good quality, decent design and a very budget price, they have good indicators for the absence of deformation, wear resistance and sound insulation.
Let me explain a little why not. complex example for door installation.
Firstly, at the Finnish doors, hinges are already embedded in the vertical rack of the box, and we don’t have to deal with this;
Secondly, the lock is embedded in the door leaf itself;
And thirdly, the striker of the lock is embedded in the rack of the box.
This already facilitates the task of installing the door, because. operations were done for us at the manufacturer's factory.
For installation, we need the following materials: a door leaf, two vertical racks of the box, a horizontal bar of the box (all this is sold complete with the door), a door handle and a latch (or a plug if the latch is not required), mounting foam, dowels and the door itself opening. Doorway we have already released, i.e. old door completely, together with the box, dismantled. I already talked about how to dismantle the door in the article “Dismantle the door frame”.
Of the tools you will need: a level, a drill, a set of drills, a screwdriver and a hammer.
Door installation (tool)
The plan will be as follows:
Consider all the points of this plan in detail:
1. Decide on opening the door.
"Finnish doors" - universal, i.e. they can be either right or left. Therefore, on initial stage, we determine which door we will have, right or left, and in which direction it will open - outward or inward.
All these parameters are chosen so that later it is convenient to use the door. If, for example, like mine, the bathroom is very small size, then there is no need to make the door open inside the room (there is already so crowded, and even in the open state the door will interfere). It is better that the door opens into the corridor.
In the same way, the right or left door parameter is determined from the convenience criteria. Yes, so how do you determine where the door is on the right and where is the left? I don’t know how it is described in theory, but I define it this way. We approach the door from the side into which it will open (or in our case, we just imagine it, because the door has not yet been installed with us). And we pull the door by the handle, opening it. If the door opens to the right, the door is right; if it opens to the left, the door is left.
Having decided on these parameters, we proceed to the next stage.
2. We assemble the door frame.
We put the door leaf on the floor, be sure to lay something on it (I used packing cardboard from the door) so as not to damage paintwork door leaf;
We fasten the vertical rack of the box to the door leaf (we fasten the hinges to the door leaf);
We put on the other side of the door leaf the second rack of the box (with a striker for the lock) so that the tongue of the door leaf lock enters the groove of the rack;
We attach the upper transverse bar of the door leaf and mark its required length.
Installing the door (marking the cross bar)
The length of the transverse top bar of the box should be 6-8 mm longer than the door leaf. The door leaf should freely enter between the vertical racks of the box and between them there should be gaps on the right and left of 2-3 mm, so that when closing the door does not rub against the racks.
We cut off the required length of the upper transverse rack of the box;
Installation of an interior door (we saw a cross bar)
We twist two vertical and upper horizontal rack of the box.
Door installation (connect vertical and horizontal racks)
To do this, we drill two holes for the screws on one side, two holes on the other side and tighten them with screws. The direction of drilling must be chosen so that the screw is completely in the body of the horizontal and vertical racks of the box;
Install the lower transverse rack of the box.
Do-it-yourself door installation
It does not come with a door. The door is supposed to be installed without it, but I installed the door to the bathroom, so I also installed the bottom transverse bar of the box. If the door is installed in interior opening- she is not needed.
3. We mark and drill holes for fastening the door frame in the opening.
In right and left uprights we make three holes for fastening, evenly distributed along the entire length. Racks are made of fiberboard and are a bit thin, so 3 holes each. Otherwise, in the future, when filling the seams with foam between the opening and the box, they can be squeezed out (the foam expands when it solidifies), and the door will cling to the racks. We drill 2 holes in the upper horizontal bar.
We remove the chamfer so that the head of the dowel is completely drowned in the body of the rack and does not interfere with the installation of the feigned bar.
4. Install the box in the doorway.
Door installation (we expose the door frame)
We place the box evenly in the middle of the opening and with the help of the level we achieve verticality in a plane parallel to the plane of the wall in which the doorway is located. We drill holes and bait dowels.
Similarly, we achieve the verticality of the box in a plane perpendicular to the plane of the wall in which the doorway is located.
Installation interior doors(attach the box)
We twist the dowels, trying not to pull the racks of the door frame with them. And finally we check the verticality of the installation of the box in all planes.
We fill the seams between the opening and our box with foam.
Door installation (filling the seams)
5. We assemble the door.
We hang the door leaf and tighten the fixing bolts. Gently trying to close and open the door. If the racks of the box are set exactly on the level, the door will close and open without touching the box.
We fasten the handle into place and put the latch.
Installation door handles
It may happen that the door will open only if you lift the handle up, and not down. It is not comfortable. To fix this, unscrew two screws from the end side of the door leaf, turn it over door lock 180˚ and tighten the screws back. The operation of replacing the lock is described in detail in the article "Replacing the lock in the door with your own hands." It is also necessary to turn over the tongue that locks the door.
Installing the lock (turn over the latch)
To do this, pull the latch tab in the direction from the door and turn it 180˚.
6. We install feigned strips and a cashier.
The last step in installing the door will be the installation of slats. In some models of doors, they are already installed, but then it is necessary to hide the holes for fastening the door frame by placing plugs.
In my case, I had to install straps, they went separately. To do this, we file the upper ends on the vertical bars, and on the horizontal bar the right and left ends at 45˚.
Do-it-yourself door installation
We insert the strips into their grooves and easily (through soft material so as not to damage the paintwork) we hammer them into the grooves as in the photo below.
Door installation (insert stop bars)
The cashier is best installed at the final completion finishing works(for example, when the wallpaper is pasted). So the door will look more aesthetically pleasing and beautiful. How to install it correctly, evenly and accurately, I will write a separate article. In order not to miss new publications, you can subscribe to blog updates.
]]> http://ckm-group.ru/51-montazh-dverej.html ]]>
]]> http://profdver.ru/st29.htm ]]>
]]> http://www.doorservice-ust.ru/ustanovka-dverei-gost.html ]]>
To ensure that entrance and interior doors meet the requirements of safety, fire resistance and other necessary conditions comfortable living, their installation must be carried out in accordance with regulatory documents. Failure to comply with the installation rules can lead to additional material costs, inconvenience, danger, and even litigation. Therefore, before deviating from the standards for any reason, you should think about possible consequences. The use of the recommendations of one or another collection of SNiP in the process of work depends on the material of manufacture, the location and purpose of the door structure.
What are the rules for?
The first SNiP appeared in the USSR in the 50s of the last century. Over the years, the standards have been improved and changed, but the fundamental principles used in the installation of doors have remained intact and, importantly, have stood the test of time. In the post-Soviet space, in most cases, they try to adhere to the requirements of SNiP, although today they are trying to replace them with SP and TU, which is not always true.Along with entrance doors protect from cold, drafts and uninvited guests, they also, according to the norms of SNiP, serve as evacuation passages that provide in case of emergency unhindered movement of an increased flow of people, carrying the wounded and sick. In addition, their function is to provide free space to move undisassembled furniture sets and large household appliances.
Door sizes are regulated state standards and correspond to the dimensions of the wall openings laid down by the designers in the construction documentation. Blocks, in this case, do not have to be ordered individually, which is convenient and rational. In exceptional cases, in order not to violate the architectural appearance of the building or at the special request of the owner of the mansion, it is allowed to install door blocks custom sizes. But deviations are allowed only upwards, in order to avoid creating dangerous situations.
It should be noted that interior doors can be made a little narrower and lower than the outer ones.

It is also necessary to rely on the rules of SNiP due to the fact that they quite clearly indicate the long-developed and justified:
- methods of heat and sound insulation of entrance and interior doors;
- fire resistance and bullet resistance characteristics of special door blocks;
- air tightness standards for external enclosing structures;
- methods that guarantee maximum burglary resistance, etc.
Today it is necessary to experiment in rare cases, since the prescribed norms provide an opportunity quality installation any door. The main thing that is required from private developers and reputable construction companies- this is strict adherence to SNiP, although some experts argue that their implementation is not at all necessary.
It should be understood that the current regulations are not aimed at complicating the process of installing doors, but at ensuring comfort and safety, the absence of noise and cold inside the house.
Some requirements of SNiP
It is worth noting that it will not be possible to tell about all the standards required for the installation of a particular door in one article. The problem is not even in the number of rules, but in the variety of materials, models and places for installing doors. But highlight General requirements relating to most entrance or interior building envelopes, it is still possible.
According to SNiP, tolerance of the installed door frame vertically can be no more than 3mm. The side frame posts are attached to the slopes at least at two points on each side. Moreover, the distance between them in the same plane should be no more than 100 cm.
When installing new door stick to simple rule, which consists in the fact that its sash in the open position should not overlap adjacent openings inside the apartment or on the landing. In extreme cases, you will need to change the side of the opening of the canvas.

For door blocks, their correct geometry and the absence of visual defects are important. But no less significant point is the tightness of the closing of the doors of the entrance doors and the absence of gaps. The normative air permeability of the external enclosing structures is 1.5 kg / (m2 per hour), therefore special meaning here it is given to the sealing contours installed in the porches between the box and the canvas. They also prevent the penetration of dust and odors from the street, as well as the appearance of drafts. But when installing internal doors, the gaps between the floor and the doors can be 5mm for rooms and 12mm for bathrooms.
The noise insulation standards for entrance doors allow the penetration of sound waves into the apartment at a level of no more than 30 dB, which is stipulated in the relevant SNiP. The calculation of the thermal insulation of the door is carried out according to several indicators, including data on the average winter temperature of a particular region.
Control of the installation of door blocks
On the preparatory stage the presence of a passport for the product with a record of the provision of a guarantee is checked. The surface of the door is also inspected and, with the help of a tape measure, the compliance of the structure with the declared geometric dimensions is determined. Before starting the installation, check:
- dimensions of the wall opening;
- the accuracy of the applied markup;
- the correct location of embedded elements required for fasteners.

Installation of the door is accompanied by a technical inspection and drawing up of certificates of examination hidden works. The following are subject to special scrutiny:
- tightness of insulation of gaps between wall slopes and the box;
- the quality of fastening of the door frame and sealing gaskets;
- compliance of the mounted block with the design position;
- correct installation of hardware and accessories;
- sash fit density.
Operational control, according to the standards, is performed by the master or foreman of the company responsible for installing the door, and acceptance is performed by the customer's representative or the owner of the premises.
-
Doors are usually 60/70/80/90 cm wide. The correct width of the opening is the width of the door +8 or +9 cm (if the thickness of the box in its narrowest part is from 1.5 cm to 2.5), or +10 cm (if the thickness of the box in its narrowest part is 2.5 cm and above ). For all cases, the correct height of the opening is the height of the door leaf + 6 cm. from the finishing floor., i.e. 206cm. The doors to the bathroom can be 190 cm high, so the correct opening height is 196 cm. Here are some examples of correct openings.: With dimensions doorways you need to decide in advance and it is very important to independently constantly monitor your team during the repair process. Standard height - 1 cm from the finished floor. As for the doors of the bathrooms, it is not recommended to do less than 1 cm so as not to disturb the air flow. If you have plastic windows do not forget to make supply valves for air from the street so as not to increase the humidity in the apartment too much. In order to protect the wooden parts of the doors from warping due to high humidity when carrying out repairs, it is necessary to install doors after ALL finishing work, including in neighboring rooms. Tile or wallpaper glue, especially plaster, dry fairly well. long time releasing moisture into the room. Humidity levels above 70% for several days increase the risk that doors will pick up moisture from the air, swell, and stop closing properly. However, if you like to wash your bathtub or shower often, humidity is not a threat, as the bathroom is quickly ventilated. Installation of wooden doors should not be done if you do not have a finished floor! Without doors, it is much easier to lay floor coverings, and it is easier to install doors later, with a clear fit of the trim to the floor. If you first install the box directly on the screed (main floor), then it is impossible to bring flooring under the box, as it is already on the floor. In addition, it is difficult for the master to correctly calculate the lower clearance of the door from the subfloor, taking into account the future coating. If you did everything right and put the doors after laying the finished floor, it will not be difficult to replace the floor later - you just need to pull the laminate or parquet out from under the door pillars and slip a new coating. In this case, the racks will not fall, but will remain hanging. If you have the opportunity to plan the width of doors and openings in advance or have questions about the width of the openings, then follow these recommendations: It must be ensured that the door does not close the switch when opened. It is highly desirable that the door leafs do not intersect with their trajectories. If this is a door to the bathroom, it is necessary to provide for its opening by 180 degrees for ventilation after taking a bath or shower. If in one corridor some of the doors will open into the corridor, and some into the rooms, the closed doors will look different due to the features of the door frame. Make sure that a door opened 90 degrees does not block the opening of an adjacent door. A common mistake of repair crews is openings that are too high, because maximum height should not be higher than 208 ~ 209 cm from the flooring, otherwise the upper trim will not close the opening. Solution: if your opening is higher than necessary, and the repairmen have already left, glue the wallpaper lower, or order high capitals. A more thorough way is to lower the height of the opening with drywall and wooden blocks and then glue the wallpaper. Quite common in new builds standard opening it can be 217-220 cm high. This is due to the fact that many customers make underfloor heating and the height after their installation becomes standard. If the opening is at least 2-3 cm wider than necessary from the sides, the foam joint will not have sufficient strength, and this is important, since the mounting foam helps maintain even gaps and ensures the overall resistance of the door to loads. Solution: narrow the doorway with a 5x5 wooden beam or using foam blocks and tile adhesive. The ends of the openings must be parallel vertically. The walls must be even and strictly vertical. It is necessary to check the walls to the right and left of the opening for humps / depressions by attaching a long rule, extension or a flat board to the wall. Especially often humps are found closer to the floor. Even one small hump will interfere with the tight fit of the casing to the wall. Solution: plaster and level the walls. If you do not want or cannot level the walls throughout the apartment, then do it only around the openings (about 50 cm wide). If you have already made repairs and the wall is littered - that is, tilted at a vertical level - you will have to choose from two options: If the wall thickness more thickness door frame - it is recommended to purchase You can, of course, stick wallpaper on the ends of the walls, but it will look out of date, and on the other side of the wall there will be nothing to nail the trim on. For finishing the slopes of the entrance doors, the most good decision- which will give the front door a finished look. The width of standard extensions is usually 10/12/15/20 cm. If your walls are very thick (more than 20 cm), then the extensions must be spliced along the length. As a rule, with this arrangement of the door, it is necessary to cut the trim along the curvature of the wall so that there are no large gaps. Sometimes this has to be done on both sides, or cut all four platbands. But reducing even one platband in width, we still spoil appearance doors, see photo: The door leaf is located in the opening closer to that part of the wall where the door will open, so the threshold covering the floor joint when closed door should be located under the door leaf and then it will not be visible when the door is closed, see photo: A common mistake of repair teams is the wrong location of the sills! To avoid such a mistake, draw a scheme for opening all doors in advance and give it to the foreman before laying the finishing floors. For living rooms and kitchens, it is recommended to order doors 2 meters high. For bathrooms in new homes, a canvas 1 m high is often required. 90cm due to the presence of waterproofing and special high thresholds. If you missed this moment and did not order doors with a height of 190 cm, then you need to expand the opening in height or, alternatively, you can shorten the door. If you increase the opening in height, then the upper mark of the doors to the bathroom and interior doors will be at different levels. If the door is cut from below, then the panel pattern is lowered. Therefore, sometimes it is better to order smooth doors for bathrooms. A common mistake is the threshold to the bathroom from a wooden door frame, as aesthetics and ventilation are violated. wet room, and in the future, mold may appear. Mounting foam will not be able to stick if there is a lot of dust on the ends of the doorway. It is necessary to remove dust and prime the ends of the walls of the opening if they are covered with gypsum putty or if the walls are made of gypsum / aerated concrete blocks. If there are open round cavities and voids at the end of the opening, they can be repaired with plaster, leaving marks with a pencil so that the master does not drive fasteners into them. Holes for door frame fasteners are drilled between these cavities into lintels. If the walls of the opening are made of drywall, then in a metal profile at the vertical ends of the opening necessarily must be dry wooden block. It is needed for reliable fastening of doors to self-tapping screws through the hinges and the counterpart, and it also stiffens the walls in the area of the opening. Doors installed in openings without reinforcement are doomed to short-term operation and quickly sag. If inside metal profile a bar is laid and the ends are not sewn up with anything, then this is not correct. Foam does not adhere well to galvanized metal. Over time, flaking is possible. To avoid this, GKL or GVL strips or plywood are screwed to the ends. Foam adhesion to these materials is excellent. It is not allowed to leave voids between the sheets of drywall in the upper part of the opening. The fact is that the upper box is often strongly bent or bent when wedging, and to straighten it, for example, with the help of foam, a filled end of the wall is required. For those who want to install sliding sliding doors opening height for standard door should be approximately 202 cm. and the width of the opening should be equal to the width of the door leaf or a couple of centimeters wider. In the process of finishing the opening with extensions and platbands under the portal, its dimensions should become smaller than the door leaf. At a height of 207 cm. up to 212cm. there should be no voids from the floor in the opening, since a wooden bar with a section of 5x5 cm and a length of about 190 cm will be horizontally fixed here, to which an aluminum top rail with rollers will be attached. A common mistake of repair teams when laying floor coverings is when the gap between the floor covering and the wall in the area of the platbands exceeds the thickness of the platband. And you just need to remember to make it no more than 3 mm. In the wall near the floor, you need to make a recess (strobe) to compensate for possible expansions of the floor covering. To prevent deformation under the influence of gravity, the canvas, boxed timber and trim must be stored on flat surface lying. Doors can be placed on their side. Before installation, it is necessary to store the door and moldings indoors for several days to equalize the humidity. Do not remove the packaging from the doors in advance, especially in the cold season, until the temperatures have completely equalized. The hinges are hung at a distance of 20 cm from the top and bottom of the door leaf. The thickness of the metal and the absence of backlash are very important. If the thickness of the hinge metal is 3 mm, then these are good hinges, a thickness of 2-2.5 mm is much more common. It is very good if the hinges are made of brass, steel. Most common door hinges there are several types: Locks and latches are best chosen based on the quietest volume of the mechanisms when opening and closing and their reliability. Magnetic locks are quiet, they need to be bought more expensive and preferably Italian, there are very high quality options. Do not save on them, so as not to suffer later. Cheap latches with plastic tabs are not always of high quality, here you must first ask around with knowledgeable people (not sellers), and not buy too suspicious options. Sometimes such cheap magnetic locks and latches do not work immediately after installation. Door installers are well aware of these models. It is most reliable to buy classic latches / locks. It is best to choose them with plastic reeds, as they are the quietest in operation and do not clang like metal ones. Sometimes it happens that the new latch works hard. In this case, put a couple of drops of silicone grease on the lock tongue. For Europe - 95 cm. Many symmetrical doors are now being produced, in which the handle according to the design of the door should be located strictly in the middle of the leaf. Therefore, the standard handle height for Russia is 1 meter. Almost all models of door handles come with too long self-tapping screws, which, when screwed into the door, can jam the lock or lead to its unstable operation. Door installers almost always screw on the handles with their self-tapping screws.How high should the door be from the floor?
How are the doors installed?
Door width for different rooms
In which direction to open the doors in the apartment
If the doorway is much higher (wider) than the door frame
Preparing the walls of the opening before installing the doors
Installing a door if the wall is sloping and littered vertically
When to Install Extensions
If the door is perpendicular to the wall

 so there are a few more options to solve this problem:
Setting the interior threshold

Installation of interior doors in the bathroom

Preparation of openings for interior doors
Preparation of opening for sliding doors
Preparing the floor before installing doors

Storing doors after purchase
Which hinges to choose


How to choose locks and latches


How high should the door handle be from the floor?
When installing the front door, the owners of apartments and houses are guided not only by their own preferences and understanding of comfort, but also by the code sanitary norms, ignoring which can lead to fines and forced alterations.
In accordance with the rules, the structure that overlaps entrance opening living quarters, is evacuation and is designed to ensure the unimpeded movement of people, also having sufficient dimensions to carry the wounded on a stretcher. Based on this, installing doors according to the rules fire safety accompanied by the following requirements:
The size of the light opening in multi-apartment residential buildings is at least 800x1900 mm.
In buildings or structures owned by organizations (with the exception of private residential buildings), it is prohibited to use additional doors or change the direction of their opening from the apartment to the corridor or to the landing, if this may interfere with the free movement of people living in this room or neighboring apartments.
The regulatory literature also contains a number of rules regarding such indicators as the airtightness of the entrance structure, its heat and sound insulation characteristics, as well as special requirements, extending to fire-resistant, bullet-resistant and other special-purpose canvases.
In the section "Construction heat engineering" blowability (the ability to pass moving air masses) outer door SNiP defines a value not exceeding 1.5 kg / m2 hour. To ensure this indicator, the blocks must be equipped with seals in the area of the porches and folds.
In order to comply with the recommendations of SNiP, the doors must be installed in such a way that the movable part of the structure fits snugly against the frame. The gaps between the box and the wall must be carefully sealed. The tightness of the product is provided by sealing layers of rubberized fabric or rubber.
As prescribed in the chapter "Residential buildings" SNiP, entrance doors apartment buildings should separate premises for any purpose and floor corridors from landings and elevator lobbies. In residential buildings, the corridors between the stairs are recommended to be separated by partitions with doors equipped with door closers.
In the "Protection from noise" section, the noise insulation indicators of structures installed at the entrances to residential and public buildings. In accordance with SNiP, metal doors, which are used in lobbies, lobbies, corridors and on stairwells, must have an isolation index of 30 dB.
The requirements that fire doors must meet are proposed by SNiP for consideration in the chapter “Fire Safety of Buildings and Structures”, as well as a number of other sections relating to fire resistance test methods. Safes and vaults of valuables, banking, burglary and bulletproof structures are separately standardized.
All structures on the escape route, in particular those installed at the exits, must open outwards. If the project provides for inward-opening entrance doors, fire safety allows their installation in the following cases:
When fully opened, an unoccupied space of at least 1 m remains between the canvas and the wall.
The open sash does not block access to neighboring rooms or apartments.
The design does not block the opening of adjacent doors.
The width of the opening is at least 800 mm.
Opening doors for fire safety is not standardized for the following rooms:
Multi-apartment, single-apartment, blocked residential buildings;
Premises in which no more than 15 people stay at the same time;
Storerooms, which do not provide for permanent jobs, with an area of \u200b\u200bno more than 200 square meters;
Access to the platform stairs of the 3rd type (open external stairs);
Bathrooms;
Outdoor structures installed at the entrances to buildings in the northern climatic zone.
Fire safety requirements for doors also regulate the width of the escape route for products opening from the apartment to the corridor: this indicator is calculated by reducing the width of the corridor by half the door leaf (if the openings are located on one side of the corridor) or by the width of the whole leaf (with two-sided openings) . At the same time, as fire safety says, the doors located in the floor corridors of apartment buildings, this requirement do not obey.
Changing the opening side is not a redevelopment, if this does not transfer the structure or create a new opening. In this case, references to the original project of the house with the direction of movement of the canvas embedded in it do not work - each owner has the right to decide independently what type of opening he needs.
Thus, if we are talking about residential premises, the installation of fire safety doors with a change in the direction of opening can be carried out without additional approvals. However, it should be borne in mind that the open sash should in no way block the entrance opening of the neighbors.
The difference in the size of the door leaf and the doorway is due to the fact that overall size block assembly over size blades by 30-60 mm, a mounting gap of 10-20 mm is also required, for reliable fastening of the block and filling it mounting foam. In the end, if the recommended dimensions of the openings are met, the mounting gap is covered with a neat door casing.
For more information on requirements for door constructions, please refer to the respective normative documents. We list only some of the requirements that are relevant to the installation of interior doors.
GOST 475 78 (from 1979) regulates the quality of raw materials for the manufacture of door structures. The moisture content of wood should not exceed 8%. The document also aims at the absence of defects on wooden surface and fittings fastening points: knots, wormholes, resin pockets, which may affect the quality of fastening during further installation.
GOST 30970–2002 characterizes the features of PVC products and the requirements for their installation.
Certificate of Conformity No. 6629-88 informs about the options for connecting the door frame during installation.
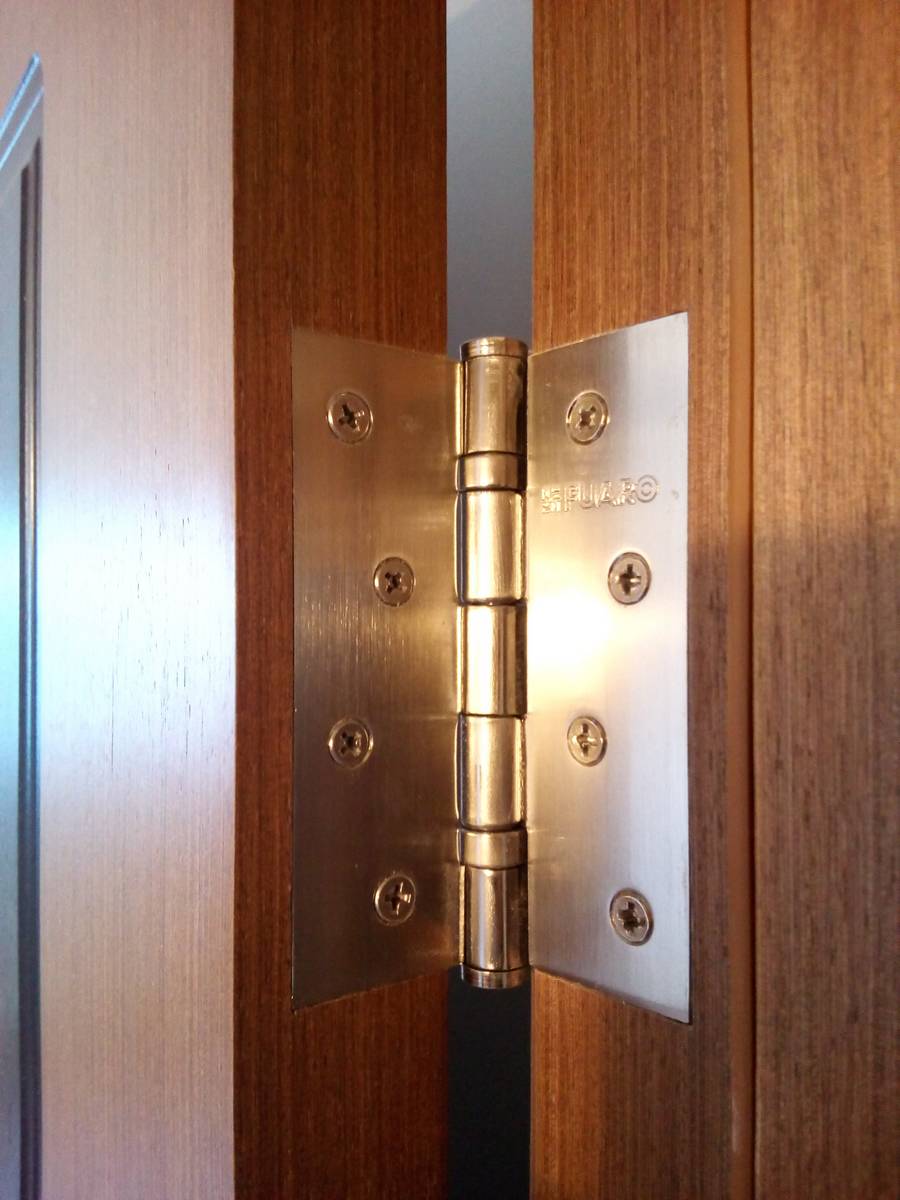
GOST 538-88 fixes the requirements for door extensions, hinges and fasteners.
Basic requirements of SNiP for the installation of interior doors
- Fastening of the side frame racks must be carried out at least at two points on both sides, the distance between them can vary from 1000 mm.
- The number and location of the hinges is determined by the features of the locking mechanisms, which, in turn, depend on the operating factors and the weight of the door structure, the size of the opening parts.
- An important point is the tightness of the web to the door frame or seal (if provided by the manufacturer). We are talking about the so-called porch.
- The maximum deviation of the mounted door frame vertically can be no more than 3 mm.
- Internal doors should be equipped with a box, 3 mm higher than the leaf size (tolerance 1 mm) on all sides, except for the lower gap. The bottom distance between the door leaf and the threshold or floor must be at least 10 mm.
- If the floors in adjoining rooms have different levels of flooring, then a threshold can be set. If the floor covering is without drops, it is not recommended to set the threshold.
- The door should open towards a larger room. If door structure installed between the room and the corridor, then the best way- its opening towards the room. It is not recommended to open a door to a door, or a door to an adjacent opening. When choosing the “handedness” of opening, it is also necessary to take into account the places where the limiters are attached.