We make drainage in the garden with our own hands. The device of the drainage system in the garden
bad growth horticultural crops and trees, constant dirt on garden paths and seasonal flooding of cellars and cellars indicate high level groundwater suburban area. You should not put up with these inconveniences, otherwise high humidity can turn into more significant problems - swelling of blind areas and paths, shrinkage of walls, and even destruction of the foundation. Nevertheless, there is no reason to rush to get rid of suburban property. It is not difficult to drain the territory - it is enough to build an efficient drainage system. The construction of drainage does not require any special skills, so you can easily do it yourself. As for knowledge, we will try to talk about the secrets of construction and give important recommendations in the course of work.

A drainage system is necessary where the site is flooded even after a light rain
The question of whether a drainage system is needed in a suburban area, as a rule, does not require a long study of the situation and an analysis of natural factors. Most often, the inconvenience that occurs due to waterlogging of the soil appears after snowmelt or heavy rain. The beds are overgrown with sedge, paths and lawns on long time puddles occupy, and basements and cellars suffer from dampness - these are factors that indicate the need for drainage. Nevertheless, before investing time and money in arranging a drainage system, you should make sure that it is worthwhile. Several conditions will help to do this, indicating the need to drain the soil.
If at least one of these factors is confirmed in your country house, then the need for drainage can not be discussed. A high-quality drainage system will give a second life to cultivated plants, make the territory cleaner, save paths from deformation, and the foundation from destruction.
Varieties and arrangement of drainage systems
The problem of excessive soil moisture in the area can be solved by two types of drainage systems - surface and deep. The decision which one to use to drain your site directly depends on the reasons that lead to the flooding of the territory.
Surface (open) drain for collecting rainfall
Surface-type drainage is a system of storm water inlets designed to collect and remove rain and melt water outside the site, preventing it from soaking into the ground. This drainage system works great for clay soils and can complement traditional storm sewers. Water is drained into filtration wells or outside the site. In addition, the lion's share of precipitation simply evaporates.

Point drainage is often combined with linear system sewerage
Depending on the design of the drainage systems surface drainage is divided into two types:
When arranging point drainage, wastewater is collected using storm dampers, drains, storm water inlets and ladders. Their installation sites are door wells, roof gutter drain points, areas under water taps and other areas that need local water collection. Point collectors are connected to underground pipes, through which effluents enter the collector storm sewer.

Linear trays drainage system closed with gratings that prevent their clogging
Linear drainage can be near-wall or remote from structures. It is a system of grated trays for collecting precipitation that did not fall into the point storm water inlets. This method of drying is rational to use in such cases:
Linear also includes road drainage, which is made in the form of a ditch parallel to the roadbed for the movement of cars.
Arrangement of a deep drainage system is necessary where groundwater approaches the surface of the site closer than 2.5 meters. During its construction, a large amount of earthwork is required, therefore it is best to construct such drainage at the same time as digging foundation pits for the foundation of the house and outbuildings.

Prefabricated Drainage Pipes and Recommended Ground Types
For construction deep drainage perforated pipes (drains) are used, which are laid in the soil layer at an angle. The presence of holes allows the drains to collect excess moisture and transport it to the storage collector, filtration well or drainage tunnel.
The slope of the drainage pipes must be at least 1%. For example, for a 20 m long highway, the height difference between the upper and lower points will be 20 cm.

Design features of deep drainage systems
Another common type of deep drainage is a reservoir or backfill system. It is made in the form of an underground channel, half filled with a filter pad made of crushed stone or crushed brick. To prevent the absorption of the collected moisture, the bottom of the formation drains is sealed with a layer of clay, on top of which a rolled waterproofing is laid.
The simplest and most effective methods of draining a summer cottage
Since drainage in the summer cottage and directly around the buildings can be done in various ways, we will focus on the simplest and least labor-intensive options.
How to reduce moisture levels without drainage
Many factors influence swampiness, therefore, in some cases, a summer plot can be drained without drainage. If a high humidity soil contributes to a special relief, then it is quite simple to make the water flow outside the site. To do this, in some places the soil is removed, and in others it is poured, creating a small slope. If the selected soil is not enough, then it is imported from outside the garden area. It is better to add soil in the country with black soil or peat, and in order to make the soil lighter, 1/3 to 1/5 parts of sand are added to it.

A reservoir equipped at the bottom of the site is an excellent way to dispose of drainage water
In the event that water accumulates on the site due to closely spaced layers of clay, and the territory itself has a slight slope, then a small reservoir can be dug at the lowest point. It can be used as a natural reservoir for irrigating crops, turned into a fish pond, or used as a decorative element landscape design. As a rule, due to the high level of groundwater, there is no need for additional waterproofing, but in some cases a special PVC film for pools will help make the reservoir airtight. To prevent the surface of the artificial lake from blooming, aquatic plants are planted along its banks.
Planting moisture-loving plants is great way normalize soil moisture. For example, an ordinary birch is a real pump that literally pumps water out of the ground. Spiraea, shadberry, hawthorn, wild rose, and, of course, willow and willow do a good job of draining the territory. Planted in problem areas, as well as along the paths, they will not only remove excess moisture, but will make the landscape original and attractive.
How to make drainage around a country house or outbuildings
To protect the basement or basement from melt and rain water, they construct around summer cottages wall drainage. This drainage system is most effective during the off-season, when the groundwater level reaches its maximum value. The construction of the "reclamation" system is best carried out at the stage of foundation construction, however, if the decision to build it was made due to the appearance of water in the basement, it's okay - better late than never.

Constant flooding threatens to destroy the foundation
The construction of the drainage is carried out in stages.

Digging a trench and sealing the foundation

Drainage pipes are laid in a "pie" of crushed stone and geotextile
If it is not possible to purchase special perforated pipes, then they can be made from ordinary polymer sewer PVC pipes. To do this, drillings are performed in their walls, the diameter of which should be slightly smaller than the size of individual grains of gravel or granotsev.

Vertical manholes allow you to monitor the condition of the drainage and, if necessary, clean it

Drainage around the house can be done in two ways - close to the foundation and at a distance from it
You should not hurry with the arrangement of the blind area around the house - it is necessary to withstand time for the soil to shrink in the trench. For concrete pouring and laying paving slabs start only after the soil is completely compacted.
Video: construction of a low-budget deep drainage system with one well
Drainage of a suburban area: the easiest method
A surface drainage system allows you to avoid unnecessary financial costs and build drainage facilities on a large summer cottage. Its main purpose is to remove excess moisture during heavy rains or during the period of snowmelt.
When arranging open drainage, earthworks are carried out in accordance with the instructions below.
Experienced builders determine the points for laying storm drains and a prefabricated collector, observing the flow of rain or melt water, planning the location of channels in such a way as to optimally combine individual streams into a common stream.
![]()
Preparation of drainage ditches
Next, they deal, in fact, with drainage. Depending on the degree of aesthetics, landscape design requirements or personal preferences, it can be tray or backfill. In the first case, the arrangement of channels looks like this:

Laying trays will make the drainage system durable and aesthetic
In the second case, the construction is carried out according to the following scheme:
For the arrangement of drainage, you can also use the old, "old-fashioned" method - the construction of fascines. For this, branches of alder, willow or birch are harvested, which are tied into armfuls 15 cm thick so that thin twigs are on one side and thick ones on the other. Bundles of branches are not laid on the ground, but on pegs previously installed along the entire length of the trenches, connected like anti-tank "hedgehogs". Brushwood is placed with thick branches up and compacted along the edges with moss. If everything is done correctly, then we can count on a 20-year operation of the reclamation system.
To protect the walls of the channels from collapse, rubble stone or turf is used. The trenches are decorated by constructing ridges along their edges with perennial moisture-loving plants, such as irises.

One way to make the drainage channel more attractive is to plant ornamental plants.
Drainage of a suburban area: the traditional way
No matter how simple and cheap an open drainage system is, it has one significant drawback - low aesthetics. Agree that landscape design on a site with a whole network of channels is not an easy task. In this case, it is better not to save money and build a durable and efficient deep-type dehumidification system.
The best scheme for laying drainage pipes is the "herringbone". In it, the side lines converge to one central pipe, which is led into a sewer well or outside the site.

Diagram of a deep drainage system
If the drainage system is needed not to protect the foundation, but in order to reduce soil moisture, then the depth of the trenches is chosen based on the recommended values:
For drainage use special polymer pipes with holes with a diameter of 1.5 to 5 mm. Ideally, their type and quantity is determined by a calculation that takes into account soil moisture, its type, precipitation, etc., however, if you do drainage yourself, it is cheaper to buy PVC water pipes with a diameter of 100 mm and make a grid of holes in them with step 40-60 mm independently.
![]()
Indoor drainage trenches can be dug manually or with earthmoving equipment.
After the ditches are dug, proceed to the main part of the work.

You can fix geotextiles on the walls of the trench using fragments of bricks or pegs driven into the walls.
Observing the slopes, they lay and connect drainage pipes into a single network.

Backfilling of perforated drainage pipes with crushed stone
It is not recommended to use crushed limestone for arranging drainage. Firstly, at a depth it is compressed and will not let moisture through, and secondly, its interaction with the soil can provoke the appearance of a salt marsh.
Video: construction of a closed drainage system in a summer cottage
Maintenance and cleaning of drainage in the country
Although a properly built deep or surface drainage system does not need frequent preventive measures, some work cannot be avoided. The contents of manholes should be checked periodically, clearing soil particles using a pump to dirty water and high pressure pumps. When pumping mud from a drainage well, a long pole is used to shake up bottom sediments. Complete flushing is required in case of severe silting of pipes, as well as every 10-15 years of operation of the drainage system.

High pressure water systems are best for cleaning drain pipes
To free the line from sand deposits, the pipeline must be accessible from both sides. Rinsing is carried out with a strong jet of water, which is alternately directed from one side of the pipe, then from the other side.
If you have to deal with persistent deposits of dirt and clay, then you can use the traditional plumbing technique - cleaning pipes with a long cable and a stiff bristle ruff brush. By combining mechanical action with flushing, it is possible to completely remove long-term deposits on drainage pipes.
In case of siltation of the channels of surface systems, you can resort to cleaning them with saltpeter. To do this, the turf and the top backfill are removed from the trenches, after which saltpeter is evenly scattered on the crushed stone layer. Then the “pie” is poured abundantly with water and the upper layers are returned to their place. A similar method allows you to extend the performance of the system for more than one year, but you can only use it as a last resort - saltpeter is a source of nitrates, and its excess negatively affects the quality of the soil.
Video: how to flush a deep-type drainage system
High-quality drainage system will protect the foundation and basement country house from flooding, will add health and strength to green spaces. The cost of land reclamation measures is not so high as to refuse them, especially since you can build drainage on the site with your own hands. Everything you need for this can be easily found in the distribution network, and earthmoving equipment will help speed up the work.
Share with friends!In some regions, groundwater is very close to the surface. So close that they threaten the integrity of buildings (their foundations) and prevent plantings from growing. All these problems are solved by the drainage of the site. In general, this event is costly both in terms of the amount of funds required and the necessary time costs. A lot of time is spent on planning. If you do everything wisely, then you need data from a hydrogeological study and a project drawn up by a specialist. But, as usual, only a few do this, most make the drainage system with their own hands.
What water is drained
Drainage of the site is a costly and time-consuming event that requires a large amount of land work. The best time for construction - the process of planning and arranging the site. More late dates executions lead to a big mess, which is far from pleasing to everyone. However, if there is water on the site, you have to go for it.
There are several types of water on the site that interferes with us and needs to be diverted. They have different character require different measures.
surface water
They are formed during snowmelt and heavy rainfall, during work on the site (watering, washing paths), discharging water from the reservoir, etc. What all phenomena have in common is their one-time occurrence: surface waters appear after certain events. A more reasonable way to divert them is a device. She copes with the task perfectly, and the cost of arrangement is much lower.

For the diversion of surface water, mainly open channels are installed, water intake is a point under storm pipes or linear along the entire roof overhang. From these receivers, water is taken by solid plastic (asbestos-cement) pipes into gutter or dumped into a ravine river, lake. Sometimes let's take it to the ground.
ground water
Those groundwaters that have a seasonal level (higher in the spring after the flood, lower in the winter), have a feeding zone (where they come from) and outflow (where they go) are called groundwater. Usually, groundwater is present on sandy, sandy loamy soils, less often in loams with a small amount of clay.
The presence of groundwater can be determined using self-dug pits or several wells drilled with a hand drill. When drilling, a dynamic level is noted (when water appeared during drilling) and a steady level (some time after its appearance, its level stabilizes).

If we talk about the diversion of water from the building, then the drainage system is arranged if the groundwater level (GWL) is only 0.5 m below the foundation. If the groundwater level is high - above the freezing depth - then it is recommended with the measures taken to drain the water. At a lower level, other options are possible, but this requires careful and multi-layer waterproofing. The need for drainage of the foundation should be assessed by specialists.
If high-standing groundwater (GWL above 2.5 meters) prevents plants from growing, site drainage is required. This is a system of channels or special drainage pipes laid in the ground at a certain level (below the GW level by 20-30 cm). The depth of laying pipes or ditches - below the GWL - so that water flows to lower places. Thus, the adjacent areas of the soil are drained.
Verkhovodka
These underground waters are found on soils in highly located water-resistant layers, but often their appearance is the result of construction errors. Usually this is water, which, being absorbed into the soil, meets on its way layers with a low ability to absorb moisture. Most often it is clay.
If, after rain, puddles stand on the site and do not leave for a long time, this is perched water. If water accumulates in the dug ditches, this is also a perch. If a few years after the construction of a house on clay soils or loams in the basement, the walls begin to “cry” - this is also a perch. Water accumulated in rubble pockets under the foundation, in the blind area, etc.

The removal of the top water is easiest to do with the help of ditches, but it is better to prevent its appearance - to backfill the foundation not with crushed stone and sand, but with clay or native soil, carefully tamping it in layers. The main task is to exclude the presence of pockets in which water will accumulate. After such a backfill, it is required to make a blind area, which is wider than the backfill and an obligatory stroke - the removal of storm water.
If the site is sloping, consider terracing and retaining walls, with the obligatory installation of drainage ditches along the retaining wall. The most difficult thing to deal with perched water is in low areas that are lower in level than neighboring ones. Here rational decision- backfilling the earth, since there is usually nowhere to dump water. More possible variant drain outlet through neighboring plots or along the road to a possible drop point. You have to decide on the spot, based on the existing conditions.
Not to drain
The installation of a drainage system is an expensive undertaking. If it is possible to get by with other measures, it is worth doing it. Other measures include the following:

If after all these activities the situation does not suit you, it makes sense to make a drainage system.
Types of drainage
Site drainage is a complex system with many nuances and features. By structure, it can be local (local) - to solve a problem in a particular area. Most often it is the drainage of the foundation, basement and semi-basement (basement) floors. Also, water drainage systems on the site are common - to drain the entire site or a significant part of it.

By installation method
According to the installation method, the drainage system can be:
- open. Concrete or stone trays are used, ditches are dug around the site. They remain open, but can be covered with decorative grilles to protect the system from large debris. If you need a simple solution for draining surface water in your country house, these are ditches along the perimeter of the site or in the lowest zone. Their depth should be sufficient so that at maximum flow the water does not overflow. So that the unreinforced walls of the drainage ditches do not collapse, they are made at an angle of 30 °,
- closed. Water is caught by laid special permeable - drainage - pipes. Pipes are led into a storage well, into a sewer, a ravine, a nearby reservoir. This type of drainage on the site is good for permeable soils (sandy).
- Zasypnoy. Drainage of this type of site is usually used on clay soils or loams. In this case, the pipes are also laid in ditches, but a layer-by-layer sand and gravel backfill is arranged in them, which collects water from the surrounding soils. The worse the soil conducts moisture, the more powerful the backfill is required.

Drainage option for a summer cottage - cheap and cheerful
The specific type of site drainage is selected based on site conditions. On clays and loams, an extensive gravel-sandy zone is needed, into which water will drain from the surrounding soil areas. On sands and sandy loams, there is no need for such a pillow - the soils themselves drain water well, but only a specialist on the results of geological research can specifically say.
By type of implementation
There are several types (schemes) of drainage devices on the site:

When draining the site, the central drain or collector is made of pipes of a larger diameter (130-150 mm versus 90-100 mm for conventional drains) - the volume of water here is usually larger. The specific type of drainage system is selected based on the tasks that need to be solved. Sometimes you have to use combinations of different schemes.
Site drainage - device
The drainage system consists of a network of interconnected pipes that are located along the perimeter (or area) of the territory protected from water. At intersections or turns put drainage wells. They are necessary to monitor the condition of the system and clean silted pipes. From all drained areas, water enters the collector well, where it accumulates to a certain level. Then it can be dumped or used for irrigation and other technical needs. The discharge can go by gravity (if there is somewhere), and submersible ones are used for irrigation and other technical needs.

Drainage pipes and wells
Pipes for drainage are used special - with holes ranging in size from 1.5 to 5 mm. Water flows through them from the surrounding soil. Holes are located over the entire surface of the pipe. They happen different diameters, for private houses and plots the most used size is 100 mm, for diverting large volumes water can be taken with a cross section of up to 150 mm.
They are now made mainly from polymers - HDPE, LDPE (low and high pressure polyethylene) and PVC (polyvinyl chloride). They are used for laying to a depth of 2 meters. There are also two and three-layer combined ones, which are made from combinations of these materials, they are buried to depths of up to 5 meters.
Pipes for drainage are selected taking into account the depth of occurrence. It is required to select according to the ring stiffness. It is indicated by the Latin letters SN and the numbers following them, displaying the ring stiffness (resistance to loads). For laying to a depth of up to 4 meters, the rigidity should be SN4, up to 6 meters - SN6.
The surface of the drain pipe is wrapped with filter materials. Filter layers can be from one to three. The number of layers is selected based on the composition of the soil - the smaller the particles, the more layers are required. For example, on clays and loams, pipes with three filter layers are used.

At the turning points and in places where several pipes are connected, revision wells are installed. They are needed for easier cleaning in case of blockage, as well as for the possibility of monitoring the condition of the pipes. As a rule, all pipes converge into one collector well, from where water is either sent by gravity to the discharge point, or pumped out forcibly.

There are special wells - for drainage systems, but it is quite possible to bury a concrete ring with a bottom and a lid of small diameter (70-80 cm) and bring pipes into it. Depending on the depth of laying the drainage rings, several rings may be required. Another option is to make a manhole and a drainage pipe big size, but in this case you have to come up with something with the bottom. For example, you can fill the bottom with concrete.
bias

In order for the collected water to drain on its own, it is necessary to observe a certain slope towards the direction of movement. The minimum slope is 0.002 - 2 mm per meter, the main one is 0.005 (5 mm per 1 meter of pipe). If the drainage is shallow, the slope of the pipe can increase to 1-3 cm per 1 meter, but it should be done as little as possible. At a flow velocity of more than 1 m/s, fine soil particles are “sucked in”, which contributes to a more rapid silting of the system.
The slope is changed (in relation to the "duty" of 5 mm per 1 meter) in two cases:
- If it is necessary to divert a larger amount of water per unit of time without increasing the diameter of the drain. In this case, the slope is increased.
- If you want to get away from backwater (when the pipe laid with a given slope is below the GWL, i.e. water simply will not drain). In this case, the slope is reduced.
In the practical design of the system, questions may arise about how to provide a given slope. This can be done with the help of using a water level (not very convenient) or a flat board paired with a conventional building bubble level. Having leveled the bottom of the trench, a board is laid, a level is placed on it. Moving it along the board, they check and correct the slope of the bottom of the trench in a certain area.
Drain installation technology
Pre-dig trenches of a given width and depth. The bottom of the trench is leveled and compacted. Do not forget about the slope, but at this stage it makes no sense to withstand it exactly. Next, about 100 mm of coarse-grained washed river sand, it is also tamped (spilled, then passed by a rammer), leveled. Sand is desirable fraction Dsr 1.5-2.5 mm.

It is laid on sand with a density of not more than 200 g / m2. The edges of the canvas are lined along the walls of the trench. A layer of granite rubble is poured on top. The size of the crushed stone fraction is selected depending on the size of the holes in the drainage pipe. For the smallest holes, crushed stone with a grain of 6-8 mm is required, for the rest - larger. The thickness of the crushed stone layer is 150-250 mm, depending on the type of soil. On clays and loams, 250 mm is required, on soils that better drain water - sands and sandy loams - about 150 mm.
Crushed stone is rammed, leveling into a given slope. A drainage pipe is laid on the compacted gravel. Further, the pipe is sprinkled with gravel in layers, each layer is rammed. There should be at least 100 mm of gravel on top of the drain. After that, the ends of the geotextile are wrapped, their overlap should be 15-20 cm. A layer of sand with grains of 0.5-1 mm is poured on top. The thickness of the sand layer is 100-300 mm, also depending on the water permeability of the soil: the worse the water is drained, the thicker the sand layer. The “native” soil is laid on the compacted sand, and then plants can be planted.
A little about backfill materials
Crushed stone should be granite or other hard lime-free rocks. Dolomite (lime) or marble are not suitable. Testing the existing one is simple: drip vinegar on it. If there is a reaction, it does not fit.
Once again, we pay attention: the crushed stone is laid washed - so that the new pipes do not immediately silt up.

Sand is required coarse-grained. Grain size from 0.5 mm to 1 mm. The sand must also be clean. Some part of the sand is poured with clean water, shaken up, they wait until the sand settles and evaluate the purity of the water. If the water is cloudy, with a lot of suspended particles, the sand needs to be washed.
Some nuances of construction
When draining the site, the central drain or collector is made of pipes of a larger diameter (130-150 mm versus 90-100 mm for conventional drains) - the volume of water here is usually larger.

The drainage device on the site starts from the lowest point and moves gradually up. First, a collector well is installed. If the groundwater level is high or if the top water has not yet descended, water may accumulate in the ditches. This muddy slurry will roll down the well, clogging it. In addition, the presence of water in the ditch greatly interferes with work: drains must be laid in dry ditches. To drain them along the ditch, side pits (sumps) of greater depth are made. Crushed stone is poured at the bottom. The accumulated water is pumped out of these pits.
Not all owners of suburban allotments are “lucky” with ideal hydrogeological conditions. Often, only in the process of cultivating the land or building, they realize that underground waters lie high, that puddles stand for a long time during the flood period. Don't worry, drainage will solve this problem. Agree, it is much easier to build it than to look for a perfect site.
The drainage system will relieve excess moisture from the soil-vegetative layer, which will ensure the normal growth of cultivated green spaces. It will divert underground water from the foundation in case of contact, protect the basement and viewing hole garage from flooding.
Those who wish to arrange the drainage of the garden plot with their own hands or the efforts of a team of landscape workers will find detailed answers to all sorts of questions here. Our material describes in detail the options for groundwater drainage systems and methods for their construction.
A drainage system that collects and drains excess groundwater is necessary in the following cases:
- The plot is flat, i.e. there are no conditions for spontaneous movement of water downhill.
- Groundwater is marked at a level close to the earth's surface.
- The site is located in a lowland, river valley or in a swampy drained area.
- The soil-vegetative layer develops on clay soils with low filtration properties.
- The cottage is built on a slope, not far from its foot, which is why when precipitation falls on the site and around it, water accumulates and stagnates.
Installation of drainage is almost always necessary in areas with clay soils underlying the soil: sandy loam, loam. During the period of heavy rainfall, snowmelt, this type of rock passes water through its thickness too slowly or does not allow it to pass at all.
Water stagnation at the level of soil development is associated with its waterlogging. In a humid environment, the fungus actively reproduces, infections, pests (slugs, snails, etc.) appear, which leads to diseases of vegetable crops, rotting of the roots of bushes, perennial flowers and trees.

Due to stagnant water, waterlogging of the soil-vegetative layer occurs, as a result of which plants die in a water-saturated environment, deterioration appearance site. The drainage system allows you to remove moisture instantly, preventing its long-term impact on the ground
If you do not solve the problem with waterlogging of the soil, then over time, erosion of the earth may occur. In frosty times, the soil layers containing water will swell, which may damage the foundation, paved paths and other site improvement facilities.
To check if drainage is necessary, you need to find out throughput soil layers in the area. To do this, dig a small hole 60 cm deep and pour water into it to the limit.
If the water is absorbed in a day, then the soil underlying the soil has acceptable filtration properties. In this case, there is no need for drainage. If after two days the water does not leave, it means that clayey rocks lie under the soil-vegetative layer, and there is a risk of waterlogging.

Due to the heaving of water-saturated rocks, the walls of residential structures can crack, as a result of which the building may become unsuitable for permanent residence.


Consider the types of drainage systems and their features.
The main types of soil drainage systems
Before starting to draw up a work plan, purchase equipment and materials, it is necessary to determine which system it is advisable to implement so that it works as efficiently as possible.
There are three types of drainage systems:
- superficial(open) - is a ditch on the surface of the earth, used to remove excess moisture formed due to private rains or snowmelt;
- deep(closed) - water is drained using a system of pipes, wells; the system is used in case of risk of flooding the garden with precipitation and / or groundwater;
- filling- the principle of its construction is the same as the deep one, only drainage material without pipes is used exclusively; suitable for draining areas during rainfall.
Each of the above technologies has its own advantages and disadvantages.


Stormwater as an effective addition
Storm sewer- set downpipes with a well for the accumulation of moisture, through which it is transferred to the water intake. Before the water enters the well, there is a special siphon partition (grille) designed to clean the incoming liquid from debris, as a result of which the system does not clog, and there is no unpleasant odor in it.
Storm water sewer system with linear type water collectors is a series of trays located at a slope towards the place of moisture collection. Tanks are installed in ditches with a layer of gravel at the bottom. The technology is used when the slope of the day surface of the site does not exceed 30 degrees relative to the horizon.

Open ditches of the drainage system, as well as storm sewers, can be covered with a special storm grate that does not allow debris to pass through
The main difference between a point system and a linear one is that the point system uses a pipe system located underground. Water is collected through the so-called "points" - special storm drains equipped with a permeable grate.
This solution makes the structure almost invisible on the site.

Storm sewer point collectors are installed under the downpipes that collect atmospheric water from the roof of buildings
Sometimes one type of system is not enough for an area, so they can be combined to maintain an optimal level of moisture.
You need to choose the type of system individually, taking into account landscape, geological features. For example, if the house is located away from a body of water, then you can limit yourself to open drainage. If the mansion is located on a landslide-prone slope in the river valley, then it is better to apply several systems at the same time. You can read more about the arrangement of storm sewers.
Image gallery


Closed type drainage device
System closed type is a network of trenches in which pipes and drainage material are laid. Drainage can be laid both over the entire area and in a specific area that needs drainage.
The deep drainage system consists of the following elements:
- drainage pipes;
- well (drainage);
- water pump.
To implement the system, it is necessary to dig trenches, install pipes, and build drainage systems.

Deep, i.e. the closed drainage system is absolutely invisible on the site, since the pipeline is sprinkled on top fertile soil on which you can plant vegetable crops
To equip a water pipe in a trench, you will need:
- geotextile;
- crushed stone;
- gravel;
- sand.
The system is effectively used in case of flooding of the site with groundwater.
Standard structural components of the drainage system are:
Image gallery


Drawing up a layout of elements
Before carrying out work, it is necessary to draw up a site plan, noting housing, domestic and household facilities, as well as shrubs, trees, flower beds.

The diagram illustrates the layout of an open drainage system according to the herringbone pattern. In the figure: 1) branches of the pipeline; 2) main sewer; 3) storm drain; 4) well
Then you need to draw up a layout of trenches.
There are 4 main types of schemes:
- the location of the snake;
- parallel device;
- laying drains with a herringbone;
- trapezoidal arrangement.
You can choose the scheme yourself, but the herringbone markup is most often used.

The choice of pipe layout depends on the shape of the site. The most effective is the herringbone pattern, since it is able to cover the largest area.
Ditches can be placed along the perimeter of the territory and along the contour of the house. On the site where vegetables and flowers will grow, a network is being built taking into account the requirements, which will be discussed below.
Technical requirements for installation
When constructing a trench, the following requirements must be considered:
- the depth should be 1-1.2 m, and the width should be 35-40 cm;
- near trees, a trench is dug to a depth of 1.2-1.5 m, near forest plantations - by 70-90 cm, near flower beds - by 60-80 cm;
- if at the level of the PRS of the site prevails peat soil, then, given that it quickly shrinks, the depth of the trench should not be less than a meter;
- if the site is relief, then the depth can reach a meter, if it is gentle or with a slight slope, then digging a trench with a depth of less than 1.5 m is inefficient;
- on clay soils: sandy loam, loam, trenches are dug at a distance of 7-10 m from each other, on well-drained: sands, gravel and gravel deposits - at 15-20 m;
- the drainage system should be located more than 1 meter from the foundation of the house, and the minimum allowable distance to the fence is 50 cm.
For the construction of an open drainage system, special pipes with a mesh should be selected. Their diameter can vary from 0.15 to 0.5 cm. It is better to refuse the use of asbestos-cement or ceramic drains, since they are impractical, require pre-training, frequent rinsing, quickly become clogged.

The most effective are perforated plastic pipes with geotextile and a filter made of coconut or other fiber.
For the installation of closed drainage branches, it is recommended to give preference to perforated pipes made of polymer or composite materials. Some modifications are equipped with a special filter shell (geotextile), which prevents the system from clogging.
The collector diameter must be larger than the pipe diameter. If the area of the site to be developed is more than 0.5 ha, then the diameters can be equal.
The slope of the system towards the collector should be 2-3 cm for each meter of pipe with a diameter of 5-10 cm. If a larger diameter pipe is planned, then the slope should be less. We outlined in more detail how to correctly calculate the slope of the drainage pipe.
Owners of land in a lowland or on a steep slope face the problem when water stagnates at the lowest point, when the receiving water can be located higher. In this case, in the lower part of the territory, it is necessary to build a storage well, into which it is necessary to introduce drainage pump. With its help, water is pumped up and discharged into a ditch, ravine or other water receiver.
If for the disposal of collected water it is planned to build absorption well on the site, then the work on its construction is carried out in the following sequence:
Image gallery


Progress in the construction of the system
The first thing to do before digging a trench is. Its depth should be 2-3 m, and the diameter - up to 1 meter.
The most reliable well is concrete. However, install concrete rings manually is not always possible, so you will have to resort to the help of lifting equipment. In addition, high cost and fragility are disadvantages of concrete structures.
Plastic well - a special design made of polyethylene, polypropylene or polyvinyl chloride, is practical and of high quality, effectively withstands ground pressure. The advantage of a reservoir well is that it provides pipe bends, and the package includes rubber cuffs ensuring the tightness of the connections.

Plastic wells are considered the easiest to operate and install, meet the price-quality ratio
You can also pave a brick well on your own, make a structure out of rubber and other improvised materials.
Subsequently, they install in the well, which pumps water into the drainage system - a sewer, a well or other natural water intake.

To protect ordinary plastic pipes from clogging, so-called "external" filters are used, made from straw, fibrous peat, weaving waste.
After digging trenches, do the following:
- The trench is covered with sand by 10 cm, after which the geotextile layer is settled so that the edges of the canvas are higher than the recess.
- Geotextiles are covered with crushed stone by 20 cm.
- Lay drainage pipes.
- Pipes are covered with gravel or crushed stone of sedimentary rocks to a height of 30-40 cm, then with coarse or gravelly sand 30 cm.
- The geotextile is rolled up - it will hold small particles and allow the system to become clogged.
- Geotextiles are sprinkled on top with a fertile layer of earth - soil.
- The pipes are connected to the well.
The technology for designing a backfill drainage system differs from a deep one in that it does not provide pipes. The trenches are filled with large rubble or broken bricks, covered with small stones or gravel on top.
Implementation of the open variant
To create surface systems, the same rules for constructing a trench are used as for the implementation of a deep one.
For an open system, it is enough to build ditches 0.7 m deep and 0.5 m thick. The walls are made with a slope, the bevel angle is 30 degrees. The ditch is taken out to the sewer, which is common to the plots or to any other water intake.

The easiest and most inexpensive way to install a drainage system for draining a garden plot is an open option that you can do yourself without any problems and costs.
The walls of open drainage ditches are compacted, sometimes reinforced with cobblestone or rubble stone, laid out with concrete tiles.
On our website there are other materials about the arrangement of the drainage system on the site and around the house, we invite you to familiarize yourself with them:
Extending the life of the drain
A backfill type drainage system is able to function effectively for 5-7 years, while both deep and open drainage structures with high-quality pipes make it possible to forget about the problem of waterlogging for 50 years. But this is possible under the condition of periodic maintenance of the network.
There are 4 rules for caring for the system.
- On the site where the pipes are located, large-sized equipment should not pass - the road for it should be laid separately.
- Regular loosening of the earth will improve its water permeability, which will ensure Good work systems.
- Once every 2-3 years, pipes should be flushed under strong water pressure, cleaning them from clay particles and rust.
- Earthwork for installation should be carried out on damp ground.
Fulfilling simple tips, can extend the life of the equipment and avoid repair.
Conclusions and useful video on the topic
The video tells about all the nuances of a private drainage system:
Installation of drainage into the ground relieves owners of land acres from many problems. By setting drainage system, you can not worry about the state of crops, the general appearance of the site with increasing humidity.
When you constantly meet with the problem of the appearance of excess water on the site, it is necessary to take measures to remove it. Otherwise, you will not only get into trouble in cultivating the site, but also jeopardize damage to the foundation of the house or nearby utility buildings. The manufacture of drainage, or rather, a drainage structure in this situation, is the only acceptable way out.
In this article, we will consider a simple and economical way to create drainage in a personal plot. 
Preparatory actions
Before you begin the process of assembling and installing a drainage structure, you need to decide what result you would like to achieve. Based on your decision, you need to at least at a primitive level create a project for the future system for yourself: determine its location, possible consequences contact of the system and surrounding objects, dimensions, dimensions. Based on the generalization of all these data, it is already possible to calculate the material costs for the acquisition of the entire volume Supplies. It is useful, by the way, to understand that the depth of drainage directly depends on the height of the well intended for drainage. It is customary to place the well a little higher than the elements of the entire structure. 
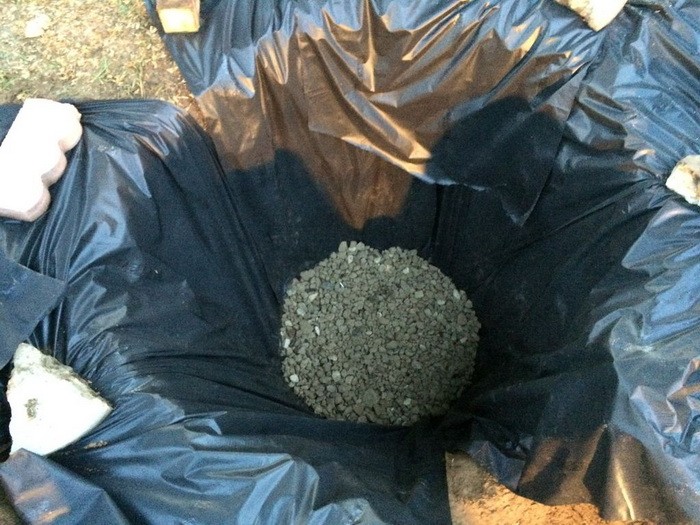
Now about the design itself: traditional (or “French”) drainage is a trench filled with gravel, separated from the ground by geotextiles (geotextile is used to prevent mixing of soil and gravel, it also passes water through itself and prevents weeds from growing). Gravel together with geofabric helps water to quickly soak into the ground, evenly distributing moisture along its location, thus preventing the collection and stagnation of water in a particular one place.
When creating a drainage of this type is usually used corrugated pipes, equipped with longitudinal holes on one side, usually made of PVC. At the end of the entire system, a drainage tank should be located, the task of which is to evenly distribute the accumulated water into the ground around it. To create this well, a two-hundred-liter plastic barrel in the form of a drum is well suited (the rounded shape of the container is more preferable in this case) with multiple holes in the bottom and walls. This well should be placed on a special gravel “cushion” (about 10 cm), the space between the walls of the pit and the tank is also filled with gravel (layer thickness 15 cm). Holes are made in the upper part of the barrel to receive incoming water, and one of the holes is to install a special drainage grate. You don’t need to make many holes, two or three, 5 cm each, are enough. One large hole is made in the upper part of the well wall, designed to enter the drainage system pipe.
The second major element of such a system is a water collection tank, the width of which should be approximately 30x30 cm. The tank must be equipped with a drain grate. personal plot is not a very costly operation. In the manufacture of the system, affordable materials are used and you need a little of them. The most expensive part you will need may be the catchment tank. A PVC pipe will cost much less. Gravel will need about two cubic meters. You will also need to purchase a special fabric - geotextiles.
Digging a drainage trench
Next, you need to dig a trench from the catchment area to the drainage site and a pit to install a well on this side and a reservoir on the other. In the place for the drainage well, the pit will need to be deepened by 15 cm compared to the depth of the rest of the trench, the depth of which, in turn, you will need to independently calculate based on the size of the drainage tank. 


Production of a drainage well
Using a drill with a diameter of 2-3 cm, you can easily turn the walls of the tank into a sieve. Through these holes, as far as possible made at the same intervals, entered the barrel waste water should evenly go into the surrounding soil. On the wall of the barrel, at the top, you should make a hole according to the diameter of the drainage pipe and prepare a mount for the pipe. 


trench filling
Then the excavated trench must be covered with geofabric. This will prevent silt and dirt particles from mixing with the gravel. Also, geotextiles will provide better absorption of moisture by the ground. Next, place an already prepared 200-liter barrel on an 8-10 cm gravel bed. Place a small amount of gravel around the barrel and make sure that the tank does not “walk” from side to side. Similar actions should be done with the water collector, which must be made so that its upper edge is along the edge of the earth's surface. The height of the water collector can also be adjusted by adding gravel. 


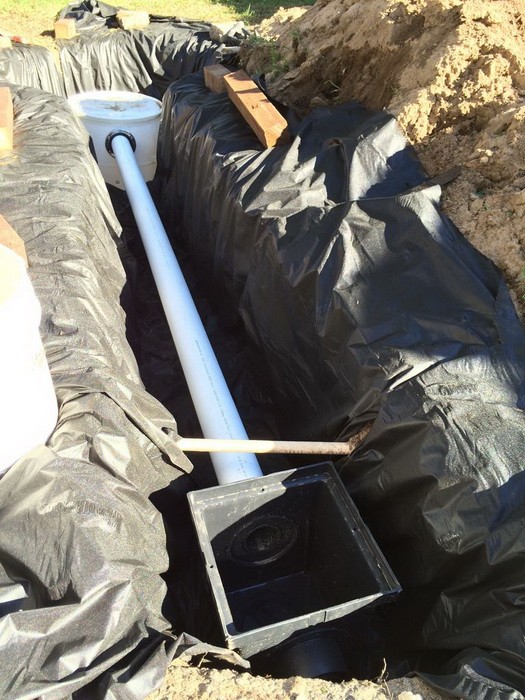
Make sure that the water collector is also immobilized. Then you need to connect both reserve cars to the drain pipe. It is important to know that the holes in the drainage pipe should be located on its lower side, while the pipe itself is laid under a slope. Fill the trench with gravel. Make sure that 15 cm remain on the surface of the earth and gravel. Next, we mount the grate for draining on the tank. Then it is necessary to tuck the geofabric, making sure that the edges of the textile on both sides of the trench overlap, covering each other. 


Now you know how you can independently build drainage in just a couple of days at no significant cost. The main thing in this case, as in all others, is careful preparation.
Video How to make drainage on the site with your own hands
The drainage of the garden plot today is necessary procedure for many.
To create a drainage system, you need accurate calculations. Errors in laying can lead to the destruction of the foundation of the house.
As you know, the cost construction works today it is not cheap, but you can save a lot if you do everything yourself and use improvised materials that are available in almost any summer cottage. Thus, the land plot can be drained without significant cash costs, for this it is necessary to make some efforts. You will also need the following tools for this:
- trowel;
- shovel;
- wheelbarrow;
- building level;
- roulette;
- hacksaw.
Still need skillful hands, diligence, and then everything can be done without much difficulty and a garden plot with the help of a drainage system can get rid of many problems.
How is stone and fashin drainage done

Drainage systems can be different, one of the most common is a system made of oak, hazel, alder or birch. From the branches you need to form the so-called bunches-fascines. Such a process is recommended to be carried out on crossed logs (goats), they must be arranged along the length of the trench. Thus, the branches will lie upside down on the cross, they must be firmly tied with a rope, you can use wicker or steel wire. It is necessary to tie the bundles, because if this is not done, the drainage will soon silt up, which will prevent its functioning. Doing it yourself is easy.
The thickness of the fascine (bundle) must be at least 30 cm, the thickest branches must be laid in the middle, the smaller branches must be laid on the sides. It is necessary to start laying the bundles from the top of the ditch, it is necessary to lay moss on them and also on the sides. Where the entrance of the trench to the pit is located, a source with a socket is made, for this you need to use boards.
As for the service life of such a system, the wooden drainage, which is located on peat soils, can easily last up to 25 years. made of stone is made of crushed stone, the size of which should be 8-10 cm. This is done in this way: at the bottom of the trench you need to lay the most large stones, smaller ones are stacked on top and on the sides. In this case, it must be borne in mind that the level of the stone partition must be at least 30 cm. Moss must be laid on the stones, then the turf is laid, but so that the grass is below. As for the depth to which the drainage is laid, it should be about 1 m.
Back to index
Do-it-yourself wooden or ceramic drainage

On a personal plot that needs drainage, you can make wooden or ceramic drainage with your own hands. Before this, you need to set the level of the slope of the site, then you need to dig a trench and you should take into account how to do plumbing system into which the water will flow. Drainage systems made of ceramics are made of ceramic pipes, the diameter of which from the inside must be at least 5 cm. The pipes must be laid very tightly in the trench, all joints are lined with matting and moss.
In those places where the drainage enters the reservoir, you need to make a source in the form of a pipe made of wood, and another one is inserted into it. wooden pipe. Then you need to fill up the trench, lay layers of turf with grass from below, and then everything is covered with earth. As for the depth of the backfill, on average it is 1 m. From a tree, it is made from 3 boards. Moss should be laid around the perimeter of the pipe, and then gravel or fine gravel should be poured, but this must be done carefully. After that, you need to lay the turf plates and pour the earth.
It is necessary to install pipes from the source. In order to make poles, poles from conifers trees, the thickness of which is from 7 to 10 cm. Before laying them, you need to remove the skin from them. You need to put them on transverse linings in 1 or 2 balls, you need to spread moss on top. If drainage is done with brushwood, then the technology is similar. It is not difficult to do such a procedure with your own hands, but it must be borne in mind that drainage systems made of brushwood are not durable.
Back to index
Do-it-yourself soft drainage in the garden

On the market building materials materials such as geotextiles and tecton are offered today. They are great for making soft drainage with your own hands. Tecton perfectly absorbs moisture, and when it absorbs it, it does not release it back. As for geotextiles, it is a kind of filter that allows water to pass through, retaining debris. is not difficult, it is perfect for the garden.
To begin with, a trench or a pit for drainage breaks out so that the bottom of the pit is tilted to the side where water can be diverted, then a tecton must be laid on the bottom of the ditch, this is done in the form of a trough. After that, the entire ditch is covered with geotextile in such a way that there are 40 cm edges, which is necessary for overlapping.
Drainage material is poured onto the geotextile (pebbles or crushed stone can be used as this), the height should be two-thirds of the depth of the pit. Then the drainage is overlapped with those edges of the geotextile that remain. Sand is poured on top and everything is leveled. Such drainage of a garden plot can be quickly done with your own hands, it is very easy to install, and it functions no worse than other systems.