How to make a kitchen set with your own hands. Accurate calculation is the basis of success. Do-it-yourself kitchen set: tool purchase
Furnishing the kitchen with practical and spectacular furniture is not a trivial task. How to contrive so that the furniture fits perfectly into the interior, perfectly endures the peculiarities of the local microclimate, pleases the whole family, and does not ruin the family budget with its cost? ready-made proposals there was no such “golden mean”, maybe try to make it yourself? After all, collect kitchen set with your own hands is quite simple - with correct measurements and accurate calculations, such work is within the power of anyone who has ever twisted a screw or sawed a board with his own hands. Don't believe? Consider step by step all the nuances of the upcoming work!
The most common mistake many home craftsmen make is overestimating their own strengths. Having decided to equip the kitchen with self-made furniture, they begin to plan the most "fancy" options, guided by the picture they like from a design magazine, or even their own imagination. But at the same time, they absolutely do not take into account their real skills both in design and in a banal assembly. Therefore, novice furniture makers, before making a kitchen set with their own hands, are advised to heed the advice of more experienced craftsmen.
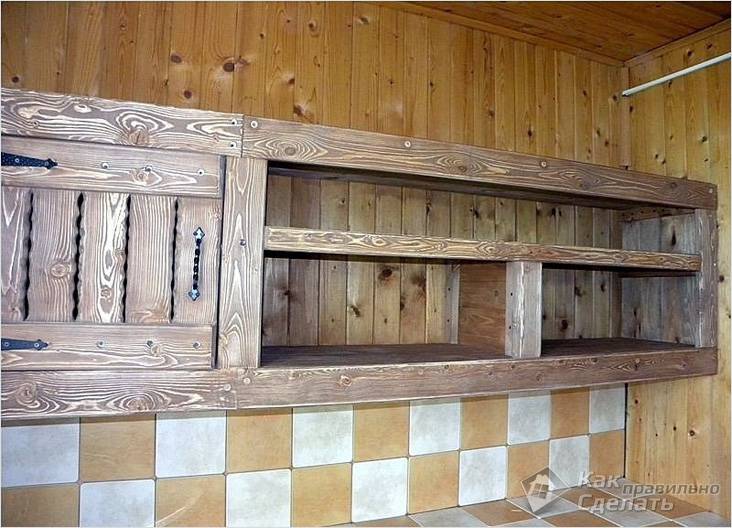
The simplest option kitchen set for country house
Note rules:
- The principle “the simpler, the more reliable” works great for beginners in the furniture business. Take classic rectilinear designs as a basis - they are easy both to measure and to assemble.

Do-it-yourself kitchen from wooden planks
- A sign of professionalism in creating a kitchen set is a well-perceived symmetry in the arrangement of individual pieces of furniture and the design of facades.

Symmetrical cabinets under the finished cornice look very neat
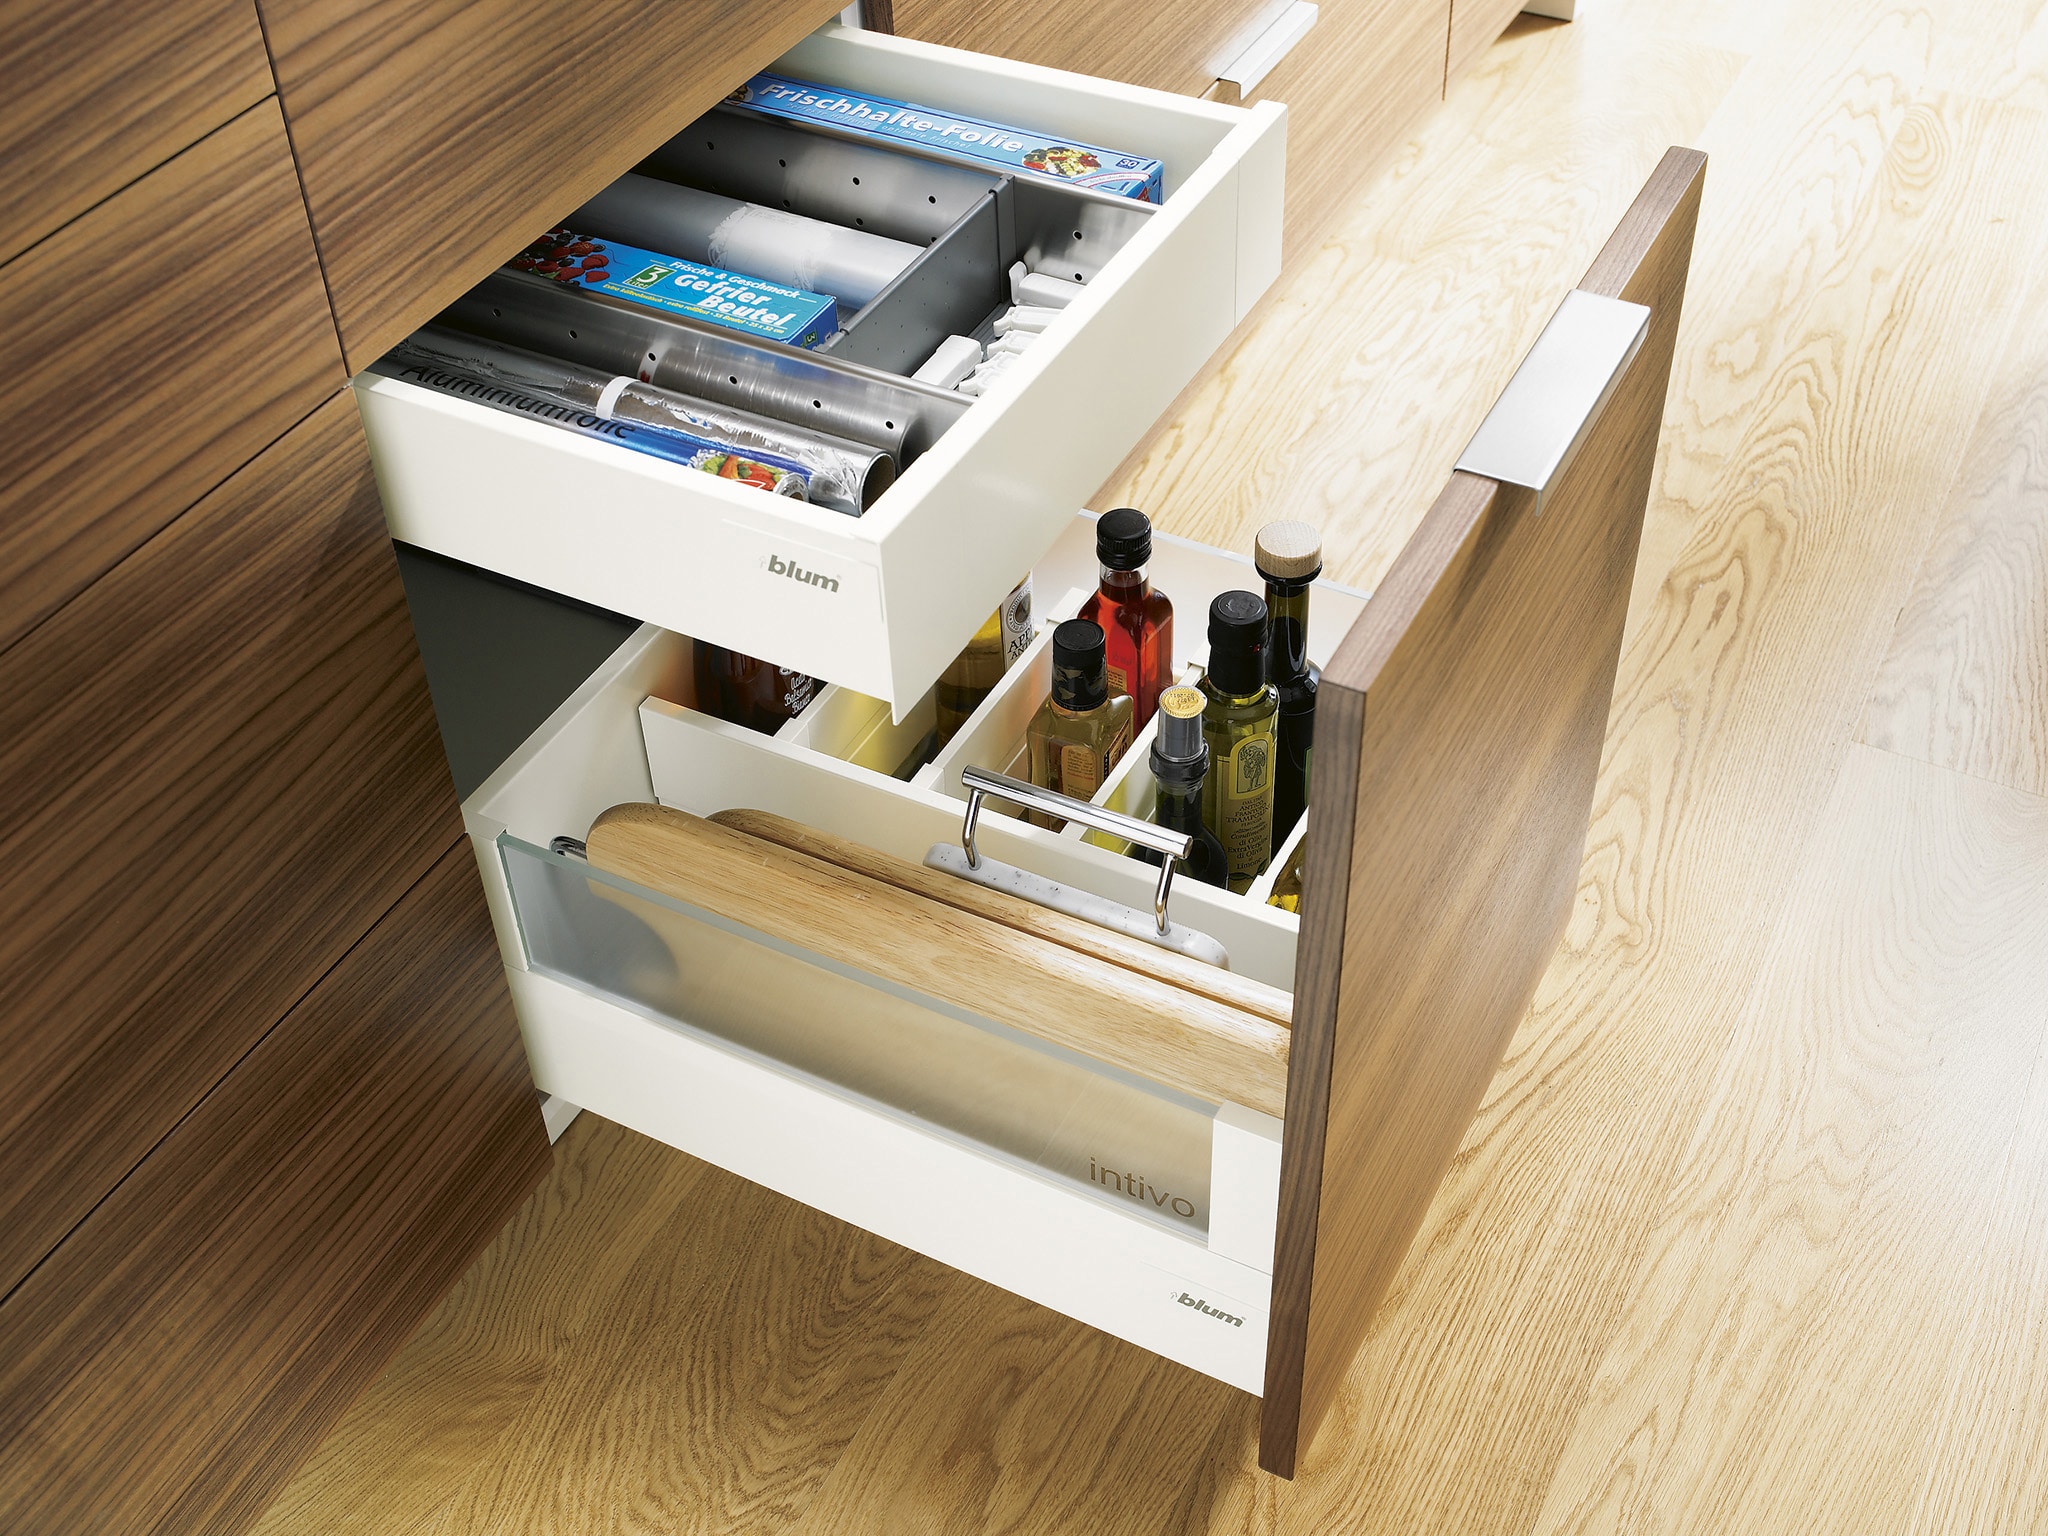
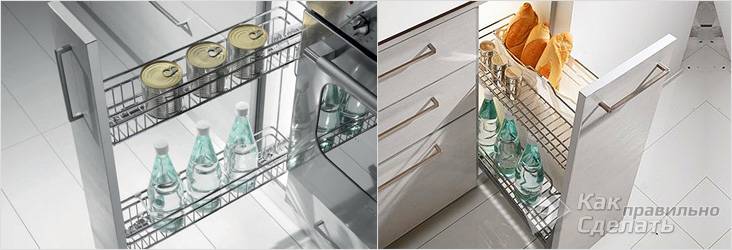
- Even the simplest modular set, fitted into the interior without gaps and protruding parts, looks beautiful and aesthetically pleasing. And functionality will be added by the use of novelties that are light in execution, for example, cargo, organizers or boxes with exit systems.
Cargo boxes are just made for tight spaces
Organizer dividers can be bought ready-made or made by yourself.
- You can give a touch of "exclusivity" due to the original furniture facades which usually come to the fore. They can be completely made by yourself, ordered ready-made or decorated to your own taste.

Facades with photo printing will become spectacular decoration any interior

Vinyl stickers for budget decor
On a note! If you take standard furniture sizes as a basis for a headset, you can significantly reduce the cost of materials and their processing.
Standard or exclusive - which materials to give preference to
If you are taking up the manufacture of furniture for the first time, choose materials of an average and low price category - after all, no one is safe from mistakes and damage to blanks. Having trained in working with cheaper frame parts, facades can already be made from natural wood or glass. But no matter which option you choose, it is important to take care of protecting the future headset from changes in temperature and humidity.
To create a reliable housing, you can use any kind of chipboard and fiberboard with outer coating:
- Chipboard is the most common "furniture" material, which is used both for mounting the frame and for creating facades. It is not too heavy, strong enough, and high-quality laminate lining of the plate provides good protection against moisture. In addition, the material is inexpensive, has a wide range of colors and imitations. expensive coatings. For kitchen furniture a standard sheet thickness of 16 mm is sufficient.

chipboard - budget material for self assembly furniture
Disadvantages: Chipboard must be closed external protection– otherwise, when heated, the stove may emit bad smell and evaporate formaldehyde compounds. Although the material is quite simple in installation, it will not work to assemble / disassemble the case or screw in the screws several times - due to the large number of internal voids, the fasteners loosen and do not hold well.
Important! The most durable is the facing of plates with plastic (postforming). The protective layer is applied under high pressure and literally grows together with the tree, without peeling off even with temperature changes and prolonged contact with water.
Chipboard with plastic protection
- MDF - fiberboard holds fasteners perfectly, does not evaporate harmful substances, is easy to process (including figure-milling), which allows you to create non-standard shapes and original decor. Laminate, PVC film, natural or artificial veneer, plastic, paint and varnish products are used as a protective coating.
Disadvantages: the price of blanks is 1.5-2 times higher than analogues from chipboard.
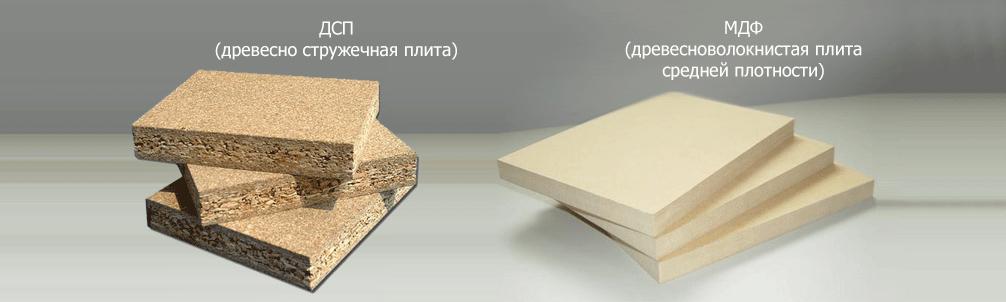
- Fibreboard or HDF - thin particle board - practical and easy option for the manufacture of the rear walls of the headset.
But for facades, the choice of material is not limited to wood-based panels. Here you can use an array natural wood, rattan, bamboo, glass ... The main thing is the confidence of the master in own forces during processing and assembly.
On a note! Facades are the "face" of the kitchen. Therefore, if you don’t have enough practical skills in the furniture business, but you want to create a set with an original pattern or milling, you can order ready-made facades or give blanks for decoration to craftsmen with professional equipment.

You can choose ready-made facades for any interior style
All of the above materials (with the exception of fiberboard) are also used for making do-it-yourself countertops. Facing with acrylic or other artificial stone, plastic, metal also looks good, but such products are usually made to order.
Advice! When choosing a material, do not be too lazy to go to a building materials store and carefully examine everything possible options personally. With this approach, it will be much easier to imagine appearance your future furniture.

The choice of materials for self-manufacturing furniture is very wide
Preparatory stage
The lion's share of the price for furniture goes to design and calculations, since even a non-professional assembler can make a kitchen set with his own hands from processed blanks. Therefore, creating your own kitchen wall design for a specific interior, you really save. And do not worry, the masters assure that higher mathematics is not needed for such calculations - it is quite enough to know the basics of arithmetic.
Accurate calculation is the basis of success
To take measurements correctly, arm yourself with a tape measure, level, calculator and a sheet of paper to record the data obtained. It would be nice to involve an assistant in the work - after all, the dimensions of many pieces of furniture exceed the span of the hands of one person, and the calculations can turn out to be inaccurate.
We act in stages:
- First, a general measurement of the room is made in order to calculate the length and height of the walls, as well as indicate the exact location of the window and doorways, window sills, communications (gas, sewer, heating and water pipes, ventilation, sockets and switches).
Important! All overall parameters are tried on at least three times (for example, the length of the wall is determined under the ceiling, at the level of the plinth and in the center) in order to level deviations due to possible curvature.
- The measurements taken are applied to the drawing (if there is a difference in the measurements, it is taken for calculations minimum value). Such a scheme can be drawn both on paper and in a computer graphics program. PRO100 is considered the most convenient for novice designers, but others can be used - AutoCad, BlumDynalog or Basis furniture maker. In any of these programs, you can get a finished sketch in 3D format, and in some (for example, BlumDynalog) there is also a module for cutting components with all the markup and assembly diagram.

Creating a kitchen project with computer program
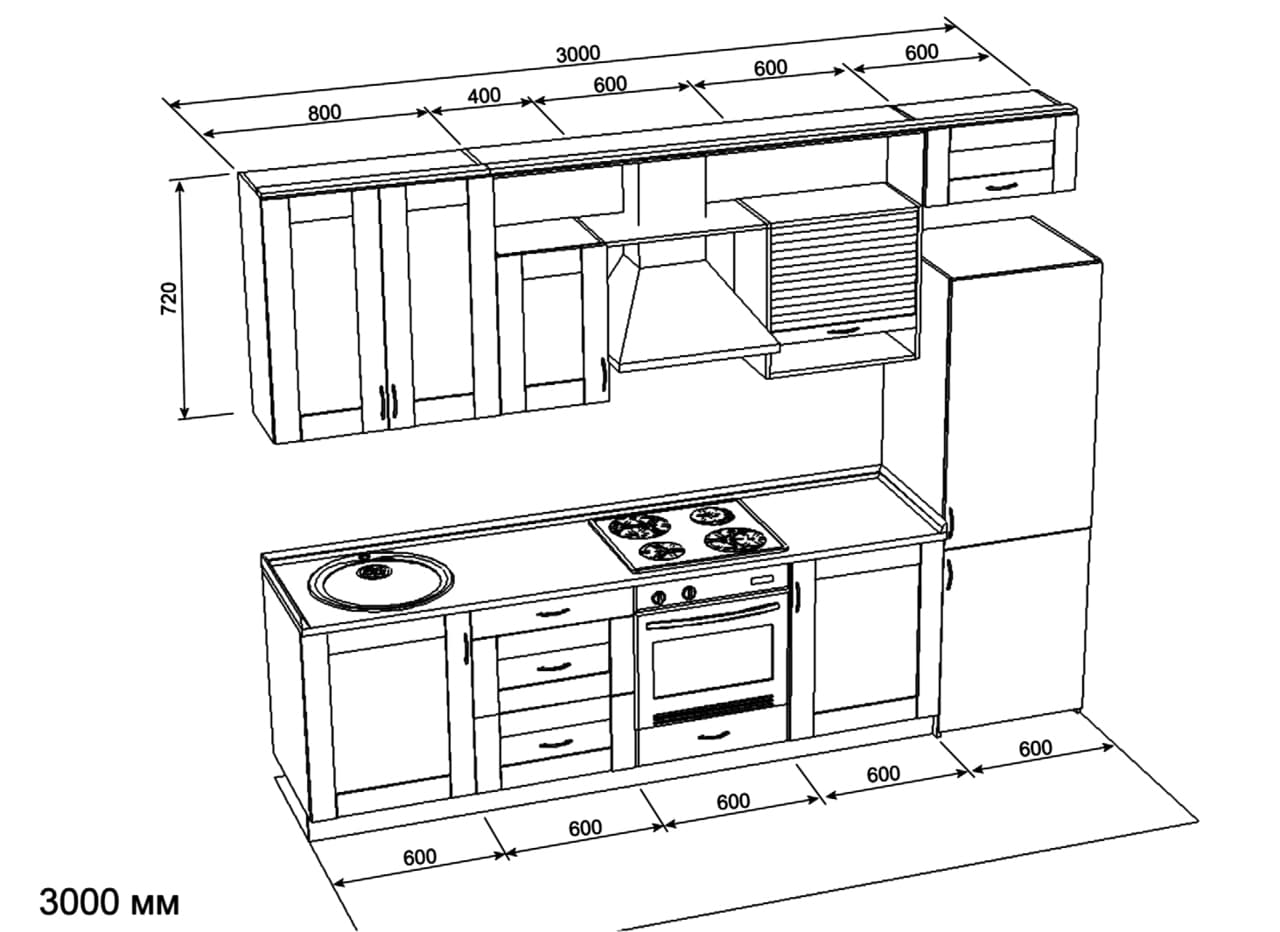
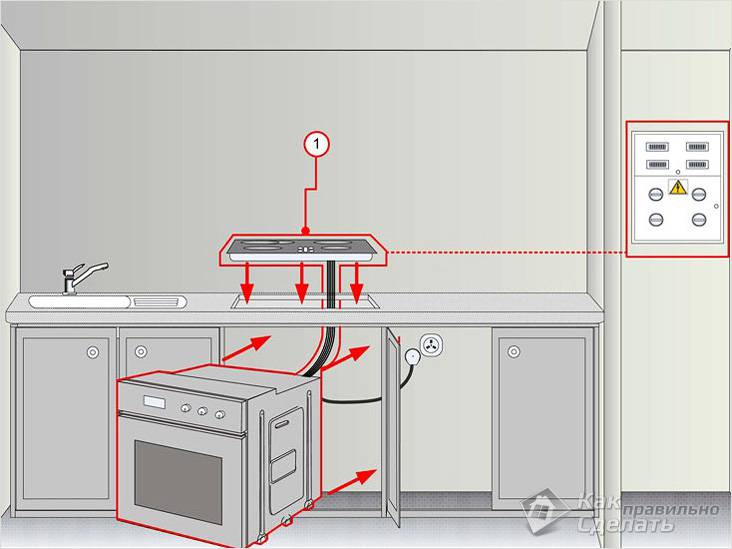
- Then calculations are made for each item of the headset. Moreover, it is necessary to take into account household appliances - a refrigerator, a stove (or an oven and a separate hob), an extractor hood, a microwave oven, a dishwasher, a dryer and other overall or not very appliances.
Important! In addition to the size of the equipment, it is necessary to provide for the placement of sockets for it.

Communication scheme for the kitchen wall
- At the last stage, detailed markings are made for each cabinet and bedside tables for shelves, drawers, fixtures and other fittings. If you are going to install purchased standard parts in them, check the dimensions in advance so as not to miss the calculations.
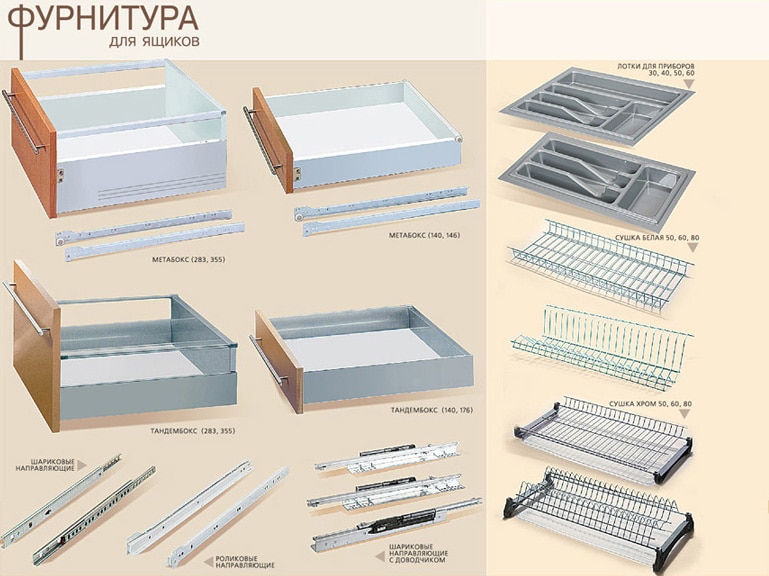
Ready fillers for kitchen drawers
For those who have a well-developed spatial imagination, a simple paper drawing is quite enough. For the rest, a color 3D sketch will be more visual, thanks to which you can not only make accurate markings, but also decide on the design of the headset.
The kitchen project can be depicted on paper
Attention! To order sawing material for a future set, you must have a dimensional diagram of each part.
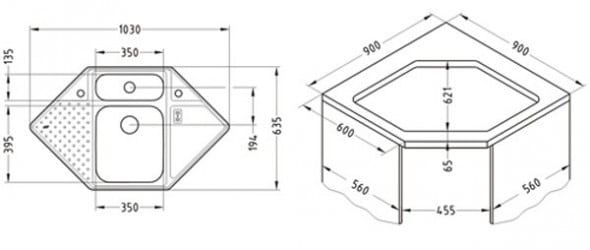
An example of a detailed diagram for the manufacture of a corner sink cabinet
Ordering and receiving materials
Having fully decided how to make a kitchen set with your own hands, the finished drawings are transferred to the workshop, where they are cut into parts. The cost of work will depend on such factors:
- complexity of material processing;
- size matching furniture standards;
- the number of blanks (for a large order you can get a tangible discount);
- need additional processing cuts;
- urgency.
Important! If during marking it turned out that in some parts additional holes for pipes or other elements are needed, be sure to indicate their location and diameter in the drawing. For self-cutting, you need at least a jigsaw, and this is far from a guarantee of accurate cuts.

After a few days, all ordered items are handed out. Be sure to check the presence of each part and their dimensions, color matching and defects, as well as the quality of the cut itself.

Blanks for assembling a kitchen set
Attention! The coating should not have large chips and cracks - they can lead to premature loss of its protective qualities and deformation of the entire product.
A defect in the processing of cuts can spoil the appearance of a new headset
Edging of the ends of parts
The edges of the obtained blanks from laminated chipboard or MDF must be further processed, as they remain uncoated (the array can simply be coated with paint, varnish or wax-oil impregnation). To do this, edging (or trimming) is carried out - gluing bare spots with a narrow melamine or plastic tape. You can perform this procedure at home.
Important! The footage of the adhesive tape is determined by the dimensions of the parts with cuts. The edge should be 4 mm wider than the end of the part and match the color of the main coating.
Edging is carried out according to the following plan:
- The chipboard part is installed with a cut up, it is not necessary to fix it, you can just hold it.
- Edge tape is pressed against the end with the adhesive side inward.
- To improve adhesion, the glued tape should be heated (it is enough to iron the melamine tape with an iron set to medium heat, but the plastic one needs to be heated stronger and longer, for example, using a building hair dryer).
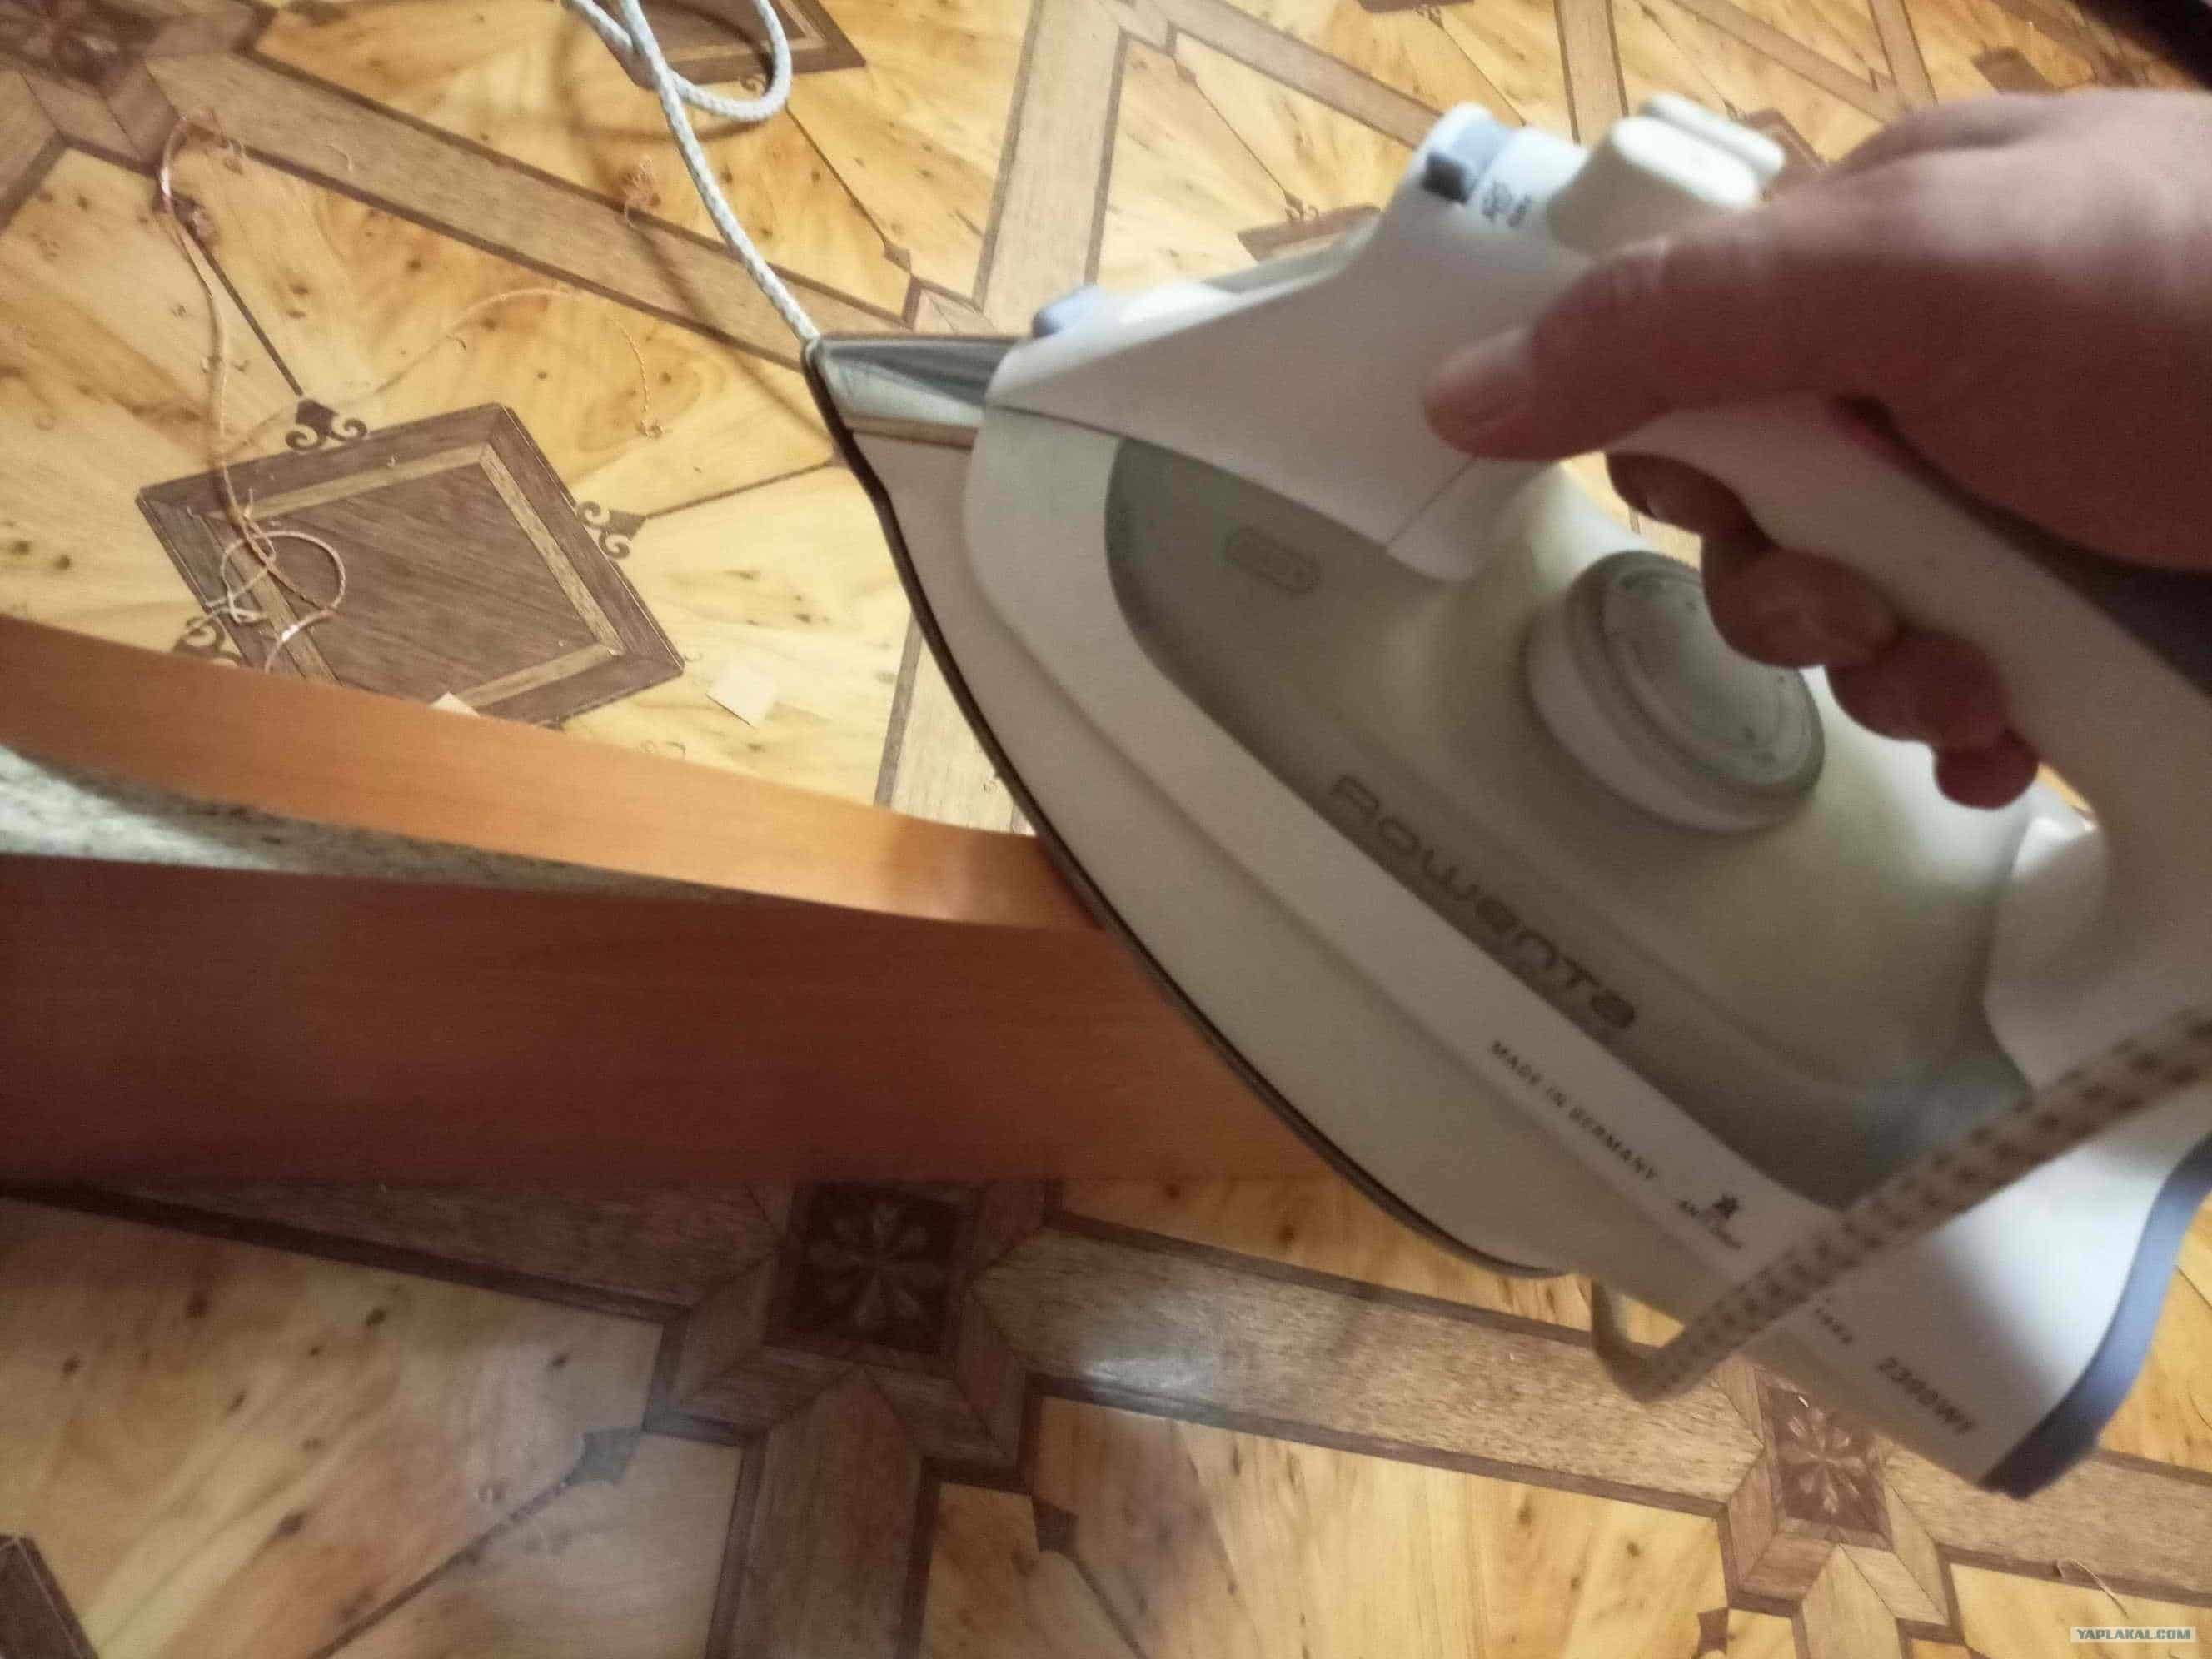
Finishing ends at home
On a note! In order not to spoil the coating of the tape, when working with an iron, it can be covered with a sheet of paper or a thin cloth.
- After the edge has stuck and cooled, it is necessary to remove the protruding edges. Excess melamine tape is easy to cut with a regular wallpaper knife, for plastic it is better to use a hacksaw blade.
- Finally, it is recommended to process the cuts with medium sandpaper or a small file to remove roughness and slightly round the corners.
Advice! Although the process of closing the ends is not complicated, it takes a lot of time and requires care and accuracy. This service can also be offered in the workshop where the sawing was ordered, and if they have an edge facing machine, you should agree.
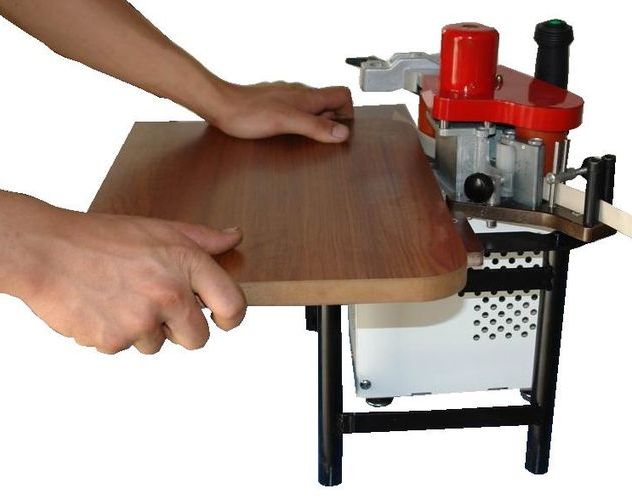
Edging workpieces on professional equipment - quickly and reliably
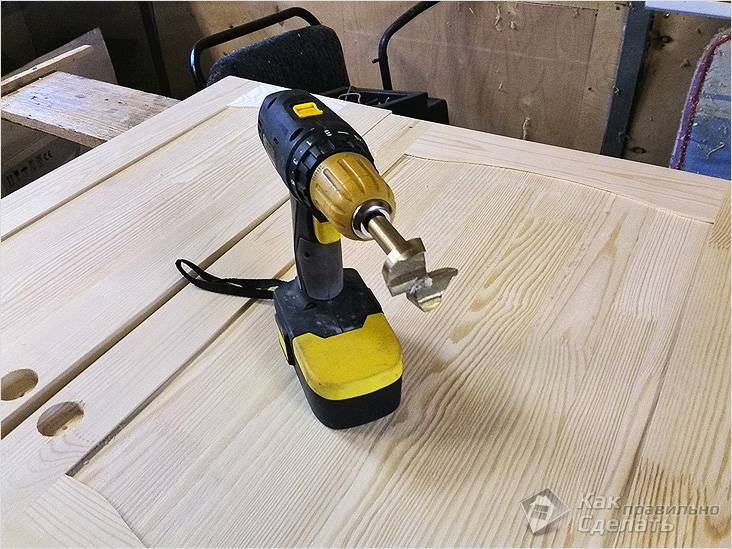
Preparation of parts - marking and drilling holes
At this stage, it is necessary to mark the places for fasteners on the workpieces and drill holes for the screws.

To make holes, you will need a drill and wood drill bits
We act in stages:
- First we work with the side walls. We place them on flat surface inside up (like an open book). Referring to the drawn plan, we calculate and mark the places where the horizontal lines fit - the bottom, the lid and the shelves. To do this, you can use a board of the same thickness as the material of the blanks - it is easy to draw a straight line along it at the right distance. To mark the location of the shelves, we use a tape measure and the same board.
- In the center of the marked fit of the horizontals (that is, at a distance of 8 mm from the drawn lines with a board thickness of 16 mm), we outline the drilling points. They should be 50-100 mm (depending on the depth of the cabinet) from the outer edge. For clarity, you can prick small indentations in these places with an awl.
- Holes are drilled from the inside of the sidewalls with a 4 mm drill.
- FROM outer side we make chamfers under the hats of self-tapping screws. This is easy enough to do with a simple drill with a 9mm drill set in reverse.
- We attach the lower horizontal to the processed sidewall - the angle can be fixed with the help of an angle vice or ask someone to hold the parts so that they do not move. Through the hole already made in the sidewall, we drill a horizontal with a 2 mm drill.
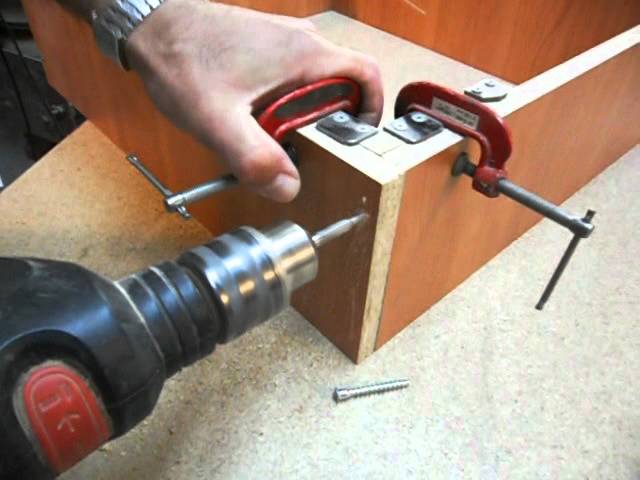
Angle vise will help fix the walls perpendicular to each other
- Repeat these steps for the remaining horizontals and the second sidewall.
Such preparation must be carried out for the side surfaces of all cabinets and bedside tables, after which you can take up the assembly.
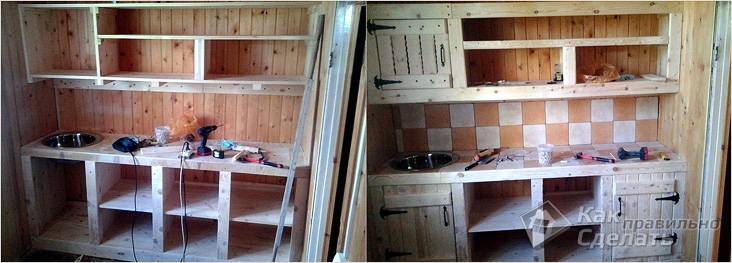
Assembling a kitchen set with your own hands
To assemble the headset, you need to mark on the wall using a level, and continue assembling the blanks, starting with massive floor pedestals.
Assembly of the main frame
We assemble the bottom line from fully prepared parts - the basis of the future headset.
Action algorithm:
- We fasten the parts using the usual 55 wood screws and a screwdriver.
- We check the correctness of the assembly by measuring the diagonals of the resulting rectangle.
- From the visible outer sides, we close the caps of the self-tapping screws with special plastic plugs.
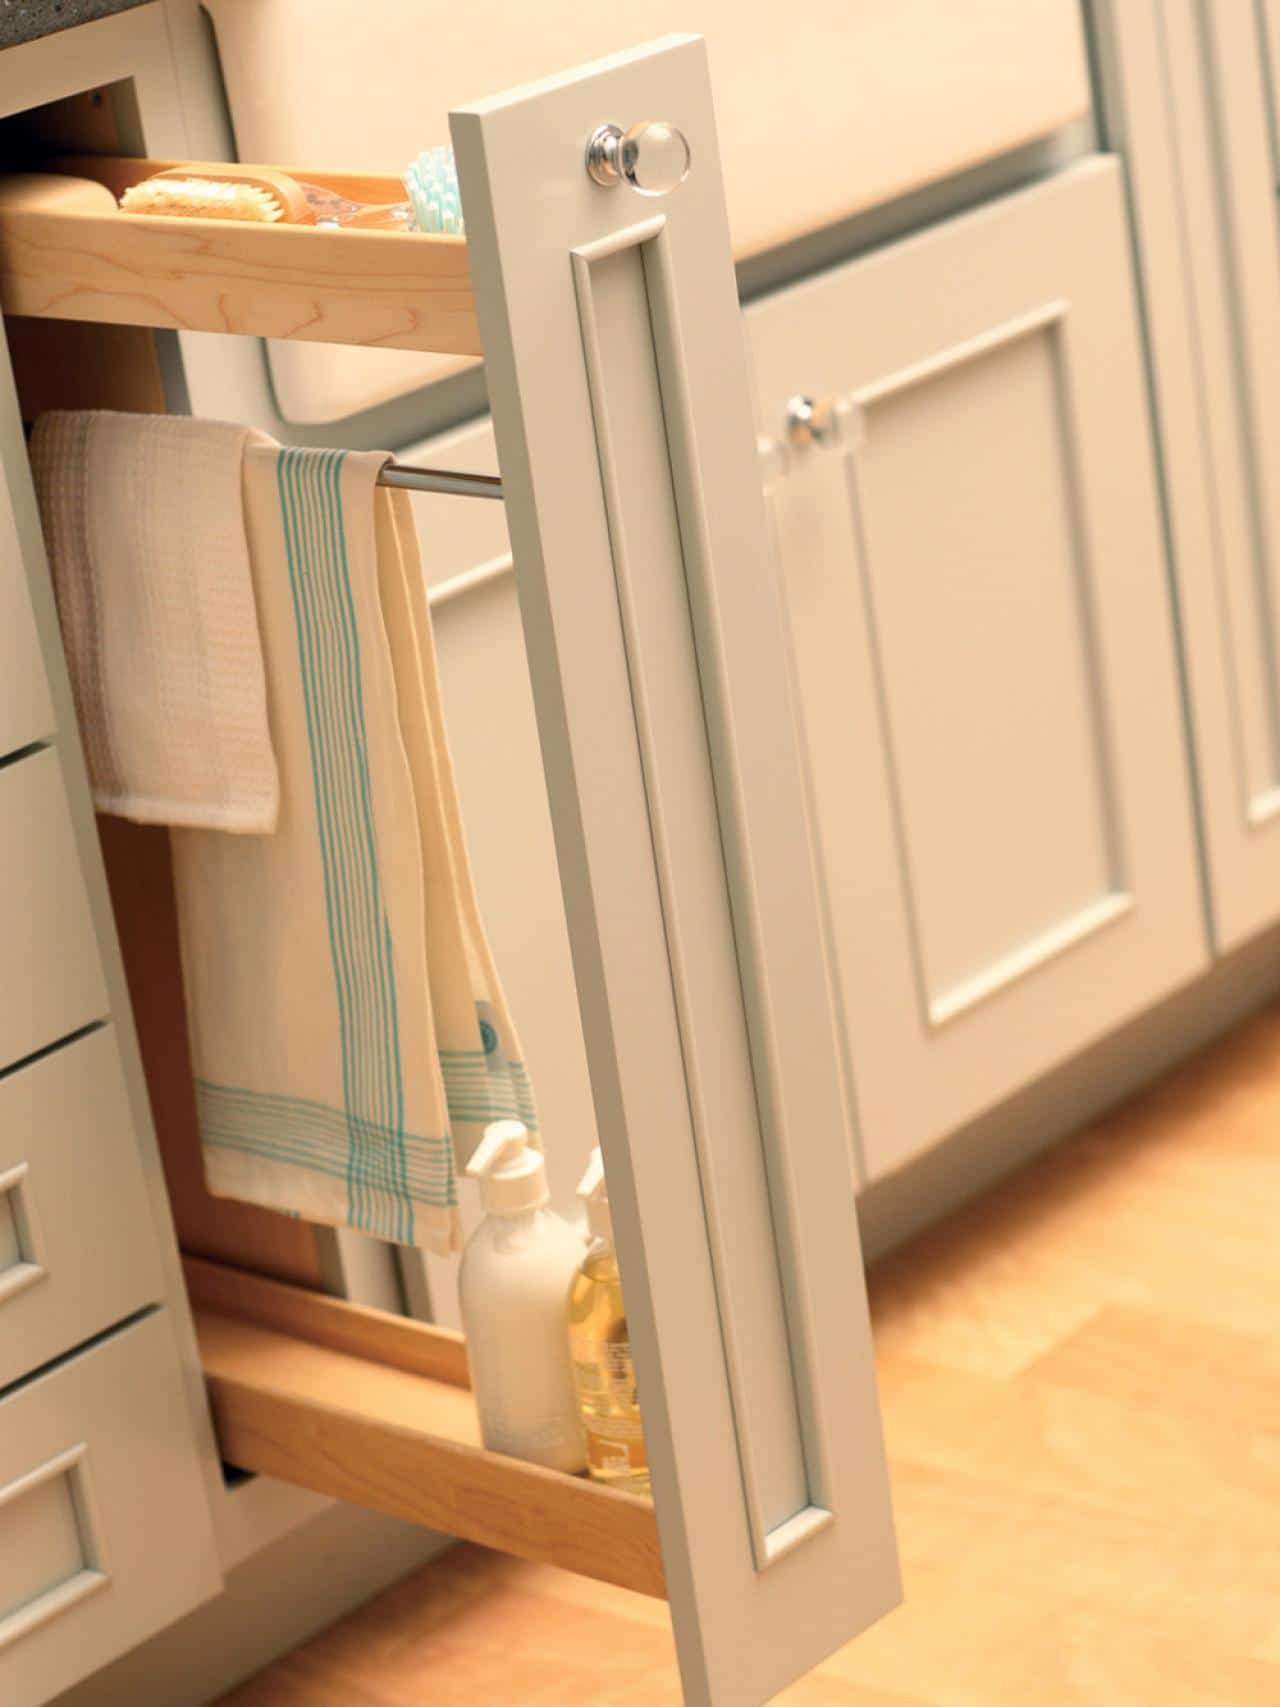
- For hanging cabinets, we attach the selected fittings to the upper horizontal, with which we will fix the cabinet on the wall.
- We attach guides or closers to the bedside tables with drawers on the inner walls.
- To the bottom lower tier We mount furniture legs.

Assembly floor stand with legs
- We close the resulting frame with a back wall made of fiberboard. Fastening can be carried out with staples or simple galvanized nails in increments of approximately 100-150 mm. Fixation is carried out along the sidewalls and all horizontals - from above, below and at the level of the shelves.

The main frame is ready, there are still works with facades, hanging cabinets and countertops.
Installation of kitchen facades
In most cases, the facade elements of kitchen furniture are doors made of glass, solid wood or wood boards. Loops are used to fasten them to the frame. quick installation, the installation of which can only be done by a master with necessary equipment.
The work is done like this:
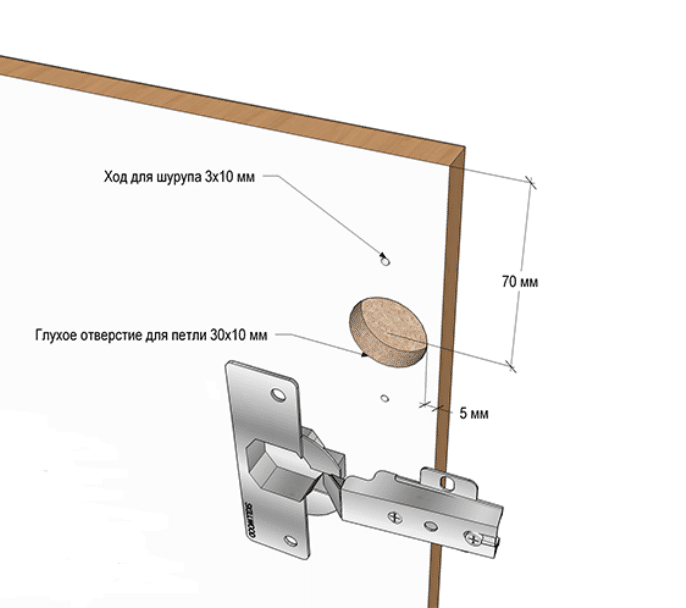
- A place for hinges is marked on the door. It is worth focusing on a distance of 50-100 mm from the top or bottom and 21-22 mm from the edge of the sidewall.
- Forstner cutter 35 mm drilled round hole for hinges up to 10 mm deep. If this recess is made too shallow, then when fixing the hinge with screws, the facade may be squeezed out from the outside.
- The hinges are installed in the recesses, aligned with a ruler, after which holes are made for self-tapping screws using a 2 mm drill.
Important! Be careful not to drill through the door.
- We fix the loops to inner surface facade using zinc self-tapping screws 4x16.

- We install the front door in place. To do this, we apply a ruler to the end of the frame in order to obtain the necessary clearance for the correct opening and closing of the door.
- We install the facade with deployed hinges, mark the points for drilling.
- We make holes with a 2 mm drill to a depth of no more than 10 mm.
- We fix the hinges to the sidewall with 4x16 zinc screws. If necessary, we adjust the hinges for a smooth fit of the door.
Facade strips that close the drawers are much easier to install. If you bought special boxes such as metabox or tandembox, then they always come with ready-made mounting brackets. If the box is the most common, then the facade is fixed with self-tapping screws (zinc) 4x16.
Screed headset elements and installation of countertops
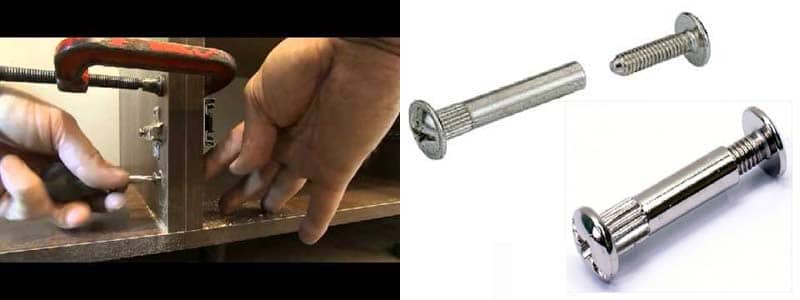
To turn all cabinets and bedside tables into a single structure, it is necessary to combine adjacent modules with each other. For this, 5 mm intersection screeds are used. The adjoining walls are drilled through in two places - above and below. The main part of the screed is inserted into the hole, and the second - the fixing screw - is screwed into it.
Installing the countertop is not difficult. We simply fix it on special fasteners installed on the box of the lower cabinets. But the installation of the sink should be taken seriously. After all, you need not only to fix the structure, but also to take care of the correct sealing of the seams with silicone (however, a lot here depends on the type of model, because overhead, mortise and integrated sinks have their own installation nuances).
As you can see, the hand-made assembly of the kitchen set really turned out to be not too difficult. Even the most difficult part of creating a project and correct calculations is also within the power of any person who studied mathematics at school. And yet, not every one of us is ready to spend time and effort on something that can be entrusted to professionals and get a known high-quality result. Therefore, think carefully - are you ready to accomplish labor exploits in the field furniture production, or entrust this process to qualified craftsmen.
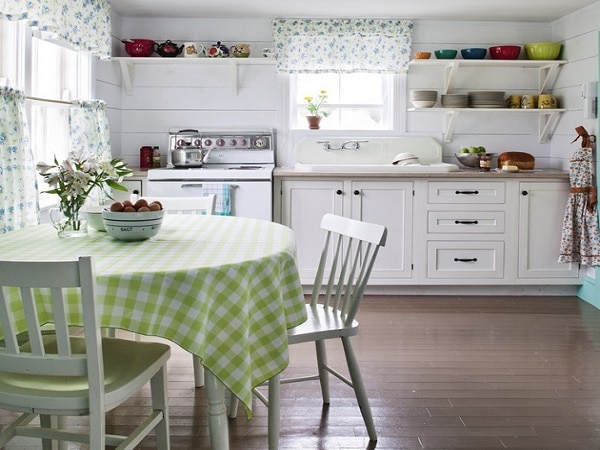
In this room, the family spends a lot of time: family conversations over a cup of coffee or tea, dinners and lunches, discussions important events per day. That is why the kitchen should be cozy. But when creating an interior, it is necessary to take into account that kitchen room should be functional and comfortable. When arranging a room, you need to approach the choice of furniture responsibly.
Today, the most popular kitchen furniture designs are:
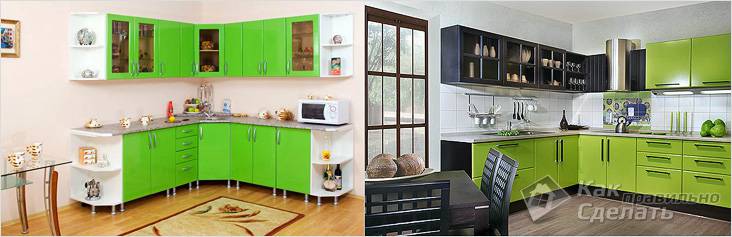
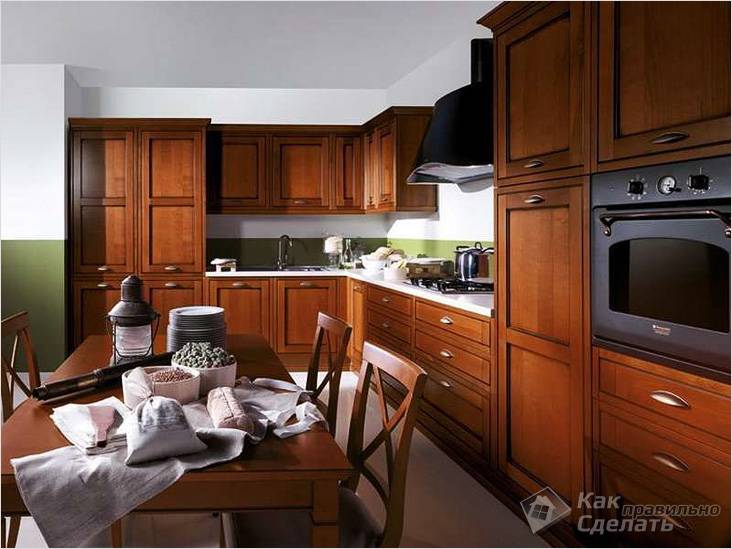
- timeless classic. This style is preferred by those people who present to the design high requirements. The classic style will never lose its popularity. Furniture in the kitchen, even after many years, will be relevant and modern. Kitchen sets in classical style distinguished by sophistication and elegance. They fit perfectly into any interior of an apartment or house;
- modern modern, in which there is a harmonious combination of color. Such furniture is functional and practical. The presence of decor is especially important when creating furniture in the Art Nouveau style. For such purposes, it is worth using modern fittings.
Secrets of creating a successful design
In the manufacture of kitchen furniture important role hardware plays. It will not be able to increase the usable area, but it allows you to make the furniture especially comfortable. Creating furniture is not only based solely on its size. It is necessary to take into account internal organization kitchen products, in other words, you need to correctly plan the "stuffing" for the kitchen. 
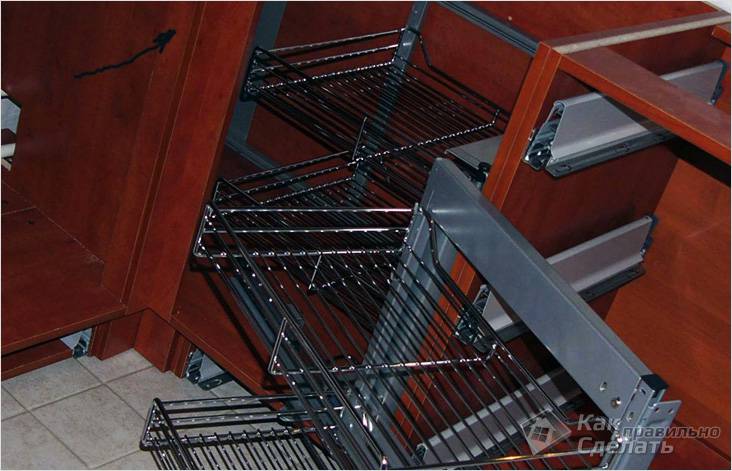
The most popular for many years remains corner cupboard. However, this item is practically not used, and takes up a lot of space. Items that are needed in very rare cases are placed in it. But it can be turned into a functional product by equipping it with a special mount for shelves that will move out.
Kitchen drawers should be made with separated zones. Thus, each kitchen utensil will get its place. You can always quickly and easily find a knife or fork. Modern mechanisms should be made on the basis of spring brackets, so the cabinet doors will open up. 
The kitchen set is more convenient to install on the legs. It will not be possible to avoid garbage in the kitchen, and it is much easier to clean under such furniture. Another advantage of the legs is the fact that if moisture gets on the floor, it will not damage the furniture. Water can be easily and quickly wiped off.
When creating kitchen furniture, you can use special roof rails - beautiful slats made of chrome-plated material. Such kitchen accessory can be used to create any interior. With the help of hooks, you can place any kitchen utensils on it.
When installing a modern kitchen set, a great option is to create a metal rack for dishes or a bar counter.
When creating furniture for the kitchen, it is necessary to take into account the color palette. The shade of the kitchen should be in harmony with the room itself, because only a complete room is comfortable and cozy.
You should decide on the types of lockers and their placement. With such a task, the easiest way is to contact a qualified designer who will help you choose a more rational color and type of furniture, and design a set correctly. But if you have great taste, knowledge and a sense of harmony, then creating a kitchen furniture design will not be difficult for you.
The choice of material for the manufacture of a kitchen set
Currently, a variety of materials are used for the manufacture of kitchen furniture:
- laminated chipboard or natural wood to create a facade headset. Chipboard is a more popular material, because it is much easier to work with it. For the manufacture of facades, varieties of fiberboard are perfect: chipboard, which is the most inexpensive material, MDF, which has a medium price range, and MDF with a painted surface. Many experts recommend using MDF to create the facade of the kitchen. This material is more practical and durable. In addition, it can have the most incredible colors.
- Tabletops. Here the choice is huge. It all depends on the amount you are willing to pay for a piece of furniture. On the construction market, countertops made of stone and chipboard are presented for purchase. It is chipboard that is the most popular material, because it can be used to make a countertop of any shape and size. In addition, the material is easier to process, has a long period operation and reasonable cost.
Chipboard tabletop can be made matte or glossy. But if you are creating a real work of art, then you simply cannot do without a stone countertop. To create it, both natural and artificial materials can be used.
- Apron . This work plane of the wall, finished with special panels, can become a real decoration and addition to the headset. If you choose an apron in the same tone as the countertop, you will be able to create a complete picture. This accessory is very easy to install. It does not require special care, it is able to serve long time. But its cost is slightly higher than that of a good ceramic tile.
- Fittings for kitchen furniture can be very different. It all depends on your means and desires, as well as on the style you choose. You can use accessories made of plastic, wood or chrome. Products of this kind should be chosen especially carefully, because the whole look of the kitchen set, and, accordingly, the room will depend on their appearance.
For example, plastic handles tend to lose their appearance after a short period of time. The most popular option for accessories today are chrome-plated products. They have a long service life and are very easy to care for.
Production of parts for a kitchen set

The manufacture of kitchen furniture should begin with the preparation of materials and tools. You can't do without a hammer and screwdriver in this process. The work will require a significant number of tools:
- a planer used to process cuts in material. An excellent option is a tool powered by electricity;
- a hacksaw used for sawing the base material;
- a milling cutter used to cut holes and recesses for fittings. You should take a tool for wood;
- a drill used to form nests for door hinges;
- screwdriver for quick and hassle-free installation;
- iron used for gluing the edge;
- measuring tape;
- screwdriver for twisting parts;
- a simple pencil for creating drawings on the material;
- sandpaper for grinding sawing places;
- primer of the same color as the base material.
Also, for self-production of the kitchen, you will need material:
- Chipboard from which the shelves will be made. For such purposes, the most the best option is chipboard with a thickness of 16 mm;
- Chipboard 32 mm thick to create a countertop;
- Fiberboard for the manufacture of the rear walls of the headset;
- modern fittings;
- fastening materials.
You can independently make kitchen furniture of any configuration. But even the most simple products look elegant and individual, if the creation of the project is approached with skill. When developing a kitchen set, you should be guided by the functionality of every detail, and then you will surely be able to create comfortable furniture.
The main task in sketching is accuracy and clarity. You need to take measurements and put them on paper. It is recommended to use a unit of 1 mm, in this way it is possible to create a particularly precise design. On the material, it is recommended to leave allowances of 2 mm and 5 mm. The drawing should be done with a simple pencil, which ensures the accuracy of the application. Also, many experts recommend numbering each part for the convenience of further assembly of the structure. 
Before starting to create a project, it is recommended to determine the places where kitchen appliances. They should be marked on the plan with the exact dimensions. Also on paper, you need to create the appearance of a kitchen set, namely the placement of cabinets, cabinets and shelves.
Only after determining all the dimensions and applying to the drawing, you can begin to manufacture parts. For this:
- apply all planned fasteners and handles to the material. You can make a layout using plain paper or cardboard;
- drill holes for mounting handles and hinges;
- make sawing parts, strictly following the drawing lines. It is better to make a cut with back side material, thus allowing the outside to remain beautiful;
- glue the ends of all parts. This will provide your furniture with a longer period of operation, since it is the edge that protects the material from swelling.
The main stage of creating details for the kitchen set is completed. As a result of your work, you received individual elements that need to be assembled.
Assembly and installation of a kitchen set
How the process of assembling furniture for the kitchen takes place can be seen in the video:
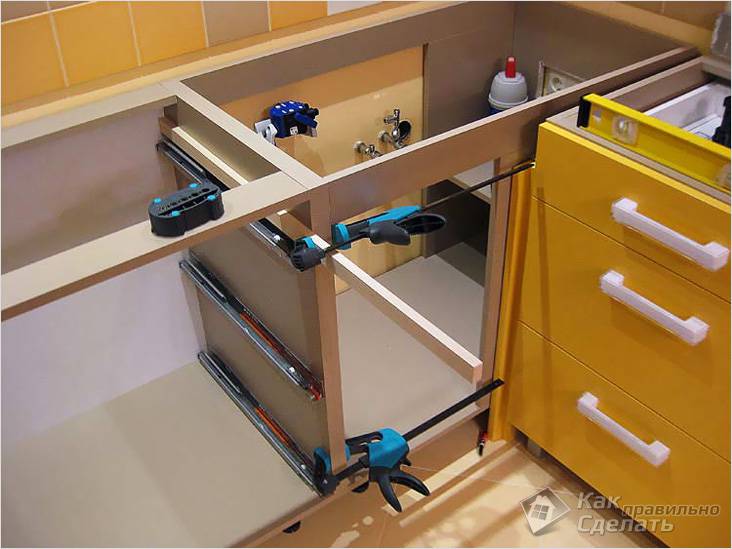
To assemble kitchen furniture, you will need a drill. Take a drill with a diameter of 5 mm and a longer length than furniture coupler. Kitchen furniture should be assembled with a coupler, which is why you need a hex key. First it is recommended to do pre-screed using "rough" screws. This is necessary to determine all errors and inaccuracies in the design. Assembly of furniture begins with the installation of lower cabinets. The vertical parts should be attached to the horizontal ones. Do not forget about the fastening of shelf holders. At the end of the design, you need to nail the back wall. 
Further, taking into account the height retractable structures guides should be attached. Remember that they exist right-handed and left-handed. The next step is to assemble the drawers. Many recommend putting the joints of the elements of the boxes on glue. This will make the design especially durable. This is important for products that will constantly move. Insert finished drawers into special profiles. They should walk smoothly and not cling to other parts of the structure.
If the drawers sag, the back wall should be nailed more firmly. This will make the whole structure more durable and holistic. The last step will be attaching the legs to the nightstand. Similarly, all bedside tables are assembled, including hinged ones.
After the rough assembly is completed, all inaccuracies are eliminated, you can assemble the headset. For these purposes, screws with a length of 50-60 mm are used.
The work surface of the kitchen set can be purchased at ready-made in hardware store. But if you planned to make it yourself, for the manufacture of countertops you will need chipboard of the same size as the cabinet that will be placed under it. Also a great option is to lay fiberboard under it. This will even out all the uneven edges of the cabinet and make the countertop more durable and hardy. The tabletop is attached to the cabinet with self-tapping screws. Holes for this are prepared in advance. From the inside, the entire structure is reinforced with steel corners.
Placement of the sink will require accurate measurements. Using a pencil, make marks, cut a hole with a jigsaw according to a previously created sketch. Edges are recommended to be lubricated to increase fixation. special glue based on silicone.
In places marked for loops, cut out sockets for fastening. This should be done very carefully so as not to spoil outside cabinets or cabinets. Attach the hinges with self-tapping screws.
The last stage of installation will be the fastening of fittings. Handles and hinges, holders under kitchen utensils and towels should be placed in the most convenient places. These products also fill the entire headset with a peculiar meaning. It is thanks to them that the furniture comes to life. When choosing accessories, stick to uniform style giving preference quality materials. These are the items that you shouldn't skimp on.
For a kitchen made on your own, you can independently make a kitchen table.
It is not difficult to make a kitchen set with your own hands. Stock up on patience, material, tools and boldly get down to business. It is worth doing it with enthusiasm and inspiration, because independent creation furniture should be fun. This is the only way to get high results from your work. Simple Tips will help to create such kitchen furniture that will bring joy from its use and fill the room with comfort.
If you look at the kitchen set market, you can find great amount original design solutions that win the hearts of many housewives. However, the prices for such works of design thought are exorbitant. Under such circumstances, willy-nilly, one has to think about alternative options. Some decide to make a kitchen set with their own hands. To do this, today there are kitchen fittings, and building material, and tools - in general, everything. And, as practice shows, a home-made kitchen set is in no way inferior to a purchased one, especially in quality. And this is not even taking into account the price, because in any case it is more profitable to make a set for the kitchen on your own. If you decide to accomplish such a feat, then you will have to work hard not only with your hands, but also with your head.
Headset manufacturing methods
There are several directions, following which you can realize your plans. For example, to prepare everything necessary details, you can contact a specialized company that provides cutting and edging services. This is a good option, since you choose the size of the kitchen set yourself.
Another option is to purchase ready-made parts. We can say that this is the easiest option. But in this case, your kitchen set will be standard. There is another solution, which consists in the complete manufacture of a kitchen set with your own hands, starting from measurements, cutting and ending with assembly.
Simplicity and functionality of the design
If you prefer the latter option and want to do all the work yourself, then in this case you should consider the design of the headset. As a rule, it is best to choose a simple, functional and convenient design. A classic kitchen fits into this category, the cabinets of which have drawers and hinged doors. This design has large quantity pluses. Here is some of them:
- Possible modular assembly. In this case, each element is designed and assembled separately.
- This headset will suitable solution for both large and small kitchens.
- There are a large number of building materials that allow you to implement such a project.
- This furniture is durable, practical, roomy and comfortable.
- Even a non-professional carpenter can create such a design.
- AT classical kitchen you don't have to work with curved lines, which makes the job easier.
- Simple mechanisms are used.
- You can easily choose the right fittings, facades and countertops.
Among other things, such a kitchen set, if necessary, can be altered or upgraded, since you will personally know the location of each bolt!
What to make?

Next preparatory stage is the choice of the appropriate material. In general, kitchen sets are made from different materials, here everything will depend only on your financial capabilities and wishes.
- An array of wood. This material is the most expensive, but also the most durable and strong.
- Painted MDF. Availability in price. Has excellent performance.
- Laminated chipboard. One of the cheapest materials that is in the greatest demand, even among Italian craftsmen!
- Postforming. Postforming boards are a wear-resistant and practical material. What is most interesting, you can choose any color and texture of the surface.
- Chipboard without coating. It is used for the manufacture of individual elements of a kitchen set, for example, for the side and back wall.
When choosing a material, it is worth looking at ready-made kitchen sets in furniture stores. This will allow you to imagine what kind of furniture will turn out from a particular material.
The eyes are afraid, but the hands are doing: let's start measuring
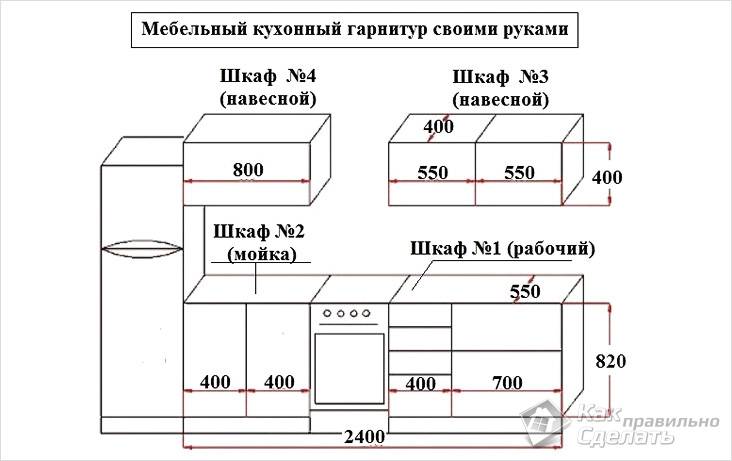
The production of a kitchen set begins with measurements. First you need to decide what type of headset will be. In fact, the kitchen set can be divided into two types: angular and straight. As for direct kitchens, it is a little easier here. Along one wall there will be several bedside tables and hanging cabinets. In some cases, the headset is placed parallel to each other on two walls. Here, the measurements are quite simple. You need to measure the length of the wall.
When measuring, it is important to take measurements with a tape measure in several places, for example, at a height of 200 mm from the floor, at chest level and under the ceiling. This is due to the fact that slight deviations can be observed due to the curvature of the walls.
As practice shows, the discrepancy between such measurements can be up to three to four centimeters. Using modern Construction Materials these discrepancies can be leveled. Start taking measurements when the old furniture is already dismantled, then you will have free access to the wall.
When measuring, one often encounters difficulties. For example, gas or water pipes can be located on the walls - all this will need to be taken into account when installing the kitchen, cutting out the appropriate holes. Make it the easiest electric jigsaw. As for the sink, then usually the cabinet for it comes without a back wall, since in this place there is a junction of sewer and water pipes. The main rigidity of the cabinet is achieved thanks to the metal corners.
Among other things, it is important to take into account the presence of a gas stove in the measurements. Based on the measurements, it will be necessary to make appropriate adjustments to the design configuration of the cabinets and cabinets. After all, to gas stove gas pipes will fit. This is especially true when you want to make a single countertop.
The hood is closed with a specially made locker. To do this, you need to make a special cutout in the back of the cabinet. As for measurements corner kitchen, then the whole process follows the same principle.
Small production of big parts
Where you can feel complete freedom is when choosing the color and design of the kitchen set. You should think over and draw up a figurative "cutting map" according to the finished drawing. In order to avoid mistakes and carry out the correct order of individual elements or cut them yourself, it is important to know about several nuances of cutting according to the drawing. The diagram below will help you with this:
This is what a standard wall cabinet will look like:
- Horizontal.
- Side wall or side.
- Shelf.
- Back wall.
One of the features of the horizontal is its size. Based on the scheme, the horizontal is located between the side walls and is connected using confirmation screws. Accordingly, suitable holes will need to be made in the details. Here, for example, holes in the side blank:

When measuring each detail, it is important to take into account any nuance, otherwise the sawing process will be carried out incorrectly. In most cases cabinets are made standard size. The width is a multiple of 100 or 50. Therefore, the width can be:
- 250 mm.
- 300 mm.
- 400 mm.
- 800mm etc.
It is important to take into account the thickness of the chipboard; for the case, a material with a thickness of 16 mm is used. Accordingly, the horizontal of a cabinet with a width of 800 mm inside will be 768 mm. This is due to the fact that the side wall will occupy 16 mm each on both sides, it turns out like this:
768 mm + 32 mm = 800 mm
But these measurements are for when you are making standard kitchen. Today you can not adhere to the standards and make the dimensions of the cabinets at your discretion.
As an exception, a cupboard for dishes should be mentioned. It is manufactured to the same standard. Although today this element can be made to order.
If we talk about shelves, then there are also some subtleties that are important to consider when measuring. The shelf can be fastened in two ways: tightly or laid on special shelf holders. In the first case, the size of the shelf will be identical to the horizontal width. In the second case, the size of the shelf should be 3 mm smaller for its free installation.
Well back wall also needs special attention. It is made from fiberboard. The area of the rear wall should be slightly smaller than the entire body. For example, if the dimensions are 700 × 600 mm, then the back wall will be 695 × 595 mm. Why? There are two reasons for this:
- If the rear wall protrudes beyond the dimensions of the case, then it will interfere with the tight connection of the modules.
- When sawing fiberboard "plays" on the machine, therefore, an error may occur upwards of several millimeters.
The principle of measuring tables and cabinets is practically no different. There is one caveat that concerns fittings when it is complex or the design of the finished module is also complex. In this case, you will most likely need the help of specialists. The scheme of thumbs can be of the following plan:

We give the blanks a finished look
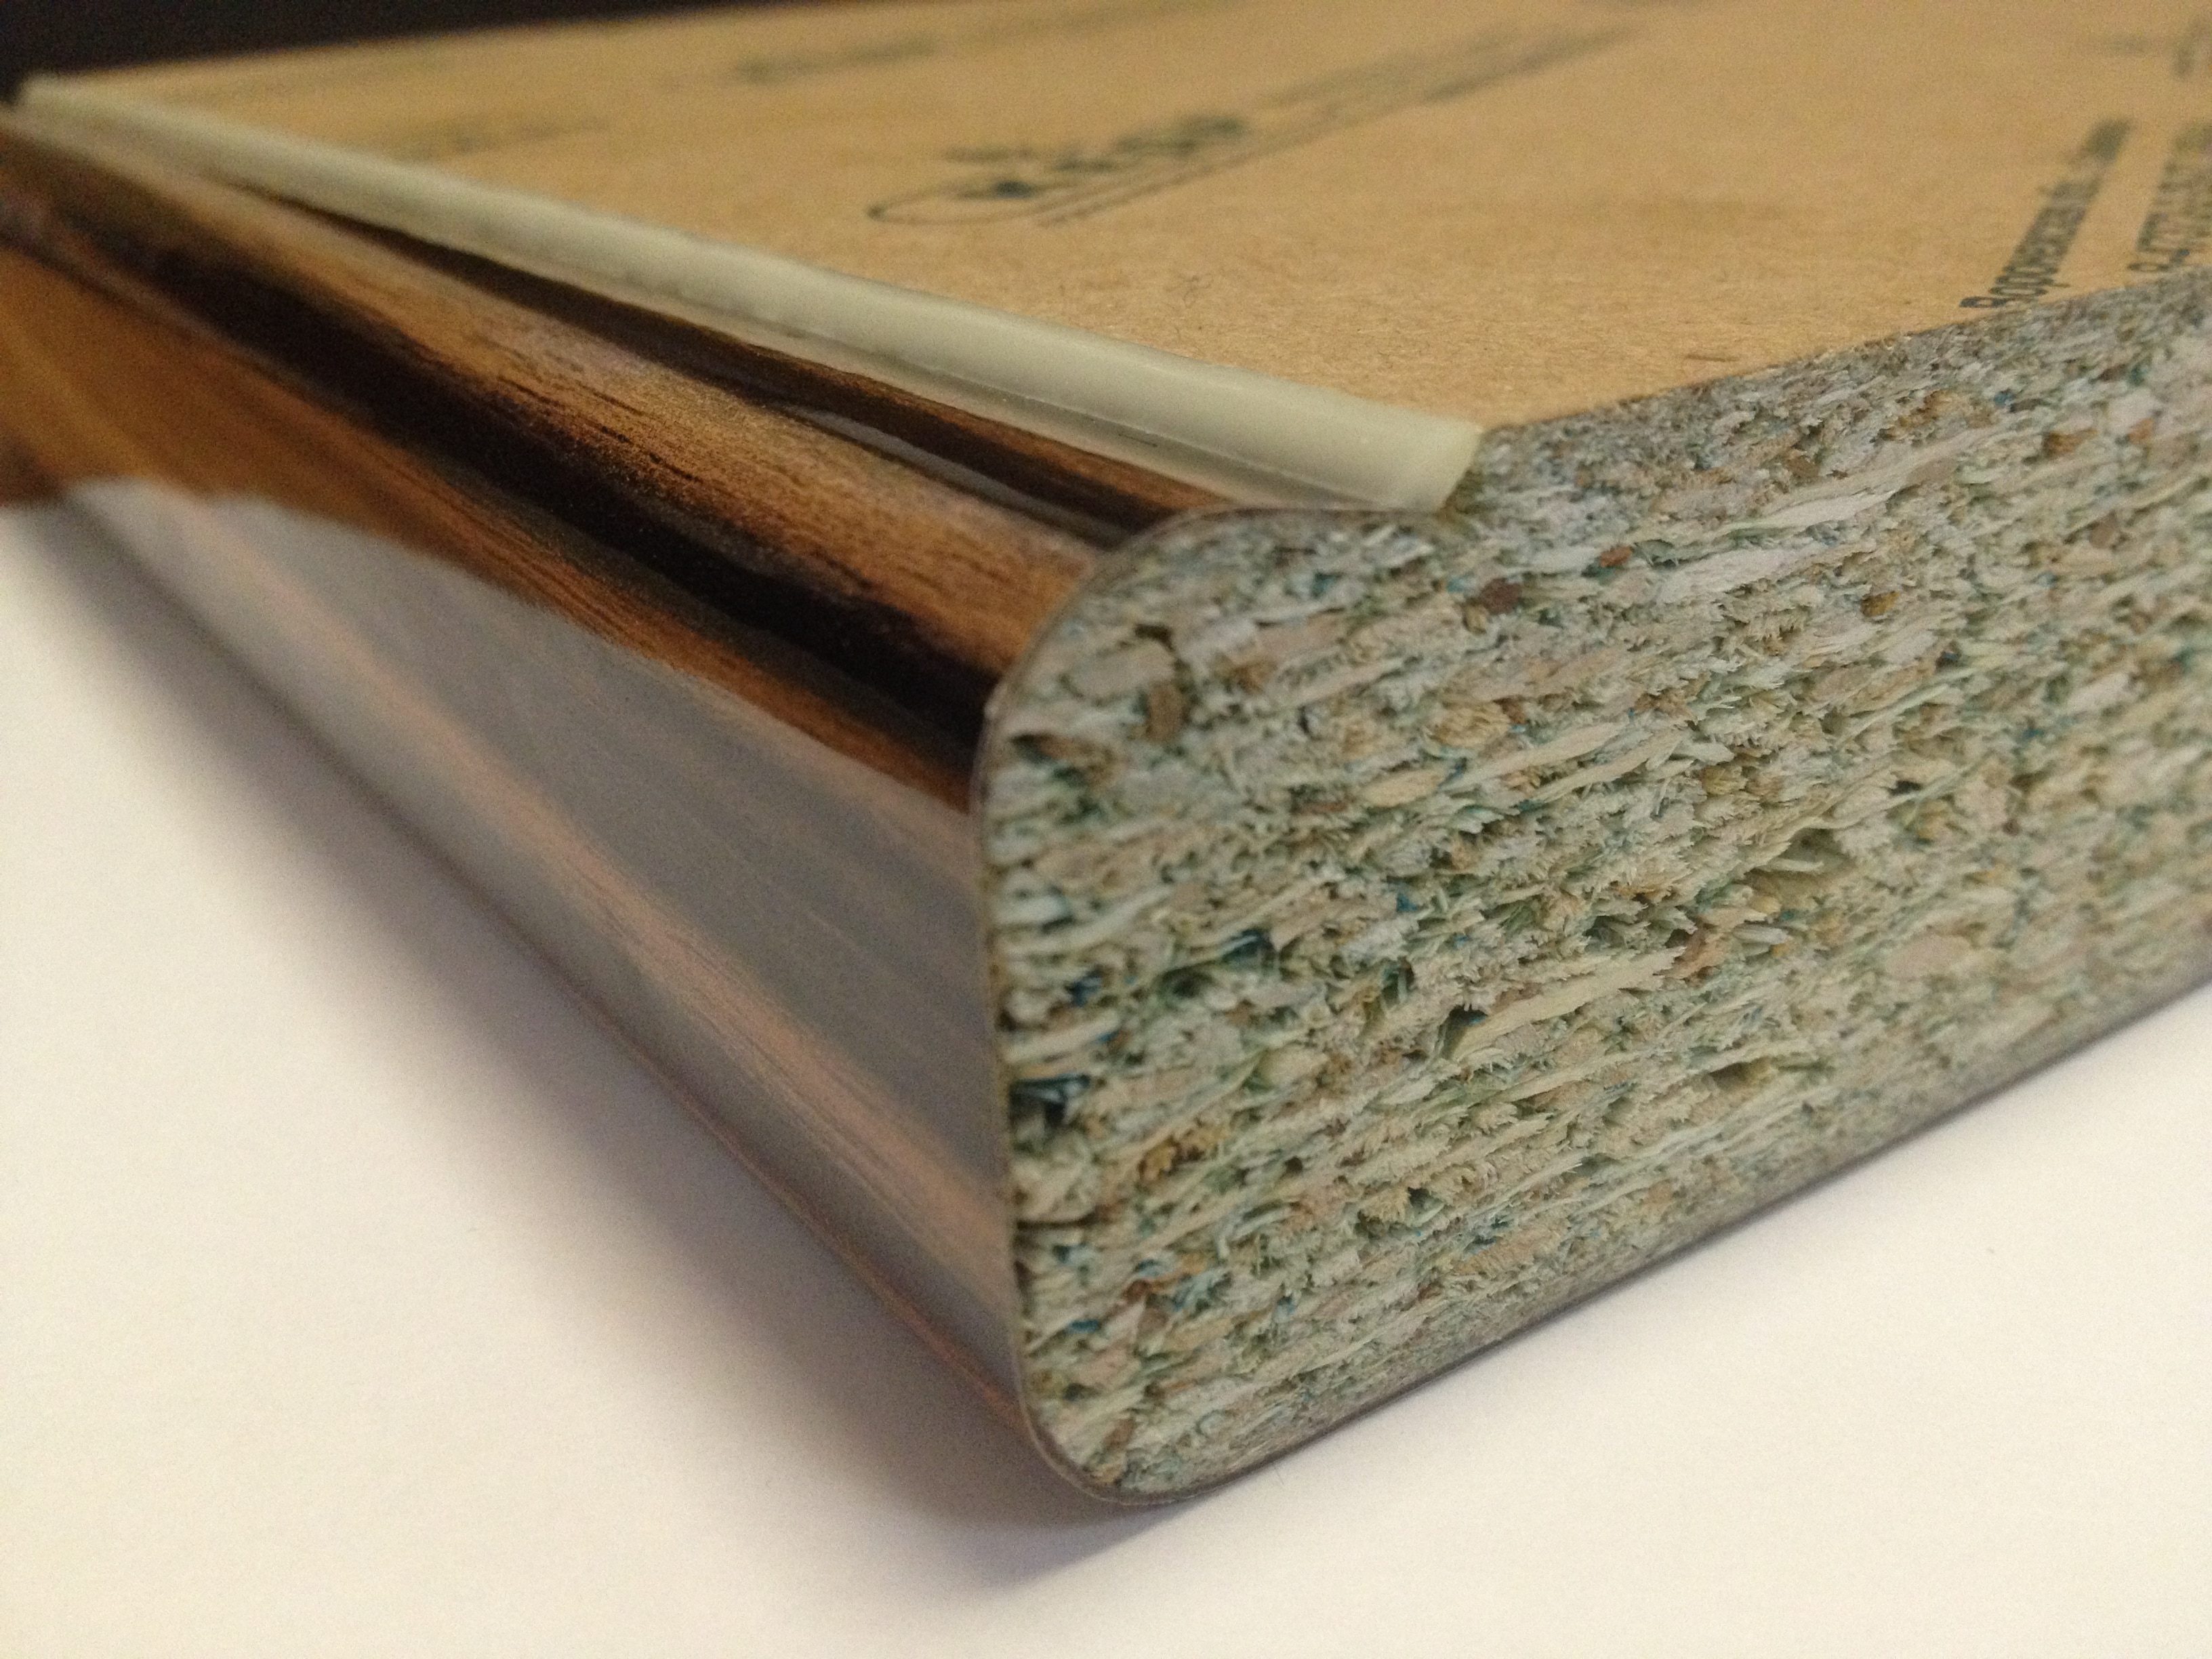
When all the blanks are cut out, it is not yet time for assembly. It is important to carry out preparatory work, which includes edging. What it is? This is one of the key finishing elements of each workpiece, which reliably protects the edges from the penetration of moisture, chemicals and other liquids into the workpiece. The edging also protects against chips and other mechanical damage.

Thus, each end on the kitchen set must be processed with a special edge. There are several varieties of them. But when it comes to practicality and durability, it is best to use a plastic edge.
If this stage of work is difficult for you, then seek the help of professionals!
When buying an edge, choose the color that matches the body. Until the moment of installation, the edge should be stored in a dry place, as with reverse side it is treated with a special glue that melts under the influence of temperature. Its gluing is carried out using a household iron. In no case should you use a hair dryer, due to the unstable temperature supply. And in general, the hair dryer will not withstand the duration of the period of gluing the edge.
Now we will sequentially consider how to glue the edge with an iron with your own hands.
So, for work you will need:
- Iron.
- Two pieces of fabric.
- Small file.
- Stationery knife.
- Edge.
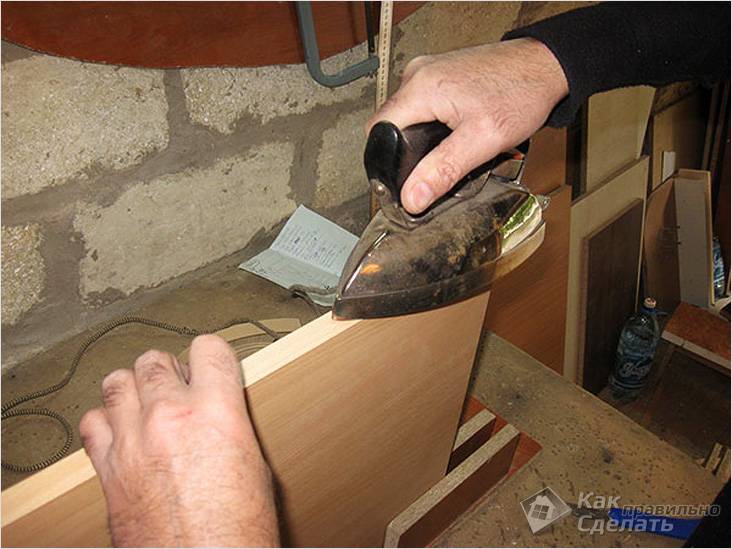
- First of all, set the thermostat on the iron to medium.
- The workpiece can be placed on the table horizontally, end up or rested with one end against the wall. Next, with a margin of two to three centimeters, cut off the edge and attach it to the end.
- Fold the first piece of fabric several times. Through it you should heat the edge. This technique will prevent overheating of the edge and prevent damage to it. Accordingly, the iron will be protected from accidental contact with glue on its sole.
- It takes a few seconds to heat up. After heating, the edge is pressed with another piece of fabric, it remains only to wait for it to cool.
- As mentioned above, the chipboard thickness is 16 mm, and the edge has an average of 20–23 mm. For this reason, after gluing, protruding residues should be cut off with a clerical knife.
- At the final stage, process the joint of the part and the edge with a file. Thanks to such a simple operation, the angle will not turn out to be too sharp.
This is the sequence in which the edge is glued.

For work you will need:
- hacksaw,
- a hammer,
- electric plane,
- jigsaw,
- plumb line,
- level,
- ruler,
- roulette,
- clamp,
- workbench or reliable table,
- screwdriver,
- screwdriver,
- vise,
- jig for making holes for dowels,
- crowbar,
- sandpaper,
- a set of needle files and files,
- construction and stationery knife,
- a set of drills and an electric drill,
- pliers,
- safety goggles and gloves,
- robe.
If possible, it is best to use a laser level for measurements. It will save you from errors that are usually found at the end of the work!
Assembly of the lower part of the kitchen set
Before starting the assembly, all parts must be sorted. Next, set aside those parts that will be needed first. If you decide to assemble the cabinet first, then you will need the following parts: side wall - 2 pieces, rack - 2 pieces, back wall - 1 piece and bottom - 1 piece. Other elements of furniture are sorted according to this principle.

Each part must be assembled in stages. For example, mounting holes can be made in advance or directly at the time of assembly. There are no conventions or rules here. In this work, accuracy is important, otherwise it is very easy to damage the chipboard. In each part, all holes must exactly match. You can start the assembly from the box. It is equipped with roller guides, which are fixed on the two outer sides of the box on the sides. Then the whole box is assembled. The holes from the edge should be at a distance of 7 cm. After that, holes are made for the shelf supports. Connect the two racks and the bottom, and then screw the upper ribs, to which the countertop will subsequently be attached.

At this stage, check the diagonal of the drawer box. It must be equal on both sides.
Now it's time to mount the back wall. As already mentioned, its size will be less than the width and height of the box, respectively, by five millimeters. To begin with, fiberboard is nailed to a long wall. The diagonal is checked. Corrected if necessary. It is finally fixed with several nails. The pitch of the nails can be 100 mm. If you want to make a stronger fixation, then use screws. If the cabinet will stand on legs, you should turn the cabinet upside down and screw them. Install the box in place, and the cabinet is completely ready! According to this system, all other elements of the lower part of the kitchen unit are assembled.
Assemble the nightstands gradually so as not to clutter up the kitchen.
At the final stage, it remains to mount the countertop. It can be integral or consist of several parts. In the latter case, special connections should be used for its docking.
According to this principle, it is collected and top part, which consists of lockers and pencil cases. The only difference is that the cabinets will need to be screwed onto the hanging brackets.
Installation of upper cabinets

When the entire assembly is completed, it remains to install everything in its place. To install the top of the kitchen set, you will need:
- drill/hammer drill,
- long level,
- roulette,
- ruler,
- screwdriver,
- a hammer,
- clamp,
- wrench.

There are several options for hanging cabinets. For example, you can mount a mounting plate on the wall. Similar - screwed on the cabinet. Immediately before fixing the bar, it must be checked for evenness. It will also be necessary to use intersectional screeds. They are used to connect modules to each other.

So, the installation process will take place in the following order:
- On the hinges, the hook is mounted in the middle position.
- In order for the hook to hook onto the mounting rail, the inside of the side walls of the cabinet must protrude a few millimeters beyond the rear wall of the cabinet.
- After, measurements are made under the holes on the wall for the hinged rail. When calculating the height, decide whether the cabinet will butt or overlap with the backsplash.
- The mounting rail will in all cases be below the top edge of the cabinet.
- In order not to miss, you can first attach the cabinet to the wall at its future location. The assistant can put the appropriate mark on the wall.
- Using a level on the wall, draw a straight horizontal line that will point to the top edge of the cabinet. It is not recommended to take measurements from the floor. There is a possibility of inconsistencies.
- At this stage, mark the drilling location.
- Insert the dowel into the hole.
- Using fasteners, fix the mounting rail.
- Now you can hang the cabinet.
- Using a level, check the evenness of the cabinets among themselves, if necessary, using screws, adjust on the hinges to the level.
- Clamp all the cabinets together, starting from the corner. Insert wooden or cardboard pads between the clamp and the cabinet.
- Next, drill through the holes between the cabinets for the intersection ties.
- To avoid chips, hold a wooden beam at the exit of the drill.
- Cross-sectional screeds will pull together all the cabinets.
- Finally, put the fronts in place using the special screws and hinges.

In the process of performing this work, observe safety rules. This will keep you from getting hurt!
A simple method for making a new kitchen set
There is the easiest option for making new furniture for the kitchen. If your old furniture suits you, then it can be taken as a basis for new kitchen. It's very easy to do this:
- First, take apart old furniture into parts. Remember which parts were used in which designs.
- brush old surface sandpaper. Rinse off the dust well and "bring to life" each element.
- Now take all the measurements from the doors, facades, sides and shelves. These dimensions should be transferred to new blanks.
- As a result, you can cut chipboard sheet for the necessary details of the future kitchen.
- Then it remains only to mount all the parts according to the above instructions, install new fittings, and you can start using the new kitchen.
In order to finally give your preference to this option, it is advisable to think several times: do you like the current design, do you need to change anything in height or width, and so on. During the transfer of dimensions, you will still have the opportunity to correct something.
As you can see, this is the simplest and most primitive method of making a kitchen set with your own hands. In fact, the kitchen will have the same format and size, only in the foreground and inside there will be completely new facades and fittings. This option is preferable for those who have limited resources and will not be able to buy new headset if there is no time or desire to develop a project from scratch.
So, to make a kitchen set is quite within the power of everyone. Most importantly, do not stop half way. Leave your comments at the end of this article and share your personal experience!
Video
Here is the process of assembling a kitchen set, performed by professional craftsmen:
A photo

![]()


The kitchen can safely be called the heart of the home. Every day they cook and eat food, arrange gatherings with family and friends. Therefore, it is so important to create a cozy and comfortable atmosphere in the kitchen. Big role in creating the interior plays a kitchen set. It should be as functional as possible and fit into the design of the room.
Color selection
In order for the furniture to be a harmonious composition with decoration and other interior details, when choosing a color, a number of nuances should be taken into account:
- Lighting and background. If the kitchen is located sunny side, use furniture in cold colors (gray, blue, purple). Suitable for poorly lit rooms warm colors(orange, vanilla, light green). Colors such as lilac, moderate shades of blue and green are neutral and suitable for rooms of any degree of illumination.
Furniture should not merge with the walls, but contrast with interior decoration kitchens. In doing so, it should be taken into account that light furniture on the background dark walls looks larger, visually reducing the room. dark furniture on a light background makes the room visually more voluminous.
- Room size. When choosing the color of furniture for the kitchen, the size of the room is of great importance. Dark headset even in big kitchen will create a heavy gloomy atmosphere. Better furniture complement light colors with bright details. A small area definitely needs to be equipped with furniture light shades which will visually enlarge the space.
- Psychological factor. Psychologists advise when choosing a color to take into account the temperament of the inhabitants of the apartment. For example, red color will increase the tone of melancholic natures, and it is better for excitable people to choose a calmer shade. White is a universal color, but so that the kitchen does not look pale and boring, it is better to dilute it with bright details. Green - adjusts to proper nutrition, gives the room a feeling of freshness. Blue - reduces appetite and will allow the inhabitants to keep themselves in shape without special diets. Violet - soothes, brings notes of harmony.
Color variety in the photo
 Blue colour reduces appetite
  Dark furniture on the background light walls
 Decorating the kitchen gray color
![]() Kitchen in white
Kitchen in white 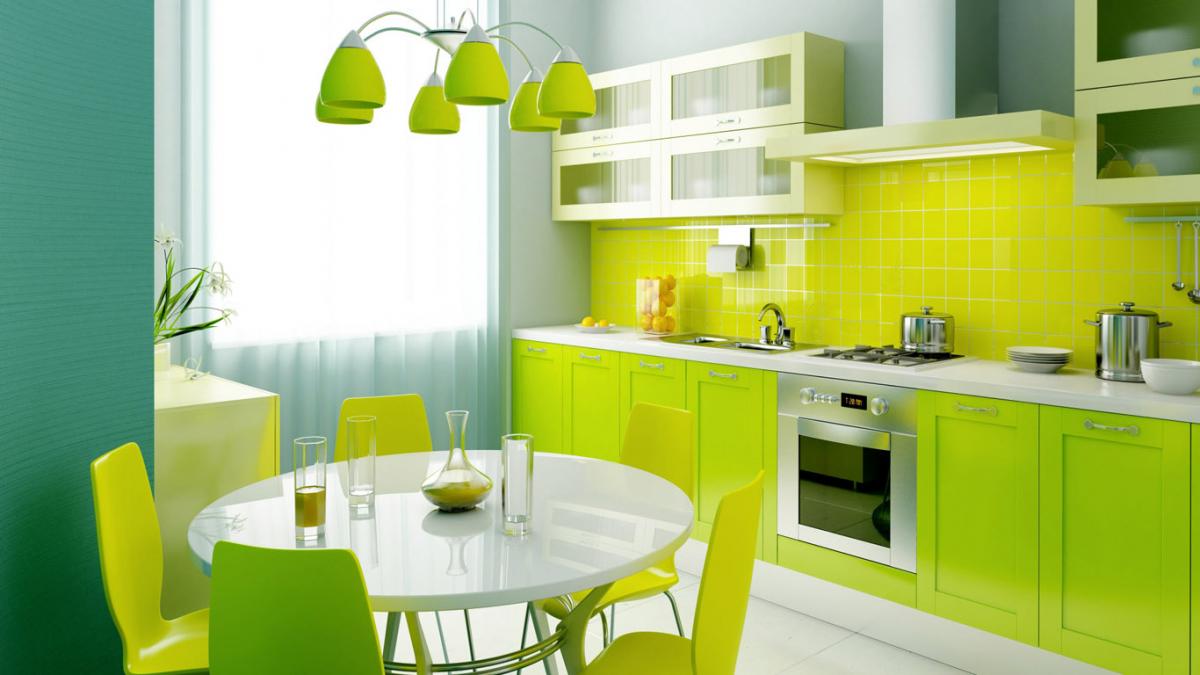 light green color in kitchen design
  purple kitchen decor
Material
The choice of material for furniture should be approached in terms of practicality, attractiveness and cost. The facade of the headset is the "face" of the kitchen, so it should be given maximum attention. The most common materials for its manufacture are:
- Chipboard – chipboard. Lumber is impregnated with synthetic resins, making the material resistant to moisture and steam. The flexibility and elasticity of the plates allows you to create structures of any complexity from them. Chipboard has a smooth and hard surface with high performance properties.
- MDF- fibreboard. Represents wood waste glued with natural carbamide resins, therefore it is an environmentally friendly material. MDF is very different high strength, resistance to moisture, bio- and fire resistance. The plates are quite soft in processing, due to which they have wide design possibilities.
- Wood- natural beautiful and environmentally friendly material. However, in order to protect it from temperature and humidity fluctuations typical for the kitchen, wooden furniture is treated with antiseptics, special impregnations and varnished. Such processing reduces the environmental friendliness of the material, besides lacquered surface requires special care. To minimize the deformation of the front facade, only the door frame is made of wood, and MDF is used for the panel.
- Plastic– modern material resistant to fire, scratches and high humidity. The plastic is stuck on MDF panel, as if wrapping it from all sides. This way you get a facade increased strength and sustainability. Thanks to the textural and decorative variety of plastic, such a set can become a decoration for a kitchen made in one of the modern styles.
To ensure the strength, durability and beauty of kitchen furniture will allow the combination of materials in its manufacture. For example, the body of the headset is made of chipboard, the facade is made of fiberboard, and the countertop is made of stone.
Gallery of materials for the kitchen set
Along with the facade, the headset should also take care of the countertop, because it is she who is subjected to the maximum load during operation. Most practical option- this is a stone (marble, marble chips, granite, basalt). Such a countertop is not afraid of mechanical damage and hot pots. alternative natural stone can become acrylic resin, porcelain stoneware. In addition to stone, countertops are made of laminated chipboard, of stainless steel, laminated plastic.
Headset dimensions
To choose the right size for a kitchen set, you need to draw a project of the room, making preliminary measurements:
- door and window openings;
- the length of all walls;
- distance from floor to ceiling and window sill;
- the location of the protruding elements ( heating appliances, pipes, sockets, etc.);
- existing household appliances.
Large furniture stores have a measurer on staff. It will be much easier and more reliable to use his services.

Experts recommend purchasing a kitchen set, in which the work surfaces are located on different height(sink, stove, food cutting area). Due to this, the load on the back during cooking is reduced.
In addition to the area of \u200b\u200bthe room, when calculating the size of the headset, one should take into account the growth of the hostess, who will most often have to use it. Despite the fact that the standard worktop height is 85 cm, kitchens with a worktop height of 90 cm are commercially available. Its depth can be in the range of 60-90 cm.
Wall cabinets also have a certain standard. With a depth of 30 cm, their height can be 36 cm, 72 cm or 92 cm. Optimal Distance between the countertop and hanging cabinets - 90 cm, it can be reduced to 50 cm.
Form and design
The shape of the kitchen set depends on the layout of the kitchen. Conventionally, all models can be divided into two types.
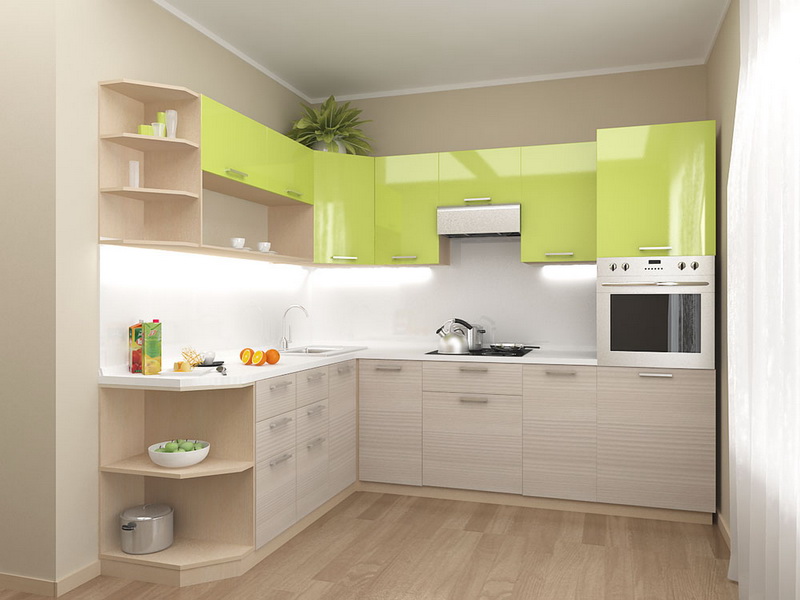
- Linear. Rectangular headset without protruding parts and massive decorative elements, installed along one or two parallel walls, will be an advantageous solution for placing an elongated shape. At the same time, the distance between parallel walls must exceed 2 m.
- corner. Headsets G shape will look good in small square kitchens. They can help you save free space using corners. L shape the headset is universal and suitable for rooms of any size and configuration.

The design of the kitchen set should match the style of the room:
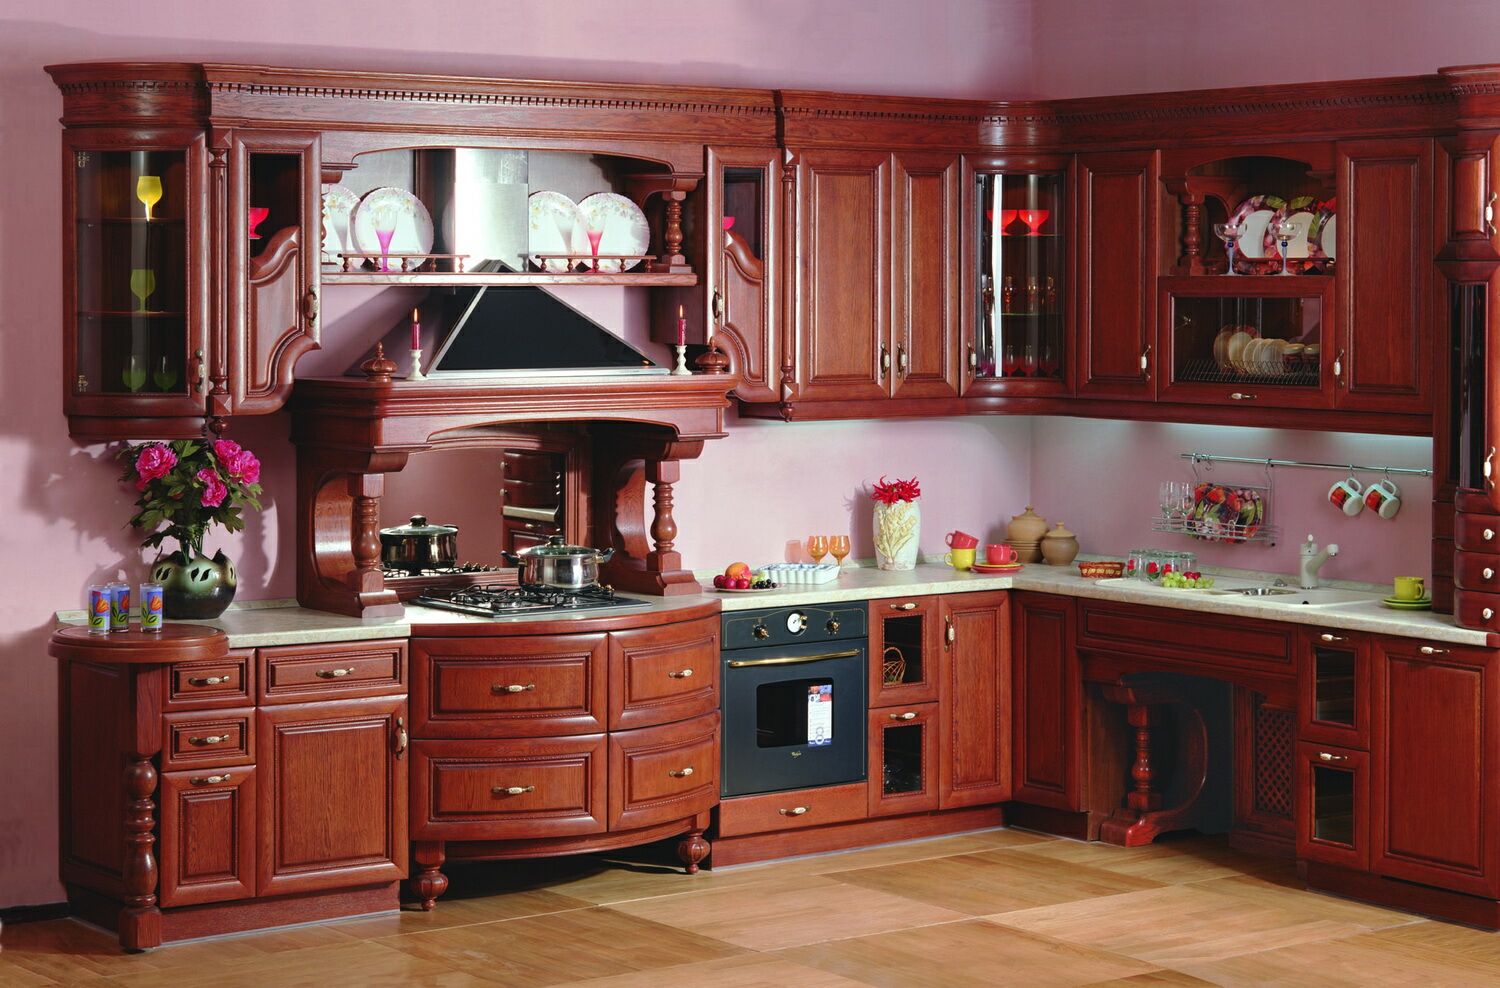
- classic. The nobility of the style will be emphasized by furniture made under wood in natural shades and metal fittings. Appliances usually hidden behind facades decorated with carved cornices and balustrades. Such a headset is suitable for any layout and footage;
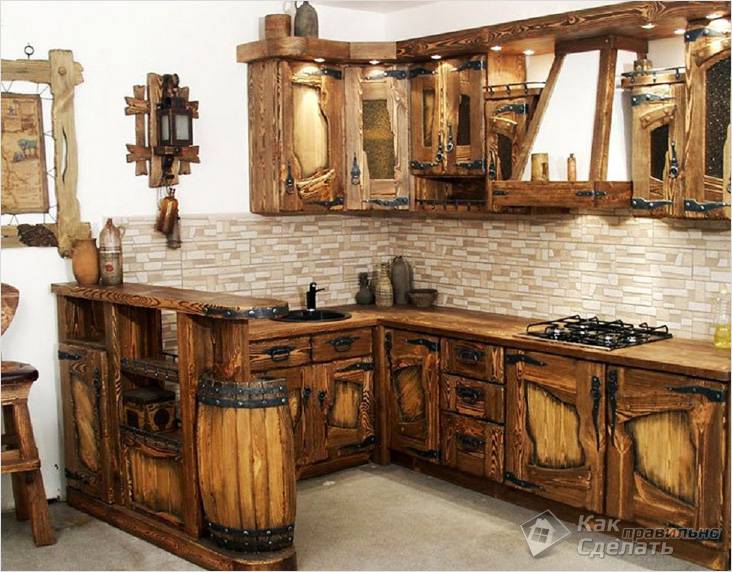
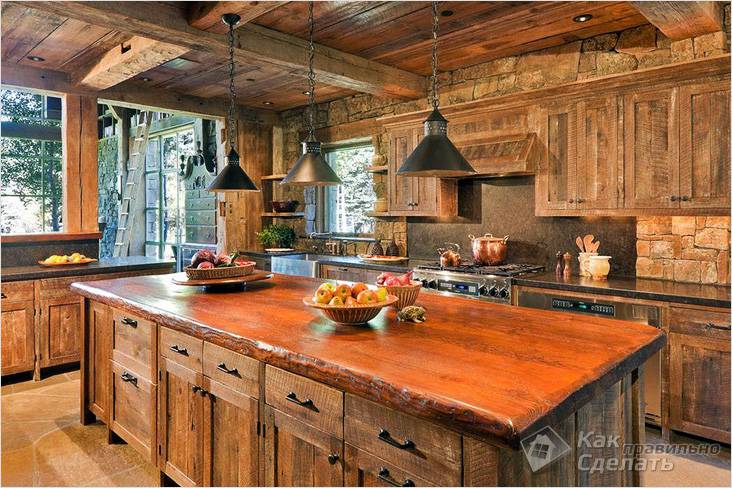
- country music. Wooden furniture with details made of glass, metal, stone will help to embody the style of village life. Since the style implies massiveness and solidity, it is only suitable for spacious kitchens;
- modern. Modern style will make the most daring design solutions. The functionality of the furniture and the absence of unnecessary details will save space and give small room ease;
- high tech. The style allows experimentation with materials and colors. Modern technology and facades with a glossy surface look equally good both in a spacious room and in a limited space;
- loft. The style is built on the contrast of old and new. Therefore, in the background brick walls or plank floor will harmoniously look like a set made of modern materials, metal, glass.
Design styles (photo gallery)
Functionality
To make the kitchen set not only beautiful, but also comfortable, you need to carefully plan the location of its component parts. Designers advise doing this taking into account the following nuances:
- You need to start planning from the dishwashing area. Storage space is usually created under the sink household chemicals and waste, and a dishwasher is installed to the right or left of it, if necessary.
- Next to the sink is a place for cooking, under which it is convenient to place shelves for storing dry food and household utensils.
- Next should be hob with an exhaust system installed above it.
- Consider the placement of other appliances (refrigerator, microwave oven, electric ovens, etc.).
Preference should be given to the headset, floor cabinets which are mounted on adjustable legs. They will allow you to set the cabinet to the required height and protect it from moisture.
Special devices will help to increase the functionality of the headset:
- retractable section "cargo";
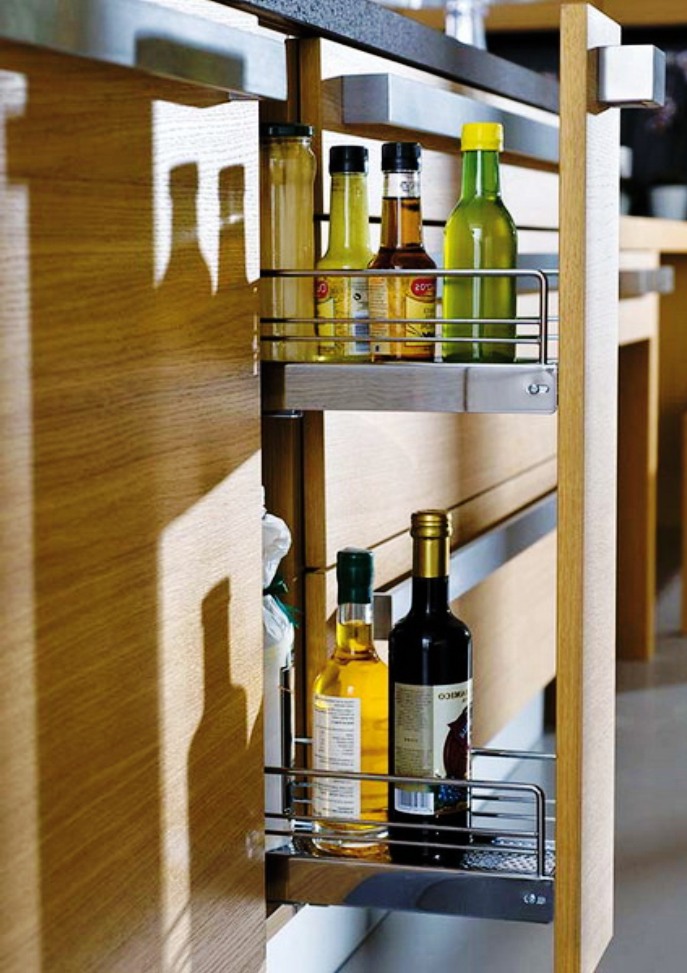
Retractable section ‘cargo’
- "carousel" for easy access to corner cabinets;

- sections with hooks that are located between working surface and wall cabinets;

- drawers with "full extension" guide system;

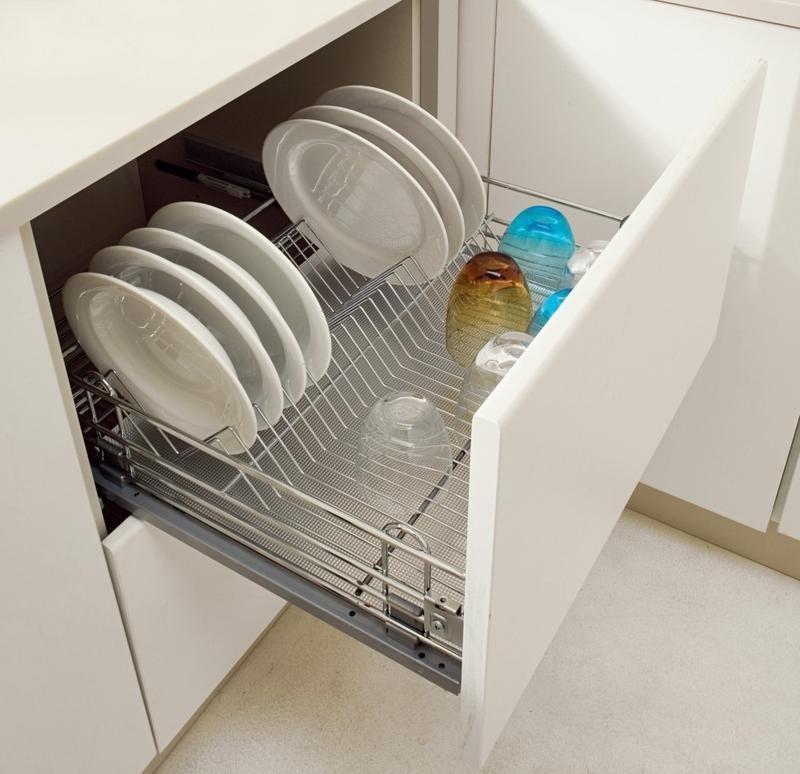
- sections for drying dishes with removable trays.
You should not buy a kitchen set, guided by fashion trends. It should be comfortable, match the design and size of the room, please all family members. Therefore, before buying, you need to carefully consider the smallest details or consult a professional designer.
With some skill carpentry tools, as well as having out-of-the-box thinking, given the variety of materials and finishes, you can solve the problem of arranging a kitchen, especially a small one. How to update furniture by making a do-it-yourself kitchen set that fits optimally into specific conditions?
Options for making headsets on your own
Getting serious creative activity for manufacturing, you should realistically assess your abilities and capabilities and choose one of the following options:
- Do all the calculations for the headset items on your own, and then contact a specialized salon to cut the details of the cabinets from the selected material.
- Purchase ready-made standard components of the headset, including those made of wood. In this case, you will not be able to create your own kitchen design, but the process of assembling cabinets will be simple.
- Do all the actions for measuring, cutting, assembling the headset yourself, according to the photo with a variety of configurations and textures of materials of harmonious kitchen furniture ensembles.
The actions for the latter option can be greatly simplified if we take as a sample the old furniture after dismantling, which is completely satisfied with its shape and dimensions. It is not necessary to copy all the details kitchen cabinets in exact proportions, you can make your own changes and additions to the image of a homemade headset.
Design features
An important motive for making an exclusive headset is the desire to bring its functionality closer to one's own ideas of convenience. The dimensions of a small kitchen dictate their conditions in terms of cabinet compactness, so it is advisable to provide for the maximum possible number drawers, closed storage areas.

Designing an Ensemble Drawing furniture items, it is useful to pay attention to their modular types. This is convenient in terms of assembling small cabinets and then arranging them on the kitchen area. Niches for embedding are necessarily predicted household appliances. Most attractive rectangular shapes headset modules will not cause difficulties even when using wood as the dominant material on the front planes, which do not require additional painting with careful grinding and polishing.
Proper selection of material
Without a detailed analysis of materials suitable for the specifics of the kitchen, it will be impossible for an amateur craftsman to cope with a creative idea, how to make a set that not only has a unique design, but also fits into the family budget.
- As the photo shows, even from inexpensive MDF boards you can design elegant furniture for a small-sized kitchen, the main condition being to follow the dimensions indicated on the drawing after all approvals and taking into account the wishes of the hostess of the house.
- Solid wood remains the most reliable, but at the same time expensive materials for kitchen furniture designs.
- Inexpensive kitchen cabinets can be made from chipboard with a modern protective laminate layer. Skillful imitation of many natural objects (stone, wood) has led to the growing popularity of this type of material.
- Innovative, wear-resistant postforming is gradually taking the lead as a material for kitchen sets, thanks to its excellent external decor with a wide color palette. It is a conventional plate coated with durable plastic, which does not require painting during the entire period of operation.
Fiberboard is a good material for making do-it-yourself boxes and for the back walls of headset cabinets. Carefully selected fasteners and accessories, corners, legs. For kitchen worktop you can choose from variations artificial stone, durable plastic, tempered glass, stainless steel, laminated boards.

measurements
When drawing cabinets, you do not need to save time on taking accurate measurements by first deciding the layout of the future headset. Corner placement, optimal for a small kitchen area, will require an appropriate configuration. A linear set is the easiest to do on your own, while it will allow you to organize space in different ways. The most conservative way is to install cabinets along the wall in one line. Kitchens of a square configuration easily support two parallel pieces of furniture or their installation in three planes.
Measurements of the kitchen are carried out with a tape measure. Experts recommend not to be limited only by the length of the walls, determined at the floor level. Knowing the height of the headset cabinets, the measurement should be carried out at these levels too. This will allow you to easily install ready-made kitchen sets in their places later. If discrepancies are revealed, then a smaller size is applied to the drawing.
Particular care in marking will be required by the area with the outlet of the water supply, where the sink is supposed to be placed, if for reliability it is decided to make a cabinet for it with all the walls with slots in the right places.
It is easier to completely remove the back or side wall, then the structural rigidity will require correct installation corners - "kerchief", which is easy to do yourself. Mandatory marking of places of passage gas pipes or to connect an electric stove.

Design intent and cutting chart
Free creative search for harmonious color interlacing and textured delights of the future headset allows you to develop a multifunctional custom interior in which it will be calm and comfortable to be. You should not completely match the tone of kitchen cabinets to the walls; contrasting colors look much more advantageous, but with varying degrees of saturation. If you paint the surfaces of a small kitchen in light neutral shades of the achromatic range, then absolutely any color is combined with them.
Focusing on pre-made measurements of the dimensions of a small kitchen, the dominant objects are applied to the drawing: refrigeration and cooking plant, washing. Be sure to mark the niches for the dishwasher and washing machine. Everything left kitchen space filled with cabinets of varying degrees of capacity.
After that, it is useful to make a kind of "cutting map", drawing out each detail of the cabinet separately and marking the places of fasteners and placement of shelves. Such accuracy is necessary so that during assembly all surfaces of the headset fit perfectly.
Important! When compiling a cutting map, it is necessary to take into account the thickness of the previously selected material for the construction of cabinets.
The size of the shelves objectively depends on the method of fastening. When laid on overlays, the length of the shelf will be less than the inner horizontal of the cabinet by about three mm. Fiberboard for the rear wall of the headset dictates the need to reduce the size of the part around the entire perimeter by the same amount of 3 mm on all sides, since when sawing, there is often an offset to the outside, which will cause gaps between the headset modules.

Edging
If you carefully study the photo of the details of the kitchen cabinets prepared for assembly, it becomes clear that after cutting the blanks, the headset comes even from wood. milestone to create a protective coating for the edges. Just paint them will not work because of the rough texture of the cuts.
Among the variety of protective materials, it is optimal to choose plastic that gives excellent moisture resistance and strength. With the help of simple devices and devices, edging can be done at home, although most rational decision is to contact the experts.
The algorithm for self-processing the edges of the headset includes several steps:
- In the store, an edge of a suitable shade is purchased.
- A cut-out blank of a future cabinet, for example, made of wood, is fixed end up or placed on a workbench (table) so that there is free access to the end.
- The iron regulator is set to medium heat.
- A piece of the edge is cut off with a margin and applied to the machined area of the butt.
- Cotton fabric is applied on top in several layers.
- The iron is applied to the fabric for five to six seconds, after which the heated area of \u200b\u200bthe protective material is pressed against the base with another piece of fabric until it cools.
- Excess plastic is carefully cut off with a sharp clerical knife.
- The places of cuts are polished with a small file.

Assembly operations
Starting to assemble the headset, you need to determine the sequence of execution. Having selected all the details for the first cabinet, using a pre-designed drawing, it is important to make the holes correctly. Now the drawer of the cabinet is being assembled with strict monitoring of maintaining horizontals and verticals. The principle is simple, the whole structure is a box, as evidenced by the photo. If the details of the headset are sawn from wood, then the fasteners are fixed quickly and securely with a screwdriver. Having fastened the racks and the bottom, the diagonals are additionally measured, which must be absolutely equal.
After fixing the upper edges of the cabinet, the back wall is mounted, which can be painted before that. First, the screw is screwed into one of the upper corners, stepping back from the edges by 3.0 mm.
The first vertical is checked, and the rest of the screws are screwed along it in 10 cm increments (you can use nails, especially if the cabinet is made of wood). Held control check the level of horizontals of the future piece of kitchen furniture and the final fixing of the part.
Immediately for assembled cabinet drawers should be made if it is provided for by the project, attach guides and install shelves. Especially this order is appropriate in a small kitchen, so as not to take up extra space. Painting is in progress, legs and fittings are being strengthened, and for upper cabinets- loops with which they will be fixed on the wall.