Construction of a bath combined with a wooden house. House-baths from a log
Traditionally, when they plan to build a bath on suburban area, a separate place is allocated for it, as a rule, located at a decent distance from the living quarters. However, not everyone can afford such a luxury, as many have limited plot sizes. In this case, if you do not want to completely abandon the idea of \u200b\u200bbuilding a bathhouse, then a steam room can be made inside the house.
Types of projects of houses equipped with a bath
All projects of houses in which there is a steam room can be conditionally divided into three types:
- The house is equipped with a steam room after construction;
- The project initially implies the presence of a bath. Most often these are two-story buildings or houses with an attic;
- The structure is attached separately to the house, while it is under the same roof with the building and the entrance is made from the house.

Projects of houses equipped with a bath after construction
Peculiarities
The project of a house with a steam room inside is called a “built-in sauna”. In fact, this is a wooden cabin heated by a stove-heater. In the city, electric heating is usually used, and in a country house you can also make a wood-burning stove..

If you have already decided to make a bath inside the house, then you should keep in mind that its price will depend on several points:
- Is a ready-made prefabricated product-design bought or will it be made by hand,
- The complexity of the implementation of the entire project;
- What materials will be used;
- What will be the quantity and quality of accessories that the cabin will be equipped with.
Advantages

The steam room inside the house has a number of advantages, among which are:
- The ability to enjoy the process at any time of the year without fear for your health.
- Influence outside temperature limited.
- No additional site required.
- Possibility to use communication systems at home.
- Construction savings.
Flaws
Of course, along with the advantages, the project of a house with a bath inside has many disadvantages:
- If you use one heating system, then to warm up the bath you will need to heat the whole house.
- Building a stove inside a steam room degrades its overall fire safety.
- High humidity in the room, so the bath must be equipped with a forced ventilation system.
- It is impossible to place a bathhouse on the shore of a reservoir.
Advice! From the inside, the walls of the steam room are best sheathed with clapboard. The material has good performance properties, in addition, the style of the Russian bath will be maintained.

In the photo - a house-bath from a bar
Bath house project
As a rule, such structures are used for country cottages when the owner's funds are limited. In this case, a steam room with a washing and technical room is done on the first floor, and the second or attic floor is reserved for living rooms.
Such a building has the same advantages and disadvantages as the project described above, with the exception that the bath can initially be made more spacious and comfortable.
Attached bath project
Peculiarities
Since the shortcomings of the steam room in the house are quite serious, the project can be a little more complicated and make a bath under the same roof with the house, but at the same time outside its side chapels, i.e. attach a room to the house.

This option has a number of obvious advantages, among which are the following:
- Savings on electrical wiring and plumbing.
- One of the walls of the bath will be finished wall housing, which also provides savings and better heat preservation.
- With this arrangement, you do not have to travel a long way from housing to the bathhouse, which is very comfortable in winter time.
- The dimensions of the steam room are not as limited as in the case of the organization inside the house.
In this case special meaning It has correct location baths. The entrance must be made through a heated room so that there is no temperature difference. Otherwise, the heat will quickly leave.
Some of the shortcomings inherent in the above projects are also present in this design. This applies primarily fire safety and the inability to place the building on the shore of the reservoir.

Extension dimensions
If properly organized inner space baths, then an extension of 2.5 m in width and 3.5 m in length will be enough for it. True, for the sake of such compactness it is necessary to sacrifice some premises, which are most often made into hotels.
For example, a washing room can be combined with a steam room, dividing the zones with the help of an interior partition. It is best if this partition is made of brick and tiled. This will provide required level heat retention and moisture insulation.
Such compactness has another plus - it takes less fuel to heat this bath. Moreover, the wood stove can be installed in such a way that.
Foundation and walls
The main difficulty of the project is the construction of the foundation, since the foundation must be buried to the depth of the foundation of the main house. As for the material, it is best to use the same from which the house itself is built. This will make it possible to do without the device of docking structures, which will simplify the construction.
Advice! Before starting the construction of walls, it is necessary to lay waterproofing. To do this, you can use several layers of roofing material.

Warming
If the steam room is separately attached to the house, then it is especially necessary to approach the warming of the steam room with particular responsibility. by the most the best option is the sheathing of walls from the outside with mineral wool mats, on top of which the structure is sheathed with siding. Thanks to this, the extension can look harmoniously with the facade of the building.
The floor and ceiling of the steam room must also be insulated with mineral wool (
Houses with a bath are often found, while no less often there are different opinions about such a solution, both negative and positive.
We decided to figure out how appropriate a bath is in a private house, and how to properly equip it.
Bath inside the house
Advantages

Bath - combined with the house, it's convenient.
To get the most objective picture, we will consider all the pros and cons of placing a bath in the house.
Let's start with the positives:
- When a bathhouse is being built along with a house, you do not need to spend money on a separate foundation and a separate roof, and these are the two most expensive units in the construction of a dwelling;
- At home, heating, water supply and sewerage are combined into one system, so there is no need to install a separate boiler room, septic tank and water supply system, and this significantly reduces the cost of the project;
- The bath inside the house does not need powerful separate thermal insulation, just general thermal insulation is done taking into account the requirements of the steam room;
- Country house - combined with a bathhouse, does not require a separate piece of the site, which in some cases is the determining reason for choosing this option;
- A house with a bath is convenient. There is no need to run from room to room around the yard, which is especially important in the cold season. In addition, there is always a kitchen, lounges, all kinds of amenities nearby;
- There is no need to equip a separate bathroom for a bath, since it is already provided for in the house;
- The house is heated by default, and the need to maintain a positive temperature in the bath in winter disappears automatically.

Important!
In fact, you just have to add a steam room to your bathroom, since the rest of the rooms (cloakroom, shower room, relaxation room) are already present in the house.
We see that the main advantages come down to economy and convenience, and this, you see, is quite important in our time. Very often the owners country houses they are simply not able to allocate a place on the site that is suitable for all the requirements of SNiP and GOST, so they have no choice. Significant cost savings and the convenience of a steam room located right in the house - these are the main arguments of supporters of combining bath and living quarters.
Flaws

Like all building technology, a house combined with a bathhouse has its drawbacks.
They are mainly dictated by the features of operation. bath room and especially for security reasons:
- The steam room is very characteristic high humidity and temperature, which, with poor-quality heat and waterproofing of the premises, can cause substantial harm many structural units and elements of the house and lead to its premature damage, as well as to increased wear;
- Furnace equipment poses an increased fire hazard. In the case of its location near residential premises, especially inside them, the security requirements are especially stringent. Even if you follow them, you cannot completely eliminate the risk of fire, and this is a big responsibility;
- Burning large volumes hydrocarbon fuel leads to the release of a significant amount carbon monoxide(CO), which is a dangerous toxin that, if inhaled, causes severe poisoning and even death. Therefore, combustion products must meet the most stringent requirements.

Important!
At self-assembly an indoor bath should strictly comply with all safety requirements and technical conditions that must be taken into account in the project.
A do-it-yourself bath in a house without a competent project is not built, as this is extremely dangerous.
The conclusion from this is this: if you decide to save money and combine a bath with a house, you will need to minimize all possible risks. This can be done with the help of modern building materials and technologies, however, a professional should be engaged in their selection and determine the installation method at the design stage.
Mounting

We will not consider in detail the construction of the entire house, but only dwell on the most crucial moments.
Therefore, the instruction that follows is not a step-by-step guide, but only touches on the nodes that you should pay special attention to:
- Project . We will not tire of repeating that design is one of the most milestones any construction, especially when it comes to potentially dangerous objects. A combined steam room should be designed together with the house, and a professional civil engineer who is qualified for such tasks must work on the project;

- Foundation. When creating a foundation, you should immediately lay that part of it that will serve as the basis for the furnace. This will greatly simplify the work in the future;

- Moisture protection. Waterproofing of all nodes in contact with the steam room and shower area should be elevated and multi-level, and all surfaces should be protected: floor, walls and ceiling;

- Thermal insulation. If the house does not provide for external thermal insulation of the walls, then it will have to be done at least on the walls of the steam room and shower room, in addition, it is better to completely insulate the steam room so that it does not give off heat to adjacent rooms;

- Ventilation . Except natural ventilation at home, you should equip a forced air purging system that completely eliminates the possibility of accumulation of carbon monoxide and other products of fuel combustion;

- If the walls of the steam room and shower are made of timber, then the lower crowns should be selected very carefully.: it is better if they are made of larch or glued laminated timber, and their treatment with antiseptics, fire retardants and water-repellent compounds must be impeccable and certified;

- Flue gas removal. The stove must be equipped with an efficient system for removing combustion products from wood or gas. The points of contact between the chimney and building structures(walls, floors, roofs) must be decorated with special fittings, which prevent the heating of these;

- Furnace equipment must comply with SNiP and GOST standards, it is better if it is built by a professional or bought in a store.
Important!
Despite the fact that the cost of the project increases from additional requirements and safety conditions, heat and waterproofing, ventilation and others, they cannot be neglected - this is extremely dangerous for the house and its residents.
Conclusion
It is possible to combine a bathhouse and a house in one room, but this will require a certain approach to the construction of a number of units and structures. No less attention will have to be paid to safety measures related to the operation of furnace equipment, flue gas removal and ventilation.
The video in this article, which we have selected and posted for you, will tell you more about the rules of these moments.
If you are the owner of a summer cottage, then a guest house will not hurt you. After all, this small building will be used to receive guests infrequently, and the rest of the time it can serve as an outbuilding, tool storage or even a bath. Moreover, even with small area land, the house can be made more spacious by adding an attic. Typical and individual projects guest houses with a sauna or a billiard room, an attic or a winter garden can be easily found on the Internet, but how to choose the right one, what criteria should be used when choosing?
Project selection and budgeting
Following classical Russian traditions, many landowners order single- or two-story houses from round logs. The exterior of such a building fits perfectly into the landscape of the area, and inside the guest house can be finished with the most modern materials. Usually such a project guest house always complemented by the functions of the bathhouse, and this is very convenient - after all, the guests will leave, but the bathhouse will remain, and it will be possible to use it at least every day. 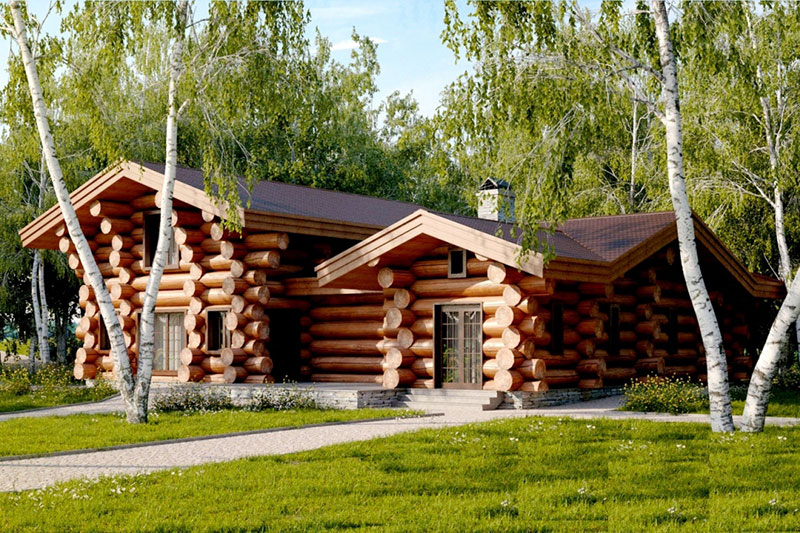
In practice, a guest house with a bathhouse is built more often than other projects, and even in a one-story building of such a house it is possible to place not only a bathhouse, but also a billiard room, a kitchen, a living room and utility rooms. For example, on the plan two-story project, shown in the figure below, the house has not only a steam room in the bath, but also a bathroom, and a living room with a large hall, and a kitchen combined with the living room. On the second floor there are bedrooms, a balcony and a corridor. A wide porch for entering the first floor and a comfortable one will be a comfortable functionality for children and old people - there is enough space for them in the project.
In the vestibule on the ground floor there is a mini-boiler room, which works not only when using the bath, but also for heating the whole house. And the last is a vast terrace, above which there is an equally wide balcony on the second floor. For summer holiday it is difficult to find a more comfortable place not to leave the house and contemplate nature. 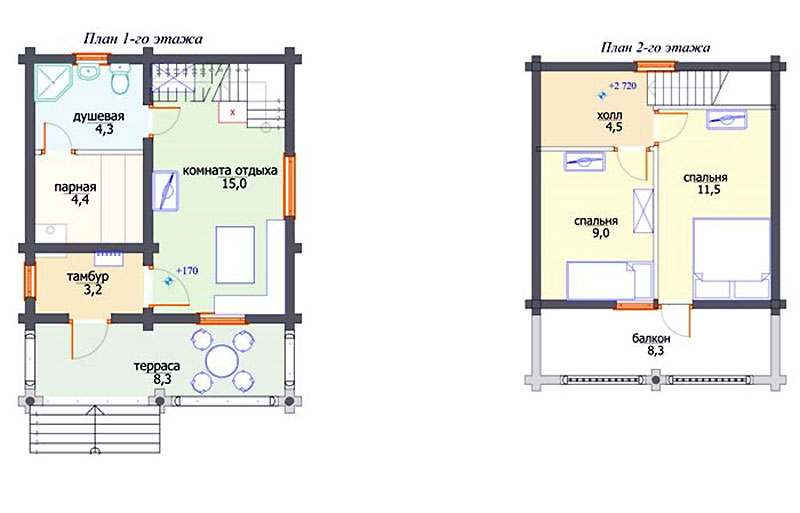
To implement the project of a guest house with a bathhouse or other additional functionality, you must first select it. The most popular, despite the fact that they are more expensive, are two-story wooden structures, on the first floor of which there is usually a bathhouse and a steam room, and on the second floor there is a rest room and other living quarters. Such a house has wonderful advantages:
- Double deck design saves space personal plot- a standard guest house with a bath usually occupies 25-30 m 2 of the total area on the ground;
- Saving family budget it is also obvious - the foundation is being built on a much smaller scale, and, as you know, the construction of the foundation is 30-40% of the construction estimate of the entire house. In addition, the same savings occur during the construction of the roof and installation heating system;
- The comfort of using such a house is much higher, since all the premises are in the same building, and you do not need to go outside to get to the pool, billiard room or rest room.

Before you start building a guest house, you need to specify its location on the site - this is required by the project and elementary space saving. Without linking the project to a place on earth, you will not succeed. Designing and drawing up with a bathhouse requires professional skills, so you will have to turn to architects, but at the same time you will be able to make your own individual changes even in a typical project.
Room layout tips:
- The first floor is traditionally reserved for a bath or sauna with all necessary utility rooms- dressing room, corridor, shower room. The area of these premises is calculated from the requirements of SNiP, which recommend allocating at least 3 m 2 per person for convenient use of the functionality. In the dressing room there should be a place for storing firewood for at least one heating of the heater. The side of the stove that heats up more than others should face the steam room, and the side with a place for loading fuel should face the corridor or dressing room. If the baths allow, here, on the ground floor, they equip a shower or pool, a bathroom and a rest room;
- On the second floor, you can equip a billiard room or a recreation room, a bedroom, game room, etc. The flight of your imagination is not limited here.
The construction estimate should contain approximately the following expenditure items:
- Construction of a foundation for a bath - purchase of cement, sand, gravel, formwork boards, transportation costs, etc.;
- Lumber for a house with a bath: for the construction of a log house (logs, timber, frame), floors, ceilings, roofs and roofs, stairs, terraces, verandas, porches, interior partitions, etc.;
- Heat-insulating, waterproofing and vapor barrier materials - fiberglass, membrane, glassine, roofing material, mineral wool, polystyrene, expanded polystyrene, etc.;
- Hardware and accessories: clamps, angles, plates, staples, nails, screws, anchors, turboprops;
- Windows and doors (preferably wooden, not plastic);
- Purchase or construction of a stove-heater;
- Construction materials for laying engineering communications- water supply, sewerage, ventilation, electricity, communications;
- Finishing (internal and external) materials.
Preparatory work and foundation construction

The volume of excavation work will depend on the composition and properties of the soil, but usually projects of houses with a bathhouse involve the use of wood as the main building material, therefore, with such a small weight of the building, the foundation is made shallow, columnar or piled, but does not require the use of special equipment. Preparing a site for construction means that it must be leveled, cleared of debris and vegetation, drained or reinforced if necessary. upper layer bulk soil.
If your bathhouse will stand on a columnar base, then it is better to use concrete or asbestos-cement pipes with pouring them with a concrete solution. The poles are installed at the corners, parallel to the wall in 1 m increments, parallel internal partitions with a step of 1.5 m. The pillars are waterproofed with roofing material or hot bitumen, and installed in drilled (dug) wells on sand cushion a layer of up to 15 cm. Concrete is poured on top of the pillow with a layer of up to 20 cm, crushed stone of the middle fraction is poured with a layer of 120 cm, moistened and rammed.
For a wooden guest house with or without a sauna, a plinth is required, which will protect the log or timber walls from waterlogging and other atmospheric influences. To do this, they dig a trench 0.3 m deep, pour a 10-cm layer of sand on the bottom, and lay red brick between the pillars as thick as the pillars. As it grows, cut pipes are embedded in the masonry for the passage of communications - ventilation, sewerage, etc. The finished base is covered with hot bitumen, and ruberoid is glued on top, and so - 2-3 layers. 
Under the location of the shower and / or bathroom, a main drain is made, to which the drain from the steam room is attached. Sewerage for all water drain points is made common - it can be a home-made or industrial septic tank, or a cesspool made of concrete, brick, etc.
A wooden guest house, a bath, whose projects are shown above, is being built on a wooden grillage (logs) from a bar with a section of 150 x 150 mm or 200 x 200 mm. A draft floor is laid on the logs, which is protected by a membrane vapor barrier, insulated, and the finishing floor is laid on it. In the shower room and steam room, the draft floor is made with an angle of inclination of 5 0 -7 0 towards the drain.
If the guest house is not being built from timber or cylindered logs, but from hand-cut logs, then such lumber should be impregnated with an antiseptic and flame retardant impregnation before starting the construction of the log house. The first, lower log, is taken in size larger than the others, this also swings the first beam. The corners of the log house can be fastened in different ways: "in the bowl" or "in the paw." All interventional gaps are sealed with jute or tow; lovers of naturalistic design can be advised to moss. The next step after installing the log house is the construction of interior partitions from timber or thick slats. All internal surfaces buildings are insulated and waterproofed, a decorative finishing material. It can be a wagon or slats, veneered plywood or imitation of precious wood. 
Ceiling or interfloor overlap, as well as the base for truss system terraces (see the figure above) is built from a bar with a section of at least 150 x 100 mm. On top of the beam with nails or self-tapping screws, a floor from a planed board of 30-40 mm is attached. The beams of the truss system must be no less than 100 x 80 mm.
The base, rafters and ceiling are fastened with clamps and / or brackets, a frame (batten) is mounted on the rafters for attaching the roofing material. It is better to make the roof non-combustible, that is, do not use soft tiles and other similar roofing materials. The roof lathing and ceiling slab are protected from moisture by an internal layer of hydro- and vapor barrier material, a layer of heat insulator, decorated with clapboard or other materials.
If the size of the site does not allow you to build a bath separately with the allocation of a special functional area and a set of communications, it is possible to erect a single building under common roof. The correct design of such construction will create a comfortable complex, the use of which will be beneficial even from an economic point of view.
The construction of a bath under the same roof with a house can be:
- pre-designed;
- made as an extension to the wall.
Recently, it is the second option that is most common. For its implementation, a trench is dug, a monolithic strip foundation is laid. External walls they are built from the same material as the house (but there are also options for joining timber with bricks, frame technologies, etc.). The wooden bath is also sheathed on the outside with a layer of insulation and siding.


If the bath is part of a residential building, it is important to foresee and consider the following communications before designing:
- ventilation system (high humidity can destroy the supporting structure);
- waterproofing to protect building materials from moisture both from the outside and from the inside of the bath;
- combination with a bathroom with an autonomous or centralized sewage system (economically beneficial);
- general wiring.


It is desirable to make a kitchen wall with an adjacent wall (it is possible to install a single stove). Also popular are the options for combining a bathhouse and a residential building with a covered corridor-transition. This option allows you to comfortably visit the bathhouse in winter without going outside, and also, subject to sufficient space and the installation of a heating system, it is easy to install a font or pool in the transition.


Nuances
The combination of a house with a bath can be divided into three degrees:
- at the planning stage, when the bath complex is located on the ground floor and combined with a single roof of the house;
- a full-fledged extension of the log house, when the roof is extended and closes the bath complex;
- the use of a common wall, when the docking of buildings is facilitated and a smooth transition from the house to the bath is observed.
It is important to take into account the location of the exit from the bathhouse, since in winter a separate entrance can bring inconvenience, which is usually corrected with the help of a covered glazed veranda. Such a project is more complex and more expensive, given the need to install high-quality double-glazed windows, wall insulation, non-slip flooring and space heating.
 House with a bath - photo


Foundation
During the construction of a full-fledged bath complex, combined with residential building, special attention is paid to the foundation. Features of the foundation depend on the material of the walls and the planned load. The foundation must be solid and built separately from the foundation of the house. The fact is that high humidity can lead to the appearance of cracks and the departure of the foundation from the general structure.
The depth and thickness of the foundation is made depending on the height of the future bath and the materials used, but experienced builders recommend laying the foundation below the freezing point of the soil in order to exclude any movement and deformation during the change of seasons and the accompanying heaving of the soil.


 Scheme - the principle of docking the main house and extension
  Options for adjoining the foundations of the extension according to the scheme of open (a, b, c, d) and closed (e) contours: 1 - existing house; 2 - extension
When planning, it is important to ensure the removal of sewers. To do this, 2 pipes are removed for the removal of a separate house and bath. If there is no main sewage system, then a separate cesspool will have to be made for the bath. If water supply is carried out, then it is also better to use a separate pipe for the future bath.

For single storey wooden house, combined with a small bath, a strip foundation with a depth of up to 0.5 meters and a width of up to 30 cm is suitable. For a brick or block house, you will need to create a full-fledged foundation, installed in accordance with the rules, which can withstand a heavy load.
A universal solution is the construction of a monolithic strip foundation, the schemes of which are presented below.


Attention! Foundation pouring works are best done in the warm season, since the finished foundation must be thoroughly dried and settled for 21 days before construction continues. AT winter period the best option for arranging the base for a bath are screw piles. For a bath with dimensions from 4x4 to 6x6, you will need 4-9 screw stainless piles with a diameter of 108 mm and a wall thickness of 4-5 mm.
Foundation construction instructions

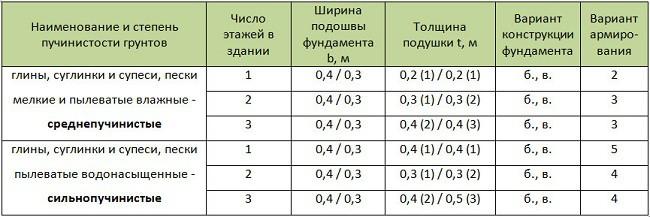
Notes:
- the number in brackets indicates the material of the cushion: 1 - medium-sized sand, 2 - coarse sand, 3 - a mixture of sand (40%) with crushed stone (60%);
- above the value line for walls made of insulated wooden panels, below the line - for log and timber walls.
The location of the future bath is determined, along the perimeter of which pegs are driven in. On these pegs, used as a guide, the construction twine is evenly stretched.
Next, the width of the foundation is laid down, a cast-off is installed and the second twine line is pulled. It is obligatory to check the diagonals of the foundation and the accuracy of all right angles. For measurements, it is convenient to use a rangefinder and laser level, as well as a plumb line for installing stakes and cast-offs.
A trench is dug along the perimeter of the walls (in accordance with the markings). The walls should be even. If the soil is sandy, it is advisable to install temporary formwork, which will prevent shedding from the walls to the bottom.


We must not forget about the trench for communications - the drainage system. If a central sewer is provided, then the trench is carried out to the nearest tie-in into the pipe. If there is no central sewerage, then the trench is led to a drain pit, equipped separately from the house.
A pipe is mounted in a trench under communications under a slight slope and covered with sand and soil. The trench under the foundation of the bath is covered with 2/3 rubble and coarse sand. This backfill is wetted with water and compacted.
In the resulting trenches, formwork is installed, knocked together from boards of the same length. In this case, the level of the foundation must be 20 cm above the ground. The inner walls of the formwork should be laid with a film or roofing material. In the foundation, it is imperative to provide and install ventilation pipes - vents.


Connected reinforcing bars are laid in the trenches. The frame is fixed with plastic clamps (the frame should be 5 cm away from the formwork walls and the bottom of the trench, and 5-10 cm from the top point of pouring concrete).


a. - mesh with two bars of working reinforcement; b. - mesh with three bars of working reinforcement; in. - T-shaped joint; g. - L-shaped corner joint; e. - additional reinforcement of the MZLF with a large sole width, when the sole is wider than the base by more than 60 cm (additional mesh is located only in the lower part.
1 - working fittings (A-III); 2 - auxiliary reinforcing wire ∅ 4-5 mm (Вр-I); 3 - rods of vertical reinforcement ∅ 10 mm (A-III) connecting the upper and lower grids; 4 - reinforcement for reinforcing the angle ∅ 10 mm (A-III); 5 - connection with wire twists (the length of the twist is at least 30 diameters of the working reinforcement); 6 - additional working reinforcement ∅ 10 mm (A-III)

Concrete is being poured. The concrete mixture is leveled, and after drying (during this period it is recommended to cover the tape with a film and periodically moisten it with water from a watering can) it is supplemented with waterproofing (bituminous mastic or roofing material).
Attention! When building an extension bath, it is important to remove the soil near the foundation of the house from the adjacent wall in order to lay a new foundation at the same level.


Video - Extension to the house. Tape base
Features of the construction of walls and windows
When building a bathhouse from logs and timber, it is important to remember about shrinkage, which lasts for several years in a row. If it is decided to use bricks or blocks for construction, remember the need for perfectly vertical walls, as well as the observance of masonry rules.
If the bath is being built as an extension, then it is important to accurately dock the walls and ensure a reliable bond. To do this, holes are drilled in the wall of the house for reinforcement rods, which are driven in so that their opposite end is fixed in the future into the masonry of the wall of the future bath.
As for windows, today they are very popular metal-plastic structures. They are easy to use, easy to install, minimal maintenance and long service life. When working with such windows, it is important to follow two basic rules:
- each window must be equipped with an opening window;
- structures should not be very large and have jumpers.
Ignoring these rules will lead to the fact that in winter the room will be very difficult to ventilate.
Video - Installing windows and casing in a wooden house
Video - Do-it-yourself installation of a pigtail
Instructions for erecting the walls of the bath from logs
When building a log bath, it is important to know the nuances of laying logs so that the structure lasts as long as possible, and its design is not disturbed.
The first crown is laid out from the thickest types of logs. In this case, it is important to treat the lower part of the crown with an antiseptic, and the upper part with mastic, which is responsible for waterproofing the structure.
The corners are made "into the bowl", that is, the ends of the logs must go beyond the future walls. This design will protect against moisture and blowing. The most impressive look is the dovetail styling, which requires a lot of effort and experience. For its construction, it is better to contact an experienced carpenter.

Marking and cutting down the log house "into the bowl"

The simplest laying option is the connection in the "end sheet pile":

Corner cuts of a simplified design "into the end tongue"
A spike is made from the end of the log, and a groove is cut in the side of another log.
The same grooves are made at the bottom of all logs, which guarantees an even and reliable laying.
The logs are connected to each other with the help of dowels and dowels.
Video - Building walls using dowels
For the construction of high-quality bath walls, a beam with a section of 15 × 15 or 15 × 18 is used. The above method contributes to smooth laying with reliable fastening of logs. At the same time, metal or thick wooden pins can be installed in the corners and in the central part of the beam for the greatest structural strength.
 SAMSUNG DIGITAL CAMERA


Between each crown, an additional layer of insulation should be laid in the form of tape flax or jute, which is cut into strips, laid between logs and nailed with a stapler. Experts recommend using jute, since it practically does not compress after installing the walls and shrinking the bath. For a greater aesthetic appearance, a jute rope is used, which securely closes the joints.
The nuances of the construction of the roof
With combined construction, the roof must have a one-piece structure. Its separation can lead to a rapid violation of the integrity of the building. It is better to use a 2-pitched or 4-pitched roof as it differs large area and high stability, able to withstand such a complex structure. Before proceeding with the construction of the roof, it is important to decide whether the installation of an attic or attic is required, since this part of the house must be built immediately.

An example of an extension with a pitched roof

What is important to remember when building a common roof:
- it is important to accurately calculate the height of the roof of the bath and residential building;
- be sure to make two chimneys - separately for the house and the future bath;
- a system of ebbs and reliable snow holders is immediately hung.

When building a bathhouse as an extension, the roof can be single or gable. When arranging a shed structure, the highest exactly bath roof should adjoin the wall of the house and go under the main roof. Ceiling ceilings to reinforce the structure, they should be erected from a 10 × 10 cm timber or a board laid on an edge with the same width. Then, a crate is attached to the bottom and top of the beams, on which heat and vapor barrier is applied. Roof rafters must be mounted so that the roof slope is 20%. Then it is laid roofing material, and the remaining gaps and crevices are sealed with mounting foam.

The material for the roof can be anything, depending on the wishes of the owners. However, it is economically advantageous to use a metal tile or a galvanized profile. These materials require the creation of a simple frame with wooden lags. Bituminous or onduline roofs will require not only professional installation, but also the creation of a special surface. But outwardly they look more respectable and impressive.

Step-by-step instructions for building a roof for a bath
Consider the option of building a gable roof for an extension bath. The roof of the bath will be joined to the main gable roof of the house, resulting in a single design of the bath house.
| Stage | Illustration | Description |
|---|---|---|
| Mauerlat | To begin with, a Mauerlat is laid on the walls of the house. In the case of the construction of a log house, the last log or beam of the wall serves as the Mauerlat. For block and brick walls mauerlat is made of concrete, which is poured into the formwork with mandatory reinforcement. If a wooden mauerlat is laid on a brick structure, it is necessary to lay between the wall and the beam roll insulation, and the beam itself is fixed with anchors. | |
| overlap | Ceiling beams are laid on the Mauerlat, for example, from a board with a section of 10x5 cm (installed with an end face) or a beam of 10x10 cm. It is convenient to fasten with perforated corners and galvanized screws (8 screws for each corner). We choose a step of beams of 60 cm. | |
| Front board lining | ends ceiling beams must protrude beyond the Mauerlat. The ends are trimmed in level, then a sheathing board is attached to them. Please note that the roof of the bath under construction protrudes above the extension wall at the same distance as the existing roof of the house. | |
| Draft flooring | Before installing the rafters, it is necessary to fix the boards on the floor beams. You can use both edged and unedged boards, as well as OSB. Fastening can be done with small gaps. | |
| markup | We sew two boards 150 cm wide to the pediment of the existing roof. This will be the first truss truss, along which it is convenient to make markings for the rest of the rafters. From the point of intersection of the nailed boards, we measure the distance to the ceiling. We put a mark - this point will be the middle of the roof. From the intended central point, we measure the distance to the right and left peaks (the ends of the floor beams with a hemmed board), for example, it will be 1.5 m. On the opposite side of the roof, we mark the central point by measuring the same one and a half meters. | |
| Installation of a support beam for rafters | At the marked point, we fix a vertical beam with a section of 150x50 cm, we strengthen it with slats. We fasten the transverse beam from the junction point of the boards of the first roof truss to a vertically mounted beam (we cut the vertical beam along the length as necessary). The horizontal board will serve as a support for the rafters. |
|
| Rafter Assembly | We calculate the angle of inclination of the roof, the length of the rafters, cut out the first rafter, try it on the spot. According to the template, the rest of the rafters are cut from the board 150x50 cm. At the upper point forming the ridge, we connect the rafters with 200 mm long nails, using perforated fasteners. The bottom mount is the same. | |
| pruning | The protruding corners of the ceiling beams will be further cut with a saw. | |
| Structural reinforcement | We strengthen the rafters with horizontal jumpers for greater stability of the structure. We strengthen the corners of the roof base with vertical supports from a beam of small section. | |
| On the installed rafters we fix the waterproofing. We shoot the material with a stapler. | ||
| crate | We attach battens and counter battens to the vapor barrier to create a ventilated roof. We decorate the overhangs, cutting off the excess protruding boards of the crate. | |
| We sew up the gables with an “inch” board, for this we fasten vertical bars to the extreme rafters, after which we fix the boards with self-tapping screws horizontally. | ||
| Installation of finishing roofing material | We complete the work by mounting a metal tile or profiled sheet, a ridge, if necessary, install snow retainers and wind strips. |
Arrangement of the bath floor and interior decoration
When building a bath, it is important to pay special attention to the arrangement of the floor. It is important to remember that this room will be constantly exposed to moisture. Therefore, the most convenient and cost-effective option is a concrete floor in the form of a screed with a slight slope to the drain pipe. For additional and reliable floor insulation, expanded clay or penoplex is used.
Video - Sex in the bath
The drain pipe, as a rule, is located in the central part of the room, and has an outlet to cesspool. With sandy soil, such a pit can be located directly under the bath with dimensions of 60x60x60 cm. But if the soil is clayey, then the water will not absorb well, and accordingly, it is better to draw a conclusion away from the bath.
Video - Do-it-yourself sewerage device in the bath
At the same stage, the installation of the drain ladder is carried out. After the screed has dried, you can proceed to finish the floor. In this case, it is recommended to use ceramic tiles with a relief non-slip surface. We must not forget about the thorough waterproofing of those places where the floor is connected to the walls of the future bath. For this, the screening method using bitumen or the laying of any waterproofing material can be used.
Video - Drain in the bath
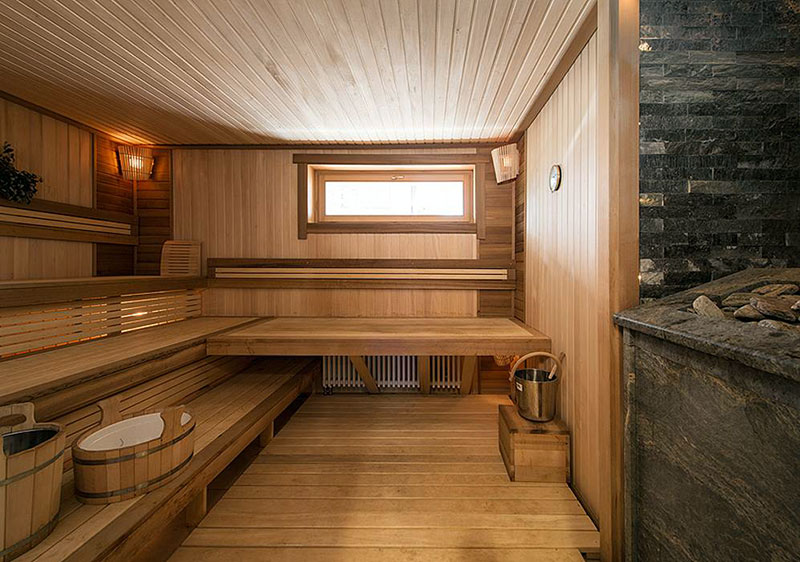
The walls and ceiling in the bath, as a rule, are sheathed wooden clapboard. In many modern bath complexes, the owners prefer wood trim replace ceramic tiles. It is not less aesthetically pleasing, as well as strength and durability. At the stage finishing works it is already possible to carry out the arrangement of the premises: the installation of equipment for the bath, electrical wiring and furniture.

The guest house-bath is a real outlet for those who live and work in the city. Rest in such a building, for example, under the capital costs fabulous money, but many are willing to pay it. Because the weekend friendly company, easy ferry and wonderful conditions are much more pleasant than even flying to hot islands. And this wonderful building can be built with your own hands, on any site! And therefore, Russian craftsmen, who rarely can’t shoulder anything, take on such construction - a real pleasure. And what and how - now we will tell.
Sauna house: a tribute to fashion or practicality?
A bath-house for guests is not just a residential building, in which a steam room is built somewhere, but everything else - decoration, layout, design of the premises - is no different from an ordinary summer cottage. No: a bathhouse-guest house is a construction with one concept of style and architecture, where the steam room is the organizing and semantic center, and everything around is adjusted to it and its special mode of operation. Including interior design.
But let's immediately define the concepts. So, a guest bathhouse-house differs from a regular bathhouse with a rest room in that you can even live in this one. There is:
- kitchenette;
- full bathroom;
- separate bedroom;
- well-established system of water supply and wastewater disposal;
- constant and maintaining the optimum temperature.
You can come here with guests and stay for the whole weekend, or live at least two summer months like in a country house. But this option differs from a full-fledged guest house with a sauna built somewhere in such important points:
- a bathhouse with a sink, a font and a dressing room is the starting point for the entire project;
- all this goodness occupies more than half of the entire living space, and not an unnecessary "corner";
- all materials for construction and decoration are selected exclusively environmentally friendly, because. bath-house is intended, first of all, to heal the body and spirit.
Thus, the guest bath-house is not used constantly, but periodically - as a “visit”, and therefore it is very important to think about how it will be heated in the absence of the owners, and how to prevent such unpleasant situations as burst pipes.
The subtleties of design and layout
So, what are modern bathhouses for guests? In most cases, they are built from environmentally friendly timber, and in two floors. Communications and amenities should be, but at a minimum: a shower stall, a bathroom, a kitchenette and an entrance hall, and as little as possible is allocated for all this. square meters. As the designers say, if only it was, but not distracting. But the rest of the area is divided approximately in the following proportion: 50% - for the steam room, swimming pool, font, shower room and dressing room, and 50% - for the guest bedroom and a spacious lounge. And everything is finished in a single conceived style.
When planning the interior of the guest bath-house, strictly observe all building codes, rules and recommendations of experienced builders. The most important thing is to make such a bath completely fireproof and protect the rest room furniture from excess steam and moisture. And therefore, no matter how much you want to save a couple of valuable square meters on the dressing room, do not do this: there must be a vestibule between the steam room and the exit to the residential area.

And, finally, do not succumb to the persuasion of friends to do something non-standard in such a building against building regulations, because “This and that one has it, and everything is fine, no one burned down.” Remember: first of all, you are building a steam room, and only secondly - a residential house.
And in more detail about all the subtle nuances of conducting electricians, steam and waterproofing of Russian baths, you can read on our website in the same section. And now let's take a closer look at how to build different guest bathhouses: both expensive and fashionable, and compact and cozy.
Project #1 - modest but tasteful
AT guest house with a bath, it is customary to arrange a separate full-fledged bathroom, with hot and cold water. And for this, you can immerse a special pump with a filter in a well dug in advance, put a boiler or a storage water heater. Place the heater itself directly in the washing room, and from it already take the pipes to the toilet and the kitchen part of the house.
Yes, the building materials themselves will have to be spent a lot. But we will reveal 5 secrets different options construction of a guest house-bath: starting from a budget frame, which you can build on your own in one vacation, and ending with a two-story "master's" house, with a pool and a veranda.
Other projects of baths with a veranda can be seen in the article
Here, for example, is a great project and its implementation:


Project #2 - for those who love luxury holidays
An ideal option for a guest house-bath for a small family, where guests will periodically visit, is a 6x6 m area and a residential attic. Frame technology- Inexpensive and within the power of anyone. She does not need any additional equipment or a team, such a bath can be built slowly and independently. At the same time, checking each stage personally, being sure that everything was done in good faith and no one stole anything, which is why then nothing “accidentally” breaks or rots.
If you want to look at the most beautiful baths in the world, we advise you to read the article
Build such a steam house using the "Platform" technology. Its essence is that even walls that have not yet been sheathed will not stagger, because:
- In each outer wall, two jibs are cut in opposite directions.
- The outer walls are firmly connected to the inner ones, and on top they are tied with a second board of the upper strapping to each other. It is the second board that gives the desired result.
- The entire frame is nailed from below to a common solid floor platform, and on top is also connected by a solid platform of the upper floor.
This technology is also good because immediately after the walls are built, you can finish them: neither shrinkage nor caulking is needed, as in the case of log cabins. More about this project:
- The foundation for such a building is suitable even for a shallow tape. Be sure to make an additional transverse tape between the sink and the steam room. Equip a small technical basement inside the foundation: here you can enter and remove water, place filters, a hydraulic accumulator and other communications.
- Make the outer racks of the frame walls 150 mm wide, and internal walls- 100 mm.
- Insulate the ceiling, floor and walls of the attic in such a bath basalt slabs, preferably "Rockwool Light Butts", and the internal walls with the overlap of the first floor - "Rockwool Sound Butts", which also provide good sound insulation.
- In this project, the floor of the entire first floor is laid out with practical porcelain stoneware, and the roof is Finnish shingles. As for the decoration of such a house, a lining is traditionally suitable for the interior, and a blockhouse as an exterior.
- The most convenient staircase for a bath-house is a rotary one with winder steps. Divide the attic into at least two separate rooms - at least a hall and a guest bedroom.
- The dimensions of the steam room in this project are 2x2.7 and the ceiling height is 2.55 m. The total volume is 13.8 cubic meters.
- For a winter house-bath, it is important that the floors are warm. And for this, lay under the floor mats with temperature control. Moreover, it is desirable with remote control - after all, people do not come to the guest house every week. So, in your absence, the floor temperature should be set to 5 ° C, and for weekends with friends - up to + 20 ° C.
- Install convectors on the second floor. Bring all temperature controllers to a separate vestibule block near the electrical panel. There, then install the device for remote on / off. So you will be calm for your house-bath, even with a long absence.
Bottom line: a fairly rigid frame structure, which is what is needed for a guest house-bath.


Project #3 - Recreation for Glory (emphasis on exterior)
This is the moment that is usually least known. How to decorate a bath-guest house? Obviously it's better modern siding. More decor? Why ... As a result, a cozy and comfortable building is obtained from the inside, which outwardly still looks ridiculous and cheap. And there will not always be a desire to come to such a place - after all, we love it when everything pleases our eyes.
But it’s enough just to see similar projects on glossy magazines, as it becomes clear: ready-made bathhouses from advertising look amazing and beckon because they have thought out the exterior: the external design of the bath and the space surrounding it. And this: a beautifully designed pond in front of the steam room, stylized garden furniture, good selection exterior finish buildings and decorated elements and successful lighting design.
Even without much investment, you can significantly change the site on which your bath is located: lay out “rural” stone paths using a stencil, cut a couple of benches from snags and varnish them, install Garden swing, hang stylized lanterns, dig a shallow pond (using a ready-made bowl), plant conifers perennial shrubs. And the house-bath itself should not be finished with a bright cheap facade of a poisonous color, which only somehow looks in the catalog, and not with “torn” brick pieces (which the fashion has long since passed), but at least give it the look of a real Russian steam room: with siding for high-quality timber, carved elements and the corresponding weather vane. Put the same barbecue on the attached terrace and a huge barrel of water.
This is the guest bath-house - where it is good to relax and the real Russian spirit is felt in everything! Look for yourself, for example, here is such a project:


Project #4 - a bath house with a residential attic
Often a bathhouse is built as a guest house with only one residential attic. What to do if the planned budget is not enough for a larger area and extensions. But it doesn't matter: the main thing is to properly organize the space, and not only the summer bedroom can be on the attic floor.
First, immediately divide this room into two separate zones. Therefore, even at the construction stage, “raise” the second part of the attic with a podium in three steps - this is both effective and practical. In the middle, make those same steps, and to the right and left of them - built-in drawers. In them you can store bed sheets, and dishes, and everything else you need. You will no longer need any cabinets or bulky chests of drawers, and the attic itself will become visually much larger.

Next, organize a recreation area on the raised part: there may be cushioned furniture, sofas, nightlights, toys. In order to cover this area, use ordinary Japanese screens or install sliding panels that are now in vogue.
The second part can be taken to communicate with guests: a billiard room is set up here, mounted on a bracket plasma tv, a mini-bar is installed. Do not put bulky furniture - only small poufs or soft frameless chairs will do, or even just throw blankets on the floor, because on weekends it will always be warm due to the fact that the steam room is heated under it.
And how such a bath is built, you can see in detail on our photo instructions:
Project #5 - modern style is the head of everything
In the guest bath house, the entire interior design is a single concept. Even the bedroom, not to mention the rest room or dressing room, should be similar finish and style like everything else. Most of all, natural wood lining, wooden flooring and soft textiles are suitable for this purpose.
The rest room in such a building is intended primarily for spending time with family and friends, and therefore its main attributes are a large massive table, a huge plasma TV, a predator skin on the wall, wooden shelves rough workmanship and upholstered furniture.
A kitchen in such a house can also be, but then a minimum of space is allocated to it, and it is enough to put just a couple of modular elements. But such premises as a library, a nursery, a spacious bathroom or dressing room should not be.
You can see the process of building such a bath in more detail here: 

Optionally, separately you can place a billiard room, a swimming pool, gym and the "Japanese" attic, where there is no furniture, and fragrant herbal teas are drunk right on the rug in the middle of the floor.
Yes, and one more thing: when building a guest house-bath, immediately think about where you and your friends can leave their cars for the night. It can be a separate spacious garage, or it is better to allocate a solid basement under the bath itself for this purpose. After all, usually only at the end of a large-scale and expensive construction, many newly-made owners begin to remember this important aspect. And they grab their heads.
Listen to our advice, experiment, plan - and the dream will become a fashionable reality!