Beautiful niche for TV. Creating a drywall TV niche: tips and instructions
Reading time ≈ 6 minutes
Plasma TV today it can be found in almost any home, it has become an important and necessary part of the interior. Sometimes you want to beautifully beat this detail or hide it in the wall. The plasma should be in the wall and not protrude even a centimeter, which is only possible when creating a recess from drywall. Such a structure is perfect for equipment with a thin LCD, LED and LCD screen.
A niche for a TV from is modern way furnish the space in a stylish and functional way. Such design decision today it is very popular, it gives the room dynamics and volume. The plasma panel in the recess can free the room from unnecessary shelves or chests of drawers, as well as visually enlarge it and make it more spacious. It is possible to assemble such a design on your own, you need to act consistently and know some subtleties and nuances.
Peculiarities
Television monoblocks are attached to the walls using various brackets, but this method is suitable for restaurants, cafes or clubs. When creating the interior of an apartment, comfort and safety are in the first place, so it is important to hide all cables and wiring well. What are the advantages and disadvantages of plasterboard wall cladding and creating a niche.
Advantages:

The downside is the possible reduction in the area of the room due to the wall into which the niche and the plasma panel will be installed.
Choose a design
This design can be built in rooms of any size and shape: rectangular, round and square. The form of the installation itself can also be varied. Consider the main types of drywall TV niches with examples in the photo:

Design solutions:

How to install a niche
Before starting construction drywall installation, it is necessary to develop a project plan and sketch a sketch on paper. The sequence of actions will be as follows:
- Transferring the project to the wall, marking and mounting the frame.
- Sheathing of the inner walls of the future niche.
- If necessary, set the backlight.
- Plasma placement and communications wire for equipment operation.
- Sheathing the frame with plasterboard.
- Final work on finishing designs.
Required tools:

Mounting process
We proceed to install a niche for a TV with our own hands in stages:

Now you know how to make a TV niche yourself, and you can start finishing.  It can be surface painting, processing decorative plaster or polyurethanes, as well as wallpapering. The main thing is that the design is in harmony with the interior and fits the style of your room.
Do-it-yourself drywall TV niche is great option installations for modern household appliances. Plasterboard sheets are practical, versatile material, which will help to create a design quickly and without much cost.
Plasterboard niche for TV: advantages
If you have never dealt with this material and doubt whether it is suitable for your household appliances, we suggest that you familiarize yourself with the main advantages of this design:
- The TV will fit perfectly into any interior concept, it will not seem like a “foreign” object
- The design will allow you to place not only a TV, but also other items - CDs, books, various decorative elements.
- The TV will be protected from falling and mechanical damage
- You can completely hide the wires and cables - the interior will look more aesthetically pleasing
- Lamps are placed in the resulting recess, which will make the space brighter and more comfortable.
- Installation of the structure requires minimal financial costs
Varieties of forms
Most popular form drywall niche for TVs - rectangular. However, this is not the only design option. If you like original solutions, we recommend that you pay attention to other options.
- rectangular shape
It allows you to perfectly fit a thin screen, as well as equip additional shelves. This perfect solution for rooms of any size. The recess can be located both vertically and horizontally. The vertical niche increases headroom, so it is ideal for walls that are too wide.
- oval shape
Due to the complex manufacturing technology, it is rarely used to install TVs. However, fans will surely love it. original solutions. The design visually reduces the space, so you need to use it in the interior very carefully.
- curved shape
Just like the oval one, it is made using a complex technology, but at the same time it looks original and stylish.
Jpg" alt="(!LANG: do-it-yourself plasterboard TV niche" width="795" height="530" srcset="" data-srcset="https://remontcap.ru/wp-content/uploads/2017/10/post_201_3794..jpg 300w" sizes="(max-width: 795px) 100vw, 795px">!}  .jpg" alt="(!LANG: do-it-yourself plasterboard TV niche" width="795" height="551" srcset="" data-srcset="https://remontcap.ru/wp-content/uploads/2017/10/post_201_3791..jpg 300w" sizes="(max-width: 795px) 100vw, 795px">!}
  .jpg" alt="(!LANG: do-it-yourself plasterboard TV niche" width="795" height="544" srcset="" data-srcset="https://remontcap.ru/wp-content/uploads/2017/10/post_201_3789..jpg 300w" sizes="(max-width: 795px) 100vw, 795px">!}
  .jpg" alt="(!LANG: do-it-yourself plasterboard TV niche" width="795" height="528" srcset="" data-srcset="https://remontcap.ru/wp-content/uploads/2017/10/top_201..jpg 300w" sizes="(max-width: 795px) 100vw, 795px">!}
  .jpg" alt="(!LANG: do-it-yourself plasterboard TV niche" width="795" height="546" srcset="" data-srcset="https://remontcap.ru/wp-content/uploads/2017/10/post_201_3797..jpg 300w" sizes="(max-width: 795px) 100vw, 795px">!}
  .jpg" alt="(!LANG: do-it-yourself plasterboard TV niche" width="795" height="527" srcset="" data-srcset="https://remontcap.ru/wp-content/uploads/2017/10/post_201_3796..jpg 300w" sizes="(max-width: 795px) 100vw, 795px">!}
Design Options
The recess takes on not only the functional load, but is also an excellent decorative element, so the designers developed several options for its design.
- In the form of a box
This is a decorative design with open shelves and different racks.
- Niche on a smooth wall
There may also be drawers, lockers. It turns out a kind of drywall wall for a TV.
Additional shelves and racks can also be arranged in different ways:
- asymmetrical
This arrangement is suitable for ergonomic use of space. Suitable for zoned and combined rooms.
- symmetrical
A symmetrical niche will fit perfectly into the interior, furnished in classical style. You can thus place the TV in rooms designed for relaxation and sleep.
The plasterboard niche with backlight for the TV is also very popular. The backlight can serve not only as a decor, but also as a separate source of lighting.
Sketch development
This milestone creating a drywall construction for a TV. The more detailed you think everything through, the less likely it is that the work will need to be redone.
- The basis of the sketch is the drawn frame of the future niche. Here you should depict all verticals and horizontals, consider the location of all load-bearing profiles, take into account the load on them, etc.;
- Image changes electrical wiring. The location of drywall sheets. Drawing the main lines of structures;
- Placement of finishing materials, taking into account their thickness, influence on general form designs.
In order for the calculations to be correct, adhere to the following recommendations:
- The depth of the structure must match the length of the TV so that it does not protrude beyond the edges of the drywall sheets. If there is a socket behind the TV, the depth must be increased several times more
- The width of the shelf should be 20 cm wider than the TV. It is also necessary to leave a small distance on the sides so that it is convenient to connect and disconnect equipment
All other dimensions can be controlled at your own discretion.
Necessary tools and materials
Any installation work requires the presence of certain tools and materials, without which it is impossible to perform it quickly and efficiently. To build a high-quality drywall niche in the living room for a TV, prepare:
- metal profiles. They will be needed for the construction of a rigid frame - the basis of a future niche or plasterboard shelf for a TV. For any shape, you will need 2 rack and 2 guide profiles. If the design of the structure is curved, you will also need an arched profile.
- Plasterboard sheets. This is the main material for creating a recess. To fix them, you need to prepare special self-tapping screws
- Dowel. These are special fasteners that allow you to firmly fix the guide profiles. They are perfect for attaching metal frame to concrete and brick walls
- Decoration Materials. Any drywall construction involves the use of compounds for leveling and processing. To this end, it is worth acquiring putty and a primer. Tiles, wallpapers, mosaics, paint, etc. are used to give the niche a beautiful, aesthetic look.
- Instruments. To work with metal profiles and drywall sheets you need to get: a drill, a screwdriver, a screwdriver, a hacksaw, a planer, a construction knife, instruments for measuring
The block of sockets, as a rule, is located below. The wires will be hidden behind the TV.
How to make a drywall niche for a TV: workflow
Main stages:
Data-lazy-type="image" data-src="https://remontcap.ru/wp-content/uploads/2017/10/a303b74c46c9217fc17198fc13cdb0da.jpg" alt="(!LANG: do-it-yourself plasterboard TV niche" width="718" height="415" srcset="" data-srcset="https://remontcap.ru/wp-content/uploads/2017/10/a303b74c46c9217fc17198fc13cdb0da..jpg 300w" sizes="(max-width: 718px) 100vw, 718px">!}
Jpg" alt="(!LANG: do-it-yourself plasterboard TV niche" width="800" height="450" srcset="" data-srcset="https://remontcap.ru/wp-content/uploads/2017/10/maxresdefault-5..jpg 300w" sizes="(max-width: 800px) 100vw, 800px">!} 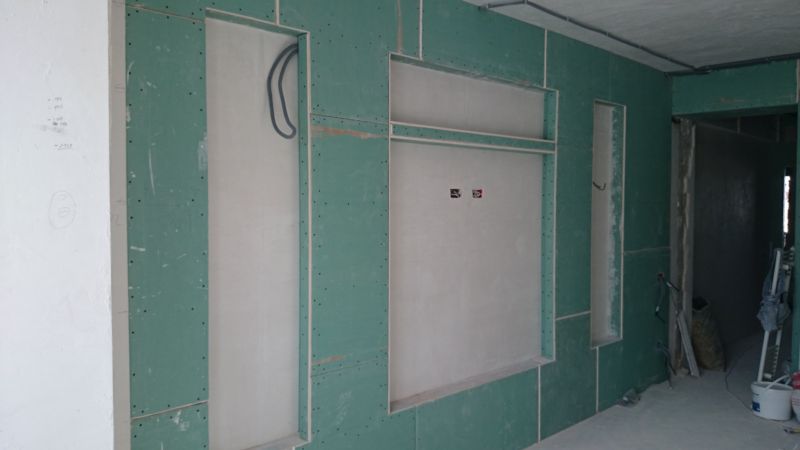
What finish to choose?
- Dye
This option for finishing the niche under the TV with drywall is suitable if the putty is applied neatly and efficiently. To add texture to the surface, use a special spatula to apply paint.
- Wallpaper
This is the cheapest and easiest finishing option. For pasting a niche and the entire wall, you can use the same wallpaper. The niche will be completely invisible.
- Fake diamond
Such a finish will take a lot of time and require maximum effort. The material can be cut with a grinder if necessary. It is convenient to use liquid nails when working with artificial stone.
- Polyurethane
Foam plastic is great modern material for finishing. From it you can create a variety of patterns and textures. It is great for decorating rooms in a classic style.
A TV in a drywall niche on the wall will update your interior, make it interesting and original. If you want to "refresh" the room, be sure to consider this option.

An excellent one, which will allow you to carefully place a TV and all the devices required for it inside you, can be called a niche. This design perfect for those rooms in which there is not a lot of space, but you still want to place everything in it as efficiently as possible necessary devices and items. Such a product has another significant advantage - it is a TV stand, that is, by making a niche, you can be sure that your TV will hold securely and is unlikely to fall off somewhere
It is very convenient that a do-it-yourself niche for a drywall TV is assembled completely, you do not have to resort to the services of specialists, you just need to follow the tips and rules of this article. It is easier to create such products than to build, for example, a common one. Therefore, even a beginner will perfectly cope with this work. By creating a niche, you will create an ideal place for a TV in your apartment, in addition, you can place everything you need for it to work nearby.
What is this article about
Form selection and niche design
For a niche it is very important to choose suitable design, which will not only emphasize the features of the product itself, but also organically fit into the interior. It is very difficult for most people to come up with at least some shape that will differ from an ordinary rectangle. If you are one of them, then you should start by browsing the Internet pages with similar products, so you can highlight the main design points for yourself, highlight any design features, in order to finally create your own individual product.
If you create other drywall constructions along with a niche, then it may be better to use the services of a designer who will definitely come up with a single drywall composition that will please your eye all the time. Our advice, make a few sketches of a niche according to your fantasies, because it can be made not only square or rectangular, but also complex shapes, with height differences and the presence of bends.
Measure the wall where the drywall niche for the TV will be installed. You need to know its dimensions and, preferably, the area in order to choose the dimensions of the structure almost perfectly. In accordance with the dimensions, but not much attention to them, make the project a niche. In the project, you need to sketch a niche of the form that you came up with, but do not forget that the dimensions of the product must also be indicated there.
Also, you must imagine how the TV will be attached to the support. In the role of the latter, both the wall and the niche itself can act (in this embodiment, it will be necessary to strengthen the bottom of the structure). Everything additional devices, for example, game consoles and various receivers, amplifiers, will need to be placed side by side, so make sure that there are shelves for them in the niche.
Work surface marking
The complexity of the markup will depend on where the niche will be located. If everything is standard, that is, the niche is on the wall, then the markup will take place only on the surface of this wall. But if the niche is made in the form of a partition, then you will also have to make markings on the ceiling and floor. We will consider the usual version of the location of the structure - on the wall.

As always, the first step is to mark the contours of the structure, indicate the places where the niches themselves will be located, that is, the cavity where the TV will be placed. The points for laying the rack profile are also indicated on the wall, in addition, for each profile rail (guide or rack) that is located in this area, you need to specify the dimensions. So that later, when you cut the profile, you can immediately measure the length of the rail and make a cut, and not measure the entire markup and frame.
A niche, which is made in the form of a TV stand, that is, the device will directly stand in the recess of the structure, is additionally reinforced with a profile, and chipboard or plywood is placed on its bottom - this should also be noted during marking. Make sure that all the lines are clearly visible, and the trace of the pencil is held securely, otherwise you can then touch the marked area with the tool, the lines will be erased - you will have to redo everything.
Quite often, the largest TV is placed in the living room, as there are a lot of people gathering there, and the screen should be visible to everyone. But we are talking about the fact that the living room is also often installed electric fireplaces, which is in perfect harmony with the TV, especially if the perfect hole for the fireplace is made in the niche, that is, exactly according to its size. If you will make a fireplace in your niche, then make an indication of this at this stage. In addition, it is better to place the TV on a special hanger that is attached to the wall, so do not forget to mark the place where the hanger is attached, or better, fix it now.
The process of building a frame for a niche
The frame will be made of several types of profile, which can be selected in size and thickness specifically for the weight of the structure and the load (in our case, the TV) that it will withstand.
- guide profile. This type the profile will be used to connect the frame of the structure to the wall, that is, it will be the link between the base and the product;
- Rack profile. It is used to erect the entire frame by connecting it to the already installed rails of the guide profile. Using this type of profile, all jumpers and stiffeners in the frame are created;
- Profile for bends. It already has holes that were made at the factory, so it can be immediately bent without pre-training. But it can be replaced without any problems with a rack-mount profile, which is simply notched as necessary.

Before you make a purchase of a profile, it is worth calculating its quantity. An article about calculating the number of profiles for drywall constructions explains in detail this process we advise you to read. You need to start assembling the frame by installing a guide profile, which is always located at the boundaries of the structure. You need to fix it to the base, and if it is concrete, use a drill and dowels.
The guide profile is cut into the necessary parts along the length with metal scissors, after which it is fixed on the wall and, if the niche is made in the form of a partition, on the floor and ceiling too. To give the plasterboard TV stand the required area, you need to use a rack profile. The rack profile is fixed between two guide rails using self-tapping screws.
It is necessary to place the rack profile in such a way as to give the structure maximum strength and the desired shape, so that it is possible to sheathe this frame with plasterboard sheets, as a result of which it would become exactly what you intended at the planning stage, that is, a niche. The rack profile connects all the guide rails, after which you can start working on those places where there is a bend in the profile.
As mentioned above, you can use both a special profile and an ordinary rack profile. The latter only needs to be cut with scissors every 5-7 centimeters, making an incision on each of the two sides, and leave the third intact - it will be in direct contact with the drywall.

With such a prepared profile, a bend is made, for example, in the form of a portal in the recess for the TV. Also, this profile creates a transition between parts of the structure in order to obtain a single product as a result. Having finished creating the frame, you can proceed to its sheathing and decorative trim.
Sheathing the frame with drywall sheets
It is at this stage that a significant minus of a niche manifests itself - this design, unlike the ceiling or, has recesses, for which drywall will have to be cut a lot. You'd better use for this electric jigsaw so that your hands do not get tired, and the work goes faster. Also, a niche, especially a corner one, creates a lot of seams between drywall sheets, so you have to use more plasters.

So, if the TV is on a hanger, then start sheathing the area around it. If the TV will simply stand in a niche, then the first step is to sheathe the area behind it, after which you can proceed to the sheathing of the place where the TV will stand and the adjacent walls in the recess of the niche. When you have sheathed the recess, you can move to the front side of the structure, sheathing it. Please do not confuse this sequence when trimming. If you follow these instructions, then putty will pass somewhat lighter, since the seams between drywall sheets will be hidden by the front sheets of the GKL.
For some sections of the frame, it is possible as follows: make cuts on the GKL sheet every 6–8 centimeters and break the sheet along them, after which it can be fixed on the frame.
It is necessary to finish the work by strengthening the corners and further filling the product. We hope that now you will not wonder how or how to make a niche for a TV, because in the article we explained this in detail and quite simply. Easy work and quality results!
Drywall is one of the most popular finishing materials on the market today. It is very easy to work with, including cutting and bending. At the same time, it is quite durable and can even act as partitions and walls in the interior. But it is even more interesting to use it to create decorative designs, such as multi-tiered ceilings or niches in the walls. A plasterboard TV niche can be the main highlight of your living room. At the same time, its implementation will give you such additional benefits as:
- Simplicity and relative cheapness in implementation;
- The ability to hide all the wires in the wall.
Today you will see how stylish and creative a drywall TV niche can look in a living room design and get acquainted with the features of its manufacture.
Drywall TV niche: how to do it
Drywall niches can be installed on walls made of almost any material: concrete, brick, wood, etc. Each TV niche is created based on the wishes and taste needs of the owner of the house or apartment, so the installation process is unique. For example, your niche can be horizontal or vertical, rectangular or round, illuminated or not, and in absolutely any size and finish. In this case, the sequence of actions always remains the same:
- Mount the frame;
- Sheathe the inner walls of the niches;
- Set backlight if necessary;
- Hang the TV and conduct communications (TV wires, antenna, etc.);
- Sheathe the entire niche frame with drywall;
- Carry out finishing work.
As a rule, for a plasterboard niche for a TV, a metal or wooden frame. Here's what it looks like in a photo:


Not very attractive, right? But drywall, lighting and various decorative coatings easily turn this unsightly design into candy. Let's see how interesting a plasterboard TV niche can be in the interior of the hall!
How can I arrange a niche for a TV in the hall
Consider the main possibilities that the design of a niche in the living room offers, in addition to hiding the wires:
- A vertical TV niche will create the illusion high ceiling and leave room for tall cabinets on the sides;

- A horizontal drywall niche, on the contrary, will visually lengthen the wall and, in combination with low furniture, will expand your living room;
- A full-scale drywall construction with several niches on the wall is useful not only for the TV, but also for storing various souvenirs, figurines, indoor plants and other decor;
- Drywall niche with backlight - interesting way add a romantic and mysterious atmosphere to the interior of the living room, as well as emphasize the decor on the niche shelves.

Also read:
As for finishing materials for niches, here the only limitation can be your sense of style and budget. Typically, the niche structure itself is finished with plaster, paint, or wall paper, while the interior cavity may be decorated with stone, glass, wood, or a contrasting shade of paint or wallpaper. Highlighting the interior walls of a niche with a color or texture visually deepens the surface and gives the room a more embossed and bold look. At the same time, experts recommend choosing for this purpose not too dark shades, otherwise the niche will look more like a hole in the wall than a stylish interior solution.

We will not torment you any more: enjoy the photo of beautiful TV niches in the living room! And don't forget to save best ideas note to yourself.
Beautiful drywall niche for TV in the interior - 20 photos:


Also read: 


Not everyone likes freestanding large-sized typical furniture, and built-in wardrobes and niches are ideally adjusted to the size of the room or made to fit specific interior items. A drywall niche for a TV is very common among such structures.

For such a masking of the TV, you can choose one of two design options:
- The TV is located in a niche on a smoothly sewn wall. In this wall there are built-in wardrobes, drawers, and other niches.

The location of the wall elements relative to the central axis is stylistically important:
- A symmetrical arrangement of shelves and doors will be required for a room decorated in a classic style. According to the law of composition balance, symmetry corresponds to the static state of the overall picture, so it is preferable in the bedroom and rest areas;
- Asymmetry is suitable for modern style, minimalism, hi-tech. It would be more appropriate to use it in cramped rooms for the purpose of ergonomics, especially if it is more convenient to place the TV not in the center of the wall or the wall is no longer symmetrical (because of the door, for example). More suitable for combined and zoned rooms: kitchen-living room, teenager's room.

We develop a sketch

First, it is better to sketch an approximate general view, then step by step to verify and edit:
- The main thing is a traced metal frame of a plasterboard structure. Here you need to take into account all the horizontals and verticals, consider the location of the profiles that carry the greatest load, as well as reinforcing jumpers.
- Apply wiring changes to the sketch: relocation of sockets, hidden wires, lighting scheme.
- Estimate how to economically cut drywall sheets, apply the main lines.
Already at the stage of work on the sketch, you need to decide on the finish. After all, some finishing materials have their own thickness, and it must be included in the drawing. For example, for ceramic tiles(including for artificial stone) 4-9 cm, and the same amount for a layer of tile adhesive.

Tools and materials
Any installation work do-it-yourself, include the preparation of building and finishing materials:
- metal profiles Necessary to create a rigid frame - the foundation of a future niche or shelf. Regardless of form future design, two types of profiles are used - guides (28 × 27) and rack-mount (60 × 27). To them - self-tapping screws for metal 14 - 16 mm. You may need another type of profile, for example, arched. It is used if the design of the future shelf includes curly bends. Perforated metal and arched plastic corner necessary to give the correct geometry outside corners shelves.
- Drywall sheets - the main material from which the structure will be mounted. In order to assemble such a box, even a ceiling plasterboard with the desired properties and optimal size. As fasteners, special self-tapping screws with a countersunk head are used.
- Dowel-nails. The frame of the future design should be a reliable solid foundation, therefore, the fastening of the guide profiles must be of high quality. For this, dowels are used, which are necessary when attaching a metal frame to brick and concrete walls.
- Electrician. Drywall constructions, with the help of which the interior of the housing is equipped, rarely do without mounting sockets or lighting. A design project often includes decorative or functional elements that require electric wires, sockets, switches, lamps.
- Finishing materials. Rough finish do-it-yourself drywall constructions can not do without processing special formulations and structural alignment. For these purposes, you will need a primer and putty, the appearance of which is determined by the decorative finish option.
The design of a TV shelf is determined by its shape, which is formed on initial stage, as well as - appearance which gives already finishing. Depending on the purpose of the structure, it can be finished with mosaics, tiles, paint, plaster or wallpaper. You can often see original designs from GKL and combined finishing.

A box or niche made of drywall for a TV is most often painted or pasted over with wallpaper.
A tool for working with drywall includes a mandatory set consisting of a drill or puncher, a screwdriver, a knife for cutting plasterboard or a jigsaw, a milling cutter, metal shears, measuring tape, building level and mounting pencil, grinder, suspensions, sandpaper, spatulas and mixer.

Niche installation
Any do-it-yourself installation of a niche or drywall shelf begins with a sketch or detailed drawing. Such a maneuver helps to determine the design of the structure and correctly calculate the amount of building materials.

The further manufacturing process is as follows:
- First, the markup. Lines are applied to the wall, ceiling and floor, along which metal profiles will be laid.
- Guide profiles are attached along the horizontal markings. Rack-mounted ones are screwed to them, which will bear the entire load and drywall will be attached. Sometimes the crate for drywall is made of wood in whole or in part. wooden bars just may be needed as load-bearing racks.
- If the wall with a TV niche will consist of drywall boxes located one above the other, then you need to build them alternately from the bottom up.
- Now finished frame needs to be covered with drywall. Drywall is cut with an ordinary wallpaper knife or a jigsaw after careful measurements. A layer of cardboard is cut on one side, then the slab is broken along the cut line, and cardboard is cut along the break line on the other side. Sometimes a drywall sheet is first attached to the frame from the joint and only then cut off, so it turns out faster and more accurately.
- Drywall is attached to the frame first from the sides and only then from front side. The joints of drywall sheets should be located exactly in the middle of the profiles so that they do not hang anywhere in the air without being supported by the frame.
- Self-tapping screws are screwed into the drywall every 10 - 15 cm. The hats should not stick out, they need to be drowned a little, carefully, without breaking the drywall.
- After the entire frame is sewn up, the joints and self-tapping screws are puttied, sanded and primed. When puttying, it is better to use reinforcing tape.

Finishing
- Wallpaper - the simplest and cheap option. If you paste over a niche in the same way as the rest of the room, then it will merge with the interior as much as possible and the masking function will be fully performed. If it is in the style of the interior, then you can choose a contrasting color.
- Painting requires very careful and accurate puttying. Drywall surfaces can be textured with a special spatula. Painting performs the same decorative functions as wallpaper.
- Artificial stone requires the most effort and time. The tiles need to be cut. In small volumes. This is usually done with the help of a grinder, you will need the ability to handle it. To avoid dirt and dust while mixing the tile adhesive, it will be easier to use liquid nails.
- Polyurethane is a beautiful modern finishing material. Foam plastic moldings look like stucco and come in all sorts of shapes. Polyurethane is painted or covered with foil-potal. A TV niche decorated with these materials will harmoniously fit into classic interior living room or hall.
Building a niche for a plasterboard TV with your own hands is not only an updated interior of your living room and interesting experience but also significant savings for the family budget.
