Do-it-yourself multi-tiered plasterboard ceiling. Plasterboard ceilings (175 photos). ceiling design in a small kitchen
The ceiling is the most visible part of the interior of any room. If all the imperfections of the floor and walls can be hidden by furniture, carpets, tapestries and other items, then the ceiling is always in sight. That is why when planning it is given a lot of attention. The era of simply leveling the ceiling with plaster and putty mixtures has long passed, now more complex structures are relevant, which give unique look room, create a comfortable zonal lighting, beat all the strengths and hide the flaws of the interior. And it may seem to many that the creation of such a ceiling is the business of professionals. the highest level. The purpose of this article is to debunk this myth and convince the reader that two-level ceiling any normal owner can make from drywall with his own hands.
A little about drywall
Many mistakenly believe that drywall appeared in our country in the early 90s of the XX century, when Western building materials became available and "gushed" to Russian market. Few people know that drywall was invented and patented back in the 19th century, and large industrial production was set up in 1917. Skeptics may argue that nothing was known about drywall during the Soviet era, but stubborn facts say otherwise - this material was successfully used by Soviet builders, however, it was called differently - dry plaster. It was not available to everyone and was not used in civil engineering projects, and therefore such an erroneous judgment.

But now everything has changed and everyone can buy drywall, it is in any hardware store. Moreover, the whole range of accessories is attached to it: profiles, connecting elements, fasteners, materials for sealing joints and much more. But the main thing is that all the technologies for working with drywall are in the public domain, manufacturers do not hide this at all. And it is not at all necessary to turn to "super" specialists. Maybe it's better to figure it out yourself and make sure that there is nothing complicated in principle. The main thing is to follow the recommendations that have been developed on the basis of the experience of many decades. But, let's talk about everything in order.
How is drywall made?
In the very name of this unique building material, its structure is hidden. The basis of this building material is a gypsum sheet of rectangular size, which is pasted over on all sides with facing cardboard.

Gypsum is natural mineral, which has a number of unique and useful qualities:
- The ph level of gypsum is very close to that of the human body.
- The production of products based on gypsum does not harm the environment.
- Gypsum is a non-combustible material.
- Gypsum products help maintain a normal level of humidity, as they say in everyday life, this material is able to "breathe".
The main disadvantages of gypsum, which limits the use of building materials based on it, are insufficient moisture resistance and fragility. Therefore, standard drywall is not used outside, but in rooms with high humidity use only special sheets that have special markings.
Types of drywall
Plasterboard sheets, depending on the place of their application and the availability of the desired properties, come in different nomenclature. About what are drywall sheets, described in the following table. At the same time, the nomenclature of the leading manufacturer of building materials, the world famous company Knauf, is shown as an example.
| Image | Name | Cardboard color | Marking color | Application area |
|---|---|---|---|---|
 | Drywall regular () | Grey | Blue | For interior decoration rooms with normal and dry humidity conditions |
 | Drywall moisture resistant () | Green | Blue | Sheets have a reduced (no more than 10%) water absorption. Can be used in rooms with dry, normal, damp and wet humidity conditions |
| Drywall with increased resistance to open fire () | gray or pink | Red | They are more resistant to fire. Used in fire hazardous areas | |
 | Moisture resistant drywall with increased open flame resistance () | Green | Red | Combines the properties of GKLV and GKLO. Used in fire hazardous areas with high humidity |
From the table it can be concluded that the use of certain drywall sheets determines the mode of humidity in the premises, as well as the level fire hazard. About what are the humidity conditions of buildings depending on the air temperature is shown in the following table.

Knauf engineers, depending on the purpose of the premises, have developed recommendations for the use of various types of drywall sheets.

Plasterboard sheets are rectangular sheets that have different sizes of thickness, width and length. The main geometric dimensions, as well as the weight of 1 m 2 of the sheet, are shown in the following table.

Most often on sale there are drywall sheets having 2500 mm in length and 1200 mm in width. Other sizes are usually made by the manufacturer on request. In addition to the geometric dimensions, drywall sheets have another important indicator - the appearance of the side edge. If the end edges are simply a sheet cut at a right angle with a bare gypsum core, then the side edges for the convenience of joints can have a different profile, and they are pasted over with cardboard. The types of edges of drywall sheets (GKL) are shown in the table.
| Image | Edge type | Designation | Application |
|---|---|---|---|
| straight edge | PC/VR | It is used in two-layer structures made of plasterboard, when sealing of the joints of the lower layer is not required | |
| Thinned edge | UK/AK | It is required to seal the GKL joint with reinforcing tape and putty of the Knauf-Fugen type | |
| Semicircular with front side edge | PLC/HRK | Sealing a seam without reinforcing tape with putty type "Knauf-Uniflot" | |
| Semi-circular and front-facing thinned hem | PLUK/HRAK | Sealing the seam with Knauf-Fugen putty with reinforcing tape, and Knauf-Uniflot without reinforcing tape | |
| rounded edge | ZK/RK | Installation of plasterboard with subsequent plastering |
In the decoration of ceiling and wall structures, GKL with a thinned and semicircular edge (PLUK) is most often used, which makes it possible to shorten the technological chain of finishing, and this speeds up the process and significantly reduces its cost.
Profiles and fasteners for drywall systems
Naturally, plasterboard sheets themselves are very rarely attached directly to the walls, and even more so to such a responsible structure as the ceiling. Frames are assembled for fastening, and drywall sheets are already attached to them with special fasteners. At first glance, it may seem that the construction of drywall structures includes a huge range of components and fasteners, but in fact everything is much simpler. Let's consider what profiles are used for arranging frames of two-level ceilings.
| Image | Name, designation, rus/eng | Description and purpose |
|---|---|---|
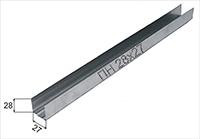 | Ceiling guide profile PN 28*27/UD 28*27 | It is made of galvanized steel with a thickness of 0.4, 0.5 or 0.6 mm. Standard length 3000 or 4000 mm. Designed for use with the PP 60*27/CD 60*27 profile for arranging metal ceiling frames and wall cladding |
 | Ceiling profile PP 60*27/CD 60*27 | The ceiling profile is the basis for the formation of the metal frame of the ceiling from the plasterboard. It can be used for facing plasterboard walls. Available in thicknesses of 0.4.0.6 m and standard lengths of 3000 and 4000 mm |
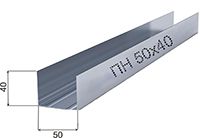 | Rack guide profile PN 50*40, 75*40, 100, 40/UW 50*40, 75*40, 100*40 | It is made of galvanized steel with a thickness of 0.4, 0.5, 0.6 mm. Standard length 3000 or 4000 mm. It is used in conjunction with PS/CW profiles of appropriate dimensions in the manufacture of partition frames, but can be used in some particularly critical places in the suspended ceiling structure (mainly PN 50*40/UW 50*40) |
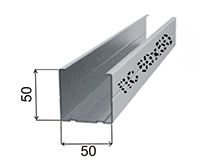 | Rack profile PS 50*50, 75*50, 100*50/CW 50*50, 75*50, 100*50 | The basis for the formation of partitions with the corresponding PN profiles, but can also be used in ceiling frames (PS / CW 50 * 50) |
Can be equipped in rooms where they will be affected high humidity or harsh chemicals. That is why the profiles are made of galvanized steel, which is less susceptible to corrosion processes. It is best to choose a thickness of 0.6 mm, as these profiles provide the best structural rigidity. It is allowed to use profiles made of galvanized steel sheet 0.4 or 0.5 mm, but only in those places where it is required, for example, to make short jumpers, auxiliary elements, and more. load-bearing elements the ceiling should be made only with a profile of 0.6 mm. The length of the profile (3000 or 4000 mm) is chosen based on the geometry of the room. The main rule is to use solid sections of the profile wherever possible.
Manufacturers of gypsum boards and accessories for them additionally provide for the possibility of using them as load-bearing and auxiliary elements of a false ceiling wooden blocks section 50*30 mm or 50*50 mm. In this case, it is necessary to choose softwood with a moisture content of not more than 12%, while all the bars must be pre-treated with antiseptics and fire retardants before installation. But in creating complex ceilings, especially those involving curved elements, it is best to use metal profiles for the following reasons:
- The metal profile has corrosion protection, does not require additional processing.
- Metal profiles are easily processed with an affordable tool, with the help of them it is easy to create any, even the most complex, multi-level ceiling design.
- Manufacturers of drywall systems have developed various technical documentation for the installation of structures with a detailed explanation of each stage and drawings. All this information is in the public domain.
- Metal profiles are available at any hardware store and are sold at a reasonable price.
In addition to profiles in drywall systems, other elements are used for mounting and attaching frames to building structures. There are a great many of these elements, but we will only consider what concerns a two-level plasterboard ceiling in the following table.
| Image | Name | Purpose and application |
|---|---|---|
| Elements for fastening the main and supporting profiles to each other | ||
 | Connector for ceiling profiles PP 60 * 27 / CD 60 * 27 single-level (Crab) | It is made of galvanized steel 0.5-0.9 mm. Designed for connecting profiles PP 60 * 27 / CD 60 * 27 in one level at a right angle. dimensions: 148*148*18mm. The connection is made using self-tapping screws for metal |
 | Profile connector PP 60*27/CD 60*27 two-level | Designed for connecting profiles PP 60*27/CD 60*27 at different levels at a right angle. It is mainly used in the construction of "floating" ceilings, that is, not connected with the walls. Overall dimensions 58*45 mm, thickness 0.5-0.9 mm are made of galvanized steel. Rarely used in two-level ceilings |
 | Universal single-level connector for profiles PP 60*27/CD 60*27 | Allows T-shaped connection of profiles PP 60 * 27 / CD 60 * 27 both at a right angle and at an angle of up to 45 °. It also allows longitudinal connection of profiles with an angle of up to 30°. Additionally, it can carry out fastening to the bearing base. Dimensions 215*53 mm, thickness 0.5-0.9 mm. It is used very rarely, since there are many alternative ways to connect profiles |
 | Profile extension PP 60*27/CD 60*27 | It is made of galvanized steel with a thickness of 0.5 to 0.9 mm. It is used for longitudinal connection of PP 60*27/CD 60*27 profiles. The extension securely connects two profiles without loss of strength. Self-tapping screws for metal are used for fastening |
| Elements for fastening profiles (wooden bars) to the bearing base | ||
 | Straight hanger for profiles PP 60*27/CD 60*27 | Designed for fixing ceiling profiles PP 60*27/CD 60*27 to the supporting base: ceiling or walls, using appropriate dowels or anchors. It is made of galvanized steel with a thickness of 0.5 to 0.9 mm. Overall dimensions 60*30*125 mm. For fastening wooden bars, direct suspensions 50 * 30 * 125 mm are produced, but they are used extremely rarely. Load bearing capacity of direct suspension - 40 kg |
 | Anchor hanger for profiles PP 60*27/CD 60*27 | Manufactured from galvanized steel 0.9 mm thick. Designed for fastening profiles PP 60 * 27 / CD 60 * 27 to the supporting base - the ceiling, if the distance from it to the profiles exceeds 120 mm. The bearing capacity of a suspension is 25 kg. Used in conjunction with suspension rod |
 | Anchor suspension rod | Used in conjunction with an anchor hanger. It is made of galvanized steel wire with a diameter of 3 or 4 mm. Available in various lengths - from 150 to 3000 mm. Fastened through the eyelet to the ceiling, and the lower part is fixed in the spring plate of the anchor suspension |
In fact, in the assortment of manufacturers of drywall systems there are also other elements that make it possible to simplify the installation technology. These are special arched profiles, and different kinds connectors, but as practice shows, they are extremely rarely used, they are practically not on sale. Therefore, the authors of this article decided to save the attention of the readers of our portal and talk only about what is widely used.

When choosing profiles and connectors, you must trust only well-known manufacturers and conscientious sellers. Unfortunately, the market is simply flooded with cheap fakes for drywall profiles, as well as other components. In the table, it was not for nothing that we indicated the thickness of the profile, since it is this indicator that indicates the required strength. But on sale you can see profiles not only 0.7 mm, but also 0.6, 0.5 and even 0.4 mm, and from the appearance, an inexperienced consumer will not be able to distinguish a catch. Moreover, sometimes counterfeit products look more advantageous. That is why it is worth buying components for drywall systems only from well-known manufacturers, the leader of which is the Knauf company. It would be useful to invite a specialist who will help you make the right choice. Of course, the original profiles are more expensive than others, but the reliability of the plasterboard ceiling will be on top.
Fasteners for drywall systems
In order to assemble a metal or wooden frame for a plasterboard ceiling, as well as to fix the GKL, there are special fasteners. Usually, in the markets and in stores, along with profiles and drywall, sales assistants will always advise the necessary hardware, but still, it would be useful for the future owner of a two-level drywall ceiling to find out which fasteners should be used.
First of all, it should be noted that almost all elements must have anti-corrosion treatment. Most often, fasteners have a phosphated coating followed by oiling or an electro-galvanized coating. This avoids corrosion, and also allows painting, puttying without pre-training. Experienced drywall installers will surely remember the times when they had to pre-paint over the heads of ordinary self-tapping screws so that rust spots would not show up later. Now, fortunately, all commercially available fasteners for plasterboards have the necessary coating and do not require special preparation for final finishing.
Elements for attaching frames to load-bearing bases
Let us first consider the fasteners used to fasten frames to load-bearing bases and connect metal parts to each other.
| Image | Name | Designation, dimensions | Purpose |
|---|---|---|---|
 | Self-tapping screw with a sharp end | LN9, LN11 (length 9 or 11 mm), slot type PH2 | For connecting metal parts of the frame to each other without pre-drilling with a profile thickness of up to 0.7 mm |
 | Self-tapping screw with drilling end | TN9, TN11 (length 9 or 11 mm), slotted PH2 | For connecting metal parts with a profile thickness of 0.7 to 2.2 mm without pre-drilling |
| Dowel for hollow structures | MOLLY, with a diameter of 11 mm - length 49-77 mm, with a diameter of 13 mm - length 51-79 mm, slot PH2 | For fastening the profile PN/CW, PN/UW and attachments to sheet or hollow structures | |
| Nylon dowel | NAT, diameter 6, 8, 10, 12, 14 mm, length 30, 40, 50, 60, 70 mm | For fastening guide profiles PN 28*27/UD 8*27 to solid wall structures | |
| Multifunctional nylon dowel | YLT, diameter 6 mm, length 35, 40, 50, 70 mm, diameter 8 mm, length 80 mm | For fastening profile PN 28*27/UD28*27 to both solid and hollow wall structures | |
 | Plastic anchor dowel (dowel-nail) | LYT, PDG, PDGN, diameter 6.8mm, length 80mm | For fixing PN 28*27/UD 28*27 profiles to load-bearing building structures. It is also used for fastening direct hangers to the ceiling. |
| Metal anchor dowel (metal dowel nail) | ZN, diameter 6 mm, length 40 or 49 mm | For fixing straight and anchor hangers to load-bearing structures | |
 | Dowel for hollow structures with a drill tip | DRA, diameter 13-15 mm, length 28 mm | For attaching attachments to gypsum boards. Does not require pre-drilling. Used in conjunction with a screw with a diameter of 4-5 mm |
| Dowel for hollow structures without drill tip | DRIVA, diameter 13-15 mm, length 23 mm | Appointment as well as DRA. Requires pre-drilling | |
 | Sealing tape for metal profiles | Knauf-Dichtungsband, width 30, 50, 70, 95 mm, thickness 3 mm, 30 m per roll | For tight coupling of metal profiles and suspensions with load-bearing building structures, as well as to provide sound insulation |
A few words should be said about the advisability of using a sealing tape, because you can honestly say that in most cases it is not used, referring to uselessness. And very in vain. What is this tape for?
- It is practically impossible to find a perfectly flat surface of the walls so that the guide profile PN 28 * 27 / UD 28 * 27 would adjoin the wall without gaps throughout its entire length. The tape allows you to compensate for small irregularities and ensure a tight fastening of the profile to the supporting structures.
- A tighter fit and the material of the tape itself provide increased friction, which increases the mechanical strength of the connection.
- The tape provides shock-sound insulation of the metal frame from the walls and ceiling. In building structures, especially in reinforced concrete, acoustic waves propagate very well from various sources: drilling and chiselling, loud music, movement and falling of heavy objects, steps, temperature deformations and others. If the frame structure gets into resonance with these acoustic waves, then this is fraught with the appearance of cracks in the ceiling finish, and sometimes with the destruction of the frame. The sealing tape reduces such harmful effects on the frame and gypsum board.
The production technology, the recommended materials used, together with tests for various types of loads and impacts, are developed by teams of high-class engineers from the manufacturer's company. It makes no sense to trust not them, but individual installers. Arguments like “I did this a hundred times” should still be inferior to technical documentation. Only in this case can we hope that the ceiling structure will last a long time.
Elements for fastening the plasterboard to the frame
It is time to consider the elements used in fastening drywall sheets to a metal (wooden) frame. Traditionally, we present them in the most understandable tabular form.
| Image | Name | Designation, dimensions | Purpose |
|---|---|---|---|
| Self-tapping screw with a countersunk head and a sharp end | TN, standard lengths: 25, 35, 45, 55, 65, 75 mm. Slotted PH2 | For fastening drywall sheets to metal frames (with frequent threads) or wooden frames (with wide threads). Profile thickness up to 0.7 mm. Made of steel, phosphated | |
 | Countersunk head self-tapping screw with drill end | TB, standard lengths: 25, 35, 45, 55, 65, 75 mm. Slotted PH2 | For fastening GKL to metal frames with a profile thickness of 0.7 to 2.2 mm. Does not require pre-drilling. Have a phosphated or electro-galvanized finish |
In order for the fastening to be reliable, it is necessary to choose the correct length of the self-tapping screw. The manufacturer recommends using the following method:
- For a single-layer plasterboard sheathing on a wooden frame, it should be assumed that the length of the self-tapping screw must exceed the thickness of the sheet by at least 20 mm. For example, a wooden frame is sheathed with GKLV with a thickness 12.5mm. Accordingly, the length of the screw must be at least 12.5+20=32.5 mm. The closest size is TN35 with wide carving for wood.
- For a two-layer plasterboard sheathing on a wooden frame, the length of the self-tapping screw should exceed the total sheathing value by the same 20 mm. For example, a wooden frame is sheathed with two layers of plasterboard along 12.5mm each, which means that the length of the screw is not less than 12,5+12,5+20=45 . Fits TN45 with wide thread.
- For a single-layer sheathing of a metal frame, in addition to the thickness of the plasterboard, the thickness of the profile (or profiles) is also taken into account. The self-tapping screw must exceed the total thickness by 10 mm. For example, a metal frame with a thickness 0.6mm sheathed GKLV 12.5mm. So the length of the self-tapping screw TN must be 12.5+0.6+10=23.1 mm. Best fit TN25.
- For a two-layer cladding of a gypsum board on a metal frame, the total thickness of the cladding, the thickness of the profile, is taken into account. The length of the self-tapping screw should also exceed them by 10 mm. For example, a two-layer sheathing made of GKLV according to 12,5 mm on a reinforced metal frame with a thickness 0.9 mm. In this case, the length of the screw must be at least 12.5+12.5+0.9+10=35.9 mm. Since a reinforced profile with a thickness of more than 0.7mm, then self-tapping screws should be used TV(with drilling tip) and length 45 mm.
Video: Self-tapping screws for drywall and profile
Drywall tool
To assemble the frames, attach them to the supporting structures of walls and ceilings, and plasterboard sheathing, you will need a certain set of tools. The presence of some is mandatory, while others are highly desirable, and still others are designed to facilitate technological process at large volumes installation work, therefore, they are used by professionals and are very rarely available in the arsenal of the average home master. We list a set of tools, indicate the purpose, obligation or desirability of application. The team of authors of the article decided to summarize all these data in a table, which is very convenient for readers of our portal.
| Image | Tool name | Purpose and description |
|---|---|---|
 | Pipe water level (spirit level). Length 5-10 m (depending on the size of the room) | For marking horizontal lines. Application is required. |
 | Building bubble level. Length from 0.4 to 2 m (it is desirable to have several different sizes) | For marking and controlling horizontal and vertical lines. For the installation of metal frames, it is desirable to have magnetic clamps on the level. Application is required. |
 | Marking cord (chopping, painting) with a supply of coloring powder | For marking straight lines (horizontal and vertical) on walls and ceilings. The application is very desirable, since the cord greatly simplifies the marking |
 | Roulette 5 or 10 meters | For measuring and marking rooms, gypsum boards and metal profiles. |
 | Scriber metal | For marking metal profiles. Application is desirable. |
 | Construction pencils and markers | For marking building structures, plasterboards and profiles. Required for use |
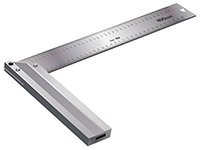 | Construction square | For marking and mounting profiles and plasterboards. Application required |
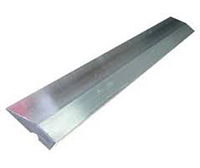 | Building rule (it is desirable to have different sizes of 1500 mm and 2500 mm) | For marking, cutting GKL, control of correct installation. Application required |
 | Level laser (level) with the builder of horizontal and vertical planes. Preferably with magnetic locking device | For marking and checking the correct installation. The application is highly desirable, especially for large volumes of work. in good construction stores give for rent |
 | Cordless or mains screwdriver | For the assembly of frames and cladding GKL. The screwdriver must have a torque limiter, smooth running, instant brake, light weight. Corded screwdrivers are preferable, as they are compact in size and light in weight. Application required |
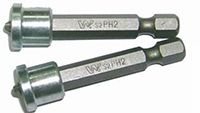 | Nozzles (bits) for a screwdriver with a slot PH2. | For mounting frames and covering them with plasterboard. It is preferable to choose bits with a depth limiter so that the screws do not break through the GCR through |
 | Network puncher with a set of drills with a diameter of 6, 8, 10, 12 mm | For mounting guide profiles and hangers to walls and ceilings. The main selection criterion is a light and convenient tool, since a lot of work will be done at height. Application required |
 | Electric power drill with a set of drills for metal and crowns of various diameters | For pre-drilling holes in a metal or wooden frame, as well as in plasterboard for installing dowels, lamps and other elements. The drill should have variable speed, reverse, be light and comfortable |
 | Angle grinder (angle grinder, angle grinder) with a cutting disc for metal | For cutting metal profiles. An angle grinder is best suited for 115 or 125 mm discs. Application desirable |
 | Electric jigsaw with wood saw | for cutting wooden elements frame. It is possible to cut drywall along a curve. Use preferred but not required |
 | Electric shears for metal | For cutting metal profiles in large volume. Application optional |
 | Hand shears for metal (straight, right or left) | For cutting metal profiles. Application required |
 | pliers | To work with a metal frame ceiling. Application required |
 | Screwdriver set in different lengths with slot PH2 | For working with the frame in hard-to-reach places for a screwdriver and screwing TN or TB self-tapping screws to the desired depth. Application required |
 | Construction knife with a set of replaceable blades 18 mm wide | For rectilinear cutting of plasterboard, cutting edges, chamfering. The knife must have a metal clip and a reliable screw lock. Application required |
 | Knife-saw for drywall | For a curved cut GKL. Application required |
 | Planer for drywall | For edge preparation, chamfering. Application required |
 | Hammer 200-300 g carpentry | For working with a metal profile, driving dowels. Application required |
 | Gypsum profile cutter | For fastening metal parts of the frame to each other without the use of self-tapping screws. Use preferred but not required |
 | Mounting belt for tool | For placing the tool and fasteners on the belt, which is very convenient when working at height using a ladder or platforms |
Video: Drywall Tool
Safety regulations and protective equipment when working with drywall
When working with plasterboard structures, a lot of various tools are used - electric and manual, various types of building materials, primers and paints are used. Work with the ceiling is carried out at a height that does not exclude a fall. All of the above obliges to observe simple, but necessary rules safety technology.
- All power tools must have serviceable power cords, without damage to the insulation. Any twisted and tape-wrapped cords are unacceptable. Tool bodies must be free of cracks, dents, and ventilation holes shouldn't be covered by anything.
- If extension cords are used, they must also be absolutely intact. Power tool plugs must fit snugly into the sockets on the extension cord.
- In rooms where the humidity level is more than 80%, work with power tools is unacceptable.
- The power tool can be released from the hands only after it has completely stopped. This is especially true for angle grinders (grinders). Be sure to unplug the power cord after use.
- The person working with drywall should be wearing tight clothing, with no protruding parts. It is best if a special working overalls are used. Long hair must be matched with a headdress: beret or scarf.

- Hands must be protected with special work gloves. Despite some loss of tactile sensitivity, it is necessary to develop a good habit in yourself - always work with gloves. The sharp edges of the cut profiles are able to cut through the hands to the bone.
- When drilling and drilling walls and ceilings, fitting, drilling and grinding GKL is formed a large number of cement and gypsum dust capable of getting into the eyes and respiratory organs. Therefore, it is necessary to use protective equipment: goggles and a respirator.
- When working at height, it is necessary to use only special building ladders and platforms. Application kitchen stools, tables and other items is unacceptable.

- At the place of work should not be strangers especially children and pets.
- Sheathing the ceiling structure with drywall should be carried out only with a partner.
For the safety of the tool, it should be cleaned after work with a soft brush from dust, in no case should it be wiped with a wet cloth or washed under running water (except for spatulas and brushes). If the tool is not needed at the work site, then it should be packed in cases and, if possible, taken out of the room.
Methods for mounting metal frame profiles
The success of the installation of a plasterboard ceiling largely depends on how well the frame is assembled. It is he who is a kind of "skeleton" on which the entire structure is fixed, therefore, when assembling it, it is necessary to follow all those recommendations of the manufacturer. We gave recommendations on the choice of components and fasteners to readers of our portal earlier, and we will consider connection methods in this section. At the same time, the authors of the article, in addition to the methods recommended by manufacturers, will give an example of alternative methods that do not reduce the strength of the structure, but can greatly reduce the cost of the finished ceiling.
Fastening guide profiles to load-bearing building structures
As mentioned earlier, PN 28 * 27 / UD 28 * 27 are most often used as guide profiles in ceiling systems, and in some cases, in especially loaded areas, it is allowed to use the PN 50 * 40 / UW 50 * 40 profile. These profiles can be attached both to the walls - with the help of an appropriate dowel, and to the ceiling - with anchors (dowel with nails). The step of fastening to the even bases of the walls is no more than 400 mm, and to the ceiling - 250 mm. It is better not to spare a penny dowel and fasten to the walls also in 250 mm increments. In the profiles of well-known manufacturers, there are already pre-drilled holes with a diameter of 8 mm with a pitch of 250 mm, and if they are not, then it is better to pre-drill with a drill with an appropriate drill. Experienced craftsmen can, when installing a profile, immediately drill holes with a puncher both in the profile and in the supporting structure, but for those who make the ceiling from GKL for the first time, it is better not to experiment, but to do it right.
To fix the PN-profile to the walls, you should:
- If there is no hole for dowels in the profile, then they need to be drilled with an electric drill with an 8 mm drill bit. At the same time, the holes should be at a distance of no more than 50 mm from the edges of the profile, and the step between them should be 250-400 mm (depending on the evenness of the wall).
- The profile is applied to the wall with the lower edge to the previously marked line, the fit is checked. If necessary, incisions are made in the side walls of the profile so that the fit is the tightest.
- A sealing tape of the appropriate width is glued to the end part of the PN-profile.
- The profile is applied to the wall, combined with the marking line. A hole is drilled that exceeds the length of the dowel by 10 mm at the beginning of the profile, then the dowel is inserted into it, then in the middle, and then at the end. The fit is checked and these areas are fixed with a screw (dowel-nail). Then all other sections of the profile are drilled and fixed.

- The anchor dowel-nail is usually hammered with the sharp part of the hammer. For those who do not have the appropriate skill, it is quite acceptable to twist the dowel-nail with a screwdriver. This will not affect the strength of the connection.
For fixing straight sections of the PN-profile to a reinforced concrete ceiling:
- Installation is carried out similarly to fastening to walls, only metal anchor wedges (dowel-nails) are used as fasteners.
- Practice shows that in most cases in ceiling structures it is permissible to use plastic dowel-anchors with a diameter of 6 mm and a length of 80 mm. If the hole falls on a void in the slab, then you need to use a dowel for hollow structures.
- The step of fastening on the ceiling should not exceed 250 mm.
- If any curvilinear structure is planned on the ceiling or walls, then the guide profile must also be bent according to this curvature. Manufacturers offer in their assortment special profiles for arches and curved structures, but in most cases such elements are difficult to find on sale, and they are unreasonably expensive, due to a more complex manufacturing process. That is why most craftsmen independently adjust the guide profile to the desired surface. For this you need:
- On the supporting base (ceiling or wall), the future curved surface is marked.
- With scissors for metal or a grinder (angle grinder), cuts are made on the side surfaces and the end in increments of 3 to 10 cm (depending on the radius of curvature).
- The profile is then bent and attached to the supporting base at each bend segment. This takes a lot of fasteners, this work is quite complicated, but for the desired result it will still have to be done.

In this process, it is important to understand the very principle of forming straight or curved surfaces, then any, even the most bold ideas to create plasterboard structures will be easily implemented.
Fastening guides and carrier profiles
From the very name of the guide profile follows its purpose - to give direction to the future plane of the drywall construction, and the main part of the load from the weight is already performed by other profiles - carriers. In ceiling systems, in most cases, this function is performed by PP 60 * 27 / CD 60 * 27 profiles. If the guide profile PN 50 * 40 / UW 50 * 40 is used in especially loaded places, then PS 50 * 50 / UD 50 * 50 will act accordingly as the carrier.
Fastening with self-tapping screws
The supporting profile is inserted into the corresponding guide and fastened in most cases with a metal self-tapping screw LN9, LN11, TB9, TB11. Installers call these self-tapping screws "bugs", "fleas", "seeds". The length of the self-tapping screw is determined by the total thickness of the connected profiles. In most cases, a length of 9 mm (LN9, TB9) is sufficient, but which screws to use - with a drilling or sharp tip - disputes among professional installers have not subsided for many years. The manufacturer recommends using self-tapping screws with a sharp end with a profile thickness of up to 0.7 mm. In plasterboard ceiling systems, profiles exceeding this indicator are very rare, therefore the authors of the article recommend the use of such screws (LN9, LN11), although in this case TB9, TB11 are also quite appropriate.

Very often, sales consultants complete buyers with self-tapping screws with a drilling tip, but based on the experience of drywall installers, the authors of the article recommend using LN9, LN11. Why? It has been noticed that when screwing in a self-tapping screw with a drilling tip, the probability of its turning with an unadjusted torque in a screwdriver is much higher. This is due to the fact that the drilling tip makes a hole in the profile metal of a much larger diameter than the sharp end of LB9, LB11. That is why turning will occur at a much lower torque, which can adversely affect the strength of the frame structure. In turn, the sharp tip LN9, LN11 pierces the metal and the threads are very tightly “wrapped” by the profile, and so tightly that not every torque limiter on the screwdriver will work and the installer can literally twist his hands. Therefore, before starting installation work, the limiter should be adjusted, and it is better to do this experimentally.

Screwing self-tapping screws into a metal profile requires some skill. For novice installers, screws often fly out of the bit, which is often accompanied by censorship and obscene language. In order to properly tighten the self-tapping screw, it must be positioned strictly perpendicular to the parts to be fastened, drilling must be started at low speeds with a certain pressing force. After the screw drills or pierces the metal, the force is reduced, since the thread will already work and the self-tapping screw will go “like clockwork”. Usually, after a couple of hours of work and a certain number of fallen screws, the necessary skills are already being developed.
A very important issue is choosing the right bit for a screwdriver. You should not spare money on it, you should buy only high-quality products with the appropriate PH2 slot and a magnetic lock. Cheap no-name products from the Celestial Empire will serve in best case one day, and a high-quality bit can last more than one year, provided that the torque limiter, which is also called a ratchet in everyday life, is set correctly.
Fastening with a cutter
There is another very good way to fasten drywall profiles together - this is the use of a cutter. This tool, with the help of a hard alloy striker (punch), cuts through and bends the walls of the fastened profiles, which provides a fairly strong connection, no less durable than self-tapping screws. Using this method provides certain advantages:
- Installation is much faster than with self-tapping screws.
- The use of a cutter provides the necessary mechanical strength of the connection, such unpleasant phenomena as turning self-tapping screws are excluded.
- If a large amount of work is planned, then the cutter can pay off at one facility by saving on self-tapping screws.
- The cutter leaves a flat profile surface, which facilitates the installation of drywall.
- The cutters make holes at the same distance from the edges of the profile, so no preliminary marking is required.

Using this tool is very simple:
- Fastened profiles are exposed.
- The handles of the cutter are divorced.
- The working hook is wound between the fastened profiles. The punch should be perpendicular to the walls.
- The handles of the instrument are sharply brought together to a characteristic click.
- Handles are divorced and all operations are repeated in a new place.
There are many types of cutters, different manufacturers, different quality. For one-time work, you can choose an inexpensive model, and if you plan a lot of work on the construction of frames, then it is better to choose more professional model, such as Knauf or Stanley. The main thing when choosing is to try it out in practice, connecting exactly those types of profile with which you plan to work. For mounting the ceiling frame, a lot of work is done at a height, so it is better to choose a compact model that will be convenient to work with with one hand.
Fastening load-bearing profiles to building structures
The main bearing profile in plasterboard ceilings is PP 60*27/CD 60*27. In order for the weight from the ceiling to be distributed to the building structures - the ceiling and partially the walls - the load-bearing profiles must have reliable fastenings. What are the fasteners?
Fastening with a direct suspension
The main method of attaching the PP 60 * 27 / CD 60 * 27 profile to the ceiling, if the distance from the ceiling plane to the bottom plane of the profile does not exceed 120 mm, is to use a direct suspension, which has already been described earlier. For fastening you need:
- On a pre-marked axial line of the profile, the position of the suspension is determined, it is applied to the place in expanded form, attachment points are marked (at least two).
- The distance between adjacent hangers on the same profile should be no more than 50 cm.
- Holes for fasteners are drilled with a 6 mm drill. The depth should be 10 mm more than the length of the dowel or wedge anchor.
- A suspension is applied, anchor wedges or dowel nails are inserted directly through it into the holes.
- Anchor wedges (dowel nails) are hammered in with a hammer.

- Suspension legs are bent down.
- The profile is set according to the level (laser level, stretched cord).
- Through the side holes of the suspension, the profile is fastened with self-tapping screws LN9, LN11 or LB9, LB11, two on each side.
- The protruding legs of the suspension are bent upward.
- In the direct suspension there are several holes for attaching to supporting structures. This is an oblong hole in the center, two holes at a distance of 46 mm and two more at a distance of 78 mm, located already behind the fold line (they are also called “ears”). This is clearly seen in the figure. Opinions on which fasteners to use are completely different, but experience shows that it is most advisable to fasten precisely for those holes that are located at a distance of 46 mm, since in this case, with a vertical load, the suspension practically does not change its position.

- In some hard-to-reach places, it is more convenient to mount “by the ears”, but in this case, after attaching to the ceiling, it is necessary to bend the legs at 90 ° and pull them down under some effort so that all the gaps that will inevitably appear under the load of the ceiling are already out.
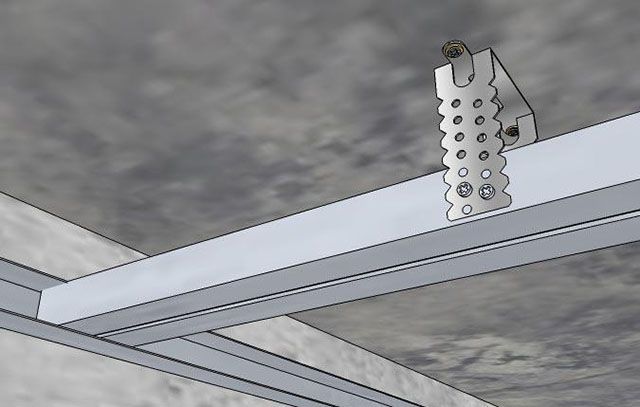
Fastening with an anchor hanger
If the distance from the ceiling plane to the lower part of the profile is more than 120 mm, then you can’t do without an anchor suspension, which consists of two parts: the suspension itself and a rod of the appropriate length. Installation of such a suspension is extremely simple, we will describe it step by step.
- On the center line of the profile previously marked on the ceiling, marks are made for attaching the suspensions. In this case, the distance between adjacent hangers should be no more than 50 cm, and from the wall to the nearest hanger - no more than 25 cm.
- Holes with a diameter of 6 mm and a depth of 50 mm are drilled in the designated places with a perforator.
- A suspension pull eye is applied to the drilled hole, a metal dowel nail (wedge anchor) is inserted through it, which is then hammered.
- The suspension rod is bent down by 90°, and it should be positioned so that it is on the center line marked on the ceiling.
- An anchor suspension is mounted on the rod, for this they press on the spring legs, start the rod, set the suspension to the desired position, and then the legs are unclenched. If too long ends of the rod remain, then they are simply bent up with pliers, leaving the required length for adjustment. It is better to cut off too long ends with a grinder, and it is better to do this in advance.
- All suspensions for the carrier profile are mounted in the same way.
- The mounting part of the hangers is inserted into the profile and fixed in it with a spring retainer or by turning (depending on the design of the hanger).
- By squeezing the spring tabs and moving the suspension along the rod, the required level is set along the pre-tensioned cord or. This operation is done for all profile hangers PP 60*27/CD 60*27.
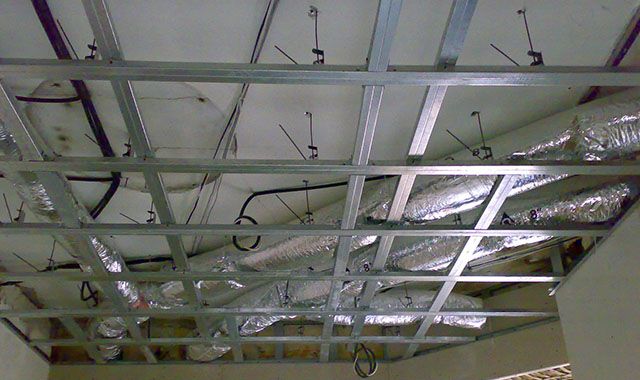
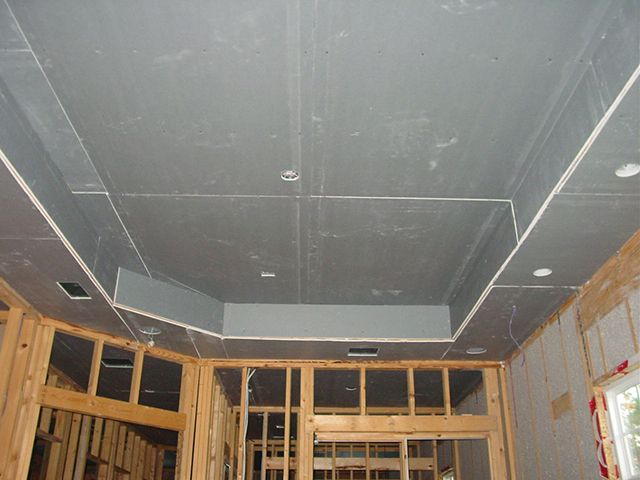
The entire ceiling structure is “suspended” on anchor hangers, which makes it possible to hide engineering communications behind the ceiling
Alternative ways of fixing support profiles
There are cases when, when arranging a plasterboard ceiling, the calculation of components was incorrectly made and the purchased suspensions do not fit in size or they simply run out. Naturally, during work, I really don’t want to be distracted by buying additional suspensions, and accessible stores can be very far away. When assembling a metal frame, there are always a lot of scraps of various profiles, from which it is quite possible to build a home-made suspension. Let's look at some of the most common options.
- Direct suspension extension. It is used when the standard length of 120 mm is not enough, and the anchor hanger is not available. In this case, you can attach two self-tapping screws to the legs of a direct suspension on each side of the foot from the other suspension.
- Another way is to insert a piece of the ceiling profile PP 60 * 27 / CD 60 * 27 between the suspension and the legs from another suspension. The ceiling profile plays the role of a kind of extension.

- In the third method, 90 ° corners are made from the PN 28 * 27 / UD 28 * 27 profile, which are attached to the ceiling with one side on the anchor, and with the other, longer side, to the mounted profile PP 60 * 27 / CD 60 * 27. Drywall installers call them "boots". Naturally, there should be two boots - on both sides of the profile.
- The fourth method involves a good command of metal shears, with which a suspension is cut from the PP 60 * 27 / CD 60 * 27 profile, including “ears” for attaching to the ceiling and paws for attaching to the carrier profile.
The Internet is replete with assurances of "experienced installers" that home-made suspensions are in no way inferior and even superior to industrially manufactured ones. But the team of authors of the article considers it necessary to warn readers of our portal against the rash and widespread use of home-made suspensions and recommends using those recommended by the manufacturer. And that's why:
- Industrially manufactured suspensions are designed for a certain load: 40 kg for straight and 25 for anchor, which will provide the desired strength of the ceiling. Homemade suspensions cannot guarantee resistance to such loads.
- Hangers from well-known manufacturers have a thickness of 0.9 mm, while maximum thickness the profile used for self-manufacturing of fasteners is 0.7 mm (and most often 0.6, 0.5 or even 0.4 mm). Naturally, the strength of such products will be significantly lower.
- Elongated suspensions have a larger number of fasteners, which reduces the reliability of the structure.
Based on the above arguments, it is still worth using regular fasteners. It is allowed to use self-made suspensions, but only in those places where the load-bearing profiles have an insignificant load, for example, in short (up to 50 cm) jumpers, auxiliary elements and other unloaded areas.
Connecting carrier profiles to each other
To form a good metal frame of a plasterboard ceiling, in addition to reliable fastening to building structures, it is also necessary to fasten the supporting profiles PP 60 * 27 / CD 60 * 27 to each other. The types of connectors have already been considered, now it's time to consider exactly how to use them.
Profile extension PP 60*27/CD 60*27
In retail chains, these profiles are mainly 3 or 4 meters long, which in most cases is enough to create any ceiling structure using solid pieces of profiles, and this, in principle, should always be tried to be done. Very rarely, but there are situations when this length is not enough, so the profile must be lengthened. This can be done both with the help of standard connectors, and in alternative ways.
Application of profile extensions PP 60*27/CD 60*27
As practice shows, it is best to use a regular profile extension, which is always on sale, has a penny price and provides the desired connection strength. How to apply it?
- It is best when the profiles are connected according to factory cuts - they are the most even and will provide a high-quality joint. In extreme cases, you can carefully, according to the preliminary marking with a square, make a cut with a grinder and then clean the burrs with a file.
- The extension is inserted into one of the profiles inward to the limiters that are in the side parts. Then the lateral part of the profile is bent with pliers.
- Another profile is mounted on the other part of the extension and similarly bent with pliers.
- The profiles to be connected are placed on a flat surface, the joining point is strengthened with metal screws, which should fasten both the profile and the extension. It is recommended to screw in 4 screws on each side.
- When installing an elongated profile on the ceiling, the connection point is additionally insured with straight or anchor hangers at a distance of 10 cm from each side, and this must be done regardless of the location of the main hangers.

Alternative ways to lengthen profiles PP 60 * 27 /CD 60*27
If there was no profile extension at hand, then you can make it yourself. Durability, really. It will be somewhat lower, but subject to insurance of the junction with suspensions, this method is quite applicable.
- 10 cm of profile PP 60*27/CD 60*27 are cut off.
- With scissors for metal or a grinder, the upper curved sides are cut off from this segment.
- The sides are aligned with pliers, a concave profile is attached to the lower part, like a regular extension.
- Exactly in the middle of the manufactured part, a marker is made with a marker, on which the junction will fall.
- Further, the connection proceeds in the same way as in the previous case.
You can do without an intermediate part. Then it is necessary at one end of the connected profiles to cut off the bent sides on both sides to a length of 10 cm, then insert one profile into the other, align it on a flat surface and fasten it with self-tapping screws - 4 on each side. But such a connection is less reliable due to the fact that there is no stiffener in the wide part of the profile.
Methods for lengthening profiles are clearly presented in the video.
Video: Profile extension
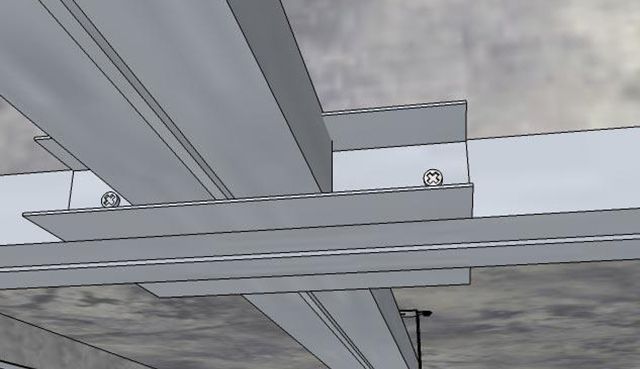
Connection of profiles PP 60*27/CD 60*27 at an angle in one level
Connection using "Crab"
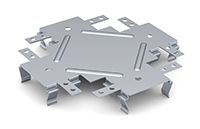
The main method of such a connection of profiles is a connection at an angle of 90 ° and in most cases it is used. To do this, there is a special connector, called in everyday life "crab". Connecting with its profiles is extremely easy:
- On the main bearing profiles PP 60 * 27 / CD 60 * 27, marks are made of the axes of the joined profiles. Most often, jumpers between the main profiles are made every 50-60 cm.
- The crab is inserted into the main carrier profile until it clicks, when the spring legs go over the side of the profile.
- Moving the connector along the profile, combine the center of the crab with the mark.
- On the crab, the antennae are bent onto the main profile and self-tapping screws are screwed through the holes - two on each side, so the crab is fixed on the main profile.
- On the other adjacent main profile, with which the first profile will be joined using a jumper, similar operations are performed to install the crab.
- Between crabs on adjacent carrier profiles, the required length of the jumper profile is measured. For example, the distance between the axes of adjacent profiles is 600 mm, the width of the PP 60 * 27 / CD 60 * 27 profile is 60 mm. It turns out that the length of the jumper profile should be 600 mm-30 mm-30 mm = 540 mm. In order for the profile not to enter too tightly, but to have a gap, it is cut into a length of 10 mm less: 540 mm-10 mm = 530 mm.
- The jumper profile of the desired length is cut off. Particular attention should be paid to the quality of the edges. If necessary, their geometry is corrected with pliers, and the burrs are cut off with a file. excellent quality cutting gives a grinder or electric shears for metal.
- The jumper profile is inserted into the crabs on the main profiles, latched with paws and fixed with self-tapping screws through pre-bent antennae.
- The operation is repeated at all places where the connection of profiles is required.
There are situations when it is required to connect two PP 60 * 27 / CD 60 * 27 profiles at the same level not at a right angle, but at a different one or “crabs” have ended, but you don’t want to be distracted from the installation process. Therefore, it is worth considering other ways of connecting.
Video: Connection of profiles "Crab"
Alternative ways to connect profiles
Of course, it is preferable to use such profile connectors that are recommended by manufacturers of components for drywall systems. However years of experience installation allows us to say that alternative methods are in no way inferior in strength to the recommended ones. Let's describe one of the most common.
During the installation of the frame, profile waste inevitably remains, in particular, PN 28 * 27 / UD 28 * 27, which can be used for a single-level connection of PP 60 * 27 / CD 60 * 27, both cruciform at right angles and T-shaped at right angles angle, but also at any arbitrary angle (there are such situations in complex ceilings). It should be noted that the described method gives the strength of the structure no worse than with "crabs", and much better, in case of acquiring counterfeit connectors.
- On the bearing profiles, the axes of the jumper profiles are marked. We remind you that the distance between the jumpers should not be more than 600 mm.
- From the remains of the PN 28 * 27 / UD 28 * 27 profile, segments of 10 cm are cut. A mark is made in their middle.
- A section of the profile PN 28*27/UD 28*27 is applied to the side shelf of the profile PP 60 * 27 / CD 60 * 27, while the pre-marked marks are combined, and the lower edges of the profiles are set at the same level.
- With metal screws (TN9 or LN9), the segment is attached to the main profile. The distance from the edge of the segment to the attachment point is 10 mm. For these purposes, it is quite possible to use a cutter.
- In all designated places on the main bearing profiles, segments from the guide profile are mounted as described above.
- Jumpers are cut from the profile PP 60 * 27 / CD 60 * 27, and their length should be 10 mm less than the distance between the main profiles. This will greatly facilitate installation, the frame structure will not burst.
- Jumpers are inserted into the intended places, the center line is aligned with the mark on the carrier profile. Fastening is done with a self-tapping screw (TN9 or LN9) or a cutter. One attachment point is quite enough, since the main load falls on the supporting profiles, and the subsequent plasterboard sheathing will add even more rigidity to the structure.
Such a connection of ceiling profiles in one level is practically not inferior in strength to the "Crab"
Obviously, for connecting profiles at an angle, the operations are performed in exactly the same way as described above. The only difference is that the jumpers are cut at the required angle, which is easy to mark by attaching the profile to the attachment point. You can, of course, use a standard universal single-level connector from Knauf, but practice shows that they are used extremely rarely, and therefore it is very difficult to find them on sale.
There are other alternative ways to connect profiles at an angle at the same level. To do this, the end of the profile PP 60 * 27 / CD 60 * 27 is cut with scissors for metal as shown in the figure. This method is widely used, but the team of authors of our portal does not advise readers to do this, since the strength of the structure is greatly reduced due to the fact that the side curved shelves are inevitably cut off, which give the profile the necessary rigidity. In addition, there is an increased consumption of the more expensive profile PP 60 * 27 / CD 60 * 27, and the resulting trimmings are no longer good for anything, but the trimmings PN 28 * 27 / UD 28 * 27 will always find the use of waste from them practically will not.

Arrangement of a two-level plasterboard ceiling
Finally, the time has come to move on to practical actions and begin to equip a unique and inimitable ceiling with your own hands. For ease of perception and a complete understanding of the process, the team of authors of the article divided this process into several stages.
Determining the ceiling design
Surprisingly, this issue is one of the most difficult in arranging multi-level ceilings, because there is no shortage of drywall and all components, you can find high-class craftsmen or perform the installation technically flawlessly ceiling structure yourself, but the wrong design can nullify all efforts. Therefore, the question of choosing the right design is paramount and everything should start with it. Therefore, at this stage it is possible to attract a good specialist in this area, which, unfortunately, are in the minority. Other in a good way there will be a study implemented projects on the Internet, of which there is simply a sea and the choice of the most suitable for specific conditions. In turn, the team of authors of this article will give some advice.
- Multilevel ceiling from drywall, in addition to the decorative function, it also performs an engineering function: electrical wiring and low-voltage systems, lamps, ventilation and air conditioning systems, exhaust ducts in kitchens and bathrooms, and more can be located in the space between building structures. In no case should design harm engineering systems, but should coexist peacefully in favor of the former. For example, in order to please the designer, the duct of the kitchen hood is forced to make many turns, which increase the resistance to the air flow, and, therefore, reduce efficiency and increase noise.

- GKL ceiling design should not exist separately from the interior of the entire room. On the contrary, it should emphasize all its details: the location upholstered furniture, tables and cabinets, combined flooring, the presence of various significant interior details: a bar counter, flowerpots, a large aquarium, TV and others.
- Modern design implies conciseness, strict geometry, symmetry and functionality. The era of fanciful forms, many crooked lines, heaps of tiers and crazy decisions of self-taught designers unjustified by any laws of harmony has passed.
- In most housing stock in Russia, the ceiling height is on average 2.5 meters, so it should be remembered that the space is not infinite - the smaller the two-level structure “eats” precious centimeters, the better, but you should take into account the diameters of the air ducts, the dimensions of the installed lamps and other equipment. Usually the first level, if it does not have built-in lights, is mounted at a distance of 5-7 cm from the ceiling, and the second 10-20 cm.
- The best lighting is a combination of directional and diffused light. The best place for installing spotlights, this is the second level of the plasterboard ceiling, and the main source of diffused lighting (chandeliers) is the geometric center of the room or a certain zone located on the first (topmost) ceiling level.
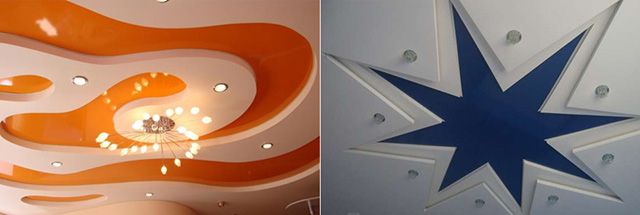
- Rectangular shapes of multi-level ceilings (including those with rounded corners) are suitable for visually narrowing or expanding rooms; circle or ellipse shapes emphasize the center of a room or the center of a certain area in a large room; many curved lines can only be used in a dynamic interior that combines several styles, but not in the classics.
- Most often, the second (lower) level, where Spotlights, mounted around the perimeter of the room, and the first level is located in the center. In this case, the second level is called either a box or a curb. It can have both smooth edges, and curly, and rounded, and others.

- If the second level is also located in the center of the first level, which is sometimes justified in terms of design, then this detail is called an island. For example, on big kitchen working surface located in the center, respectively, an island is made on the ceiling, where the hood and backlight are hidden.

An example of an "island" in a modern kitchen
- In two-level ceilings, lighting is very easy to implement (with LED strip or duralight), which gives the interior a mystery and intimacy. The lighting is especially good in the bedrooms.
- When designing a ceiling, you should consider various lighting scenarios that can change the mood from a noisy party with friends to spiritual gatherings with loved ones and relaxing while watching your favorite movie. The abundance of modern lighting devices and control devices will help to easily realize this. Then a multi-level plasterboard ceiling realizes all its possibilities.
Also, one should not forget that in one apartment or house there should not be a room that “lives” according to separate laws that differ from others. All rooms should be in harmony with each other and, despite some differences, the overall concept of interior design should still be supported. Unless, of course, we are talking about an apartment or a house, and not about an entertainment establishment.
At what stage of repair or construction is a two-level ceiling made?
The creation of a multi-level plasterboard ceiling is not a separate operation, but is included in the complex of construction and repair works, and in the final part - at the stage of final finishing. When exactly can you start this work?
- Firstly, all construction processes for the construction of walls, partitions and ceilings must be completed.
- Secondly, all engineering systems, cabling of the lighting system along the ceiling can be done after the construction of the frame.
- Third, windows must be inserted.
- Fourthly, all "wet" processes must be completed: the arrangement of the floor screed, the plastering of walls and slopes. The room must be ready for final finishing.
- And finally, the humidity in the room should not exceed 75%, and the air temperature should not be below +16°C.
In the final decoration of the premises, the principle applies - it starts from the ceiling, goes to the walls and ends with the floor. That is, first the ceiling construction is done, plasterboard sheathing, joints are sealed, and then the ceiling and walls are putty, which can be combined into one process so that these very dusty works are not stretched over time.
Preparatory work
Once the ceiling design has been selected and agreed upon with all interested parties, the implementation of the selected ceiling in a particular room can already begin. But for this it is necessary to draw a plan of the room, on which, later, draw a diagram of the ceiling.
Measurement of the premises, drawing up a plan
In numerous articles on construction and repair, both in magazines and on the Internet, floor plans are ideal rectangles or other regular geometric shapes on which any ideas of owners and designers are very easily realized. But at the end of the work, it turns out that the room was far from ideal, which affected those geometric shapes from drywall.
Human vision has a unique property - without measuring anything, it still immediately evaluates that some lines are not parallel, surfaces are not horizontal, a circle or an ellipse is imperfect, and a curved or wavy line does not obey the natural laws of harmony. From this, the whole impression of an ideal and beautiful ceiling can immediately come to naught. Therefore, it is necessary to measure the room, draw up a drawing and markup correctly. We will describe how to do this, but for this it is worth remembering school course geometry. All stages of marking in the plan are shown in the figure. All measurements must be carried out in millimeters, as is customary throughout the world.

- First of all, you need to find the geometric center of the room, which is always located at the intersection of the diagonals. To do this, a masking cord is stretched from corner to corner, and two diagonals are “beaten off”. In this place, you can immediately tighten the dowel or self-tapping screw, depending on the material of the ceiling.
- Diagonals are measured and these values are recorded. In the figure, these are segments D1D3 and D2D4. If their length is equal, then the owner can be congratulated - his room is perfect rectangular shape in plan, and if not, then it is a trapezoid or just a quadrangle.
- The length of short walls is measured, and their midpoints (points H1 and H2) are found, between which a cord is pulled. If the cord hits the geometric center, then excellent - the line is immediately beaten off, if not, then it is shifted by the amount of deviation and beaten off with a masking cord.
- A similar operation is performed with long walls, the segment V1V is beaten off
- Now you need to build perpendiculars to the H1H2 line. For this, it is not necessary to use a square, which also has its own error, but it is better to apply the method of geometric constructions. On the diagonals, from the center, equal segments Od1, Od2, Od3, Od4 are marked. It is best if they do not reach corners of 10-15 cm to simplify marking.
- Points d1, d2, d3, d4 are connected and as a result a rectangle is obtained (by the condition of equality of the diagonals), from which all further marking and construction of the frame will “dance”.
- On a sheet of graph paper (preferably A3 format), a plan of the room is made. To do this, on a scale (1:50 or 1:25), a horizontal line is drawn, on which the center is indicated.
- On the ceiling, the distances OH1, Oh1, OH2, Oh2 are measured and plotted on the selected scale on paper.
- From the points h1 and h2, perpendicular lines are drawn, on which the segments h1d1, h1d2, h2d3, h2d4 are plotted, which must be equal.
- Straight lines are drawn from the center through points d1, d2, d3, d4 - these are the diagonals of the room. On them we set aside on a scale the segments OD1, OD2, OD3, OD4 previously measured on the ceiling.
- We connect the points d1, d2, d3, d4 D1, D2, D3, D We get the outer rectangle - this is the true geometry of the room, and the inner one is the correct geometry, which even the most demanding human eye will correctly perceive.
Everything, the room plan is ready, now the task of the owner, on his own or with the help of specialists, is to enter the chosen design into a specific room. It is recommended to mark the future arrangement of furniture on the plan with a thin pencil on a scale that reflects its true dimensions, as this can greatly affect the design of the ceiling. Of course, it is best to use computer 3D visualization programs, but for people with a rich imagination, it will be enough to lie on the floor and, holding the plan on outstretched hands in front of their eyes, imagine the future ceiling.
Determination of the ceiling level, revision of its surface
The plane of any ceiling must be strictly horizontal, however, slabs or monolithic ceilings, even in new houses, do not always, unfortunately, meet this requirement. Therefore, it is necessary to “beat off” the horizontal level and check the plane of the ceiling. How it's done?
- On one of the walls, closer to the corner, a horizontal mark is made with a pencil or marker at a distance of 10-20 cm from the ceiling.
- Using a water level (water level) or laser level this mark is transferred to other places - 2-3 marks on each wall. When using a spirit level, care must be taken that there are no bubbles in the tube and that it is not located near heating appliances.
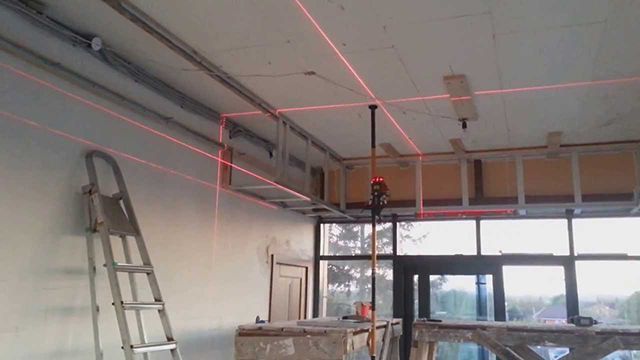
- With a paint cord, set according to the marks, horizontal lines are beaten off on all walls - we get a horizontal plane.
- The distance is measured in the corners and in the middle of each of the walls from the line to the plane of the ceiling and their difference is estimated.
- If the difference in distances is a few millimeters (up to 5), then such a ceiling can serve as the first level of a two-tier structure, and all flaws will be corrected by puttying.
- If the difference is from 5 mm to 5 cm, then the irregularities can be corrected by plastering the ceiling with a reinforcing mesh, and only then it will act as the first level.
- If the difference is more than 5 cm (sometimes this happens), then there is no way to do without sheltering this “disgrace” with a suspended structure.
In addition to the plane, it is necessary to check the quality of the surface, which in the future will have to be plastered, puttied or covered with a false ceiling. What are the options and what decisions can be made?
- In an apartment or house, the ceiling is whitewashed (painted) on plaster. In this case, it is necessary to wash off the whitewash, and beat off the old plaster to the ground. After that, plaster and putty. This is an extremely time-consuming and troublesome process, so the best way out is to cover such a ceiling completely behind a suspended structure.
- If the floors in old houses are wooden, then the ceilings should definitely be hidden, especially since the height of the ceilings in such housing is usually from 2.7 to 3 meters and you can “roam around” in creating any plasterboard structure without prejudice to the height of the room.

- If the ceiling has a solid foundation, is plastered, and all communications have already been made, then it is quite possible to simply putty it and use it as the first level.
- If the ceiling is a bare concrete slab, which is often the case in newly built houses, then it will still have to be plastered and puttied or hidden behind a suspended structure, which will additionally hide all communications.
As can be seen from the foregoing, in most cases it is advantageous to make both levels of the ceiling from gypsum boards, since plastering and puttying the surface with preliminary removal old finish will be at a price no lower than a drywall construction. Moreover, a well-mounted first level of the ceiling "eats" from a height of 5-6 cm, which does not bring any discomfort, but correct design and the color scheme can visually raise the ceiling.
Choosing a two-level ceiling implementation scheme
It is time to choose a specific scheme for which the ceiling will be implemented. The fact is that regardless of the endless number of implementations of drywall ceilings, there are only a few typical schemes. Let's consider them sequentially, breaking into groups.
First level - plastered ceiling
In this case, you can implement boxes (borders) along the walls of the room, and leave in the center free space ceiling, which must be carefully, since when the light is on, flaws in the surface will immediately be visible. You can also organize islands from the GKL, which can be used to zoning the premises. Naturally, built-in lamps are placed in the second level, and illumination in the form of a light cord or light-emitting diode (LED) strip can also be used. Currently, the price of LED products is rapidly falling and you can quite afford a multi-color RGB LED strip with a control unit and a remote control.
Option 1: No ledge for lighting
The figure clearly shows the design of such a ceiling in section. The profile PN 28*27/UD 28*27 is attached to the wall with dowel-nails and it defines the second horizontal level of the ceiling. On the ceiling, the same profile is fixed to metal anchor wedges, it sets its shape in plan, and it does not have to be rectangular. The horizontal size of the box is set by a section of the PP 60 * 27 / CD 60 * 27 profile inserted into the guide profile on the wall and fastened to it with a LN9 or LB9 self-tapping screw. A guide profile is mounted on the ends of the horizontal PP 60 * 27 / CD 60 * 27, and segments of the same PN 28 * 27 / UD 28 * 27 are screwed to it from above, which will be the basis for attaching the vertical segments of the PP / CD profile. This is how the frame of the box is formed.
The diagram does not indicate direct hangers, which should insure the horizontal profile. Apparently, the authors of the figure considered that with such dimensions, suspensions are not needed, but the team of authors of the article still recommends using them.

Option 2: With ledge for lighting
The figure shows a diagram of the implementation of a two-level ceiling with a cornice, where the backlight will be placed. Previously, neon lamps, light cords - Duralight and even Christmas tree garlands were used. Now the best choice is LED strips with a self-adhesive layer.

The design difference from the previous version is minimal. To create a cornice, the horizontal profile is extended by 5-10 cm. To attach the horizontal profile to the vertical one, you need to make cuts to a depth of 2.5 cm, bend the wide part of the PP 60 * 27 / CD 60 * 27 profile inward, and cut off the curly ends of the shelves, or, having previously made an incision, press with pliers. Then, through the resulting side tabs, you can securely fasten the two profiles with metal screws. PN 28*27/UD 28*27 is attached to the end of the horizontal profile PP 60*27/CD 60*27. At the stage of sheathing the frame, a strip of drywall 3 cm-5 cm wide is attached to this profile.

A two-level plasterboard ceiling, in which the ceiling surface itself acts as the first level, has a number of undeniable advantages:
- This design is easier to make.
- Much less material is needed.
- The design of the ceiling takes less precious centimeters of room height.
- The frame is fastened directly to the building structures - the ceiling and walls, which increases reliability.
The disadvantages of such structures are:
- On old ceilings, you will have to knock down the old plaster to the ground, and this is a laborious process.
- For wiring at the first level, chasing is required.
- Perfectly plastered and much more difficult than perfectly even sheets of drywall.
- Bad soundproofing.
That is why most often the owners and craftsmen prefer to completely cover the ceiling under drywall, under which there may simply be bare floor slabs.
First level - plasterboard ceiling
In this case, you can simply “close your eyes” to all the shortcomings of the ceiling and eventually get perfect surface. This approach can be compared to applying makeup, but you don’t have to take it off every day, but it will serve faithfully for a long time. Consider what options for arranging the ceiling are used.
Option 3: Attaching the second ceiling level to the first
In this case, the frame of the first level of the ceiling is first mounted. For the successful construction of the frame, it is enough to set the guides of the first level at a distance of 5 cm from the lowest point of the ceiling. Then the first level of the ceiling will lower the height by only 5 cm + 9 mm (GKL thickness) = 59 mm. Even in a room with a ceiling height of 2.5 meters, it will be imperceptible.

The figure shows the design of such a ceiling in section. It is very similar to the previous schemes, the only difference is that the vertical profiles of the second level box are fastened not to the ceiling, but to the frame of the first level. Naturally, such a ceiling can be equipped with a cornice for lighting - just like in the previous example.
In the figure below, it is noted that the first level, located under the box of the second, is not sewn up with drywall. And this is absolutely correct. What for? Although both the literature and the Internet are full of examples, when only after the first level has been completely sheathed, the second level box is mounted. This option is only suitable for those who like to "bury" extra square meters of drywall (which cost money), but not for a reasonable and zealous owner.
The main disadvantages of this option are the high material consumption, as well as lower reliability - after all, the second level is attached to the "intermediary" - the first level, and not to more durable and reliable building structures.
Option 4: Fixing the first level of plasterboard ceiling to the second
This is the most elegant solution for arranging a two-level ceiling, combining the advantages of all options. The presented diagram shows that the second level box is fastened to building structures, which increases the reliability of the structure. The first level is also attached to the ceiling, and guides are fixed on the vertical surfaces of the box, which do not carry a large load, but only set the plane.

The advantages of ceilings in which both levels are “sewn up” with drywall are:
- No need to mess with troublesome and “wet” removal processes old plaster and applying a new one.
- The ability to carry out all the necessary communications under drywall.
- The best soundproofing.
- Relatively simple finish.
- Fast installation.
The only drawback of such structures is the high material consumption.
Drafting a plasterboard ceiling
After there is a clear understanding of the design of the ceiling, a room plan has been drawn up taking into account the actual dimensions and configuration of the room, a design option has been selected, you can begin to draw up a project. The authors of the article immediately give advice to home craftsmen - it is better to copy the previously drawn floor plan in several copies, since when drafting the project, adjustments can be made, and the most drastic ones. That is why, in order not to redraw the floor plan several times, it is better to have several blanks.
When transferring the selected design to the floor plan, nothing should be drawn by hand, everything should be justified in terms of geometry. It is easy to draw a beautiful figure by hand on a sheet of paper, but how to draw on the ceiling? That is why, using only a compass, a ruler and a protractor, it is necessary to fit the chosen design into strict mathematical laws. It is worth imagining such a picture - in front of the installer there is a clean ceiling without any marks. Having at hand only a tape measure, a compass (we will tell you how to do it later) and a pencil, the installer must transfer all the markings from the project to the ceiling.
Read tips on choosing, in a new article on our portal.
If you can’t do it yourself, then you can turn to specialists who, using special software, will do it all beautifully. An example of a well-executed ceiling plan is shown in the figure.

What should be on the plan?
- Firstly, all constructions on the plan should start from the geometric center of the room.
- Secondly, all dimensions of the boxes must be indicated.
- Thirdly, if the ceiling configuration involves rounding, then the positions of the centers of the circles in relation to the geometric center and their radii should be indicated.
- Fourth, if a complex curve is assumed, then it must be constructed by conjugating arcs of circles, which also have both a center and radii.
- Fifth, there must be centerlines the location of the built-in lights, their specific position and the diameters of the holes for them. On straight sections with reference to the geometric center, and on arcs in polar coordinates, which means specifying the center of the circle, angle and radius.
- And finally ready plan the ceiling is also better to print or photocopy in several copies.
After drawing up the plan, it is necessary to make a scheme of engineering communications, which includes:
- Distribution box locations.
- Type of wires and their cross section.
- How to connect lights. For example, if they should light up and go out all together, then it is enough to bring one wire and run it in a loop - from one to another, providing a parallel connection. If several zones or different lighting scenarios are expected, then it is necessary to run separate wires from the switches or the controller to the groups or even to each individual luminaire.
- Wiring routes.
- If there will be exhaust or ventilation ducts in the ceiling, then it is worth indicating their position.

The design of the ceiling frame should include the arrangement of profiles PN 28 * 27 / UD 28 * 27 and PP 60 * 27 / CD 60 * 27, the position of straight or anchor hangers, “crabs”, the layout of drywall sheets. The frame project is best done on a pre-copied ceiling plan. What needs to be done for this?

- Set aside 300 mm (on a scale) from the geometric center of the room to each side along the axes of the regular rectangle d1d2d3d4 (see room plan).
- Build a grid of mutually perpendicular lines with a step of 600 mm - these will be the center lines of the PP 60 * 27 / CD 60 * 27 profiles.
- Mark the position of direct suspensions at the first level of the ceiling. To do this, set aside 250 mm (in scale) from the center line up and down along all grid lines. Next, arrange the suspensions with an interval of 500 mm. The hanger closest to the box should not be further than 200 mm from it. In which case, change the arrangement by changing the intervals between them downward, but the suspension should not be on the line of intersection of the axes of the profiles.
- If the horizontal profiles of the box have a length of more than 300 mm, then mark the position of the hangers in their middle (straight, if the distance to the ceiling is less than or equal to 120 mm, or anchor, if the distance is greater).
- Designate all the places on the first level of the ceiling where the Crab connector will be used - this is nothing more than the intersection points of the lines.
- Make a layout of drywall sheets on the plan. Sheets should be placed along the main bearing profiles (those on which suspensions are placed). GKL should be laid in a run, that is, the seams of the joints of adjacent sheets should not match. The minimum run-out is 600 mm. All joints must fall strictly on PP 60 * 27 / CD 60 * 27 profiles. First, the layout of the first level is done, and the remaining pieces can be used to sheath the box. When laying out the sheets, it is very convenient to use pieces of cardboard on the scale of the ceiling plan, which will display the plasterboard (dimensions 2500 * 1200 mm). So it is possible, by laying and cutting these pieces, to evaluate the required amount of drywall and determine the optimal layout.
- The required number of profiles, "crabs", suspensions, drywall sheets is calculated. At this stage, it is advisable to involve an experienced installer so as not to purchase too much, since you can buy more of the defect, and it is very difficult to sell the surplus.
- When purchasing plasterboards and components, you can safely add 15% to the calculated figures, as there will be errors in the calculations, adjustments will be made to the design during installation, and mistakes are inevitable that lead to breakage of ceiling parts.

Some home craftsmen at the design stage even try to count the number of screws needed to mount the ceiling. In the community of installers, this is taken as bad manners, so it is better to stock up on two boxes of 1000 pieces of self-tapping screws for metal and drywall. Only at first glance, this is a lot, but in reality it may not be enough - it all depends on the design of the ceiling. It is better to purchase GKL in advance. For 7-10 days, so that the sheets "get used" to the temperature and humidity conditions of the room where they will be mounted.
Ceiling markings
After drawing up plans and a two-level ceiling project, it is necessary to transfer the drawing from paper to the ceiling, and this must be done by geometric constructions, as well as on a paper plan. And for this you will need the same tools: a ruler, a compass, a protractor (although the main angles of 30 °, 45 ° and 60 ° can only be built using a compass and ruler). For the ceiling, a rule, a tape measure and a self-made compass are suitable. With the first two positions, everything is clear, but with the third it is necessary to give some advice from practice.
- It is necessary to designate all the centers of the circles, transfer them from the plan to the ceiling. Earlier, when taking dimensions, the diagonals were already drawn, the axes were drawn, the correct rectangle was built, so there should not be any difficulties in this matter.
- In the geometric center of the ceiling (at the intersection of the diagonals), as well as in all centers of the circles, it is necessary to drive in the dowels and tighten the screws so that their hat protrudes by 10-15 mm.
- A piece of the required length is cut off from the PN 28 * 27 / UD 28 * 27 profile, which should slightly exceed the largest radius of the circle on the ceiling plan.
- At one end of the profile, a hole with a diameter of 4 mm is drilled, which will serve as the center of the circle.
- The required radii are measured from this hole, according to the ceiling plan, holes are drilled in these places where a marker or pencil will be placed. Near these holes, the values of the radii are written with a thin marker.
- If you fix the profile in the center of one of the circles on the ceiling, you get a compass for drawing circles. To do this, after fixing in the center, a marker or pencil is placed in other pre-drilled holes and a circle or arc of the desired radius is drawn.

The compass can also be made from an inextensible cord, on which the necessary segments are measured, but the device from the profile is much more convenient to use and has better accuracy.
Tip: The PN 28 * 27 / UD 28 * 27 profile prepared as a compass can be used to build right angles. To do this, it is necessary to set aside distances of 30, 40 and 50 cm from the center. By constructing the Pythagorean triangle (Egyptian triangle), you can get a right angle on any surface.
When all the tools are ready, you can start marking. What, first of all, should be transferred from the project to the ceiling?
- Firstly, on the walls it is necessary to beat off the first and second levels of the ceiling. The first level can be located at a distance of 50 mm from the lowest point of the ceiling, and the second at a distance of 10-30 cm from the first (it all depends on the height of the ceiling and the configuration of the room). The best way to do this is with a laser level, and in its absence, with a water level (spirit level).
- secondly, all axial lines of the ceiling profiles PP 60 * 27 / CD 60 * 27, both bearing and jumpers, are transferred to the ceiling. This is fairly easy to do, since there is already a rectangle on the ceiling that was drawn when drawing up the floor plan. By measuring the required distances along the sides of the rectangle, you can build a grid of center lines with a step of 600 mm.
- Thirdly, the locations of the suspensions (straight and anchor) are marked.
- Fourthly, the configuration of the box of the second level of the ceiling is drawn, and this is done by the method of geometric constructions - with a compass made in advance and a ruler.
- And, finally, the locations of the built-in lamps in the box and the source of the main light (chandeliers), as well as the points where the junction boxes will be mounted, are marked.
Installation of a two-level plasterboard ceiling
Before starting work, it is necessary to prepare the room. For this:
- All furniture is removed from the room.
- It is desirable to cover the floor with cardboard and plastic wrap, as the platform and stepladder will often be rearranged, and there will also be a lot of dusty work.
- If the room has a door, then it should be wrapped with plastic wrap and covered with tape, and if not, then a large piece of dense fabric (for example, an old bedspread or curtains) is hung in the doorway, completely covering the opening. When dusty work is carried out, the cloth is moistened with water from a spray bottle.
- It is also desirable to close the windows from dust - for this, their entire window opening can be covered with plastic wrap and glued masking tape. The window sill can be covered with old newspapers or cloth. After completion of work, the room must be ventilated daily.
- It is desirable to have at least two bright light sources: diffused - for the entire room, and directed in the form of a carrier - to illuminate the work area.
- It is desirable to have a mounting table, it can be an old kitchen table or a high platform.
- To collect garbage and waste, which will be enough, you need to have a large bucket.
Example 1: Plasterboard box in the kitchen
Let us describe sequentially the process of mounting the frame of a two-level ceiling. As a first example, here is the process of creating a drywall box that is located above the countertop of the kitchen nook. Built-in lamps should be mounted in the box, as well as an air duct for a kitchen hood. The surface of the ceiling is leveled and plastered, so it was chosen as the first level. All stages of installation are presented in the form of a table.
| Illustration | Description of the installation steps |
|---|---|
 | Markings are applied to the ceiling and walls according to the project. electrical wiring placed in a corrugated pipe (required!), It is best to pull plastic clamps and fix in the corner between the surface of the ceiling and the wall so that there is no interference during installation. |
 | A sealing tape is glued onto the back of the PN 28 * 27 / UD 28 * 27 profiles, and then they are attached along pre-marked lines to the walls with dowel-nails in increments of 30-40 cm, and to the ceiling with anchor wedges in increments of 25 cm. in the corners of the profile inserted into each other and fastened with a TN9 or LN9 self-tapping screw. These guide profiles determine the dimensions of the future box. |
 | The distance from the ceiling to the lower edge of the wall guide profile is measured. From the profile PP 60 * 27 / CD 60 * 27, segments are cut with scissors for metal, the length of which is less than 10 mm of the measured distance. At the end of the segments, the side shelves are cut off 2.5 cm from the end of the profile, and a tongue is made from the back, as shown in the figure. As a result, suspensions are obtained. |
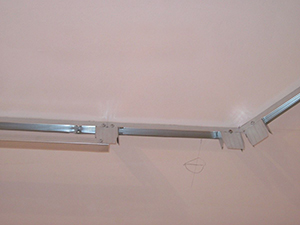 | The resulting suspensions are fastened with TN9 or LN9 self-tapping screws to the ceiling profile in increments of 40-60 cm. At the same time, they must be placed at the ends of the profiles, before any bends at the joints of drywall sheets. |
 | A guide profile PN 28 * 27 / UD 28 * 27 is attached to the lower part (to the tongue) of the hangers. Fastening is done through the back, and the sharp edges should be directed towards the wall. When fastening, the horizontal level of the plane formed by the lower part of the wall and mounted guide profiles is controlled by the level. You can also control the correct installation with a tape measure - the distance from the ceiling to the bottom of the profile should be equal on all suspensions. At the ends, the mounted and wall profile must be fastened with a self-tapping screw. |
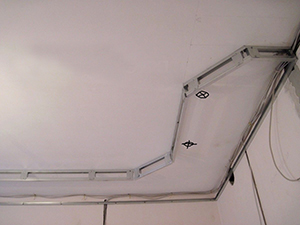 | On the ceiling, according to the project, installation sites for recessed fixtures are planned. |
 | A wire is stretched to the installation sites of the fixtures (preferably PVA 2 * 0.75). Since all the lamps must be turned on at the same time, it can be stretched with a loop - to the first lamp, then from the first to the second, etc. All wires are placed in a corrugated pipe with a diameter of 16 mm and attached to the ceiling with plastic clamps. The length is made such that they hang below the plane of the box by 15-20 cm. |
 | In the designated places that should not fall on the installation sites of the fixtures, the distance from the wall to the back of the guide profile mounted on suspensions is measured. Pieces of the profile PP 60 * 27 / CD 60 * 27 are cut off, which should be 10 mm less than the measured distance. The resulting segments are inserted into the profiles PN 28*27/UD 28*27. This is how the guides of the lower plane of the box are formed. |
 | Horizontal segments of the profile are set perpendicular to the wall using a square. |
 | And then they are fixed with a TN9 or LN9 self-tapping screw. |
 | The verticality of the front part of the box is checked using a square. |
 | And also fastened with a self-tapping screw. You should pay attention to the fact that the center lines of the vertical and horizontal profiles PP 60 * 27 / CD 60 * 27 do not coincide, so that in the future there are no joints of drywall vertical and horizontal planes on the same line. |
 | Cutting drywall strips right size and are attached to the front of the box with self-tapping screws TN 25. For the kitchen, it is better to use moisture-resistant drywall (GKLV). Fastening step 10-15 cm, all joints should fall in the middle of the profile PP 60 * 27 / CD 60 * 27. |
 | All engineering communications are checked. Kitchen hood air duct installed. In this particular case, a rectangular air duct with a cross section of 120 * 60 mm is best suited, which allows you to install hoods with a capacity of up to 350 m 3 / h. |
 | Drywall sheets are cut to size for sheathing the bottom of the box. Fastening is done with TN 25 self-tapping screws in increments of 10-15 cm. Joints should only be in the middle of the profiles. On the horizontal surface of the box, the places for installing built-in lamps are immediately outlined. To do this, you can drill small holes. |
 | GKL joints are puttied and reinforced with sickle, aluminum reinforcing corners are glued. Then the entire surface of the box with polishing is puttied in two passes. Then fillets are glued. |
 | Fillets and the lower plane of the box are painted in White color, and the side surface - in the color corresponding to the walls. Holes are cut out with a crown into which lamps are mounted. The box is ready. |
With structures, the most important thing is to understand the very principle of building frames and plating them with gypsum boards. Then any, even the most complex ceiling design, can be implemented independently.
Example 2: Installation of a two-level ceiling with lighting
In this example, consider the installation sequence of a complex two-level ceiling, in which the second level occupies the main ceiling area, and the first level is a round island, in the middle of which a hanging lamp is mounted. In this ceiling, the backlight function is additionally implemented.

Such an unusual and nice solution will be justified only in rooms with high ceilings. Let us describe the technological process of creating such a ceiling.
| Illustration | Description of the installation steps |
|---|---|
 | With the help of a hydraulic level or a laser level, marks are placed on the ceiling that determine the second level of the false ceiling. The labels are connected by a line using a rule. |
 | A guide profile PN 28*27/UD 28*27 is mounted along the line through a sealing tape. |
 | To mark the circle, a section of the PN 28 * 27 / UD 28 * 27 profile is taken, fixed at the center with one end, and circles (inner and outer) of the required diameters are drawn through the pre-drilled holes with a pencil or marker. |
 | Profile PN 28 * 27 / UD 28 * 27 is cut with scissors for metal into segments 10 cm long. In this case, the cut goes to the side shelf and back of the profile. |
 | The incised profile is applied to the outer circle on the ceiling and fastened to each segment with dowel-nails 6 * 60 mm. |
 | By attaching a bubble level to the lower plane of the wall guide profile and setting it horizontally, you can measure the distance from the ceiling in the circle area to the lower level with a tape measure. It is this width that a strip of plasterboard will need to form the side of the central circle. |
 | From the drywall sheet is cut along the strip desired width. The back side (marked) is rolled with a needle roller, and then wetted with a paint roller with water until the gypsum no longer absorbs water. The main thing is not to overdo it and prevent the drywall from being soaked through with water. After about 10 minutes, it can be gently bent. |
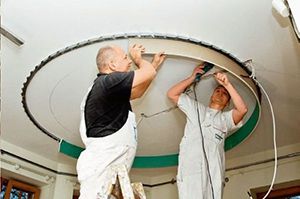 | A strip of drywall is applied to inside a circle formed by a perforated profile and screwed with self-tapping screws into each segment. Work must be carried out with a partner. The joints of the strips are reinforced with a piece of PP 60 * 27 profile placed under them. |
 | Profile PN 58*27/UD 28*27 is cut into segments of 10 cm, only in this case only side shelves are cut. Further, it is applied to the bottom of the circle of drywall strip and attached with self-tapping screws TN 25 to each segment. |
 | Given the significant plane of the ceiling, the bearing profiles will be laid in two tiers, the bearing capacity of such a ceiling is higher. The upper bearing level of profiles PP 60 * 27 is laid and fastened on top of the wall PN 28 * 27 with an interval of 1 meter. At the intersections of the profile with the central circle, its end is cut in accordance with the radius of curvature and is also laid and fastened on top of the perforated guide profile of the circle. |
 | Perpendicular to the supporting profiles with a step of 50 cm, the lower level of the profiles is laid, which are already inserted inside the wall guide profile PN 28 * 27. When crossing with a circle, the end is trimmed in accordance with the radius of curvature and inserted into the perforated profile PN 28*27/UD 28*27 of the circle. |
 | If necessary, if the length of the profile is insufficient, it can be extended with an extension. |
 | At the intersection of the upper and lower level profiles, two-level connectors are installed (they are also called two-level "crabs"). |
 | On the upper bearing level of profiles PP 60 * 27 / CD 60 * 27, direct suspensions are installed with an interval of 50 cm (just in the middle between the points of intersection with the lower tier of profiles). Suspensions are attached to the ceiling with two anchor wedges with a diameter of 6 mm. After mounting all the suspensions on the ceiling, a cord is stretched in the lower plane of the ceiling, all profiles are sequentially leveled and fixed on straight suspensions with TN9 or LN9 self-tapping screws (4 for each suspension). After that, the frame is checked and the electrical wiring is connected to the backlight. |
 | Plasterboard sheets are mounted on the frame with the long side parallel to the supporting (upper) profiles. This method of fastening will provide more high rigidity ceiling structure and ensure that all end joints of the gypsum plasterboard will fall on the lower level profile (gypsum board length 2500 mm, and the distance between the axes of the profile is 500 mm). Fastening step with self-tapping screws TN25 - 200 mm. |
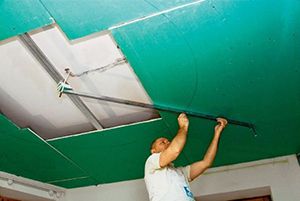 | In the area of \u200b\u200bthe central circle, drywall sheets are mounted with a margin, in order to later form a circle of a smaller diameter in order to place hidden lighting in the resulting niche. To draw a circle with the desired radius, a temporary profile is attached to the edges of the plasterboard in the projection of the center of the circle on the ceiling. A previously used compass from a guide profile is attached to it and a circle of a smaller radius is drawn than on the stream. |
 | A drywall saw cuts along a circle line. After that, the edges are processed with a drywall planer. |
 | In order to hide the lamps, you need to make a border. To do this, the PN 28 * 27 / UD 28 * 27 profile is cut into 10 cm segments with metal scissors (the cut should fall on the side shelf and back). The profile is attached to the edge of the round opening (back down, sharp edges up) through drywall from the bottom up with TN25 screws for each segment. Further, a strip of drywall 5-7 cm wide is attached to this profile (pre-rolled with a needle roller and moistened with water). |
 | GKL joints are brought with a planer, and then a special perforated plastic corner is applied to the joint between the horizontal plane of the ceiling and the vertical plane of the drywall strip and is “targeted” with a stapler to the drywall. |
 | The end edges of drywall sheets that do not have thinned edges are prepared for the subsequent sealing of joints. To do this, the edges of the sheets are cut with a construction knife to form a groove. All protruding pieces of cardboard should also be cut with a knife. |
 | To improve the adhesion of putty, all seams are treated with a primer. Before doing this, to remove dust, you can wipe the entire surface of the ceiling with a soft, slightly damp cloth. |
 | To seal the joints of the GKL, a specially designed putty (ready-made or requiring preparation) is used for this purpose. Of the most famous are: Knauf Fugenfüller, Knauf Uniflot, Shitrok, Vetonit and others. Putty is applied to all joints, as well as to those places where there are screws. |
 | At the joints, a reinforcing sickle tape is deepened into the putty with a narrow spatula. After that, the next layer of putty mass is applied and leveled with a wide spatula. |
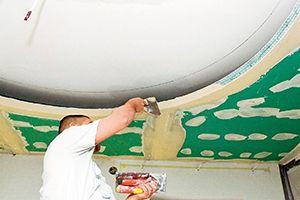 | The perforated plastic corner and the surfaces next to it are also treated with putty. |
 | After sanding, it will most likely turn out that another leveling layer of putty will be required. After its application and drying, the surface is polished again with a grater with fine mesh(from 400), primed and painted. |
 | Luminaires are installed in a niche, which can be fluorescent lamps, a light cord or LED strips. A lamp is hung in the center of the circle. |
Video: Mastery secrets when working with drywall and profile
Video: An example of installing a two-level ceiling
Video: Two-level plasterboard ceiling in the kitchen
Video: Installation of a multi-level ceiling, part 1
Conclusion
Drywall is a unique finishing material and, above all, it is interesting in that having a very simple set of tools and basic skills to work with it, any good owner will be able to independently create his own, beautiful and unique ceiling and other structures. It was not in vain that the authors of the article paid a lot of attention to seemingly “insignificant little things”: fasteners, connecting profiles, attaching the frame to building structures, designing, marking, etc. The fact is that understanding these “little things”, understanding the basic principles of working with drywall will help in the future to realize any of your ideas and give your home a unique look. The best design is one that is made by yourself and for yourself. The best two-level ceiling is the one that is made by hand. Summing up the results of the article, the authors wish to give several theses:
- A plasterboard ceiling can be made in a couple of weeks, and mistakes made at the design and installation stage will remind you of themselves much longer - years. Therefore, more attention should be paid to the choice of design and design.
- A plasterboard ceiling is a non-separable structure, so all engineering communications hidden behind it must be carried out and made flawlessly.
- The purchase of drywall and accessories should be done only famous brands and verified sellers. Unfortunately, there are a lot of counterfeit products on the market.
- In the dispute between the album of technical solutions of the manufacturer of drywall constructions and the argument "I did it a hundred times" of a single master, the album of technical solutions should win.
- When creating a drywall ceiling on your own, especially for the first time, mistakes are inevitable, and there is no need to be afraid of them. A good master is one who made many mistakes, but realized them, corrected them in time and will not allow them in the future.
Good luck with your repair!
In recent years, drywall has gained great popularity among builders. Sheets of this material can be used in a variety of works when decorating a room. It is very easy to install. For designers, this material opens up a huge field for fantasy. In most cases, a single-level ceiling using such sheets is done to create additional sound insulation. More complex design differ . They make it possible to highlight the ceiling, create the necessary holes and cut out the original curly steps.
Do-it-yourself installation is available to almost everyone, even if he has never dealt with such work. Drywall sheets are attached to a special aluminum profile, which has guides. The result is a frame in which wires and various communications are hidden.
Plasterboard multi-level ceiling has certain functions:
- The room looks much larger, the appearance of the room changes, the apartment looks much more beautiful.
- All the irregularities of the ceiling become invisible.
- The ceiling closes all engineering communications.
- Excellent lighting appears thanks to lamps of various levels.
In order for the installation of a multi-level plasterboard ceiling to be successful, you must have a variety of tools:

- perforator;
- screwdriver;
- level;
- construction square;
- hacksaw;
- pliers;
- metal scissors;
- pencil.
The main materials used are:
- drywall sheets;
- metal profile to carry out the installation of the frame;
- self-tapping screws;
- dowel.
To independently carry out the installation of GKL sheets and make a frame, two types of profiles are used:
A guide profile is screwed to the walls, into which the ceiling profile is installed. It will form the frame. Profile "CD" allows you to add a plasterboard ceiling structure with details of curvilinear geometry.
Number and features of levels
Of course, installing a multi-level drywall ceiling is the dream of many homeowners, but the solution to this issue is related to the height of the ceiling. It is this value that regulates the number of levels that can be done in a particular room. To accurately calculate the number of levels, you first need to determine what the height of the very first level will be.

To this end, on the ceiling, you need to find the lowest point, from which you need to measure 2.5 cm. A mark of this value is made on the wall. It becomes a guideline for setting other marks in the corners of the entire room. For accurate marking, a water level is used. A marking thread is laid around the entire perimeter. It is she who shows the lower level. If this size is increased by 1.5 cm, the desired height of the first level will be obtained.
In order for the installation of a multi-level ceiling to be carried out correctly and consist of several rows of profiles, it is very important to determine how the frame skins will be made. It is necessary to calculate the number of profiles and drywall sheets. You need to know exactly how the material will be attached.
To answer all the questions posed, you must first draw a sketch of a multi-level plasterboard ceiling. On such a plan, show the installation of all levels. All preliminary measurements are entered into the drawing, the required materials are shown with an indication of their quantity, and the installation of auxiliary elements is taken into account.
Back to index
Frame and construction features

After the installation of the line, the “UD” profile is first fixed. It is necessary that its lower surface is in contact with the line. Fixing the profile is done with dowels that match the structure of the wall. Some profiles do not have holes. Therefore, they are attached to the wall through pre-drilled holes. The fastening installation step must exceed 40 cm. Docking joints can be made with an overlap.
The next step is to determine the direction of laying drywall sheets. "CD" profile is mounted across the ceiling. Find the most even angle in the room. It must have 90°. After his determination, on his part, they begin to do the installation.
The ceiling is marked for profile installation. This is done on both sides, maintaining a step of 50 cm. The lines passing between the marks on each wall are marked with a chopping thread. Each such mark becomes a reference point for the "CD". Maintaining a step equal to 40 cm, fastening brackets are fixed directly along the line.
Then you need to measure the distance between opposite walls. Cut off excess parts. The length of the profile should not exceed the resulting distance by approximately 5 mm. After that, the "CD" must be inserted into the fixed "UD". In this case, the "CD" profile should be above the first level, it needs to be slightly raised. To this end, the profile is slightly bent and lifted by a mounting bracket located in the middle. Under the bottom of the "CD", according to the level of the surface of the frame, pull the thread. In order for it to be well stretched, self-tapping screws are first attached to each side of the frame. A thread is wound on them.
According to the established thread, CD profiles are set. First, they are screwed to the central bracket with small self-tapping screws. For their small size they are called "fleas". Then remove all screwed profiles. After the CD is fully set, the mounting brackets are thoroughly tightened according to the level. The end of the bracket is bent up.
Installation of a multi-level ceiling in houses or apartments is enough interesting way, helping to visually increase the height and space of the premises.
This instruction will detail how to make a multi-level ceiling with your own hands correctly.
A multi-level plasterboard ceiling usually performs the following functions:
- visually enlarges the room, changing the appearance of the premises;
- hides flaws and irregularities of the base of the ceiling;
- allows you to hide a variety of communications: electrics, plumbing, ventilation, etc.;
- The problem of lighting is solved by installing lamps at different levels.

Drywall is versatile finishing material, using which, it is possible to prepare as soon as possible different rooms to the finish. Ceiling installation is three times faster than finishing work.
Installation of multi-level ceilings in stages:
- Make level markings.
- Installation of a U-shaped metal profile over the entire area of \u200b\u200bthe room.
- Installation of the main frame from profiles.
- Installation of drywall sheets for the first level.
- Installation of a metal profile for the remaining levels.
- Finishing the structure with plasterboard sheets.
- Applying putty to the ceiling for finishing.
According to the technical documentation, the installation of multi-level structures is allowed to be done indoors with a relative humidity of not more than 70%.
Before starting work on finishing the premises, it is necessary to do all the work that is related to water processes ( cement screeds and etc.). It must be taken into account that all measures for the ventilation and electrical installations are made and summed up according to the scheme corresponding to the complexity of the project. Wiring should be led to places where lamps or fixtures will be located in the future. neon lights. Also, the system must be ventilated.
Precautions while carrying out:
- dust during the installation of drywall can enter the lungs. Therefore, it is necessary to use personal protective equipment (“petal” or respirator, goggles). It is necessary to make a well-ventilated room;
- tools should be used strictly for their intended purpose;
- it is necessary to turn off the electricity if work is performed in fire hazardous premises;
- work on scaffolding or ladders. When installing them, it is important to ensure the stability of these stairs;
- maintain cleanliness in the workplace, avoid large accumulations of construction debris.
The device of multi-level ceilings

In order to install a multi-level structure, you will need the following tools:
- Ticks.
- Rasp with a blade of 25 cm. Designed for processing the edge of the plasterboard.
- Prosekatel.
- Needle roller.
- Edge planer.
- Cordless screwdriver.
Design options and the number of drywall levels are limited only by imagination. The main task is to know the principles of framing and installation of drywall finish sheets:
- Markup. Two levels need to be marked: the base level of the ceiling and the starting point for the beams.
- Installation of "U"-shaped profile on the area of the room.
- Installation of the main frame from the ceiling profile.
In addition to the main profiles, depending on the chosen installation scheme, auxiliary profiles are installed, to which the profile for the second level will be attached.
It is not important to sheathe the construction of the base continuously.
This process is the most responsible and time-consuming. The final appearance of the ceiling will directly depend on the responsibility of this stage. For ordinary descents, without installing backlighting, it is possible to use different schemes, but first you need to install “U” profiles to the prepared ceiling and walls. The profile is screwed along the walls with self-tapping screws through plaster to the “C”-profile with a certain step. If an additional profile is not provided and the ceiling is sheathed, then the profile is mounted to the ceiling through plaster using dowels and long self-tapping screws. After that, the finished second level is sheathed with drywall, puttied and painted.
To install the ceiling profile, direct suspensions are used. They are attached to the wall with dowels with a pitch of 40 cm and self-tapping screws - to the ceiling profiles. When fastening the profile, you need to keep the level, which is controlled by a tight lacing. In order for the structure to have final strength, transverse jumpers are used, which can be made from. They are strengthened by "crabs" at a distance of 60 cm from each other. Or an alternative construction from profile waste is used.
Back to index
Installation of multi-level ceilings

No additional technology is practiced when arranging a multi-level ceiling. The required levels are simply added from the ceiling and guide profile. The only difference between multi-level plasterboard ceilings is decorative form level. Particular difficulty occurs in the manufacture of wavy forms for which the GKL bends. For bending sheets, dry and wet methods are used. Dry is a trick of the groove on the side of the bend. Wet bending method - one side is pierced with a special roller and wetted with water. After that, the drywall sheet is filled with moisture and placed in a special template. To perform "steps", the sheets are cut at a certain angle at the bends.
When the profile structure is assembled, they proceed to the stage of attaching drywall sheets. At the beginning of the installation, the sheets are cut to the design dimensions. For this process, a construction or clerical knife is used. With its help, the top ball of cardboard and gypsum filler are cut along the marked line. Then the sheet is laid on the edge of the table, the second cardboard base is broken and cut. After cutting the sheets, hairiness occurs, which is removed with a planer. In some cases, the trimming of the ends of the sheet is done with sandpaper.
During the installation of the GKL, the following order is optimally used:
- laying a whole sheet;
- laying half sheet.
This procedure must be repeated.
This is done in order to smooth out the differences as well as possible, if any. To fix drywall sheets, metal screws are used, which are screwed flush so as not to perform additional work on puttying these places.
Anyone wants to make the interior of their apartment unusual and interesting, using various materials and decor. Multi-level plasterboard ceilings are increasingly used in interior design. Decorative, curvilinear design on the ceiling looks very organic.
 An example of the design and decoration of a multi-level plasterboard ceiling
 How often do you have to delimit a large room into several zones, and help with this will help. When arranging a multi-level structure, the room can be zoned using color, mirrors, or special lighting.
 A variant of the construction and design of a multi-level ceiling in the living room
 This is a curved or straight structure built on the first level of a plasterboard ceiling. You can equip a simple low ledge, or you can, in which diffused lighting will be equipped, by. The second level of the ceiling is usually arranged along one wall. It is easy to build a multi-level plasterboard ceiling with your own hands.
 Plasterboard ceiling project with dimensions and levels
 You can build a three-level ceiling, its design differs only in the number of steps on the ceiling. But it should be understood that if there are several ledges, then the supporting structure should be strengthened, the maximum load should be 14 kg per square area. It is easier to make a multi-level plasterboard ceiling straight in several levels than a figured one.
Marking is considered the most difficult - the success in mounting a beautiful one depends on this process.
Preliminary work: drawings and markup
Before starting work, you need to consider the options for multi-level plasterboard ceilings and choose the right one. You have evaluated your ceiling, and decided to make a beautiful curvilinear design, according to a certain design. You need to start with a drawing and markup, and only then take on the implementation of your ideas. The device of multi-level plasterboard ceilings begins with a drawing.
A three-dimensional figure on the ceiling cannot be created without using a drawing. You can make a schematic drawing on paper, or you can download a special program to your computer. Competent marking can be done by measuring the horizontal of the ceiling, on which to mark everything and cascades.
 Drawing and marking of all levels of the plasterboard ceiling
 How to make a drawing:

As soon as everything is clear and correctly marked on paper, you can start marking the surface of the ceiling.
Preparing for installation
Once the ceiling markings have been successfully completed, you can go shopping. The material should not be bought end-to-end so that the work does not stop due to the fact that one profile or several suspensions were not enough, so it is worth buying 10% more than the required number of components.
The list of materials that are needed before starting work:

Frame device
Before we start, let's prepare the tool that will be needed:
- marker;
- grinder or scissors for iron;
- impact drill or hammer drill;
- special ;
- screwdriver;
- gloves;
- protective glasses.
 Mounted frame of a multi-level ceiling
 First of all, you need to equip the main level of the surface, for this, screw the starting profile to the walls - this will be the base for the supporting structure. The profiles are fastened in increments of 25 cm. The next step is to fasten the intermediate ones to the guides using. At this point, the first stage of installing a multi-level ceiling can be considered complete. You can start collecting the second level.
 Assembled frame and sheathed with plasterboard in the form of a circle
 We fix the supporting structure on the walls, according to the markup. With the help of suspensions, which are screwed to the main crate with self-tapping screws. A profile is attached to these suspensions, which will form an additional tier of the ceiling.
The photo shows that the ceiling frame was assembled at the first level, it is 70 mm. - 10 mm. = 60 mm. from zero, also at the same level a circle was assembled and sewn up. I will not go into details on how to assemble the main ceiling, this has already been described in previous entries, I will talk about the order of execution before existing ceiling on the picture. First of all, we need to mark the centers of the circles on the ceiling and draw these circles along the indicated radii.
It is important to note here that when drawing the outer circle, we reduce the radius by 10 mm, and when drawing the inner circle, we increase it by 10 mm, respectively, I will explain once again why this is connected - along the drawn lines on the ceiling, we will nail the guide profile, therefore drywall (6 mm) that will rotate on this profile will increase the radius of the circle by 6 mm.
 Applying putty ceiling with several levels
 Plus putty will take 2 - 4 mm. As a result, we will fall into the size on the drawing.
How circles are drawn on the ceiling

 Cut the guide profile into segments, you can use scissors
  Cut metal profile that can be fixed to create shapes on the ceiling
 Please note that we nailed the guides not on all circles, but only on those that are at the first level from zero. Then comes the assembly of the entire frame at the level of 60 mm. from zero, there is really one thing, but you don’t need to put brackets where there will be no ceiling according to the drawing, that is, the brackets are placed near the guide nailed to the ceiling in a circle.
After the frame is assembled, we cut the profile along the edge of the guide minus 5 mm, so that later we can put another guide on the edge of the profile, also cut into segments, but not in the same way as we cut it on the ceiling, in these guides it is necessary to cut only the side shelves, the main one remains intact, then we put the guide on the profile without screwing it, cut out strips of 60 mm each. from drywall 6.5 mm. preferably along the entire length (250 cm), we fasten these strips by bending to the upper guide, then we fasten the guide that we started without screwing to the bottom of the drywall strip.
As a result, we should have got what we saw in the top photo at the beginning of the article. The exception is that the circle in the middle is sewn up. But I think for those who read the blog, it will not be difficult to sew up a circle.
If a curved design is provided, then the profile is cut along the side walls to make it easier to create a curved line. The design must be rigid - the pitch of the profiles is 40 cm. 
You can buy a special arched profile for. The auxiliary frame should be carried out according to the level, for this you can pull the thread along the plane. Once the main profiles are installed, you can proceed with the installation of intermediate profiles.
To do this, the rack profile is cut into segments of 50 cm, which are subsequently installed in the gaps between the main components of the structure, across, and screwed with small “seeds” self-tapping screws. The video shows the installation process of a multi-level ceiling.
Most builders note that during the renovation of an apartment or house, one of the most difficult processes is how to make a plaster ceiling or any other material.
The unevenness of various tiled floors, and the fact that the corners almost never correspond to each other, and many other details interfere with the quick execution of work. To hide all these shortcomings today is quite difficult. And rather not so much difficult as expensive.

This article will discuss step-by-step instructions for installing a plasterboard ceiling, which has a huge number of advantages, ranging from ease of installation to reasonable prices.

What tools will be needed?
If you are thinking about how to make a plasterboard ceiling with your own hands, then first of all you should do various preparatory work for the main process, namely: it is important to purchase the necessary quick installation ceiling building materials, and prepare all the tools.

In order to install your own two-level plasterboard ceiling, you will need:
- Water type level in order to accurately mark the place where the guide level will be installed.
- For fast drilling of various openings any puncher.
- Scissors with which it will be possible to cut metal.
- "Bulgarian".
- Screwdriver for fastening GKL, as well as a profile.
- Roll
Frame installation
The first thing to do is to choose a place for future marking of the place where the guide profile will be installed. Labels should be applied after all containers have water at the same level.

It is up to you to decide exactly how many centimeters to retreat from the building ceiling, however, most builders offer to look at a photo of a plasterboard ceiling in order to understand that the distance should not be less than ten centimeters.
After the completion of the work of the first stage, that is, after marking has been carried out on each wall, you can proceed to drilling several holes for the dowels. For this, a perforator is used.

After completing the installation of the guide profile, using the prepared tape measure, it is necessary to make marks right along the perimeter with an average interval of about 60 cm.

If you want to make a fairly simple design, consisting of only one level, then there is no need to install popular c-profiles in two directions at once. It is enough to markup exclusively on two opposite sides.
After that, you can proceed to fixing the suspension. After completing the installation of all direct suspensions, you can proceed to the installation of the ceiling profile and the subsequent sheathing of the ceiling with sheets.

Ceiling decoration
To date, a huge number of the most various ways ceiling decoration. Thanks to the active development of the construction industry in stores, you can find many different decorative materials that will decorate the ceiling.

Everything will depend solely on taste preferences and financial capabilities. Someone prefers plaster molding, and someone is delighted with foam baguettes.

You should not pay attention to various kinds of fashion trends, as they pass quickly, but you will definitely live with a new renovation for more than one or two years.

It is important that the ceiling gives you only joy from looking at it and creates a feeling of comfort in the room.
After you decide what the ideal ceiling after repair looks like for you, it is important to assess whether you can afford it financially, and if the answer is yes, then you can safely go to the building materials store and choose what will allow quickly make your dreams come true perfect ceiling into reality.

There is nothing difficult in the technology of creating false ceilings using drywall.
It is only necessary to remember that before doing anything, you need to think several times, since such a ceiling is not set for a year or even five years.
Note!


Photo of a plasterboard ceiling


Note!


