Is it worth doing a false ceiling in the kitchen? Suspended ceiling in the kitchen: system installation, panel, cassette, metal, rack and plasterboard types
The desire to have excellent finishes for all rooms in the house is quite logical - a huge range building materials on the market allows you to realize any ideas of designers and consumer requests. Suspended ceiling in the kitchen is not uncommon, especially since you can build it with your own hands at minimal cost. The room takes on a stylish look, and behind a simple design, you can even hide telecommunications - electrical cable, telephone wires, etc.
Design features
The design of the false ceiling includes the following elements:
- metal carcass, fixed on the floors;
- modular parts that form the ceiling surface itself.
Between the two planes (old and new ceiling base) engineering television and radio communications and lamps are freely placed. It is this feature that served as the name of the false ceiling false ceiling design.
In the manufacture of modular elements, the form of plates, cassettes, rails or panels is most often used. Raw materials for their production can be any:
- glass or mineral fiber;
- steel, aluminum;
- reinforced gypsum, drywall;
- wood;
- plastic;
- DSP, MDF or fiberboard.
Modern technologies make it possible to finish the ceiling even with a laminate.
The main advantages of the suspended structure:
- excellent disguise of the old coating or ceiling irregularities;
- the possibility of complete or partial replacement of electrical wiring hidden in the ceiling "pie";
- easy access to utilities;
- energy efficiency while improving the reflective characteristics of the upper plane of the room;
- speed of installation;
- availability and reasonable cost of materials.
Types of suspended ceiling structures
Based on used for manufacturing ceiling elements The constructions arranged with their help are of several types:
- cassette;
- rack;
- lattice;
- tiled;
- cellular;
- panel.
The most common are tiled and panel suspended ceilings for the kitchen. The panels are put on a pre-prepared frame, the color of such elements is initially white. If desired, the owners can paint the structure in any color.
In addition to the types listed above, suspended panel ceiling structures may be unusual, for example, glass with photo printing. Glass panels are attached to the T-shaped profile, on which a photograph is printed or any film pattern you like is pasted.
Cassette ceilings are made of steel or aluminum cassettes. square shape. In this case, the panels can be painted in any color. The main advantages of such structures:
- long service life;
- increased moisture resistance;
- the possibility of repeated dismantling;
- perforation provides good ventilation;
- pasting cassettes with any noise-isolating and heat-saving material;
- variety of textures smooth surface applied ornament;
- convenient access to utilities.
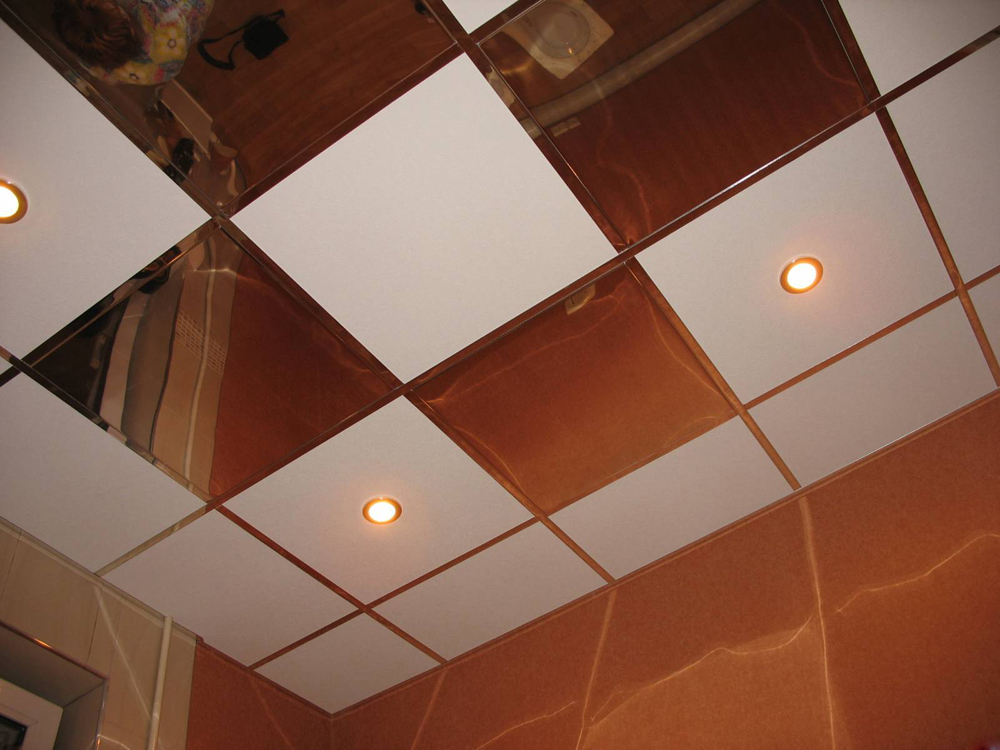
Modern mirror ceilings from cassette elements - latest achievement in the field of design. By applying an unusual pattern or spraying matte or glossy surface design allows the rays of light to play whimsically in the space of the kitchen. Cons of mirror false ceilings:
- visual and real narrowing of space;
- complex installation and maintenance;
- even a slight coating of dust immediately catches the eye;
- expensive pleasure.

The mirrored ceiling will create the feeling of having a “Second Light”
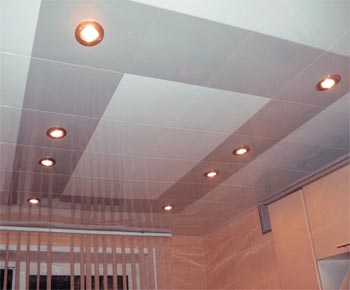
The next view is metal suspended ceilings in the kitchen. These structures are excellent technical specifications. Such structures have the following advantages:
- resistance to temperature changes and moisture;
- light weight of fragments and frame;
- ability to withstand a significant load.
Aluminum ceilings for the kitchen are panel, slatted and with decorative lattice trim. Protective covering anodic oxide or high-quality varnished fragments may or may not have perforation. For painting panels and rails, powder dyes made from polyester resins are used. The rest of the parts and fasteners are made of steel and coated with zinc.
Slatted ceilings are divided into 2 large groups:
- open - elements of the same color as the base itself are inserted into the gaps of the frame. The result is a single-color ceiling canvas. By combining colors, you can achieve conditional zoning of the kitchen;
- closed - special rails and butt joint technology are used to fasten the panels.
Panels on slatted suspended ceilings are also of 2 types: German with rectangular fragments for structures open type And Italian style with rounded edges and closed version mounts.
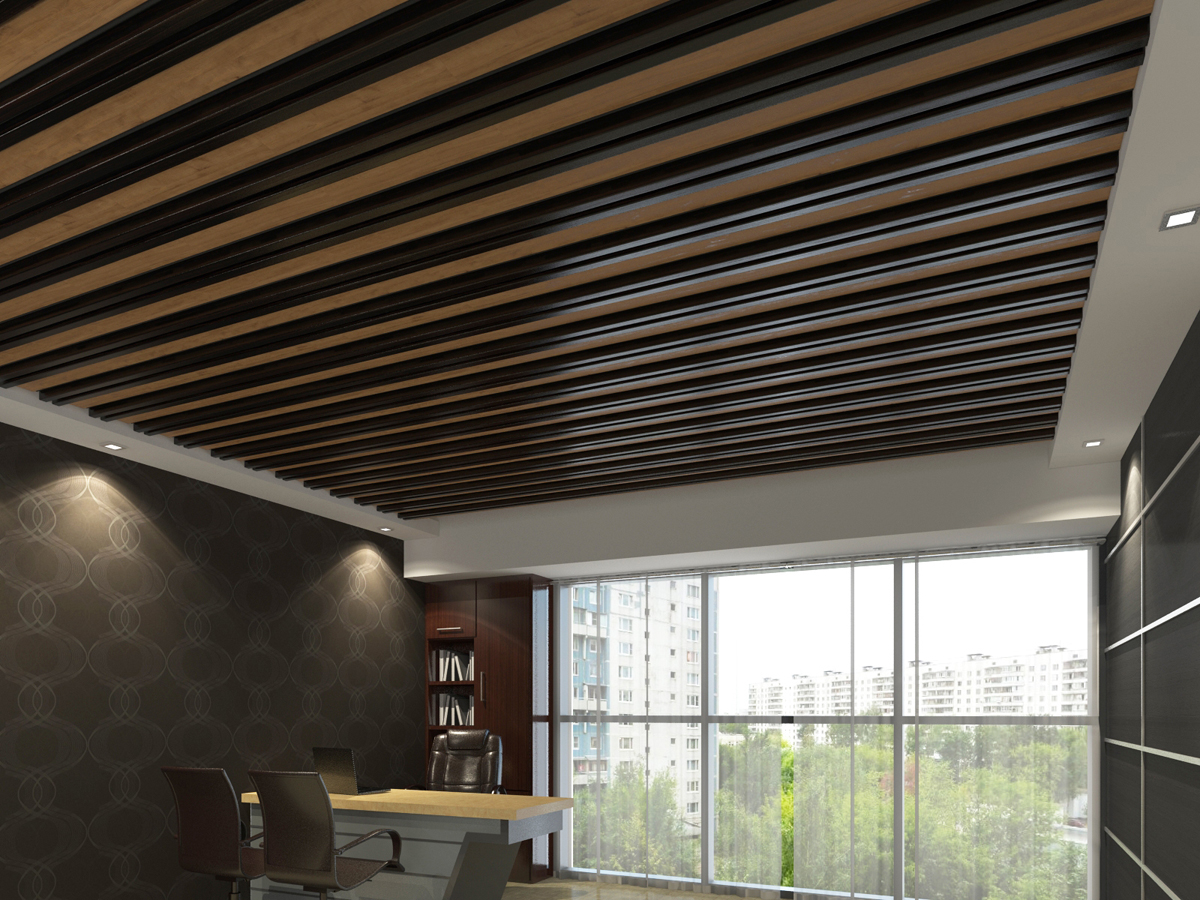
Reiki can be white or colored: elegant silver, luxurious gold or trendy mirror. In rack ceiling structures it is convenient to mount lamps, mount complex chandeliers or minions. The service life of such panels is at least 2 decades. In addition to durability, rack ceilings have other advantages:
- combination with any kitchen style and footage;
- reliability;
- use of quality materials;
- unlimited scope for designer ideas;
- environmental Safety;
- ease of care;
- hygienic: they are not afraid of mold and do not collect dust;
- high resistance to fire and water;
- great accommodation internal systems ventilation, electricity, etc.;
- high reflective characteristics;
- assembled in 2-4 hours.
The variety of shapes and textures of the elements used in slatted ceilings makes the kitchen individual, having its own face. But such structures also have their minus - the lack of the possibility of partial dismantling.
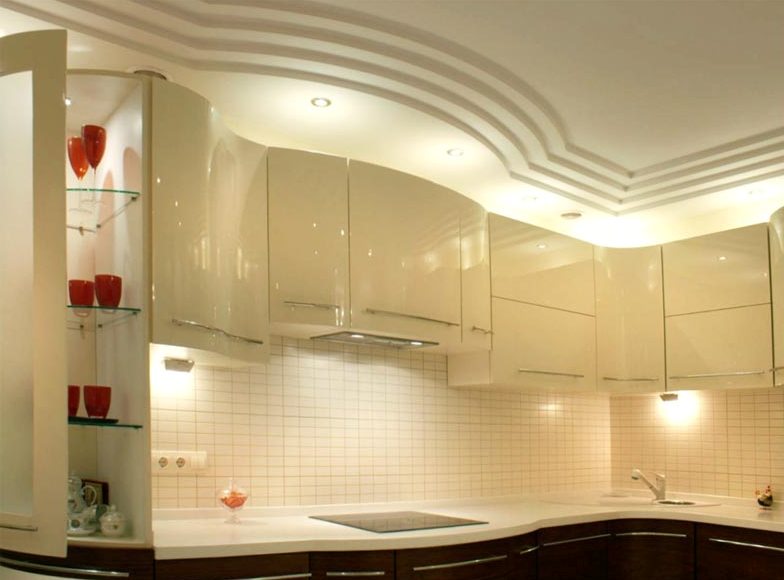
The next material for the construction of a suspended ceiling is drywall. This inexpensive raw material can be used to create structures with complex geometries and different number levels. Perfect surface leveling is the main advantage drywall sheets, sold in dimensions of 1.2 x 2.5 meters and 10-15 mm thick. The option with drywall construction is definitely the cheapest, available to any master.
Important: when choosing drywall for the ceiling, it is necessary to give preference only to moisture-resistant models. The service life of this material is 20 years or more.
Advantages of plasterboard kitchen ceilings
The unique flexibility of drywall sheets is just a godsend for interior designers: it is possible to form cavities and protrusions of any shape and size from the material, it is easy to mount all kinds of lighting inside. On the stage finishing plasterboard suspended ceiling is pasted over, lined or painted - there are a lot of options. It is about this type of suspended structure for the kitchen that is most in demand on the market today and it is worth talking in more detail.
Suspended represent the optimal design in the ratio of design-quality-price concepts. The speed of construction is ahead of any other models of suspended ceilings, and the level of complexity of work is available even to a novice master.
False ceilings today are practical, inexpensive and reliable. They are easily decorated using various, self-selected technologies. The main advantage of such ceilings is the simplicity of their manufacture. Even if you don’t know how to work with drywall, thanks to the recommendations written below, you can make a high-quality false ceiling in the kitchen with your own hands.
Pros and cons of suspended ceilings

Suspended ceilings in our country appeared not so long ago. But in a couple of decades, they have gained extraordinary popularity. Therefore, let's consider what are their main advantages:
- Wires and housings of all lamps can be hidden inside such a ceiling, which will significantly improve the design of the room, eliminate unnecessary finishing works and save time;
- With the help of suspended ceilings, you can hide all the irregularities of a conventional ceiling;
- Since suspended ceilings are simple in technology, it becomes possible to install the most complex structures;
- Small price. If the budget is limited, then the suspended ceiling without various additional structures perfect fit;
- Reliability. False ceilings do not rot, do not rust and are resistant to any temperature changes.
Decorative ceiling decoration will not present any difficulty.
Thanks to these features, suspended ceilings look very nice in the kitchen. Plus, it's easy to install them yourself.


But it was not without its downsides. Although they are minor, they are present:
- Washing such a ceiling is not very convenient. In this case, it is highly recommended not to use coarse brushes, as they can scratch the surface;
- When the ceiling is flooded by neighbors from above, it is very difficult to get rid of water above the ceiling. But the stretch ceiling perfectly holds back this water, thus the property does not deteriorate. Therefore, we can consider this as the dignity of stretch ceilings.
About the problems of the flood
A small leak in stretch ceilings will practically not hurt, and this unpleasant misunderstanding can be quickly eliminated. with my own hands. But, if the flooding was strong, then at the seams false ceiling there will be damage.
To remove the accumulated water, you need to make a small hole in one of the seams and drain it from there.
The main problem is that even with the timely draining of water between the main and suspended ceilings, it is problematic to dry the space. This may cause deformation of the coating. The only way out of this situation is to make a hole right size to dry the space. But this procedure is rather complicated, and it is very problematic to close the hole afterwards.
Installation steps
Tools and materials
For that to mount ceilings, you need:
- fasteners;
- for the frame - metal profile;
- special jumpers that connect all parts of the frame at the intersection of profiles;
- a certain number of sheets of drywall. They are calculated using square meters, therefore, it is necessary to measure the area of \u200b\u200bthe ceiling.
Instruments, required for installation:
- roulette;
- screwdriver;
- perforator;
- a hacksaw for metal or a special knife for cutting drywall;
- laser level;
- jigsaw;
- putty knife.
After that, you can start marking the installation of the ceiling.
markup
markup produced in several stages:
- base lines are applied around the perimeter of the entire kitchen. Each line should be 150 millimeters apart. If there are much more communications, then you need to navigate by them;
- after the first stage, markings are applied for the placement of the frame.

After these steps, you can begin to fix the frame and sheathe it with drywall.
Frame installation
The false ceiling frame looks like a system consisting of metal profiles that are firmly fixed to the kitchen ceiling.
It is attached like this:
- First you need to fix the start profiles. They are attached along the baseline to the walls.
- After that, using a laser level, alignment occurs;
- Next comes the installation of the main part of the frame. According to the markup, suspensions are attached, which must be bent with the letter “P”.
- Self-tapping screws to these suspensions and the profile itself is fixed. In this case, a level is useful;
- TO start profile you need to fix all ends of the rack profiles. To fix the knots, "crabs" are placed.


ceiling lining
To sheathe the ceiling, you will need another person to hold the drywall sheets. Before you install drywall on the frame, you need to cut grooves for pipes and holes in certain places in which there will be lamps. Sheathing is as follows:
- installation starts from the window;
- a sheet of drywall must be pressed against the frame;
- after that it needs to be leveled;
- then drywall is screwed with self-tapping screws every 15 - 25 centimeters. The head of the self-tapping screw must be recessed into the ceiling so that it is possible to seal the hole with putty;
- all sheets must be joined closely, there should not be even the slightest distance between them;
- after which you need to putty the ceiling and you can consider it ready.


If the ceiling is assembled from cut materials, then it's okay. All joints can be sealed with putty.
How to install a false ceiling with your own hands (video)
1 part
part 2
part 3
part 4
part 5
- self-tapping screws are not recommended to be screwed at an angle;
- at a temperature of less than ten degrees, installation is not carried out;
- when working with drywall, goggles or a protective mask are needed;
- since the suspended ceiling will be in the kitchen, it is required to use only moisture-resistant drywall;
- the load increases if a multi-level structure is being installed. Therefore, it is necessary to pay more attention to the ceiling frame.
Conclusion
After reading this article, you have learned about all the features of the installation process of false ceilings in the kitchen. Therefore, you can easily make repairs yourself with your own hands, without resorting to the help of specialists.
Suspended ceiling in the kitchen is rightfully considered one of the most successful and rational decisions. Thanks to its qualities and design features, this option for decorating the ceiling can be done with your own hands, using the most common types of construction and finishing materials and designing the room in the chosen style.
The false ceiling in the kitchen is monolithic structure, which consists of a supporting metal frame and constituent elements that form a new surface. It is worth noting that various ways installation of such modular parts can greatly diversify overall design premises, giving it unusual shapes. Such a design can advantageously integrate high kitchen cabinets in general interior, along with a special way of lighting, to highlight certain working areas of this room, and also makes it possible to efficiently and rationally place large-sized household appliances and communications under the false ceiling for the kitchen.
The false ceiling above the kitchen provides for the presence of space between it and the ceiling, it allows you to hide wiring, electronics lighting fixtures and other communications.
The modular elements that form the surface of the suspended ceilings in the kitchen are made from various materials. They may be in the form of slabs, individual panels or blocks. There are also cassette types of construction, their installation by one's own hands will not take much effort.
Suspended ceilings in the kitchen have a number of advantages compared to other structural solutions for finishing ceilings. Among them are the following:
- Easy installation. Suspended ceiling in the kitchen can be mounted by hand if available necessary tools and auxiliary equipment;
- The ability to design and install a variety of shapes and decorative elements that form a unique and inimitable design;
- The suspended ceiling in the kitchen is easy to wash and clean from various contaminants;
- All types of suspended ceilings for the kitchen hide all defects, irregularities and other imperfections of old surfaces;
- At correct installation and the presence of a layer of thermal insulation, the false ceiling for the kitchen perfectly keeps the heat in the room and can significantly reduce heating costs.
However, in addition to the advantages of a false ceiling above the kitchen, you should also pay attention to the existing disadvantages of this type of structure, namely:
- The suspended ceiling above the kitchen, due to the prefabricated nature of the installation (for example, cassette structures), is not durable and can be deformed or damaged by accidental ingress of foreign objects;
- Suspended ceilings in the kitchen take away some of the usable area rooms, so when choosing various furniture, such as cabinets and furniture modules, this fact should be taken into account.
The process of installing false ceilings in the kitchen
 In order to qualitatively mount false ceilings for the kitchen with your own hands, it is necessary to perform accurate measurements and calculations of the total area. At the same time, it is necessary to find out how many work areas are planned and whether the room will be combined with other rooms, the design and functionality of which must be consistent with the overall style.
For quality installation the exact location of the surface along the horizontal axis is required. The further process of installing and assembling the entire structure with your own hands will depend on this.
After marking the horizontal plane of the future false ceiling in the kitchen, it is necessary to proceed to the installation of wall corners or guide profiles. If cassette suspended ceilings are installed for the kitchen, then in addition to the guide corners, intermediate guides and suspensions are also required. Suspended ceiling above the kitchen drywall boards will require a similar frame mounting system, however, it will differ in some connecting parts and technical features suspensions. In order for wall corners to be securely attached to a vertical surface and withstand loads, they must be fastened with anchors or dowel connections. With some experience, such work is easy to do with your own hands.
Cassette suspended ceilings for the kitchen allow you to provide access to electrical wiring or other communications at any time, so the suspended elements should be positioned precisely taking into account possible revisions of the space between the ceiling and the ceiling.
After the guides are installed, it is necessary to proceed to the installation of modular false ceiling elements for the kitchen. They can either be attached to the frame with the help of connecting elements, or they can simply be laid on the ribs of the frame structures.
Installing a false ceiling in a small kitchen

The design of the design of any room largely depends on the area of \u200b\u200bthe room. For a room that has a small area, the best option will use drywall boards. This material allows you to vary the use of different segments according to their size, in contrast to cassette structures or other types of design. hinged systems. If modular parts cassette system are optimally suited for large areas, then the use of drywall will be rational when decorating a false ceiling in the kitchen small sizes. This is due to the possibility of using different segments of the canvas for their placement on the appropriate area.
When sheathing with drywall, ceiling design options are possible, in which the cabinets kitchen set can be located under special podiums, which are equipped with lighting. At what height the cabinets will be located, should be selected depending on the limit of the location of the suspended structure. In this case, the design of the room plays a key role in the ergonomic arrangement of all parts and elements. When ordering headset items such as wall cabinets, it is necessary to take into account their height due to the change in the limiting horizontal boundary.
Important! Cabinets should be located working surface at a distance of at least 55-65 cm, otherwise it can significantly reduce the level of comfort and ease of use of the furniture. Cabinets can be equipped with alternative opening and closing systems or have awnings that allow the doors to open to the top position.
Features of maintenance and care of the false ceiling for the kitchen
Suspended ceilings in the kitchen require special care and operating rules. You can wash them with lung care soap solution, which, due to its qualities and features, can wash even the most old stains.
Suspended ceilings require special attention when high temperatures. Those places that are exposed to hot vapors, water vapor during cooking should have additional protection from the influence of these factors, otherwise the design will soon be spoiled by steam and a touch of burning. In this case, it is worth additionally treating the surface with a primer, which will not only protect it from deformation or damage, but also help to wash it if it is heavily soiled.
- It's a simple and doable job. We will successfully hide them old ceiling and all communications, while providing quick access to them. Special ceiling structures are easily attached to the frame, giving the kitchen an aesthetic look (see also).
Features of false ceiling for the kitchen
A false ceiling consists of a metal frame attached to the ceiling and modular elements that form a new ceiling. The empty space between it and the old ceiling will be successfully occupied by modern engineering Communication and lamps, so this system called false ceiling.
Modular elements in the form of plates, rails, panels, cassettes are made from the latest materials:
- mineral fiber or glass fiber;
- aluminum or steel;
- reinforced gypsum or drywall;
- plastic;
- wood, MDF, fiberboard, TsSP.
Now such a ceiling in the kitchen is still finished with laminate or other fashionable facing materials.
Benefits of false ceiling for the kitchen
There are several of them:
- Excellent disguise of the defects of the old ceiling.
- Upgradable engineering equipment under the ceiling and providing easy access to it.
- Achieve perfect light reflection and unconditional improvement in illumination while reducing energy costs.
- Suspended ceiling is mounted simply and quickly.
Do-it-yourself suspension system installation
The calculation of the number of suspensions depends on the weight of the ceiling being mounted and the area: 8 pieces are needed per 10 sq.m.
Installation consists of the following steps:
- At first let's build all upper communications.
- Suspended ceiling requires accurate marking of the horizontal of the future false ceiling. The first such mark let's do on any wall with the expectation that the new ceiling covers both projections and communications.
Advice! In order to minimize the height of the kitchen, it is necessary to accurately measure all the built-in accessories in the new ceiling system.
- We attach along the horizontal line marked on the walls L-profile, moreover, its painted side down. We will select the fasteners according to the material of the wall: screws with a hook or a ring - it is more convenient to fasten them.
- We mount guide profiles shaped like the letter T, but inverted. A long profile like this has slots. The short profile has protrusions at both ends, which we insert into the slots of the long profiles.
Note! It is better to make a curtain of guides on a 2 mm wire or use 2 special metal rod in a curved plate.
- Alignment of the resulting system do by level and repeat it 3 days after installation.
Types of suspended ceilings
Suspended ceilings that you can choose for the kitchen are very diverse: tiled, cassette, panel, slatted, cellular, lattice. But panel and tiled are the most in demand.
panel ceiling

Panel ceilings are suspended structures with panels, for example, made of pressed material, which are put on a frame.
Such a ceiling in the kitchen is usually white, but if desired, it can be painted in any color. Installation of panel ceilings is easy to do on your own, and they will last more than 20 years.

Ceilings for the kitchen with photo printing- a bold interior decoration. Photo printing on glass panel favorite photo or color drawing looks fantastically beautiful.
This photo-printed hanging system is also from T-profile and glass plates, with an image printed on them:
- gluing a film with photo printing;
- with a picture on the glass.
Cassette ceiling

The panels here are anodized or painted in any color.
Advantages:
- durability;
- high resistance to humidity;
- the possibility of multiple dismantling;
- improved ventilation due to perforation;
- sticker on them with heat and sound insulating materials;
- cassettes are smooth or ornamented;
- cassette false ceilings are convenient for subsequent maintenance of telephone and computer lines and air conditioning and ventilation systems masked by this coating.

An unusual pattern, drawing, spraying, matte or shiny will create beautiful game light: new light vectors, will increase the brightness due to the illusory nature of its sources.
Cons: high price, lowering the height of the kitchen, constant care: dust is too noticeable on them.
metal ceiling

Advantages of metal ceilings:
- resistant to temperature extremes and moisture;
- their designs are light, but can withstand heavy loads.
Aluminum ceilings in the kitchen can be slatted, panel and even with decorative grille. Their panels and slats are perforated, but can be non-perforated.
The decorative coating of aluminum parts also performs a protective function: an anodic oxide or high-quality paint layer with polyester resin powder dyes. All steel parts and fasteners are zinc plated.
rack ceiling
There are 2 types of suspended ceilings in the kitchen rack:
- open with inserts: during installation, we close the gaps between the panels with inserts of the same color as the panels, obtaining a continuous sheet. Colored inserts put a designer accent on the desired areas.
- Closed: we fix the rails end-to-end with special panels with a special ledge that closes the gap between the rails.
There are two options for slatted ceiling panels:
- german type with rectangular panels suitable for ceilings open view;
- italian design characterized by rounded edges of the panels and suits the closed type of the ceiling.
Suspended ceilings are covered with slats of traditional white, elegant silver, luxurious golden color or trendy mirror tones. Slatted ceilings allow the installation of minions, any lamps, chandeliers.
It is easy to align the frame during assembly, so you can install such a ceiling yourself: you need to set the first corner, and then just attach the fasteners.

Advantages of rack ceilings:
- possibility of application in any kitchen;
- special design guarantees a long service life;
- the quality of materials will ensure the duration of its operation;
- its design possibilities are endless: colors, shapes, models;
- health safety;
- unique hygienic characteristics: do not get dusty, do not grow moldy, easy to clean;
- waterproof and fireproof;
- slatted suspended ceiling in the kitchen is adapted for the installation of ventilation, lighting, electrical wiring;
- excellent light reflection saves energy;
- installation speed - several hours.
Features of slatted false ceiling:
- The use of rails and jointing different colors and sizes, their connections at different angles horizontally or vertically, in various levels, their curves and combinations with lamps, mirrors built into this ceiling, will make the kitchen unsurpassed.
- The rail bent on the sides is an aluminum tape. From it you can cut the rail of the desired length. The usual length is 3 or 4 meters, and the width is 20 cm, 15 cm and the most popular is 10 cm with optimum thickness 0.5 mm, not allowing deformation.
Minus: slatted suspended ceilings are not designed for partial dismantling.
Plasterboard ceilings

This material is sold in frames or sheets (1.2x2.5 m with a thickness of 15 or 10 mm).
Note! The kitchen needs moisture-resistant drywall: its service life is up to 20 years.
Installation of a suspended plasterboard ceiling consists of the following operations:
- We mount the suspended plasterboard ceiling on a rigid frame, since the whole structure is quite heavy. Ideal for this metal profiles and reliable fasteners, and the step of fastening screws is 20 cm.
- We do the installation taking into account the dimensions of the built-in lighting and ventilation systems.
- The frame is a crate and suspended structure connected to an existing floor. We will strengthen the crate with an additional profile, which we will skip over it.
- suspension system- these are stretch marks from 2 reinforcing bars (diameter 10-12 mm). We connect them with a threaded coupling with lock nuts.
- The resulting system is quite rigid and allows you to freely adjust the horizontal of the ceiling.
It has been used for decoration of premises for decades. all sorts of options suspended ceiling systems. The theme is not new, however, its popularity will continue for many years to come. This article will present step-by-step instruction how to choose and install suspended ceilings in the kitchen.
Choice of false ceiling
There are several basic designs of suspended ceiling systems:
- Plasterboard single-level and multi-level
- Plastic panel
- Aluminum rack
- Aluminum cassette
- Suspended ceilings ARMSTRONG
- Stretch ceilings fabric and pvc
Which ceiling to choose for the kitchen? In this case, wooden suspended ceilings will not be considered, because they are the least popular for finishing apartments and country cottages. Although this option has a right to exist and has certain advantages.
First of all, we must proceed from the operating conditions of such a ceiling. The kitchen is the room where food is prepared. This is associated with the release of water vapor, which is richly flavored with fat or sugars.
Even if you have the most modern and powerful hood, some of these vapors will inevitably settle on the false ceilings for the kitchen, soaking them with specific odors and leaving dirty marks. Suspended ceilings such as Armstrong, aluminum cassette, aluminum rack and stretch fabric are not suitable for this.
The former usually have ceiling tiles from mineral materials and it's almost impossible to wash them.
The latter are often made of aluminum with fine perforations that make cleaning difficult. Therefore, the installation of a rack false ceiling in the kitchen is not desirable. If it is not there (the cassette is smooth), then problems arise with washing out of the areas where the frame and cassettes join.
Aluminum slatted false ceiling in the kitchen is not recommended for the same reason. Fat is difficult to wash out of the joints between the rails. Such ceilings are perfect for the bathroom, bathroom and corridor (hallway).

Stretch fabric ceilings also cannot be used in the kitchen. Everyone knows that fat and tissue are two incompatible things.
Ideal for such a room plastic and stretch ceiling from polyvinyl chloride film (PVC). Plasterboard suspended ceilings look very good in the kitchen, but they need to be repainted water-based paint every 2-3 years.
However, these three types of suspended ceiling systems are leaders in finishing. kitchen facilities. Let's take a closer look at how to install false ceilings for the kitchen from plastic panels. They are very easy to wash soapy water, are practically not susceptible to moisture and do not absorb unpleasant odors.
Calculation of materials and selection of tools
Our kitchen has the following dimensions:
- Length - 3 m
- Width - 2.7 m
- Height - 2.5 m
For decoration, plastic (PVC) panels with a width of 250 mm, a length of 2700 mm and a thickness of 10 mm will be used. The area of plastic panels should be equal to the area of the kitchen ceiling or 2.7 x 3 = 8.1 sq.m.
Important to remember! The walls of the room may not be even (the view from the top is not a perfect rectangle). Therefore, 5-10% must be added to the figure obtained. This is compensation for unevenness and trimming of panels.
To save the height of the ceiling, we will use an overhead chandelier as the main lighting. If spotlights are used, the ceiling is lowered to the height of the lighting device (usually 10-12 cm).
In our case, the suspended ceiling in the kitchen will drop to a height of 4 cm. PVC plates are mounted on a wooden or metal frame. We will use a metal frame made of galvanized profiles, as it does not deform like a wooden beam when flooded from above.
We use the following galvanized profiles and fasteners for the frame:
- Wall guide UD-27
- Ceiling mounted or carrier CD-60
- Direct suspension U-shaped
The number of the guide profile is equal to the perimeter of the kitchen or 3 x 2 + 2.7 x 2 = 11.4 m.
The number of rows of the ceiling profile can be calculated using the formula:
(A / 0.4 - 2) = K where
- A - room width m
- 0.4 - profile fastening step m
- K - number of rows
Applying the formula, we get (2.7 / 0.4 - 2) = 4.75 pieces or 5 profiles of 3 m each.
TO ceiling the supporting profile is mounted on a suspension with a step of 1 m. For our premises, you will need 5 x 3 = 15 pcs.
The wall profile is fastened with dowels 6 x 40 mm to the wall with an interval of 1 m. Dowels are needed: 11.4 m x 1 \u003d 11.4 or 15 pcs.
Hangers under the false ceiling in the kitchen are also fixed with dowels in increments of 1 m. They need 15 x 2 = 30 pcs.
To fasten the profile to the suspension, galvanized 12mm self-tapping screws are used (with a drill, 2 pcs. on each side). They need 15 x 4 = 60 pcs. + 5 х 2 = 10 pcs (two for fixing the supporting profile to the wall UD-27).
You will also need 11.4 m (along the perimeter) of the mounting plate and the same amount of ceiling skirting pvc. The bar is fixed with galvanized self-tapping screws with a 25 mm press washer in increments of 35-40 cm. To join the plinth in the corners, 4 decorative inner corners are required.
Before you make the ceiling in the kitchen, you need to stock up on the following tools:
- Level laser or water
- Paint chopping thread
- An electric drill with a good fight or a hammer drill
- Screwdriver with magnetic nozzle
- Saw for metal
- Knife construction or clerical
- Construction corner
- Measuring tape and pencil
- Hammer
- Rule with a level of 1.5 m

Ceiling markings
Using a level, we mark the ceiling on the walls (we lower it by 4 cm from the existing ceiling). According to the marks with a paint thread, we beat off the horizontal plane. On the ceiling with a step of 400 mm, we mark the axes of the location of the ceiling profiles. This is required by the installation technology of suspended ceilings.
It's important to know! CD-60 profiles are placed perpendicular to the direction of laying plastic panels. You also need to know that the panels should be perpendicular to the natural light source - the window. In this case, the joints between the panels will not be noticeable.
Fastening the guide profile UD-27
On the beaten off horizontal plane, the guide profile is fastened. Do this with a drill and dowels. At the joints in the corners, the profile shelves are cut at 45 degrees.
Installation of U-shaped suspensions
Two holes are drilled along the axes marked on the ceiling with an interval of 1 m with a drill with a 6 mm concrete drill. A suspension is attached to them with dowels and the perforated ends are bent in the form of the letter "P".
Important to remember! In the place where the chandelier is attached, it is necessary to strengthen the frame from segments of the same ceiling profile.
Installation of ceiling profiles
Support profiles CD-60 are mounted to the hangers. This is done with 12 mm self-tapping screws and a drill with a magnetic nozzle. Each suspension leg is attached with two self-tapping screws.
It's important to know! When installing ceiling profiles on false ceilings in the kitchen or any other room, check the horizontalness of the installation using the 1.5 m rule with a level. You can also pull the control cords for this. They are fixed to the wall profiles perpendicularly.

Mounting plate fastening
A mounting plate is mounted along the perimeter to the wall corner with self-tapping screws with a press washer. In the corners, to avoid overlaps, it is cut at an angle of 45 degrees.
Skirting board installation
A ceiling plinth is inserted into the shelf of the mounting plate. To do this, it has a special groove that facilitates the finishing of the ceiling in the kitchen. In the corners, the plinth is joined with plastic corners.
Fixing ceiling panels
Panels are cut to size. Mark with a corner, ruler and pencil along front side. Conducted along the line sharp knife and break the panel. After that, it is installed in the groove between the mounting plate and the plinth. It is fixed with a self-tapping screw with a press washer to the UD-27 profile and CD-60 profiles.
The second panel is inserted into the groove of the previous one and also fixed with self-tapping screws.
Where there will be a chandelier, a hole is drilled in the panel and the lighting wire is brought out. Similarly, the coating is prepared for the placement of a lighting point and when installing a suspended rack ceiling.
The last panel must be cut lengthwise. At the points of attachment to the frame, drill holes with a drill, install in the groove of the previous one and secure with self-tapping screws.
At the end, the site is installed ceiling plinth and mounted chandelier. Do-it-yourself false ceiling installation completed