Features of the use of J-shaped and other types of profile when facing with siding. Why do you need a j profile in siding where to put it How to connect a ji profile of a siding to each other
J-profile for siding is a universal additional element with a wide range of applications. With it, you can replace any other auxiliary parts. J-profile for siding, as a rule, is used for decoration and edging:
house corners
On the end cut accessory is shaped latin letter"ji", hence its name. The element is installed using nails or rigid fastening to self-tapping screws.
The main types of J profile
G-profile is of three types:
Ordinary Accessory - Universal Co standard parameters. The heel width is 23mm and the height is 46mm.
Wide Jay profile. Used in window frames.
The arched element is a flexible J-profile. Used in the design of doors and window openings, is also suitable in a number of other cases. Parameters - 85*91*65 mm.
The component is produced in the same color scheme, which is the material itself. It is also possible to pick up contrasting details to make the exterior more vivid and unusual.
To buy a J-profile for siding and soffits of the desired type, choose a product from our catalog and place an order. The actual cost of the product detailed description and sizes of accessories are indicated on the website. Delivery is carried out in Moscow, as well as throughout the Russian Federation and is cheap. Interested Wholesale price component parts? Contact us now and find out about favorable conditions cooperation. We also offer a price list for your convenience.
For proper installation of siding, not only panels and battens are required, but also additional elements for joining siding long walls, in corners, arches, for finishing openings, as well as starting and finishing strips - for correct installation ventilated facade. Types, sizes and shapes of these accessories depend on the selected siding collection. So, for panels such as "ship board", block house, facade panels and foam siding, various components are used.
Let's figure out what components are needed for sidinghow to choose and calculate them required amount so that you don’t have to get rid of the surplus or buy the missing strips one by one.
Siding accessories: you need to know "by sight"
Purpose, shape and dimensions of components for vinyl siding:
- Initial (starting) bar
Standard length - 3.66 m.
It is used as an initial element of finishing of a facade. Markup is preliminarily made so that the initial bar is set strictly horizontally, at the desired level. The first siding panel with the bottom edge is inserted into the initial bar. The upper edge of the panel is fixed with self-tapping screws to the crate.
- Connecting bar

Standard length - 3.06 m.
With the help of a connecting strip, the seams are hidden when joining the siding panels along the length.
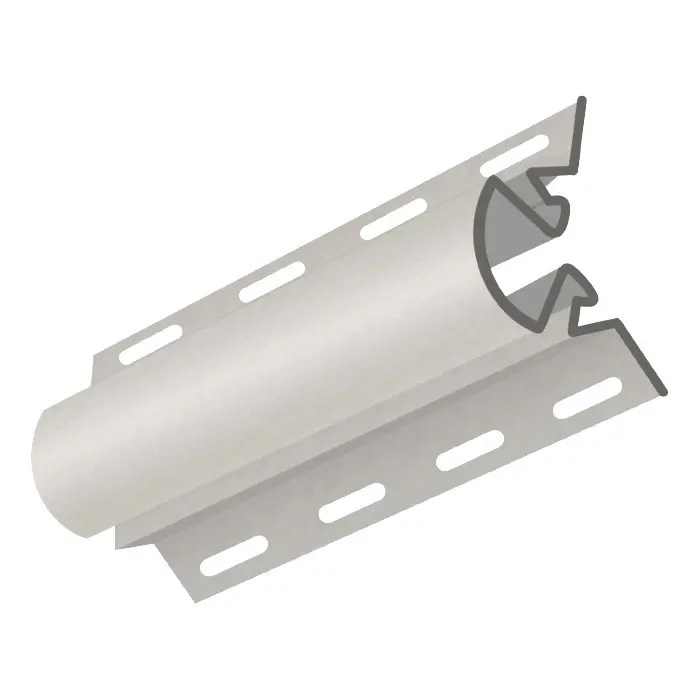
- J-trim bar

Standard length - 3.66 m.
The J-trim bar is installed around the perimeter of window and doorways. It can replace the starting bar. For facade panels, a J-profile is used instead of a J-trim strip. In fact, this is the same bar, but since the thickness of the facade panels is greater than that of the siding, the channel in the j-profile is a little longer.
- Periowindow plank

Standard length - 3.05 m.
The window sills vary in width. They trim window and door openings.
- platband


Standard length - 3.66 m.
Platbands are used for edging window and door openings.

Standard length - 3.05 m.
Docking element connecting the siding panels at the outer corners. Rounded outer corner it is finished with an angular radius strip, to which a wide platband is previously attached on both sides.
- Inner corner
- Outside corner and outside radius corner

The length of the bar is 3.05 m.
The corner element is designed for joining siding panels in the inner corners of the building.
- finish plank

The length of the element is 3.66 m.
The finishing strip is used to install under the eaves before installing the last siding panel. It is the final element in the facade cladding process.
- J-bevel

The standard bar length is 3.66 m.
Or siding is an up-to-date and simple way to complete the cladding of a house. For correct fastening panels, start, finish, drain or plinth plank and other mounting elements. Let's talk about the features of choosing and installing these important details.
Varieties of planks
Usually, a document is attached to a set of slats, which describes in detail their purpose and installation procedure. There are no fundamental differences in the installation of parts from different manufacturers. For this reason, you can safely use the instructions given in this article.
All mounting elements have a special shape and purpose. They also come in different sizes and prices. Consider the features of the most popular types of slats.
A number of auxiliary elements are provided for reliable and accurate fastening of the panels. Click to enlarge.
The starting bar, which is often called the initial bar, is used to install the first panel. The standard length of such a profile is 3660 mm. During operation, it is necessary to take into account such a feature of the material as thickness. The bar is very thin, so it is attached directly to the surface to be treated.
From this bar begins the installation of panels.
The initial bar is installed across the crate, and a rigid base is placed under it. The base material depends on the characteristics of the crate. For example, a lath or a perforated corner is used for a wooden crate, and a UD profile is used for a galvanized crate.
If you have a branded facade subsystem with ventilation, then there is no need to additionally mount the base - this has already been provided by the manufacturer.
Interestingly, if you install the siding yourself, the color of the initial bar does not play any role. This is due to the fact that it will be completely covered by the panels and will not affect the appearance lining. The profile is fastened with nails or self-tapping screws.
Outwardly, it looks like a J-profile. Their only difference lies in the thickness (at the finishing frame it is much less). It is used for fixing the end panel and processing the edge of the cut sheet. Since it needs to be fixed across the crate, you must first make the base more rigid. For this, the same materials are used as in the case of the initial bar.
In appearance finishing bar very similar to the J-bar.
Most shops sell products with a length of 3660 mm, but other sizes can be found if necessary. The fastening of such a profile is carried out arbitrarily, that is, when screwing in a self-tapping screw, it is not adjusted by 1-2 turns. The nail is also not finished off by 1-1.5 mm. This method makes the mount more resistant to weather conditions. With temperature changes, it can decrease and increase without deforming the structure and without affecting the appearance of the building.
Inner and outer corner
This type of plank is used to connect parts of the siding and external design corners.
- outer corner. Standard part length - 3050 mm. Fastening is done arbitrarily, as with the previous bar. This allows the corner to change dimensions with temperature changes. This profile also has decorative properties. You can find corners whose surface is similar to a brick or has the form natural stones. The setting will be the same regardless of the pattern. Due to the sizing corner strip, the crate must be installed at a distance of 10 cm from the corner of the house. This will help to join the edges of the perforated tape and the crate.
- Inner corner. This bar also has a length of 3050 mm. It is used to set the inner corner of the panels. Installation is carried out arbitrarily. The quality of work depends on compliance with the conditions for the profiles of the crate described in the previous paragraph.
Inner and outer corners.
G-plank and G-bevel
- J-profile is used for finishing facing surface and internal corners building. This is one of essential elements for siding, as it is universal. It is mounted on convex parts. When installed on slopes, it protects them from rain and snow. It is also useful if the siding ends on one wall and does not go to another. The length of the bar is 3660 mm. Mounting is done randomly. When finishing a building with metal siding using a G-Strip, the end result is neat.
- J-bevel, which is also known as wind bar, used for finishing narrow strips. Such a profile can be useful when finishing a cornice or balcony. The chamfer has a length of 3660 mm. Despite the fact that its fixation is carried out on the finishing profiles, it is better to use stainless steel screws.
Slope and H profile
- A window or slope bar is attached in those places where it is necessary to close thin depressions. Most often it is used to cover the slopes of doors and windows. The installation of the bar is carried out arbitrarily. Its length is 3050 mm.
- The connecting H-bar is used when the length of the installed panels does not match the dimensions of the walls. The standard profile length is 3050 mm. Mounting is done randomly. The plank is mounted along the crate before the siding is attached, so additional profiles are attached for it. They must be horizontal. Their fastening is carried out every half a meter.
Platband and hinged bar
This type of slats is used quite rarely and not all manufacturers have it. Sometimes the platband is sold with the marking "wide G-profile". Most often it is used in decorative purposes. It is installed at the joints different types siding. It is also often used to create a window frame if it is flush with the wall. The length of one bar is 3660 mm. Mounting is done randomly.
Element - platband.
drain bar
The purpose of this bar becomes clear from its name. It is necessary for the drainage and drainage of water. In addition, it has decorative properties. Usually a drain or plinth strip is required when designing a transitional space between the plinth and the facade. Due to the peculiarities of its design, it cannot become a guide profile for attaching siding. Mounted on top of it starting bar, and under it - a corner or rail. This is necessary for rigidity. Lath length - 3660 mm.
When installing planks, remember that the durability and beauty of the siding directly depend on them. You can avoid bumps if you think about the installation and make sure that the siding panels are 50mm shorter than the net length of the installation. Otherwise, under high temperatures it will seriously deform or bend the bar. In any case, you will need to make repairs, that is, remove panels and trims, and then reinstall them.
If during installation you find that you do not have an internal corner, then it's okay. Instead, you can use 2 J-strips, after attaching each to a separate plane.
The diagram shows in which places of the structure which elements are used.
What do you need to cover the house with siding?
- Cord.
- Square.
- Building level.
- Saw or hacksaw for metal work. It is important that the saw has fine teeth. Large teeth can damage parts. Moreover, it is difficult to perform small work with them.
- Knife cutter. You will need it in order to mark the lines along which the panels will pass.
- Screwdriver and screws.
In general, the installation of slats does not present serious difficulties. In order to facilitate the work, purchase all the materials in advance and consider where each panel will be attached.
In spite of big number varieties of slats and the technical details of the installation, you can do everything yourself.
Vinyl and metal siding panels are the most popular cladding materials these days. Moreover, since the advent of siding, the principles themselves have been revised. facing works. Now you can do the installation yourself, without involving specialists.
A wide variety of colors and textures, low cost and ease of installation determined the popularity of this facing material. In addition, he has a number unique qualities which are difficult to overestimate.
About siding
This material appeared in North America, namely Canada, about 50 years ago. At first, these were wooden panels, which, thanks to their excellent appearance, quickly gained popularity. Since wood is quite an expensive and maintenance-intensive material, vinyl and metal panels soon appeared, which cost less while still offering a number of unique qualities.
Today, siding has an extremely wide scope. It is actively used for finishing works new buildings and restoration of old country or country houses. It is used for facade cladding, insulation and protection of walls from various external influences.
In addition, this type of sheathing is used not only in the cottage, but also high-rise building. Siding is sheathed not only in residential buildings, but also in industrial ones, administrative buildings and trade facilities. As a rule, most often siding is subject to sheathing wooden houses, somewhat less often - brick.
Read here.
Benefits of siding
- Price.
- Possibility of laying a heater.
- Durability. Service life - 50 years.
- A variety of colors and textures, including imitations of wood, brick or stone. There is also a profile for siding under a log, which has the appearance of a natural log house, and in color and texture is practically indistinguishable from this material.

- Resistance to mechanical damage. Vinyl siding is flexible, while metal siding has a galvanized steel core that adds strength to the structure.
- Possibility of installation in hard-to-reach places.
- The ability to perform installation work without the involvement of professionals.
- Resistant to temperature extremes.
- Fire safety. Vinyl panels melt without spreading fire. Metal and are not affected by fire at all.
- Siding does not need special care. A simple rinsing with water from a hose is sufficient.
Siding installation
Holding installation work includes three stages:
- Surface preparation;
- Installation of the crate;
- Installation of siding panels.
So, before you start installing the profile for siding, you need to prepare the surface and install crate.
Surface preparation
In preparation, you should dismantle all protruding facade elements that may interfere with installation work. These include gutters, window sills, shutters, weaving plants. A layer of old, peeling plaster is removed, but if the house was covered with clapboard, then the planks are knocked out or replaced.
Read here.
Lathing installation
The crate is mounted depending on what type of siding you are installing. So, if the laying of the starting profile for siding is carried out horizontally, then the lathing strips should go vertically in order to provide fastening to the panels, and vice versa.
Also, the crate differs in wood and steel. Steel is used in the installation of metal siding. Vinyl panels mounted on wooden frame.
The presence of the crate allows you to mount the siding on uneven walls, besides, thanks to its presence, the walls can be insulated. And this will save on heating in winter season and provide a home with warmth and comfort. Insulation sheets are laid between the profiles of the crate and fixed with self-tapping screws.
By means of the crate, the necessary ventilation of the siding panels is achieved. Since the crate is the basis for attaching the siding, and therefore must be strong and robust design. If you decide to make a wooden frame, then be sure to process the wood special solution which will protect it from bugs and moisture.
The step of the crate depends on the weight and dimensions of the siding sheets.
Siding installation
Installation work involves not only laying panels, you should also use a variety of do-it-yourself siding assembly - step by step guide home master, which are installed under windows, at corners, platbands, etc.
For installation work, you should use special tools which should be prepared in advance.

For cutting vinyl panels, metal shears, a cutter knife, a hacksaw, or a hand-held electric saw with a circular blade or an abrasive wheel are used.
When choosing nails for fastening siding to the crate, you should pay attention to the following characteristics:
- Nails must be aluminum or galvanized, the head of which reaches in diameter 0.9 - 1 cm.
- The stem of the nail should be about 0.3 mm in diameter. Its length should be sufficient to penetrate into the base to a depth of at least 2 cm
nail vinyl siding should be done in such a way as not to interfere with the compression-stretching of the panel. At the same time, a gap of about 5-6 mm should be left to expand the panel, providing fastening to the edges and chamfers.

Advice! Never nail the siding panels too tightly! This may lead to future deformation of the material.
Features of installing horizontal siding
Vinyl siding is relatively easy to install. Installation instructions are clear even for a beginner. Therefore, even if you have never encountered such work, with due diligence and accuracy, you can easily provide your home with an excellent appearance for many years.
Basis for future design cladding is the starting profile. The success of the installation as a whole will depend on how evenly and correctly it will be laid. Therefore, many are interested in the question: how to set a profile for siding?
It's easy to do. You need to find the lowest corner of the previous cladding of the house or the top line of the basement. Outline it with chalk. We drive in a nail 4 cm above the lower corner. In the same way we drive in a nail at the other wall.
Next, using a paint cord, you need to beat off a straight, even line between the nails. This procedure is carried out around the whole house. The starting strip is set with its upper edge on the chalk line. Next, you need to nail the strip along the chalk line.
All subsequent panels should be mounted relative to the previous ones. The bottom edge of the panel is attached to the lock of the previous one by pulling it up. The panels should be gripped in this way carefully and without much pressure. Pull until it clicks. top the panel is attached to the crate by screwing self-tapping screws into the perforated holes.
In addition to conventional siding panels, the cladding design includes auxiliary elements, such as Siding profiles., ji profile, designed for joining panels at corners, in door and window frames.

– great material for house cladding. At its affordable cost, it has many positive operational and technical characteristics.

You are invited detailed instructions on self-assembly siding. The guide is universal. Following its provisions, you will be able to complete any finish that provides for installation on a crate: fiber cement, wood, metal, vinyl, etc.

Siding is best attached to a pre-mounted crate. We work in the following order.
The first stage - choose the material

The frame can be assembled from wooden beam or metal profile. Metal products are stronger and more durable. Besides, metal crate much easier to attach to uneven ground.
Learn and also familiarize yourself with the calculation algorithm with an emphasis on possible nuances.
Installation of profiles is carried out with a half-meter step. Hangers are used for wall mounting. This technique will allow leveling surface differences and fixing the frame elements in level.
Wooden crate is cheaper. When choosing this option, pay attention to the condition of the wood. It is prohibited to:
- the material was exfoliated;
- was deformed;
- had bluish spots and traces of rot, etc.
The elements of the wooden crate must be impregnated with flame retardant and antiseptic. If the house is built from wooden elements, the walls should also be treated with the listed preparations.

The second stage - preparing the base
The crate is easiest to attach to a flat base. First of all, we remove any details that may interfere. These are all kinds of tiles, bars, platbands, gutters, etc.
The third stage - set the guides
Siding is best mounted horizontally. In this case, we fix the bars or profiles of the crate vertically.
For attaching rails to wooden walls use nails or screws. If the house is built of concrete blocks or bricks, we fix it with dowels, having previously drilled holes for them in the wall of the house.
We level each rail.
Important! If you plan to do outdoor work, it is best to fix the siding crate after all insulation work has been completed. In this case, there will be two crates: for insulating materials and for cladding. In this case, the rails of the two frames should be placed parallel to each other.


You can, of course, try to lay insulating layers after attaching the siding sheathing, but this is not very convenient.

We mount J-profiles
The starting rails must be perfectly fixed, as the quality of the entire lining depends on the correctness of their installation.

First step. We take the level and find the lowest point on the crate. We step back from it up 50 mm and put a mark. To do this, we screw a self-tapping screw into the rail a little.
Second step. We consistently move around the building and continue to put marks with self-tapping screws to fix the starting profiles. We also screw self-tapping screws in the corners of the house.
Third step. We stretch the rope between the corner marks.
Fourth step. We mark on the rails the boundaries of the installation of corner profiles. We take the profile itself, apply it to the corner frame structure and put marks along the edges with a pencil.

Important! We leave a 1-centimeter gap between the profiles to compensate for temperature deformations.
We leave a gap between the starting guides and the nail strips.

In order to avoid a 6 mm setback, you can cut off parts of the nail strips so that they do not rest against the J-profile during temperature changes.

Important! Starting profiles must be mounted strictly horizontally! Correct deviations for as long as necessary.
If you install guides with deviations from the level, the siding will also warp. It will be extremely difficult to fix this in the future.
We mount external corner profiles

First step. We mark spotlights. We need to see where the edges of these elements will be in the future.
Second step. Attach the guide to the corner of the frame. We do this with a 3 mm gap to the soffit or roof. We fix the profile with self-tapping screws.
The lower border of the element is placed 0.6 cm below the edge of the starting profile.
Third step. We check the verticality of the installation. In the absence of deviations, we fix the bottom, and after that - the rest of the places. Experts do not advise placing fasteners in corner elements too often.

If the house is higher than 300 cm, the profiles will need to be superimposed one on top of the other. To do this, cut the top profile. As a result, a 9 mm gap should remain between the planks of the joined elements. When laying the elements, we maintain an overlap of 2.5 cm.


Important! We join the profiles at the same level on each side of the house.
If the plinth has a protruding structure, we shorten the profile so that a 6 mm gap remains between it and the plinth.
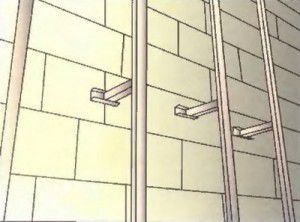
Helpful advice! Instead of a corner profile, it is allowed to install 2 J-elements (starting). This way you can save money. But this solution also has its drawback - the corner will not be as tight as when using a special corner profile. Having decided to use this method, pre-glue the wall at a similar angle with a strip of rolled waterproofing material.

We mount internal corner profiles
The order of installation of these elements does not have significant differences from the technology of arrangement outside corners- between the profile and the soffit we leave an indent of 3 mm, while lowering the lower end of the profile below the J-bar by 0.6 cm.
If there is a protruding plinth or other element from the bottom that stands out from the general level, then we also leave a 6 mm indent between it and the profile - it is impossible for the profile of the inner corner to rest against it.
There are 3 methods for arranging internal corners, see the picture.

If the wall height is more than 300 cm, we perform profile splicing. The technology is the same as for the arrangement of external corners.

We leave a 9 mm indent between the planks, carefully trimming excess material. The overlap of the upper element on the lower one is 2.5 cm. We install the fasteners with a 4-centimeter step, placing them strictly in the center of the holes intended for this. The exception is the most top point. Here the fasteners must be installed at the top of the hole.
We mount the frames of the openings

For most inexperienced craftsmen, difficulties arise precisely at the stage of framing and doorways. The order of work will vary depending on how the openings are arranged in relation to the plane of the wall.
Openings in the same plane with the facade

In this case, we do the following.
First step. We perform waterproofing of openings.
Second step. We fasten platbands or J-profiles to the openings. We equip each opening using 4 platbands: a pair of vertical and a pair of horizontal.
Third step. We connect profiles.

To make the connection of platbands as accurate as possible, we do this:

The platband at the bottom is connected in exactly the same way, only the bridges will need to be cut and bent on the side elements for their further lining on the profile below.
Apertures recessed into the facade


When installing near-window profiles, we work in compliance with the same recommendations as when installing platbands, i.e. we create cuts on the profile corresponding to the depth of the opening, and then bend the bridges and insert them into the finishing elements.
Do not be too lazy to understand the principles of bending such bridges. We make them so that they cover the junction of the cladding elements. As a result, moisture will not be able to penetrate inside.

Installing the first panel

We start facing with the least noticeable wall of the building. So we can practice and work out all sorts of inaccuracies.

First step. We insert the first cladding panel into the corner profile and into the locking joint of the starting strip.
Important! We leave a 6 mm temperature gap between the first cladding element and the lower part of the corner profile lock.
Second step. We attach the panel to the crate.
It is important to observe the dimensions of technological indents. If the lining is carried out in warm weather, we maintain a 6 mm indent, if it is cold, we increase the gap to 9 mm. When installing trim panels, the indents can be reduced.

We build up panels

We build up the cladding elements with an overlap or with the help of an H-profile.
When fastening panels with an overlap, you must first shorten the locks facing panels and mounting frames, so that as a result the overlap is 2.5 cm long.

Installation of the H-profile is carried out similarly corner elements- at the top we retreat 0.3 cm from the soffit, from the bottom we lower it by 0.6 cm in relation to the starting profile.
Important! We leave a 6 mm indent between the H-profile and any obstacles on the houses.
Installing the rest of the siding

We continue to clad the house with siding. The technology of work is similar to the order of fastening the first panel.
Important! Every 2-3 rows, we check the horizontalness of the cladding using a level.
Having reached the opening, we remove the unnecessary piece of the panel falling on the opening.
We provide reliable fastening of panels with the help of "hooks". For this we need a punch.

We mount an additional finish profile at the bottom of the opening. It will allow you to level the lining on the plane.

Mounting under the roof

Under roof structure fasten the J-profile.
We work in the following order.
First step. We measure the distance between the lower part of the lock of the finishing element and the lock of the penultimate facing panel.
Second step. Subtract from the measurement obtained 1-2 mm indent.
Third step. We mark the whole panel, cut off its upper part with a locking connection.
Fourth step. We create "hooks" at the top of the element with a 20 cm step. To do this, we make cuts and bend them to the front side.
Fifth step. We insert the trimmed element into the penultimate siding panel. With a slight upward movement, we snap the inserted element into the locking connection of the finishing profile.

We mount the pediment
We sheathe the pediment around the perimeter. All fasteners, except for the top, are installed in the center of the holes. Upper fastener install holes at the top. Sheathing can be done both with profiles for arranging internal corners, and with a starting profile.

Mounting procedure is the same as mounting wall panels. We cut the edges of the elements and connect them with the locks of the receiving profiles. Keep in mind the 6mm setback when mounting in warm weather and 9mm when working in winter.
We fasten the last element of the pediment sheathing directly through the panel material - this can only be done here.

Cladding completed.
Find out how, and also look at the calculations and a step-by-step guide, from our new article.
In order for the paneling of the house to be as successful as possible, you need to know certain subtleties of performing such work. There is a list general recommendations for any siding, as well as separate tips for panels made from a specific material.
For different materials
Now you can do it yourself at the highest level.

| Name (model) | Advantages | Length x width x thickness, mm | Quantity in a package, pcs |
|---|---|---|---|
| Vinyl Siding Kanada Plus | 1. Coloring in dark tones performed using the "Cool Color" method (heat absorption), which involves the use of masterbatches. 2. Excellent appearance remains unchanged even when exposed to high and low temperatures, the range of which ranges from -50°C to +60°C. 3. Retains impact resistance even if the temperature environment drops to -20 60 ° С. 4. Not subject to microbiological corrosion (fungi, mold). | 3660 x 230 x 1.1 | 20 |
| Acrylic Siding "Kanada Plus" | Among the others useful qualities acrylic siding"Canada Plus" is worth highlighting: Increased resistance to direct ultraviolet rays; Excellent tolerance to acidic and alkaline solutions, as well as to various fats; Good washing tolerance with chemical detergents; High degree deformation resistance (perfectly tolerates temperatures up to 75 ° -80 ° C). | 3660 x 230 x 1.1 | 20 |
| Alta Siding - Vinyl Siding | "Alta-siding" is: one of the safest finishing materials on the Russian market; frost resistance and the ability to maintain strength even at very low temperatures(from -20 to -60°C); resistance to significant temperature changes and impact external environment; durability: the service life of Alta-siding is up to 30 years; resistance to aggressive substances (to clean the siding, you can use detergents); non-susceptibility to infection by moldy fungi. | 3660 x 230 x 1.1 | 20 |
| facade metal siding INSI | Siding "INSI" is made of galvanized steel coated with a layer of polymer composition, which means it inherits all the advantages of this material: resistance to temperature extremes (-50°С - +80°С) and mechanical damage; long service life with preservation of original properties (about 50 years); environmental friendliness; incombustibility; possibility of mounting both horizontally and vertically; protection of the building from overheating (in the ventilated facade system); and when choosing one of two new colors (alder or rosewood) - a complete imitation of the appearance. | Length up to 6000, width up to 200, thickness 0.5 | - |
Successful work!
Video - Do-it-yourself siding installation