Sticking film on furniture. How to glue the cabinet with self-adhesive film. Design and household tricks - the right choice of material for work
Despite the fact that Soviet-era furniture is quite reliable and strong, it is not considered beautiful, let alone competing with modern furniture. In addition, by this time it was pretty worn out and in need of repair. Even in such conditions, the owners are sorry to part with it. To buy a new, modern one, you need a lot of money, because furniture has always been not cheap, and it is not cheap even now. In this case, there is one Alternative option leaving old furniture and not buying new is to try to update the furniture with your own hands, giving it an attractive and modern look. appearance. Cabinet furniture is quite easy to remake, especially since there are all the materials necessary for this. In any case, it will be much cheaper to purchase materials for reworking furniture than to buy new furniture. One of the easy and affordable tricks is to change the color and replace the hardware. There will be no special problems with fittings, but with a change in appearance, everything is much more complicated. There are several options, but two are considered the most common - painting and gluing a special film or wallpaper.

The most affordable and easiest option is to paste old furniture with self-adhesive film. On sale you can find a film for every taste, both color and monotonous, of various colors, shades and textures. Many prefer wood effect film, but there are other options that meet the spirit of modernity. This approach can really turn an old wall into furniture that will have an attractive and modern look. It is not at all difficult, it is enough to do your work slowly and carefully, which will allow you to get an interesting result that deserves attention. To see this, just look at 2 photos. The first photo is outdated. soviet wall from chipboard, and on the second - the same wall, but after the update.

The wall has received a new appearance thanks to the use of compacted self-adhesive furniture film, cream color with matte surface. Where there was an open part of the wall, there are glass doors pasted over with translucent matte film. For edging used furniture layout, chrome colors, and also self-adhesive.
The work consists of the following stages:
- The old wall is dismantled, everything that is not needed is removed, including accessories.
- All surfaces are cleaned of dirt and degreased. To do this, use a soft cloth and detergent. After that, the agent is washed off warm water with vinegar and finally the surfaces are wiped with a dry, clean cloth.
- Fragments are cut out of the film required size, with a margin of up to 1 cm. After pasting, the excess film is cut off with a clerical knife.
- The surface before pasting is irrigated with water from a spray bottle. A wet surface will allow you to accurately position the film, as it can be moved, or even peel off if the first time it was not possible to glue it well.
- Before pasting, removed from the film protective film, after which it is laid on the surface. Having correctly positioned the film fragment, they begin to smooth it with a soft cloth in the direction from the middle and to the edges. The main thing is that there are no air bubbles under the film. In this regard, all work is done slowly and very carefully.
- When bubbles form, they are pierced with a thin needle and the air is expelled from them. This operation is also carried out with a rag, moving from the edges to the puncture point. After that, this place is carefully rubbed with a rag.
- After the film is glued, a thin cotton fabric is taken and superimposed on top of the film, after which an iron is used with average temperature heating. The fabric is ironed along with the film.
- In conclusion, the finish (edging) is glued and fittings (handles) are installed.
- This technology is applied to each glued part. Glass is glued in the same way, only from the inside. After complete assembly will be brand new furniture wall. In this way, you can breathe a second life into items such as bedside tables, chests of drawers, cabinets and kitchen furniture.
After the wall was successfully pasted over, the old wardrobe and installed on the right. As a result, it turns out that the entire wall is filled with updated furniture. Using the same technology, you can update the old kitchen furniture- glue self-adhesive film and replace the handles.

There is a second option for updating furniture, which is less expensive and, most interestingly, you don’t need to disassemble anything. In this embodiment, only furniture doors are pasted over and not with a film, but with non-woven wallpaper. PVA glue is used for pasting. So that the edges of the wallpaper do not bulge, they are cut into blanks, the size of which is 5 mm smaller size doors. Judging by the photo below, the result is not bad at all.

Dignity similar finish lies in the fact that the finish at any time can be replaced with new wallpaper.
As a rule, the surface pasted over with wallpaper lasts for five years. Similar technology was used in finishing kitchen set. To make the surface washable, the wallpaper is covered with two layers of PVA glue. The most important thing here is to do everything carefully so that smudges do not form, since you will have to work with a brush.
Alternatively, the wallpaper can be varnished, but before that it is better to experiment on unnecessary wallpaper. It is important to determine what will be the reaction of the wallpaper to the varnish. When choosing a varnish, you need to know that acrylic and cellulose give a transparent surface, and polyurethane, after a certain time, will turn yellow. Polyurethane varnish practically unaffected by solvents and, if it needs to be removed, you will have to resort to mechanical impact. Usually, coarse sandpaper is used for this or an electric drill with a nozzle is used.
How to update a chest of drawers
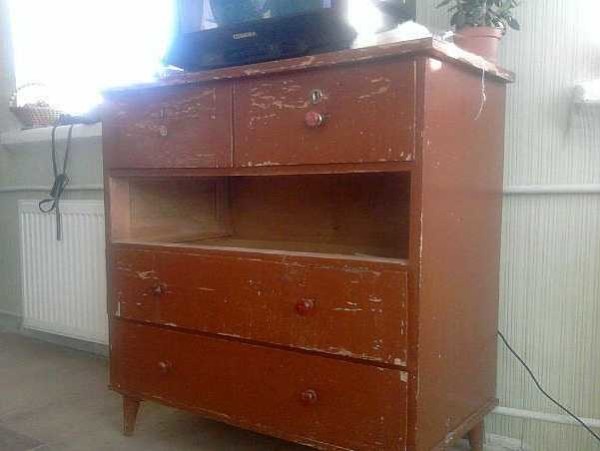
An old chest of drawers can stand in the attic for several years and lose only its appearance. As a rule, the old varnish coating cracks, but otherwise, it can be envied modern furniture. It does not dry out and remains as reliable and strong as it was before. In this case, the chest of drawers undergoes a more complex update, using painting and decoration, using polyurethane molding and wallpaper.
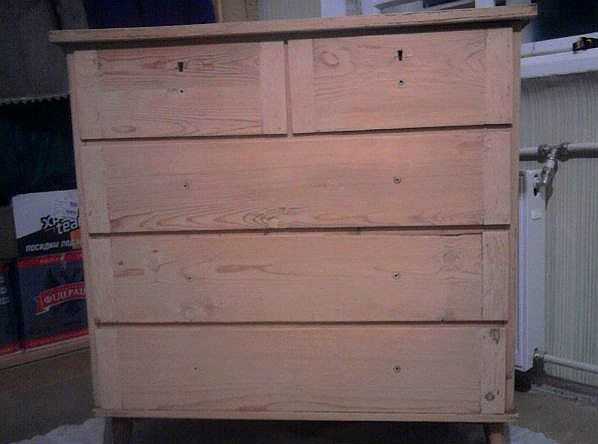
Stage number 1. All fittings are removed from the chest of drawers, after which the old coating is removed. As a rule, the old varnish coating is removed mechanically using sandpaper (large) for this. All shells, cracks and chips are sealed with putty and wait for it to dry. After complete drying, the surface is polished with a fine emery cloth. The result is what is in the photo below.
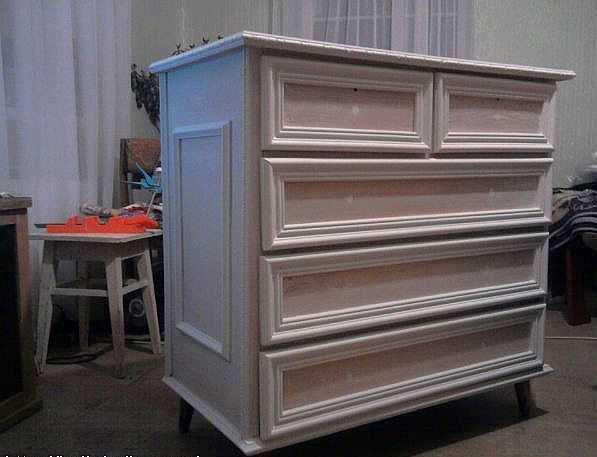
Stage #2. Installation of polyurethane moldings. The main task is to choose the right moldings so that they are neither small nor large. Basically, products up to 5 cm wide are selected and very narrow if you look at them in profile.
Acquired moldings are very carefully and accurately cut into segments of the required length, and the corners are cut at an angle of 45 degrees. At the same time, care must be taken to match the pattern. The molding is attached with PVA glue. Alternatively, you can use self-tapping screws for reliability. At the same time, before screwing them, recesses are made for them. All recesses are sealed with putty very carefully, otherwise there may be problems when the putty dries.

Stage 3. All surfaces for gluing are treated with a primer. As a primer, it is possible to use PVA glue diluted with water in a ratio of 1:2. After the primer has completely dried, proceed to painting. As a rule, 2 coats of acrylic paint are applied on water based. Color - coffee with milk, although the photo does not match the color indicated due to poor color rendering.
Stage number 4. Decoration is carried out on the basis of wallpaper made using silk-screen printing technology. Segments of wallpaper are cut clearly according to the size of the inner part, bordered by molding. The wallpaper is glued with PVA glue. After complete drying, the entire chest of drawers is covered with a water-based varnish in 2 layers.

Stage number 5. In conclusion, modern legs in the form of wheels for furniture are screwed to the chest of drawers and handles are installed.
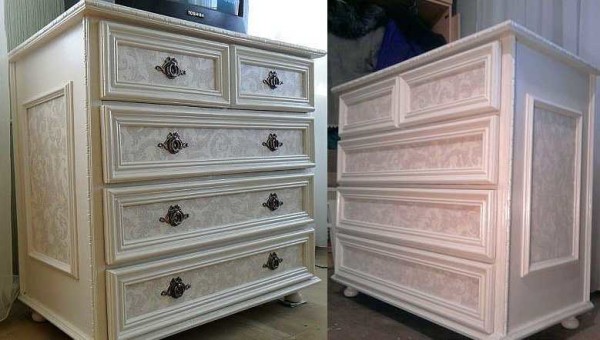
If you carefully study the technology, then everything is much simpler than it might seem. Although, all stages require a certain accuracy, otherwise there will be problems with the appearance. In the same style, you can update the wardrobe. The result is not a bad set for a room or bedroom. Maybe not quite modern, but original and stylish, and most importantly - very cheap.
If a old furniture has a lacquer coating, it is very difficult to get rid of it. In the absence of obvious flaws, it is better to resort to using a primer to complex surfaces and only after that proceed to painting. This approach will minimize the effort to update old furniture.
Updating an old nightstand
The photo below shows the process of updating an old polished bedside table. First of all, polishing was removed, after which the surfaces were puttied and sanded. After that, it was painted acrylic paint in two layers. In conclusion, paper from the gift bag was pasted on the door, thanks to which it was possible to obtain original drawing. After that, the entire bedside table is covered with two layers of semi-gloss acrylic varnish.

All stages do not represent special difficulties if you have the slightest skill. All processes correspond to the sequence of actions described during the restoration of the chest of drawers. The result exceeds all expectations.
 This old bedside table subject to update.
  This package will serve great decor for doors.
  The result of updating the old nightstand.
 Remodeling furniture with your own hands is simple and accessible to everyone, if there is a desire. Unfortunately, without desire, nothing will work. Below in the photo, you can see a bedside table, redone according to a very simple technique: the bedside table was simply pasted over with embossed wallpaper and varnished twice.
How to remake a table
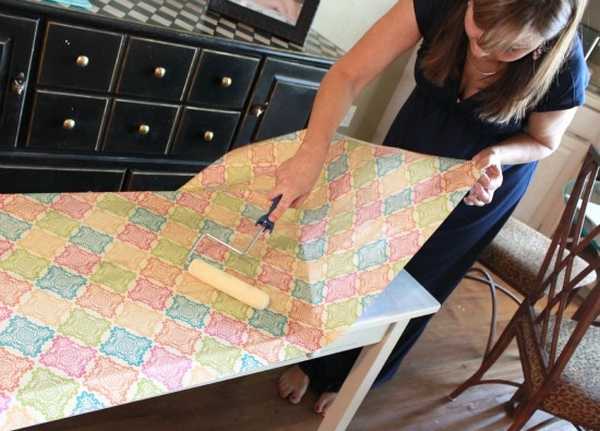
Having adopted such technology, it is enough just to turn an ordinary coffee table into the subject modern interior. It is simply taken and pasted over with wrapping paper. This is a thick paper that sticks without problems and does not sag under the action of varnish.
First you need to do the legs and edges of the tabletop. They need to be painted light color to match the new style more. After that, you can proceed to further work.
Before gluing, you should cut out a blank from paper a few large sizes than the size of the countertop. PVA glue is used for gluing. The surface is well rolled with a roller so that there are no air bubbles. The result should be a perfectly smooth surface.
After that, remove excess material by running a fine-grained emery bar along the edge of the tabletop, pressing the paper against the tabletop. This method allows you to very evenly remove excess material, which is more like a professional action.
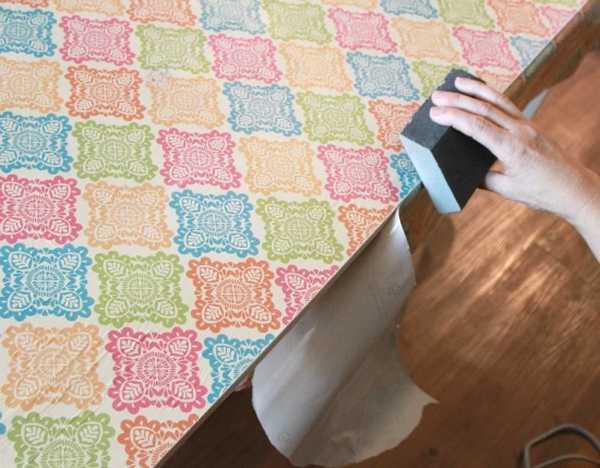
Finally, the surface is covered with two layers of varnish. In this case, the layers should be thin. Each layer is applied perpendicular to the previous one.

Alteration of furniture: photo ideas
Self-adhesive film is an easy-to-use and widely used finishing material, which has a number of advantages:
- It can be applied for different type surfaces.
- This material is durable, practical, environmentally friendly, has an extensive color palette, which makes it perfect for creating any interior design. And also able to update old, shabby furniture so that it looks like it was fresh from the store.
Application examples of self-adhesive film
How to self-paste furniture with a film
So, pasting furniture with self-adhesive film is not the most difficult task, but you still need to know a number of features. Before purchasing a film, you need to measure the furniture that is to be pasted. And already in accordance with these dimensions, purchase it, not forgetting that the rolls have different widths.
The process of gluing furniture is as follows:
- Remove all handles and other loose fittings from furniture.
- Then, the surface must be thoroughly rinsed and degreased. To do this, you can use detergent or ethyl alcohol. Such a procedure will be sufficient if the surface is polished or varnished, without damage.
And if you are dealing with a surface made of plywood, or boards, then it requires a preliminary primer with methyl wallpaper glue or polyester varnish. If cracks and damage are found in the furniture, they must be repaired with sandpaper, putty and covered with acrylic primer. - Next, a piece of film is cut off to the size you need. On its inner side there is a special centimeter grid, along which the film can be easily cut evenly.
How to stick a film without bubbles
When pasting, the film is separated from the paper by several centimeters, applied to the surface, after which it must be pulled with one hand and smoothed with the other using a clean, dry cloth. Getting rid of bubbles this way. If after pasting they still remain, they can be removed by piercing with a needle.
Or you can use another way to avoid the appearance of bubbles. To do this, before gluing, you need to sprinkle the surface with a weak soapy water. In this case, the film will slide, and it will become much easier to eliminate air bubbles.
Do you want to update an old wardrobe, furniture or interior in an apartment? It is self-adhesive film that will make your goal a reality! Undoubtedly this a budget option you will like it. Doors, a chair can easily be given a woody effect, and a wardrobe can be decorated with trendy patterns. With the help of a self-adhesive film, glass products can also be improved. Read on and you will know all the secrets about it. wonderful material, how to decorate your favorite interior items with it, how to properly glue a self-adhesive film on furniture so that there are no swellings and bumps.
What is a self-adhesive?
Self-adhesive film is a vinyl or plastic film with decorative design(color, pattern, texture) on one side and an adhesive layer on the other. Glossy paper base protects the adhesive layer from dust and damage until it is used. After cutting, the paper surface is removed and the film is transferred to the desired surface.
Self-adhesive film, able to realize any design solutions and create good protection for any interior items. It is versatile, and also has several other advantages:
- Good response to environmental influences.
- Long service life.
- Large range of expensive rendering effects.
- Excellent contact with any type of substrate.
- Good moisture resistance.
- Simplicity and ease of care.
Below we will take a closer look at the types of such material, how to properly stick a self-adhesive film on furniture.
Film types according to underlying material
- Polyvinyl chloride.
- Polyester .
- Propylene.
These materials are quite affordable, reliable and safe. Paper, natural and synthetic fabrics are also used for film production.
Types of film by structure
According to the structure of the canvas, the following types of film are distinguished:
- Single layer. The composition of this material includes multicomponent mixtures, which include polyvinyl chloride resin and various plasticizers. Stabilizers and pigments are also used as auxiliary substances. Further, all substances are mixed into a homogeneous mass, which, in turn, is formed into a film.
Important! The physicochemical properties and stiffness of the film are directly dependent on the type of plasticizers added.
- Double layer. Two separate webs, the backing and the cover, are made for the production of two-layer coatings. For the base, fabric or paper is most often used, and for the coating - polyvinyl chloride resin. Used for manufacturing various methods molding. As a result, more plastic webs are obtained, which facilitates the convenience in their application.
Important! Specifications of such materials is somewhat lower than that of a single-layer film.

By type of canvas surface
The attractiveness of the decorated surface and its combination with other interior items directly depends on the quality and type of surface of the self-adhesive film. There are the following types:
- Glossy - appropriate for darkened rooms.
- Matte - in perfect harmony with a room where there is a lot of light.
- Mirror - suitable for any room, including the bathroom.
- Transparent - used for finishing glass surfaces.
- Holographic - for any surface to create an original effect.
Decorative possibilities of the film
In the current market provided wide selection self-adhesive films for decoration different surfaces. The range allows you to accurately select the right coating for solving the problem. So, all self-adhesive films are divided into two versions.
Standard
The standard version is available in a single color version in various color palette and includes the following types of imitation:
- Imitation of precious wood species.
- Imitation stone.
- Ceramic tile.
- Textile.
- Canvas.
- Tapestry.
- Children's stories.
special purpose
- Under velour.
- Gold, metallic, silver.
- Imitation cork cloth.
- Thick films for furniture, countertops, window sills.
Ways to use self-adhesive film
Such material is often used in design, construction, as well as for outdoor and indoor advertising. We can say that absolutely any objects can be decorated with self-adhesive film.
Film for work surfaces
Under constant load and frequent use main work surfaces may fail. This applies to kitchen tables, countertops, as well as furniture in the office.
Important! Tightening with a film will avoid rapid damage, which is the advantage of the material.
Self-adhesive film for furniture
Pasting furniture with a film with your own hands is a rather interesting process:
- Using film coating, you can give solidity to the room using texture natural wood or stone.
- Film with imitation fabric fit for a more modern target direction.
- You can safely use a velor film, which will add some charm and comfort to the room.
Film for children's room
For creating decorative coating walls with children's drawings, such material is perfect. At the same time, at the request of the child, you can easily change it to any drawing you like.
Important! We would like to note that the film coated for drawing will help the child in development without compromising the interior. You can draw on it by erasing previous drawings. Good idea, is not it?
Bath film
Self-adhesive film is perfect for wall decoration, as the material is moisture resistant and prevents the formation of mold.
Important! If you use a mirrored canvas, you can visually expand the space of the bathroom.
Film for doors
Application in this spectrum is widely used to give an expensive effect, as well as for the purpose of benefit:
- Such a coating is able to protect the surface from moisture, which is extremely important for wooden doors.
- Also, such a canvas is protected from scratches and cracks.
- The shades of such coatings are diverse, which will perfectly harmonize with the rest of the range of rooms.
Important! Samo door leaf you can close up with a film imitating wood, and glass - transparent, with the effect of broken glass.

Self-adhesive window film
This material is mainly used for protection against sun rays in room. canvases varying degrees tinting will perfectly cope with this problem.
To protect window sills from crumbling, a dense film with a protective coating is often used, thereby protecting oneself from unplanned expenses. The film is also used in the production window profiles. The most common option is imitation of natural wood. As a result, it looks expensive and is very affordable in terms of money.
Film for glass surfaces
The application of a self-adhesive film will protect fragile surfaces from chipping or complete destruction, as well as increase their resistance to impact. For door inserts and countertops, a film with a stained glass pattern is used.
Important! Such a film can be safely used both in fragments and to create unusual and attractive patterns on the surface according to an individual idea.
The technology of applying self-adhesive film on furniture
Applying such material to any surface is quite simple. You do not need specialists, so you can easily do this simple process. We will reveal all the subtleties of how to properly glue a self-adhesive film on furniture.
How to stick self-adhesive film on furniture?
So, to stick a film, do the following:
- Prepare the surface by cleaning it from various pollution, if necessary - cover with a primer or varnish.
- Cut the film into strips or curly elements of the desired size.
Important! If possible, it is better to take a canvas with a small margin, in order to avoid a shortage of material.
- Next, you need to remove sequentially the lower protective layer, rolling the film over the surface, while slightly stretching.
Important! Irregularities in film application can be corrected immediately after application.
To obtain a quality result, we will introduce you to the main recommendations for each process:
- For glass surfaces, use a combination of water and dishwashing detergent. This will remove dust and degrease the surface.
- If a wooden surface without lacquering, before application, coat the base with a primer.
- When gluing the film, it is necessary to smooth the surface, which will eliminate swelling under the film itself.
- When decorating the walls, use wallpaper glue to permanently fix the self-adhesive film.
- If it is necessary to paste over round corners, it is necessary to heat the canvas with a hairdryer before application to make it more plastic.
Now you know how to stick a self-adhesive film on furniture in a fairly short time.
How to paste over the cabinet with self-adhesive film?
Self-adhesive film will help in the restoration of your old cabinet. You could say it will give it a second life. How to glue a cabinet with a self-adhesive film quickly, efficiently and be satisfied with the end result?
Despite the simplicity, this work has a number of features. You need attention, accuracy and patience.
For work we need:
- Adhesive tape.
- Pen or pencil.
- Scissors.
- Sharp knife.
- Roller or squeegee for smoothing the film.
- Primer, putty, and sandpaper - for cleaning the surface.

Here are the basic tips for applying self-adhesive film to your favorite but old cabinet:
- If there are oily areas of the cabinet, they need to be washed. After that, wash and dry all parts.
Important! We do not recommend scraping off the old finish of the cabinet. sandpaper, since air will remain in the cracks when gluing the film. If the old coating is peeling or crumbling, naturally, it will have to be removed.
- When choosing a film for a cabinet, it is better to give preference to a thinner structure. This will ensure ease of application, as well as a beautiful aesthetic appearance.
Important! The choice of color is up to the owner of the room itself, because only he is the creator of his space. Lots of options: timeless classic, abstraction, positive children's drawings. We want to pay attention to the fact that the film of light tones quickly becomes dirty, and the dark one is more durable. Therefore, dark shades will be most welcome.
- Before applying the film, it is advisable to disassemble the cabinet, if possible. This will cover all surfaces and joints with a film, which will hide the color of the former coating.
Important! If the design has handles, shelves, locks, then they must also be removed, and then screwed into place.
- It is necessary to glue the film immediately evenly, otherwise it may be skewed, and then, pressing it against the part and rubbing it with a soft cloth to squeeze out the bubbles, it will be difficult to fix something.
Important! Pasting the cabinet, it is necessary to separate the film from the substrate gradually, two to three centimeters.
- It is completely worth tightening the holes for handles, bolts, shelves with foil. It can be easily pierced or cut through after work is completed. You can install new handles and locks, thereby giving newness to your favorite cabinet.
Now you know how to glue a cabinet with self-adhesive film. It will not take much time, and the final effect will please you and your guests.
How to wallpaper a closet?
After the repair, do you have wallpaper that is a pity to throw away? We will show you how to use them in your interior. You can glue them over an old closet, thereby dramatically improving its appearance. You will immediately kill two birds with one stone by decorating slightly worn furniture. For such a process, no special skills are needed, but we will now tell you how to do it.
You must have heard that wallpaper decorates various items interior. Products receive a second life, thereby extending their service life:
- A great idea for decorating a closet is to imitate others. finishing materials, wood, brick, leather, stone. Such vinyl wallpapers often left behind various finishes rooms.
Important! We would like to note that such canvases have a significant relief and a frequent pattern, which will help hide defects on the surface of imperfect furniture.
- If you have left paper wallpaper, then after gluing it is necessary to apply a couple of layers of varnish on them, which will give a certain gloss and protect the canvas from moisture.
We collect the necessary materials
Before starting work, it is necessary to prepare such tools and materials:
- Sandpaper - to prepare the surface for pasting.
- Ruler, tape measure, corner - for measuring.
- Pen, pencil, marker - for marking lines and borders.
- Knife, scissors - for cutting wallpaper.
- Primer and putty on wood - to prepare the surface for the sticker.
- Roller, brush, spatula - for applying the compositions themselves.
- Cloths for smoothing and removing glue.
- Wallpaper glue or PVA glue.
As you can see, the list is quite long, but the end result is worth it. Turn on your creative imagination by adding a one-of-a-kind author's contribution.

We start preparatory work
Before wallpapering a cabinet, it is necessary to make the surface suitable for such a process. Therefore, you need to do the following:
- The first step is to disassemble the cabinet, remove all accessories from it.
- The next step is to sand this surface, thereby removing the entire layer of varnish from it. Sandpaper will help with this, but it will take a lot of time and effort.
Important! You can put a screwdriver or a grinder on a drill with a certain nozzle and then walk along the surface. Helps remove nail polish building hair dryer. To do this, heat the surface and remove the previous protective layer with a spatula. After that, it is necessary to plaster the surface. If your furniture has not been treated with anything, then we recommend using a zero-grain sandpaper for a rough effect.
- At the next stage, with a damp cloth, remove all the dust from the sandpaper and give the furniture a little rest.
Important! It is necessary to putty the cabinet if there are irregularities and surface defects. By the way, embossed wallpaper able to hide minor imperfections. Deep defects will have to be leveled with putty using several layers.
- You probably know that after the putty has dried, these places need to be leveled with the overall surface of the cabinet. Of course, sandpaper will come to the rescue.
- For better adhesion with wallpaper, it remains only to prime this surface.
These preparatory work, undoubtedly, will help you to stick wallpaper on your cabinet with high quality, thereby improving the final result.
pasting
Now let's move on to painting the cabinet itself. So, it goes through several stages:
- Before you start, you need to make blanks from the remnants of wallpaper. To do this, the desired surface is carefully measured, the dimensions are transferred to the wallpaper material. Next, cut out the patterns in accordance with the dimensions of the cabinet.
- After - glue the prepared surface with glue. When applying glue, try to gradually level the canvas to avoid bevels and the formation of bubbles under the wallpaper itself. Agree, this is not at all difficult to do.
Important! For such work, it is better to use PVA construction glue, as it glues materials better, unlike wallpaper.
- We recommend using dry rags to level the canvas and remove excess glue.
Self-adhesive films allow you to update the look of any furniture. Such coatings are used to restore damaged veneer or laminate, increase performance characteristics kitchen table or headset, masking defective areas. The technology of coating the base surface is quite simple. Such work can be performed even by an inexperienced user who knows the sequence of work and has patience. From our article you will learn how to glue a cabinet with self-adhesive film and what kind of film to choose for pasting furniture.
Types of films for cabinets
Self-adhesive coatings for cabinets and other furniture elements allow you to protect the surface of products from fading, prying eyes and shedding fragments (if the material is glued to glass or mirrors). Colored items with ornaments or geometric pattern allow you to decorate the wardrobe and make it stand out from the rest of the furniture. Let's get acquainted with the main types of self-adhesive coatings.
Decorative films for the cabinet

Such materials are quickly glued and do not need special care. The protective decorative layer protects the product from scratches and increases the life of the furniture.
Sometimes the film is applied to wardrobe mirrors or glass inserts. Decorative films are characterized by a huge selection of colors and shades, easy application to the base, resistance to abrasive particles, and ease of maintenance.
Color films
The products in question are used to restore the glass surfaces of sliding wardrobes. colored protective coatings maintain transparency. Their main features are high resistance to abrasive particles, ease of maintenance and gluing surfaces.
The most popular is the color film for sliding wardrobes - Oracal series 641.

Stained glass films for wardrobes and mirrors
When decorating mirror cabinets or products with glass inserts, films that imitate stained glass are often used. Stained glass film for cabinets is well glued to the base, quickly removed, resistant to abrasive substances.

How to glue a cabinet with self-adhesive film
The work of pasting a sliding wardrobe with oracal film will not take much time, the main thing is to be patient and get acquainted with the technology. In addition, you need to prepare a tool.
Required tools and materials
Before pasting the old cabinet with self-adhesive film, we prepare the following tools:
- construction tape measure or a long ruler;
- sharp knife for cutting cloths or scissors;
- black marker or pencil;
- dry cloth;
- flower sprayer filled with soapy water;
- self-adhesive film for the cabinet.
When all the tools and materials are prepared, you can proceed to the main work.
Training
Begin work with the preparation of the foundation. First on kitchen cabinet remove all fittings, along with this, the doors are dismantled. Now we examine the surface of the cabinet for defects, chips, potholes or cracks, and other protruding parts.
We unscrew all the bolts with a key, to extract the screws or self-tapping screws we use a Phillips screwdriver. Irregularities are more difficult to level, they are filled with putty. After the solution has dried, the surface is cleaned with fine-grained sandpaper. Before laying the film, it is necessary to degrease the furniture. To do this, use a solution of ethyl alcohol or a mixture of water and detergent.
If the cabinet is made of chipboard, MDF or natural wood and does not have a special coating, then it is better to use a primer to improve adhesion. The solution is applied to the base and allowed to dry.
Pasting the cabinet
Pasting the cabinet can be done using a wet or dry method. The choice of method will affect the result.
Dry pasting method
So the dry method is applied if it exfoliates kitchen facade in small areas, as well as in the case of applying decorative details on the corners of furniture or uneven areas. In this case, a small part of the protective substrate is separated, which will free the base. After that, the new coating material is applied and leveled.
How to stick a film without bubbles? During such work, it is necessary to pull back the substrate and alternately fix the roll on the base surface. Alignment is carried out using a silicone spatula.
wet method
If it is necessary to paste over an old cabinet with a film, it is used wet method laying decorative coatings. In this case, the material is fixed on a moistened base, which will allow for correction during work. To moisturize adhesive mixture applied to the base, a spray gun is used. The backing must be completely removed. Inner side products are wetted with soapy water. For its preparation, 10 milliliters are diluted in a liter of water. liquid soap or other detergent.
When using the wet method of pasting a cabinet with a self-adhesive film, it is important not to overmoisten the surfaces. Significant moisture contributes to the slipping of the sheets and slows down the gluing process.
The film is placed on desired area furniture, fasten the canvas moving with a roller from the center to the edges of the product. The remains of the solution should evaporate after 2 days from the moment of application. After that, the canvas with the pattern is again treated with a roller. A similar sequence of work is used for gluing side walls and facades.
Possible problems when gluing the cabinet
How to fix problems when pasting a cabinet:
- Not everyone knows how to disguise a damaged wardrobe mirror. During these procedures, front side film, visible swelling defects appear. If they are noticed at the stage of carrying out the main work, you need to peel off the base of the film and fix it again. If the material is well seized to the base surface, a cross-shaped incision is made in defective places. sharp knife or pierce the canvas with a needle. After the release of air, the coating is rolled on with a roller. The capabilities of the film allow you to get flat surface after such an impact.
- If, after carrying out work, dents appear on the facade of the furniture, PVA glue is poured on the defective areas of the surface with a syringe through the film. This material is rolled up. As a result of such an impact, the coating is leveled, and the glue will fill the void and create solid foundation, the remains of the solution are wiped soft cloth.
- For a novice user, it may seem difficult to stick a canvas on glass surfaces or milled cabinet edges. In places of rounding, cuts are made and the remnants of the material are removed.
If you need to remove the self-adhesive film from the surface of the furniture, watch the following video, which describes the entire process:
Ideas for pasting a cabinet with self-adhesive film
In the modern construction market there is great amount canvases for finishing furniture facades. For decoration, you can use products that imitate fabric, leather, stone or natural wood. Many users order film from the manufacturer based on their own preferences. Such products allow you to transform the interior of the room, create your own unique style.
Do you often have a desire to change something in your interior? I think that most people sometimes have such an idea in their heads, but not everyone gets to implement ideas.
Even the most trendy interior after a year or two, it no longer evokes the emotions that arose in the first time after the repair. And now I want to change or add something.
You can re-glue or repaint the walls, but what about the furniture? Self-adhesive films come to the rescue, with which it is possible to implement the most daring design decisions. Moreover, the modern construction market offers a wide variety of them both in color and texture.
Let's look at several options for updating the interior using this material.
We update furniture
Old furniture: cabinets and cabinets, chests of drawers, shelves and much more can be updated using self-adhesive film. This is perhaps the most inexpensive way change the furniture, as well as the mood of the room in which it is located.
Kitchen cabinets can be given a completely different look by changing their color and texture with self-adhesive furniture film, complementing them with new fittings.
Paste the facades with a silvery "metal" film, and your kitchen will gravitate towards high-tech style. If at the same time it is possible to change the color of the walls to gray, fill the room with appliances in the same color scheme, then new style on the face.

Tired of monotony, I wanted bright colors- We hurry to the store for a colorful film. It is enough to paste over part of the cabinets with it and the kitchen will change, and your mood will change for the better.

An old, but still serviceable refrigerator can also be updated with self-adhesives, changing it beyond recognition.

With the help of such a valuable material, you can also update other furniture. For example, stick a film on drawers desktop or dressing table.


Similarly, you can decorate a chest of drawers. In this case, it is not necessary to use the material of the same color. The combination of several colors of the same texture in one piece of furniture, or vice versa, of different textures similar in color, will not only update it, but will give the surfaces an interesting look.


The old wardrobe will sparkle with new colors and heal new life if the doors are pasted over with a self-adhesive film. The interior will be cozy and harmonious, it is enough to match the wallpaper to the tone of the new cabinet, or vice versa, choose a film to match the already purchased wallpaper.


When changing the style of the interior, it is not always possible to buy new furniture. Some items can be restored with film. We select a suitable pattern or texture, make a little effort, and get a completely new piece of furniture.

If this item has become a coffee table, then to accent it in tone, we recommend pasting over a photo frame, a box for storing papers or a flower stand with the same color.
New look for glass surfaces
Doors with clear glass in a few minutes it can be turned into a stained glass window. To do this, it is enough to paste over the glass with a self-adhesive stained glass film.


In the same way, you can transform both windows and glass furniture inserts. This type The film transmits light, filling the room with color effects. Stained glass film is a sufficiently durable multilayer material, moisture resistant, resistant to UV radiation.


With decorative glass film, you can change any glass and mirror surfaces premises. Films create the effect of glass processed sandblasting machine, but at the same time, the glued surface will be much cheaper than the machine-treated one. Among other things, it creates additional protection from blows. In the event of glass breakage, the fragments will not crumble.

Surfaces can be pasted over with films purchased in a store from a standard but varied set, as well as materials with an individual pattern, which can actually be ordered from manufacturers of these products.
Decorate walls and ceilings
Decorative synthetic films for walls and ceilings will help diversify the interior with little effort. These are canvases of large sizes, and small decorative stickers.

You can decorate with them both smooth painted walls and pasted over with wallpaper. Small fragments will enliven the room, accentuate any zone, add individuality.

Ceilings can be decorated similarly to walls.

Modern films are durable and have moisture-resistant qualities, so they can be used even in wet rooms. Self-adhesive film for the bathroom will help you easily change the boring interior without changing the tiles.

The drawing is cut into fragments according to the size of the tile and pasted onto it. The walls will look new. If desired, the film can be easily removed and replaced with a new one.

How to glue self-adhesive film?
You can paste over with a film almost any surface: metal, wood, plastic, glass. A matte self-adhesive with a relief pattern will hide small irregularities, while a glossy one, on the contrary, will emphasize them.
Wonder Film adheres better to smooth surface, however, you need to work with it carefully, because bubbles and wrinkles can spoil the appearance of the object pasted over. The working surface must be prepared: if necessary, sand, remove dust, degrease; Rough surfaces should be primed, cracks and chips should be puttied and treated with primer.

Self-adhesive film adheres better to a smooth surface if it is pre-moistened with soapy water.
Start work by freeing a small piece of film from the protective layer, level it with rubber spatula, expelling air and water, gradually removing protection.
It is better to mark up the desired fragment for gluing in advance. The film is well cut with a clerical knife, the edges will be smooth, without burrs. It is recommended to glue fragments of the film with an overlap.
Pasted surfaces can be washed with a soapy solution with a soft cloth without the use of abrasive products.
Self-adhesive films are often sold in rolls of 36cm, 45cm, 67cm and 90cm widths. Manufacturers offer material with various textures: wood, marble, velvet, leather, as well as with drawings, plain, transparent and stained glass. Everyone will be able to find their own film suitable for decorating and updating the interior.


The price depends on the width and length of the film in the roll. So stained glass film in a roll of 15 m and a width of 90 cm can be purchased from 2 to 2.8 thousand rubles. decorative film under a tree 45 cm wide and 2.1 m long - for 350-500 rubles. You can also buy film by the footage, check with the sellers for the conditions of sale of their goods.