DIY wooden toy box. Create a unique plywood box with your own hands. Cardboard box transformation
Creative housewives offer many ways to create practical items for storing children's toys. A wooden box is recognized as a strong and durable construction, but its manufacture is available only to those who have the skills to work with wooden details. Easy to create and practical to use, the model from plastic pipes or wooden bars. In addition to mobility and lightness, it has another advantage: it adapts as a screen for zoning space during children's games.
Rational choice of location, shape and material
You can create a toy box with your own hands from improvised materials. A container for items of children's games should be an accessible place for storing small or large things for the baby. Housewives identify several factors that are decisive when choosing the location, materials and other characteristics of a toy storage container. These include:
- accessibility for the baby;
- fastening strength and ease of closing the box;
- capacity for a separate class of toys;
- external attractiveness of the box for the child.
The location of the box with toys is important for the distribution of the baby's play time during the day. If the objects of interest to him are located within his reach, then he can not only choose toys on his own, but also fold them after the game. This teaches the child to keep order from an early age.
The second step is to determine the allowable and optimal volume of the box. Capacity - one of the main qualities of the box. Teachers recommend from an early age to teach kids to proper organization your workspace. In accordance with this, teach the child to distribute toys by size and type for their storage in different places. To reduce the cost of manufacturing a large container, creative housewives recommend using cardboard from boxes with a large household appliances. Capacious containers for small items must be closed so that you do not have to collect things around the house again.
And then choose suitable materials: wood, cardboard, fabric, foam rubber. If during the manufacture of the container it is assumed that the baby will be able to handle it independently, then it should be made from safe materials. When using foam rubber or cardboard, the child will not be able to get hurt, which distinguishes such a frame from wood or metal.
When using a tree, all the elements to be ground should be carefully sanded for safe use by a child. Long-term operation of structures made of natural solid materials (oak, aspen, birch) will help to ensure special impregnation, primer and coating with varnish or paints. When working with foam rubber, the edges that are turned or sewn are pre-pasted with a special adhesive tape to strengthen them.
Lids, ties and other fasteners should be easy to use. Preferably they are made from natural materials. It is not advisable to use a synthetic cord, as it slips and the ties are quickly untied.
Another important quality of such a container is its appearance. Firstly, any hostess selects interior items in accordance with the style and color scheme of the room. A box for storing children's toys in this matter is no exception. Secondly, children do not like to clean up, and a toy-shaped box will help diversify the process. The attractive appearance of the container will help to quickly teach the child to carefully handle things, diligently collect them in a place agreed in advance.
Manufacturing instructions
Particularly valuable ideas in organizing the space of a children's room are those that help create a functional thing, such as a stool, screen or table, with the possibility of storing various things in them.
The elements of the interior and decor of the baby's room, which can also serve as a repository of his play items, include:
- folding bench with a second shelf for placing small toys;
- mobile folding bookcase;
- sleeping place along the window with a secret drawer;
- hanging baskets;
- drawers built between the legs of the table on the right and left sides of the person sitting;
- a suitcase attached to a stool;
- fabric pockets on a solid basis in the shape of a favorite character;
- fabric hanging pockets on the bar;
- a folding rigid base with pockets or drawers, which is used to zone the space of a room during children's games;
- baskets woven from wicker or newspaper tubes;
- street structures from car tires.

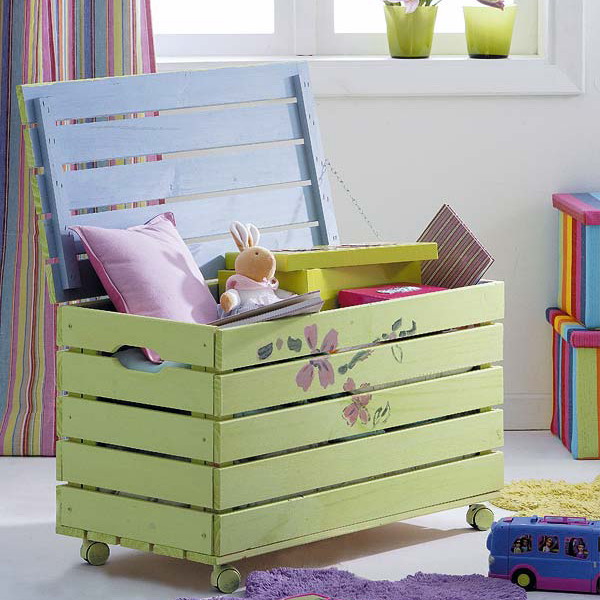
Wooden or cardboard box
The most durable, durable and environmentally friendly design of a box for storing children's toys is recognized as a box made of wood. It can be implemented as a chest of drawers or seating, bench, stand and more. To reduce the cost of crafts, it is permissible to use parts for its manufacture old furniture.

Wooden box for storing children's toys
Making Instructions:
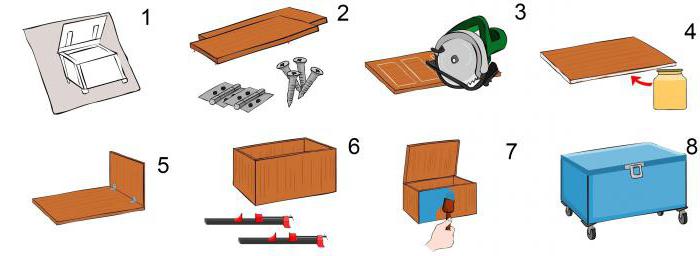
- 1. Design a model of a wooden box, considering its dimensions, methods of movement (legs, wheels).
- 2. Prepare materials for manufacturing: plywood, boards, bars, screws, hinges for attaching a door or lid, wood glue or PVA, a saw for cutting boards.
- 3. Draw and cut out 6 parts: bottom, 4 side walls, lid.
- 4. Fasten the parts with glue and screws, the lid with hinges (folding version).
- 5. After making the box, it should be sanded and painted. You can "turn" it into a carriage, a car or a fabulous house.
- 6. Wheels will help make the box mobile; they should be attached to the bottom of the structure.

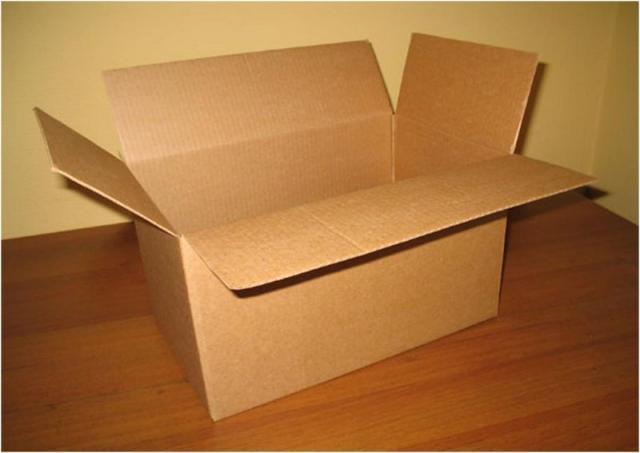
Thick cardboard box
Making a toy box with your own hands is recognized as an easy and useful joint activity with a child from 5 years old. A pliable cardboard in the hands of a creative adult turns into a beautiful box for children's things. The child's choice of the color of paper or fabric to decorate the design will help create the illusion that he made the product himself. With this approach, the baby will cherish this thing and learn to use it faster.
For fastening to cardboard, you should choose an environmentally friendly clean materials, PVA glue is suitable for fixing.
Storage ideas: life hacks, tips, do-it-yourself gadgets
Fabric bag or decorated ottoman
AT small apartments finding a place to place a box for children's things and games is not easy. For such cases, the ingenuity of caring housewives adapted fabric bag for storage of toys. It is convenient to fold products into it, and you can place it simply by hanging it on reverse side doors. For ease of handling such a device, rings are attached at the entrance to the bag, which helps the child to easily get and place toys in it.

Toy bag hidden behind the door
A fabric toy storage bag is practical, but doesn't look very neat. But its undoubted advantage is mobility. Such a device can be easily transported to the country house, hidden under the bed or behind the desk.
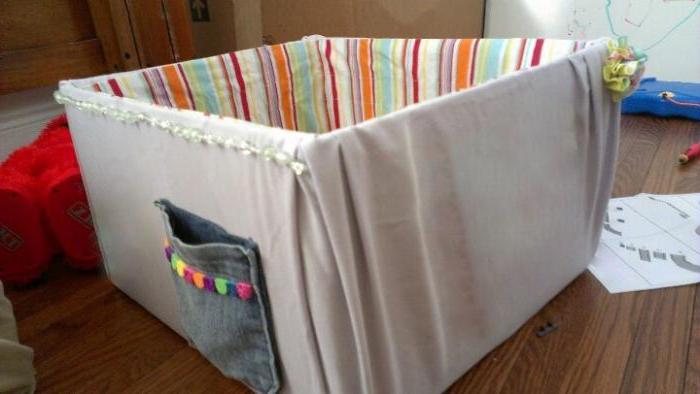
The fabric can be used to decorate a solid base made of wood or plywood: a box is prepared, as in the previous paragraph, then all sides are sheathed. The practical design in the colors of the interior will succinctly fit into overall design children's room.
The pouffe is also lined with fabric. In order for such a design to serve as a place to store toys, it is enough to provide a lid that a small child could freely use. It can be removable or openable. In the second case, it is hinged to the back wall of the base.
According to color scheme wallpaper or furniture select fabric for upholstery ottoman. Patterns are cut out on paper - these are 8 blanks according to the diagram below. For stitching, allowances for seams of 1 cm should be made. Reduce the cost self-manufacturing storage for toys is possible at the stage of procurement of materials. Creative housewives suggest using old jeans, a blanket, a baby blanket that are no longer used for their intended purpose.

Pattern for sheathing the cover of the ottoman with the possibility of storing children's toys in it
Sewing order:
- 1. According to the shape of the pattern, a template is prepared on paper and transferred to the fabric.
- 2. The corner of each element is sewn, folded inward, to create an opening for insertion into the stuffing fabric.
- 3. The parts are sewn together from the wrong side.
- 4. According to the size of the resulting hole, a circle is cut out and, after stuffing, the hole is closed with it and sewn by hand.
- 5. The top blank is attached to wooden lid pouffe with a carpentry stapler or sew an elastic band along the edge of the fabric and put it on the base.
Newspaper tubes
Practical storage box for children's toys craftsmen offer to make from newspaper tubes. Decorate such a craft with a bright plug-in rag bag. A decorative elastic band or lace is sewn to its edge.

Basket-bench from newspaper tubes
Procedure:
- 1. The direction of the fibers is determined: a newspaper sheet is arbitrarily torn, and the direction in which a more even edge is obtained is accepted as correct.
- 2. Newspapers are cut along the direction of the fibers along the entire length into strips no more than 8 cm wide.
- 3. A thin knitting needle is applied to the corner of such a strip and, pressing it tightly against the paper, the sheet is twisted. The end is glued to the tube. At least 80 pieces of such blanks are made, although it all depends on the selected size of the box.
- 4. To make the bottom of the basket, cut out 2 pieces in the shape of a square or oval from thick cardboard. Tubes are glued around the perimeter of one of the cardboard blanks - these are future racks. From above, a second identical part is glued to this blank, the tubes are fixed between them. Set aside until the glue is completely dry.
- 5. Weaving begins by bending the racks vertically. The working tube is folded in half and wrapped around the first rack, twisting, moving to the next. The working tubes will need to be lengthened; for this, new tubes are inserted into the tails of the workers, carefully gluing the tip.
- 6. To achieve strength and uniformity of weaving, a weighting press is installed on the bottom, the size of which clearly corresponds to the dimensions of the basket. Such a rigid base is removed before forming the edge of the basket.
- 7. Having completed the weaving, the attachment points are glued with liquid PVA.
- 8. To decorate the basket, it is covered acrylic paints, then building varnish on wood. Creative housewives use printed napkins for decoration using decoupage technique.
- 9. The final element is the sewing of the bag, which will be inserted into the basket. As the toy storage area gets dirty, the bag is simply washed and placed back in the basket.

Photo-instruction for weaving a basket from newspaper tubes
old suitcase
Cleaning up toys from a tedious task for the baby can be turned into real game, if you make the repository original. An old suitcase is suitable for a box for small toys, dolls with outfits or a collection of cars.

Old suitcase as storage for children's toys
The suitcase is attached to the chair. Depending on the age and height of the child, the height is selected so that the baby can freely reach the storage place. Drawings are built on the surface of this design, three-dimensional elements are applied using the decoupage technique. Creative housewives are able to make a whole castle, which will not only be a storage for toys, but also decorate the interior of the room.
Car tires
Outdoor play equipment can be stored in the hallway or near the porch.

Tire containers
Old car tires will help to organize a storage place for bulky toys at no additional cost. The material is wear-resistant to temperature extremes and changes in air humidity, soil.
The manufacturing technology of such containers for toys is simple. Car tires it is enough to paint with acrylic paints in colors that match the tone of the door or porch. They are stacked on top of each other and get a container of the desired height, convenient for the child to use.
Organizer and screen
For storing small toys such as chocolate egg figurines, key rings, etc., there are other practical ideas. original solution becomes a folding rack with pockets on inside. By opening this design, you can create a screen for temporary zoning children's room during games.

Organizer for small toys and a screen
A strong rigid base for such an organizer for small toys is recommended to be constructed from plastic pipes or wooden bars. The simplified version is hinged structure on one stick-holder, on which fabric with pockets is hung.

Hanging organizer for small toys
Box and stool of 4 drawers
Plastic or wooden crates are readily available at hardware or garden stores. Using them to construct practical storage for toys and a stool simplifies the fabrication task and reduces the time involved.
The boxes are nailed to each other or glued with superglue. The upholstery on the seat surface is selected according to the color scheme of the room. The design is convenient and its mobility: if you attach the wheels, then this stool can be easily moved from one room to another.

Four-sided stool with the possibility of storing small toys
Well, which parent is able to refuse his child to buy a toy that he likes? Everything is swept off the shelves: from small trinkets to solid sizes of soft animals and entire doll houses. Toys in the house are also relatives with guests. As a result, their assortment grows to such volumes that it becomes impossible to walk around the room without stepping on some kind of typewriter or doll dishes. This means - it's time to think about how to make a toy box with your own hands?
Why not go to path of the lung resistance and just not buy any storage system in the store? It's a matter of psychology and education. original box for children's toys, hand-assembled - great way turn the boring and little-liked cleaning process into an entertaining action. Yes, in game form, it will be easier for a child to accustom to the idea that there should be order in the room. He himself will gladly collect everything that was scattered, and with his own hands will send the toy box to the place allotted to him.
How difficult is the task? Exactly to the level of your desire to do handmade. After all, collect interesting design literally from nothing.
Expendable materials
“You can make a box for children's toys with your own hands from almost everything”
What exactly can you work with to get a really cute craft that attracts the attention of the baby? As the photo says, you can make a box for children's toys with your own hands from almost everything. His role may be played by:
- carton boxes;
- wooden container;
- plastic boxes;
- baskets;
- buckets.
You can make a box for children's toys from almost anything.
In the end, the toy storage can simply be cut out and assembled from the remnants of the fabric. Let's see what can come out of such foundations.
A few ideas on how to make a DIY toy box
Cardboard box transformation
You can make a box for toys from any box, even a shoe box, but considering that the child will use the container several times a day, it is still better to take something stronger and more voluminous. To do this needlework you will need:
- scotch;
- glue;
- a set of colored paper;
- scissors.
Box for toys from a cardboard box
Sequencing
Do-it-yourself work on creating a toy box begins with the removal of unnecessary parts from the workpiece. Need to trim upper part, that is, remove the elements that form the lid of the box. Then holes are cut along the side faces for future handles.
Coat the surface of the box with PVA glue
Now we paste over the blank with colored paper, putting it on PVA. To simplify the task, you can use self-adhesive film. It is more practical and dirt can be removed from its surface.
Cover the box with colored paper
When choosing color solution, be guided by the main interior colors used in the decor of the room. Then a do-it-yourself box for children's toys will not look like a ridiculous element of interior decor. You can assemble a whole set of such colored boxes and provide separate storage of balls from cars and designers.
DIY toy box
soft container
An option that meets all the requirements for arranging a nursery. How to make such a toy box with your own hands? You need to start by creating a frame. Traditionally, it is made from hard wire, boiled from thin rods, knocked down from wooden slats.
Textile box pattern
According to the size of the frame, the fabric is cut. There will be two patterns: one for the outer skin, the second for the inner. On the bottom it is recommended to put more dense material, such as tarpaulin, teak or burlap.
Perform fabric cutting
Do-it-yourself work on the toy box will continue with the arrangement of soft walls. Between the fabric layers should be laid thick layer foam rubber or replace it with synthetic padding pillows, sewn with your own hands according to the available sizes.
Turn out the finished structure
In the first case, for reliable fixation of foam rubber, the sides need to be quilted. You can put into business large beautiful design buttons. Thus, the issue of the decor of the product will also be solved. See the photo for ideas on creating beautiful soft toy boxes with your own hands.
Fabric toy box example
wooden container
The most durable model, toys in which more than one generation can store toys. If inheritance is not included in your plans, then wooden box it will not be difficult to retrain it into a furniture element of a different functionality, for example, convert it into a mini chest of drawers or a comfortable seating pouffe.
What you need and how to make a box for children's toys with your own hands from wood?
As Supplies fit:
- boards;
- elements from already unnecessary furniture;
- durable plywood.
Required Consumables
It is clear that it is better for dads to work with such consumables. It will be easier for them to find perfect option fixing elements in each case and solve the issues of wood processing.
Action algorithm
To make a high-quality toy box made by yourself, do not be lazy to make a sketch future design on a sheet of paper indicating the dimensional parameters and the method of movement.
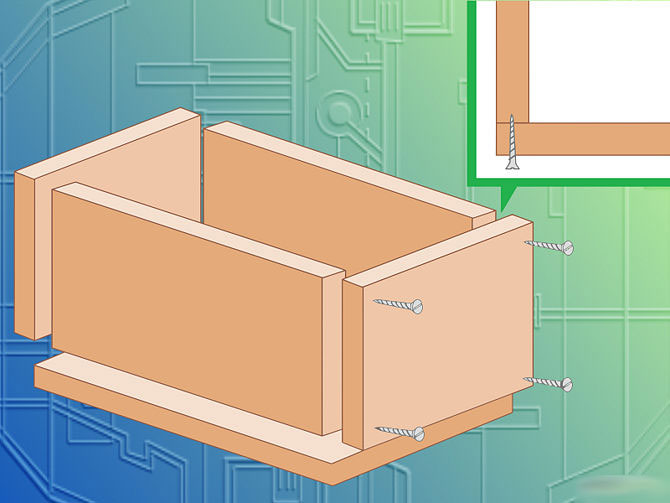
Look at the photos of DIY toy boxes. There will definitely be options with lids. This is very practical, as it will allow the piece of furniture to act in several forms at the same time. To assemble them, you need to prepare 6 parts: 4 side walls, a bottom and a lid. All elements, except for the last one, are connected with screws and glue. The cover is fixed on hinges.
Decorate the assembled box
The wood used in the work must be carefully sanded with your own hands so that the toy box does not have roughness and splinters, neither inside nor outside. This is a child safety issue, so take it seriously.
If it was planned to make the structure mobile, it would have to be put on furniture wheels.
How to decorate such a thing? A matter of taste. It is acceptable to keep the natural pattern of the wood and simply open the box with several layers of varnish. You can paint it in the most unpredictable colors or paint it with thematic drawings.
An interesting idea is how to design a toy box with your own hands using the patchwork technique. For this, again, paints will be used.
Attach furniture wheels for mobility
Painting the container with plain paint and decorating it with animal figures, geometric figures, and letters sawn from wood is considered a classic.
You can attach a soft mattress of cheerful colors to the lid of the box, then you can also sit comfortably on it. In a small nursery, such a piece of furniture may well replace a chair.
DIY wooden toy box
DIY creative boxes for children's toys and more
“A worthy alternative to a toy box will be a do-it-yourself hammock”
In principle, you can store toys in anything, so turn on your imagination and go!
rare suitcase
The suitcase dug in the depths of the pantry of grandfathers is a real find! It can be turned into a magnificent element of interior decor and, at the same time, make a box for storing toys out of it. All that is required is to change its design with any convenient way. When considering finishing options, keep in mind that the appearance of the product should overlap with the general interior solution. So it will be easier to enter the nursery's atmosphere.
Toy box from an old suitcase
Plastic container
How to make a box for children's toys with your own hands from it? You can assemble container containers into a single structure by building something like a chest of drawers. But in this case, you will have to work on creating wooden frame which is not for everyone.
There is such an option as simply placing them around the room. However, it will look boring, even though the elements are bright and colorful.
Rack for toys from boxes
From a completely different perspective, a nursery will appear with boxes for toys randomly stuffed with their own hands on the wall. Such a composition will create a picturesque mess and serve as an excellent repository for children's treasures. And the child will have the opportunity to choose what and where to put. For example, he will collect cars in a red container, and books in a green one. So that the baby does not get confused, each box can be marked with the corresponding pictures.
Separate boxes by color
Car tires
The idea is more suitable for giving. In order to assemble such a box for children's toys with your own hands, it is enough to put two or three tires on top of each other. For greater decorativeness, they can be painted in different colors or decorate in a different original way.
Tire storage box
Wooden packaging
In appearance, unsightly designs can be turned into a real masterpiece. There are a lot of design options for wooden boxes. It looks interesting, for example, decor with book spines.
Another creative is a skateboard box. The product is painted and placed on the running platform of the skateboard. Such a toy warehouse will be easy to move to any corner of the house. How else to make a toy box with your own hands, tell the photo.
Functional toy box
Textile storage
Instead of a box, you can do soft construction for storing toys in the form of a bag. It will not be difficult even to untie the rope and extract the contents little child. Great solution are transparent bags sewn from fabric and vinyl film. Transparent walls will allow you to quickly find the desired item, without spilling all the contents on the floor.
Transparent toy bags with drawstrings
A worthy alternative to a toy box will be a do-it-yourself hammock. It is often hung over the head of the bed and stuffed toys are stored there. This is done so that the baby can always get his beloved bunny or dog. Sleeping in the company of fluffies is much calmer.
Hammock for soft toys
Autoparking
Does the boy have a solid collection of small cars? Suggest that he park them in the hive garage. The design is a multi-tiered structure, constructed from the bearing bases of the rolls toilet paper. How you can assemble an alternative to a toy box with your own hands, look at the photo.
Rack for typewriters from bushings
In principle, the process is not laborious. Cardboard bobbins are glued side by side. To prevent cars from falling out back wall can be closed with one common piece of cardboard.
Something similar, but in the appropriate decor (with ribbons, bows, rhinestones) can also be offered to girls. After all, it is not necessary to design a whole box for children's toys with your own hands, if you plan to store only some little things in it.
Organizer from bushings for storing small things
funny buckets
The mission of the toy storage system can be assigned to plastic and zinc buckets. It is good if the containers are initially multi-colored. Otherwise, you will have to decorate them yourself. On plastic, the application will hold well, but plain zinc buckets will have to be painted. You can work on their design with decorative tape. This material will allow you to realize any fantasies. Look for ideas on how to make a box for children's toys from buckets with your own hands, in the photo.
Bright buckets for storing toys
Conclusion
The issue of storing toys may not be such a big problem if you are not too lazy to solve it radically. As you can see, it is not at all necessary to run to the store for the containers under them. Enough to find the right idea how to make a toy box with your own hands on the Internet and implement it in life. The untold wealth of the child will be harmoniously distributed in the modest expanses of the nursery in a matter of hours.
Photo gallery - do-it-yourself toy box
The toy box is necessary element any children's room. Cleaning should be an exciting activity for the child, and each toy to have its own place. You can buy a basket or chest of drawers in the store, but it is much more interesting to create a beautiful box yourself.
This item can be easily made with my own hands and realize your best creative ideas pleasantly surprising the children. In addition, the implementation of this design will take only a few evenings.
A do-it-yourself toy box can be made of cardboard, chipboard or sewn from fabric. Get a capacious container in which you can put everything board games with toys.
Cardboard box
The easiest option is a cardboard box. To work, you need the following set of tools and materials:
- Thick cardboard box.
- Decoration fabric or self-adhesive film.
- Scissors, needle, thread and glue.
- Tape and ruler.
First you need to cut off the upper part, glue the sections with tape.
Option to decorate a regular cardboard box with colored paper and curly scissors
If it is planned to make a product with handles, then the holes must be made in advance and also smooth the cuts with tape.
Then make measurements of the exact parameters of the box. An inner and outer cover is sewn from the fabric, and then both parts are sewn on top. For sheathing, a dense, well-cleaned material is selected.
Another option to decorate the box is to cover it with cloth or self-adhesive film. This is a very simple procedure. To implement it, you need to cut out several pieces of fabric or film according to the dimensions of the walls and bottom. At the same time, do not forget to leave 1-2 centimeters for bends. First, the outer part is glued, then the inner.
Important! Corners and joints should be given special attention, if glued poorly, the fabric may disperse.

Children will be happy to decorate the box with unusual patches with you.
If you need handles for the box, they are cut out of fabric, sewn together and inserted into the slots. You can choose any method of fastening - glue or, alternatively, simply tie the ends of the fabric together.
Decor options
- On top of the fabric or film on the box, you can stick a variety of patterns. For example, make smiles or faces with eyes and a mustache.
- Ordinary jeans for decorating the box will add additional pockets to the design.
- The toy basket is diversified with buttons, zippers and opening elements.
- If you decorate a box for storing children's toys with colored paper, then images of cartoon characters or children's photographs are suitable as decor. Bright colorful images can be cut from gift bags.
Tip: Another option is a fabric toy bag. It can be in the form of a backpack or a fabulous house.

Original boxes can be woven with your own hands from newspaper vines dyed with food coloring
Chipboard product
To store children's toys, you can make a product from plywood or chipboard.
The walls and bottom of the box are fastened together with self-tapping screws, here, of course, male help is required. To fix the lid of the box, it is best to use special spring holders. This design will prevent children from pinching their fingers. For easy movement of the storage box, it is better to install special wheels on it. They are sold in every hardware store.
The product must be varnished. The varnish must be transparent and non-toxic. The walls of the product can be decorated with various figures, numbers or letters. These parts are easy to make out of wood with a jigsaw and paint them in different colors, or ask the children for advice, maybe they already have ready-made parts in their bins, for example, from puzzles. Then glue the decoration to the surface with glue.
You can decorate a wooden basket using a stencil and bright colors.
Important! For very young children, you can fit wooden structure foam rubber, and on top - colored fabric.
There are many interesting ways create convenient system to store toys.
- An old suitcase preserved in the attic can become an unusual box for children's toys. Such a suitcase is easily pasted over with colored paper or sheathed with a colorful fabric.
- A great way to store is to use plastic boxes. They can be placed throughout the room or attached to the walls in a chaotic manner.
- If you have your own yard, then you can make a great place to store outdoor toys. To do this, 1-2 tires are painted in bright colors and placed on top of each other. It turns out a great tank for baby supplies.
- An original solution for the interior of a children's room can be the use of metal and plastic buckets. Buckets must first be painted and arranged in different parts rooms. Plastic products can be connected using drilled holes.
- From fabric, there are many options for roomy and practical products. For example, you can make a beautiful basket or sew wall structure from pockets for storing small toys.
Having spent a little time and showing imagination, you can please your child and create a fabulous atmosphere in his children's room.
When a child is born in a family, parents and visiting guests often give toys. And as the child grows up, the number of baby dolls, dolls, cars, balls begins to grow exponentially. Gradually it becomes clear that they need to be put somewhere and stored somewhere. After looking at the prices of ready-made boxes and containers for storing children's toys in stores, parents are wondering how to make a toy box with their own hands. This article can help in such a situation.
Box of different materials
the main task - make the toy box comfortable, roomy, and so that the baby likes it, otherwise the parents themselves will have to put everything there.
As a box for storing toys can be suitable:
- Cardboard boxes of all sizes, from shoe boxes to large electronics boxes.
- An old suitcase, already unnecessary and gathering dust on the mezzanine. You can decorate such a suitcase depending on the interior of the room.
- Plastic boxes and plastic buckets (preferably in different colors).
- Wooden box (for convenience, wheels can be attached from below).
- From pieces of old fabric (baskets or pockets for dolls, bags for small parts Lego type).
Master class number 1 - a box from a cardboard box
Most affordable way making a container for storing toys with your own hands - from a cardboard box. It is better that such a box is dense and durable, since the child will use it several times a day.
For manufacturing you will need:
- colored paper (packaging or for crafts);
- scissors or stationery knife;
- glue (preferably PVA);
- scotch.
Step by step production:
1. To begin with, the top closing covers are cut off and holes are made (places for future pens).
2. colored paper(better pick bright colors and patterns that match the interior of the nursery) cut into sheets along the width of the box and stick on the entire surface of the box in accordance with your wishes.
3. It is better to glue the corners of the box more carefully, the remaining sheets are overlapped on the edges of the previous one.
4. Places for handles are cut with scissors, it is also better to additionally glue them with paper, similarly glue the edges of the box for strength.
5. The outer decoration of the box depends on the creative imagination of the parents, if desired, the child can decorate his box.
 Box making process
 Such multi-colored container boxes can be made different size several pieces for separate storage various kinds constructors, balls, dolls and bears, children's books, etc.

On video: do-it-yourself cardboard boxes for toys.
Master class number 2 - tofabric-lined cardboard box
Just like in the previous master class, you can make a box, only with outer and inner upholstery with fabric. For softness, you can make a layer of foam rubber.
How to make such a soft box, see the points:
1. The fabric is cut to the size of the box (all sides are pre-measured with a ruler) and sewn on sewing machine. Such patterns are made 2 pieces - it turns out, as it were, covers for the inside and outside.
 We make blanks from fabric
2. All sides and bottom of the box are smeared with glue and the resulting fabric cover is applied - first the inner, then the outer.
 Glue the corners
3. At the top, two covers are sewn with a needle.
 Sewing the edges of the cover
4. Holes for the handle are cut out on the sides, the fabric is sewn along the edges. If desired, you can sew carrying handles on the sides of the box (made from colored braid).
 Making a pen
5. External decoration entirely depends on the imagination of the parents.
 The box is ready
On video: cloth box decor.
Master class number 3 - msoft box on frame
A do-it-yourself soft toy box is made using a spiral frame. You can take it from a ready-made cylindrical box bought in a store (it is usually covered with synthetic fabric, which is not very useful for a child).
Manufacturing process:
1. The synthetic fabric must be removed from the frame, and according to its pattern, make a similar pattern for the bag from cotton fabric.
2. For inner surface a second pattern is made from synthetic winterizer or other fabric.
3. The bottom is cut out of a denser fabric, the fabric is sewn to the frame with threads from below.
4. The outer and inner bags with synthetic winterizer are laid respectively from the inside and outside of the frame, fixed, the seams must be stitched.
5. The soft eco-friendly box is ready, it can be further decorated with pockets and other decorations on the outside.

On video: handmade toy bag
Master class number 4 - to orob from wood
A very strong and durable option for a toy storage container is a wooden box. It can later be used as a piece of furniture in the children's room (like a chest of drawers or seating). For the manufacture of such a wooden box, some parts from old furniture that they want to throw away are also suitable, for example, kitchen cabinets or an old chest of drawers.
Of course, only a man who has some skills in working with wooden parts and how to fasten them can make such a box.

Production plan:
1. Draw a sketch of the future box, thinking the right dimensions and methods of its movement (wheels or handles for moving).
2. Prepare necessary materials: plywood, boards (bought in a store) or parts of old furniture, screws, hinges, wood glue or PVA, saw for sawing boards (can be cut to specified dimensions when purchased in a store).
3. In total, 6 parts should be obtained: bottom, 4 side walls, cover.
4. The parts are fastened with glue and screws, the lid - with the help of hinges (folding is made).
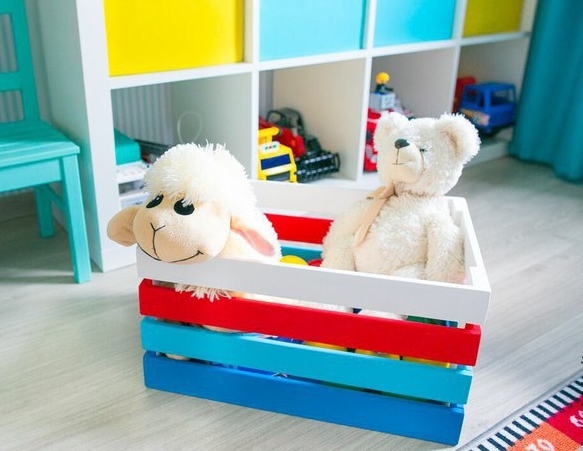
5. The box must be sanded and painted, you can solid color with drawings (children's or vegetable), it is possible in different colors, etc.
6. Wheels are attached from below (for ease of movement around the room).
 Manufacturing process
Ways to decorate such a toy box:
- In the style of patchwork - the walls and the lid are decorated geometric shapes from colored paper.
- The classic version is a box of the same color (white or light), wooden decorative figurines animals, letters of the alphabet, hearts, etc.
- If such a box is used as drawer under the bed, then only the front wall is decorated, to which a handle is also attached to make it easy to pull out from under the bed (better and the wheels at the bottom), then the top cover is not needed.

On video: wooden toy box.
Storage racks
Highly convenient option storage of many toys - making a wooden rack (open). In it, each shelf can be occupied either by retractable cardboard boxes, or standing books lying soft toys and many children's necessary items. The main thing is that the child can get them on their own and then put them back.

The rack is made of wood with square cells. At first it will be possible to put it horizontally (while the child is small), and then turn it over and put it vertically (when it grows up). Subsequently, such racks can be installed in several different sizes and heights, resulting in a whole furniture system for storing not only toys, but also the necessary items for study.
Toy box idea (1 video)
Children are the flowers of life! We love them and want them to have the very best. And what is so valuable for young children? That's right, toys. And here we are talking not about quality, but about quantity. The more of them, the better.
However, parents face common problem- all these toys are scattered throughout the house or apartment. So that you do not step on them, and there is order in the rooms, you can make a special box in which the child will store these toys.
The tool is convenient, simple and practical. In this article, you will learn several ways to make a DIY toy box. Then the child will be accustomed to order.
Box from a waste cardboard box
Everyone should have an extra box after shopping. shoe boxes, household appliances or products. Everything will fit. In fact, you almost already have a ready-made storage box, it just needs to be decorated and strengthened a little to store toys. Check in advance if the cardboard is soft, as it will not last long.
So below is detailed instructions how to make such a cardboard toy box. All you need to work is a box, a gun with glue and a piece beautiful fabric. The instruction is as follows:

That's it, the toy box is ready. It remains to turn the box over, pin the clothespins on top and put the books inside so that the fabric sticks tightly to the cardboard. In order for the toys inside the box to be ventilated, do not cover it.
Advice! This is an easy option that anyone can do. You can glue such a box not with a cloth, but with paper and attach handles to it. This is done very simply.
Durable wooden toy box
It is clear that the cardboard box is not entirely reliable and children can simply bend it. To prevent this from happening, it is better to make a product out of wood. It will take a little more effort and skills, but the result is worth it. The box will be strong, durable and reliable.

Except for your practical value, it will perform decorative role complementing the interior of the room. Yes, and it can be used as a chair if you install it under the wall, cover it with a blanket and put pillows. We will consider two types: a box in the form of a box and from boards.
Making a wooden box
The technology is not easy, so you need to be especially careful and work according to the instructions. The photo shows what you can do.

The instruction is as follows:
At this stage, the box is ready and can be used for its intended purpose. You can decorate it, attach a handle and legs.
Advice! To protect the material, it can be opened with varnish or stain.
Board box
This option is a little more complicated, but it looks pretty nice. Outwardly, it resembles an ordinary food storage box. To work, you will need boards of a certain size, plywood for the bottom, a hammer and nails.
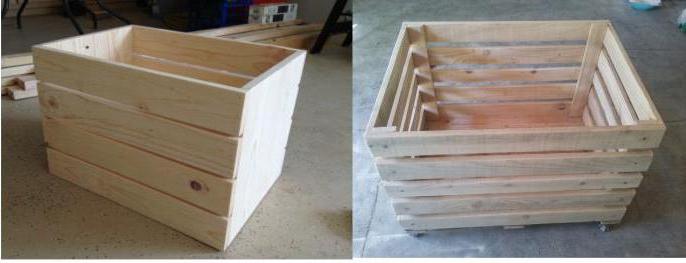
On plywood, you need to fix four equal bars in vertical position. They must be firmly fixed. Then you need to bottom, moving up, stuff the boards on them. This is done around the perimeter of the frame. You can make gaps between the boards - large or small, as you wish. So, the box will be ventilated.
Advice! You can nail a piece of plywood to the bottom on both sides, and fill the boards with it. So, you can make legs for the structure. Alternatively, use rollers.