How to make shelves in a small steam room. Shelves in the bath - drawings. Rules for the construction of bath shelves
The Russian steam room is a building that is intended for wellness procedures that help to relax the soul and body.
An important functional element of the steam room is a shelf - a special wooden flooring.
A modern sauna shelf can be made with your own hands in accordance with the operational features of the room and the individual preferences of the owner of the bath.
Optimal dimensions
In order to make comfortable and functional shelves in the sauna and bath, first you need to decide.
Many owners of baths prefer multi-tiered structures, the most common option is three-tier shelves. However, experts recommend choosing shelves in two rows. It is economical and convenient enough for attendants, in addition, it is easier to build them yourself.
To make quality construction, it is necessary to focus on the following dimensions of the shelves in the bath:
Height
The optimal shelf height is determined by the average height of visitors. This ensures the convenience of the procedures, while the shelves for the bath must be located at the level of the thumb, lowered down in a sitting position. The average height is 80 cm.
It is also important to observe the allowable distance between the bench and the steam room ceiling of 120 cm. This is determined by the level of comfort when the attendant is in a sitting or lying position.
The length of the shelves may be less if the bath has a more compact size.
Attention! Between the decorative wall cladding and the shelves, a technological gap of 4 mm must be observed on all sides, taking into account the coefficient of expansion of wood during swelling.
When arranging a two-row structure, the width of the lower shelves is 55 cm, and the upper ones - up to 75 cm. Small gaps of 6 mm are also observed between the individual elements of the benches. In the presence of side benches, their width is 45 cm.
The number of shelves is determined by the dimensions and operational features of the steam room.
Choice of wood
These tree species are distinguished by good performance, durability and wear resistance.
Aspen
This is one of the best natural materials that is used to make, in particular, shelves. He possesses medicinal properties relatively cheap and practical to use.
Aspen cleans the air quite well, neutralizes negative energy, restores strength. For this reason, aspen shelves are simple, affordable and durable.
The only hidden drawback of the material is the predisposition to internal decay of the fibers, so the choice of wood must be especially careful.
Linden
An excellent material for the manufacture of bath shelves and tables. It has a lot of advantages - easy to process, has an attractive appearance, resistant to stains and cracking, durable, affordable.
When heated, the wood exudes a gentle and pleasant smell, which has a beneficial effect on respiratory system. The disadvantage is the tendency to darken with prolonged use in wet areas.
Abashi (African oak)
This is a unique material that has high strength, inertness to overheating and mechanical damage. Abashi heats up quite slowly, which completely prevents the occurrence of burns at high temperatures.
Wood is presented in dark and light colors, perfectly retains its performance throughout the entire period of use.
The disadvantage of abasha is its high cost and the complexity of the initial processing.
Manufacturing
To make shelves of the required size for a suitable number of people, you should prepare necessary tools and materials. For work you will need:
- wooden boards from the selected type of wood;
- wooden beam;
- stand-up boards for fastening the structure;
- self-tapping screws;
- corner;
- nails.
At the initial stage, the instruction provides for the assembly of the frame for the future shelves.
Assembly of the frame base and installation of the flooring
The wooden frame base is assembled from 10 prepared beams with a section of 5 × 7 cm and 5 rack boards for attaching shelves. The beams for the frame are mounted vertically and fastened horizontally to each other using strapping. Fixing to the racks is carried out on a paired connecting element.
To provide additional strength, the structure is additionally mounted to the wall surface.
As a flooring, flat and pre-boards are used. Installation of boards is carried out in compliance with the technological gap between them of 6 mm. For the lower shelf, 3 boards are used, for the upper bench - 7.
Next, the flooring is installed on the prepared frame with fixation on self-tapping screws, which must be sunk 5 mm deep into the wood. Driving fasteners is carried out with reverse side regiments. The boards are stuffed with a gap at a slight slope of 2 degrees.
Structure fixation
Fixing the shelves to the wall is carried out in compliance with a gap of 11 cm. The lower shelf has a movable structure mounted on special mechanisms - skids, which simplifies the process of cleaning the steam room.
The photo shows a step-by-step algorithm.
In places where wooden frame regiments is in contact with floor surface, special rubber gaskets are mounted for additional waterproofing.
Treatment with antiseptics
The final stage of arranging a shelf in a Russian steam room is wood treatment with reliable antiseptics. Constant contact with sufficiently humid and hot air contributes to the rapid destruction of wood fibers.
Carrying out timely prevention will prevent.
Important! For the treatment of bath shelves it is forbidden to use chemicals, as well as varnishes and drying oils. In conditions of high humidity and temperature changes, they are able to release toxic substances with a pungent odor, which can cause allergic reactions.
Equipped with wooden shelves - the heart of any bath. High-quality and convenient shelves will provide a comfortable and pleasant pastime for the benefit of the soul and body.
The owners of the bath, who decided to equip it on their own, at a certain stage of the work, think about how to make a shelf in the bath. It is one of the most important components of the interior, because from its functional characteristics directly related to the level of comfort. If you have the right materials at your disposal and know how to handle construction tools, then it will not be difficult for you to make a shelf for a bath with your own hands. To avoid common mistakes and learn about all the intricacies of the upcoming work, you should familiarize yourself with the basic rules and advice of specialists in the construction of the structure.
Shelves in the bath can be made by hand
Material selection
Hardwood is best suited for assembling shelves. The reason is that products made from it do not emit resin when heated strongly. This is a very important factor, since heated resin can not only stick to the skin, but also leave a severe burn. When choosing materials, you need to take into account all the nuances, so each decision must be carefully considered. Bath - a room with a specific microclimate.
Important! Wood must be suitable for use in conditions of high temperature and humidity.
 It is necessary to choose wood that does not contain resin
Shelves in the bath are best made from wood with low thermal conductivity. It will not get very hot, so it will be comfortable to sit on the shelf. Popular types of wood used for the construction of the regiment.
- Aspen. This is an affordable material that has many healing properties. Folk healers believe that aspen absorbs negative energy and gives a person positive emotions. Concerning specifications, then shelves made of such material are considered one of the most practical and durable. When buying, you need to make sure that there are no internal rot in the selected boards.
- Linden. Experts believe that this wood is the best in terms of price-quality ratio. Its main advantages include low thermal conductivity, practicality, aesthetics and affordable price. It is quite easy to work with, so even beginners can handle it. In addition, when heated, the shelves will exude a light woody aroma, thanks to which bath procedures will bring even more pleasure. Linden products are easy to care for, as they do not absorb sweat. Over time, the shelf may darken, but this will not affect it in any way. performance characteristics.
- African oak (known as abash). The material has many advantages: it is famous for its high moisture and heat resistance, practicality, and the ability to withstand heavy loads. African oak products heat up quite slowly, so even with very high temperature in the steam room it will be comfortable to lie on the shelf. There are light and dark abasha wood on the market, so you can choose the material that is most suitable for the interior of your bath. Perhaps the only drawback of African oak is its high cost.
 Types of wood for the manufacture of shelves in the bath
 Bath shelf size: correct calculation
Before you make shelves in the bath with your own hands, you should make a lot of calculations. It is necessary to determine the number of tiers. Recently, more and more steam room owners are making two- and three-tier shelves. Single-tier shelves are traditional for Russian baths. Multi-level benches are rather typical for saunas, where people do not lie, but sit. Next, you should decide on the size of the structure.
- Height. This parameter is selected in such a way that it is easy for the steamer to work with his hands and does not have to bend too much. Experts recommend placing the shelves at the level of the fold of the thumb of the lowered hand. The height of the product ranges from 70 to 90 cm. Many people like to take bath procedures while sitting, so it should be comfortable to lie and sit in the steam room. Between the shelf and the ceiling, a distance of 110 to 150 cm should be observed.
- Lenght and width. A bath is a place where a person wants to relax as much as possible, so the length should allow him to lie down to his full height. On average, the length of a standard shelf is 220 cm, and the width is 90-100 cm. Traditionally, the product is placed along the walls, and their number largely depends on the size of the steam room. If you are the owner of a large bath, you can double the width of the shelf so that 2 people can sit on it at once. Before you make more shelves in the bath, make sure that it will not take up too much space and interfere with the bather. In small rooms, the option of placing a "compartment" is often found. In this case, a bench with a shelf is attached to one of the walls, if necessary, the shelves are folded back and fixed on the bench. It can be easily returned to its original position. Often there is an option when a stationary shelf is combined with a mobile bench.
 The dimensions of the shelves are selected depending on the position and number of steamed
 Design features
It is sometimes difficult to assemble and install a product that will constantly be in conditions of high humidity. Therefore, you should read the information on how to properly make the shelves in the bath and install them:
- It is desirable to construct the structure in such a way that it is open from below. This is necessary for practical reasons: the shelves will be well ventilated and dry quickly, and it will be much easier for you to clean and clean the floor.
- It is better to mount the shelves at a slight slope so that the water does not stagnate on it and rather drain.
- The installation of rubber or plastic linings will help prevent the occurrence of fungus and rot on wood. They are mounted between the floor and vertical supports, which significantly extend the life of the entire structure.
- Aesthetic appearance in the design of the steam room also plays an important role. The surface of the shelf should be smooth, and the corners of the boards should be rounded. Make sure that the parts of the structure fit snugly against each other, otherwise the product will stagger and creak.
- Before you make a frame for the bath shelves, make sure that the width of the boards chosen for its manufacture is 4 times its thickness. If this condition is met, then the wood will dry out quickly, and you will not have to fight the fungus.
 In the steam room, you need to process the wood well so that splinters do not form, and it is also better to avoid sharp corners
 The methods of attaching the boards, with which you can make shelves in the bath, also deserve mandatory consideration.
Very important! exclude the possibility of skin contact with metal structural elements during the operation of the steam room, otherwise you can get burns on the body.
 In order for the shelves to dry, it is better to leave empty space under them.
 The following mounting methods are common:
- deep screwing of self-tapping screws into wood;
- placement of self-tapping screws back side products;
- the use of special oak wedges in the work, driven into pre-prepared holes.
 Self-tapping screws must be placed on the inside of the shelves so that the iron elements do not burn when heated
 To provide bath visitors with maximum comfort, equip the shelves with an additional backrest. To do this, several polished boards are attached to the wall, to which the shelf adjoins, stuffing them on vertical supports made of bars. Boards should be placed at a distance of 5-10 cm so that moisture does not stagnate between them. The back is made from the same wood as the shelves. It allows you to comfortably sit on a shelf and lean against the wall without fear of getting burned. On the end wall, special foot supports are often stuffed. Experienced attendants It is advised to lie down on the shelves and raise your legs slightly above your head. So they warm up faster.
 For convenience, in the steam room on the wall, pads are installed under the back.
 Ways of arranging shelves
There are many schemes for the arrangement of regiments. Your choice should be based on the size of the steam room, the presence of windows and other features of the room. Before you make shelves in the bath, it is recommended to study the various drawings and layouts of interior items in the steam room, and then choose the most suitable one from all the options. As a rule, shelves have:
- As a single linear structure along one of the walls in one or more tiers.
- The L-shaped design along the adjacent walls of the steam room will help you make the most of the usable area. There are a great many options for how to make corner shelves in the bath, among which you can find the right one.
- Several individual shelves along each wall. Often, low and high linear benches are installed along a long wall, and shelves are mounted along an adjacent wall at an average height.

So you can see the mistakes made in time and eliminate them at the planning stage. In addition, accurate measurements and calculations will be required to purchase the necessary materials.
Two-tier bath shelves
The main thing is to follow the instructions, carefully following each of its points. A tutorial video will help you make a shelf for a bath.
- Rack installation. The supports on which the bath bench is laid give the structure reliability and strength. To make a row of beds, you will need an average of 4-6 racks. Their length should be equal to 1-1.15 m. Depending on the length of the shelf, the cross section can be 50 by 100 mm or 100 by 100 mm. To connect the racks, rectangular bars are used, on which carrier rails and boards for the shelf are also installed. To mount the racks to the wall, use the elongated dowel-screws. A small gap (10 cm) must be left between the wall and the rack adjacent to it to improve ventilation and prevent wood decay.
- Installation of the supporting structure. It must withstand not only the weight of the boards, but also the mass of people who will rest on the bench. Experts recommend using a guide beam with a section of 50x120 mm or 50x100 mm. For laying the top row, a load-bearing bar with a section of 50x50 mm is used. It is mounted perpendicular to the top surface of the shelf. The distance between the bars depends on the thickness of the top boards and can vary from 50 to 60 cm. The thinner the boards used, the more often the bearing bars should be placed. This will prevent the boards from sagging under the weight of people lying on them.
- Upper bed. For it, you will need well-polished and carefully planed boards, the thickness of which is 3-6 cm, and the width is 10-24 cm. They are laid on load-bearing bars every 2 cm, which ensures the unhindered passage of hot air through the structure. The method of fastening the boards depends on personal preference, but boards located along the length of the bed look much more beautiful than those installed across the sunbed. In addition, this placement option allows you to significantly save materials and somewhat facilitate the work. Options for how to make a shelf and equip a bath are shown in the photo.
- Installation of the lower shelf. For convenience, the lower bench should be placed at a distance of 30-70 cm from the floor. Often it acts as a step. In this case, it is made in the form of a mobile bench, which can be easily removed while the steam room is being cleaned. To create a stationary lower shelf, 4 guide beams with a section of 50x100 mm should be attached to the previously installed racks of the upper shelf at a distance of 40 cm from the floor. Of these, it is necessary to lay out a rectangle, which will be the frame for the lower bench. It is attached to the support posts with nails at least 12 cm long or special self-tapping screws. Also, 4 wooden racks (with a section of 5x10 cm or 10x10 cm) are also fastened with self-tapping screws. Every 50 cm, carrier rails with a section of 5x5 cm should be installed. Then it remains only to fix the planks of the lower shelf on them using special wooden wedges. Boards should be even and smooth, and sharp corners should be rounded off. You must take all necessary measures to ensure that the operation of the steam room is as safe as possible for you and your loved ones. Making shelves in the bath with your own hands is not so difficult, see for yourself by watching the video tutorial.
- Regiment handling. As soon as the installation of bath shelves is completed, they should be processed protective equipment. It is no secret that prolonged exposure to moisture and high temperatures has a negative effect on wood. To protect the boards from rotting and extend the life of the lounger, use specially designed solutions. picking up the right remedy pay attention to its composition. The impregnation must contain exclusively environmentally friendly substances, otherwise, under the influence of high temperatures, the wood will emit harmful fumes. When processing bath furniture, linseed oil and a wax solution consisting of purified turpentine and beeswax have long been used. They perfectly protect the wood from mold and prevent the formation of fungus. Funds are applied in 2-3 layers. You can also purchase professional woodworking products at hardware stores. Be sure to consult with the seller and check whether the selected impregnation is suitable for covering bath furniture.
 Stages of manufacturing simple bunk shelves in the bath
 The instruction is universal, so it is also suitable for those who are wondering how to make a corner shelf in the bath. The only difference is that the shelves will be mounted not on one, but on both adjacent walls, neatly joining in the corner. If you want to provide structures with greater strength and reliability, then it should be supplemented with an angular support post.
When building a steam room, the question will certainly arise about how to make shelves in the bath with your own hands. These products must be durable and comfortable to use. These pieces of furniture must comply with the requirements for the operation of wooden products in conditions of high humidity and temperature. For example, it is worth considering the manufacture of benches for a bath, the width of which will be equal to 2 m, while the length will be equivalent to 2.5 meters, while the height from the floor surface should be 1 meter.
The choice of material for the shelves
Shelves in the bath with their own hands can be made of different materials. In order for the benches for the steam room to be distinguished by the qualities of strength and durability, it is necessary to choose the right material before starting work. It can be aspen, which is characterized by high moisture resistance and the ability to endure elevated temperatures, while this type of wood does not change its original strength, color and does not become less durable. Under the influence of temperatures, the aspen will not be covered with cracks, and its color will remain light. In addition to other positive features, aspen is notable for its low cost, but it also has its drawbacks, one of which is expressed in latent decay, which manifests itself when exposed to moisture.
Best Solutions

Do-it-yourself shelves in the bath can also be made of black alder, as well as ordinary alder, which are able to withstand significant temperatures, these types of wood are resistant to deformation and have a uniform structure. At elevated temperatures, the surface of an alder bench will not heat up excessively, for the reason that this material has a low thermal conductivity. In linden, the texture is weakly expressed, this variety, as a rule, has light shade, is practically not covered with cracks and does not dry out, so that the linear dimensions of the product will not change during operation. It is easy to work with this material, it has a soft structure. As a substitute for linden, maple is used, which is not so prone to deformation at elevated temperatures and humidity. You can use it if you don’t want to mess around with the work for a long time, since the material is easy to process.
Expensive solution

Do-it-yourself shelves in the bath can also be made using abashi, which has recently become more common. This is a variety of African oak, which has a high cost. It is able to show excellent quality characteristics when exposed to humidity in a high temperature environment, its structure is knot-free, smooth and strong.
Preparatory work before the manufacture of the shelf

Before you make shelves in the bath with your own hands, you will need to prepare a tape measure, a hacksaw for wood, a square, an electric drill, a level, a screwdriver, wood drills, a Phillips screwdriver, a hammer, a ruler, a pencil, a wooden hammer, as well as an abrasive skin not only for fine, but also rough processing. Self-tapping screws can be used as fasteners.
Shelf manufacturing technology

Before you make shelves in the bath with your own hands, you need to determine what design this piece of furniture will have. It is preferable to use a stationary structure, which will last much longer. It is not recommended to use nails as fasteners, as they will not allow you to get a strong fixation. Among other things, dismantling such shops will not work. If screws are used, the shelves can be dismantled without damaging their structure, some elements can be replaced if necessary.
When making shelves in the bath with your own hands, a photo of which can be seen in the article, it will be necessary to install fasteners, which should be done from the inside, this will prevent burns.
Features of the frame assembly

Making shelves in the bath with your own hands, the photo of which is in the article, you will need to assemble the structure. Initially, markings are made for installing the rear racks, and after they are attached to the walls of the steam room. In advance, you need to install rubber gaskets in the lower end. First, the installation of the upper beams should be carried out, strengthening them to the racks and walls of the room. The upper side beams should be bolted slightly to the rear pillars, as well as the beams that are located on top of the walls.
When making the shelves for the bath with your own hands, the drawings of which must be prepared in advance, at the next stage it is necessary, by slightly holding the front posts, which are located on the edge, to fix the side beams to them. After the front carrier bars are installed, the upper frame must be assembled. In this case, it is worth using a square and a level in order to set right angles and adjust the position of the elements. At the same stage, self-tapping screws are installed, they do not need to be tightened to the end, but only a few bait. When you make do-it-yourself bath shelves, the drawings of which will allow you to do the work correctly, the same principle should be used when installing the bottom frame.
Final works
After the correctness of the assembly of the elements of the frame of the bench has been checked, all the elements must be set. The next step will be the installation of jumpers, only after that you can tighten all the screws until they stop. AT this example the option is considered in which the front and side skins are completely performed. In this case, it is necessary to close access to the area between the upper and lower shelves, while taking into account that cleaning will be somewhat complicated. A folding shelf for a bath with your own hands will make it easier to maintain the premises; you can, among other things, only partially sheathe the mentioned elements of the benches.
In order for the structure to be strong and durable, the workpieces for its installation must be analyzed before work begins. If some elements have bumps, knots or other errors, then they need to be processed, some wood defects can be sanded with abrasive sandpaper, in particular, you need to walk along the ribs and edges, which will prevent injury when using benches.
Skin features
We make shelves in the bath with our own hands, using a technology that implies the need for sheathing the front and side parts of the product. This must be done by fixing the external elements from the inside, it is necessary to perform these manipulations until the structure is installed in place, this will provide a convenient approach for work. It must be taken into account that the difficulty arises when installing boards that are located horizontally. For this reason, how can large quantity boards must be installed from the inside, leaving the smallest amount for fixing from above by plugging the holes with wooden pins. Some experts recommend using the option in which seating boards are initially assembled, followed by sheathing of the front and sides of the frame.

Technology features
Do-it-yourself installation of shelves for a bath, angular, like a regular one, should be mounted taking into account some features of the work, which are the need to ensure the safe operation of the structure. To do this, when installing steel fasteners, in particular screws, it is necessary to exclude their contact with the human body. To do this, the fasteners need to be deepened, and all the holes obtained must be closed with plugs. The base is polished at the end.
It is also important to provide ventilation holes between the frame and the sheathing boards, they should be equal to 10 millimeters or more. It is necessary not only to assemble the structure correctly, as well as to install it, but also to correctly design products at the initial stage. Otherwise, the shelves may not match the size of the steam room and the number of people who will most often use the bath. Thus, if the bath has high ceilings, the shelves in the Russian bath, made with your own hands, should be located in several tiers, which may even be 3. In order to provide more convenient cleaning, shelves located on top can have folding structures, located in the center can be stationary and main, while the lower shelves can be completely removable, while they can be easily dried after bath procedures. In order to ensure comfortable soaring, the distance from the person’s head to the ceiling surface should be approximately 40 cm. the example considers the total height of the structure, which is 1000 millimeters, as optimal height the steam room itself should be a parameter within 2.2 meters. You should not design a bath with too high ceilings, as this is unjustified, and you will have to provide additional heating of the room.
Do-it-yourself sliding shelves for a bath can be made on the basis of different sizes. If you use a width within 95 centimeters, then a person will be able to lie on such a shelf across the entire width. If you apply a width of 40 cm, then the steamer will be able to sit with a straight back. With a bench width of 60 cm, a person will be able to sit with his back reclined, resting against the wall. If a length within 150 cm is chosen, then the person can lie with bent knees. With a length of 180 cm, it will be possible to lie with a raised head, as well as outstretched legs.
In the role of the material, it is preferable to use exclusively hardwood, this is due to the fact that conifers are able to release resin when exposed to high temperatures. In extreme cases, when mounting the frame, you can use pine, but this is only for the manufacture of those elements, contact with which will be excluded. If you decide not to spend a lot of money, then maple or black alder is preferable. The rest of the wood can also be considered suitable, but it often has some drawbacks. It is recommended to use only high-quality dried wood. If you start to assemble shelves from raw boards, this can lead to deformation. It is completely unacceptable to cover benches with varnish or paint after completion of manufacturing, because the steam room can create conditions under which the wood will begin to rot and fungus will form on the surface. It is worth remembering that the use of protection products cannot replace the natural qualities of wood. It is necessary to ensure good ventilation of the room, only in this case no additional funds will be needed.
Finally
The above technology for the implementation of work is designed to familiarize the master with the method of making benches for the steam room. Recommendations are presented taking into account the size restrictions on the width of the steam room. In this case, this parameter is equal to 2 meters. Accordingly, the selected minimum width seats of the lower and upper tiers, which is equal to 510 and 530 millimeters, respectively. If you decide to make shelves for the bath yourself, then you can adjust the dimensions upwards according to certain parameters of the steam room.
Shelves in the bath and benches are a necessary attribute of each steam room. The key characteristic of this type of furniture is maximum functionality. For the manufacture of such structures is traditionally used natural wood. If necessary, they can be assembled independently. However, for this you will need to familiarize yourself with some rules and step-by-step instructions that allow you to do all the work correctly.
Most often in the baths you can find bunk structures. In this case, maximum functionality is achieved with the minimum area required for arranging the shelf. As a rule, the lower tier is used for sitting, and the upper tier for lying. Such a design must be done correctly. A slight difficulty lies in the fact that the width of the second floor should be sufficient to make it comfortable to lie on.

One of the most important criteria is the thickness of the structural components of the canopy - the log. The cost of the material depends on this indicator. The pattern in this case is as follows: the thicker the lags, the more expensive they are. However, it is not recommended to purchase products that are too thin, as they will sag under human weight.
Helpful information! To save on the construction of a bath shelf, it is recommended to place separate logs at a small distance from each other.
Before assembling bath furniture, it is necessary to determine its dimensions. Shelves in the steam room can have different sizes and shapes. However, there are traditional, most common dimensions. In accordance with this standard, the total height of the structure should be 70 cm. The distribution of dimensions between floors is as follows: for 1 tier - 40, and for the top - 30 cm.
The distance between the lags is a mandatory rule that should be strictly adhered to. However, do not make the distance too large. If necessary, these products can be made independently, but for this you need to have at least minimal woodworking skills.
Before starting the assembly of the bath shelf, it is necessary to prepare materials, tools and make a drawing, according to which all subsequent work will be carried out. Its creation must be approached with all seriousness, since inaccuracies in the drawing will lead to installation errors.
It should take into account the number of people for whom the steam room was conceived. The size of the room also plays an important role, so you should focus on them. As for the choice of location, it is not recommended to place shelves near the window opening. As a rule, this design is placed along one of the blank walls, complementing the interior with benches.
What material is best to make a shelf for a bath?
Many people advise using leafy tree material for these purposes. The reason for this choice is quite simple to explain: coniferous boards emit resin at high temperatures, which, when heated strongly, can not only stain the body, but also cause burns.
Experts recommend choosing boards made of a material that has low thermal conductivity. Such wood has a heating limit. If the boards do not become very hot, then it will be possible to sit and lie on them without experiencing discomfort. Consider what types of wood are most often used to make a shelf in the bath with your own hands.

Aspen. Aspen is a deciduous tree. This material is common, so it is easy to find and buy. Many people note healing properties such boards. Among the technical characteristics of such material are noted such as strength, resistance to decay and a long service life.
Linden. Boards from this tree are considered the best in terms of price and quality. Another advantage of basswood products is that they have low thermal conductivity and presentable appearance. Shelves made of linden boards are aesthetically pleasing and pleasing to the eye.
Products made from this material are easy to process, so it is recommended to buy them for people who have not had experience in working with wood before. It is easier to make a lime shelf in a bath with your own hands than a construction from another material. When heated, lime boards exude a very light and pleasant woody smell, which has a calming effect. In addition, they are easy to care for. Of the minuses of such material, it can be noted that it darkens over time. However, this does not affect the performance of the tree in any way.
Maple. Many experts note that this tree species is a good alternative to linden boards. Products made from this material are more durable, so they practically do not deform over time. Like linden planks, elements made from maple are great for organizing a shelf.

Poplar. Such material is distinguished by its whitish tint and is easy to process. For beginners, this is one of the best options, but products from this tree have insufficient strength. Therefore, it is recommended to use poplar for the manufacture of decorative elements of the shelf.
Note! When choosing a material for a bath shelf, it must be remembered that the wood must meet operational requirements.
Abashi (African oak). Often from this material make bathroom furniture. African oak is also suitable for a shelf in a sauna. This material is highly resistant to moisture and high temperatures. In addition, African oak boards have low thermal conductivity, which contributes to the ease of use of furniture.
The surface of products made from such wood is very even, and its structure favors fast drying. Many experts put this material in first place in the ratings of the most suitable tree species for the regiment.

Alder. durable and reliable material which is highly resistant to deformation. The thermal conductivity of alder boards is one of the lowest, so this wood is great solution for bathroom furniture.
The choice of one or another material depends on several factors. First of all, this is the financial component. In addition, it should tolerate high temperatures and high humidity well, as well as be durable and comfortable. Individual preferences play big role when choosing the material for the shelf and benches.
Information about the material and the number of boards is recorded in a do-it-yourself scheme. How to make shelves in the bath is a question that many people ask. The answer to it can be obtained by examining the types of bath benches, their features and assembly instructions.
Varieties of shelves in the steam room: common design options
There are several varieties of bath shelves, which differ from each other in their design features. The feasibility of one form or another, as well as the number of tiers, is determined depending on the size of the bath room and its features. This publication contains information about the most common types of canopies.

Step structures. To date, this option for the arrangement of shelves is the most popular. In this case, they are installed along one of the walls (without a window) in two or three tiers. The convenience of this design is to increase the degree of heating from the lower floor to the upper.
It is important to remember that the upper tier of the stepped shelf in the bath in the steam room must be installed above the line of the boiler used to heat the room. In this case, the distance from the top floor to the ceiling must be at least 120 cm. This is necessary in order to ensure maximum comfort for a person while sitting on such a structure. The same rule exists when a traditional stove is installed in the steam room.
Corner (in the shape of the letter "G") canopies. A less popular option than the previous one, however, it is also very often used when organizing the interior in the steam room. It is understood that one side of the structure will be parallel to the boiler, and the other side will be adjacent to one of the free walls.

Height corner design may be different. This parameter is selected depending on the individual characteristics of the room. Experts advise to install corner shelves in the case when the room has small dimensions, since they are as functional as possible and it is not very difficult to do them yourself. The canopy in this type of bath is best assembled from durable wood.
Canopy coupe. This design is quite rare, but the idea itself is interesting and original. She is suitable for small spaces where it is necessary to save internal space. In this case, two shelves are placed parallel to each other. Such a structure is very reminiscent of compartments in trains (hence the name).
The upper shelves can be made in such a way that they recline. The frame structure for such a canopy is usually made of support posts. These elements, similar to the legs of a bench, are joined together by wooden lintels.
Helpful information! If necessary, the shelves can be fixed on the wall without using legs. However, such a device requires proper load distribution.

In order to choose the design that is suitable for your situation, it is recommended that you familiarize yourself with the photo of the shelves in the bath. This will allow you to visually evaluate the advantages of one or another option.
For sheathing the frame, it is necessary to choose even and smooth boards from any suitable material. The main thing is that the wood is moisture resistant, durable and endures high temperatures. The distance between the boards should not be less than one centimeter. The maximum recommended distance is 2 cm.
The first thing to do before installing the shelf is to calculate its dimensions. It is worth choosing the shape and number of storeys of the wooden structure so that it fits into the interior of the steam room as competently and concisely as possible. It is also important to remember that the structure should not act to the detriment of the overall functionality of the room.
The classic version for a Russian bath is a one-story shelf located along one of the walls. Multi-level structures are more often used in foreign saunas, as this allows you to bathe while sitting. In any case, each of the above options has its own advantages and disadvantages.

Before you make the shelves in the bath with your own hands, you will need to calculate their height, width and length. Several factors influence the choice of the height of the structure. First of all, you should think about convenience. The height of the shelf should be such that the person feels comfortable. The standard for this indicator is 70 cm. It is not recommended to place the structure at a distance exceeding 90 cm from the floor.
Related article:

The right choice of material for the log house. Types of log cabin. Foundation for building. Features of the construction of a bath from a log. Log cabin projects.
The location of the shelf should be such that it is convenient for the bather to take water procedures both sitting and lying down. The distance from the canopy to the ceiling should be at least 120 and not more than 150 cm. The dimensions of the shelf in the bath may differ from the standard ones only if this is a justified decision. For example, often in small steam rooms there is simply not enough space to organize a classic design.

Another important indicator that requires careful calculation is the length of the structure. To ensure comfort while taking bath procedures, you need to assemble shelves on which you could lie at full height. This design contributes to the maximum relaxation of the steamer. The most common shelf size in a steam room is 2.2m (in length). As for the width, traditionally it should not exceed 1 m.
If the bath area is large, then it becomes possible to expand the structure by 2 times. As a result, such a canopy can be intended for two people. However, before increasing the width, it is still recommended to make sure that such a structure will not interfere with people taking water procedures.
Baths, which are small in size, are most often equipped with compartment canopies. When choosing sizes for this design, it is necessary to take into account not only the anthropometric data of a person, but also the number of people.
Shelves in the bath: design features
The assembly and installation of the canopy is a serious task that requires not only calculation, but also compliance with certain nuances and rules. For example, the best option is to build a shelf open from below. This ensures the ventilation of the wood and its accelerated drying. The practicality of this design lies in the fact that during cleaning in the room, nothing will interfere with mopping.

Another nuance of installing a shelf is that it is better to place it at a slight slope. This measure does not allow water to linger and contributes to the rapid drying of the surface. wooden planks. The dimensions of the shelves in the bath may be different, but it is recommended to adhere to accepted standards.
One of the most common problems associated with the use of bath furniture is the occurrence of fungus on it. In order to protect the structure from decay, special rubber pads should be installed. These elements can be made of polymeric material. They are mounted in the space between the floor and the vertical support bars.
A design of this type should not only be comfortable and functional, but also have a presentable appearance. All corners must be rounded to avoid injury. It is also very important that the surface of the wood is smooth, without knots and cracks. All individual structural elements must be mounted in such a way as to exclude gaps between them, due to which the canopy will creak and stagger. The height of the shelf in the bath should meet the general standards and needs of the owners.

Helpful information! When choosing boards, one important rule must be taken into account: their width should be 4 times the thickness. A board corresponding to such geometric parameters is the optimal solution for a bath. It dries very quickly, which prevents the formation of fungus.
Before proceeding with the assembly of the shelf, you must choose one of several ways to fix the boards on the frame. It is important to remember that the metal elements in the structure should in no case be located in places that the body can come into contact with. Therefore, it is best to screw the screws in such a way that their caps are located on the inside of the canopy. Otherwise, you can get a painful burn.
If necessary, you can buy shelves for the bath and pay the master who will install it. However, the financial costs in this case will greatly increase. The design of the canopy itself is quite simple, if we consider standard model so it's better to assemble and fix it on the wall by yourself.
To achieve maximum comfort, you can supplement the design with a comfortable backrest. For these purposes, several smooth boards should be prepared and fixed on rails fixed to the wall. The distance between them should be at least 5 cm to ensure normal ventilation. In addition to the backrest, you can independently make supports for the legs. All additional structural elements are usually made from the same wood from which the shelves are made.

Multi-stage bath shelves: is it worth it?
The feasibility of organizing a structure that includes two or three tiers is primarily determined by physical laws. When the room warms up, hot air rises, and in the floor area the temperature rises, but not so much. In the case of installation of a multi-stage structure, it becomes possible to select the required temperature regime.
Making a shelf in the bath with your own hands is not so difficult, but the construction of a multi-stage canopy takes more time. Of course, everyone independently determines the need for a two-tier or three-tier structure. If the bath will be used only by households, then simple one-story canopies can be made, supplementing them with benches.
In small bathhouses that suffer from lack usable area, the lower floor may be slightly higher than the floor level. But in this case, there are some advantages. For example, this design is well ventilated, which contributes to the rapid drying of the boards.

Experts recommend taking into account when drawing up a drawing of a shelf in a bathhouse that the upper floor should be wider than the lower tier. In the case of a competent distribution of dimensions, it becomes possible to use the second floor as a couch.
How to make shelves in the bath with your own hands: seat selection
After choosing the type of structure, as well as calculating its dimensions, you need to correctly select the place in which it will be located. This decision is influenced by the type of bath. For example, it is customary to perform water procedures in a Russian steam room lying down. In turn, the Finnish sauna implies the presence of places that are made as comfortable as possible for a sitting position.
In the preliminary drawing, it is necessary to indicate the dimensions of the room, as well as its features. The scheme must necessarily contain door and window openings, as well as mark the place where the boiler and any other equipment is located. Based on this drawing, you can determine the most suitable space for installing a shelf in the bath with your own hands. Photos of finished premises will help to visually assess the advantages of one or another option for the location of this structure.
Note! Canopies are not recommended to be mounted under window openings. This is due to safety rules, as the glass may not withstand high temperatures and burst. As a result, fragments can cause harm to people resting inside the steam room.

Depending on the individual conditions in the bath and the preferences of the owners, the canopy is installed on the base (legs) or fixed directly to the wall. It is worth noting that the shelves should not fit snugly against the walls, as this negatively affects the circulation of air flows. The recommended distance between the lags and the wall is 10 cm. The slats are fixed to the surface, which will serve as the basis for the vertical structural elements.
To make a shelf in the bath with your own hands, you should purchase material suitable for this purpose in advance, as well as prepare tools. When fixing individual structural elements with self-tapping screws, it is necessary to screw them into the wood in such a way that it is impossible to get hurt about them in the future.
When positioning the canopy, it is also necessary to take into account the distance to the doorway so that it does not interfere with free entry and exit. This design should be located at a distance from the boiler and not interfere with free movement around the room. Guided by the above rules, it will not be difficult to correctly select a place for a bath shelf.

Do-it-yourself shelves in the bath: ways of fastening boards
The strength of the structure, as well as its durability, depends on the method of fixing the boards. To date, there are three main options for fixing these products, each of which has its own advantages and disadvantages:
- by means of self-tapping screws that are recessed into the wood;
- self-tapping screws with outer side;
- oak wedges.
The first way is the most common. It is this option that is most often used when building a bench for a bath with your own hands. In order to sheathe the frame with boards, self-tapping screws are used, which must be driven as deep as possible into the wood. They can also be used to fasten boards from the outside, but this method is not as popular as the first.
And finally, the third way is to use oak wedges. This method is recommended by experts, as it is the most environmentally friendly. The technology of this method involves the organization of special holes into which oak wedges are hammered.

Fixing the boards for the backrest is done in the same way as the sheathing for the shelf. The only difference in this case is the wider gap between the individual elements. A photo of a shelf for a bath will allow you to quickly figure out how to attach the sheathing to the frame. It will not be superfluous to watch several videos on this topic, in which all the nuances of the installation are clearly explained.
How to make shelves in the bath with your own hands: a step by step guide
In order to make shelves, you need to make a drawing. If necessary, you can use finished scheme, but it must fit your requirements. Therefore, you need to take the choice of scheme very carefully. Further work is carried out in accordance with the step-by-step guide. Do-it-yourself shelves in the bath can be assembled only if suitable material is available. To install the canopy in the steam room, you will need the following tools:
- ordinary hammer;
- construction mallet;
- screwdriver;
- hacksaw (for metal);
- chisel;
- yardstick;
- self-tapping screws.

Helpful information! Fixing the skin to the frame can be done in a non-standard way, which involves the use of wooden wedges. However, in this case, some carpentry skills and the ability to make an accurate calculation are needed.
In order to answer the question of how to make a canopy in the bath, you need to carefully follow the instructions. Any deviation from general algorithm actions may lead to installation errors. First you need to determine the location of the supporting elements. This parameter is calculated taking into account their thickness. For example, products having a thickness of 22 cm must be installed at a distance of 60 cm from each other. This will allow you to optimally distribute the load.
The do-it-yourself drawing of a shelf in a bathhouse, drawn up earlier, should contain information about the geometric parameters of the parts and their number. All of them must comply with certain standards, namely: not have traces of decay, be smooth, not contain cracks and knots.
The thickness of the boards that will be used for sheathing the frame may be different. When choosing this indicator, you should pay attention to the width of the product. The larger it is, the thicker the board will be required, since wide and thin boards may not support human weight. The optimal ratio of width and thickness is 4:1.

How to make a shelf in the bath: making a frame and fixing it
The frame is the basis of the entire structure, so careful calculations should be carried out before assembling it. During its installation, you must be careful and try not to make mistakes. Outside, the frame resembles the supporting structure of an ordinary bench.
To install the base you need to purchase wooden bars corresponding to the future dimensions of the shelf in the bath. Photos of this design can be easily found on the Internet. The most common bars with dimensions of 50 by 70 mm. The number of such elements, as a rule, is 10 pcs. To give the structure the required stiffness index, it will be necessary to prepare 5 boards that will be used as racks.
The support posts are joined together by means of transverse wooden products. They are called jumpers, they are used to give the structure sufficient strength. If all the work is done correctly, the result will be a reliable support structure that will last for many years.
When fixing the shelves to the wall, it is necessary to ensure air flow, leaving a small gap of 10 cm between them. It is worth noting that the frame for the upper tier should be assembled first (if a two-story structure is assumed). Then the carrier racks are fixed to the wall. The step between them varies depending on the dimensions of the structure and can be from 60 to 85 cm.

Thus, it is produced First stage fastening benches in the bath. It is not so difficult to perform the above operation with your own hands, however, you need to calculate everything in advance and from time to time check the work with the scheme prepared before starting the installation.
At the next stage, it is necessary to make a recess (step) in the bar, which will be needed to organize the fastening. Fixation in this case is performed using the “lock” technique. Then, on the side opposite the supports, the second row of racks is mounted. After that, it is necessary to combine their upper ends by means of a transverse beam. In order to enhance the strength of the structure, it is recommended to use metal corners.
Helpful information! It is advisable to prepare the building level in order to make exactly the shelves in the bath with your own hands. A step-by-step guide, drawings and dimensions, as well as expert advice will help you assemble a reliable and durable wooden structure.
Next comes the sheathing of the bearing supports with wooden boards. All subsequent levels are mounted in the same way. As a flooring, experts advise taking thin and narrow logs. A structure made of such elements will be well ventilated and dry quickly, which will increase its service life and protect the shelves from rotting.

How to make a shelf in the bath: sheathing the frame with boards
In order for a do-it-yourself bath structure to be more stable, it is recommended to use rubber gaskets. These elements are located at the bottom of each bar. The next stage is very important, as it includes sheathing the base of the structure with wooden boards.
How to make a shelf in the bath? For sheathing, you will need to prepare boards from moisture-resistant material. Lags are fixed first on the first floor, and only then on the second. If the design is single-tier, then the work is greatly simplified. The gap between the individual boards must be at least 1 cm. The maximum distance between the joists is 2 cm.
The most preferred way to fix individual boards to the skeleton of the structure is to use only wooden tools. However, such an installation is not always possible, therefore, most often the logs are fixed using ordinary self-tapping screws. Since they are made of metal, it is necessary to exclude the possibility of their contact with the skin of the bather. Therefore, they are either recessed deep into the board, or screwed in from the inside.

In the photo, the shelves in the bath can be sheathed from below. In this case, the boards are fixed so as to close the gap between the seat and the floor. The need for such a solution is determined depending on the individual preferences of the owners of the bath. Such a sheathing looks presentable, however, it makes it difficult to clean the room and prevents the free movement of air masses. And also in this case it will not work to remove the legs under the bench.
How to make shelves in the bath: treatment with a protective compound
At the last stage, it will be necessary to process the shelf with a protective compound. This procedure is aimed at improving the technical characteristics of wood, which will extend the operational life of the structure as a whole. Most people believe that traditional bath furniture does not need additional processing, as it is very reliable in itself. In principle, this statement is true, but only if the structure is well ventilated.
If you are not sure that a sufficient amount of air is supplied to the shelves, then it is best to play it safe and use a special composition. First, an antiseptic must be applied to the benches, which must penetrate the structure of the tree. It is worth noting that this procedure can be done before installing the canopy. It is recommended to process the shelves for baths purchased at retail outlets. You can buy a protective composition in any specialized store or order it online.

Note! The antiseptic will protect the wood from the occurrence of fungus or mold on it. Rotting bath furniture is a problem that most steam room owners face. In addition to special preparations, there are budget options for impregnation. For example, the most affordable of these is ordinary linseed oil.
Today, compounds are common that have antiseptic properties and at the same time protect the wood from moisture, impregnating it through and through. Bleaches, which are used in case of darkening of the tree, also have certain protective properties and increase the resistance of the board to the effects of temperature. Some compositions are made specifically for saunas, so it is recommended to clarify their purpose before buying.
The task of choosing an impregnation is no less important than the answer to the question of how to make a shelf in a bath. It is important to remember that in no case should varnish or other chemicals that are not suitable for steam rooms be used for such furniture.

It is also strictly forbidden to paint the canopy with paint. This is due to the fact that the above substances are not resistant to high temperatures and humidity. When exposed to paint or varnish, it will begin to release chemical compounds that are dangerous to human health.
Before applying a protective composition to the boards in the flooring, they must be prepared. The preliminary stage is the processing of wood sandpaper. After that, you need to remove the dust remaining after grinding, and apply the desired composition to the cleaned surface.
In order for bath furniture to serve for many years, you need to study some recommendations for caring for it. The main rule to remember is that after each session in the steam room, the room must be ventilated. This procedure will quickly remove excess moisture from the room. Sometimes a bath oven is used for drying, which is turned on for some time after bath procedures.
A bath is a room in which sanitary and hygienic procedures are carried out. Therefore, the cleanliness in the steam room should be monitored as carefully as in the bathroom. Regular cleanings prevent the accumulation of dirt and the development of bacteria on the shelves in the steam room.
Note! When drying the room, it is necessary to leave everything open and the windows, and the containers located inside the steam room, on the contrary, must be closed.

After each procedure, it is recommended to wipe all surfaces using a dry towel. Such a measure will significantly speed up the drying process of wooden boards. It is worth remembering that natural materials should not be treated with cleaning products containing active chemical compounds. The best option in this case, there will be the use of laundry soap.
Self-assembly of bath furniture requires careful preparation. Before starting work, you will need to complete a drawing that includes all the necessary dimensions and data about the room and the shelf structure itself. If you are not confident in your own abilities, you can always use the services of specialists. After installation, do not forget that bath furniture needs special care.
What does a person who enters the steam room see, in addition to the beautiful finish, competently mounted by the attentive and economic owner of the bath? First of all, his attention is drawn to the stove, which is the "heart" of any steam room, as well as shelves on which you can comfortably (or not very, if something is done incorrectly) sit down for the duration of the bath procedures. It is the last item on the list that will be discussed next.
For an uninformed person, the shelves in the bathhouse are an elementary structure, consisting of 1-3 wooden benches. In practice, everything is much more serious and interesting. Did you know that shelves can be made from different materials? At the same time, the configuration and dimensions of structures can also vary. With all the mentioned nuances, as well as instructions for self-manufacturing shelves for a bath you are invited to familiarize yourself with the study of the information below.


First of all, you need to pay maximum attention to the choice of material for the manufacture of bath shelves. In the process of determining the best option, it is necessary to take into account the extreme temperature and humidity conditions in which it will be used. Traditionally, shelves are made of wood - any kind of application synthetic materials should be excluded completely.

It is important to understand the fact that not every type of wood is equally well suited for the manufacture of the considered elements of the bathing environment. You can use only those materials that fully comply with the following requirements:
- have low thermal conductivity;
- do not contain resins in their composition or include them in a minimum amount;
- characterized by high fiber density;
- normally tolerate operation in conditions of high humidity and temperature extremes.


Since ancient times in Russia, bath shelves were made of aspen and linden wood, sometimes poplar and birch were used for this. Relatively recently, the list of suitable materials was replenished with a guest from distant Africa - the abachi tree. The listed materials fully comply with the above-mentioned requirements for wood suitable for the manufacture of bath shelves. Moreover, each of them has both a set of strengths and weaknesses.


Important! Making wood shelves conifers it is impossible - the resin released during heating is unlikely to give pleasant sensations to visitors to the bath.
You can find information about the most commonly used materials for the manufacture of bath shelves today in the following table.
Table. Materials for the manufacture of shelves in the bath
MaterialDescription
  |
Nearly perfect material - knots are practically absent; - processing is easy and fast; - the material heats up slowly and dries quickly; - wood does not crack; - there are no ugly sweat marks on the surface of the finish; - in the process of heating, the wood emits a pleasant light smell; - the material has been famous for its healing properties since ancient times; - Linden is relatively inexpensive. Many advantages and only one drawback - a fairly rapid darkening in the temperature and humidity conditions of the steam room - make linden wood excellent material for the manufacture of bath shelves. |
 |
Aspen is the most budgetary representative of the category of materials, the properties of which allow them to be used in the temperature and humidity conditions of the steam room. In addition, aspen is famous for its rather serious durability, slight inclusion of knots, as well as the amazing ability to absorb all negative energy, "purifying" a person and improving his well-being. There are no complaints about the appearance of aspen - the material is quite attractive. Along with this, under a beautiful “cover” a huge nuisance characteristic of aspen can be hidden - the material is prone to rotting from the inside. If you decide to make bath shelves from aspen, if possible, be sure to saw at least a couple of boards from the batch in order to check the material for the mentioned flaw. |
 |
The abachi tree grows in hot and humid climates. The origin of the material allows it to “feel” ideally in conditions typical for a steam room. Abashi endures operation in the temperature and humidity conditions of the bath, retaining its original characteristics and appearance for the longest possible time. At the same time, the external properties of abasha are at their best - the material is presented in the widest variety of shades, from yellowish to pleasant cream. The subjective disadvantage of this wood is only its high cost, when compared with the options discussed above. |
In addition to choosing the material for the manufacture of bath shelves, it is also necessary to choose the optimal composition that will ensure the longest possible service life of wood, reducing the intensity of the harmful effects of high humidity and extreme temperature changes on it.


The conditions typical for a bath make it impossible to use the usual drying oils and oil paints- such materials, firstly, will not be able to ensure the safety of wood in the steam room, and secondly, when heated, they will emit substances and compounds harmful to human health.
The best option is to use special oil-based impregnations. After applying these, the surface of the wood is covered with a kind of protective film resistant to high temperatures and excessive humidity and harmless to humans.
Video - Wood protection in the bath
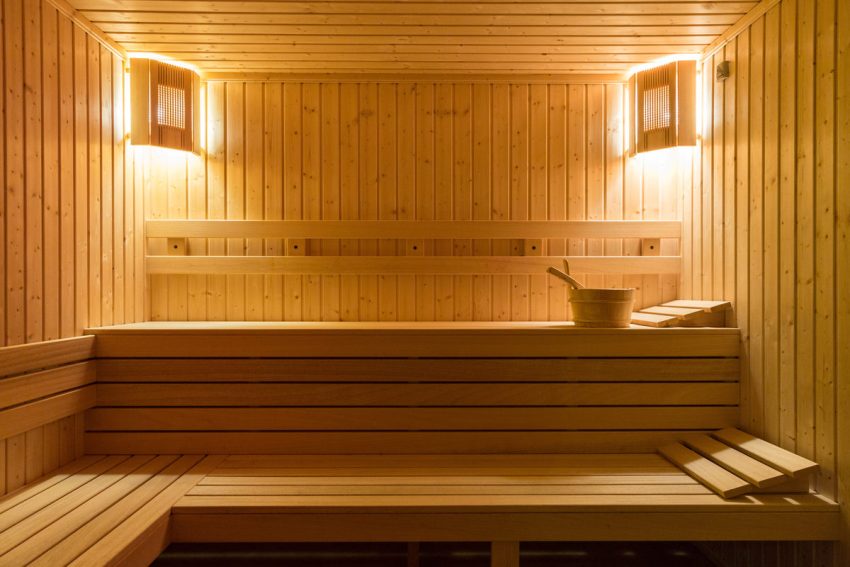
Bath shelving design
According to the principle of use, the bath shelf is an ordinary bench, a wide comfortable seat, assembled and installed in the steam room in compliance with the provisions of the relevant technology.
The main structural elements of bath shelves are, firstly, the frame, and secondly, the flooring.
The frame performs the functions of a kind of support, the base to which the boards of the stationary flooring are fastened or the construction of the dismantled flooring system is carried out. For the manufacture of the frame, a wooden beam is used, the section of which is selected individually, taking into account the characteristics of the system being equipped and the expected magnitude of the loads (the most commonly used material is 5x5 cm in size).
The support posts are installed in a vertical position and fastened with transverse jumpers - this is the most popular method. There is also a method of arranging the frame according to the type of stair stringer. And an even more rarely used option for arranging bath shelves is their installation in accordance with Finnish technology, when choosing which the frame is fixed without supports, and the seats and deck chairs look like a shelf attached to the wall, similar to those present in train cars.
Scheme existing structures frames for bath shelves are presented in the following images.


For the construction of flooring, aspen or linden boards are usually used, if there is a sufficient budget and desire - from abachi. Boards are stuffed with 10-20 mm gaps.
Important! The flooring elements must be carefully sanded, at least from the front side and ends, so that visitors to the bathhouse do not get hurt and do not drive splinters.
There are 2 main flooring options:
- stationary, in which the boards are attached to the frame with nails / screws or other suitable fasteners;
- removable - the boards are assembled into separate elements that are laid on top of the frame without providing permanent fastening with it.


The main advantage of the second option is the ability to take the flooring out of the bath and ventilate it outside the room.
If preference is given to stationary flooring, the fastening of the elements must be carried out in compliance with important requirements listed below:
- fixing the boards is best done with wooden nails or pins. In the case of using self-tapping screws, they must either be equipped on the inside of the flooring, or buried in the material by 1-2 mm;
- boards are fastened with gaps of 10 mm or more to ensure efficient air circulation inside the structure and exclude the possibility of its destruction due to rotting and other problems that occur in unventilated places with high humidity;


- the thickness of the boards is selected in accordance with their width: optimally, when the first indicator is 4 times less than the second;
- all surfaces of the boards with which the bath visitor can come into contact are carefully sanded, and sharp edges and corners are rounded;

The corners of the material for the manufacture of shelves are chamfered or rounded
- boards for sitting / lying can be placed longitudinally and transversely with respect to the adjoining wall, backrests - longitudinally.


Shelf sizes and shapes
In the process of designing shelves for a bath, it is necessary to adhere to established standards and correctly observe key linear parameters. The values recommended below will allow you to get the most comfortable shelves to use, organically fitting into the space of even a small steam room.
With regard to the width of the shelf, the following variations are the most popular:
- 40 cm is a fairly narrow seat, the use of which will be appropriate in a small steam room. If there is enough space, it is recommended to give preference to more impressive values;
- 60 cm - a shelf of medium size;
- 90 cm is a standard and very convenient option. On such a shelf you can comfortably sit with bent legs;
- 150 cm - a wide shelf that allows you not only to sit, but also to lie with your legs bent.
If there is enough space in the steam room, the dimensions of the shelves can be increased at your discretion.


More detailed information regarding the dimensions of the constituent elements of bath shelves is consecrated in the following image.

Regarding the installation height of the elements, the recommendations are as follows:
- 1.1-1.2 m - professionals advise trying to maintain such a distance between the lower step and the second shelf;
- 40-60 cm - the optimal gap between the 1st and 2nd shelves;
- 20 cm - this distance between the floor surface and the lower step is the minimum allowable;
- 1.5-1.8 m is the minimum recommended shelf length.


The following image schematically shows the recommended shelf sizes and distances between different surfaces and elements.

Additionally, bath shelves are classified according to their structural features. There are 3 main options, each of which you can find in the following table.
Table. Bath shelving options
Variety of shelves for a bathDescription
 |
Occurs more often than others. With this design, the shelves are mounted on one wall and arranged in steps. At the same time, on the lower shelf it will be the most “cold”, and on the top shelf it will be the hottest air masses, as you know, are displaced by cold air and rush upwards. |
  |
The best option that allows you to save and make the most efficient use of available space. Shelves are arranged in such a way that the upper and lower of them are adjacent to one wall, and the intermediate part of the structure is arranged on an adjacent wall. |
  |
The arrangement of shelves of this configuration allows you to save some space in the steam room. The principle is simple: when not needed, the upper tier rises to the wall, like a shelf in a train compartment, and if it becomes necessary to use it, it just as easily falls back. |


The simplest design - straight shelves in several tiers (in this example there are 2 of them, you can make fewer or more, based on the same guide) are installed along the wall. As an example, a steam room with a 3 m long wall is taken - one of the most common options. If in your case the length of the wall along which the shelves are installed does not match the one indicated as an example, the differences from the instructions given will only be in the required amount of starting materials and frame racks.
In order for the erected shelves to be as convenient as possible, a number of important requirements must be met in the process of their design.
Firstly, the seat of the lower tier should rise above the floor level by at least 0.6 m. With more modest indicators, spending time on such a shelf can hardly be called comfortable.


Secondly, the width of the shelves should not be less than 400 mm. If possible, it is better to completely focus on a 600 mm indicator as a minimum. In general, this moment is directly determined overall dimensions pair room, available space and owner preferences.


Thirdly, between the seat of the upper tier and the ceiling of the bath, you need to leave a gap of at least 1.1-1.2 m in height, otherwise the visitor to the steam room will rest against the ceiling with his head, which is not very convenient.
To assemble the shelves in a steam room of the mentioned sizes, you will need about 40 m of timber with dimensions of 5x5 cm (or more), from which you will make the frame, and approximately as many boards for the finishing sheathing. Optimal dimensions boards are as follows: width - 120 mm, thickness - about 30-40 mm.


The process of building bath shelves consists of 2 key stages: mounting the frame and arranging the flooring. You can find the order of these events in the following table.
Table. The procedure for arranging bunk bath shelves
Stage of workDescription
  |
In this example, a two-tier structure is being built. The work is performed in the following sequence: - the frame of the upper tier is made. To do this, 12 blanks 120 cm long are cut off from the beam. You also need to make 6 blanks 60 cm long. By connecting the long vertical supports at the top with horizontal jumpers, we get U-shaped racks in the amount of 6 pieces. Their height will be 1.2 m; - we fix the received racks on the wall surface with a step of 60 cm. Wood screws are well suited for fastening, while fixing it is better through wood corks - the presence of such will eliminate the likelihood of moisture accumulation between the racks and the bath wall. If this rule is not followed, the wood will rot very quickly and the shelves will become unusable; - to make the structure more reliable and rigid, we fasten the far free corners of the frame with a long bar. In this example, the wall has a length of 300 cm, we take the corresponding beam. For bonding wooden elements use self-tapping screws or other suitable fasteners; - proceed to the manufacture of the frame of the lower bath shelf. To do this, we take a bar and cut it into 6 elements 60 cm long (they will take on the functions of vertical supports) and a similar number of blanks 120 cm long (they will be used as horizontal crossbars). We fasten the prepared blanks into elements in the form of the letter G, following the above recommendations. Vertical racks should rest against the floor of the steam room. For greater stability, we also fasten the far free corners of the lower tier of the frame with a 3-meter beam. As a result, we got a frame for shelves 3 m long and 60 cm wide. |
  |
Choice Recommendations optimal material for sheathing were given earlier. Having chosen the ideal wood for us, we proceed to the sheathing of the frame. To do this, we prepare the required number of sheathing elements with a length slightly less than 3 m (about 20-30 mm must be left for air gap between the walls of the bath and the sheathing of the frame). We sew in turn as horizontal surfaces frame, and the gaps between the shelves. For fastening, it is recommended to use wooden pins, for example, from oak wood. The disadvantage of fastening with screws / nails is that in the conditions of the bath the metal will heat up quite strongly, and this can lead to burns for visitors to the steam room. If the use of metal fasteners is the only possible option, their heads must be sunk into the wood by 2-3 mm, and the resulting recesses should be masked with wooden plugs. It is also recommended to leave gaps between the floorboards - centimeter gaps will be enough. |
Video - Simple do-it-yourself bath shelves
Corner shelves for the bath are built in a similar sequence. In fact, when erecting a corner structure, the shelves are simply mounted against two adjacent walls and neatly joined at the corners. To ensure greater reliability and rigidity of the structure, an additional corner support post should be installed.


The main feature of the "Finnish" shelves, as noted, is the absence of vertical support posts. The manufacturing technology of the structure is reduced to assembling the seat/lounger frame with its subsequent placement on supporting frames, previously attached to the walls of the steam room, and sheathing.


Recommendations regarding the fasteners used and the required gaps remain similar to the previous instructions: where possible - wooden pins, where not - self-tapping screws with a deepening of the cap into the wood and installation of decorative plugs, gaps - 20-30 mm between the ends of the shelves and walls, 10 mm - between the elements flooring.


For the manufacture of supporting frames, it is recommended to use a wooden beam with an enlarged section, for example, 10x10 cm. You will need a little material (the length of the frame is determined in accordance with the planned width of the shelf), so you will not incur significant costs for its purchase. The frame can be made from 5x5 cm bars (preferably 10x5 cm) or boards with similar parameters.
Let's get to work.


First step. We measure the length of the wall along which the shelves will be mounted. This will allow us to determine the required frame length. Do not forget to subtract 20-30 mm from the obtained value to ensure the gap between the shelves and walls (more the best option is to provide this gap by laying less skin, as in the previous instruction).

We have already determined the length of the product. We select the width ourselves, taking into account the size of the steam room and personal preferences. The width indicator directly determines how much space will be available to the bath visitor for sitting / lying. In the corners we fasten the frame with metal corners and tighten with bolts / self-tapping screws. It is better to do this from the inside of the structure. We also install intermediate transverse rails from the same timber. The recommended step for placing the transverse bars is 50-60 cm.
After assembly, make sure that the frame fits into the available space.
Second step. We fix the supporting frames on the wall with a length corresponding to the width of the equipped shelves. Our task is to fix 2 wooden blocks at the same height. We are convinced of the evenness of fixing the beds with the help of a building level.
For fastening the supports we use screws / self-tapping screws. Fastening is carried out at 2-3 points. The last moment depends on the size of the frame - the longer it is, the more fasteners should be. The recommended step for placing fixing elements is no more than 40 cm.
We fix the lower beds with a protrusion in relation to the upper ones. The length of the protrusion should correspond to the planned width of the bottom shelf.
To provide the necessary ventilation gaps, we put thin plywood strips on the outside of the beds.


Third step. At this stage, our task is reduced to laying the assembled frames on the support beds. To ensure greater reliability and rigidity of the structure, we additionally attach the frames to the wall using screws / self-tapping screws.
Fourth step. We equip the flooring. Boards can be fastened both longitudinally and perpendicularly to the frames of the structure. Recommendations regarding the fasteners used and the gaps between the boards were given earlier.
In this example, the master cuts the already finished flooring into elements of the required sizes. If you wish, you can buy the same one - this moment remains completely at your discretion.
The space between the lower and upper shelves is also sewn up.


Fifth step. We mount the backrest above the top shelf. To do this, we can use either a ready-made corresponding product, or we can build a backrest ourselves by nailing vertical slats up to 1-2 cm thick to the wall in increments of 40-50 cm, and then fixing the boards on them.
The shelves are ready.
Video - Finnish bath shelves
Helpful advice! Based on the same technology, you can make a compartment shelf. The only difference is that the upper shelf in this case is not laid on stationary beds, but is mounted using a folding bracket that can withstand the upcoming loads.
Now you know what bath shelves can be and how to assemble these products on your own. Choose the option you like and proceed with the work, following the provisions of the corresponding instructions.
Video - Do-it-yourself bath shelves drawings
How to make shelves in the bath correctly - instructions
At first glance, bath shelves do not represent anything complicated. However, there are special rules for their construction, which are dictated by the peculiarities of their use. Therefore, in order for them to last as long as possible and be comfortable in use, it is necessary to strictly follow all the rules for their construction. Consider what shelf layouts exist, and also give a step-by-step guide for building a canopy in a bathhouse with your own hands.

Design elements of bath shelves
The bath regiment has another name - a shop. Benches come in different heights, they are arranged according to a certain pattern.
They consist of two main elements:
- frame, which is the base to which the floorboards are attached. The flooring can be fixed or dismantled. The most common is the frame, made of support posts, which resemble the legs of a bench, connected by wooden lintels. There is another option, when the frame is made as a stair stringer, to which the steps of the shelves are attached. Sometimes the frame is built in the likeness of the frames in the sauna. In this case, there are no supports, and the frame looks like a railway shelf fixed to the walls of the steam room.
- Flooring, made of stuffed linden or aspen well-polished planks. Between the boards there should be a small distance of 1-2 cm. The flooring is either fixed to the frame, or is a separate element. Loose flooring can be taken outside to dry. It can also be used as a seat, couch or podium for the attendant. In the same way as the flooring, the backs and sides of the shelves, headrests, and devices that allow you to lie down so that your legs are at head level or higher are made.
Usually a steam room small size, since it is easier, faster and more economical to heat a small room to the desired temperature, so the shelves have a simple rectangular shape(read: "What are the optimal sizes of the steam room"). Usually the shelves in the bath in the steam room look like a staircase with 2-3 degrees. Such steps can look like sun loungers or corner sofas with a rounded shape. However, something like this can only be done in a large steam room.

If there is not enough space in the steam room to build a rectangular lower bench, it can be made in the shape of a right triangle. It is located as follows: one leg should not fit snugly against the wall, and the other against the adjacent shelf.
The reason for the multi-stage shelves in the bath
According to all known laws of physics, steam and hot air rise to the ceiling. After a while, the airflow at the top cools down. Part of it leaves through the ventilation of the steam room, and part falls to the floor. For this reason, it is much hotter at the top than at the base of the bathhouses.

Multistage allows a person to independently make a choice of the best temperature regime for him. Therefore, in order to be able to take a steam bath both at the maximum temperature in the steam room and at a more gentle one, you should make shelves in the sauna with your own hands in the likeness of steps. In a Russian bath, two shelves are most often built, but three can be made, only there should be enough space for them. This means that space must be left for the movement of people in the steam room without injury.
How to arrange shelves
Do-it-yourself drawings will be required for the construction of a shelf in the bath, and all necessary calculations should also be made. A small plan of the room is drawn, dimensions are indicated, equipment installation locations, the location of windows and doors are noted.
It is very important to remember that shelves should not be placed near walls with glazed windows. Under the influence of hot steam, glass can burst and fragments will fall on people. Therefore, in steam rooms with windows there are not many options for arranging shelves in the bath. You can place them only along the walls, where there are no windows and glazed ventilation vents.


There are several layouts for shelves:
- Along one wall in 1-3 rows, placing shelves on top of each other.
- Design in the form of the letter G with various options number of degrees. For example, 2-3 along each wall, the upper and lower shelves along the long wall, and the middle one along the adjacent short one.
- Two parallel structures located along opposite walls in the likeness of a compartment in a train car. Structures can be either symmetrical or asymmetrical.

Before you make shelves on paper in the steam room, you should draw several options and choose the most suitable one from them. In order to properly plan everything and calculate the required amount of lumber, you need to know the exact dimensions of the shelves for the bath.
Bath shelf dimensions
Based on a person of average height and configuration, the following sizes of shelves in the bath have been developed for receiving steam procedures in a sitting or lying position:
- The length of the shelf so that you can lie with your legs bent at the knees is 1.5 m.
- To lie on a shelf at full height without bending your legs, the length should be 1.8 m. But in this case, everything is individual, since all people are of different heights and it may be that even 2 m is not enough (read: "What is the size of the shelves in the steam room needs to be done - advice from practice").
- The minimum shelf width is 40 cm. Most often, this is the lower shelf, which is mainly used as a footrest for the attendant. You can not only stand on such a stand, but also sit if you want to cool off a bit.
- The most common bath benches are 60 cm wide. However, they are not very convenient for soaring in a supine position.
- The width of the shelves of 90 cm allows you to sit across with your legs crossed and lie down for a person of any configuration.

The minimum dimensions are given, but no one forbids making shelves bigger size. But building smaller bath shops is not worth it - they will simply not be comfortable.
Bath furniture height
With regard to the height of the shelf in the bath, completely different principles apply; there are no standard values here. First, the height of the top shelf is determined. 1.10 - 1.20 m are measured from the ceiling and the top shelf is installed at this level. This will allow you to sit on it, and gives you enough room to swing the broom to whip the person's back rather than the ceiling. But in order to be able to do this, holding the broom in bent arm, you should leave more space, about 1.5 m.
Sometimes the top shelf is installed opposite the steam door. This will allow you to get more out of the steam. However, it is not necessary to adhere to such a scheme.


The height of the bath shelves can be 40 - 60 cm. The lower bench should be at least 30 cm from the floor. The height of the shelves depends on their number.
As a rule, the lower part of the structure is not fixed. This allows you to wash and dry the floor underneath. For a sufficiently heavy lower stage, special skids are made that move along rubber guides.
Rules for creating shelves for the steam room
To guarantee the comfort of soaring, safety and long life of bath finishes and furniture, you should follow the recommendations below, which explain how to properly make shelves in a steam room:
- Shelves should not fit snugly against walls.. A gap of approximately 10 cm should be left between them, it is necessary for ventilation. To ensure such a gap, first pieces of timber should be fixed to the wall. The elements of the frame are attached to it with the help of self-tapping screws, while the heads of the self-tapping screws should be sunk into the wood.
- For the construction of the frame, it is recommended take a bar 50x70 mm. In order for the wood to dry completely, the thickness of the board must be 4 times less than its width.
- Depending on the thickness of the planks the required number of supports is determined. If the board has a thickness of 22 cm, then the supports are installed at a distance of 60 cm from each other.
- To make the structure stable, the frame supports should be connected along the entire length with a board from below and from above.
- For all bathroom furniture legs rubber pads should be nailed.
- For fixing boards recommended to use wooden nails or pins that are hammered into the holes drilled under them. If there are only self-tapping screws, then they should be screwed in from the back so that they cannot be burned. If there is no other option but to fix it from the outside, then the metal hats must be buried in the wood.
- Shelf planks should be spaced at least 1 cm apart.
When calculating the required amount of material, you should remember about technological indents.


By Finnish technology shelf devices in the side steam room are made in the same way as the flooring, that is, with ventilation gaps. However, in Russian baths, the side boards were attached tightly to each other, this was done to reduce the heated space. Of course, in this case, the steam room will warm up faster, but the wood that is hidden will dry out much longer. Which option is best chosen by the owner of the bath. See also: "How to make canopies in the bath with your own hands - tips and instructions from the master."
Technology for creating a simple shelf
Here is a step-by-step guide for building the simplest shelves in the bath with your own hands:
- The shelf length is measured. There should be a gap between the wall and the shelf.
- The frame of the shelf is fastened with galvanized corners.
- The frame should be adjusted to the required length.
- Beds are attached to the wall with screws, and a level should be used.
- Further, right and left beds are installed at the same level.
- To provide ventilation between the wall and the shelf on outside pieces of plywood are placed on the frame.
- Floorings are made for the top shelf with a size of 60 cm, for the bottom - 40 cm.
- Shelf frames are attached to the walls with screws.
- Finished shelves should be cut to the length of the frame. Then they are laid in their place and fixed.
- The back of the required size is made and attached to its place.
There is nothing complicated about how to make shelves in a steam room. It is important to follow the above recommendations on how to properly make shelves in the steam room, and take the construction responsibly.
Bath shelves: self-production
What is more important for a steam room - a good hot stove or a comfortable shelf? More important the right combination these two components. In order for the soaring process to proceed as expected, not only strong heat is important, but also a comfortable position of the body in order to perceive it. Sitting or lying down, just soaking up steam or whipping the body with a broom, opening the pores in such a way as to get the maximum benefit and not overheat. This means that the height of the shelf, its shape, the distance from the source of heat, as well as the width and length of the bench are important - everything should be comfortable, made according to the rules, in compliance with technologies from A to Z.

Shelf design


What is a shelf? This is a design of benches of different heights, combined into a single set of furniture for the steam room. The structure consists of a frame, which is a support and flooring, which can be both stationary and removable. Removable floorings are convenient in that they can be thoroughly dried in the sun after winter use, as well as an audit of the frame and a thorough cleaning of the steam room.
The frame is a structure of vertical racks, which are the support and crossbars necessary to give the structure rigidity. The frame can be made in the form of a shelf rigidly attached to the wall, it can be in the form of a ladder with two or three steps.
The flooring is made of polished boards, joined together with a gap of 1.1.5 cm. It serves as a couch or seat, can be equipped with a backrest, pillows in the form of a triangle, which is important in order to be able to take a comfortable floor while lying down.
As a rule, private steam rooms cannot boast large area, in them the shelves are placed along a long wall, full face to the stove or they are designed according to the principle of a compartment consisting of an upper and lower shelf. If the area allows, they make corner frames, rounded, paired, and even with triangular inserts. Multi-tiered structures of complex geometry require complex calculations and precision execution.


Advice! If the room is small and you want to make the design original, you can combine the rectangular shelf design with a triangular or square insert adjacent to the side. These so-called seats will be useful for those who cannot stay in the steam room for a long time.
What is important to know when making your own?
First of all, the right choice of material is important. room with high humidity, high temperatures, drops requires the use of wood, which:
- has low thermal conductivity, does not heat up under the influence of heat;
- the highest levels of hygroscopicity;
- does not emit resin.
It is best to use linden, oak or aspen, but recently these species have been few on the construction market, they can be replaced with birch, poplar, maple or cedar.

The location of the shelves should not interfere with the movement of people and air circulation, you need to plan the space in advance, before the walls are erected. It is useful to prepare drawings in which all the details will be taken into account, as well as to prepare the tools and materials necessary for work. In addition to the wood for the frame, on which the 50x70mm beam goes, you will need finishing board for flooring. If lining is used, it is required to join it in compliance with the gap. The number of supports from a bar depends on the length of the shelf, the step of the supports is 0.6 cm, the standard board for a bench designed for 4 people is 22 cm.
For installation, self-tapping screws with special plastic caps, wooden dowels, rubber gaskets, small blocks and impregnation will come in handy, which will need to process everything wooden details designs.
Do not do without such tools as:
- hand saw;
- electric planer;
- Grinder;
- screwdriver;
- a hammer;
- brushes.
The shelf material must pass quality processing, must be carefully sanded, impregnated, treated with linseed oil.
Advice! Drying oil, lacquer cannot be used in a steam room, when heated, they emit volatile components that cause allergies, fill the air with unpleasant odors that create discomfort. Oil-based impregnations should be used.


Do not use metal fasteners in the bath. It is quite unpleasant to sit on a red-hot nail head. It is better to mount the elements using wooden dowels, wedges, spacers. If the design does not allow to do without metal fasteners, it must be recessed to a minimum depth of 5 mm into the surface or screwed from the wrong side of the frame.
Why build multi-tiered options?
The best shelf is the one that consists of several tiers. The heated air rises, creating the most extreme conditions hovering on the upper tier, then cooled under the ceiling, flows down, where it creates gentle conditions for taking a bath procedure. Thus, different conditions are formed in the steam room, you can sweat well upstairs or relax in the comfortable warmth of the middle or lower shelf.


In addition, the multi-tiered design allows optimal use of space, which is especially important for a steam room of a small area. On different floors, several people can steam at the same time, using brooms. The tightness of the steam room creates discomfort, nothing should hinder movement, the possibility of moving, entering and exiting.
The three-tier design allows children and elderly family members to bathe on the bottom bench of the shelf without fear for their well-being.
All these points should be taken into account when drawing up a diagram or drawing of a shelf. The drawing will not allow you to make mistakes, forget something or do something against the rules.
The drawing is done like this. First, a plan of the room is applied, then the dimensions are put down, in accordance with them, the equipment, stove, believe, windows are placed. It becomes clear where and how to arrange the shelves with the greatest space savings.


Important! You can not install shelves along the wall with windows. It is better to place them along the blind walls, at such a distance from the stove that it guarantees against burns, and also the jets of steam from the heater should not be directed at people.
Steam that is directed towards wooden structures, destroys them.
Correct placement: determination of dimensions and height
The presence of windows makes it difficult to arrange the shelf. If the steam room has a window or an outlet, the options for placing bath furniture are limited. However, shelves in several tiers can be arranged in a straight line, equip the structure in an L-shape, you can make an asymmetric design or place shelves on opposite walls. You can make folding decks that allow you to expand the space if the steam room has a minimum number of visitors.
Drawing up a drawing will help to correctly calculate the load, purchase right amount material, as well as determine the dimensions of the seats and beds.
Dimensions
The generally accepted dimensions of furniture for a steam room for body position, lying and sitting were formed as a result of the standard dimensions of the room. For the prone position, a length of 1.5m to 1.8m is required. It is more comfortable to lie on your back with your legs straight, but if the space is small, then make the minimum length. If the area of \u200b\u200bthe steam room allows, then the length can be made in 2m.
The width of the flooring cannot be less than 40 cm, it is usually used for the lower shelf, which serves both as a couch, where it will be convenient to sit down and as a lower step for climbing to the upper tiers. The traditional width of the bench is from 60cm to 90cm.
Height
The height of a multi-tiered structure is determined by the distance from the ceiling to the upper deck. The dimension should take into account the height of the person sitting on it, as well as the swing of the broom in the attendant's hand. standard height from the ceiling is 1.1m - 1.2m. The next tiers are separated from each other at a distance of 0.4 m - 0.6 m. To build the required number of tiers, it is permissible to apply a tolerance of 20 cm. The bottom flooring should be located at a height of 30-60 cm from the floor.
Interesting! Sometimes the bottom flooring is not made in the design, but a side bench is used to clean and maintain the shelf. An interesting option is the lower bench on the skids, along which it is pushed back and pushed back after cleaning.
Step by step manufacturing
The assembly begins with the preparation of elements of the desired size. After that, the frame is assembled, for which the beam is mounted, according to the number of supports. There must be a ventilation gap between the wall and the flooring, which is necessary for uniform drying of the boards, for this vertical racks mounted on small bars fixed to the wall, to which the supports are then sewn. The distance between the posts cannot be less than 60 cm.


Racks are sewn together with boards along the entire length. Rubber pads are nailed to the bottom ends of the racks. The frame is ready, you can proceed to the flooring. If you plan to cover the walls with clapboard, you should make an indent between the flooring and the wall for its installation.
Good to know! If you do not make gaps between the wall and the flooring, the room will warm up faster, but the drying of the wood of the floor, the lower elements and the wall will become difficult. There is no consensus that it is better, it all depends on the configuration of the shelf, the ventilation of the room and other nuances that are characteristic of a particular steam room.
The flooring is made with a slight slope of 2 ° for water flow. Floor boards must be durable, well-finished with an attractive smooth surface.
In conclusion, we can say about the need for footrests so that they can be raised above the position of the head, the outflow of blood from the lower extremities is useful for the procedure, rollers under the head and others small items comfort-enhancing procedures.
How to make shelves for a bath with your own hands + VIDEO
Shelves (shelves) for baths and saunas can be made independently, but it is necessary to take into account some of the subtleties that exist in any business. Consider the possible designs of shelves for the bath and best way production of a two-level shelf.
Material for the manufacture of shelves
Since the temperature in the steam room is much higher than in the sink, pine cannot be used, as it has a high thermal conductivity (it gets very hot), which can cause burns. Wood for shelves should have the following properties:
- Low thermal conductivity;
- No resin;
- high density;
- Resistant to high temperature and humidity.
By and large, there are two candidates: linden and aspen. A more budget option is linden, it is on it that you can stop the choice.

Linden - one of the best materials for the manufacture of shelves in the bath
Bath shelf designs
The arrangement of shelves in the bath (steam room) depends on the size of the room. If the room is large, then you will need racks of large cross-section bars, at least 100 x 50 mm.


The seat is very often made from the same lining that the walls of the bath were sheathed.
As a rule, shelves are two or three tiered.

Three tiered shelves in the bath
If the height of the ceiling in the steam room does not exceed 2200-2400 mm, then a two-tier structure is quite enough.
Two-tier shelves in the bath
There are many options for building regiments, one of them is shown in the video (a builder from Finland works). The example is good because the shelves are made without the use of support posts, which, as a rule, are most susceptible to decay, as they are in close contact with the floor.
Making the top shelf
First make the top shelf. For work, self-tapping screws with a nano coating (do not rust) and a screwdriver are used. Pay attention to the following:
- The shelves are assembled in such a way that there is a gap between the wooden parts. Thanks to the gap, the wood will dry out faster and mold will not appear.
- The self-tapping screws are screwed in such a way that after assembling the shelf, it is impossible for the human body to come into contact with the caps of the self-tapping screws - with such contact, you can get burned, since metal objects are very hot in the steam room.
- It is desirable that the distance from the top shelf to the ceiling of the bath is at least 1.2 meters, otherwise it will be inconvenient to sit on the shelf, and even more so to bathe.
- The width of the shelves should be at least 40 centimeters. Top shelf it is better to make at least 60 centimeters wide so that it is comfortable to lie on it.
- Boards or lining must be well processed, i.e. do not contain "splinter".
Making the bottom shelf
The bottom shelf is made in the same way as the top one. At the last stage, the back of the rails is attached above the upper shelf.
How to protect shelves from decay?
On sale there are many impregnations for wood, designed to protect against decay. Alas, most of them cannot be used in a bath, since the vapors of many impregnations are harmful to human health. It is necessary to use an impregnation that will not harm health, for example, SUPI SAUNAVAHA (“Supi Saunavaha”) from TIKKURILA, which contains natural wax in its composition.


Impregnation with wax for the shelves of the bath and sauna company TIKKURILA
Many lovers of the Russian bath, in principle, do not use any impregnation for the walls and shelves in the bath. Indeed, the use of impregnation is not mandatory in the construction of baths and saunas, however, impregnation provides hygienic protection of wood from the effects of the human body.