Alignment of the walls along the lighthouses - we create the ideal surface of the wall. Do-it-yourself wall alignment with beacons: we align the walls with plaster along the lighthouses correctly Lighthouse for leveling walls
The issue of wall alignment worries everyone who is faced with repairs. In old houses and new buildings, the problem of curved walls is equally relevant - they rarely meet perfectly. smooth surfaces ready for decorative trim. The fact is that before the rooms were finished tiles or colored wallpaper, today thin is in fashion decorative plaster, coloring, textured wallpaper. All this further emphasizes any irregularities.
Price plastering works just rolls over, so aligning the walls with beacons is the most acceptable way to family budget. About how to install beacons, how to align plaster mixture and bring your repair to the final stage, and will be discussed in this article.
Preparing walls for leveling
Before starting work, it is necessary to determine the degree of its complexity. Most often, blockages of walls are observed in apartments, when one of the edges or the center is several millimeters lower than the rest of the surfaces.
It is not difficult to deal with such problems, it is enough to bring the problematic part to the general level. It is much more difficult to level a wall with multiple defects: bulges, depressions, potholes, cracks.

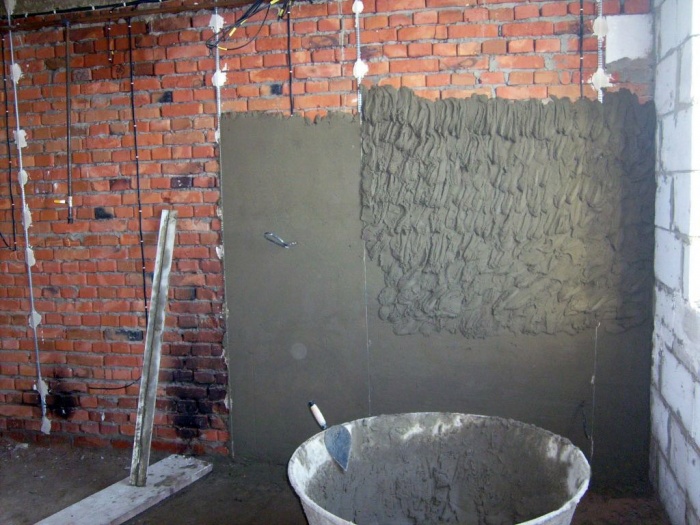
To align the walls with the beacons, the surfaces must first be prepared. Several stages:
- Tap the entire surface with a chisel, identify voids and loose, unstable places. Cracks widen and deepen a little, knock down unstable plaster. The easiest way to plaster new walls is brick, block or concrete.
- Delete old paint, mold and fungus clean off and treat the areas with an antiseptic.
- Solve everything large cracks and chips. Wait for the mixture to dry.
- Vacuum the walls or sweep them thoroughly with a damp broom - the surface should be as free of dust and debris as possible.
- Apply a primer to the walls, it is better to choose a material such as "Concrete-contact". This primer paints the walls in pink color, which helps to notice gaps and poorly processed places. The soil is needed as a binder for the top layer of the old coating; to create a barrier to the water contained in the plaster; as an antiseptic agent that prevents the formation of fungus and moisture.
- Dry the walls thoroughly.
Advice! For the preparation of non-plastered walls, it is better to use special primers for a specific material (brick, gas silicate blocks, concrete plates, tree, etc.).

What are lighthouses
Lighthouses for leveling walls are a kind of zero level that you need to go to, creating a new surface.
Professional plasterers do not use any beacons, they can work with one rule. But in order to make repairs with your own hands, it will be better and more efficient to use these "reference points".
As beacons, most often used:
- plaster cakes;
- galvanized or aluminum perforated profiles.
Lighthouses made of gypsum or alabaster mixture

In this case, the property of gypsum or alabaster is used to quickly harden. Therefore, the mixture must be kneaded in exactly the amount that can be used up in a few minutes.
First you need to lay a zero line. It is best to draw it near one of internal corners. 10-20 cm are measured from the corner and a vertical line is drawn on the wall with a plumb line.
Relative to this line, dowels or self-tapping screws are screwed into the wall in increments of 15 cm. A nylon cord with a suspended load is attached to the ceiling so that it touches the heads of the self-tapping screws.

All screws are screwed in or unscrewed so that the head of each lightly touches the thread. Concerning hats impose required amount gypsum mixture. They check again with the help of a level - the line along the beacons must be strictly vertical.
Advice! Self-tapping screws must be removed before the plastering stage. If this is not done, the fasteners may rust, the new walls will be covered with ugly spots.
This method is suitable for those who are not faced with plaster for the first time.

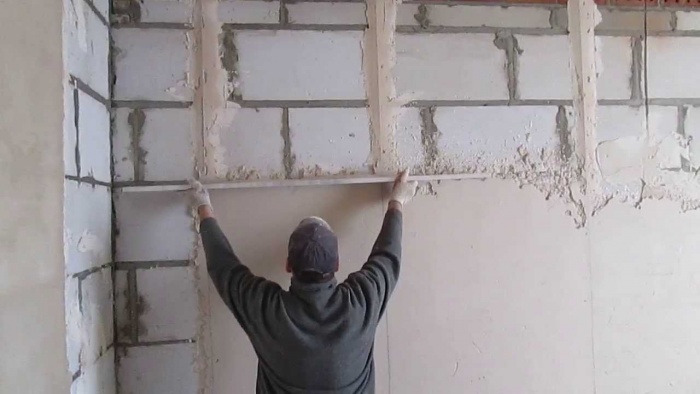
How to install metal beacons
An easier way is to mount metal profiles on the walls. The standard length of a metal profile is 250-300 cm. To begin with, the beacons must be cut in accordance with the height of the ceilings in the room.
Measure 100 mm from the corner and draw a vertical line. It is best to check its evenness with laser level. Small cakes of the mixture are applied along the entire length of this line - this can be the same solution that was prepared for plastering.

Attention! To plaster the walls in the bathroom, in the kitchen or on the balcony you need cement mixtures. In dry rooms, it is more convenient to use gypsum-based solutions: the fraction of the material (and hence the roughness) is smaller, it dries faster and lays down more evenly, thanks to plasticizers and additives.
In the solution applied to the walls, it is necessary to lay metal profiles. As a rule, they use T-profiles made of aluminum - they do not rust, so you can not remove the beacons from the walls after applying the plaster.
Galvanized beacons are best removed immediately after applying the plaster. After all, their zinc protection could be damaged during the installation process or as a result of rule movements. Rust will appear in these places, which can appear on the walls and through the finish layer.
You need to install the profile so that its “leg” is pressed into the solution, and the branched top is above the wall surface. It will be necessary to bring the wall to the resulting height - there are profiles with a height of 6 or 10 mm on sale. Accordingly, for strongly curved walls, large beacons will be required, and 6 mm profiles will be enough to eliminate small defects.
The step between the beacons should be 20-25 cm less than the length of the owner's rule. From each corner, the profile should be no further than 20 cm. When all the beacons for leveling the walls are installed, they are checked building level and the rule.
How to apply plaster on lighthouses
The finished mixture must be distributed between the installed beacons. To do this, use any method. The most convenient way is to throw plaster on the wall with a trowel. Each smear must be fixed on the wall, for this the plaster is lightly rubbed into the surface with a spatula.
Then, resting one end of the rule on the beacon installed at the corner, the second is placed on the adjacent profile. The plaster is pressed with a rule and distributed from the bottom up.
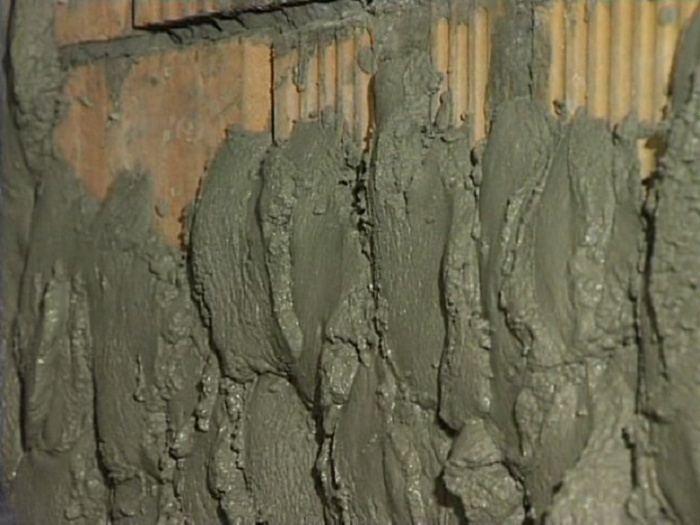
Important! The rule must not only be moved from the bottom up, but pressed with force against the lighthouses and slightly moved from right to left, as if tamping down the plaster. So the wall will become strong, the new plaster will not fall off it in the near future.
The same is done with all beacons, constantly checking the evenness of the resulting surface. The leveled area should become a guide for the rest of the wall.
In the corners, it is more convenient to align the walls with special corner rule. Can also be used common tool, just not too long. It is in the corner that even the smallest unevenness can become very noticeable - when pasting walls with wallpaper with geometric pattern, mounting corner shelves, For example.

For windows and doorways it is necessary to use metal corners to make these surfaces more durable.
Advice! If, after plastering, the walls will be painted or wallpapered, they need to be leveled more carefully. First, the surface is sanded, and then covered with a layer of putty. For decoration ceramic tiles, for example, such smoothness is not only unnecessary, but also contraindicated - the glue will adhere better to a rough wall than to a perfectly smooth one. Therefore, a simple plaster is enough.
If the thickness of the new plaster layer exceeds 15 mm, or if the walls are subsequently to be finished with heavy materials (tiles, stone), the wall must be reinforced. To do this, use a metal plaster mesh, it is nailed to the wall with stainless steel dowels.
In simpler cases - for a plaster layer of 8-12 mm - you can use fiberglass or polymer mesh, they are glued to the walls.

Conclusion
Do-it-yourself plastering of walls along lighthouses is within the power of anyone who has ever encountered cement or gypsum mortar. Given all the nuances, you can avoid problems and major shortcomings. Minor errors are easily corrected using the same solution and rule. Help a novice plasterer can video with step by step description the whole process.
"I told you what it means to level the walls and how plastering differs from puttying. Now, understanding the difference and determining that your walls need to be plastered, you will ask yourself one more question - what type of plaster to choose: "under the rule" or "according to lighthouses"?
To answer this question, you need to figure out what exactly we are achieving when leveling the walls in one way or another. Let's look at illustrative examples.
By by and large, the unevenness of the wall can be classified by three parameters:
- Deviation of the wall from the vertical
- The absence of a common plane of the wall (the presence of waves, fractures, bends)
- The presence of local irregularities (small depressions, cavities, ledges)
How it looks schematically in section.
1. Deviation of the wall from the vertical.
A) The wall can be strictly vertical (we conditionally consider a wall with a deviation of no more than 3 mm per floor height to be vertical), which practically does not occur in construction. B) It can be tilted in one direction or another. C) The wall may have different thickness below and above, thus its sides are littered in opposite directions.

A) The wall can have an ideal plane (we conditionally take such a state of the wall as ideal, in which, under the rule of length 3 m, the clearance does not exceed 1 mm). B) The wall can be unevenly curved, and the curvature can be either smooth or sharp. C, D) The wall throughout its entire length can be in the form of a convex or concave lens, gaps when measured as a rule exceed 3 mm.
3. Local irregularities

The wall may be vertical, have a fairly even general plane, but it may contain defects in places: bulges, deep cracks, cavities, dents, etc.
With what defects can be, we figured it out. Now let's figure out what they affect and why and how they need to be removed.
Wall collapse. Many people think that it is not necessary to level the walls. Like, it is enough to make it even, plastering "under the rule", and there will be happiness. As a rule, the main motivation for customers not to level the walls is the high cost of work and the large volume of bulk materials needed. But what happens if the walls are made even in plane, but not made vertical?
For clarity, let's take a bathroom in which renovation is planned. Suppose, in the left corner of the room, one of the adjacent walls is vertical, and the other has a blockage upwards, while both walls have a flat plane.

What will happen if we take and overlay these walls with tiles?
First, let's take a look at the wall, which has a blockage in level. Since the plane of the wall is even, the tile lays down perfectly, already the eye rejoices.

But now let us turn our attention to the adjacent vertical wall. And what do we see?

And we see a depressing picture: the entire row of tiles, laid in the corner, is cut with a "carrot", and it looks, to put it mildly, not at all as we expected. Important note: the narrower the trimming will be and the smaller the dimensions of the tile, the more this ill-fated angle will be striking. It would seem elementary geometry, but, unfortunately, not all customers understand what the end result will be, and then they grab their heads and start looking for answers to the question "who is to blame and what to do?".
I will disappoint: the one who did not obey is to blame professional advice and decided to save money, and if the tile has already been laid, then nothing will be done - you will either have to put up with what you have, or redo everything so as not to shudder nervously every time the ill-fated corner comes into view.

Now let's see what happens if we pre-plaster a wall with blockage along the lighthouses and make it vertical?

As you can see, even with a very narrow pruning, the angle looks quite aesthetically pleasing. And if we take and make the pruning symmetrical, then the bathroom will become simply amazing.

Approximately similar situation will be, for example, with wallpaper, the only difference is that you will not see any "carrot", however, the pattern on the wallpaper will be more and more sloping to the side in each corner. What is the conclusion? It's simple - when the walls are blocked, they must certainly be leveled. One of better ways to do this is to use plaster "by lighthouses".
Let me give you another common case. Very often, after the apartment is handed over by the developer, it turns out that the walls are not only littered vertically, but also do not form right angles. The gap can be very large: I personally observed in one of the apartments of the Solnechny residential complex (the one near the Devyatkino metro station) a deviation of 13 cm from a wall only 3 meters long. What is the risk? Let's look at the example of the same bathroom.
Let's say our walls are flat and vertical. However, they do not form a 90⁰ angle.

What happens if we close our eyes to this fact, lay the tiles and install the bathtub?

Everything seemed to work out well. The walls are even, the bathtub is white. But there is one small nuance.

Yes, yes, you understood correctly: the bath is not adjacent to one of the walls. Moreover, the more obtuse the angle between the walls, the wider the gap between the bathroom and the wall and the more difficult it will be to eliminate. Yes, of course, someone will say that you can apply decorative corner or a curb, you can go into the wall and get a bath under the tile, however, with a gap of 3 cm or more, this will be very, very problematic. Decision? It, as someone may have already guessed, is - to plaster the walls along the lighthouses and bring out the desired angles. As a result, it will turn out as we did when repairing a turnkey two-room apartment:

Agree, looks much more aesthetically pleasing?
So, with the deviations sorted out. We pass to the plane of the wall.
Suppose we decide to hang such a shelf on the wall (ignore the design, I drew it from the bulldozer):

We lean it, everything seems to be fine:


We see large gaps between the plane of the wall and back wall shelves. This is because the wall has the shape of a convex lens. The larger the radius of this lens and the longer wall, the less noticeable this defect will be. Therefore, when the walls are leveled according to the rule, it is often called "visual alignment" - when viewed with the naked eye, it seems that the wall is even, but as soon as you start attaching long and dimensional objects to the wall, it turns out that not everything is so great. The fact is that often the rule is pulled from the bottom up, and if the wall has a similar curvature, then small irregularities will be removed when leveling, but the rule will move in an arc, repeating the bend line, and as a result, a carefully smoothed radius surface will be obtained. To avoid such an effect, the wall must be plastered along the lighthouses - so we will not only make it vertical, but also create a perfectly flat plane. For clarity, I will give a link to, in which I talked about poor-quality bathroom renovation. It's right there during installation. interior door the problem of poor-quality alignment of the walls was clearly revealed.
I think there are quite enough examples to understand that plastering on lighthouses, as one of the ways to level walls, is a necessity. Neglecting the alignment of the walls on initial stage repair, the customer risks getting a whole set of problems at the stages finishing. And redoing something "later" is much more difficult ... Do good repairs, take care of your nerves, do not save on the right things, and everything will work out.
Did you like the material? Please support the author, share the link with others.
*All materials posted on the site belong to their respective owners.
One of the ways to level walls, which is still relevant today, is their plastering. But modern finishing standards require the ideal geometry of work surfaces, including wall surfaces. In order to achieve the maximum compliance of the walls with the requirements, beacons are installed before plastering - guides that indicate the vertical plane and set optimal thickness finishing layer.
When are walls leveled with plaster?
Alternative to plaster modern way wall alignment is the creation of a surface from sheet materials, among which the most used is drywall. They are sheathed with a pre-created frame made of profiles or GCR is mounted directly on the wall using a special adhesive composition. The technology is convenient, allows you to quickly create finishing surfaces that meet the requirements. However, there are several disadvantages to leveling walls with GKL, which give rise to many consumers distrust of this technology:
- insufficient strength of the false wall sheathed with drywall;
- significant concealment usable space when installing GKL on the crate;
- the high cost of this method of leveling walls.
Taking into account the disadvantages of wall cladding sheet material, many consumers prefer plastering the base wall surface both when renovating old premises and when finishing new buildings. So that the finishing surface meets modern requirements, use the technology of aligning walls with lighthouses, which allows you to get a solid and at the same time a vertical and even wall.
For plastering residential premises, modern packaged mixtures on gypsum and cement base. The former are used in rooms with normal humidity, the second - in bathrooms, kitchens and bathrooms. In these rooms, porcelain stoneware is often used as a finishing cladding or, requiring as a base moisture resistant plaster based on cement, having a high affinity for tile adhesive.
Often along beacons in technical and utility rooms not only from the inside, but also from the outside. In such situations, in order to save money, a solution is often used. self-manufacturing based on cement and sand as a filler. The use of guides allows you to get a high-quality surface even when using cement-sand or lime mixtures prepared by yourself. However, the quality of a plastered wall when leveling walls with beacons depends not only on the type of mortar used and the ability to use it, but also on what is used as guides.
What is used as guides - from old-fashioned to cutting-edge devices
In order to qualitatively level the wall with your own hands, you need not only to master the technique of plastering, but also to pick up necessary fixtures that would serve as beacons. The technology of aligning walls with lighthouses appeared a long time ago. It was invented several generations ago to install vertical guides when plastering walls, but then there was not such a variety of technologies and devices that are now used to indicate a vertical plane landmark.
Wooden slats were used as the first lighthouses, which was relevant literally until the beginning of this century. But lumber, especially after getting wet in contact with the mortar, is rarely perfectly even, so the surface drawn along such guides has an appropriate relief. In addition, the thickness of wooden slats that can be used as beacons is never less than 20 mm, which makes it impossible thin layer solution.
It got much better when the first metal plaster beacons appeared. With their help, it became possible to form a vertical plane High Quality. These galvanized steel products resemble the letter "T" at the end, where the protrusion serves as a guide for plastering, and the symmetrical fields are designed to firmly fix the beacon with plaster. These products, which are available in lengths of 3 and 4 meters, are comfortable to use and have sufficient rigidity so as not to deform even when working with heavy cement-sand mortars.
Just recently, they began to practice another way to designate a vertical wall plane. For this, a strong steel fishing line is used, which is stretched between special platforms fixed from above and below, equipped with eccentric adjusting bolts. With the help of the latter, you can very accurately set the position of the stretched lines in space, marking the ideal vertical plane. The downside of this technology is the insufficient strength of steel threads - it is not possible to work with heavy solutions that provide for strong pressure on the beacons with the rule when forming the surface. It is convenient to align the walls along the fishing lines light plaster mixtures.
General principles for installing beacons for plaster - how to do it, what to look for
Whatever devices are used as guides for plaster, when installing them, you need to achieve the following results:
- all beacons for leveling the wall must be in the same vertical plane;
- guides create a reliable stop for working with the rule - they do not bend under pressure on them when plastering;
- the vertical planes of adjacent walls, according to which the guides are installed, form a right angle between them.

In addition, the following rules for the distribution of beacons on the working wall are observed:
- extreme profiles are installed no further than 20 cm from the nearest adjacent wall;
- near the openings (windows, doors), additional guides are placed about 10 cm from the slope boundary;
- the installation step of the beacons is 20-30 cm less than the length of the working rule (with a one and a half meter tool, the distance between the racks is at least 120 cm).
There are many ways to install beacons, and many masters bring their own adjustments to this process, making it convenient for themselves. Here we consider the simplest method with which you can set metal profile beacons quickly and accurately enough. An assistant will be needed to install guides for subsequent plastering. It will be difficult to cope with the task yourself.
- 1. The process begins with surface preparation, during which the wall is freed from unstable areas old plaster, significantly protruding above the total surface of fragments and severe pollution, after which it is primed.
- 2. After the primer has dried, the installation sites of the beacons are marked according to the calculated step and the rules described above. Vertical lines are drawn here, reflecting the projection of the profile racks onto the wall.
- 3. With the help of a level and a rule, the base surface is "probed", during which the most protruding section of the wall is determined, where plaster layer will be minimal.
- 4. Extreme beacons are exposed. First, a hill of thick plaster mortar is formed along the drawn line, into which metal profiles are gradually pressed. At the same time, it is controlled that they are vertical, even and located on required distance from the base surface. After giving the beacons the desired position, the excess solution is removed so that it does not interfere with the course of the rule along the back of the guide bar.
- 5. When the solution fixing the extreme beacons sets, orientation threads are pulled between the exposed racks and the rest of the guides are mounted along them.

Immediately after setting the plaster mixture that was used to install the beacons, you can proceed directly to the plastering of the wall.
We plaster on lighthouses - simply and effectively
The technique of plastering the wall surface depends on the characteristics of the mortar used. The easiest way to work is with light and plastic gypsum mixtures, the most difficult thing is to plaster with self-prepared cement-sand mortars. But in general, the essence of the process is not particularly different.
It is necessary to tightly fill the spaces between the beacons to level the walls with plaster so that the layer protrudes above their backs and then remove the excess mixture with a rule, using the guide posts as a guide. The presence of installed beacons simplifies the work and makes it possible to form a flat vertical surface. In order for the plaster to turn out to be of high quality, you need to follow a few rules:
- if there are significant recesses relative to the plane indicated by the beacons, they are filled with mortar first of all and they begin to plaster the entire surface after setting the preliminary cape;
- they begin to plaster from below, choosing one of the niches between neighboring lighthouses, gradually filling it with mortar and forming a plaster layer to the top, only then moving on to the neighboring area;
- the plaster mortar is cut rigidly along the beacons, so that after plastering a certain area, the backs of the racks are visible.
When the mortar on the plastered wall sets, the beacons are carefully removed, resulting in the formation of vertical grooves. They are sealed with the same solution, using a plastered surface as a guide for the leveling tool.
The issue of wall alignment worries everyone who is faced with repairs. In old houses and new buildings, the problem of curved walls is equally relevant - perfectly smooth surfaces are rarely found, ready for decorative finishing. The fact is that earlier the rooms were finished with tiles or colored wallpaper, but today thin decorative plaster, coloring, textured wallpaper are in fashion. All this further emphasizes any irregularities.
The cost of plastering just rolls over, so leveling the walls with lighthouses is the most acceptable way for the family budget. How to install beacons, how to level the plaster mixture and bring your repair to the final stage, and will be discussed in this article.
Preparing walls for leveling
Before starting work, it is necessary to determine the degree of its complexity. Most often, blockages of walls are observed in apartments, when one of the edges or the center is several millimeters lower than the rest of the surfaces.
It is not difficult to deal with such problems, it is enough to bring the problematic part to the general level. It is much more difficult to level a wall with multiple defects: bulges, depressions, potholes, cracks.

To align the walls with the beacons, the surfaces must first be prepared. Several stages:
Advice! To prepare non-plastered walls, it is better to use special primers for a specific material (brick, gas silicate blocks, concrete slabs, wood, etc.).

What are lighthouses
Lighthouses for leveling walls are a kind of zero level that you need to go to, creating a new surface.
Professional plasterers do not use any beacons, they can work with one rule. But in order to make repairs with your own hands, it will be better and more efficient to use these "reference points".
As beacons, most often used:
- plaster cakes;
- galvanized or aluminum perforated profiles.
Lighthouses made of gypsum or alabaster mixture

In this case, the property of gypsum or alabaster is used to quickly harden. Therefore, the mixture must be kneaded in exactly the amount that can be used up in a few minutes.
First you need to lay a zero line. It is best to draw it near one of the inner corners. 10-20 cm are measured from the corner and a vertical line is drawn on the wall with a plumb line.
Relative to this line, dowels or self-tapping screws are screwed into the wall in increments of 15 cm. A nylon cord with a suspended load is attached to the ceiling so that it touches the heads of the self-tapping screws.

All screws are screwed in or unscrewed so that the head of each lightly touches the thread. Regarding the caps, the required amount of gypsum mixture is applied. They check again with the help of a level - the line along the beacons must be strictly vertical.
Advice! Self-tapping screws must be removed before the plastering stage. If this is not done, the fasteners may rust, the new walls will be covered with ugly spots.
This method is suitable for those who are not faced with plaster for the first time.

How to install metal beacons
An easier way is to mount metal profiles on the walls. The standard length of a metal profile is 250-300 cm. To begin with, the beacons must be cut in accordance with the height of the ceilings in the room.
Measure 100 mm from the corner and draw a vertical line. It is best to check its evenness with a laser level. Small cakes of the mixture are applied along the entire length of this line - this can be the same solution that is prepared for plastering.

Attention! To plaster the walls in the bathroom, in the kitchen or on the balcony you need cement mixtures. In dry rooms, it is more convenient to use gypsum-based solutions: the fraction of the material (and hence the roughness) is smaller, it dries faster and lays down more evenly, thanks to plasticizers and additives.
It is necessary to lay metal profiles in the solution applied to the walls. As a rule, aluminum T-profiles are used - they do not rust, so you can not remove the beacons from the walls after applying the plaster.
Galvanized beacons are best removed immediately after applying the plaster. After all, their zinc protection could be damaged during the installation process or as a result of rule movements. Rust will appear in these places, which can appear on the walls and through the finish layer.

You need to install the profile so that its “leg” is pressed into the solution, and the branched top is above the wall surface. It will be necessary to bring the wall to the resulting height - there are profiles with a height of 6 or 10 mm on sale. Accordingly, for strongly curved walls, large beacons will be required, and 6 mm profiles will be enough to eliminate small defects.
The step between the beacons should be 20-25 cm less than the length of the owner's rule. From each corner, the profile should be no further than 20 cm. When all the beacons for leveling the walls are installed, they are checked by the building level and the rule.
How to apply plaster on lighthouses

The finished mixture must be distributed between the installed beacons. To do this, use any method. The most convenient way is to throw plaster on the wall with a trowel. Each smear must be fixed on the wall, for this the plaster is lightly rubbed into the surface with a spatula.
Then, resting one end of the rule on the beacon installed at the corner, the second is placed on the adjacent profile. The plaster is pressed with a rule and distributed from the bottom up.

Important! The rule must not only be moved from the bottom up, but pressed with force against the lighthouses and slightly moved from right to left, as if tamping down the plaster. So the wall will become strong, the new plaster will not fall off it in the near future.
The same is done with all beacons, constantly checking the evenness of the resulting surface. The leveled area should become a guide for the rest of the wall.
In the corners, it is more convenient to align the walls with a special angular rule. You can use a regular tool, but not too long. It is in the corner that even the smallest unevenness can become very noticeable - when pasting walls with wallpaper with a geometric pattern, installing corner shelves, for example.

For window and door openings, it is necessary to use metal corners to make these surfaces more durable.
Advice! If, after plastering, the walls will be painted or wallpapered, they need to be leveled more carefully. First, the surface is sanded, and then covered with a layer of putty. For finishing with ceramic tiles, for example, such smoothness is not only not needed, but also contraindicated - the glue will adhere better to a rough wall than to a perfectly smooth one. Therefore, a simple plaster is enough.

If the thickness of the new plaster layer exceeds 15 mm, or if the walls are subsequently to be finished with heavy materials (tiles, stone), the wall must be reinforced. For this, a metal plaster mesh is used, it is nailed to the wall with stainless steel dowels.
In simpler cases - for a plaster layer of 8-12 mm - you can use fiberglass or polymer mesh, they are glued to the walls.

Conclusion
Do-it-yourself plastering of walls along lighthouses is within the power of anyone who has ever encountered cement or gypsum mortar. Given all the nuances, you can avoid problems and major shortcomings. Minor errors are easily corrected using the same solution and rule. A video with a step-by-step description of the whole process can help a novice plasterer.
Beacons for leveling walls - it's simple, but at the same time unique fixture, which is simply indispensable for such work. It is hard to imagine how long it will take to level the surface with plaster or other material, if you do not resort to beacons. Indeed, they greatly facilitate all finishing and repair processes, but on condition that they are correctly selected and installed according to the requirements.
|
So what are these irreplaceable assistants for leveling walls? First of all, you need to understand the principle of working with them, there is nothing complicated in this. More generally speaking, beacons are devices that are fixed on the walls at certain intervals. Each element must be in line with other parts.
metal bar
There are several types of lighthouses, each of which has its own characteristics. The most popular is considered metal version. It is a bar called a beacon rail. For ease of use, there are parts with a height of 3, 6 and 10 m. Advantages of the product:
 Metal beacon profiles have different height ribs, but the shape of the structure in all models is similar
 - There is no need for additional preparation, the elements are completely ready to go.
- Installation will not take much time, but only if you have some work skills.
- Plastering is carried out after a short period of time after their installation, provided that it was used for fixing gypsum mortar. When using dowels, you do not need to wait.
- If required, the slats are quickly cut, this makes it possible to fit them to any size.
Undoubtedly, this variety has many advantages, so many do not take into account the existing disadvantages and face problems that arise during work. Disadvantages:

 If the galvanized profile is left in the wall, it will rust, so the beacons must be removed and the furrows sealed with the same plaster
Thus, one must take into account all the pros and cons in order to avoid further problems.
Metal pipe
This option has a significant difference from the previous one, although both are made of metal. Such beacons are a pipe or a square profile and have the following advantages:
- Good strength, which is achieved due to the fact that the fixing composition is applied to the entire length of the part. This prevents the elements from falling off.
- The use of a square profile makes the job much easier.
- Fragments of different lengths can be used for work. If required, they can be quickly adjusted to the required parameters.
 Use round or profile pipes it is convenient as lighthouses, but this method is only suitable for a serious thickness of the plaster composition
 Of course, there are also disadvantages, which in some cases coincide with the disadvantages of the beacon rail:
- Any defects in parts exclude the possibility of their use, so it is advisable to check the elements with particular care.
- During extraction, the pipe or profile may be bent, making it unsuitable for other work.
- The cost of the material is much higher.
On a note! This option is more suitable for cases where the work is done by a home craftsman with no experience or it is not possible to purchase a metal bar.
Beacons made of plaster or cement
This is the most cheap way, but it can cause difficulties for a person who has not encountered their manufacture. For work, you will need only the material that is available for finishing activities - putty or cement mixture. Can be used in large and small areas. A significant disadvantage is the time it takes to create all the elements for alignment, as well as the need to wait for them to dry.
 The technique of working on metal and plaster beacons is the same, but it is much more difficult to equip a beacon from mortar, and only a professional can do it.
 Fastening beacons
Aligning walls to beacons requires them correct installation, the final result will depend on this. Therefore, it will be necessary to comply with all stages and limit concentration in order to avoid redoing.
Fixing a metal profile-rail
Such strips can be installed in two ways, which are selected based on the specific situation.
Use of dowels
It is carried out according to the following scheme:

This option allows you to do-it-yourself wall cladding along beacons by adjusting the thickness of the plaster layer.
VIDEO: fast way installation of beacons
The use of gypsum mixture
How to set beacons with a solution? This will require a mixture of gypsum, cement and sand, metal slats, level and a long straight rail. Installation technology: marking is performed, as in the previous version, kneaded right amount solution, along the entire length of the line, the mixture is dotted and the beacons are immediately installed. Each exposed element is checked by level. The final fixation is achieved by laying another layer of mortar.
The process seems simple, but requires some experience.
Installation of beacons from cement and plaster
This process will require large quantity time. Fixing occurs according to the following algorithm:
- 30 cm recede from the ceiling, the same distance is measured from the wall. A nail is driven into the resulting point or a self-tapping screw is screwed in.
- A plumb line is lowered to the floor. At a height of 20 cm from the floor, another self-tapping screw is screwed.
- The procedure is repeated on the other side.
- A cord is pulled between the screws so that it does not come into contact with the surface. A few more self-tapping screws are installed along the rope line.
- A solution is applied to each screw, a rule is placed between the upper and lower screws, the space under it is filled with a mixture. This is the case with all elements.
That is, smooth tubercles of plaster are obtained, which will play the role of beacons.
Application of plaster
The application of the solution begins with a check: it is required to evaluate the absorbency of the surface. To do this, a little water is sprayed onto the wall. If the water is quickly absorbed, then it is necessary to moisten before using the plaster.
The prepared mixture is applied in the following order:
- Using a spatula, the required amount of solution is collected.
- The composition is thrown into the areas that are between the installed beacons. Each gap is completely filled.
- The next step is to apply the rule. It is installed from below so that it rests on the edges of the lighthouses. Now you need to lift the tool up, making uniform swings in order to completely distribute the plaster. The procedure is repeated several times, if required, a solution is added.
- After the coating has dried, the metal profiles are removed. The resulting defects are covered up.
 The most difficult task is to correctly set the beacons; any home master can handle the process of leveling the mortar with the rule
 Some difficulties may arise with the corners, but they are perfectly formed with an angled trowel. For perfect evenness, plastic pipe diameter from 60 to 100 mm. She is carried out in assigned areas.
 Work on lighthouses allows you to relatively quickly and efficiently equip beautiful inclined slopes on windows and doors
 When installing door and window slopes take into account that they are performed with an extension inwards. This creates the best visual effect. To get obtuse corners, a wooden lath is applied to the edge of the frame or a special beacon designed for slopes is used.
It is not always possible to get the desired result if there are not sufficient skills. But the problems that have arisen can be solved by applying a finishing layer of putty, which will hide the existing shortcomings. The main thing is that do-it-yourself work is an opportunity to acquire necessary experience and save money.
VIDEO: do-it-yourself wall alignment with lighthouses