Installation of multi-layer shinglas shingles. Installation of soft tiles Shinglas (Shinglas) - a special laying technology and secrets for roof care. Adjoining planks, eaves and gable overhangs
We carry out the installation of a soft roof brand "Shinglas", instructions from the manufacturer TECHNONICOL. This roofing is one of the modern bituminous materials, characterized by increased operational properties. The main advantages of the coating: attractiveness, good sound insulation, thermal insulation characteristics, tightness, impact resistance natural environment, long operating period. SHINGLAS soft roof is a fairly light building material, its installation does not require the use of specialized equipment, therefore roofing can be done on your own.
In this article
Structure, material characteristics
Soft roof "Shinglas" is made in the form of shingles, having a figured edge in the form of petals, forming the texture of the coating, which resembles a tile. The basis for the production of roofing is a durable fiberglass canvas. The material is not afraid of moisture, temperature changes. The reinforcing base is covered on both sides with a special modified bitumen, which, when low temperatures retains its elasticity. As a result, the roofing material does not crack during sudden temperature changes, at sufficiently low temperatures.
The structure of shingles "Shinglas"
- The top layer is basalt powder.
- Further improved bitumen.
- The base is fiberglass.
- Improved bitumen.
- The bottom layer consists of a self-adhesive frost-resistant bitumen-polymer mass.
- The protective layer is made of siliconized film, which can be easily removed.
The top layer of the material is basalt chips with a special binding component. It protects bitumen from external influences natural environment, gives the surface roofing material aesthetic appearance. Pigments used in the manufacturing process for soft tiles"Shinglas", are characterized by increased resistance to ultraviolet rays sun.
The lower part of the shingle is processed special glue, which allows you to easily mount sheet material on a prepared roof. A special siliconized film applied to the adhesive layer of the coating protects individual shingles from contact during transportation and storage of the roofing material. The film is removed just before the shingle is laid on the roof. The adhesive composition used for Shinglas roofing retains its original performance characteristics for a sufficiently long period of time, it provides excellent sealing to the coating, does not lose elasticity at low temperatures.
How to properly lay a soft roof "Shinglas"?
First you need to accurately calculate the required amount of roofing material for the roof. To do this, you need to calculate total area, consisting of the sum of the areas of all individual roof shapes, which can be in the form of triangles, rectangles, trapezoids, and other geometric shapes. Consumable will be needed not only for covering outer surface roofs, but also for the installation of the lining layer, the arrangement of adjacent structures. When performing calculations, it is imperative to determine the length of the ridge, cornices, valleys, ends, adjoining elements to attics, pipes, and other structures.

To equip the roof with flexible tiles, the following materials will also be required:
- metal components of the roof structure - eaves, wind, adjoining strips with anti-corrosion coating;
- bitumen-polymer mastic, which is used for gluing materials made on a bitumen basis on various surfaces;
- self-adhesive lining materials made on a polyester basis, treated on the outside with a protective decorative powder;
- baseless pads, reinforced on the outside with a protective film;
- galvanized roofing nails;
- underlayment carpets made on the basis of polyesters with a non-slip coating of polypropylene;
- lining carpet, treated on both sides with mineral dressing;
- Components ventilation system;
- The valley carpet, made on the basis of polyester, the bitumen layer is treated with basalt dressing, is used for waterproofing on complex roofing sections, knots.
The consumption of tiles will depend on the type of cutting of the petals. The manufacturer on the packaging of the material indicated it usable area taking into account overlaps. Depending on the shape of the shingle, soft roof waste can be up to 15%, but not less than 5%.

Need to understand! To prevent swelling of the carpet, smudges do not form, it is forbidden to add solvents to the mastic, and the material itself must be applied with a layer of up to 1 mm.
Foundation preparation
SHINGLAS roofing installation technology assumes the presence solid battens. On the rafter system, flooring is made of high-quality edged boards, plywood, etc. sheet material. In order to prevent the joints of the four corners, the installation of the flooring sheets is carried out “in a run”. For their fastening, self-tapping screws, brushed nails are used. The flooring of the boards is carried out with a five-millimeter indent between the individual boards. If the arrangement of the crate is carried out in winter period, a five-millimeter gap is also made, which is necessary for the thermal expansion of structural elements in the summer.
Important! If the edged board used for arranging the sheathing of a solid type has not passed the calibration, the material must be sorted by thickness so that changes in the size of the boards are smooth after installation. Between adjacent elements, the difference should not be more than two millimeters.
When installing a high-quality edged board deck, you need to look at the rings, the convex side of which should be directed upwards. Lumber before its use must be well dried, then its deformation is unlikely. If you had to use still wet boards, then their edges must be fixed with at least two self-tapping screws. And in order for the structure to serve for the longest possible period of time, its wooden elements are treated with refractory, bioprotective agents.

roof ventilation
For effective functioning the roof structure with bituminous coating must have good ventilation throughout the area. Ventilation system for soft roof it is arranged in such a way that the air does not stagnate in any part of the intra-roof space. Otherwise, the accumulation of moisture in the "dead areas" will contribute to the decay of the wooden structural elements, and the insulation material will also absorb it.
The space between the waterproofing layer and the crate should be ventilated. To do this, special holes are arranged at the eaves, which, after the installation of the roof, are closed with spotlights, and exhaust holes at the ridge. To create good traction, you need to provide a pressure difference, so the hood holes are made larger by 15 percent from ventilation holes. The parameters of the ventilation system channel will depend on the slope roof slopes. The smaller the slope of the roof, the wider the ventilation ducts.

- When arranging a soft roof, it is recommended to use the material of one batch, so that in the process installation work avoid sharp color differences within the roof slope. When using bituminous shingles with the same color code from different batches, shingles of different packages must be mixed together immediately before laying. Then the color change will not be noticeable.
Important advice! In order for the shingles to be freely separated from each other, the packaging with the roofing material must first be bent, then shaken, and only then opened.
- When laying soft roofing material in the cold season, when the external air temperature is not more than +5 ° C, the packaging with the material must be stored in a warm room. And the adhesive layer of the shingle before its flooring on the roof is heated with a mounting hair dryer.
- Often, when laying soft roofing, excess material has to be cut off. To do this, it is recommended to use cutting tools with a well-sharpened blade, wooden planks on which the shingle will be cut.

The shingle should be stored in a dark place where direct sunlight does not penetrate. This is necessary in order to prevent the adhesive from sticking to the protective film. Also at long-term storage it is forbidden to stack pallets with packed shingles on top of each other, otherwise it is also possible for the adhesive to stick to the protective film as a result of strong pressure from above.
Important to remember! The bituminous coating becomes very soft in hot summer, traces remain on it from a slight load, therefore, when performing roofing work, it is recommended to use special "manholes", mats made of vegetable fiber.
Conclusion
Using the instructions for installing a soft roof, all work can be done independently. And when caring for such a coating during the operational period, it is necessary to use tools that do not have sharp ends.
Shinglas with various color codes cannot be used on the roof of the same building.
Mixing tiles from 5-6 packs will help to avoid visible differences in the color shades of different parts of the roofing (if this is not done, then a subtle difference in color tones may be distinguishable on the finished roof).
AT cold weather(at outdoor temperature below 5-10 degrees) Shinglas must be stored in a warm place for at least a day before installation. The temperature in the room should not be lower than 20 degrees, and no more than 5-6 packages should be taken out into the cold at a time. The following packages can only be delivered to the roof after the tiles from the previous ones have been laid.
The self-adhesive strips on bituminous shingles need to be warmed up in cold weather. For this purpose, a building hair dryer is used.
Tiling fastening
Fig. 12 (scheme of fastening sheets with nails)

The tile sheets on the slope are fastened to the continuous flooring with roofing nails resistant to corrosion. These nails are wide hat are driven in in such a way that the cap does not go deep into the surface of the tiled sheet either directly or obliquely. The bottom edge of the cap must be exactly in line with the surface of the tile (see top image in fig. 12).
The required number of nails depends on the angle of the slopes, as well as on the SHINGLAS collection and the shape of the tiles. Recommended nail position for different series Shinglas is shown in fig. 12.
Important: the flexible tiles of the JAZZ and COUNTRY series are mounted with an overlap, therefore, at the junction, two adjacent sheets are fixed with one nail. In order to correctly determine the place of fixation, one should focus on assembly line, which is present on the outer surface of the tiles of these series (this line is applied during the manufacture of roofing material).
For fastening roofing sheets CONTINENT series, only long nails with a wide head (4.5 centimeters long) are suitable.
Installation of the starting strip
The material for the starting strip is selected depending on the SHINGLAS series. In some collections, ridge-cornice tiles are used for this purpose, while in others, standard ordinary tiles are used.
Ridge and cornice universal tiles do not require cutting and are laid with the adhesive side down over the waterproofing lining material, indented from the cornice strip fold by 10-20 millimeters. The longer the roof slope and the greater the angle of its inclination, the wider this indent should be.
Fig.13 
The starting strip for Shinglas with the shape of cutting Accord, Beaver Tail, Sonata or Trio is made from ordinary tiled sheets, from which the petals are cut. From the underside, the entire surface of the strip, with the exception of the adhesive layer, is covered with a layer of mastic, after which it is glued in exactly the same way as described above.
Under a soft roof with cutting Continent and dragon tooth the starting strip is made from shingles of an ordinary tile without cutting off the petals.
Laying the first and next rows of Shinglas
It is recommended to lay the sheets of soft roofing starting from the middle of the slope. This makes it easier to align the shingles, especially on long pitches. The first row of tiles starts from the starting strip with a gap of 10-20 millimeters between it and the lower edge of the roofing sheets.
Laying the next rows is carried out from the bottom up diagonally.
Features of the installation of ordinary tiles, depending on the shape of the cut, are shown in fig. 14 and 15.
Western and Sonata 
Chord 
beaver tail 
Trio 
dragon tooth 
Continent 
The second row is laid from the middle of the slope with a shift in one direction or another by the width of half the petal. You can carry out installation from the center of the slope in any direction - to the right or to the left.
The lower edge of the petals after fixing the second row of tiles with nails should coincide with the upper edge of the cutouts in the previous row.
In the same way, with a shift of half a petal and alignment with the cutouts of the previous row, the third row of shingles and all subsequent ones are laid.
The life of the roof without the need for repair directly depends on the choice of roofing material. Tiling is a classic roof covering in many countries at all times, it is still relevant today. The closest resemblance to the real ceramic coating shinglas shingles based on bituminous binder have a flexible tile. It gives a neat and presentable appearance to the facade, retains its appearance, and also has the function of damping sounds!
What is shinglas?
Shinglas bituminous tile is a piece waterproofing and roofing material. Roof covering elements are made from oxidized or modified bitumen, mainly from European raw materials. The Shinglas technology was developed in Spain; in Russia, production is carried out by the TechnoNIKOL company under the control of the Spanish company Chova.
The main plant for the production of soft roofing is located in Ryazan. From here, throughout the country, they deliver durable and practical shingles shinglas.
Compound
A distinctive feature of the roof shinglas technonicol- multi-layered elements. Each sheet consists of several functional layers (from top to bottom):
- Sprinkling of basalt chips or powder of different fractions. Often colored.
- Bitumen modified or oxidized (depending on the series).
- Fiberglass is a load-bearing strength element.
- Bituminous impregnation bottom.
- Self-adhesive film that protects the canvas and fixes the canvas on the base.
Fiberglass ensures the strength of the tile and its integrity under any circumstances. Bituminous impregnation is resistant to weather and temperature fluctuations, and basalt powder protects the roof from overheating, melting and fading under the scorching sun. The quality of shinglas technonikol soft tiles is confirmed by certificates of compliance with established European and Russian standards, the manufacturer gives a guarantee of up to 30 years.
Advantages of Shinglas Roofing
There are many manufacturers on the market offering bitumen roofing. Why you should give preference to shinglas tiles:
- absolute resistance to any weather phenomena - rains, snow covers of considerable thickness and weight, winds of any strength, summer heat and winter frost, the coating is not afraid of anything;
- ease of installation of shinglas - the technology is available even to a non-professional. The design of the sheets for assembly is thought out in such a way that they are easy to lay according to simple instructions;
- the environmental friendliness of the tiles is confirmed by certificates of quality and compliance with European environmental safety standards (can be requested from the manufacturer or seller);
- Fire safety- bituminous products do not melt, do not support combustion and do not spread flame;
- long-term operation due to high operational capacity;
- acceptable cost of the material;
- the minimum amount of waste during installation - about 5% with correct calculations;
- with proper installation, 100% tightness of the coating is achieved, eliminating the need for arranging a separate waterproofing.
Varieties
Shinglas soft roof is available in several basic series, products in which differ in composition and design:
- the number of layers;
- the shape of the shingle (sheet);
- ornament;
- colors.
Collection Continent
The collection is named after the main continents of the planet: Europe, Asia, America, Africa, which associate the colors of the tiles. Its shape mimics stone tiles, which is very unusual for this type of material. The complex coloring and geometry of the product make the Continent Shinglas collection premium and noble.
Three-layer sheets, but no less practical and durable than multi-layer ones, the manufacturer gives a guarantee for them up to 50 years.

Collection Western
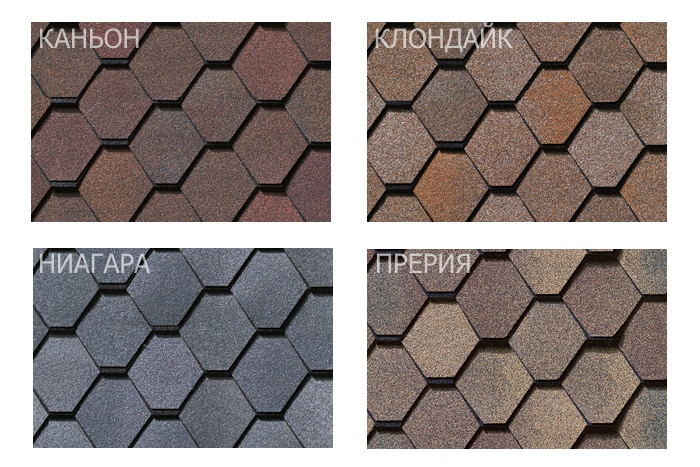
The classic form of tiles in the Western collection. This is a diamond-shaped undercut that mimics real ceramics. Canyon, Klondike, Niagara and Prairie colorways combine natural tiling with Niagara blue motifs.
In addition, the upper parts of the "tongues" protrude above the lower ones, creating the effect of volumetric coverage.
shinglas ranch
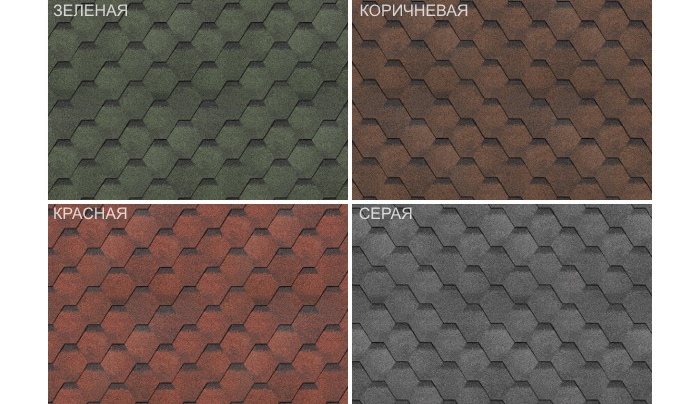
The sheets in the Ranch collection are inspired by American farmhouses. The pattern and edges of the tiled sheets are trimmed with squares. Solid colors: brown, red, gray, pink. This is the most accessible view coatings in Shinglas technology.

Country Collection
The most diverse collection of shinglas Country in terms of color schemes. The line includes cuts of the Dragon tooth shape, symbolizing some American states: Alabama, Atlanta, Arizona, Indiana, Michigan, Ontario, Ohio, Texas, Utah. Interesting tint combinations allow you to make a choice in favor of the ideal tonality for each. Coating imitates natural coatings from natural material- shingles, slate, tree bark. Distinctive feature series products is their reduced weight while maintaining the strength and performance characteristics.

Jazz Collection
Shinglas Jazz is multilayer tiles with graphic cut. Unlike the Ranch series, Jazz contains several colors and shades within one representative of the collection. The assembled roof plays with colors, especially in the sun.
This is one of the most popular shinglas collections with an optimal price-quality ratio.
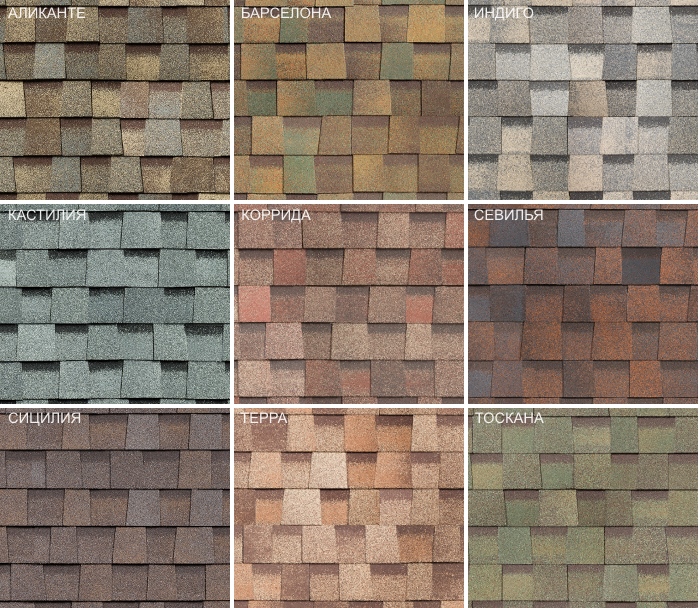
Series Classic
Classic includes several collections, but one thing unites them - traditional form ceramic classic tiles.
Art Nouveau, cutting Breeze:

Tango is also an imitator of the classic roof:

The Flamenco collection is the epitome of the classic decoration of the building, which will give the house austerity and graphic quality:

The cutting of the Sonata of the Quadrille collection was created based on semiprecious stones:
Rumba collection in complex cuts and deep walnut flowers give the exterior of the house nobility and uniqueness:

Ultra Series
The tiles of this series are made on modified bitumen, so the coating has the most adaptive properties. operational characteristics. The sophisticated Foxtrot cutting makes the coating original due to the asymmetrical chaotic pattern of the edge of the rows.

Slicing Samba is made in unique deep colors:

A series of shingles Finnish
It is the cheapest, but still durable and practical look roofing. Tiles Finnish single-layer (bituminous). It is produced in two types of trim - Accord and Sonata.

The price of Finnish shinglas does not exceed the cost metal sheets to cover the roof, so the material is available for developers with any budget.
Shinglas roof installation
Bituminous elements for roof covering are of considerable weight and relatively small in size, so the base must be solid. To do this, any sheet material is attached to the rafters:
- OSB boards;
- moisture resistant plywood;
- decking from grooved boards.
On the cornice overhang of the flooring, waterproofing is made with bituminous coating, a drip is strengthened from above - metallic profile.
Next, a bedding is laid on the base - a bitumen sheet, on which shinglas tiles will be glued. First, the joints of the slopes are blocked, then the canvas is spread in the direction from the lower edge to the ridge. Nails are stuffed along the edge of the rolled material to fix the bedding. Neighboring canvases must be overlapped.
Now the gables. They are fixed along the lateral free edge - the profile will close the end and protect the coating from wind and moisture.
Shinglas installation instructions
When the base is ready, you can start marking. A line is drawn horizontally along the visor with a width equal to 5 rows of sheets, vertically - 1 meter. These guidelines will help you align the canvas during installation.
First row assembly:
- To decorate the cornice line, special sheets or ordinary tiles with cut petals are used. Remove the protective film and attach it parallel to the eaves on the drip, stepping back from the edge of 1.5 cm. This is the size of the compensation gap.
- Roofing nails along the edge of the sheet fix the first row of the coating.
- Subsequent sheets overlap the previous ones.
- To improve the quality of the coupling, the elements can be coated with bitumen-based adhesive mastic.
Ordinary tile:
- Removed from the product protective film.
- The sheet is laid on the first row with an indent from the edge of 1.5 cm.
- Each sheet is fixed with nails in such a way that the cap does not cut into the product and is covered by the top laid tiles.
These processes are described in more detail and clearly in the video:
It is important to make the correct overlap of tiles:
- for the Jazz collection - 15 ... 85 cm;
- Trio form - offset by ½ petal;
- Tango - offset ½ petal;
- Sonata - ½ petal;
- cutting Accord - the right petal overlaps the joint of tiles of the adjacent row.
Valley design:
- Mark the gutter.
- Sheets are nailed as close as possible to the edge of the gutter and trimmed.
- The edges are smeared with mastic and pressed tightly to the base.
The pediment is designed similarly to slopes, with the difference that the extreme tiles that go to the side metal profile are smeared with mastic and glued. The connections to the pipes are treated in a similar way, a substrate is laid on them with a call to the pipe itself, it is covered with a metal design plate, and sealed.
Attached to the horse ridge profile, it is covered with tiles for the ridge.
All these processes are described in the second part of the video:
Lastly, I mount storm drains and gutters.
It is possible to ensure the necessary temperature and humidity regime of the roof only if its design includes a continuous vapor barrier, the thickness of insulation required for the region, wind insulation and a ventilated under-roof space.
A slight deviation in color tones is allowed, which is typical for shingles of all manufacturers. To minimize tonal imbalance before use, randomly mix the contents of 5-6 packs. Installation must be done in diagonal stripes.
If roofing works are carried out at temperatures below +5 °C, packages with shinglas should be submitted from warm room 5-6 packs. The self-adhesive strip on the tile must be heated with a building (thermal) hair dryer.
In order not to damage the integrity of the bituminous roof, the material on the roof should be cut on a specially placed plank.
Pallets with roofing material must not be exposed to direct sun rays, because this can lead to premature sintering of the adhesive layer with the siliconized protective film. Pallets cannot be stacked on top of each other.
Before opening the shingles shingles, it is recommended to slightly bend and shake the package for unhindered separation of the shinglas shingles from each other.
Attention! To avoid the appearance of stains and footprints, it is not recommended to walk on the roof in hot sunny weather. To move along the slope of the roof, special manholes should be used.
1. Materials used
shinglas
The assortment line of shingles SHINGLAS is the widest among Russian manufacturers and includes over 30 different models.
Lining layer TECHNONICOL
Underlayment carpet - roll waterproofing bitumen-polymer material based on polyester 1.7-2 mm thick.
Barrier OS HF - rolled waterproofing self-adhesive bitumen-polymer material 2-2.5 mm thick.
Valley carpet TECHNONICOL
The TECHNONICOL valley carpet is a rolled waterproofing bitumen-polymer material based on polyester coated with coarse-grained basalt granulate.
eaves, gable overhangs and junction bars
Made of metal with a special coating.
Special roofing nails
- Galvanized nails 25-30 mm long.
- The cap diameter is at least 9 mm.
- The diameter of the nail core is not less than 3 mm.
Mastic TECHNONICOL (FIXER)
Mastic bitumen-polymer adhesive cold FIXER.
Ventilation elements TECHNONICOL
A sufficient amount of supply exhaust openings, satisfying the minimum norms of under-roof ventilation.
2. Terminology
- visible part.
- Covered part.
- Cutout.
- Self-adhesive strip.
- Tile, tab, petal.

- Frontal overhang.
- Cornice overhang.
- Endova.
- Rib, spine.
- Skate.
- Slope fracture.
3. Consumption of roofing material
One SHINGLAS packaging Jazz series contains 2 m 2 of finished roofing (taking into account overlaps when installing tiles). Packages of other series of tiles contain 3 m 2 of finished roofing. When calculating required amount ordinary shingles should take into account the coefficient corresponding to the level of complexity of the roof. For shinglas of sonata, chord and jazz cutting forms in combination with ridge-cornice tiles, it is necessary to provide for a waste level of no more than 5%. In other cases (for the design of the starting strip, roof ribs and ridges), the level of waste is 10-15%.
The consumption of special roofing nails is about 80 grams per 1 m 2.
Roof base preparation
Roofing materials must comply with building codes and regulations (SNiP).
At SHINGLAS for wooden roof structures, as well as for other types of structures, the pitch of the rafters depends on permanent and temporary loads, as well as on individual architectural features roof, and ranges from 600 mm to 1500 mm.
Depending on the pitch of the rafters or additional step crate different thicknesses of solid wooden flooring(see table).
The following can be used as boarding: oriented strand board (OSB-3), plywood with increased moisture resistance (FSF), tongue-and-groove or edged boards with a relative humidity of not more than 20%, sorted by thickness. It is recommended to use softwood as a boardwalk.

When using an edged board as a crate, the gap between the boards should be 1-5 mm.
Installation of large-panel flooring (OSB 3; FSF plywood) is recommended to be carried out with a run-out of seams and fastened with sharp nails or self-tapping screws.
When installing a solid flooring made of plywood or OSB-3 boards in winter, a 3 mm gap must be left between the sheets to compensate for linear expansion in the warm season.
To increase the service life of wooden elements roof structure the company recommends treating them with antiseptics and antipyrines.
Attention! When installing a solid wooden flooring, you should pay attention to the fact that the fragments of annual rings are oriented with their bulges upwards (see Fig. 4). When using damp wood, the ends of grooved or edged boards are attached to two self-tapping screws on each side.

2. Roof ventilation
To increase the service life of the under-roof structure, it is necessary to provide ventilation, especially above the operated attic floor. Normal ventilation pitched roof provide three main elements: openings for the inflow of outside air, channels above the thermal insulation for its circulation and exhaust openings in the upper part of the roof (Fig. 5). Norms for cross-sectional area supply and exhaust ventilation make up 1/300 - 1/500 of the area of insulation. Pressure in attic should be reduced, so the area of the exhaust openings should be taken 10-15% more than the supply. This is necessary to create air draft.

In case of filing eaves overhangs siding to ensure the flow of outside air, special elements are used - the so-called soffit strips. When using lining, there are several ways to provide air flow, one of which is shown in Fig. 6.
Channels above the thermal insulation must have a minimum airflow height of 50 mm at a slope angle of more than 20°C. With a decrease in the angle of inclination of the ramp (less than 20 ° C), the height of the vent should be increased to 80 mm.

Attention! The under-roof ventilation system should exclude zones with stagnant air, the so-called "air bags", that is, it is necessary to ensure complete "washing" of the entire under-roof space with outside air.
3. Cornice
The cornice overhang of the roof is reinforced with metal strips (droppers). They are laid with an edge on the edge of a solid base and fastened with special roofing nails in a checkerboard pattern with a pitch of 120-150 mm, and in places of overlap 20-30 mm. The overlap between the planks is 30-50 mm.
4. Lining layer
Roof slope angle from 12° to 18°

This corner provides for laying an additional waterproofing mat under SHINGLAS. In the valleys and on the cornice overhangs, a self-adhesive bitumen-polymer material BARRIER OS HF is mounted. In the valley BARRIER OS HF is laid with a width of 1 m (50 cm for each slope), along the cornice overhang by the value of the eaves overhang itself plus 60 cm from the plane of the wall facade inside the building or structure (see Fig. 7). The OS HF barrier on the cornice overhang does not reach the droplet bend of 2-3 cm. If possible, one should strive for a continuous carpet (without overlaps) along the entire length of the valley. Otherwise, the longitudinal overlap is 30 cm with careful sizing, and it is carried out in the upper part of the roof.
The rest of the slope surface is covered with TECHNONICOL lining carpet. The laying of the rolled material is carried out from the bottom up with an overlap in the transverse direction of 100 mm, and in the longitudinal direction - 150 mm, rolling the roll parallel to the cornice overhang. It is attached to the base with special galvanized nails with a wide hat every 200-250 mm. Places of overlap are smeared with TECHNONICOL bituminous mastic.
Roof slope angle from 18°

This corner provides for laying an additional waterproofing mat under SHINGLAS in places where leaks are most likely. These include: cornice overhang, valley, gable overhang, slope ribs, roof ridges and roof outlets. In the valleys and on the cornice overhangs, a self-adhesive bitumen-polymer material BARRIER OS HF is mounted. In the valley BARRIER OS HF is laid with a width of 1 m (50 cm for each slope), and along the cornice overhang by the value of the eaves overhang itself plus 60 cm from the plane of the wall facade inside the building or structure (see Fig. 8). The OSGCH barrier on the cornice overhang does not reach the droplet bend of 2-3 cm. If possible, one should strive for a continuous carpet (without overlaps) along the entire length of the valley. Otherwise, the longitudinal overlap will be 30 cm with careful gluing, and it must be done at the top of the roof. A TECHNONICOL lining carpet measuring 1 mx 1 m is mounted under the roof exits, which is fixed along the perimeter with special roofing nails with a pitch of 200-250 mm. On the remaining areas, a TECHNONICOL lining carpet 500 mm wide is laid. Roll material is laid from the bottom up with an overlap of 100 mm in the transverse direction, and in the longitudinal direction - 150 mm. It is attached to the base with special galvanized nails with a wide hat every 200-250 mm. Places of overlap are smeared with TECHNONICOL bituminous mastic.
Note: trio cut, beaver tail and jazz provide 100% waterproofing at any slope angle.
5. Front overhang
The frontal overhang of the roof is reinforced with metal end strips, which are laid over the lining layer with an overlap of 30-50 mm and fastened with special roofing nails in a checkerboard pattern with a pitch of 120-150 mm, and in places of overlap of 20-30 mm.
6. Valley
The valley can be made in two ways: open and "undercut" method. The preparation of the base of the valley depends on the chosen method.

- Valley axis.
- Self-adhesive bitumen-polymer material Barrier OS MS.
- End carpet.
- Lining carpet.
open way
A TECHNONICOL valley carpet is mounted along the axis of the valley over the underlayment carpet BARRIER OS HF with a horizontal offset of 2-3 cm.
On the front side, the valley carpet is nailed with special roofing nails with an indent from the edge of 2-3 cm and in increments of 20-25 cm. If possible, one should strive for a continuous carpet (without overlaps) along the entire length of the valley. Otherwise, the longitudinal overlap will be 30 cm with careful gluing, and it must be done at the top of the roof.
Undercut method
With this method of installation of the valley carpet is not required.
7. Slope marking
Marking lines act as guides and help align the shinglas horizontally and vertically. In addition, they level the shinglas if any roof element is cut into the slope or the geometry of the roof slope is broken. The pitch of the vertical lines corresponds to the width of the ordinary tiles, and the pitch of the horizontal lines is applied to every 5 rows of shingles (~80 cm). Marking lines have an exclusively guiding function. They do not serve as a guide to which tiles should be nailed.

SHINGLAS SOFT ROOF INSTALLATION
1. Fixing shinglas on the roof

Each ordinary tile fastened to the base of the roof with the help of special galvanized nails with wide hats, the number of which depends on the angle of inclination of the slope. Proper nailing of special nails is very important point. Nails should be nailed in such a way that the cap is in the same plane with the surface of the shinglas, and does not cut into it (Fig. 11). The tiles are nailed, retreating from the edge 2-3 cm. For correct location nails and the choice of their number for each form of shinglas, see fig. 11. The picture shows front side, the dotted line indicates the presence of an adhesive layer on the reverse side.
Starting strip (cornice tiles)
As a starting strip, a universal ridge-cornice tile or a pattern from an ordinary tile (shingle with cut petals) is used.
Universal ridge and cornice tiles are used for mounting the starting strip for cutting forms: sonata and chord.
Cornice tiles are glued on top of metal cornice strips, retreating from the place of inflection 1-2 cm and nailed (see Fig. 11). The amount of indentation depends on the length and angle of inclination of the ramp. With an increase in the length and steepness of the slope, the indentation from the place of inflection of the metal cornice strip also increases (see Fig. 12-13).
A pattern from an ordinary tile is used for cutting forms: trio, tango, sonata, chord. When laying, the back side in the area of the absence of the adhesive layer is smeared with TECHNONICOL mastic on the “shir”. Further, it is laid similarly to the installation of ridge-cornice tiles.
With the shape of cutting jazz, the starting strip is laid from ordinary tiles without pre-cutting. In this case, the installation method is used similar to the method of laying a pattern from an ordinary tile.
First row and installation rule
On long slopes, it is recommended to install the first row from the center of the slope for more convenient horizontal leveling. The first row recedes from the initial strip by 1-2 cm (see Fig. 12-13).
The second row is mounted from the center of the slope, shifting to the left or right by half the petal. Nail the shinglas so that the bottom edge of the petals is flush with the top edge of the cutouts in the first row of masonry.
Third and subsequent rows. The third row is shifted relative to the second by half the petal to the left or right, depending on the direction chosen initially. Thus, the entire roof slope is covered.
For the most effective protection against slanting rain, glue ordinary tiles with TECHNONICOL bituminous mastic on a “peel” along the edge of the roof by 10 cm in places where there is no self-adhesive layer. The upper corners of the shinglas, which fit the metal gable strip, should be cut off by 2-3 cm to repel water, as shown in Figure 12.
Note: When laying, the amount of horizontal displacement of shingles of the next row relative to the previous one can vary in the range from 15 to 85 cm (Fig. 13). In this case, it should not be traced certain rule drawing selection. The drawing of the finished roof should be abstract.


2. Device valley
Open valley method

Ordinary tiles are laid on top of the valley carpet and are mounted in a chaotic manner behind the undercut lines (3) towards the axis of the valley (1). Don't nail special nails at a distance closer than 30 cm from the central axis of the valley (1). Fix additionally each tile in the upper part (2). Thus, two slope surfaces are assembled relative to the valley and, at the end, two coated lines (3) are beaten off with the help of laces (beats). Then, ordinary tiles are cut along line 3. In this case, it is necessary to lay a special plank so as not to damage the integrity of the waterproofing carpet. To flush water into the valley, it is necessary to cut each tile (4) and coat it with TECHNONICOL bituminous mastic from the back by 10 cm in places where there is no self-adhesive layer (5). If the water flow from the slopes differs significantly, then the valley trough must be shifted towards a smaller flow volume to compensate for the water flushing of the junction of ordinary tiles and the valley carpet. The width of the valley gutter varies from 5 to 15 cm, depending on the location of the building or structure. Thus, if the construction site is located in the thicket of the forest, it is necessary to increase the width of the gutter for the unhindered removal of foliage.
Undercut method

The initial installation of ordinary tiles is carried out on a smaller (with a smaller slope) slope with an approach to a larger slope by at least 30 cm. Do not nail special nails at a distance of 30 cm from the central axis of the valley (1). Fix additionally each tile in the corners (2). Thus, the entire smaller (with a smaller slope) roof slope is covered. Then "beat off" the chalk line (3) on a larger / steep slope. The distance from the chalk line (3) and the central axis of the valley (1) is 7-8 cm. Shinglas from a large (steep) slope is cut along the chalk line (3). To flush water into the valley, it is necessary to cut each tile (4) and coat it with TECHNONICOL bituminous mastic from the back by 10 cm in places where there is no self-adhesive layer (5).
3. Connections

At the joints of the roof slope with the walls, a triangular rail (1) is stuffed, on which an ordinary tile (4) is wound. As a triangular rail can be used wooden beam 50*50 mm, loose diagonally, or regular wooden plinth(one). If the surface vertical wall brick, then it must first be plastered and primed. Strips of TECHNONICOL valley carpet (5) with a width of at least 500 mm with TECHNONICOL bituminous mastic glued on top of ordinary tiles are mounted (the mastic is applied to the entire back surface of the valley carpet pattern). On the wall, the strip starts up at least 300 mm, and in climatic zones with increased snow loads, this value can be further increased. Top part the junction is closed with a metal apron (2) with a winding in a slug, which is fixed mechanically and sealed with silicone, thiokol or polyurethane sealant (3).


To seal the chimney and ventilation pipes, a pattern is made either from a valley carpet (Fig. 18) or from metal with anti-corrosion coating(fig.19). The resulting patterns are bent or cut in certain places.
The mounting method is shown in fig. 17. Initially, the front pattern with a factory is mounted on an ordinary tile. Then the left and right are mounted, which are wound under the tiles. Lastly, the rear pattern is mounted. During installation, it is necessary to observe the principle of cascading water. On the left, on the right and on the back side it is necessary to make a gutter 8 cm wide.
To prevent snow accumulation behind chimneys and ventilation pipes, if their cross section exceeds 500–500 mm and they are located across the slope, it is recommended to install a groove (Fig. 20).

Sealing of the lower parts of roof penetrations (skirts), antennas, communication pipes is carried out using special passage elements for shinglas (Fig. 21).

Pass-through elements are fixed with nail connections. Rows of shingles are laid on the penetration, cut and glued to the flange with FIXER bituminous mastic. Next, the necessary roof outlet is mounted on the passage element.
4. Rim ribs and roof ridges
Method #1
Ridge tiles are obtained by dividing ridge-eaves tiles into 3 parts according to the places of perforation or are cut out from ordinary tiles in a special way (see Fig. 22).
Ridge tiles are available for sonata, chord and jazz cut shapes.
Edge
1. Cut the ordinary tile facing the edge so that there is a 0.5 cm wide slot between the coverings of adjacent slopes.
2. The dimensions of the future rib are beaten off with a lace (two stripes along the rib).
3. Laying ridge tiles conducted from the bottom up. It is fixed with four nails (two on each side) so that the overlap (3-5 cm) of the overlying tile overlaps the nails of the underlying one.
Skate
The ridge is laid from the side opposite to the prevailing wind rose in the area. Otherwise, the installation of skates is similar to the installation of ribs.
Method #2
For tango, trio, sonata and jazz cut shapes, ridge tiles can be cut from ordinary tiles.
At the same time, for the shinglas of the sonata cutting form: the closed part (A), the visible part (B).
When laying a ridge tile pattern, the back part in the places where there is no self-adhesive layer is additionally smeared with TECHNONICOL mastic. Otherwise, the installation of ribs/ridges using ridge tile patterns is similar to the installation using ridge-eaves tiles.

Attention! To prevent the formation of cracks in the cold season (temperatures below +5°C) on shingles for the CLASSIC and JAZZ series, it is recommended to bend on an artificially heated metal pipe with a diameter of about 10 cm (see Fig. 23).

- The condition of the roof must be checked in the spring and autumn.
- It is recommended to remove leaves, branches and other small debris from the roof with a soft brush. The use of sharp tools is prohibited.
- Objects with sharp corners must be removed from the roof surface manually.
- To ensure the normal drainage of water from the roof, it is necessary to clean the gutters and funnels as it gets clogged.
- If there is a threat of formation of a large layer of snow, it must be cleaned off using non-sharp wooden shovels. It is necessary to remove snow from the roof in layers, leaving a protective layer about 10 cm thick on the roof.
- For preventive purposes, inspection and, if necessary, repair of installation openings, holes, cracks and parts made of metal sheets should be carried out.
Currently, the market for roofing materials is quite diverse. For the construction of a roof, anyone can choose an option for themselves in accordance with their preferences and practical tasks: from ordinary asbestos-cement slate to expensive composite tiles.
Shinglas soft tile differs from other varieties of flexible tile in its extended color range and unusual cutting of its scales.
One of the most convenient and at the same time reliable materials is soft (flexible) tiles.
Soft tile SHINGLAS is considered to be the standard in the segment of flexible roofing materials. If you follow all the manufacturer's recommendations during installation, the roof will have an aesthetically attractive appearance and will last for a long time. Shinglas laying technology is quite simple, so installation can be done without the involvement of professional roofers.
Conditions for laying soft tiles

It is important to remember that it should be at least 12% - only in this case you can use soft tiles as a roofing material. If the slope of the roof is less, then moisture will linger at the joints and such a coating is unlikely to last for a long time.
The air temperature should exceed 5 degrees Celsius, so professionals advise mounting in summer time. This is due to the fact that the shingle - a sheet of tiles - is attached to the roof surface not only with nails, but also with the help of a special self-adhesive layer, which is located on inside sheet. Under influence solar heat sheets of soft tiles are soldered together, which ensures the overall tightness of the coating. At negative temperatures, this process does not occur, so the insulation may be of poor quality.
At temperatures above 25 degrees, it is also not recommended, or you need to do all the work very carefully and not step on already mounted sections of the roof. And if you want to make installation in the cold season, you should withstand sheets of shingles at room temperature, and when laying, use a hot-air burner or a building hair dryer.
Foundation preparation
First of all, you should think about the installation of under-roof ventilation. Creation of an air gap between the base of the roof and truss system needed to prevent accumulation excess moisture, which can lead to the formation of mold and subsequent decay of the coating. Proper ventilation provided by the following elements:
- openings at the roof eaves for air flow;
- air gap between thermal insulation and roofing;
- holes in the upper part of the roof (near the ridge) for air outflow.

Forms of cutting shingles "Shinglas". different forms allow you to experiment with the stylistic design of the roof.
To ensure good air draft during ventilation, the lower holes should be placed evenly along the eaves, and the upper ones should be 10-15% larger than the lower ones. The ventilation channel between the roofing and thermal insulation should be at least 50 mm, and if the roof slope is less than 20%, then the width of the air gap should be 60-80 mm. If you follow this method of ventilation, the base of the roof will remain dry for a long time, therefore, the roof itself will last longer.
As a material for the base for soft tiles Shinglas, FSF plywood, chipboard, OSB, edged board with an indicator are most often used. relative humidity no more than 20%. The most popular material for the crate at the moment is OSB board European standard, which has a moisture-resistant grinding on both sides. The installation of such plates should be carried out with a spacing of seams and a gap of 3 mm, since the possible thermal expansion of the material must be taken into account. If edged boards are used as battens, then the maximum gap between them should be no more than 5 mm. To increase the service life, all wooden elements, including rafters, should be treated with antiseptics and fire retardants.
Underlay installation

The device of the roofing pie Shinglas: 1 - flexible tile Shinglas; 2 - self-adhesive lining carpet; 3 - OSP-3; plywood; 4 - crate;
5. Rafter system.
With a roof slope of 12 to 18 degrees, an additional waterproofing sheet is laid on the base under the Shinglas soft tile over the entire surface of the slope. Laying is carried out from the bottom up with an overlap both in the transverse and in the longitudinal direction. Fastening to the base is carried out with the help of galvanized nails with a wide head, and the places of overlap are smeared with special bituminous mastic.
If the slope of the roof is more than 18 degrees, the installation of an additional waterproofing carpet will be required only in places where leaks are most likely. In the valley roll material it is laid with a width of 1 m, 500 mm for each slope, while overlaps should be avoided during laying the material along the entire length of the valley. Skates are reinforced with insulating material at the rate of 250 mm per slope (clause 2.4 of SNiP Ts-26-76), and along the cornice overhangs lining layer must be at least 400 mm wide (clause 2.6 of SNiP Ts-26-76). Places of overlap must be smeared with bituminous mastic.
Over the lining layer are reinforced with the help of cornice and end metal slats to protect the edges of the batten. The installation of these elements is carried out with an overlap of 50 mm and with the help of roofing nails.
Laying of soft shingles Shinglas (Shinglas)
After strengthening the roof overhangs with metal strips, you can proceed to laying soft tiles. All installation work can be done by one person, you only need the following tools:

Shinglas roofing system: 1 - ridge/cornice tiles; 2 - ordinary tiles; 3 - point aerator; 4 - pipe sealing; 5 - lining carpet; 6 - valley carpet; 7 - gable plank; 8 - a solid base for tiles; 9 - cornice strip (dropper); 10 - sealing the joint with the wall; 11 - junction bar; 12 - skylight; 13 - drainage system.
- work gloves;
- a hammer;
- roofing nails (galvanized with a wide hat);
- bituminous mastic;
- trowel for applying mastic;
- chalk rope;
- roulette.
You should start with the installation of Shinglas ridge-cornice tiles, which are laid on top of previously fixed metal strips. Needs to be lubricated first back side sheets with bituminous mastic, and fasten them to the base of the roof with the help of galvanized nails with a wide hat. As a starting strip, you can use not only a special ridge roof tiles, but also patterns from ordinary sheets with cut petals.
Before laying Shinglas shingles, shingles from different packs should be mixed, as they may vary in shades. On the inner surface Each shingle has a special protective film that must be peeled off before laying the material.

The valley carpet is used for waterproofing the zone of internal bends (valleys) and junctions on pitched roofs.
The installation of the first row of tiles is carried out from the center of the slope to the edges - it will be more convenient to align it horizontally. The shingles are attached to the base of the roof with the same galvanized nails, however, care must be taken to ensure that the nail heads do not cut into the material, but are on the same level with it.
The second row is also laid from the center with an offset to the left or right by half a petal, while the lower edge of each petal should be flush with the upper edge of the cutouts in the previous row. All subsequent rows are mounted in the same way. Places where there is no self-adhesive layer, for additional protection must be coated with bituminous mastic.
To prevent unevenness when laying rows of soft tiles, appropriate markings can be made on the slope using a chalk rope. At the edges of the slope, the shingles of the tiles must be cut and additionally smeared with mastic. And the exit point of the chimney or ventilation pipe must be additionally isolated with a lining carpet, then the exit point and the passage element itself should be smeared with bituminous mastic. Also, when installing the pipe, it is recommended to make a groove to prevent the accumulation of snow in this place in winter.
When laying shingles, it is not necessary to coat each sheet with mastic - this will only spoil the appearance of the roof. The laying technology must be fully respected, you should not try to lay out a specific pattern with soft tiles - it should be abstract.
In order for the roof to last for a long time and its appearance does not deteriorate, you need to follow the following recommendations:
- the condition of the roof should be checked in spring and autumn, when leaks are most likely;
- various small debris from the roof should only be removed with a soft brush;
- remove various objects with sharp corners only manually;
- we must not forget to periodically clean the gutters so that the water from the roof flows unhindered;
- if a large amount of snow accumulates in winter, it should be removed only with wooden shovels in order to avoid mechanical damage to the roof;
- if necessary, carry out repairs to various elements of the roofing and base.
The technology of laying Shinglas soft tiles is quite simple and does not require the use of additional equipment. If you follow all the recommendations of professionals, then your roof will last a long time and will please the eye for more than one year.