How to make a kitchen countertop with ceramic tiles. The countertop is for the kitchen what the sofa is for the living room. Original design ideas.
The arrangement of the working space in the kitchen is very important both for the convenience of the hostess who is busy cooking, and from the point of view of a holistic perception of the interior. When the color of the walls and furniture are in harmony with each other, a favorable mood and a desire to use one's strength to create culinary masterpieces are created.
The most important element of the kitchen, along with the stove, is the desktop - comfortable and functional surface which must withstand daily mechanical and thermal loads, exposure to moisture and grease, aggressive environments. At the same time, it should be easy to wash and not be afraid of cleaning and disinfectants. For this, as well as possible, ceramic tiles are suitable. Manufacturers kitchen furniture rarely, on their own initiative, they make tile countertops lined with artificial stone or tile. In production, this is not technologically advanced. But with your own hands, a tile countertop is made without difficulty.
What is this article about
Materials for the manufacture of countertops
A do-it-yourself tile worktop, lined with ceramic tiles, can be made from the work surface available in the kitchen set, or made independently from moisture-resistant fiberboard (MDF) or plywood. When making a countertop yourself, it is possible to slightly increase its size or give it the necessary shape: for example, make a recess in it for more convenient location near kitchen table or perform in two or more levels - by arranging additional surfaces on which it will be possible to place a small household appliances or other kitchen utensils.
With self-manufacturing of the desktop completely, the tabletop is made of ceramic tiles made of boards of furniture fiberboard, laminated or painted industrial way choosing a color depending on the interior of the kitchen. The degree of moisture resistance of the material used is very important, since in the kitchen it usually happens high humidity, especially during cooking, and water or other liquids may spill onto the countertop. If you use chipboard that is unstable to moisture, it will begin to delaminate and insects can settle in it or mold can develop.
Tabletop pedestal
Before making a tile countertop, carefully measure the dimensions and select the tile of the appropriate size (format) so as not to cut the pieces.
The easiest way is to use an already made pedestal frame - from kitchen set.
If the pedestal is made outside the kitchen set - best option furniture painted chipboard panels. They are cutting circular saw by size. Hacksaw and jigsaw do not provide smooth edge and can be used as an alternative.

The edges of the sawn chipboard are treated with a moisture-resistant impregnation for wood - for example (Senezh, Belinka, Pinotex, Tikuurila, etc.) after drying - glued polymer tape for edges or apply a layer of oil putty. Putty is best applied in 2-3 doses. Not imposing immediately thick layer
After complete drying - this can take up to 7 days, it is processed first with coarse and then with fine sanding paper stretched over a bar.
Before applying putty, be sure to stick on the edges of the chipboard masking tape.
The sanded ends of the fiberboard are painted oil paint.
Assembly is carried out using furniture fittings:
- metal corners;
- plastic dowels;
- Screws.
You can use wooden or screw metal furniture spikes.
Before assembling the base frame, do not forget to use a Forstner drill d-35 mm to drill holes in which the door spring hinges will be placed.
Doors for the pedestal (if provided), it is best to use ready-made ones. Their choice is very large in furniture and construction stores.
Preparing the tabletop for pasting
The main problem of chipboard and other wood-based materials is high hygroscopicity - susceptibility to moisture. Therefore, before sticking to outer surface ceramic tiles, it is necessary to carefully treat the surface of the countertop with moisture-repellent impregnations.
You can use the ones already mentioned, you can - take the path of cheaper prices and use the drying oil of the Oksol brand. Before applying to the surface of the countertop, drying oil should be heated to a temperature of 90-95 ° C in a water bath.
It is best to apply with a wide paint brush made of natural hair.
Drying oil is applied twice, with an interval of 12-24 hours.
After the impregnation or drying oil has dried, which is determined by touch: the surface should not be sticky. You can start laying ceramic tiles.
What glue to use
Using standard tile adhesive on cement base not advisable. Cement mortar has poor adhesion to wood. It is better to use acrylic or epoxy adhesive.
It is more plastic, does not crack upon impact. Does not flake when the wood gets wet, easy to apply and dries quickly. Holds ceramic countertop tiles well.

A very good option is to use Liquid Nails glue in syringe tubes that are squeezed out with a special gun.
The adhesive layer should not exceed 2-3 mm. A thicker layer dries longer and does not increase the strength of the bond between the ceramic and the worktop. In addition, if you lay the tiles on a thick layer of glue (mortar), you will have to use a level to give a strictly horizontal position. Otherwise, moisture may accumulate in the recesses, and the tile may burst under mechanical load.
Glue must be leveled with a comb spatula over the entire surface. It is impossible to glue the tiles by applying glue in stripes or dots.
Laying ceramic tiles

The installation process, given the small surface area of the countertop, is simple. The laying of tiles always starts from the front side and goes to the wall (back edge of the countertop). The first row, laid along a plank nailed to the end of the tabletop or along a long building level (rule), will be a guide for subsequent rows.
The subsequent rows are laid end-to-end to the ends of the first row.
You can use masonry crosses, but it is not advisable. They give wide seam between tiles. Even the darkest grout from grease, moisture and vegetable juices will quickly darken, soak and acquire an untidy dirty shade and lose its color.
Therefore, when making a do-it-yourself tile worktop, you should strive to make the joints as narrow as possible.
In the process of facing with ceramic tiles, horizontality must be checked by a building level. Construction debris can get between the tile and the countertop and the tile will not lay flat. This is usually very noticeable on the finished product.
If the whole tile does not lie on the surface, it is cut with a manual or electric tile cutter.
Better to use manual. It does not give a lot of dust when working.
Tabletop edge finish

After laying the tiles, the end face from the side of the facade must be ennobled. To do this, you can use a wooden rail painted with oil paint or (preferred option) aluminum furniture profile. The upper edge of the lath (profile) should be 2-3 mm higher than the surface of the tile. This is to prevent chipping of the edges of ceramics during operation and the flow of spilled liquid onto the floor.
Grouting tile joints
The final process of making ceramic tile countertops with your own hands is grouting. A standard grout is used, for example: Prospector, Ceresit, Ultracolor Plus. Which is selected either close to the color of the tile - then the seams are less noticeable, or contrasting.
Never use light-colored countertop grout!
It will become dirty in 2-3 weeks even at the very careful care since the porous surface absorbs fats, vegetable (fruit) and meat juices very well.

Apply the grout for the joints with a rubber spatula or a finger; be sure to firmly press the grout into the joints without leaving gaps and air bubbles.
Immediately after grouting, the surface is wiped with a damp sponge or cloth; dried grout is difficult to remove from the surface of the tile.
It is possible to use a countertop lined with ceramic tiles 12-24 hours after the grout has dried.
Tile worktops - already a rather rare, outdated option for arranging work surfaces in the kitchen, can only be of interest to those who do not cook a lot in the kitchen for design purposes.
Ceramics are not resistant to mechanical stress (brittle). Meat cannot be beaten on such countertops.
The seams quickly become clogged and pathogens settle in them.
The surface of glossy ceramics is slippery. It doesn't hold well cutting boards. Kitchen knives quickly become dull on the surface of the tile.
A table with a ceramic tile top looks very presentable in any room, and its practicality and convenience leave similar tables made of other materials unrivaled. A finished table with a ceramic top costs quite well, and you may not like it in its coloring. A good option for acquiring such a piece of furniture is its independent production. Moreover, any person who is friends with tools can do such work. The result of your efforts will be an exclusive table that none of the neighbors will definitely have.
For DIY, the first step is to prepare all the materials required for work, as well as tools. If you don’t have some tool, then it is quite possible to replace it with an analogue, or ask friends.
Table selection
The frame of the table can be made of metal or wood. metal frames very reliable, but heavy and prone to rust. To bring such a frame to a normal state, it must be cleaned and painted.
As a basis for the future table, you can use some old dining room or Coffee table from wood. If it already has a countertop, and it is in good condition, does not have delaminations and cracks, then new stove may not be produced. If it has defects, irregularities, bends or springs, it is recommended to lay a new countertop plate on top of it. Or remove the old stove, putting a new countertop in its place.
If the frame is missing, it must be made independently from wooden blocks or chipboard boards.
The tabletop is made of chipboard (preferably laminated), multi-layer moisture-resistant plywood or OSB. OSB board is definitely the best option, as it is moisture resistant and does not require impregnation. The same can be said about laminated chipboard. Conventional stoves Chipboard can be used, but it is undesirable, because, despite the impregnation, over time they will collapse from moisture that has fallen on them. The thickness of the plate for the countertop is selected at least 16 mm. Most optimum thickness- 20-25 mm. This will ensure the stability of the table even when using heavy porcelain stoneware.
DIY ceramic tile table (photo)
Choice of ceramic tiles
For table decor with do-it-yourself tiles, almost any wall or floor tiles, having a thickness of more than 5 mm, as well as a mosaic. Porcelain tile has proven itself well in this quality. The size of the tiles, in principle, does not matter. But keep in mind that tiles not big size easier to install and less waste. A small tile is easy to calculate without a trace. The advantage of larger tiles is that the countertop will have fewer seams.
Any tile pattern is chosen. Looks great not just plain tiles, but having a specific pattern or structural composition. On a uniform background, there may be a drawing or a decorated insert.
Assortment of ceramic tiles

Other materials and tools
As additional materials we need:
- A cylinder of silicone and a syringe for it.
- Wood impregnation (if used) chipboard).
- Cement based adhesive for wooden surfaces.
- Joint grout based on epoxy resin.
The following tools will be used:
- Bulgarian for cutting tiles. In extreme cases, a tile cutter will do. Also prepare a diamond wheel.
- Jigsaw for cutting wood boards.
- Spatula for applying tile adhesive.
- Rubber spatula, which will rub the tile seams.
- Roulette and pencil.
- Level.
- Self-tapping wood screws 55 mm long.
- Decorative strips for decorating the tabletop border.
How to make a tile table with your own hands (video):
DIY tile table making process
All work can be conditionally divided into several stages, each of which is implemented only after the completion of the previous stages. Consider the case when the countertop is made new. When using an old countertop, the first three steps can be omitted. We list the main stages:
- Making a new tabletop. First you need to determine the exact size of the future countertop and its shape. To do this, the plate is placed on flat surface, and a tile is laid on it, imitating the final pattern. Tiles can be laid seamlessly or seams can be left. For this, plastic crosses are used. Tiles are laid out from the center towards the edges. In this way, you can achieve the calculation of the required number of tiles without making cuts. According to the available dimensions, the tabletop is marked and trimmed with a jigsaw. If the countertop initially has a fixed size, then the tile will subsequently have to be cut.
- The tabletop is screwed to the frame with self-tapping screws in several places. It is necessary to ensure the strength and stability of the structure. In the course of work, the horizontal level of the surface of the plate is controlled using the tool of the same name.
- If a conventional chipboard is used, then it is impregnated with a water-repellent compound. Further work resumes after the board dries.
- Tiles are glued onto the countertop using tile adhesive diluted with water. The laying process is carried out in the same order as when marking. If during the work you need to trim the tiles, then use the grinder. With its help, not only straight, but also rounded sections of the tile are easily cut.
- The tile joints and the ends of the countertops are grouted with a rubber spatula. It is recommended to use only grout based on epoxy resin, which is not washed away by water and is resistant to mechanical and chemical influences.
- After the tiles have hardened and grouted, the ends of the countertops are finished to give them a presentable appearance and protection from moisture. The finishing material can be decorative wooden planks, which are screwed to the plate with self-tapping screws or glued waterproof glue Dragon type. Also on the ends you can stick pieces of tiles, mosaics or special corner elements on the silicone.
Some masters recommend laying ceramic tiles not on cement glue, but on silicone sealant. The quality and durability of the countertop does not suffer from this. Silicone is applied along the perimeter and diagonally of each tile, after which the tile is simply glued to the countertop.
DIY tiled table

Original design ideas
A table with tiles, made with a share of fiction, is able to decorate the entire room. Are you thinking about how to make a completely unique table, but no ideas come to mind? In fact, you just need to show a little imagination and ingenuity. In particular, the tabletop can be laid out whole tile, and its pieces, scraps. Get a kind of mosaic. With the appropriate skill on the table, you can create an original drawing. There won't be another one like it anywhere.
By changing the shape of the tabletop, they achieve the entry of the table into general interior. For example, if the room is dominated by rounded shapes in the form of arches or furniture set, then round table it will come in handy. Or a semicircular table that can be placed against the wall in order to save space. The semicircular shape of the tabletop is unusual and very effective. So, there is always not enough space on the loggia or balcony, and a table of this form can always be installed without problems.
The perception of a table as a piece of furniture largely depends on the shape, size and material of its base.
If available indoors wooden furniture the frame of the table is also better to be made of wood, choosing the right shade.
The wooden frame is also good when decorating a room in rustic style. If the room is furnished to a minimum, closer to the “hi-tech” style, or there are furniture items in the room from of stainless steel, then the material of the table frame must also be metal. This is more typical for modern youth kitchens.
Do not be afraid to create, inventing new table design options. Photos on our website will inspire you to further creativity. Handmade items with a piece of your soul invested in them inspire pride in their work and have the ability to charge you with energy.
DIY ceramic tile tables (photo)


Despite the abundance modern materials for finishing work surfaces, ceramic tiles do not reduce their popularity. Kitchen worktop, surface dining table or coffee table finished with this material, resistant to moisture, high temperatures, retain their original view They are easy to take care of. In addition, ceramic coating is always beautiful. The color and texture diversity of this material allows you to organically complement the interior with both strict monochrome surfaces and create bright desktop images.
When choosing ceramic tiles for countertop decoration, you should consider the dimensions of the kitchen. For a large room, you can choose 30x30 or 60x60 cm. If your kitchen is smaller, give preference to the 7x7 or 10x10 cm format. We advise you to pay attention to the mosaic. Usage small tiles visually enlarge the space.
Try to choose a tile with an even decorative layer, it will be easier to care for such a coating. Experts believe that ideal material for arranging the kitchen worktop is porcelain stoneware tiles. It is resistant to abrasion, temperature extremes, moisture and mechanical damage.
Ceramic tile kitchen worktop
Kitchen in classical style, country or provence will become more original if the countertop is made of ceramic tiles. Of course, the material must be combined with the design of the floor, wall apron, and other similar interior elements.
When choosing a tile, you need to immediately think about finishing the end of the countertop. To make it qualitatively and beautifully from the main material - difficult task, which can only experienced master. Fortunately, there are industrial options L-shaped tiles. Buy ceramic material should be 10-15% more than required for the actual coverage area: some part of the tile will be damaged, and some will be needed for cutting parts of an incomplete size.

Necessary materials and tools for work
- The basis for the tiles can be an old countertop or other material with moisture-resistant properties (2 layers of 20 mm plywood, moisture-resistant gypsum-fiber sheet (GVL), cement particle board sheet).
- Basic tile.
- Tiles for finishing ends.
- Polyethylene sheets.
- Impregnation that increases the moisture resistance of plywood.
- Metallic profile.
- Screws, screws made of stainless material.
- Furniture stapler with staples.
- Roller glass cutter, tile cutters.
- Tile adhesive or other compound for bonding tiles to the base.
- Gun with silicone insulating sealant.
- Limiters for laying tiles will allow you to make the same indent when laying.
- Grout for seams.
- Utility knife.
- Building level.
- Roulette.
- Pencil.
- Spatula for grouting.
- Notched trowel for applying adhesive.
- Drill with drills.
- Grinding machine with nozzles of different grain sizes.
- Rags, sponges.
Description of work
Before starting work, cover the kitchen sections over which the worktop will be installed with a protective plastic wrap. This will help protect the facades from damage and pollution.
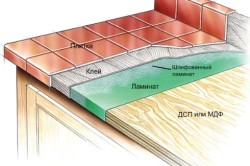
- Cut the sheets of plywood exactly to the size of the future countertop. For the base, we need 2 identical layers of material.
- Saturate the plywood sheets twice with moisture resistant protective composition from two sides. After the impregnation dries, make cuts for the location of the sink and hob. Soak the ends of the base and holes also with moisture. protective agent.
- Using metallic profile, attach the first layer of plywood to the ends of the facades with screws.
- To increase the waterproofing properties, attach a layer of the prepared film to the surface of the plywood with a stapler.
- Place the second layer of plywood firmly on top of the first (with foil). Fasten additionally with stainless steel screws around the perimeter, as well as in a checkerboard pattern over the entire area. The distance between the attachment points should not exceed 15-17 cm.

Before screwing in the screws with a drill, prepare holes so that the screw heads do not rise above the surface of the plywood, but are recessed into the material.

- At the joints of the plywood boards and where the countertop meets the wall, apply silicone insulating material.
- On the ends, you can install strips of plywood about 4 cm wide. If the base allows, you can attach the end tiles directly to it.
Sometimes a cement pad is used as a reliable waterproofing layer. To prepare such a solution, tile adhesive is used, cement-sand mortar industrial production and latex (1 part to 2 parts water). Laths-sides are temporarily installed, the solution is poured, leveled, which is left to harden for 6-12 hours, depending on the ingredients used. Then they level, fill the manifested irregularities and leave for 2-3 days for complete drying.
- Via insulating tapes or insulating filler, hide the attachment points with self-tapping screws.
- Depending on the size of the selected tile and the shape of the countertop, mark up the layout. If the countertop is rectangular, it is better to start from the most noticeable corner. At L-shaped surfaces, plan the indentation of entire products from the edge, since the corner tiles will need to be cut. Consideration should also be given to the placement of the sink and hob. Trial place the tile on the countertop.
- Start with tile adhesive (or other special composition) installation of tiles. Use special limiters that will help you place products at the same distance from each other. It will take about 12 hours for the composition to dry.

Remove excess mortar from the surface of the tiles with a spatula and a damp (not wet!) Sponge. Once fully cured, this will be difficult to do without damaging the surface.
- To evenly arrange the corner of the L-shaped countertop and the cutouts for the sink, the tiles should be cut using a special device. First, draw a cut line on the tile. Swipe it several times with a glass cutter. Then carefully pry off any excess with tile cutters. grinder finish the cuts.
- On the building mixture lay the tiles. Use a knife to remove excess bonding material around the perimeter of the paving.
- When the surface of the countertop is completely ready, proceed to finish the ends. Most easy option- usage finished products. They should simply be installed in place using tile adhesive. It is possible to make a wooden edging taking into account the color and texture of the facades of kitchen furniture. The wooden plank is fastened with screws and moisture resistant PVA. Last option- decorate the end of the countertop with cut fragments of ceramic tiles, which were used as the main coating. Before the ends dry, additionally fix their position with adhesive tape.
- After 2 days from the end of laying the tiles, wipe the countertop well and you can start grouting the joints with a special moisture-resistant compound.
- Apply the grout with a rubber spatula. Lightly press the compound into the seams between the tiles. After 20-30 minutes after application, wipe the surface with a well-wrung sponge. To dry the seams evenly, wipe them with a damp sponge every 3 hours.
- When finished, wipe the countertop with a dry cloth.
The tabletop is ready!
mosaic table
There is no need to be upset if you accidentally break your favorite cup or plate. Do not grieve and do not rush to throw it away. Better take the opportunity to perpetuate the color, the original pattern of your favorite dishes, by making a ceramic tile table with your own hands. True, for this you have to break something else ...

When decorating a table or any other product with pieces of broken ceramics, first of all think about the combination of patterns and colors. In this project, bright saturated colors and a black background are chosen as companion colors that can shade the black and white pattern of the plates. Perhaps if the plate was with tender pink flowers, they would be better combined with pastel colors: beige, light green, lilac. And make the background light. To imagine what the product will look like, draw it with colored pencils.
Preparation for work
Think about what broken glass, tiles, ceramics can be dangerous - you can get hurt when working with them. Be sure to use protective equipment: gloves (fabric, rubber) and goggles. When crushing the material, wrap it with a cloth or rag so that the fragments do not scatter.
To work, you need a stable old table from metal or wood. Can you make a table old stool or small bedside tables, installing on them, with the help of self-tapping screws, a countertop-cover. Also prepare:
- Several ceramic tiles or a sufficient number of their fragments.
- Coarse-grained and fine-grained sandpaper.
- Glue for tiles.
- Cement.
- Dye for cement.
- A hammer.
- Regular saw.
- Paint.
- A brush.
- Grout in a color that suits your design.
- Spatula for glue and grout.
- Tile cutters.
- Sponge, rag.

Step-by-step instruction
- Get started by preparing the countertop. The surface must be clean and dry. In addition, you need a good grip, so our task is not to polish it, but to make it as rough as possible. To do this, you can use a coarse sandpaper (about 80% grit) and regular saw. At an angle, scratch the table with a saw, gradually moving it.
- Now on to the most unusual part of the project - smashing ceramic tiles, plates, and whatever else you have planned. Wrap the tile with a rag and tap lightly in several places with a hammer. Do not try to make the elements of the future mosaic too small.
If you would like to receive fragments certain form use a glass cutter. Draw it along the marked lines, and then wrap it with a rag and tap lightly at the places of the cut lines. You can correct the shape of the fragments with the help of special tongs. Clamp the fragment with tongs in the right place, cover with a rag and squeeze.
- Prepare tile adhesive according to instructions. Put on rubber gloves.
- With a spatula, apply the adhesive to the surface of the table and a little to the fragments of the mosaic pattern. Based on the approximate scheme, create a pattern on the surface of the table. Work carefully so that the adhesive does not get on front side ceramic elements. If this still fails, immediately wipe the adhesive off the mosaic with a damp sponge. Don't set fragments too close. The distance between the fragments can be from 0.25″ to 1″ (0.6-2.5 cm).
- Thus, continue to lay out the desired pattern.

If the tiles of the mosaic have different thickness, the evenness of the layer can be adjusted by applying on thin large quantity glue.
- Use a damp sponge to wipe excess adhesive off the surface. Leave the mosaic to dry for 24 hours.
- The space between the pieces of ceramic must be empty for filling with decorative cement mortar, so remove excess protruding pieces of glue.
- mix cement mortar as required by the manufacturer. The substance must not flow or contain dry fragments. Add pigment to achieve the desired uniform color (black in our project).
- Apply the cement mortar to the mosaic with a spatula. Distribute, filling the voids between the pieces of ceramics.
- Form the ends of the cement with your hands and handy tools that are convenient for you. Attach small fragments of the remaining mosaic to the ends.
- Remove the cement from the mosaic with light circular motions without destroying the space filled with it. Leave the table to dry.
- Remove the remains of black cement after drying. When ceramic surface the table is completely ready, you can proceed to finishing grounds.
- fine-grained sandpaper sand the legs. Wipe them.
- Paint the wood (or metal) black (or whatever). Leave the product to dry completely.
You have made a unique piece of furniture, there is no other like it. Enjoy using your new table as coffee, toilet or beautiful coasters for vase, lamp.
In the kitchen, one cannot do without such an element that is so popular now - countertops. Many materials are used to make this product. Today, a very popular solution is tiling. This surface looks very attractive, and it is very practical to use it. The material perfectly withstand all the loads that act on the countertop.
Material selection
For the kitchen it is better to use not standard tiles, and porcelain stoneware. Its strength will provide high performance comparable to the properties of stone.

Porcelain stoneware has excellent properties in terms of use in the kitchen. When choosing it, it is important to pay attention to its surface. If you stop on a textured coating, this will cause dirt to accumulate. Therefore, it is better to use samples with a flat surface.
- The polished surface is pleasant to the touch and easy to clean.
- The embossed surface requires frequent maintenance, but thanks to this solution, you can get a unique design.
You can also use mosaic to create a tabletop with your own hands. This option looks especially good in small room. For larger area it is worth using a size of 30x30 cm or more.

The color should be selected, focusing on the interior design, as well as color design kitchen set and apron. Examples can be seen in the photo. And you can learn more about the procedure from the provided video.

Building the Foundation
If you have furniture, you need to do the following:
- In each cabinet you need to add a few legs. They need to be dispersed around the perimeter, because the porcelain stoneware countertop will weigh "decently".
- Cabinets with each other need to be well fixed, having received a single design. This will allow you to reach the level.
Tools and materials
Buy plywood. For standard dimensions the headset will fit two sheets, because the laying will be done in two layers. You should also purchase impregnations to protect the material from moisture.

The tools you will need are:
- screwdriver;
- a hammer;
- hacksaw;
- jigsaw.
First, the plywood needs to be cut so that it hangs a little. Considering standard size countertops 60 cm, do not forget about the tolerance of 2 cm on each side and 1 cm on the front.
When the cutting is done, it is possible to process the material with a protective agent in several layers, especially the ends.
Fixing the base
We fix the first layer with self-tapping screws to the cabinets so that their hats are recessed. Then we apply glue to the surface, you can use PVA.
Solution preparation
It's time to prepare the solution. You can purchase a special one or make cement-sand. In the latter, a little PVA is sometimes added.
To prepare the solution, you will need cement and four times more sand. First, a certain volume of water is poured into the container. Then a mixture of cement and sand is gradually poured in a ratio of 1 to 4. In this case, the composition must be constantly mixed. It is convenient to do this with a drill with a mixer nozzle. When the consistency of sour cream is reached, you can stop pouring the powder. Then the composition should be allowed to stand for about five minutes. Then, before use, it must be stirred again.
Solution application
Using a trowel, it is necessary to apply the solution to the prepared base, evenly distributing it. For this it is better to use wide spatula with teeth. It will allow you to get better surface for adhesion, while saving the solution. You need to create a flat surface.

Laying tiles
We will consider the easiest way to do-it-yourself styling - seam to seam. First, we make the markup in order to understand what will happen in the end.
We start laying from the angle that is best viewed. We apply the solution, focusing on the marked lines. In places where trimming of porcelain stoneware is required, it should be cut with a tile cutter, and not with a grinder.
When the tile is completely laid, you need to take care of the ends.
![]()
Decorating the ends of the countertop
- End tiles can be laid with an overlap, or horizontal tiles should be placed with an overhang that will correspond to the thickness of the porcelain stoneware, in order to then substitute the tiles at the ends.
- You can cut the material at an angle of 45 degrees. This requires a special tool, which is not always possible.
Seam processing
Even if you lay the material without joints, they will still be present, so grouting will be needed. It is better to use an epoxy-based composition. Such material has good durability, given the operating conditions in the kitchen.

You can use either a ready-made composition, or a dry mixture, which is prepared similarly to tile adhesive - mixed with water.
- For grouting it is better to take rubber spatula, which will definitely not damage the finishing material.
- To protect adjacent surfaces, masking tape is useful, which does not leave marks behind and is conveniently glued.
- Excess grout is best removed with a sponge after a day.
Original solution - excellent repair
If you create a countertop in the kitchen from tiles, you can get non-standard look interior. At the same time, it will be no less practical than when using a conventional countertop. Thus, the design created by oneself will be harmonious and comfortable.
- Installation of tiles on the surface
- How is installation done?
- Work with the ends of the countertop
- How is grouting done?
The kitchen worktop is different, but when making it, you must remember that working surface should be durable, waterproof, easy to clean from various types pollution. That is why today ordinary ceramic tiles or mosaics have become so popular for finishing countertops.
In this case, the design is not only beautiful and stylish, but also comfortable, the coating is not at all afraid of a knife and water, it is easy to clean, you can put hot pots and pans on the tile, which is not always possible when using other coating options.
Installation of tiles on the surface
Installing kitchen tiles is not very difficult. As a base, a sheet of plywood in 2 layers is usually used. The tiles are glued to the surface using tile adhesive. Suitable for finishing various options, but the most successful will be porcelain tiles, which have an aesthetic appearance and has the necessary qualities.

It does not slip, is durable, does not absorb moisture, has beautiful drawings. It is not recommended to take ordinary ceramic tiles with a glossy surface, as they do not quite fit.
Preparation includes the purchase of material for the countertop. Moisture resistant plywood with dimensions of 1500 * 600 * 20 mm is suitable for the base. This is optimal parameters for work, it will be convenient to work with a sheet with a jigsaw. It must be remembered that plywood is laid in 2 layers to ensure the necessary strength. Next, the dimensions of the future structure are determined based on free space in the kitchen. Marking is applied on a sheet of plywood using a ruler and a pencil. If the corners are rounded, then you need to use a compass.
A sheet of plywood is cut with an electric jigsaw. The 2nd layer is prepared similarly to the 1st, it is used as a template. It is important to immediately determine where the sink will be located, whether any other technological holes are needed. All of them are cut with a jigsaw, it must be strictly observed that the holes on both panels match, since then it will be difficult to fix anything.

First, all the end parts of the base under the countertop must be processed. They should turn out smooth, not have chips and burrs. This is especially true for those places where the sink will be located. After that, the plywood base is attached to the frame of the kitchen set. If possible, then the base for the countertop must be additionally fixed to the wall.
Galvanized self-tapping screws are used to fasten the frame, all hats must be carefully recessed so that they do not create problems when applying glue. Optimal length such self-tapping screws is 38 mm. This allows the tabletop to hold firmly. After the work is done, it is recommended to cover the plywood base with a primer layer. This will not only provide improved adhesion to the surface, but also additionally protect the base from moisture.
Back to index
Preparation of tile mortar
To prepare the glue, you can take the following solutions:
- Ready-made dry mixes that are easy to buy at any store. You need to choose an adhesive that is resistant to the negative effects of moisture.
- Use a mortar based on fractionated sand, cement, which can be bought at any hardware store.
- The usual cement-sand mortar, which is kneaded at home with your own hands. For greater adhesion, PVA glue is added to the mixture.
It is best to use a special tile adhesive that can be used for the kitchen. It provides excellent protection of the base from moisture, temperature changes, and other adverse conditions that may occur in such a room. In addition, you will need a notched trowel for applying glue, it should not be too wide to make it comfortable to work with.
Back to index
How is installation done?

Tiles for the kitchen - the best and practical option. It is best to use products with dimensions of 10 * 10 cm for work. It is recommended to use combined laying methods - the usual straight and diagonal. The result is an attractive surface. For edges apply diagonal laying, but for the main one - a straight line. You can lay tiles in a checkerboard pattern, it all depends on the texture of the product and the pattern.
The process begins with marking on the surface. For convenience, a simple pencil and a metal ruler are used. Since the countertop is not a floor or a wall, then increased demands must be made on the drawing. First, the center is determined, and marking lines are drawn from it to finish the edge of the surface. Even if a mosaic is to be used, it is necessary to first determine the central part of the work, and then deal with the planning and decoration of the edges. This is especially important when the tile is used for countertops with semicircular corners irregular shape.
It is important to immediately mark the part where the cutout for the sink will be located. After the markup is ready, you need to start cutting. You must act carefully so as not to increase consumption. On the wrong side of each tile, it is recommended to mark the location of the elements on the front surface.
Scheme of laying on the tabletop.
The following tools and materials are used for work:
- the tile itself;
- tile adhesive;
- metal notched trowel;
- cutting tool;
- simple pencil;
- ruler;
- building level to measure the horizontalness of the surface.
Tiles for kitchen countertops are laid from the central part strictly according to the markup. Glue is applied to the surface thin layer, after which the tile is firmly pressed against the countertop. It must be held for 1-2 seconds for the solution to seize. Then you can proceed to further installation. To make the seams beautiful and neat when working, special dividing crosses made of plastic are used. For one side, 2 such crosses are used, they are placed near the corners. They are not used for mosaics, since the laying is slightly different in technology. To work with mosaics, already used finished sheets certain size. They are applied to the surface smeared with glue, pressed, after which the film is carefully removed from the front. The seams are neat on their own.
Back to index
Work with the ends of the countertop

Screed sizes.
After the main surface is ready, it is necessary to ennoble the ends. For this, various options are used:
- During horizontal laying, ceramic tiles are laid out in such a way that one of its edges protrudes slightly beyond side surface. The size of such an overhang should correspond to the thickness of the tile plus a layer of glue. After that, the finishing material is cut into plates according to the size of the end edge and glued. To do this, you can use the trimmings that remained after the main masonry of all tiles. If a mosaic is used, then the technology for finishing the ends is exactly the same, but most likely you won’t even have to cut the material, you just need to take 2-3 rows of a solid mosaic.
- This option is the opposite of the 1st, not the front tile, but the end tile is laid with an overlap. The tile is placed exactly at the edge, and the end tile is laid with a slight overlap. Care must be taken, for the edge it is best to use a special decorative tiles which is intended for such purposes.
- There are more difficult option, which involves cutting the wrong side at an angle of 45 °. This option requires certain skills, although the result is impressive and beautiful. Cutting is carried out only with special tool. If not, then you can order this work in the workshop.