What is better for a kitchen apron. Apron for the kitchen - a stylish interior accent
If you mount an apron for the kitchen with your own hands, you can save money. In the kitchen, the surface between the countertop and the top drawers gets dirty the fastest. Water splashes, greasy stains, scale, fumes, temperature changes spoil appearance walls.
Installing a tile apron
The kitchen is a corner where the family often gathers, and sometimes a large company. The monotonous atmosphere spoils the mood, but you need the kitchen to look cozy and attractive.
The interior of any room can be diversified with bright details, and the kitchen can be decorated with an interesting apron.
Even with little experience construction works, the amateur master will be able to fulfill his dream. Ceramic tiles, MDF, glass, metal, mosaics - the range of modern materials is huge, but you need to choose the right one.
Do-it-yourself apron for the kitchen can be made quickly and efficiently, if you first watch the installation video and study the photo of the design options for the room.
You can demonstrate your taste and talent as a designer, make the kitchen original, bright and attractive.
The most common option is to lay out an apron for the kitchen from tiles, which are durable and beautiful in appearance.

It is necessary to prepare the following materials and tools:
- tiles;
- glue;
- primer;
- grout;
- putty knife;
- gloves;
- cross stitches.
Work begins with the preparation of the wall surface: it must be perfectly flat.
To install the tiles with your own hands, you first need to fix the slats at the right height so that the tiles lie flat. You need to start gluing from the corner and from the bottom.
Apply glue with a spatula and firmly press the tile to the wall. To make the seams even, you need to install 2 crosses on one side. The necessary holes are cut out under the sockets with a grinder.

Finishing work consist in grouting the joints with paste. After 2 days, the tiles can be washed.
Apron from ceramic tiles — classic version, which is well-deservedly popular with buyers.
Installation of MDF panels
An apron made of MDF panels can be quickly assembled with your own hands, because the work is not very difficult.
The panels have different shades, can imitate natural materials and various images. They can be mounted on a normal surface without special preparation, and fastening can be done with self-tapping screws, screws or liquid nails.

Tools used:
- screwdriver;
- electric drill;
- roulette;
- liquid Nails;
- self-tapping screws;
- plugs;
- putty knife;
- screws.
Liquid nails are applied to the wall and panel, and then the tile is pressed firmly against the wall.
You can fix the MDF apron with dowels or screws. First, a frame of wooden slats is installed, which are fastened with dowels. Then, using self-tapping screws, panels are installed on the frame. The caps of the screws are closed with decorative stoppers.
Sometimes holes are drilled in the panels and fixed to the wall with screws. Screw heads are closed with special plugs.
Installation of skinali (glass aprons)
Apron made of glass - spectacular and original decoration kitchen interior.
Advantages of glass apron:
- a large number of options;
- ease of installation and dismantling;
- long service life;
- visual increase in space;
- affordable price;
- good compatibility with any furniture and kitchen accessories.

Tempered glass apron, called skinali, is an original and latest invention.
To install a glass apron, you need the wall to be perfectly flat, because the glass can burst on an uneven surface, so work begins with leveling the wall.
Measurements must be taken very accurately. They need to be removed after placing the top and bottom drawers of furniture, because then it will be difficult to redo something.
Glass can be fixed on photo wallpapers or you can order a drawing according to your project in the workshop. The most expensive method is to print the pattern on a special self-adhesive film.
Screws are used to fix glass panels. wide hats. It is better not to drill holes in glass panels on your own, but to entrust the work to the specialists of the workshop where the apron was made.
Tempered glass is difficult to work with and requires skill to work. The cost of skinali depends on the number of holes for fasteners.
It is important that the ends of the glass panels are well sanded and no joints are visible during installation. Very carefully, you need to cut the holes for the switches, which are usually located in working area.

Apron made of glass fits well in kitchen interior. The lighting of the glass looks very impressive, which gives the room even more chic. Apron not required complex care It is enough to periodically wipe it with a wet, and then with a dry cloth.
Kitchen aprons made of glass give the kitchen a cozy and special flavor.
To achieve the original result, you need to take into account a number of parameters: general style kitchen design, design, Decoration Materials kitchen set, the compatibility of individual elements.
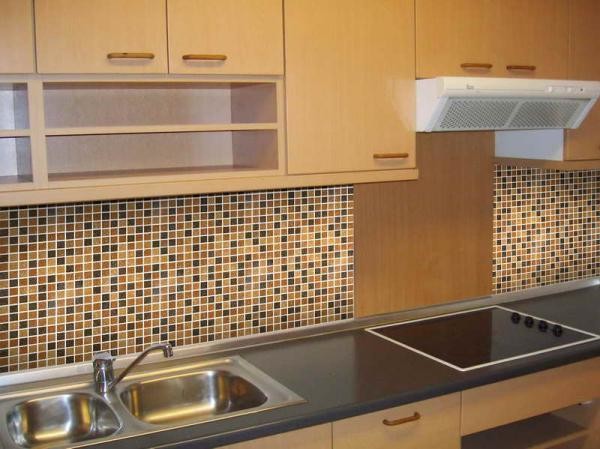
How to make a mosaic apron?
Mosaic can easily highlight the work area. It looks spectacular, but styling can be difficult. It is important to know the installation features in order to avoid mistakes.
The main thing is to carefully prepare the wall, putty the bumps, cover the surface with soil.

Better to buy tiles reinforced mesh or a self-adhesive mosaic that can be quickly mounted on a degreased wall surface.
Now they sell ready-made mosaic squares, which are easily attached to a special glue. No need to glue each tile separately. This option greatly simplifies the process and saves time.
Need to cook:
- roller;
- level;
- putty knife;
- glue;
- scissors;
- tiles;
- putty;
- primer;
- grout.
The tile is attached either with special glue, or without it. Glue is applied wide spatula, evenly distributed over the surface, wait right time and apply a mesh with a mosaic to the wall.
After the material is completely laid, the seams are rubbed with a small spatula.
The mosaic looks bright and colorful, so you need to use no more than 3 colors, even if they are pastel colors.
This apron has a lot of seams, but it looks modern and stylish.
Summarizing
Kitchen apron can be mounted from various materials. To save money, you can do the work yourself. You just need to be patient and read the installation instructions.
Handsome and practical apron in the kitchen, installed with your own hands, will be long time delight in its uniqueness and originality.
Related posts:

Do kitchen apron with your own hands will not be difficult. Such a simple device will not only serve as a decoration for any kitchen, but also protect its walls from damage. greasy traces, burning and dirty spots near the sink.
It has become relatively recent to call such a coating a kitchen apron. Nevertheless, it not only gained considerable popularity, but also acquired significant development. Over time, a huge mass design solutions and a large number of materials began to be used: tiles, decorative rock, carbonate glass, plastic.
It has long been customary to make walls near the stove and sinks from easily washable, hard and dense materials. This is due to the fact that these zones are most confirmed to be contaminated during the cooking process. Grease and soot tend to eat into the paint, and they cannot be removed.
In such cases, a kitchen apron is used, which is not fixed tightly to the wall, but simply hangs on it. If necessary, it can be removed without carrying out big renovation, and such a solution will be much more economical. It will cost more if you start to decide how to sew an apron using expensive materials.
The advantages of this approach include the variety and number of design solutions. The most striking in this case is a kitchen apron made of carbonate glass, on which any pattern or pattern can be applied.
In addition, the glass kitchen apron is a very hard and strong surface that is absolutely not afraid of greasy spots and other dirt and also easy to clean.
You can make an apron with your own hands from ceramic tiles, MDF panels, glass, plastic. Each option has its pros and cons.

Consider them:
- A tile kitchen apron is probably the most popular option.
The tile is characterized by good strength and resistance to various chemicals, temperature fluctuations. Has a huge selection of different textures and colors. The disadvantages include heavy installation, which is quite problematic to perform without certain skills. - MDF panels make it easy, quick and at a reasonable price to make a good apron, combined with wood trim the kitchen itself.
The advantages are low cost, ease of installation, the ability to select the tone of the panel for the countertop and other finishes, the likelihood quick dismantling. But such panels are not able to withstand various chemical components that are present in detergents for a long time. - Carbonate glass has already been mentioned above.
Of the minuses, it has only the price and the difficulty in choosing a design. - Plastic has a rather long service life, while it has a beautiful appearance, low price and ease of installation.
But it is not resistant to fire, and in the process of use, scratches may appear on it.
Which material to use is up to you. And how to sew, or build, an apron, we will consider below.
Do-it-yourself installation of an apron
The most time-consuming is the installation of ceramic tiles. If we sew an apron of this type, then this process does not do without measurements and miscalculations of the required amount of material. If a person has no idea at least about the basics of this matter at all, then it is better to abandon the idea or use the services of a master. He knows exactly how to sew an apron for the kitchen.
But if it was decided to lay the tiles with your own hands, then you need to purchase the tile itself, special tile adhesive, grout with polymer additives, 1.5 mm inter-row crosses, and a notched trowel.
Crosses are needed for even seams between the tiles, and they are removed immediately before grouting, and some will have to be cut into wedges.

Procedure for self-assembly next:
- Apply glue with a notched trowel. This is done at the bottom with a width equal to the future apron, and a height of one tile.
- We lay out the first row and divide the tiles among ourselves with wedges cut from crosses.
- Align the top of the tile by placing parts of the crosses under the bottom.
- After the glue is completely dry, we begin to lay out the second row in the same way.
- After complete installation, we remove the crosses and overwrite the seams.
This is the easiest way that a person without special skills can adopt.
To install glass with your own hands, you will need: the glass itself, dowels, self-tapping screws with washers, support beam, silicone.
First, holes are made 20 mm from the upper edge of the glass, and dowels 4-5 mm in diameter are driven into them to a depth of 50 mm in increments of 30 cm. The same holes are drilled at the bottom in the previously installed support bar. After the wall, on which the glass will be attached, and the apron itself are washed, degreased.
Silicone is applied in a zigzag manner to a sheet of glass with a “sausage”, with a step between the loops of 30 cm. The zigzag loops must be vertical.
For further actions, at least 3 people will be needed. Two people lift the glass and carefully install it on the support beam, the third puts 2 flat screwdrivers on the beam, and how the glass will stand on them. The latter should carefully remove the screwdrivers, guiding the sheet into place. Then, by hand, it is required to tighten the self-tapping screws, first at the top, putting washers on them, and then at the bottom. After a double drying time of the silicone, the self-tapping screws can be removed.
For MDF and plastic plates the installation method is the same as for wall cladding without making a crate.
At the end, the walls are covered with finishing plaster and all the furniture is put in place, the gap between the wall and the table top is closed with a side made of the material of the same table top, a piping is driven between the table and the side with a flat screwdriver.
Apron from improvised materials
 If there is no knowledge of construction affairs and you don’t want to do some unfamiliar work, then you can make a kitchen apron from the most available materials, such as oilcloths. In this case, you should choose any pattern you like, which will be in harmony with the design of the kitchen itself.
The film is easy to clean and can last quite a long time, plus its installation is nowhere easier. True, this option is suitable only if wallpaper was used to finish the entire wall.
First of all, you need to get an oilcloth, prepare construction stapler, scissors, tape measure.
The dimensions are determined with a tape measure with a launch under the countertop, then a piece of oilcloth is cut out according to these indicators. We attach the pieces to the wall, fasten them with a stapler. After these manipulations, you can put the furniture in place.
From improvised items, you can use unnecessary or damaged CDs. This will require a lot of disks that need to be cut into several pieces. These parts are folded in mosaic and glued to a clean wall.
When using methods for making an apron using scrap materials, you need to understand that such products do not have such good performance, as previously described.
In this case, it will not matter how to sew an apron. It may still be short-lived.

Apron for the kitchen is not only beautiful element design, but also functional. In the process of cooking, stains inevitably appear on the walls, drops from sauces, pieces of food, etc. get in. To protect the surface of the wall and facilitate cleaning, it is recommended to install an apron made of easy-to-clean materials - tiles, stone or glass. In this article we will tell you how to make an apron in the kitchen with your own hands.
An apron in the kitchen improves performance, and with the right color and design, it decorates and completes the interior of the room. With it, you can visually increase the space, emphasize the advantages of the kitchen set, hide the flaws in the layout. The variety of finishing materials makes it possible to implement the most original ideas. But the construction of anything should begin with the layout.
Apron design
The first step is to decide on the design of the apron - choose the shape and color scheme. The coating should be combined not only with the kitchen set, but also with other elements - accessories, fittings, floor, wall, ceiling finishes. During repairs in the kitchen, many focus on the selection of wallpaper or floor covering, completely forgetting about the apron, and it is he who gives the interior integrity.
How to choose the color of the apron:

In most cases, aprons are made from tiles, since this is the most affordable and suitable finishing material on the market, but if you are not constrained by funds, you can make the interior more stylish and original by building a stone or glass apron for kitchen.
Apron materials
Let us consider in more detail each of the materials used to create kitchen aprons. The choice is determined not only by the color category, but also by the complexity of installation and performance. So, if with laying tiles or artificial stone can handle even an inexperienced person, then with glass panels the matter is far more complicated.
What to make an apron for the kitchen with your own hands:

Styling tools
Since in this article we will tell you how to lay out an apron in the kitchen with tiles, we will select the tools and materials in accordance with the installation technique. Before going to the store, take measurements and calculation required amount tiles. Buy with a margin to leave a few tiles in case of repairs.
Necessary materials and equipment:
- tile;
- tile adhesive (recommended Ceresit CM11;
- deep penetration primer;
- grout for joints (in tone to the tile);
- building level, plumb;
- tile cutter;
- rubber spatula;
- notched trowel;
- foam sponge;
- plastic crosses for tiles.
You will need skills in working with a tile cutter. For wall thin tiles, you can use the most common manual mechanism.
Laying an apron from tiles
Before starting work, give a rational assessment of your capabilities - if you are not sure that you can handle it, it is better to hire a specialist and not risk spoiling the materials. For those who want to get a new interesting and useful experience, we have prepared detailed instructions for installing an apron in the kitchen.
Apron marking
The first stage is the marking of the walls. This is extremely important point, on which the final result and the aesthetics of your masonry will depend. To make the correct and clear markup, you must be able to use the building level. Ideally, it is better to get laser guides - they will significantly speed up and facilitate the process.
Another important point - the walls before marking should be as even as possible. If this is a problem, you will have to apply leveling plaster. Otherwise, you will have to compensate for the discrepancies due to the thickness of the adhesive when installing the tiles. 
There are various standards for laying the height of aprons in the kitchen, and this parameter should be selected in accordance with the dimensions of the kitchen set. On average, 80 cm are laid from the floor with an apron height of 75 cm. Thus, it will turn out to lay 7 tiles standard size 10x10 cm high, and 5 cm left for the seams.
Draw a horizontal line where the first row of tiles will be laid. It will be based on a special rail. To do this, you can use a regular wooden plank or metallic profile. Screw the support to the wall with dowels and check with the building level.
Draw a few vertical lines perpendicular to the plank to provide additional guidelines. 
Styling adhesive
Another important point before starting work. Kitchen tiles on the apron are recommended to be planted on the most popular among professional builders glue Ceresit CM11. Low consumption will allow you to save money, unless, of course, the walls in the kitchen are even, and they do not need to be leveled with glue. So, for 5 sq. m consumes approximately 12 kg of the composition. When laying tiles on draft walls consumption may increase.

Stir the dry mixture with water according to the instructions, using a construction mixer or a drill with a nozzle.
To lay the first row of tiles that will rest on the plank, coat the wall with glue for a length of 3-4 tiles and quickly apply them until the composition is dry. To spread the adhesive, use a notched trowel to leave shallow grooves on the surface - this will improve adhesion and reduce mortar consumption. Also, for better adhesion of the adhesive to the wall, it is recommended to make small scratches with a jamb knife or the edge of a sharp screwdriver.
Laying tiles
Before laying, prepare the materials that you may need in the process and place them at arm's length: a spatula, crosses, a container with mortar, a stack of tiles.
Working process:

Helpful Hints:
- To create original design, order an apron for the kitchen with photo printing from MDF. These can be ornaments, images of fruits, vegetables, landscapes, etc. Also you can put under glass coating photographs, make a collage or even paint the surface by hand.
- Use LED backlight to give originality and organize additional lighting.
- The dimensions of the apron for the kitchen should correspond to the working area, capturing the sink, cutting table, stove space.
- When choosing a tile, keep in mind that it is much easier to care for a smooth glazed surface than a embossed one.
- Plastic kitchen apron can become great alternative tiles or MDF. Today on the market you can find high-strength plastic finishing materials that will last for more than one year without losing their original appearance.
- To create aprons, any suitable according to performance characteristics materials - they must be strong, waterproof and durable. According to these parameters, river pebbles are ideal - just imagine what kind of surface can be laid out from simple pebbles brought from vacation! You can also use old coins or broken tiles for this.
- The mirror looks original and glass tiles as an apron cover. For grouting such a lining, use transparent silicone.
Video about laying an apron in the kitchen from a large tile:
Apron for the kitchen, photo
We hope this article helped you figure out how to put an apron in the kitchen. Finally - a few stylish design solutions.


Apron for the kitchen in this case is not a piece of clothing. We will talk about kitchen aprons, which also protect against splashes of water and grease, dirt and soot. But not an outfit (or a greasy dressing gown - who cares) of the hostess, but a wall behind kitchen table and stove. And we will figure out why, from what and how to make an apron on the wall with your own hands.
What for?
The wall behind the stove has been lined with durable, dense and easily washable materials for a long time. The reason is clear: this is the most contaminated place in the kitchen. It is not worth relying on sheathing, plastering and painting: everyone knows that grease and soot eat into the usual finish tightly, and it is unprofitable to clad all the walls with expensive resistant materials. A kitchen apron occupies a small area and is relatively inexpensive. If necessary, it can be replaced without venturing general repair. But at the same time, some features appear in its implementation in comparison with a continuous finish, because. the apron actually hangs on the wall. But more on that later.
The second reason has appeared in our days along with new materials. For aprons, in particular - tempered carbonate glass. It can be applied to a variety of patterns under overall design rooms, see fig. In addition, the glass apron is a solid, very hard plane that absolutely does not give in to fat, is easy to clean and lasts for decades.

In a kitchen with a glass backsplash, lighting from the underside of a hanging cabinet is especially effective in terms of aesthetics. Carbonate glass has a high refractive index, which gives beautiful game Sveta. But, of course, any other apron is not forbidden to highlight.
Of what?
So, we already know something necessary in order to make an apron in the kitchen ourselves: it should be light enough to hang on the wall by weight, not absorb splashes and fumes. dirty water, grease, detergents. The last ones especially. Modern detergents are able to seep almost between the molecules. AT last years studies of kitchen contamination have been carried out in different countries. For walls, the conclusion is clear: they lose their appearance more from stubborn residues of detergents than from traditional kitchen dirt.
Tile
A tile apron is literally as old as the world. Kitchens were lined with ceramics in ancient times. According to hygienic indicators, glazed ceramics for the kitchen seems to be suitable, but! It is not produced in sheets or slabs of large size and cannot be made: during firing it leads and warps.
Tile is tile: tile cladding always with seams. Which, in terms of hygiene, immediately reduce all the advantages of tiles to nothing: dirt is very free in them, and in it - fungi with microbes. Nevertheless, the ceramic kitchen apron remains in use: modern grout mixtures make it possible to achieve proper hygiene of the seams for 10 years, the technology has been worked out for centuries, and the materials are inexpensive. Labor intensity, however, is tiled.
Varieties ceramic aprons shown in fig. The first on the left is a classic tiled apron, but the tile is already of modern production. The difference between this and the "good old Soviet" is visible without explanation.

In the center - original apron from . Generally speaking, such a decision is an amateur with funds: the cost of the material is high, and the laboriousness is generally exorbitant, given the features of the apron, see below.
On the right is a mosaic apron. - an extremely complex and time-consuming type of decorative art, but for individual small patterned panels modern manufacturers offer interesting solution: sets of finished fragments, sized 200x200 mm or more, with elements of a mosaic seamless pattern. The drawing is developed on a computer. Having only 10-20 standard pieces at your disposal, you can get hundreds and thousands of various patterns, i.e. each of them will be almost unique, and the cost of a custom-made mosaic apron is comparable to a tiled one.
Glass
An apron made of glass, or skinali, is a relatively recent innovation. It appeared thanks to computer-controlled glass cutting on special machines and a sharp reduction in the cost of technology for the production of artificial diamonds in the last 10-15 years. The fact is that it is almost impossible to cut hardened carbonate: it is not only prickly, but breaks up into small rounded fragments.
Ordinary glass, albeit thick, is not suitable for an apron: from accidentally splashing boiling water, it can crack, throwing out traumatic fragments. From fluctuations in temperature and humidity thick glass on weight for 5-7 years it begins to float (remember, glass is not a solid body, but an exceptionally viscous liquid), a gap forms between it and the wall, in which dirt accumulates, forming nauseating stains.
Tempered glass is free from these shortcomings, but expensive, and together with custom-made computer cutting, it is even more expensive. Therefore, ready-made factory-made aprons are more in use. Their sizes, as a rule, are coordinated with those of certain types of kitchen sets.
About drawings on glass
Take another look at fig. at the beginning. Glass allows you to get a variety of decorative effects: stone imitation (top left), a visible increase in the depth of space (top center), which is especially important for a cramped kitchen, the images are flat and 3D, from abstract to "delicious". How is this achieved?
The first way is photo printing. Layers of a special high-strength photographic emulsion are applied to the base, giving additional basic colors, as in a slide film. Then they are exposed to ultraviolet light through mask negatives, developed and covered. protective film acrylic or melamine.
The photo method allows you to get images that are stunningly realistic and fit exactly into the design. In addition, such panels can be permanently glued to the wall with silicone. There are two drawbacks: expensive, and the durability of the image, although it exceeds 5 years, is still incomparable with that of the glass base.
The second way is to stick a plastic poster with a picture on the wall, and put glass on top. The edge is sealed with silicone so that fumes do not penetrate the pattern. Costs such beautiful apron several times cheaper, but 3D has to be abandoned: even if the poster is three-dimensional, under glass the volume of the image disappears. Another disadvantage is that the glass has to be fixed to the wall with shaped screws. Fasteners are visible, and drilling carbonate glass costs money: 4 holes give an increase in price the same as cutting into a rectangle.
About plexiglass and acrylic
Will plexiglass or acrylic go to the apron? They are easy to process with conventional tools, water-resistant, lighter than ordinary glass. Temperature resistance - above 100 degrees.
Unfortunately, it won't work. Since it is easily processed with tools, it is easily scratched - once. Waterproof - yes, but splashes of grease and surfactants from detergents eat into it instantly and deeply. Heat resistance of 105-130 degrees - for softening and loss of strength, but already at a temperature "swing" of 20-45 degrees (and the plate may have 60) within six months for plexiglass and 3-4 years for acrylic, clouding, yellowing begins and warping. So, alas, if acrylic still goes to the windows, then it won’t go into the kitchen. And plexiglass - neither there nor there.
organic
However, there are easily processed organic materials suitable for laying out an apron. These are resistant facing plastics and MDF.
The best material for a plastic apron - special tiles. Most often, it is produced in sets for panels of a certain size with a pattern, see fig. left. In almost all respects, such an apron is not inferior to a glass one with a 3D pattern, but it costs one and a half to two times cheaper. True, durability is 7-10 years, but by that time in modern apartments there will be a need for repair.

MDF provides the same durability. This is a good option for retro and country kitchens, in the center in fig. It is easy to assemble an MDF apron, just remove the paint from the wall (as below) and walk on the plaster with an abrasive mesh on a bar, controlling the evenness with a rule or level, like a rail. MDF weighs a little, and liquid nails stays on the wall tightly without additional fasteners.
If you need to quickly and inexpensively make an apron for 5 years, then plastic wall panels will do, on the right in fig. It is only necessary to take panels not for living rooms, but for the bathroom; There are also special ones for the kitchen. The difference is primarily in the filler, which gives White background. In ordinary panels, this is chalk, and in moisture-resistant and not prone to warping, it is marble powder.

For the price, this is not always noticeable, a “marble” board may be cheaper than a coated one. It is useless to ask sellers - they are in best case they will repeat what is written in the specification, and there it is far from always true. But, having wandered, looking closely, you can learn to recognize it yourself by eye.
On marble-filled PVC, firstly, the pattern appears to hang over a slightly iridescent white surface, see picture on the right. However, this effect is weakly expressed, it is better to select it first, and then consider the cut. It will be, firstly, smoother, almost smooth. Secondly, in the direct rays of the Sun, when light falls at a certain angle, the smallest sparkling sparks will be noticeable on the saw cut.
Video: choosing a kitchen apron from channel 1
How to do?
Laying the apron begins with the preparation of the wall. For heavy - glass and ceramic - and light, plastic and MDF, it is produced in different ways. But first of all, you need to know how far, to what level from the floor you need to deal with the wall, because this is not an easy and clean job.
We consider the lower border of the apron simply: the height of the table surface (usually 850 mm) minus the thickness of the tabletop (40-60 mm) minus another 50 mm. It is not necessary to drive it deeper under the table; hanging cabinets may be too low. If a washing machine of greater height is built into the table, it makes no sense to provide a recess in the apron for it: work or selection finished product become much more difficult. It is easier to push the machine as far forward as possible so that a strip of tabletop remains behind it.
Further, standard height finished one-piece apron - 600-750 mm. Here there are difficulties. The fact is that splashes of fat from pans fly 800-900 mm, and the recommended height of furniture suspension above the stove is also 900 mm. Therefore, you need to either move the hanging cabinets away from the stove, and put the hood with a splash catcher, on the left in the rice, or choose kitchen set with hanging compartments different heights, and arrange them with a ledge, on the right in fig.

But such solutions are suitable if the apron is tiled. Already with wall panels, if they are with a large pattern, difficulties arise. Finished glass aprons are produced in the form of a flat strip. Buying a very wide one is in vain to hide a lot of money under furniture, and the cropped pattern will lose its expressiveness. Ordering curly cutting will be even more expensive. A more or less acceptable solution is furniture from leading manufacturers with a melamine coating, but it will also have to be cleaned regularly and often until the fat and fumes are eaten after the next cooking.
The size of the apron in length is up to you. There are three selection conditions:
- From the plate - at least 900 mm in each direction.
- From the sink - the same, at least 600 mm.
- If the stove or sink is less than 900 mm from the adjacent wall, the overlap on it is 600 mm or more.
Wall preparation
Under tile or glass, you need to knock down the plaster to the base, and treat it to evenness with a strong cement primer for concrete or stone: Plitonit Grunt, Prospector. They give a rougher surface than Knauf, Ceresit and others “from there”, but in our “oak” way, and this is exactly what is needed.Under light organic materials, it is enough to wash off the paint and level the plaster, as described above. It is best to wash off with non-volatile washes based on surface-active substances (surfactants). They do not stink and do not give off toxic fumes. There are two types of surfactant washes: liquid, for horizontal surfaces and gel-like for vertical. We need a second one on the wall, of course.
Further, for any, except, perhaps, MDF, an apron, the installation of a permanent support under the bottom will be required. Under glass, a support is needed that is strong and at the same time not very rigid, i.e. wooden beam from 40x40 to 60x60, looking at the exit of the rear edge of the tabletop. It is attached to the wall with 6 mm self-tapping screws in dowels. The length of the self-tapping screws is chosen so that they go into the wall by at least 70 mm. Fastening step - 150-250 mm.
To stop under the tile, you can put a thin-walled perforated galvanized corner, it is cheaper than a bar. And it’s easier to fix: with flea screws to the thickness of the plaster, if the tile is plastic, and 20-25 mm into the wall under ceramics.
Laying
Tile
The most difficult thing is laying a slab apron. The fact is that the sizes of tiles of the usual price category differ by 1-1.5 mm. With conventional cladding, this is hidden by using crosses of a standard size - 3-4 mm. By the way, who does not know, crosses are inserted at the corners of adjacent tiles to withstand the width of the seams; removed before grouting.
But wide seams you can't do it on an apron. To maintain hygiene, grouting the apron is done grout mixtures with polymer additives, and for them the maximum joint width is 1.5 mm, otherwise polymer film when dried, it stretches, cracks and lets dirt into the seam. Therefore, 1.5 mm crosses are also needed for the apron.
But if you lay tiles on them, then it will be seen that the seams “walk” both horizontally and vertically. Therefore, you will have to immediately sacrifice a dozen or two crosses, biting off their hangers. What for? The shoulders of the crosses are wedge-shaped, and we need small wedges when laying:
- We put the tiles on tile adhesive with a hardening time of 10-20 minutes.
- With a notched trowel, we apply a strip along the length of the apron and the width of the tile height onto the wall from below above the stop.
- As soon as it came off (this is after 2-5 minutes), we lay the first row with support on the stop.
- We divide the tiles of the first row along the vertical seams with wedges cut from crosses, two per seam.
- We level the upper edge of the tiles, driving under the lower wedges.
- We wait for the complete setting of the glue and lay the second row in the same way as the first, only the upper edge of the first row will now be the emphasis.
- Each subsequent row is laid in the same way on the completely dried previous one.
With this method of laying, only the upper edges of the horizontal seams will “walk”, which is not so noticeable. And the “buzz” of the seam will not grow as the apron is laid out in height.
Video: laying a tile kitchen apron
Mosaic
If the apron is a full-fledged mosaic panel, then they make it like a mosaic without any features. If the mosaic apron is assembled from ready-made fragments, on a tile or on a fiberglass mesh, then they are laid in the same way as a slab one. The sequence of work operations is illustrated in the figure, and some features are also visible in comparison with tiles, porcelain stoneware or plastic.

Firstly, they are placed not on glue, but on a solution. In the process of work, you may have to slightly move the fragments to fit the borders of the pattern. Plate parts are moved with wedges or knocked out with a rubber mallet; on the grid - just pulling with your fingers. But, if laid on glue, then it will quickly grab, and it is also plastic from mechanical impact will lose strength.
Secondly, the solution is needed not cement-sand (it is too viscous, you can’t move anything on it) and not gypsum or alabaster (it is fluid, but fragile and sets too quickly), but gypsum-cement with a setting time of 2-6 hours. For the sake of greater fluidity, sand is added to it at least according to the instructions.
Glass
One-piece, without metal fasteners, a glass apron is installed by three people at least. First of all, upwards from the upper edge of the glass by 20-25 mm, holes are drilled into the wall for dowels of self-tapping screws 4-5 mm to a depth of 40-60 mm. Step - 300-600 mm. Dowels are driven into the holes, and paws or washers are prepared for the screws, grabbing the edge of the glass.
Further, holes are drilled in the support beam for the same self-tapping screws. Diameter - the body of the self-tapping screw without thread, depth - 2/3 of the length of the self-tapping screw. Step and indent from the edge - as above. Paws or washers are also prepared in advance for the lower self-tapping screws.
Then they prepare (clean, degrease) the wall and glass for gluing on silicone. A silicone sausage is applied to the wall with a zigzag gun, not an envelope. Zigzag loops - vertical, horizontal ones will be bad to hold, see fig. Loop pitch - 30-40 mm.

Now two people carefully (no need to hurry, the silicone hardens rather slowly) take the glass, and the third (and the fourth, if the apron is more than 1.5 m long) with two hands, crouching, puts two flat screwdrivers on the support bar. The “feeders” carefully place the glass on them and slowly lift the outer edge so that the apron slides into place over the screwdrivers.
When he got up, they press him against the wall and hold him. In the meantime, the “screwdriver” takes out, without pulling, screwdrivers and manually wraps, until it stops, self-tapping screws with paws / washers, first at the top. After that, the “feeders” can relax a little and move to the sides, so that it would be more convenient for a friend below to work. But you can release the glass only after all the self-tapping screws-holders are wrapped. Remove them only after a double period of complete drying of the glue.
Plastic and MDF
The device of an apron made of plastic plates or MDF is no different from wall cladding without a crate. The apron on the crate not only sticks out their walls too much. In the kitchen, under the crate, children will inevitably settle and harmful microflora with microfauna will multiply.
After installation
When the heavy apron is already in place, the wall is plastered flush with its surface and the furniture is put in place. Light and mosaic aprons are usually made along the opening, without moving the furniture away. When the glue / solution is completely dry, seal the top and sides with silicone along the contour. How to be above the countertop - more on that below.

Finishing touch
Sometime the table will have to be moved away, and it is impossible to stick it to the apron. But then silk will remain, along which the children and dirt will settle down. How to cover it up? Here are possible different variants, but the simplest is a side made of countertop material. He is glued to the apron. And the gap between it and the table is plugged with a PVC edging just tight, without any additional fastening. The edging is driven into the slot with a blunt wide flat screwdriver. The second option is a tabletop in one with a side, and an edging between it and an apron, see fig. So nothing needs to be glued to the apron and push the edging. But, if the table moves a little, the dirt will climb down.
About sockets
Sockets hanging in an apron are a common disease of "apron" kitchens. In order for the sockets on the apron to sit firmly, the wiring must be carried out with some features.
What's better?
So what kind of apron better fit for decorating a kitchen? If there is money for glass - of course, he is. In addition to perfect hygiene, we get a wonderful aesthetics.
If you need to make an apron quickly and cheaply - from wall panels. In most cases, the wall does not need to be prepared for this: the panels are rigid enough to lie flat. At worst, it will take half an hour of work with a grater with an abrasive mesh.
For kitchens of "wooden" design even better plastic panels MDF. As for traditional slab and mosaic aprons, now they are an amateur. Modern materials they are superior at least in terms of labor intensity, and most often in terms of cheapness.
Renovating a kitchen doesn't necessarily mean changing old tiles. We will advise you on how to renovate walls cheaply and quickly. You can do this work yourself or hire specialists in this field.
There are many options from which you can choose an inexpensive solution for yourself. From the article you will learn how to make an apron in the kitchen cheaply.

Often people choose the finish of the apron MDF board highly resistant to moisture, easy to keep clean and available in a wide range of colors. Cheap aprons for the kitchen made of plastic are convenient in that you can finish large enough sections of the wall with such MDF, connecting them with metal strips. You can also fix them with rods for hanging dishes or spices. Installing an apron made of mdf is very simple. cheap aprons for the kitchen made of plastic can be attached to the wall with self-tapping screws.

Such an MDF board can be decorated with photo printing, this, of course, will increase its cost, but will allow you to create a very original interior. Plastic aprons are perhaps the easiest solution.
Inexpensive painting
To reduce the costs associated with bringing the wall over working surface until normal, you can cover it with paint. You should not, however, use the usual paints that are used in other rooms. In this case, wall paint in the kitchen and bathroom works best. This is a special product with increased resistance to moisture and grease. This coating is also resistant to abrasion, which allows you to repeatedly wash the walls covered with paint. For an aesthetic effect, the surface of the wall to be painted must be perfectly smooth.
Paint is good decision for people who like to frequently change the appearance of the room. Such walls you can at any time be repainted in any color.
washable vinyl wallpapers
Most cheap apron for the kitchen - this is a washable vinyl wallpaper. However, this solution is not very durable.
How to cheaply update an apron?
Are you planning a renovation, or do you not like the interior of your kitchen, its appearance? Do you want to update the walls or old tile and looking for how to make an apron in the kitchen cheaply? We offer you some ideas on how to make repairs and how to change the wall above the countertop, what are the ways to update the backsplash.
How to update old tiles in the kitchen
An old kitchen apron can be presented in a new light. If the wall is tiled, it must be thoroughly cleaned. If the tile is glazed, it is enough detergent. If stains are difficult to remove, using soap and water, vinegar, or baking soda may help.
It is more difficult to restore a tile that is not protected by a layer of glaze. If stains have penetrated deeper, you can apply special means for unglazed tiles offered by chemical manufacturers.
Contaminated tile grout can be cleaned with ammonia or acid-based products available as liquid concentrates that can be dissolved in water. If these funds do not help, then you will have to update the seams.

The old grout can be removed with a stylus, then the joints must be primed and new grout applied.
This is an idea for those who do not want to knock down old tiles. You can update the wall above the work surface, or paint the tiles. Exist special paints, with which you can paint it, but the procedure is laborious, and the effect is short-lived.
This method can be used if we are planning a large reconstruction in the near future, but this year we want to do a minor renovation of the wall.

Before painting, the surface must be cleaned and degreased, otherwise the paint will peel and crumble. Each plate should be sanded with a fine sandpaper (for example, 420).

If you want to avoid removing the old tile, you can stick a new one directly on it. A new cheap kitchen tile backsplash will make it completely different and you will not need the dirty work of knocking down the old coating. To do this, you need a special glue, which must be applied to the old tile very thin layer so as not to thicken the walls. You should also look for thin tile options - options are available with a thickness of 7 mm or even 3-5 mm. old surface must be cleaned and any defects repaired with mortar.

The places where the seams were aligned should be treated with a primer solution. If we want to tile larger plot walls than the old one, the new place must be filled with a leveling mortar with a layer of the same thickness as the old tile.
Glass or drywall over old tiles
Old tiles can also be covered with other material. A fashionable solution is a sheet of glass that is screwed to the wall. In this case, frosted glass is better, it darkens the tile, or options with a pattern. Because of high temperature around hob recommended to choose strained glass. You can also put transparent glass walls through which you can see the old coating. The effect is interesting if the old tile is clean.
Other solutions that are used during wall repair:
- drywall that can be painted with moisture-resistant paint,
- veneer board finish,
- covering with thin sheet steel,
- wallpaper or photo wallpaper under glass.
Thus, there are many simple and cheap ways to update the wall above the work surface. Of course we can't reach with them perfect results, but some solutions are quite acceptable. Laminated MDF panels perform especially well, which are inexpensive, but have good durability, are easy to clean, are quite decorative, and wall defects, if any, can be hidden behind their surface.