Unusual house for a well. House for a well: original solutions in landscape design. Materials and tools
As soon as on suburban area a well appears, then you need to make a house for it, which would decorate the site and protect the water from dust and dirt. But this way of decorating a structure for some may seem quite expensive, and it is for this reason that sheds for wells are being built.
What can be canopies for wells
In such designs there are no restrictions.
Canopies can be various shapes:
- Round.
- Square.
- Rectangular.
The roof can be:
- Peaked.
- Rivne.
The flat roof of the canopy may have a slope in one direction or another.
Peaked roofs can be:
- Shed.
- Gable.
- Multi-slope.
- The height of the canopy can be any. Usually, the best option a height of 1.20-1.50 m is considered. If the canopy is mounted on, then the height may be greater.
Advice. If there is no house around the well, then the height of the canopy should not be large, since there is a possibility of dirt and dust getting into the source if it is not protected by a lid.
The canopy over the well can be installed on the house or built into the ground around the well.
Components of a canopy over a well

The canopy over the well consists of several parts:
- Base.
- Pillars.
- Roof structure.
More:
- The base serves to firmly fix the pillars in the ground.
- The pillars support the roof structure, which is also made from various materials.
The roof is modern finishing materials that are resistant to weather and climatic conditions.
Canopy pole base
There are several types of bases that are able to securely fix the posts in the soil:
- Monolithic.
- Columnar.
- Pile.
So:
- A monolithic base is the most durable and rather laborious way to fix the pillars. It is made of concrete mortar and poured around the entire perimeter of the well.
- Formwork is preliminarily constructed and recesses are made in the form of a trench around the source. The depth in this case can reach 30-40 cm.
Advice. The depth of the monolithic foundation depends on what material the canopy is made of. If it is quite heavy, then it is best to do more depth.
- The column base is more economical. It represents pillars that are poured around the entire perimeter at a certain distance from each other.
As a rule, four pillars at the corners of the structure will be enough. They must be connected to each other. Metal pipes or wooden planks are used for this.
Advice. In order to ensure a quality ligation of each concrete pillar the bases need to be mounted in them with special metal fasteners in the form of hooks.
- Metal pipes are attached to them with welding work, and wooden planks can be screwed using special fasteners.
- Pile-screw foundations are very practical. They are able to withstand quite large loads. Metal pipes are used for this different diameter or channel welded together.
Such pipes are deepened into the ground by 80 cm.
Advice. It will be mandatory to pour concrete into the recesses of the pillars with a solution to ensure their reliable fixation in the ground.
In order to pour concrete mortar metal pipes need to add crushed stone to it. It will increase the hardness and strength of the solution.
All pillars before such work are set strictly according to building level to make a flat canopy roof structure.
Poles for a canopy and decorative decoration of the structure

Any canopy with different sizes can be made from:
- tree.
- Metal.
- Brick or other stone.
Note. All these materials differ not only in their strength, but also in the duration of operation.
Wooden structures of canopies over the well

A canopy for a well made of wood was built in past centuries. He has a rather attractive appearance.
Used for this:
- Rounded bar.
- Profiled bar.
So:
- Canopy poles are mounted on any base. Their surface can be flat or have various designs in the form of wood carvings.
It is also possible to make a decorative dressing around the entire perimeter of the structure and very often a wooden mesh is used for such decoration. Planks can also be used. - Wooden structures are very durable and practical. They are able to withstand quite large loads. It cannot be said that the tree will be moisture resistant and fire resistant.
Advice. To protect this type of surface from the effects of weather and climatic conditions, it must be painted or varnished.
- It will be mandatory to pre-prepare the wood. It must be well dried and well processed. by special means for fire and moisture resistance.
Advice. For such structures, it is best to choose a tree that has passed natural process drying, since it will have much less internal deformations than with artificial drying.
- Behind wooden structures the canopy needs to be very well looked after. They demand quality and regular care. Renewal of paint and varnish layers is carried out every year in the spring.
Advice. For the winter, wooden sheds are best covered with foil or any other moisture-resistant material. In this way, they are protected and they can last a longer period of time.
It is very easy and simple to build a wooden canopy for a well with your own hands and for this you will need:
- Wooden bars.
- Finished wooden elements with various design surfaces.
- Self-tapping screws and nails.
- Electric jigsaw.
- Building level.
Metal structures of canopies
This type of canopy can be presented separately standing pillars, which can be tied together with decorative elements, or can be completely forged using different diameter metal rods.
The poles of the canopy are mounted with the base by welding. The ligation is done at the top of the structure and can be simple.
Structures of this type:
- Moisture resistant, since the surface and structure of the metal is not able to absorb moisture.
Advice. Wet conditions metal constructions very susceptible to corrosion. To prevent this from happening in without fail must be varnished or painted.
- Fire resistant. The metal is not able to respond to the impact of a direct source of fire.
- Wear resistant. They are not able to change their structure under any influence of weather or climatic conditions.
- Practical. The only thing that will need to be done in the care of such structures is regular updating of the paint.
- Very durable, as they can withstand very significant loads.
They have one drawback - the price, which is quite high. This is due to the cost of the metal.
Brick or other stone pillar structures for a house canopy

How to make a canopy over a well with stone pillars?
Everything is very simple. Here you need to initially prepare quite solid foundation, since the weight of the whole structure will be very large.
So:
- The laying of stone or simple building bricks is carried out in the usual way. All works are similar to the construction of walls of any design.
For this you can use natural stone of various shapes and sizes (rubble) or brick, which can also be of different shapes.
Advice. For the construction of pillars of a rectilinear shape (square or rectangular), a simple type of building brick is used.
For the construction of rounded pillars, special types of bricks are used, which have a certain radius.
- Masonry is carried out using a concrete mortar, which is very easily and simply prepared from sand, water and cement, and for this there is specific instruction(proportions 2 to 1 or 3 to 1 - sand / cement).
- You can use not only simple building brick, but also facing, which has similar dimensions and parameters. Then additional finishing will not need to be carried out on the pillars.
- At the top, this type of construction can be bandaged metal pipes or wooden beams. It all depends on what material the frame for the roof of the canopy is made of.
You can watch the video in this article with the construction of stone pillars for a well canopy.
Roofing materials for a canopy
To date, there is a huge range of roofing materials that are widely used for the construction of sheds for various purposes.
This is:
- Polycarbonate, which has many options for shades and types.
- Sheet slate, which is very practical and durable material and at the moment there is an opportunity to choose its specific shade.
- Metal tile, which is now in great demand and has a similar appearance to a simple ceramic tile.
- Decking - sheet metal, which is also quite popular among roofing material and stands out for its practicality and durability.
The installation of these materials is very different, as they all have different structures. As a rule, self-tapping screws and building brackets are suitable for most of them.
Tiles are laid one on one or may look like sheet metal. It is already mounted a little differently.
When choosing a roofing material for a canopy, it is best to focus on the strength of the structure so that it can withstand the load of the entire roof.
The arrangement of the well on the site traditionally ends with the construction of a house above it. This element plays both decorative and practical role, protecting the water in the well from windblown debris and freezing in winter time. In addition, the ability to close the well is essential for the safety of children and small pets.
How to make a house on a well with your own hands? This is not at all difficult, but in order to avoid mistakes and get the desired result the first time, you should first study the diagrams and drawings of typical structures, as well as choose the right Construction Materials and tools. The instructions below will help you with this.
Choosing materials and tools
Tools for the jobRegardless of the type of construction, the set of tools that you will need will be similar. To build a house on a well made of wood, you should prepare:
- electric planer;
- hacksaw;
- saw;
- Phillips screwdriver;
- building level;
- roulette;
- pencil or marker;
- nail puller;
- a hammer.
Materials for a wooden well house use the following:
- bar rounded;
- roofing materials - metal tiles, slate or roofing felt;
- thick oak log (for the gate);
- edged board;
- hinges and a locking mechanism for the door (if the structure will be closed);
- fasteners - nails, screws.
We draw up a drawing
A drawing of a house for a well with the dimensions of all its parts indicated on it will help to correctly calculate the amount of materials. To create a sketch, you need to measure the diameter of the well and, based on the available information, determine the parameters of the main components of the house:
- gables and bases;
- gates;
- doors;
- roof slopes;
- skate stands.
 Scheme of a well house
 If you find it difficult to perform the calculations yourself, then it is better to use the solutions offered on the Internet or construction literature.
House with double pitched roof
The traditional covering of a well house is a gable roof, so we will consider the sequence of construction of just such a design. The first task is to assemble a reliable frame.
Frame construction
Suitable materials for the frame are timber (thickness 5 cm, width 10 cm) and board (not thinner than 4 cm). It is necessary to adhere to the recommended parameters, since the thickness load-bearing elements It has crucial for the strength of the house and its ability to withstand winds and other weather phenomena.
 Frame assembly
 The construction of the frame begins with sawing out the details - 4 pieces of timber for the lower trim, 4 boards for the racks on which the roof will rest, 2 supports connecting the boards and the top crossbar. The dimensions of the lower trim correspond to the outer diameter of the well, the length of the racks from the boards is selected in such a way that the desired roof slope is obtained, the connecting side supports are equal to the height of the roof, and the upper crossbar is equal to its width.
When making a house for a well with your own hands, the components of the frame are fastened together with long nails (10 cm is enough). Optimal assembly sequence:
- Fasten two racks at the top and bottom, nailing the boards to them.
- In a similar way, connect the remaining two racks.
- Place both halves of the frame on the well shaft and fix with strapping.
An important nuance! The ends of the bars at the point of docking with the top crossbar will need to be cut at an angle of 45 °.
 Boarding
 Then, to strengthen the structure, the racks and frames are strengthened by stuffing metal corners into the joints. From the side on which the door is located, a wide board is attached to the lower part of the frame from the inside, which later serves as a shelf for the bucket, and narrower boards are nailed on the remaining three sides, designed to hold the head. During forced breaks in work, so that debris does not attack the well, the frame should be covered with polyethylene.
Gate manufacturing
Another detail that is difficult to do without - well gate. It is designed to wind the chain while raising the water in the bucket to the surface. As a material for the gate, he uses a thick log, often oak, since oak is one of the most durable types of wood. It makes sense to install a gate, even if you plan to use the pump, because the equipment may fail and in this case a fallback option will not hurt.
The log is given the desired length - 4 cm shorter than the distance between the posts, and its surface is sanded. Then, at the ends of the gate, they make a winding of wire and drill holes 5 cm deep and 2 cm in diameter strictly in the center of the log.
 Gate mount
 The holes are strengthened with special washers and two axes of metal rods are driven inside - short and long, curved. The longer rod will serve as a handle to rotate the gate. To install the gate in the side posts of the house, make small cutouts and insert trim into them water pipe suitable diameter. Do everything listed works more convenient at the stage of assembling the frame. After that, it remains to fix the chain with a bucket - and the gate is ready.
Roof and cladding
Installation of the roof of the house begins with the installation roof trusses. Durable boards 3-4 cm thick are suitable for them. The design consists of 3 crossbars, 8 jibs and 6 rafter parts. Stages of work on the construction of the roof:
- The ends of the rafters are cut at an angle and the parts are connected to each other with self-tapping screws. An additional fixator will be located 30 cm below top point crossbar roofs. Assembly is carried out on a horizontal surface.
- The frame is fastened to the rafters with 12 cm nails.
- The strength of the rafters is increased by reinforcing them by installing jibs.
- On top of the rafters, at intervals of 15 cm, lathing strips are stuffed. The crate is taken so long that it protrudes on both sides of the rafters by 10 cm.
- Roofing material is fixed on top of the crate, and slate is laid on top of it.
 Roofing installation
 The sheathing of the sidewalls of the structure is made of tightly knocked down boards, fastened similarly to the lathing laths, it is more convenient to make it before the start of roofing.
Door installation
If you want the water in the well to always remain clean, then the house on the well must be equipped with a door. Usually it is made in the size of 55x85 cm, and the material is the boards left over from the construction of the house or other construction work.
The door is a shield of boards knocked together, which is made as follows:
- The boards are cut into fragments 85 cm long, folded in the shape of a door and connected by screwing one bar from the top and bottom with screws.
- For greater reliability, another board is diagonally attached between opposite corners.
- The door is hung on hinges, equipped with a handle and a locking mechanism.
 One of the options for the door design
 log house
In addition to the construction described above, there are more traditional options design of wells, these include houses made of logs. Such structures are typical for rustic style and, if your yard corresponds to this style direction, information on how to make a house for a well with your own hands from a bar will come in handy.
To build such a house, a rectangular log house is laid out from logs, focusing on the outer diameter of the well. The roof supports are massive racks equipped with a gate. The dimensions of the roof are made such that its edges cover the log house with a margin, this will protect the well from the penetration of rainwater. The supports are supplied with small props that have both practical and decorative significance.
The process of installation and connection of parts occurs in the same way as in the case of a wooden house. To give the design originality, the ends of the logs can be decorated with curly carvings. But it is better to make the roof modern - from a suitable waterproofing material, since their range is large.
 Quadrangular log cabin
 Hexagon house
This house differs from the previous one only in the shape of the log house. A significant plus of the hexagon, in addition to original look, is that such a design helps to save free space around the well. This type of design is often used to decorate mines with pumping equipment.
For a hexagonal log house, it is recommended to use a beam with a diameter of at least 10 cm, and the work technology itself is identical to a quadrangular structure. It is important to remember that all timber houses need antiseptic and moisture-repellent wood impregnation, which is carried out before assembly.
 Hexagonal frame
 Examples of decorating well houses
For most owners, not only functionality is important, but also the appearance of courtyard buildings, so we suggest that you familiarize yourself with the options for how to make a house on a well more attractive and harmoniously combine it with the surrounding landscape. A popular type of decoration for well houses is carving, it gives the structure a classic look and goes well with the design of the main house, if we are talking about a wooden building.
 An example of a log house with openwork carving
 In addition, you can go beyond ordinary carving and turn your yard into a fairy tale come to life by making a house in the form of a hut on chicken legs or by installing animal figurines on a log house.
 Fairy well house
 There are more modern options - the base of the well, decorated brickwork, tiles or concrete interspersed with glass will look original, and the variety of colors and textures of these materials will allow you to organically fit the building into any landscape style.
 Modern trim finish
 Individual details matter too. If replace regular pen gate with a wheel imitating the steering wheel of a ship, you get an unusual well in a marine style.
 Details emphasize the overall style
 Whether to choose one of the above options or come up with something of your own is up to you. After all, any yard and everything in it is a reflection of the views and tastes of its owners. We wish you inspiration and success in the field of construction!
The arrangement of the well usually ends with the construction of a house, which both decorates and protects the structure. There are many various options finishes of this element, however, the procedure and principles of work in general are almost the same.

Peculiarities
A well in your own yard or in the country is often not a luxury item, but a real necessity in those places where there is no centralized water supply. However, a simple concrete ring sticking out of the ground gives aesthetic pleasure to few people, and the usability in this case is below average. To remedy this situation, it is necessary to ennoble the well by installing a special gate, which greatly facilitates the rise of water. To date, in large construction stores you can buy ready-made well fences, but, as a rule, they either have a far from the most presentable appearance, or are very expensive.
Therefore, most often, home craftsmen build houses for the well with their own hands - in this case, you can show your imagination and arrange everything exactly as you need.


Let's figure out why, in general, this fence is needed.
- The well house protects the well water from contamination due to dust, leaves, stones, and so on. This requires a tight-fitting lid - open wells are only suitable for industrial water (irrigation, washing), so if you intend to at least wash the dishes, then the lid should become an indispensable attribute designs.
- The house prevents entry into drinking water rainfall of any kind. Rain and melt water contain a large number of acid-base elements, human waste, fertilizers and other impurities dissolved in them, their entry into the water source is fraught with dangerous pollution. To avoid this, the roof of the house, as a rule, is made gable - it is easier to remove precipitation.
- The house prevents chemicals from entering the well, which are often used to spray green spaces.

These are important, but not the only functions of the houses - the walls of the well house in winter do not allow the water to freeze, and in addition, and this is very important, they ensure the safety of young children. Latches are often cut into the houses and locks are installed that prevent inquisitive kids from bending over and falling into the water.
To facilitate the rise of water as much as possible, they mount gates and racks - usually this is an ordinary log with a rotating handle, to which a metal chain is attached.
Of course, the ideal well house should require the most easy care and organically fit into landscape design.


Blueprints
There is a wide variety of houses arranged for hydraulic structures, most often they are made in the form of a cover, house or gazebo.
The first option is optimal in a limited budget, as it is quite economical. This is a simple cover that covers the entrance to the well shaft at ground level. It is quite quick and easy to equip such protection, however, it is necessary to constantly monitor the lid so that it is always closed.
The design in the form of a house or gazebo is often installed in summer cottages, where it perfectly complements the landscape design. As a rule, such a gazebo has a special protective door that prevents precipitation from entering, and also protects water from debris. The material for the manufacture of such houses is wood, which is durable and environmentally friendly.
When drawing up drawings and diagrams of houses for a well, it is very important to take into account the material from which it will be built.


Most often used:
- brick;
- a rock;
- concrete blocks;
- metal structures;
- logs.
Houses made of stone and brick are built quite quickly and simply, they are reliable and can last for many years. The only drawback of such a structure is its low attractiveness, so such houses will need finishing, which leads to additional costs of time, effort and money.
Concrete houses are very popular, this material allows you to build a structure of any shape - you can arrange it in the form of circular axes, or you can build a small hill. There are a lot of options, but each of them, like a brick, will require decorative finishes- Most often they use mosaics or stone fragments.


A house made of metal structures is optimal for high-tech sites, it is distinguished by its laconic form, strict geometry and conceptuality.
However, the most popular material for arranging houses was and remains logs.– wood products harmoniously look in any landscape, wooden house has an extremely attractive appearance, and in addition, it reliably protects the entrance to the mine. The only disadvantage of such material is the susceptibility to decay under the influence of external atmospheric factors. However, if you use stained wood and process it with special protective compounds and its service life will last for many years.
The house can also be plastic, but such options are more often used to create decorative structures.
The choice of material is far from the only issue that needs to be resolved at the stage of preparation for construction, it is very important to draw up a drawing, and for this you should choose the design of the structure.


Well houses can be open and closed.
Open models include several basic elements:
- ground part;
- lift racks;
- roof with truss system;
- door on the frame.
Such options are widespread in villages, they are optimal if several owners use the well.


Design closed type includes a slightly different set of component parts:
- post with gate (lift)
- lockable doors;
- rafters and roofing.
Each of these structures is individual and unlike the others, the walls here can either form a single whole with a log house, or the roof slopes play their role, but regardless of the structural features, they reliably protect the well from bad weather, and also make it safe for children and pets.
Traditionally, several design options are used.
- Roof house- the simplest house, which is made in the form of a simple triangular gable roof.
- A little more difficult option is an building a house in the full sense of the word. Such products are most often made in the form of a quadrangular log house and a decorated roof, or concrete rings are used - in this case, the design has a round shape.
- Look very original gazebo houses. In this case, the structure is not completely closed, but partially open, the roof is mounted on supports, and the door is equipped not in the roof itself, but near the base. At the same time, the base itself can be anything - a round ring looks very harmonious, logs with a square base, as well as an octagonal house.


The project of the future house for the well and the features of its further construction depend on the chosen form. Traditionally, the dimensions of the house should correspond directly to the structure of the mine: a series of concrete rings or the shape of a log structure. Keep in mind that if you make the roof too small, then the water will not be protected from dust and dirt, and too much cover will make the operation of the water source inconvenient.

How to build?
Regardless of which type of well house design you prefer, the set of tools you will need is about the same. If you plan to work with wood, then you will need:
- plane
- saw;
- screwdriver;
- level;
- roulette;
- pencil;
- a hammer;
- nail puller.
- But you also need to prepare materials:
- edged board;
- rounded timber;
- latch for the door;
- fasteners.
First you need to draw up a drawing, for this you need to determine in advance the dimensions of the structure and calculate the dimensions of the base, gables, gates and doors, as well as calculate the area of \u200b\u200bthe roof slopes and racks with a ridge.
Consider a method for manufacturing a house with a gable roof. Most often, for such structures, a bar (for a frame) and an edged board are used. First, assemble the frame. Its assembly usually begins with careful sawing necessary details for the lower trim, supports on which the roof will be attached, connecting boards and crossbars. Usually the dimensions of the lower trim strictly correspond to external dimension well, and the parameters of the racks are selected in such a way as to form the necessary slope of the roof. Accordingly, the side connecting supports and the upper crossbar correspond to the size of the roof: the first is its height, and the second is its width.

Frame parts are fixed with long nails in the following order:
- first you need to fasten 2 racks above and below, for this, boards are nailed to them;
- install special parts on mines and secure with strapping;
- it is very important that the ends of the bars at the junction with the top crossbar are cut at an angle of 45 degrees.
In order for the structure to be more durable, corners are stuffed into the joints, to the bottom of the frame with inside they fix a wide board, which can later be used as a shelf for a bucket, the remaining sides are strengthened with narrower boards - they are used to hold the head.


Another point that needs to be given special attention is the manufacture of the gate. It is necessary for winding / unwinding the chain, with the help of which a bucket or other container is lowered into the water and rises to the surface. The log for the gate must be thick, preferably oak, as this breed is different increased strength. Many refuse to install the gate in favor of installing a pump, but experts do not recommend doing this: like any technique, the pump can break, in which case it will not damage the fallback.
The length of the logs should be 5 cm shorter than the length between the two posts. The log must be polished, and a wire winding is made at the ends and holes are drilled in the center, their depth should be about 4-6 cm, and the thickness should be about 2. These holes are strengthened with washers, and driven inside metal rods- short and long. The long one is later used as a handle for rotating the gate. To fix the gate in the sidewalls, you should make cutouts in them and get up the cut pipes of the desired diameter. Then the chain with the tank is fixed - and the gate is ready!


And finally, on finishing stage a roof is being built and sheathing is being done. The construction of the roof begins with the fastening of the rafters, usually boards 3-5 cm thick are taken for them. In general, 3 crossbars, 8 jibs and 56 rafters are included in the roof structure. Work is carried out in accordance with the following step-by-step instructions:
- the ends of the rafters are cut at an angle and connected to each other with self-tapping screws;
- the frame is fastened to the rafters - for this you need 12-centimeter nails;
- rafters are reinforced by mounting jibs;
- a crate is stuffed over the rafters with a step of 15 cm, and the length of its planks should be such that it protrudes from the rafters by 10 cm;
- laid on top waterproofing material, for example, roofing material, and slate is laid on it, it is possible to equip the roof from corrugated board;
- sheathing is made of boards.


The door to the house is an optional element, but it is advisable to equip it if you want the water to always remain clean. Traditionally, its dimensions are 55x85 cm, and it is a shield made of boards hammered together.
Some make an insulated house for a well, usually foam materials are used for this - insulation is made along the lid or neck.

A well located on its site supplies the house with clean water. drinking water, which is much tastier and healthier than the one that is received centrally. For the well to supply clean water, it must be protected both from rain runoff and from bright sunlight, debris thrown by the wind and various small animals that can fall into it. The well house not only provides protection from these hazards, but also decorates the well, making it a valuable element of the landscape design and exterior of the entire site. In this article we will talk about what houses for wells are and how to build them yourself.
What are houses for wells
Despite the difference architectural styles and forms, the main division of houses occurs according to the type of well:
- with pump;
- with a gate.
For a well with a pump, it is necessary to create a house that will protect it and provide the possibility of maintenance, but for a pump with a gate, this is not enough. After all, the gate must be part of the house, otherwise the effectiveness of the protection provided by the house will decrease, and it will also be very inconvenient to get water from such a well.

The shape of the house can be different, so everyone chooses it based on their preferences and, trying to harmoniously fit this design into the interior of the site. Materials can also be different - from traditional logs, to metal corners and plastic. It all depends on your desire, ability to work with various materials and the presence of these same materials. The roof is not an indispensable element of the house, because in the villages they still manage with ordinary wooden lids, both completely removable and hinged, however, as decorative element the roof is perceived much better. A well house with a pump should provide enough free space to maintain the pump and any type of house should not interfere with the preventive cleaning of the well.
How to build a roof for a well

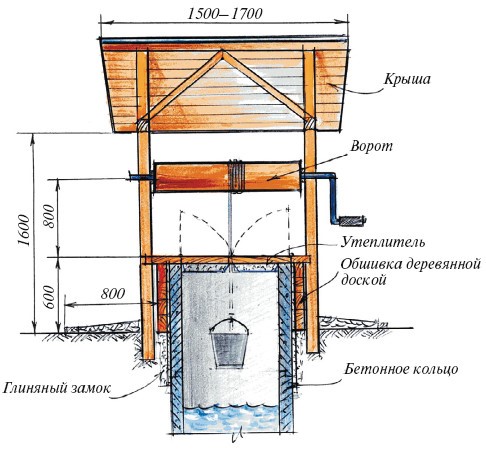
As an example, we will talk about the independent construction of a square house from sawn timber 10x10 cm, with a lid and a decorative corrugated roof. This house is installed on a well, the walls of which are made of rings KS 7-9, with a gate, a rope and a bucket. Outside diameter of these rings is 84 centimeters, the elevation of the last ring above the ground is 40 cm.
To build a well, we need the following materials:
- collar;
- rope or chain;
- sawn timber 100x100 mm;
- board 25 and 50 mm thick and 100–125 mm wide;
- wooden dowels;
- loops;
- polystyrene scrap;
- screws and nails of different sizes;
- insulation (jute, linen, linen or felt);
- cement;
- sand;
- crushed stone;
- fittings.

To work, you need the following tools:
- chainsaw;
- jigsaw;
- drill with hammer mode;
- screwdriver;
- manual tamper;
- wood saw;
- axe;
- chisel;
- a hammer;
- shovel;
- roulette;
- pencil;
- square;
- caulk.
Step by step construction instructions

First of all, you will need a collar and a rope or chain. They can be removed from the old house, or you can buy at any hardware store. The length of the collar should be at least 115 cm, if it is shorter, then a longer handle will be required. Having prepared the collar, dig a square hole around the well with a depth of 15 cm and dimensions of 180x180 cm. Seal the bottom of the hole manual tamper and pour 5 cm of fine gravel or sand. Make a formwork with internal dimensions of 140x140 and 5-10 cm above the ground, then install it in the hole so that the ring is in the center of the formwork. Make a reinforcing mesh from the reinforcement and install it so that it rises 5 cm above the rubble. Knead and pour concrete into the formwork. This operation, as well as fastening the crown of the house to the foundation, are described in detail in the articles - Which foundation is best for a house made of timber - calculation features and Attaching a timber to different types of foundation.
Here step by step order actions:
- Using a chainsaw, cut the timber into pieces 124-130 cm long. All pieces should be equal in length. Then cut the 50mm board into 4 pieces of the same length. If the board is wider than the beam, then carefully slash the excess in the center with an ax. These boards are needed to create a castle that will firmly hold the walls of the house.
- Cut half-tree locks in all segments of the timber. To do this, step back from the edge of the beam 10–15 cm (depending on the length of the segments, the main condition is that the distance between the inner edges of the locks should be 84.5–85 cm and be the same on all segments) and draw a line perpendicular to the edges of the beam. Step back from this line 100 mm and draw another parallel line. Lay the beam on its side and, at the level of those lines, draw a line along the center of the beam. Rotate the beam 180 degrees and draw another such line. Then, with a hacksaw, cut the timber along perpendicular lines to the longitudinal line and use a chisel to remove the cut piece. If you have never done such work, then first practice on scraps so as not to spoil a good beam.
- Fix on the formwork a crown crown of two boards and two beams. It is desirable that the bars lie parallel to the wall of the house, so they will look more beautiful.
- Lay two more crowns and secure with wooden dowels. Do not forget to lay insulation between the crowns, this will keep your well from freezing even in the most severe winters.
- Raise the frame of the house so that it rises slightly above the ring, but no more than 1 crown.
- Lay the last crown from a board and a bar. Fill the voids between the concrete ring and the frame with foam.
- Measure the resulting log width and divide it by the board width of 50 mm, then round down to a whole number. Cut so many boards 50 mm thick, set two aside, and make two identical shields from the rest, fastening them with boards 25 mm thick. These will be the well covers.
- Hang the resulting covers on the remaining two boards and lay both doors on the house parallel to the walls of the house. Set them as evenly as possible and attach the end boards to the log house.
- Cut two pieces of timber of such length that, standing on the foundation, they rise 120–140 cm above the log house. These will be the roof supports and the collar.
- Drill holes for the wrench at a height of 80-90 cm from the top of the log house and insert the wrench.
- Attach the supports to the walls of the log house on the sides perpendicular to the canopies, using powerful self-tapping screws, screwing them into each crown. Self-tapping screws must be deepened by 30–40 mm, and the holes must be sealed wooden dowels hammering them dry or using PVA glue.
- Measure the bend of the crank handle, add 10 cm to it and draw a line at this distance from the crank. This is the install mark. bearing beams roofs.
- Determine the most beautiful and pleasant dimensions for the roof. Some make a decorative roof that covers only the covers, others cover the roof with a collar, and still others make a huge roof that turns the well into a kind of gazebo. We offer the second option - a square gable roof measuring 180x180 cm.
- Cut 4 pieces of board 50 mm thick and 165-170 cm long and make a roof frame out of them. To do this, use powerful self-tapping screws to screw two boards to the supports. Then attach two perpendicular boards to the ends of these boards using self-tapping screws or nails.
- If the support rises above the frame by more than 40 cm, then cut the bars of the supports at a height of 40 cm, then cut a groove in the middle of each support for a board 25 mm thick. The grooves should be directed along the axis of the wrench. After that, sharpen the tops of the supports at a 45-degree angle so they don't get in the way of the roof boards. If the height of the supports is not enough, build them up with boards 50 mm thick, also cut a groove in them and sharpen them.
- Cut a piece of board 25mm thick equal to the length frame plus 5 cm, insert into the slots of the supports and secure with nails or self-tapping screws. This will be the ridge of the roof.
- Measure the distance from the ridge to the frame and add to it the desired overhang of the roof (usually 10 to 30 cm) and add 10 cm to this. Cut 4 pieces of board 25 mm of this thickness and make two corners in the shape of an inverted V, which attach to the ridge and frame. These will be the roof rafters. In this case, from above, it will be necessary to fasten each board to the ridge flush with its end, and fasten the lower part of the corner to the edge of the frame with an overlap.
- From a board with a thickness of 25 mm, cut the crate in the amount of 3-4 pieces on each side of the roof. The length of the boards of the crate is equal to the length of the ridge.
- Treat all elements of the house with fire protection and soak with oil or cover with paint or varnish.
- Nail the crate to the rafters, the bottom board along the bottom edge of the crate, the top one 3-5 cm from the ridge, and the rest at an equal distance between them.
- Sew the crate with corrugated board.
- From boards with a thickness of 25 mm, cut the elements of the pediment. Correctly mark and cut corners, thanks to this there will be no gaps between the corrugated board and the gable. If you mark or cut corners with errors, you will have to install a plinth that will hide the gaps.
- Treat the gable with fire protection and varnish or paint.
Probably, each of us associates a well with wooden frame, a collar and a bucket on an iron chain, neatly folded gable roof and a peasant woman standing next to her, on whose shoulders a yoke rests. It is unlikely that you will find something like this as soon as you dig a well in your country house. No log cabin, no roof, just bare concrete rings. But everything is in your hands, because they are exactly what you will need when you get busy. self-manufacturing well house. Do not be afraid, there is nothing complicated in this, you just need common sense and a powerful desire, coupled with knowledge of some features of the work, and now you are already building your own little architectural miracle with your own hands.
The main task of the design is to protect water from dirt, insects, branches, etc. You can, of course, just cover the well with some kind of lid on top, but bare concrete rings are unlikely to delight anyone (and it’s more difficult to collect water ), so the second function of the house is purely aesthetic. Moreover, such a house can be a whole work of architectural art and be the envy of your neighbors.
To install a log house, you can seek the help of professionals, but we know very well that handmade things always bring more pleasure, and they save a lot of money.
let's consider different designs a house, we will study their pros and cons, and also learn how to make a house for a well on our own.
Designs, schemes and drawings

To begin with, let's decide how many walls our house will have. You can choose a rectangular or hexagonal frame.

The tetrahedral version looks more traditional, but the hexagonal version has its own advantages. The design of such a log house will allow you to save space, it takes less area and is well suited for small areas. Otherwise, it is more a matter of taste, each option can be beaten, decorated, decorated in its own way.

There are more simplified schemes open view without walls. They perform their function just as well, but they are easier to make. Also, designs are closed and open type. closed design differs in that it completely hides the well, and the open one consists of walls in height concrete ring and roofs.
Self-assembly
Usually the material for building a house is wood. It is easy to process, durable and looks good. Both timber and logs are used for the manufacture of crates. For facing the above-ground part, brick or cobblestones can be used. This material goes well with wood.
List of building materials for all works:
- Wooden beam, the section of which is 5 x 5 cm or logs for a log house (depending on the design).
- Roofing material. It must be light, otherwise the supports may break.
- A log for the manufacture of a lifting mechanism.
- Protective impregnation for wood, paint, varnish.
- Metal hinges, handle, latch or other latch.
- Nails, screws.
- Metal corners and bushings.
- Bucket, chain.
- Door material.
The general set of tools that you will need in any case:
- For processing logs, we need an electric planer, for timber and boards - a jigsaw.
- It is also necessary to have a grinder.
- Building level.
- Roulette.
- Hammer and preferably a nail puller.
- Hacksaw.
- Screwdriver Set.
Where the frame is installed depends on the design of the house. It is easier to make a canopy or just a roof, in which case it will not be necessary to fill the foundation.

As the foundation itself, it is usually used concrete formwork or tile base. You can use the blind area of \u200b\u200bthe well, modifying it a little. Do not forget to worry about rainwater drainage in advance by using special gutters in the formwork for this. It is also advised to add a little to the formwork solution liquid glass, to protect against moisture and dampness, but this is an optional condition. Consider the size of the base so that when the house is ready, it is convenient for you to draw water, the design should be, first of all, convenient and practical.

Now consider a simpler and cheap option lumber assembly:
- Four pieces of timber are cut into racks and eight into crates. We consider how much timber is needed for sheathing and do the same. We process the material with an antiseptic. Be sure to add insulation.
- First, the lower crate and racks are assembled, then the upper one. The level of the upper crate should not be higher than the concrete ring. Then sheathing is done using the building level.
- Racks are made of boards with a cross section of half a centimeter. We make the gate, in the same way as in the first version, we wind the chain around it and install the skate. If the roof is closed, the racks are attached to its frame.
- Next, the roof is assembled approximately according to the same principle as in the variant with a log house.
There is an even simpler type of house, it assumes the presence of only two roof slopes and is made from boards.

How to make it:
- Install four posts at a pre-marked distance. Do not forget to treat the boards with impregnation.
- Nail the boards at the top and bottom by connecting the posts.
- Next, cut the rafters and fasten the top. Install a deadbolt for extra strength. It is mounted thirty centimeters below the ridge point.
- Make a cut where the rafters meet the top boards and secure them to the frame. Install two jibs for reinforcement and combine the rafters with a ridge of two boards. Subsequently, a crate is installed on these two boards.
- Roofing material is quite suitable as a roof, slate is placed on top of it, and corner joints are closed with wind boards. Budget option there will be the use of corrugated board or ondulin.
An integral element of the house is the door. To make it, fix 3 bars on the frame, which will serve as the frame of the door. Based on the dimensions of the frame, assemble the door, remember that its size should not exceed inner size frames. For stiffening, attach a block diagonally, and then fasten the hinges to the door and frame. Hang the door on the frame and install the handle. Check if the door catches the frame when closing and opening.
 So, our house is ready and we can move on to the stage of decorative finishing. Design options are countless. You can decorate the facade of the house with carvings, paintings, platbands. If you want to make a house in oriental style, a hexagonal design, tiled diamond-shaped roof is more suitable for you. You can also decorate the well with flowers, hang flower pots under the roof, decorate the walls climbing plants. Perfect fit marine theme, the gate is a great place for the steering wheel, between the posts you can pull the ropes, cover the roof with canvas. You can find old boards and decorate a house in an old, medieval style, or fade the existing material with gray paint. For modern dachas suitable transparent polycarbonate roof, forged metal supports. A popular option is the mill house. In this matter, it all depends on your imagination and taste preferences.
If the installation of a well on your site is not possible (there is no place bad soil, deep location of the aquifer) you can still build a log house that will perform a purely decorative function. To complete the illusion, you can build a container of water inside.
The cost of materials and work
Buy finished house you can absolutely different prices. A simple design of boards and a gable roof costs from 7 thousand rubles. More interesting options, with walls will cost you more. Such houses are sold at a price of 15 thousand rubles.
If you do all the work yourself, then the prices for materials will already depend on what type of house you have chosen, as well as your design decision and preferences in choosing the material. On average, from three to seven thousand rubles. However, one thing is for sure, the final price will be cheaper finished models On the market.
Results
If you have already decided to install a well house on your site, here are the main points that you should keep in mind:
- The cheapest and easiest design to manufacture is an open house without walls. The most expensive and difficult to install is the closed hexagonal version.
- It is very important to treat all parts with impregnations and varnishes before installing the structure directly above the well. Doing this after installation can contaminate well water with chemicals.
- A wooden block nailed to the door diagonally will avoid its distortion.
- If your site does not have suitable conditions for a well, you can always install a decorative frame.
Finally, do not forget to properly care for the well, and it will always delight you with clean and tasty water.