Shower outside in the country. How to make a summer shower in the country with your own hands? Shower equipment with water supply
We build a summer shower for a summer residence with our own hands
Start realizing your idea with careful design. As they say, measure seven times, cut only once. To get started, view finished projects summer shower and make your own based on them. Take into account the place allotted for the shower, the availability of building materials and the desired dimensions. Here you need to take into account the volumes of the owners themselves.
Even a beginner can easily draw up a shower project on their own. A simple drawing or a small drawing will help you calculate the amount of building materials, avoid some mistakes and unnecessary costs.
An outdoor shower should be spacious and comfortable. It is necessary to provide a place for clothes and bath accessories - at least 40-60 cm. The height of the shower should be about 2.50 m. Dimensions interior, which are most common - 160x100 mm and 190x140 mm. All this must be taken into account when drawing up a drawing or project.
Site Preparation Tips…
Now you need to decide on the location of the summer shower. Naturally, it is better to build it in a well-lit sunny place away from other buildings. Then the water in the tank will be heated throughout the day from solar heat. But if it is planned to build a heated summer shower, then it is not necessary to adhere to this condition.
The distance from the house should also not be too large so that you can quickly move into the room after water procedures. It would be wise to take care of the water flow in advance. It is better to take it to a septic tank or a septic tank. It is worth paying attention to the convenience of water supply and, if possible, ensure automatic filling of the container. After choosing a place, it is necessary to prepare the site: remove the top layer, level the base for the shower and fill the site with sand.
Rebuilding the frame...
An outdoor shower can be a capital structure, or maybe light frame design. Therefore, the main stages of the construction of such souls differ.
The foundation is a reliable basis for a shower cabin, but sometimes it is completely useless
To make the base for the shower correct and for convenience, you need to make elementary markings: for this, pegs are hammered in the outer corners of the site. After that, be sure to check the diagonal and pull the cord.
The dimensions of the foundation depend on the materials that will be used in the construction of the shower. For a brick or cinder block building, a foundation is poured with a depth of 30 cm. If metal or wooden frame for a summer shower, the foundation will be slightly different. Before pouring, you need to prepare a place for pipes - lay a log or branch desired diameter wrapped with ruberoid.
If you use an outdoor shower the family has been planning for more than one year, it is better to make formwork - to raise the level of the foundation above the ground by 10-15 cm, increasing the height of the trench due to boards reinforced with pegs and spacers.
When pouring the base under the shower with concrete, it is extremely important to ensure a flat surface. This is done in the same way as with floor screed, using a level and two guides. The guides are leveled, poured with concrete, the floor base is leveled along the guides. Only horizontal surface can serve solid foundation for further building. After leveling is done, start laying bricks.
Installing a shower using a frame
A metal frame can be used as the basis for the shower (it is more durable). Building a summer shower will be much more economical if you use wood. But this material is not durable. Considering the peculiarities of our climate and high humidity due to the operation of the building, it is better to treat it with bio-impregnation to protect it from insects and fungus.
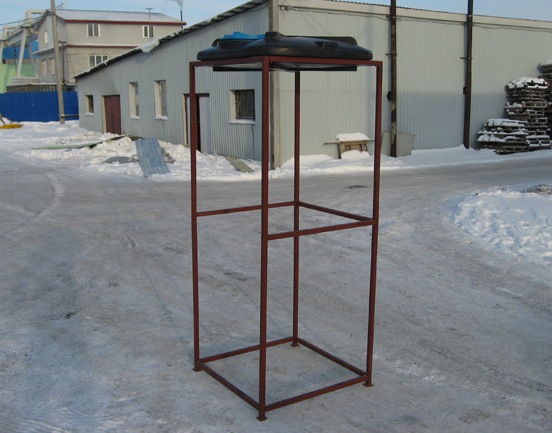
Determining the amount of building materials and the size of the building, proceed to the installation of the frame. The first stage is markup. On the ground, a rectangle is designated, the sides of which will correspond to the parameters future design. In order for the design of the summer shower to be stable, it is necessary to make pile foundation. Therefore, holes of the required depth are drilled at the corners of the marking (130-170 cm, the depth depends on the length of the pipes). Then the foundation is directly installed from the pipes. It is better to use metal pipes 1.5-2 m long (9-10 cm in diameter) for this, but even railway sleepers can be used. The piles are deepened into the ground so that they protrude 20 cm beyond the soil. The pipes are then filled with concrete. After it hardens, wooden bars should be installed in the pipes. The width of the beam used for the frame should be no more than 10 cm.


This is how we cover the frame with pvc film and get an excellent building
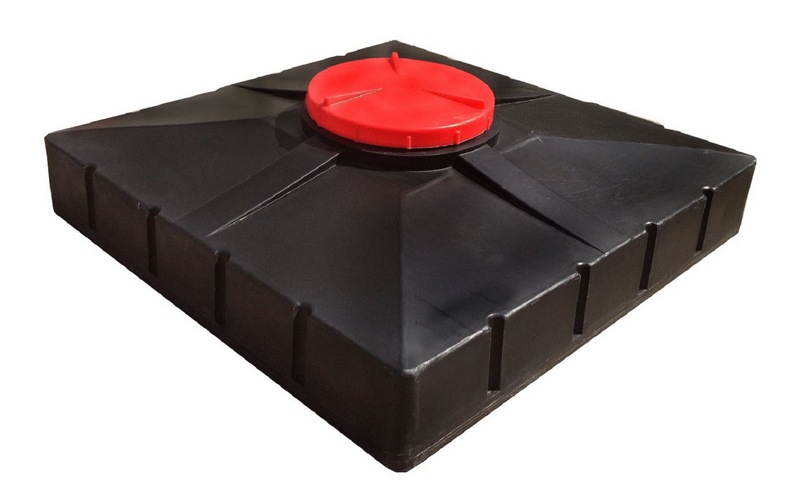
The next installation step is ligation: starting from the top, the entire structure is bolted together. If the calculation is made correctly and all dimensions are observed correctly, the design will turn out to be reliable. This will make it possible to install a water tank big size. Its volume should be calculated according to the formula: 40 l × 1 person and not more than 200 l. Heavy capacity construction may simply not withstand. It is desirable that the tank be flat and correspond to the roof area, that is, rest against the supporting structures.
The dressing inside the frame will later serve as lags for the shower floor. Now we connect the beams-bases of the walls with each other with slopes. They should be installed exactly in the thickness of the wall, but not in the overlay.


And here is the option sheathed with plastic slate
Slate sheets, OSB boards, boards, plastic panels and even PVC film can serve as walls for such a shower.
Making communications...
You can build a summer shower with your own hands from building materials, remaining on the site after the construction of the dacha, but with the summing up of communications, the situation is somewhat different. Here you can not do without financial investments.
- Pipe laying, tank installation. After the erection of the structure, it is mounted water pipe. The outlet for the shower head hose must be made above the level of the head. Otherwise the pressure will be too low. Now you need to put the tank. You can install a purchased plastic tank. Although, in order to save money, a barrel or any other container is usually used. Before the tank rises, you need to make a tap with a thread, and also install a tap with a nozzle. Now the tank or barrel should be securely fastened to the roof. As a rule, water in a tub or tank is heated using sun rays. In order for the tank to heat up faster, it is pre-painted black. It is good to equip a film greenhouse around the tank: cover it with foil to reduce heat transfer from the north side.


A metal shower tank will never go out of style, but now plastic options are increasingly being used.
- Lighting. When wiring wiring for lighting, do not forget about the rules of electrical installation. After all, the humidity in the shower is increased. Of course, you can do without electric lighting if you use the shower exclusively in summer time. A stream of light coming from a small window (above head level) with frosted glass will also be enough. In spring, the days are somewhat shorter, so only daylight will not be enough.
- Ventilation. To improve the circulation of air flows and protect against the appearance of condensate, it is advisable to make a hole in the ceiling and close it with a decorative grille.
- Shower drain. How to build an outdoor shower, make piping, bring lighting - we figured it out. Now let's deal with the drain problem. With an increase in the average daily temperature, the volume of work of summer residents increases significantly and the load on the shower increases. That's just the temperature of the soil does not affect its drainage properties. It is good if it is possible to combine the drain from the shower and the sewer at home.
For fast disposal and good outflow Wastewater, outdoor shower must be installed on a hill. The walls of the pit should be further strengthened to prevent shedding. Please note that the volume drain pit must certainly be at least 2 cu. meters.


A common mistake of novice builders is the location of the septic tank near the wall of the shower stall or under the shower itself. If the volumes of water are large, then the septic tank can be flooded. Over time, drainage works worse, appears bad smell. With constant heating, not only soil shrinkage is possible, but even the destruction of the foundation, which is extremely dangerous. Therefore, the drain of the summer shower must be diverted a few meters from the structure.
The water drain is equipped with a waterproof layer using PVC film, roofing material or hydrostekloizol. Alternatively, do concrete screed reinforced with metal mesh.
It is impossible to use clay as a waterproof layer. After a while, it will wash out and may contaminate the drainage ditch.
We install the pallet
To equip a summer shower with your own hands and provide an outflow of wastewater for it will allow the pallet. It can be a purchased pallet, a stainless steel sheet pallet, or the most cheap option – wooden pallet. Instead of a pallet, boards are laid, but not tightly, but leaving gaps for water. The grate of boards is pre-sanded well with sandpaper and treated with an antiseptic. For convenience, you can put a rubber mat on top.


The simplest shower tray - from ordinary boards
Waterproofing must be laid between the floor of the summer shower and the tray. For this, ruberoid is used. When installing the pallet, it is necessary to ensure that the slope is formed towards the drain for unhindered water flow. The pallet is screwed to the walls with self-tapping screws.
For more comfortable washing, so that you do not have to stand on metal pallet, it is desirable to put plastic gratings.
Building cladding…
An outdoor shower should harmoniously fit into overall design your yard. Any designer will tell you that for outdoor upholstery it is better to use materials that complement the ensemble of adjacent buildings.
Facing the summer shower is not only decorative, it is necessary to protect the walls from the effects of weather. The surface of the walls can be plastered and painted or sheathed vinyl siding, it all depends on the imagination of the owner, his financial capabilities and features of the building. For example, a polycarbonate outdoor shower on a frame does not need to be lined at all.


Left - polycarbonate variant; on the right - a shower lined with wood
A good option is to sew up the walls and ceiling with clapboard. If the family will visit the dacha only in the warm season, then it is better to choose pvc film, dense colored (opaque) polyethylene or tarpaulin. If the shower cover is removable, it can be easily removed in the pantry for the winter.
How to make an outdoor shower comfortable...
It is very convenient when the building is divided into two zones: a shower room and a dressing room. To prevent water from entering the dressing room area, the floor of this area should be made a few centimeters higher. To protect clothes from splashes will help and a small decorative curtain from polyethylene.
If you need to use the shower even in a colder period of time, then the walls will have to be insulated. For this, polystyrene foam is used. This material must be filled inner space frame. Further, the structure is upholstered with PVC film using a stapler and decorative rails. Already on top of the film produce interior decoration.
If you choose materials to decorate an outdoor shower (there are plenty of photos both on the Internet and in catalogs), try to pay attention not only to aesthetic data, but also to practicality. Only moisture-resistant materials are suitable for finishing the inside of the shower cabin.

A modern outdoor shower in the form of an extension to the house - why not an option?
For interior decoration you can use thin linoleum, plastic panels, oilcloth or wood. If you decide on wood, then do not forget to cover each board separately with hot drying oil, and only then proceed to finishing work. When facing internal walls the material is launched under the sides of the pallet.
To improve soil drainage, you can plant a few moisture-loving plants next to the shower. Green spaces absorb water. They not only decorate, but also protect the space around the shower from waterlogging.
Thus, a do-it-yourself summer shower will become an indispensable outbuilding on personal plot.


If it is not possible to hot water in a private house or in country house, then in this case it would be advisable to build an outdoor shower.
How to build a summer shower with your own hands from wood?
To build wooden shower in the country with your own hands, you can follow the following instructions:
First you need to choose appropriate place for building a building. When choosing, it should be taken into account that such country shower will be constantly exposed to moisture both inside and outside.
Tip: it is better to build such a structure in a well-ventilated area. This is necessary so that the wood dries faster. Also, do not plant bushes, trees and tall plants, as they retain moisture, do not allow air to circulate, and as a result, prevent the drying of the wood from which the country shower is made.
Production earthworks. For a shower, we dig a hole 1x1 m in size, 40 cm deep. We lay a layer of rubble on the bottom of the pit, which will help the soapy water soak into the soil faster. Next, cinder blocks should be laid out in the corners. They must be leveled.

Next, we proceed to frame manufacturing. To do this, we take boards whose thickness is 30 mm and a width of 15 cm. A base measuring 1x1 m will be made from them. 4 beams with a section of 70x100 mm are attached to this base. For dressing the frame, side and two transverse jumpers are used, which are inserted into the grooves. They also serve as a reinforcement for the roof, on which a hundred-liter tank will be installed.


Works on frame sheathing. For these purposes, you can use lining, blockhouse or false timber. The gaps between the grooves should be two to three millimeters. This is necessary so that the timber can expand freely when regularly wet. In our case, a material imitating logs was used for shower cladding.


do-it-yourself shower step-by-step instruction. A photo


Finishing work. Before painting, it is necessary to prime the wood. For these purposes, a bioprotective antifungal impregnation is suitable, after drying of which the surface is painted with at least 3 layers of facade acrylic water-borne varnish.

The next stage in the construction of a soul in the country is tank installation for water.

building a shower in the country. A photo


Tip: for a summer shower, it is advisable to use a tank with a minimum volume of one hundred liters.
You can build such a wooden shower in the country with your own hands in one or two days.
building a shower in the country with your own hands. Video
Do-it-yourself summer shower
For the construction, it is necessary to prepare the following materials:
- timber;
- fasteners (self-tapping screws);
- shower kit, which includes a bracket, a mixer, a curved pipe, an adapter and a nozzle;
- rubber hose.
How to build a summer shower in the country with your own hands?
Construction order:
Drafting drawings. For such a structure, it will be necessary to make a wooden pallet in the shape of a circle from dense wood. We will have cardboard as a template. required size. First you need to lay the cardboard on a flat surface and fix it with tape. Next, using measuring devices, draw a circle with two squares located inside. According to this template, the construction of a wooden floor will be carried out.


do-it-yourself summer shower drawings
Construction pallet. The floor will be three-layer. The order of the base for the floor is as follows:

Works on pipe installation. Connect all the elements that are in the shower set.


do-it-yourself summer shower step by step instructions. Video
do-it-yourself summer shower step by step instructions. Video instruction
Summer shower for giving from pipes and polycarbonate
This option attracts with its low cost, resistance of materials to the action of sunlight and moisture, as well as ease of processing.

The procedure for the construction of the foundation and floor
Before you start building a polycarbonate outdoor shower, you need to decide on its location. For such a structure, an inconspicuous place with flat surface away from wells and wells.
Site preparation. To do this, we fill it with sand and ram it.

Drill or dig four holes into which posts for the foundation will be inserted.

Lay a layer at the bottom of the hole rubble 10-12 cm thick.

Install pipes made of plastic, used for laying sewers. We make them inside and out.

do-it-yourself summer shower step by step instructions. A photo

In the central part it is necessary to dig drainage pit and fill it with rubble.


We also cover the area around the blind area with rubble.

From a bar with a section of 100x150 mm we make base for the construction and attach it to the foundation posts. For these purposes, it is necessary to drill holes in the cement and insert plugs into them.


It is also necessary to fasten jumpers to the frame with self-tapping screws and reinforce the structure with steel corners. Between the pipe and the beam we lay waterproofing.


Tip: before installing the jumpers, you need to try on the pallet, as it will subsequently be installed between them. Therefore, if necessary, it will be necessary to adjust the frame to the dimensions of the pallet.


Next, you need to remove the floor height from the timber 50x50 along the entire perimeter and after that you can proceed to the device floor covering . The result should be a base with a built-in pallet.


The order of the construction of walls and roofs
Let's start building wooden frame soul. At this stage, it is necessary to provide a doorway. In our case, the height of the walls will be 2.5 meters.


summer shower made of polycarbonate step by step instructions. A photo

A solid one is attached to the rafters crate.

Making a layer waterproofing from roofing felt or bikrost.

From the sides we produce sheathing finished board.

For coverage roofing use soft tiles.

After that, we process the entire wooden frame wood stain two coats, and then varnish in two or three coats. For such a structure as a half-carbonate summer shower, about 7.5 liters of stain will be needed.


Frame cladding polycarbonate With outer side. For these purposes, it is recommended to use special thermal washers, for which it is necessary to cut holes on polycarbonate using a cutter.


Door made in the form of a wooden frame. Its height is two meters. To give rigidity, jumpers and jibs are used. Next, the door frame is painted, hung on hinges and lined with polycarbonate.


After that hang water heating ba k, faucets, curtains, hooks, rugs and other accessories.


At the bottom of the pallet it is necessary to bring the drain into drainage pipe , inserted 20-30 cm into the crushed stone base.


At the final stage we produce entrance improvement in the country shower. To do this, we dig a hole, fill the foundation with concrete and lay reinforcement in it. After the concrete has gained strength, we lay bricks on it, on which steps made of wood will be installed. You can decorate if you want. To do this, you need cement and stones.


Attach steps.

Do-it-yourself shower for giving
The first thing to do before starting construction is to decide on location summer soul. For such a structure, a well-lit, calm, slightly elevated place is suitable.

Tip: it is desirable that the shower is not located too close to the buildings and is built in the same style as them.
Stages of building a soul in the country
Drafting project. It is planned to build a shower consisting of two small spaces. Minimum size bathing compartments should be 100x100 cm, changing rooms - 60x100 cm. In our case optimal size soul - 200x150 cm.
At the chosen site mark out the rectangle dimensions 140x190 cm. We drive pipes in the corners. The foundation for the shower will be piled from two meters asbestos-cement pipes, whose diameter is 90-100 mm. They must be buried in dug pits to a depth of about 1.5 m. 20-30 cm should remain above the ground. After that, drainage and a drain system are arranged.

Summer shower project. A photo
To organize the flow of water is done waterproof layer. It can be made from a PVC film or roofing felt, which must be laid on an inclined surface. Alternatively, a reinforced concrete screed can be made.

Making the top and bottom strapping frame.

Plank floor covering.
Tip: In order for water to flow out of the shower cabin, it is recommended to install floorboards with gaps that are 10 mm wide.

The shower room should be separated from the dressing room by a high threshold and curtain.
Finishing work. Outside, the country shower is sheathed with clapboard or siding, moisture-resistant plywood, fiberboard, etc. Inside, for finishing, materials that are not afraid of moisture should also be used.
It is necessary to install a water tank on the roof, the water heater is installed indoors.

Hozblok with a do-it-yourself shower

The order of construction of the structure:
After you have chosen a suitable place for the construction of a shower, you can proceed to earthworks: dig out excavation, fill it with PGS and lay out point brick foundation.


After the foundation is ready, you can proceed to the device wooden frame designs. For these purposes, a beam is used.


For plating shower on the sides and back in this project, a board with a thickness of 10 mm was used. A window and door opening should be provided in front.


Device roof frame from a wooden beam. In this project, window openings should be provided on the folding roof.


Corners should be lined with boards.


Can be used for roofing shingles.


The door is made from boards. Handles for doors and steps can also be sawn out of wood.


All wooden elements necessary paint paint or varnish.
Bench arrangement, installation shower tray, wall cladding with plastic, fastening hooks, etc.


Summer shower projects for a summer residence
Project No. 1
For the shower, you can also use not only a wooden frame, but also a metal one. This design can be installed directly on the ground. A curtain is used as a door in this project.

Project No. 2
The shower can be made from wavy sheet metal, which can be bent in a semicircle. For this option, there is no need to install a water heater. It will be enough to connect to the water supply.

Project No. 3
Such a summer shower made of pipes is lined with white plastic on the outside, and brown on the inside. The shower cubicle can be erected on a paved concrete platform. For this option, you will need a water heater.

Project No. 4
As a floor in such a shower, you can use wood flooring. Inside the room is lined with blue plastic. Instead of a roof, a wooden lattice is used.

Project No. 5
The base of this shower is made of metal pipes. Brown corrugated board was used for wall cladding. The roof is also made of corrugated board. Light enters the shower room through the holes between the wall and the roof.

Project No. 6
For the manufacture of this shower, red polycarbonate was used. For this option, there is no need to install a tank on the roof. To use such a shower, you will need to connect it to the water supply.

Project No. 7
The frame of such a shower is made of metal pipes, painted in Blue colour. Plastic was used for wall cladding white color. A metal structure was made for the tank.

Example #8
Rustic shower. The frame is made from dry tree trunks. Branches are used for cladding. Logs are fixed on top of the structure, on which a water tank is installed.

Project No. 9
The frame for such a shower is made of metal elements. Floor and wall cladding - varnished wood. Such a summer shower does not have a door and a water tank.

Without a country shower it is difficult to imagine a comfortable country rest. Thanks to him, staying in the country becomes much more pleasant, especially in extreme heat.
It is not so difficult to make it if you use a moisture-resistant material that is easy to mount. It can be cellular polycarbonate, plastic panels or corrugated board. If you need best option- it is worth paying attention to the shower from corrugated board.
Advantages of a country shower from a professional flooring
1. Cheapness. Firstly, if you decide to make a do-it-yourself shower from corrugated board, you save money for all the assembly work. Secondly, the material itself is quite inexpensive. Thirdly, often after different construction works sheets of corrugated board remain, which it is a pity to throw away - but here they will come in handy.
2. High strength and the rigidity of the galvanized sheets of the material guarantees excellent properties for the walls and roof of the future shower.
3. Anti-corrosion properties- this is very important for a room where high humidity is expected.
4. Simplicity installation work , as it is not necessary to have sophisticated professional equipment and relevant skills.
5. Construction speed and installation - four to five hours are enough. Then you need to wait until the sealant dries, and you can begin the full operation of your small architectural structure.
6.Durability designs.
7. aesthetic appearance thanks to modern processing material and variety of colors
Here is what a country shower from corrugated board looks like in detail:
We build a shower from corrugated board
At the heart of the whole technology is the fastening of corrugated board to a frame made in advance (from profile pipes and a corner). To build a summer shower from corrugated board with your own hands, you need to prepare the following materials before starting work:
- sheets of corrugated board;
- pipes for the frame (50x50 or 40x60 mm);
- fitting;
- comfortable shower head;
- hose;
- self-tapping screws;
- sealing tape, sealant.
You will also need tools such as a mounting clamp, a level and a shovel. Better choose quality materials and not the cheapest ones. Then in the future you will enjoy all the benefits of using modern building materials. With their help, you can quickly and easily make a great shower from corrugated board with your own hands.
You just need to follow the instructions below and as a result you will get a presentable summer shower made of corrugated board, which will decorate the site and provide you with maximum comfort on hot summer days.
A simple practical shower looks like a central rack with plumbing and side walls, which are sheathed with corrugated board.

Stage 1. Dig the pit
A shower in a country house made of corrugated board can have different design and be located above the pit itself or not far from it. If a drainage system is installed directly under the shower, then for this a hole is dug at least 50 cm deep and for 40-45 of them it is covered with large rubble, stones, brick fragments, etc. Upper layer covered with small gravel. This foundation is already being laid wooden lattice 10 cm high is the shower floor. You can make it yourself, observing a gap of 0.5-1 cm.
In the second case, when there is no hole under the floor, you will need to create a drain - for example, by concreted the pipe and plastic drain on the floor or using a special pallet. Drainage must be carried out in a special sump or in gutter. The first can serve as a eurocube, that is, a special plastic container in metal grate. Two such connected eurocubes can be a purification plant.

After determining the dimensions of the shower (usually 2x2 or 2x3 m), its base is marked. From this place, the earth is removed to the level of the depth of the shovel bayonet. Then the pit is lined with roofing material and covered with crushed stone with a layer about 15-20 cm thick.
In the same pit, a piece of hose or pipe is laid, which extends beyond the perimeter of the shower itself. The pipe can be laid on the surface or in a trench. Now a pallet with a drain is placed on top, which is connected to the pipe. You can just do concrete or tile.
Stage 2. Install the metal frame
A country shower made of corrugated board is made on the basis of a frame made of profile pipes. You need to calculate its dimensions, based on what sheets of corrugated board you have. Pipes will have to be dug into the ground to a depth of about a meter and this must also be taken into account.
Four racks of profile pipe they are concreted at the corners of the shower, and the fifth is needed for the door canopy. Then horizontal jumpers are prepared to connect the racks from below, above and in the middle - it is recommended to use welding, as this is the most reliable way.
If working with a welding machine in this case is impossible, then it is quite possible to use self-tapping screws for metal. You can take screw connections, but for them you have to drill holes. The finished frame is coated with an anti-corrosion agent and painted.
Stage 3. Raise and secure the barrel
It is necessary to strengthen the roof, for which profile pipes are also suitable. They will serve as lags, that is, bars on which they will fit roofing material. Already on top of this is placed a container of water.
Both a plastic and a metal tank with a recommended volume of 150 to 200 liters are suitable for water intake. If you are interested in fast heating of water, then pay attention to flat designs dark color. It is better to initially take a black tank from an easily heated material, but you can simply paint the barrel black, install and securely fasten it to the roof.
Stage 4. We sheathe the shower with corrugated board
Using self-tapping screws, the frame is sheathed with corrugated board. At the same time, verticality is constantly checked, for which you need a level. It makes sense to take a ready-made door, but you can do it yourself if you have time to tinker.
Stage 5. We install plumbing
The tanks sold already have holes for both the shower and the water intake - you just need to connect the supply hose, mount the faucet and put a watering can / sprayer. And for a regular barrel, you will have to do the following series of procedures:
- drill a hole;
- insert a piece of threaded pipe;
- put a crane;
- put another piece of threaded pipe (drive);
- connect a sprayer or watering can;
- cover the barrel from getting leaves and debris.
You can see the construction of a shower from corrugated board in the following video:
Summer time gives us warm sun, greenery, flowers and great opportunity take a shower on fresh air. After the tightness of a city apartment, this procedure brings a pleasant feeling of renewal and unity with nature.
Despite the simplicity of the design street shower, there are many interesting options its implementation. With the most interesting and profitable for construction on suburban area we will meet in this article.
Summer shower options for giving
It's no secret that you can build a summer shower for a summer residence from different materials. For the frame, you can take profile metal or wooden beam. To fill the walls of the booth, cellular polycarbonate, corrugated board, tarpaulin, polyethylene film, siding, blockhouse.
In addition to using frame structure, the walls of the shower cabin can be made of blocks or bricks. The washing compartment can be single or interlocked with a toilet. This solution reduces the cost of construction and allows rational use of the area of the site (photo No. 1).

Photo No. 1 "Two in one" - a popular way to combine a shower with a toilet
The simplest and most inexpensive outdoor shower is a frame made of wooden bars sheathed with a planed board (photo No. 2-3).

Photo No. 2-3 Summer shower with a cabin made of timber and boards

Photo No. 4 An example of the simplest prefabricated structure made of timber and boards, which can be covered with an awning
The main thing to pay attention to in this case is the strength of the frame on which the container will stand. The frame racks must be protected from decay and reinforced with corner braces. The concrete floor can be replaced with a standard shower tray by directing soapy water from it into a common septic tank.

Photo No. 5-6-7 Variants of interesting, but at the same time simple wooden showers
If you have a grinder and welding, then you can make a summer shower with your own hands from a metal profile and cover its walls with a tarpaulin. If a welding machine no, then the frame is assembled using threaded connections, and reinforce the corners with steel plates - "kerchiefs" (photo No. 8-9).
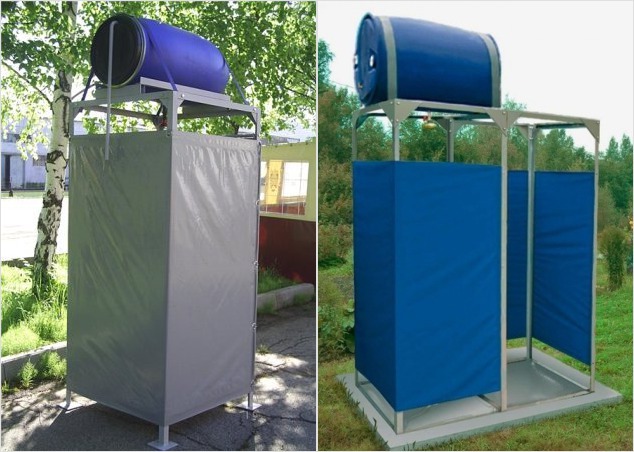
Photo No. 8-9 Summer shower from a metal profile covered with tarpaulin
This version of the shower is more convenient than a single cabin, since it has two isolated compartments: for undressing and washing.
The photo number 10 shows a popular among summer residents garden shower. It also uses a metal supporting frame, but the filling of the sidewalls is made of a film screen, put on rings and a cord.

Photo No. 10 Shower stall with a metal frame and a screen made of polyethylene film
The metal base of the booth is easily combined with corrugated board. Thus, a simple and robust design, well protected from the wind (photo No. 11).

Photo No. 11 Shower cubicle sheathed with corrugated board

Photo No. 12 Garden shower with a dressing room (220x100) from profiled sheet and pipes
In the factory, outdoor shower cabins are most often made using two materials: a profile pipe and sheet polycarbonate. If you want to save money, the same design can be assembled by independent efforts. It turns out aesthetically pleasing, durable and practical (photo No. 13-14).

Photo No. 13-14 An excellent shower for a summer residence - a profile pipe and cellular polycarbonate
The dimensions of this design are designed for the installation of a flat plastic tank with "watering can".
The shape of the shower cabin does not have to be rectangular and closed on three sides. Photo #15 shows interesting solution based on a wooden beam wall and metal pipe along which the screen moves. You can't put a heavy tank on such a shower. It is designed to supply heated water from a domestic water supply.

Photo No. 15 The original "corner" street shower
A frame for a summer shower is not needed if you attach it to the wall of the house. To do this, you need to line it with a waterproof material and bring the mixer with a hose to the surface. By filling the floor with large pebbles and making a simple drainage, you will get what you dreamed of: cozy corner for water procedures, filled with air and light (photo No. 16). If you don't like open version wall shower, then put at wall lung as in photo #17.
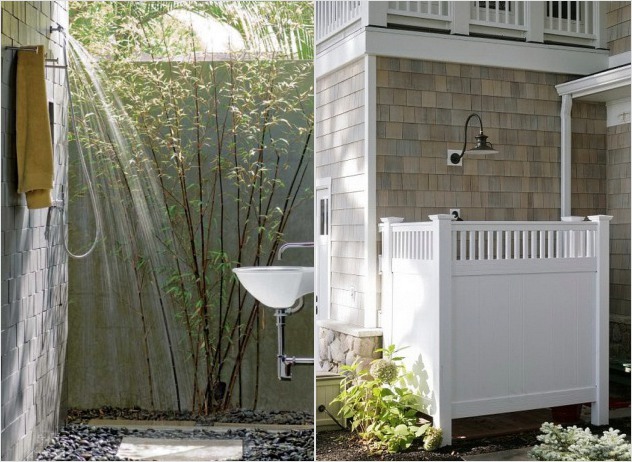
Photo No. 16-17 You can take a shower in summer not only in a cabin, but also near the wall of the building, and the wall shower enclosure will protect you from prying eyes
Weaving plants can be successfully used to fill the walls of an outdoor shower. All that is needed for such a solution is a lattice screen made of mesh, on which ivy, hops or grapes will weave a living carpet.
When considering the materials from which you can build a shower structure, do not forget about natural stone. The option shown in photo #18 will perfectly complement the landscape design.

Photo No. 18 Wall of wild stone, curled up "snail" - the best place to accommodate a summer shower
The laying of the fence in this case is made dry, without the use of mortar. It is not needed here, because a flat stone was used in the work. It is securely held in the wall array due to its weight. The considered option does not involve the installation of a container, since its appearance will spoil the beauty of stone lace. The shower head is supplied with water from an external water supply.
If there is an old tree on your site, do not rush to cut it for firewood. Its trunk can be used as an original outdoor shower installation. Surround it with a curvilinear concrete wall, and your creativity will delight neighbors and friends (photo No. 19).

Photo No. 19 An old tree on the site is not a hindrance, but the basis of the original shower design
Continuing the review of the options for a summer shower, we note that it can be built not only from purchased, but also from inexpensive improvised materials.
In photo # 20 you see such a design. Its frame is made of wooden bars. Weaving from a willow vine, which grows next to summer cottages, was used as a fence.

Photo No. 20 Simple, inexpensive and beautiful - a wooden frame sheathed with willow vines
If you are going to build a utility block of bricks in the country, do not forget to plan a shower compartment in it (photo No. 21-22).

Photo No. 21-22 Compact hozbloki "shower shed" from blocks
On durable stone walls such a structure can be easily installed in any volume and shape.
Estimated cost of ready-made options
Shower cabins of factory production are presented in several options. In some, the metal frame is equipped with a screen made of synthetic fabric. Others are sheathed with cellular polycarbonate or completely made from modular plastic panels. The buyer is offered two planning solutions: outdoor shower with and without dressing room.
The average price of an outdoor shower with a moisture-resistant awning and a 200-liter plastic tank (heated) is 15,000 rubles. For a frame-tent structure, supplemented by a locker room and a washbasin, you will have to pay at least 18,000 rubles.
single cabin from cellular polycarbonate on a galvanized frame with a heated 200-liter tank can be bought at a price of 20,000 rubles. This design can be supplemented with a locker room, paying about 5,000 rubles for it.
Summer shower cabin made of plastic metal frame, equipped with a heated tank will cost no less than 24,000 rubles.
Note that prices can vary greatly in the regions of the Russian Federation, so you can get the most up-to-date information from local manufacturers.
How to build a summer shower with your own hands?
The choice of material in this case depends on the set of tools that you have. If the farm does not have a welding machine and a grinder, then the frame is made from planed bars. You can sheathe it with a board, plastic clapboard or simply fix the film waterproof material on the racks.
Summer shower made of polycarbonate metal profile more durable than wood and not much more difficult to assemble. For this work, you need to prepare a steel corner 50x50mm or a profile pipe with a section of 40x20mm (wall thickness 2 mm). The number of purchased profiles is calculated based on the dimensions of the shower: height 2.1 meters, length and width - 1 meter.
Cabin dimensions may differ from those indicated, since its length and width depend on the dimensions of the purchased tank. The length of the racks must be taken 10 cm more than the height of the frame (for concreting).

It is more convenient to assemble the sidewalls on a flat asphalt or concrete platform, using the welder's magnets to fix the profiles.
The sequence of operations looks like this:
- In pairs, we lay two racks and two crossbars on the site and weld them with an overlap.
- Having installed the side frames vertically, we attach two transverse profiles to them by welding, check the corners and fix the joints with a working seam.
- Having poured a concrete screed under the shower cubicle, we put it in it finished frame so that the legs of the uprights sink into the concrete. We check the verticality of the installation (if necessary, we adjust the depth of embedding the racks into the screed).

After that, it remains to weld the door frame and fix the hinges on it. The work is completed by cutting the cellular polycarbonate and fixing it with self-tapping screws to the shower frame. Can be used to collect water steel pallet or, at the concreting stage, make a drain channel by installing a ladder and a sewer pipe in it.
Summer is a great time for country rest. The absence of a soul can overshadow it, since a person, regardless of whether he works or rests, needs to produce water procedures.
If the cottage is used only in the summer, then the easiest way to organize a shower is on the site. You can make a mobile shower, or build a solid outbuilding.

Portable outdoor shower
In stores you can find a foot shower. It does not require any construction or installation to operate. As a rule, only a small container of water is needed to use it.

An existing hose is lowered into the tank, which is connected to the pump. It looks like a small rug. Water comes out through a hose with a watering can, and for it to go, a person just needs to stomp in one place.

This device is simply indispensable, as it is suitable not only for summer cottages, but also for picnics, you can take it with you on trips.

With its help, water procedures can be carried out not only on the street, but also in the house, when it is very cool outside.
To do this, you just need to put a basin and wash. Another advantage of a mobile shower is self-adjustment water temperature. Such a shower in the country is simply not replaceable.

Stationary shower
Many summer residents are interested in how to make a stationary shower. This option is quite expensive compared to the first one. However, it will serve you for many years.

Before starting construction, it is necessary to consider where the water will drain from it. It is good when there is an antiseptic on the site. It can be drained from the shower.

If it is absent, then you need to make a hole, fill the bottom with expanded clay. A family needs a pit measuring 60x60x60 cm.

If sand predominates in the soil, the walls of the recess will have to be strengthened so that they do not crumble. Suitable for this metal grid or boards that are no longer needed.
shower base
As a rule, the shower building weighs little. Therefore, it makes no sense to make a foundation for it, it can be replaced with blocks. They are leveled at the same level so that the structure is level.
It is much cheaper than the foundation, and takes much less time to build, since the foundation must dry out, and the building can be erected immediately on the blocks.

Blocks should be placed 20 cm from the ground, this is necessary so that the tree does not rot.

In the event that you are going to make a metal structure, then the blocks can not be aligned at a level of 20 cm. Such a frame can be installed on ordinary paving slabs.

building
There are two types of building. The first is when the building is divided into several parts. In one part, a shower is made, in the other a dressing room or technical room where the boiler is installed.

Note!

The second type is a simple shower with a curtain, where only water procedures will be performed. Therefore, the dimensions of the soul are calculated from what kind of building is planned.
Frame types
Metal. The frame can be made of a profiled pipe, 3 mm in size. For work you need a welding machine.

Pipe joints are best welded, so the structure will be stronger. If the device is not available, then the joints can be fastened with special bolts.

Wood. For construction, you need a beam. Usually use a bar with a size of 50x50 mm. Before starting construction, it is necessary to make a drawing of the shower in the country.

shower sheathing
After the frame has been erected, the shower must be covered with material. There are no specific material standards. Everyone chooses according to his own pocket.
Let's highlight the most popular materials:
- oilcloth;
- the cloth;
- wood;
- slate;
- polycarbonate.
Water tank
Absolutely any container can be used as a tank. Basically, these are metal or plastic barrels. They can be purchased at any building, country stores.
Note!


When choosing, consider the region of residence. For southern cities, any capacity is suitable, but for northern regions only metal, as it heats up faster.

shower tray
It is best to purchase a pallet ready-made, as it will have a drain that will directly merge into the pit. The pallet is made of plastic or metal. Metal will last much longer, so it is advisable to choose it.

Making a summer shower in the country is not so difficult. The main thing is to thoroughly approach the design and calculate in advance the amount of material required.

For clarity, you can consider a photo of a summer soul in the country with your own hands. It will make your stay comfortable and enjoyable.

Do-it-yourself photo of the soul in the country

Note!


